ESP DODGE GRAND CARAVAN 2013 5.G User Guide
[x] Cancel search | Manufacturer: DODGE, Model Year: 2013, Model line: GRAND CARAVAN, Model: DODGE GRAND CARAVAN 2013 5.GPages: 132, PDF Size: 4.51 MB
Page 5 of 132
VEHICLES SOLD IN CANADA
With respect to any vehicles sold in Canada, the name Chrysler Group LLC shall be deemed
to be deleted and the name Chrysler Canada Inc. used in substitution.
WARNING!
• Pedals that cannot move freely can cause loss of vehicle control and increase therisk of serious personal injury.
• Always make sure that objects cannot fall into the driver foot well while the vehicle is
moving. Objects can become trapped under the brake pedal and accelerator pedal
causing a loss of vehicle control.
• Failure to properly follow floor mat installation or mounting can cause interference
with the brake pedal and accelerator pedal operation causing loss of control of the
vehicle.
• Never use the ‘PARK’ position as a substitute for the parking brake. Always apply the parking brake fully when parked to guard against vehicle movement and possible
injury or damage.
• Refer to your Owner's Manual on the DVD for further details.
USE OF AFTERMARKET PRODUCTS (ELECTRONICS)
The use of aftermarket devices including cell phones, MP3 players, GPS systems, or
chargers may affect the performance of on-board wireless features including Keyless
Enter-N-Go™ and Remote Start range. If you are experiencing difficulties with any of
your wireless features, try disconnecting your aftermarket devices to see if the situation
improves. If your symptoms persist, please see an authorized dealer.
CHRYSLER, DODGE, JEEP, RAM TRUCK, SRT, ATF+4, MOPAR and Uconnect are registered
trademarks of Chrysler Group LLC.
COPYRIGHT ©2013 CHRYSLER GROUP LLC
INTRODUCTION/WELCOME
3
Page 22 of 132
WARNING!
• Persons who are unable to feel pain to the skin because of advanced age, chronicillness, diabetes, spinal cord injury, medication, alcohol use, exhaustion or other
physical conditions must exercise care when using the seat heater. It may cause
burns even at low temperatures, especially if used for long periods of time.
• Do not place anything on the seat that insulates against heat, such as a blanket or
cushion. This may cause the seat heater to overheat. Sitting in a seat that has been
overheated could cause serious burns due to the increased surface temperature of
the seat.
HEATED STEERING WHEEL
•The steering wheel contains a heating ele-
ment that heats the steering wheel to one
temperature setting.
• The heated steering wheel switch is lo- cated on the center instrument panel.
• Press the switch once to turn the heating element On. Press the switch a second
time to turn the heating element Off.
•
Once the heated steering wheel has been
turned on, it will operate for approximately
58 to 70 minutes before automatically
shutting off. The heated steering wheel can
shut off early or may not turn on when the steering wheel is already warm.
TILT/TELESCOPING STEERING COLUMN
• The tilt steering column tilt lever is lo- cated below the steering wheel.
• Push down on the tilt lever to unlock the steering column.
• With one hand firmly on the steering wheel, move the steering column upward
or downward as desired. To lengthen or
shorten the steering column, pull the
steering wheel outward or push it inward
as desired.
• Pull upward on the tilt lever to lock the column firmly in place.
GETTING STARTED
20
Page 44 of 132
Menu
• Press the “MENU” hard-key to access the System Setup menu and the My Files menu.
• Press the “MENU” hard-key in an active mode (SAT, CD, AUX, etc.) to change modespecific settings.
Equalizer, Balance And Fade
Audio Control Menu
• Press the “AUDIO” hard-key on the right side of the radio.
• Use either the arrow soft-keys or the cross-hair on the screen to change Bal-
ance and Fade. The “CENTER” soft-key
resets the settings.
• Touch the “Equalizer” soft-key and use either the arrow soft-keys or the sliders on
the screen to adjust BASS, MID, and/or
TREBLE.
Display Settings
• Press the “MENU” hard-key and touch the “Display Settings” soft-key to access the
Display Settings menu.
• Select the “Daytime Colors” soft-key to switch to manual daytime mode and to
adjust the brightness of the display using
daytime colors.
• Select the “Nighttime Colors” soft-key to switch to manual nighttime mode and to
adjust the brightness of the display using nighttime colors.
• Select the “Auto Color Mode” soft-key to switch to automatic daytime/nighttime mode and to control the brightness of the display using the dimmer switch of the vehicle.
• Touch the “EXIT” soft-key to save your settings.
ELECTRONICS
42
Page 59 of 132
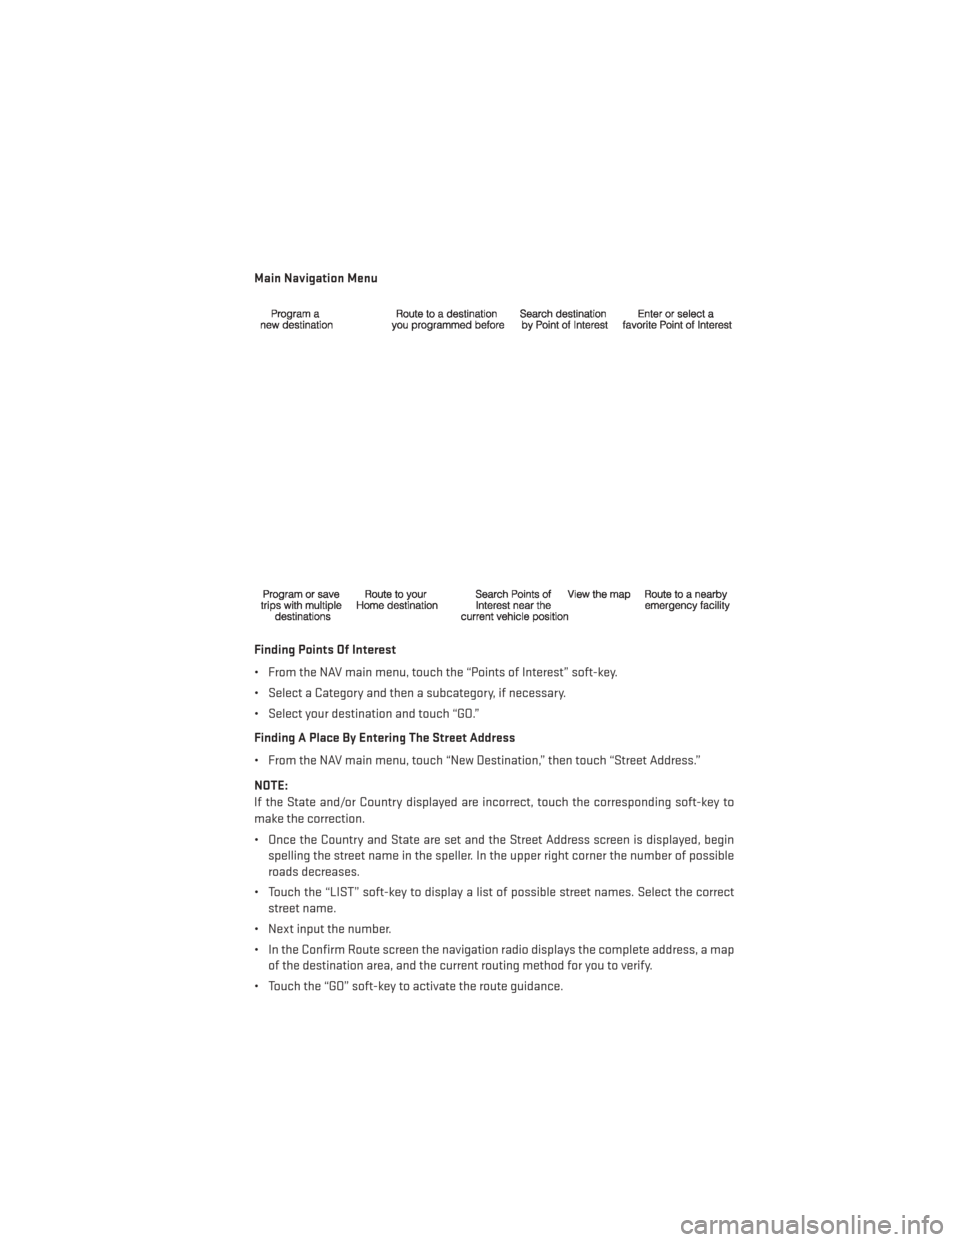
Main Navigation Menu
Finding Points Of Interest
• From the NAV main menu, touch the “Points of Interest” soft-key.
• Select a Category and then a subcategory, if necessary.
• Select your destination and touch “GO.”
Finding A Place By Entering The Street Address
• From the NAV main menu, touch “New Destination,” then touch “Street Address.”
NOTE:
If the State and/or Country displayed are incorrect, touch the corresponding soft-key to
make the correction.
• Once the Country and State are set and the Street Address screen is displayed, beginspelling the street name in the speller. In the upper right corner the number of possible
roads decreases.
• Touch the “LIST” soft-key to display a list of possible street names. Select the correct street name.
• Next input the number.
• In the Confirm Route screen the navigation radio displays the complete address, a map of the destination area, and the current routing method for you to verify.
• Touch the “GO” soft-key to activate the route guidance.
ELECTRONICS
57
Page 63 of 132
• You will see a favorite star indicator in the upper right side of the screen below the “SAT”soft-key and a pop up will alert you that a favorite song or artist is currently playing on one
of the SiriusXM satellite radio channels.
NOTE:
Refer to your Uconnect® 730N or 430/430N
User's Manual for more information.
Display SAT Favorites List
• Touch the “Search/Browse” soft-key and select “Favorites” from the SAT Browse
screen.
• Touch the desired favorites soft-key to switch the SAT tuner to the corresponding
channel.
• You may use the “LIST” soft-key to toggle between:• Favorite Songs
• Favorite Artists
• Currently playing favorites
Replay
• While you are in SAT mode, you can replay 44 minutes of the current SiriusXM chan-
nel (when the channel is changed, this
audio buffer is erased). Press the REPLAY
button to listen to the stored audio.
• You can touch the on-screen controls to pause and rewind audio playback, touch
the SCAN button to preview each of the
tracks stored in the buffer, or select a
track from the list.
• The time displayed below the bar indi- cates how much time is present between
the current buffer play position and the
live broadcast.
Replay Option Option Description
Play/Pause Touch to pause content playback. Touch Pause/Play again to resume playback.
Rewind/RW Rewinds the channel content in steps of five seconds. Touch and hold to rewind continuously, then release to begin playing content at that point.
Fast Forward/FW Forwards the content, and works similarly to Rewind/RW. However, Fast Forward/FW can only be used when content has been previously rewound.
ELECTRONICS
61
Page 70 of 132
SiriusXM SatelliteRadio Mode “Channel Number” (to change the channel by its spoken number)
“Next Channel” (to select the next channel)
“Previous Channel” (to select the previous channel) “List Channel” (to hear a list of available channels)
"Channel Name" (to change the channel by its spoken name) “Select Name” (to say the name of a channel)“Radio Menu” (to switch to the radio menu)“Main Menu” (to switch to the main menu)
Disc Mode “Track” (#) (to change the track)
“Next Track” (to play the next track)
“Previous Track” (to play the previous track) “Main Menu” (to switch to the main menu)
Memo Mode
To switch to the voice recorder mode, say “Memo”. The following are
common voice commands for this mode: “New Memo” (to record a new memo) — During the recording, you may press the Voice Command
button
to stop recording. You proceed by saying one of the following commands:
— “Save” (to save the memo)
— “Continue” (to continue recording) — “Delete” (to delete the recording)
— “Play Memos” (to play previously recorded memos) — During the play-
back you may press the Voice Command buttonto stop playing
memos. You proceed by saying one of the following commands:
— “Repeat” (to repeat a memo)
— “Next” (to play the next memo)
— “Previous” (to play the previous memo) — “Delete” (to delete a memo)
— “Delete All” (to delete all memos)
Voice Text Reply
• If equipped with Uconnect® Voice Command, your Uconnect® 430N, 730N & 731N radios may be able to play incoming Short Message Service (SMS) messages (text messages)
through the vehicle's sound system.
• It also allows you to respond by selecting from various pre - defined phrases.
• Not all phones are compatible with this feature. Refer to the phone compatibility list at www.UconnectPhone.com. Connected mobile phones must be bluetooth-compatible
and paired with your radio.
• Press the “Voice Command” button
and after the BEEP, say “SMS” to get started.
NOTE:
To access the tutorial, press the “Voice Command” button
. After the BEEP, say
“tutorial”. Press any hard-key/button or touch the display (Touch-Screen radio) to cancel
the tutorial.
ELECTRONICS
68
Page 71 of 132
WARNING!
Any voice commanded system should be used only in safe driving conditions following
applicable laws regarding phone use. Your attention should be focused on safely oper-
ating the vehicle. Failure to do so may result in a collision causing you and others to be
severely injured or killed.
Bluetooth® STREAMING AUDIO
• If equipped with Uconnect® Voice Com-mand, your Bluetooth-equipped iPod®
devices, cell phones or other media play-
ers, may also be able to stream music to
your vehicles speakers. Your connected
device must be Bluetooth-compatible,
and paired with your radio (see Uconnect®
Phone for pairing instructions).
•
Non-Touch-Screen Radios: Press the “AUX”
button on the radio faceplate until "BT" or “Audio Streaming” is displayed on the radio
screen.
• Touch-Screen-Radios: Press the “RADIO/MEDIA” or “MEDIA” hard-key and then touch the “AUX” soft-key tab.
VIDEO ENTERTAINMENT SYSTEM (VES™)
System Operation
•
The screen is located in the overhead com-
partment console. To lower the screen,
press the release button located in the
center of the console rear of the screen.
• The system may be controlled by the front seat occupants using either the radio or
DVD player controls, or by the rear seat
occupants using the remote control.
• The video screen displays information in a split screen format. The left side of the
screen is referred to as Channel 1 and the right side of the screen is referred to as Channel
2. All modes except video modes are displayed in a split screen format.
• To use the headphones, press the power button located on the right ear cup. Select the channel on the headphones (1 or 2) which corresponds to the channel selected on the
desired video screen.
• To receive VES™ audio through the vehicle's sound system, press the VES™ soft-key on the radio's touch-screen.
ELECTRONICS
69
Page 82 of 132
ROADSIDE ASSISTANCE
•Dial toll-free 1-800-521-2779 for U.S. Residents or 1-800-363-4869 for Canadian Residents.
•Provide your name, vehicle identification number, license plate number, and your location,
including the telephone number from which you are calling.
• Briefly describe the nature of the problem and answer a few simple questions.
•
You will be given the name of the service provider and an estimated time of arrival. If you feel
you are in an “unsafe situation”, please let us know. With your consent, we will contact local
police or safety authorities.
INSTRUMENT CLUSTER WARNING LIGHTS
- Electronic Stability Control (ESC) Indicator Light
• If this indicator light flashes during acceleration, apply as little throttle as possible. While driving, ease up on the accelerator. Adapt your speed and driving to the prevailing road
conditions. To improve the vehicle's traction when starting off in deep snow, sand or
gravel, it may be desirable to switch the ESC system off.
- Tire Pressure Monitoring System (TPMS) Light
• Each tire, including the spare (if provided), should be checked monthly, when cold and inflated to the inflation pressure recommended by the vehicle manufacturer on the
vehicle placard or tire inflation pressure label. (If your vehicle has tires of a different size
than the size indicated on the vehicle placard or tire inflation pressure label, you should
determine the proper tire inflation pressure for those tires.)
• As an added safety feature, your vehicle has been equipped with a Tire Pressure Moni- toring System (TPMS) that illuminates a low tire pressure telltale when one or more of
your tires is significantly under-inflated. Accordingly, when the low tire pressure telltale
illuminates, you should stop and check your tires as soon as possible, and inflate them to
the proper pressure. Driving on a significantly under-inflated tire causes the tire to
overheat and can lead to tire failure. Under-inflation also reduces fuel efficiency and tire
tread life, and may affect the vehicle’s handling and stopping ability.
• IF THE LIGHT STARTS FLASHING INDICATING A LOW TIRE PRESSURE, ADJUST THE
AIR PRESSURE IN THE LOW TIRE TO THE AIR PRESSURE SHOWN ON THE VEHICLE
PLACARD OR TIRE INFLATION PRESSURE LABEL LOCATED ON THE DRIVER'S DOOR.
NOTE:
AFTER INFLATION, THE VEHICLE MAY NEED TO BE DRIVEN FOR 20 MINUTES BEFORE THE
FLASHING LIGHT WILL TURN OFF.
• Please note that the TPMS is not a substitute for proper tire maintenance, and it is the driver’s responsibility to maintain correct tire pressure, even if under-inflation has not
reached the level to trigger illumination of the TPMS low tire pressure telltale.
WHAT TO DO IN EMERGENCIES
80
Page 83 of 132
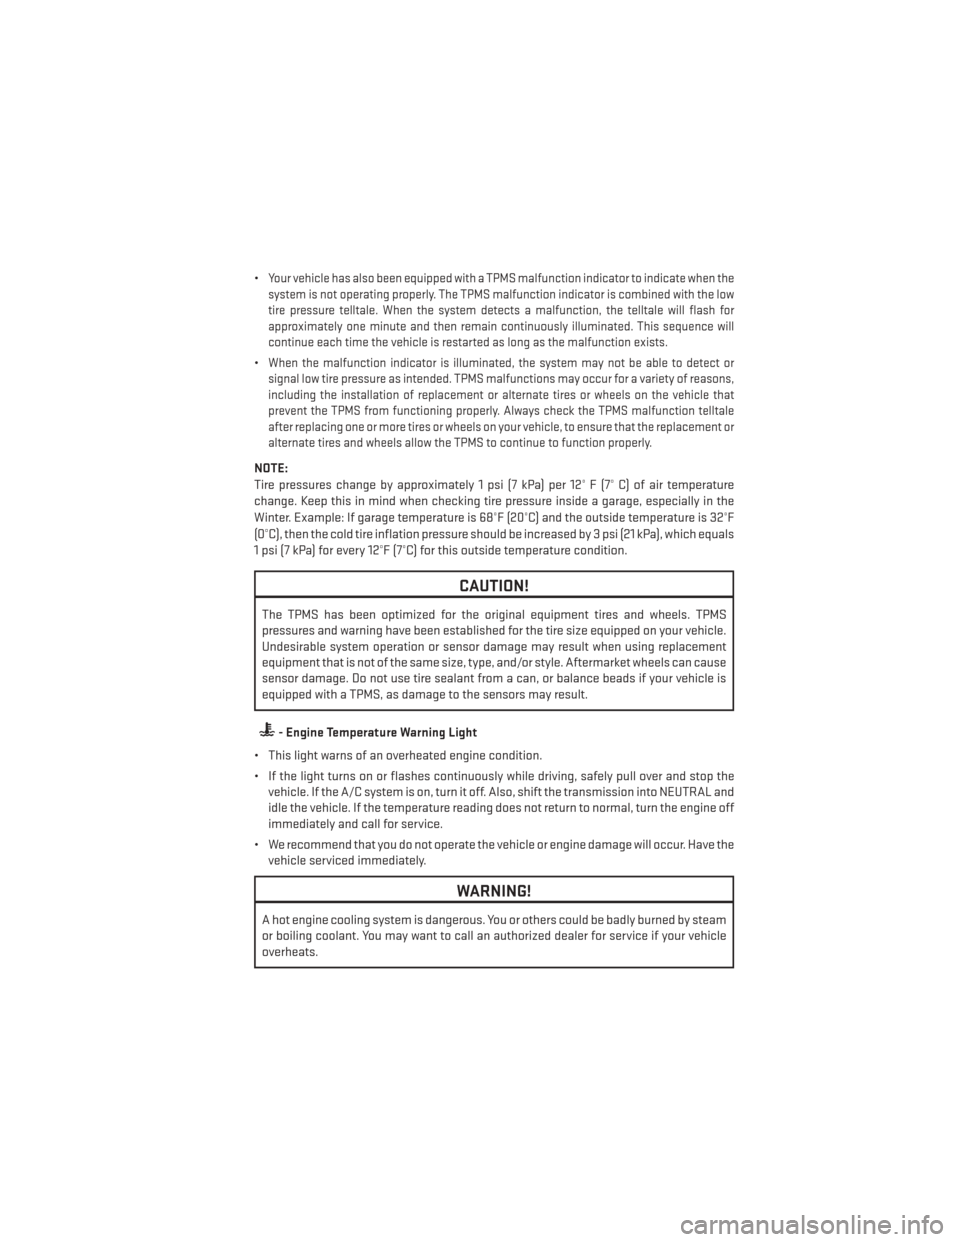
•Your vehicle has also been equipped with a TPMS malfunction indicator to indicate when the
system is not operating properly. The TPMS malfunction indicator is combined with the low
tire pressure telltale. When the system detects a malfunction, the telltale will flash for
approximately one minute and then remain continuously illuminated. This sequence will
continue each time the vehicle is restarted as long as the malfunction exists.
•When the malfunction indicator is illuminated, the system may not be able to detect or
signal low tire pressure as intended. TPMS malfunctions may occur for a variety of reasons,
including the installation of replacement or alternate tires or wheels on the vehicle that
prevent the TPMS from functioning properly. Always check the TPMS malfunction telltale
after replacing one or more tires or wheels on your vehicle, to ensure that the replacement or
alternate tires and wheels allow the TPMS to continue to function properly.
NOTE:
Tire pressures change by approximately 1 psi (7 kPa) per 12° F (7° C) of air temperature
change. Keep this in mind when checking tire pressure inside a garage, especially in the
Winter. Example: If garage temperature is 68°F (20°C) and the outside temperature is 32°F
(0°C), then the cold tire inflation pressure should be increased by 3 psi (21 kPa), which equals
1 psi (7 kPa) for every 12°F (7°C) for this outside temperature condition.
CAUTION!
The TPMS has been optimized for the original equipment tires and wheels. TPMS
pressures and warning have been established for the tire size equipped on your vehicle.
Undesirable system operation or sensor damage may result when using replacement
equipment that is not of the same size, type, and/or style. Aftermarket wheels can cause
sensor damage. Do not use tire sealant from a can, or balance beads if your vehicle is
equipped with a TPMS, as damage to the sensors may result.
- Engine Temperature Warning Light
• This light warns of an overheated engine condition.
• If the light turns on or flashes continuously while driving, safely pull over and stop the vehicle. If the A/C system is on, turn it off. Also, shift the transmission into NEUTRAL and
idle the vehicle. If the temperature reading does not return to normal, turn the engine off
immediately and call for service.
• We recommend that you do not operate the vehicle or engine damage will occur. Have the vehicle serviced immediately.
WARNING!
A hot engine cooling system is dangerous. You or others could be badly burned by steam
or boiling coolant. You may want to call an authorized dealer for service if your vehicle
overheats.
WHAT TO DO IN EMERGENCIES
81
Page 112 of 132
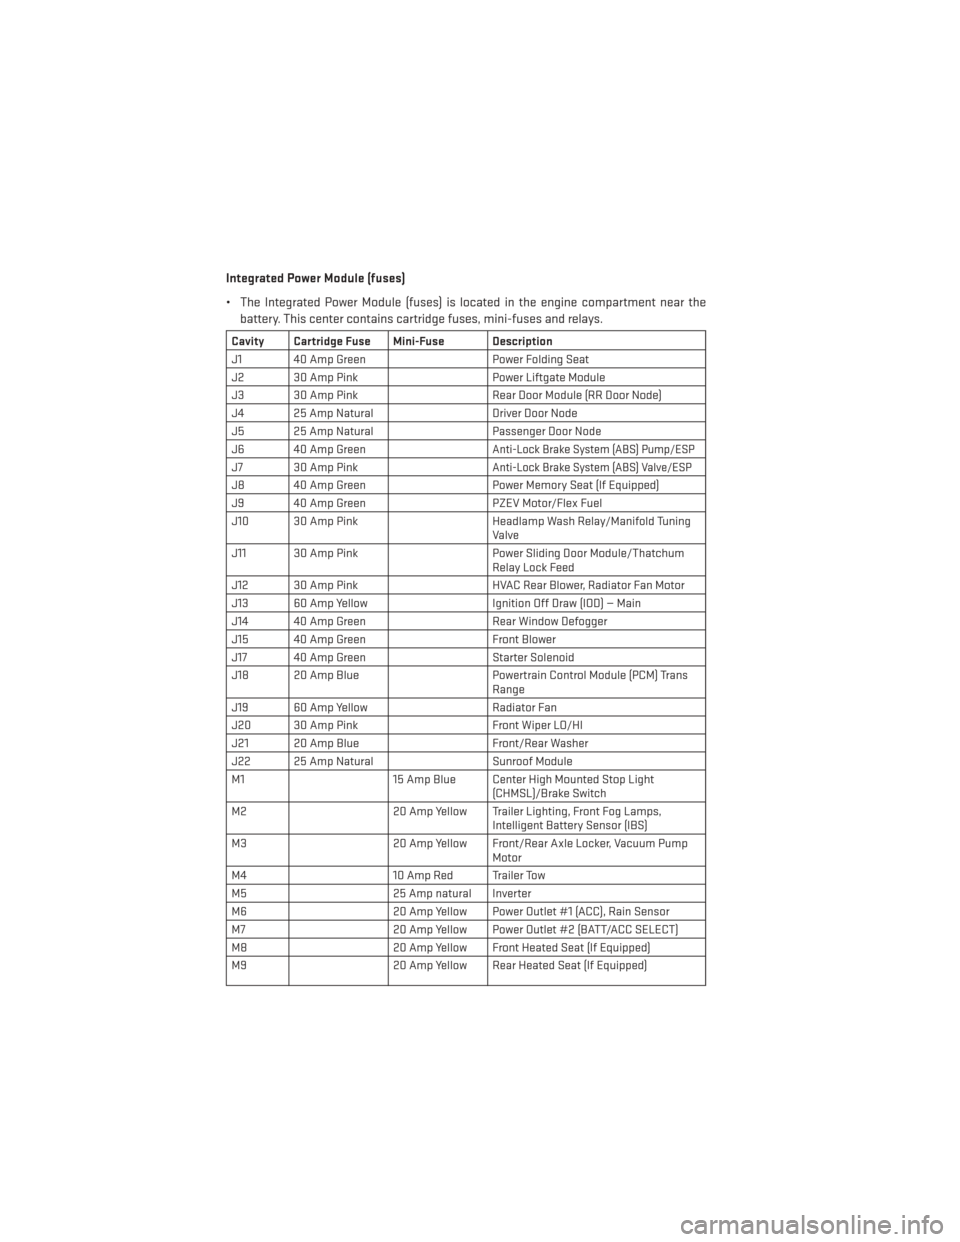
Integrated Power Module (fuses)
• The Integrated Power Module (fuses) is located in the engine compartment near thebattery. This center contains cartridge fuses, mini-fuses and relays.
Cavity Cartridge Fuse Mini-Fuse Description
J1 40 Amp Green Power Folding Seat
J2 30 Amp Pink Power Liftgate Module
J3 30 Amp Pink Rear Door Module (RR Door Node)
J4 25 Amp Natural Driver Door Node
J5 25 Amp Natural Passenger Door Node
J6 40 Amp Green
Anti-Lock Brake System (ABS) Pump/ESP
J7 30 Amp PinkAnti-Lock Brake System (ABS) Valve/ESP
J8 40 Amp Green Power Memory Seat (If Equipped)
J9 40 Amp Green PZEV Motor/Flex Fuel
J10 30 Amp Pink Headlamp Wash Relay/Manifold Tuning
Valve
J11 30 Amp Pink Power Sliding Door Module/Thatchum
Relay Lock Feed
J12 30 Amp Pink HVAC Rear Blower, Radiator Fan Motor
J13 60 Amp Yellow Ignition Off Draw (IOD) — Main
J14 40 Amp Green Rear Window Defogger
J15 40 Amp Green Front Blower
J17 40 Amp Green Starter Solenoid
J18 20 Amp Blue Powertrain Control Module (PCM) Trans
Range
J19 60 Amp Yellow Radiator Fan
J20 30 Amp Pink Front Wiper LO/HI
J21 20 Amp Blue Front/Rear Washer
J22 25 Amp Natural Sunroof Module
M1 15 Amp Blue Center High Mounted Stop Light
(CHMSL)/Brake Switch
M2 20 Amp Yellow Trailer Lighting, Front Fog Lamps,
Intelligent Battery Sensor (IBS)
M3 20 Amp Yellow Front/Rear Axle Locker, Vacuum Pump
Motor
M4 10 Amp Red Trailer Tow
M5 25 Amp natural Inverter
M6 20 Amp Yellow Power Outlet #1 (ACC), Rain Sensor
M7 20 Amp Yellow Power Outlet #2 (BATT/ACC SELECT)
M8 20 Amp Yellow Front Heated Seat (If Equipped)
M9 20 Amp Yellow Rear Heated Seat (If Equipped)
MAINTAINING YOUR VEHICLE
110