DODGE GRAND CARAVAN 2015 5.G Owners Manual
Manufacturer: DODGE, Model Year: 2015, Model line: GRAND CARAVAN, Model: DODGE GRAND CARAVAN 2015 5.GPages: 703, PDF Size: 19.83 MB
Page 391 of 703
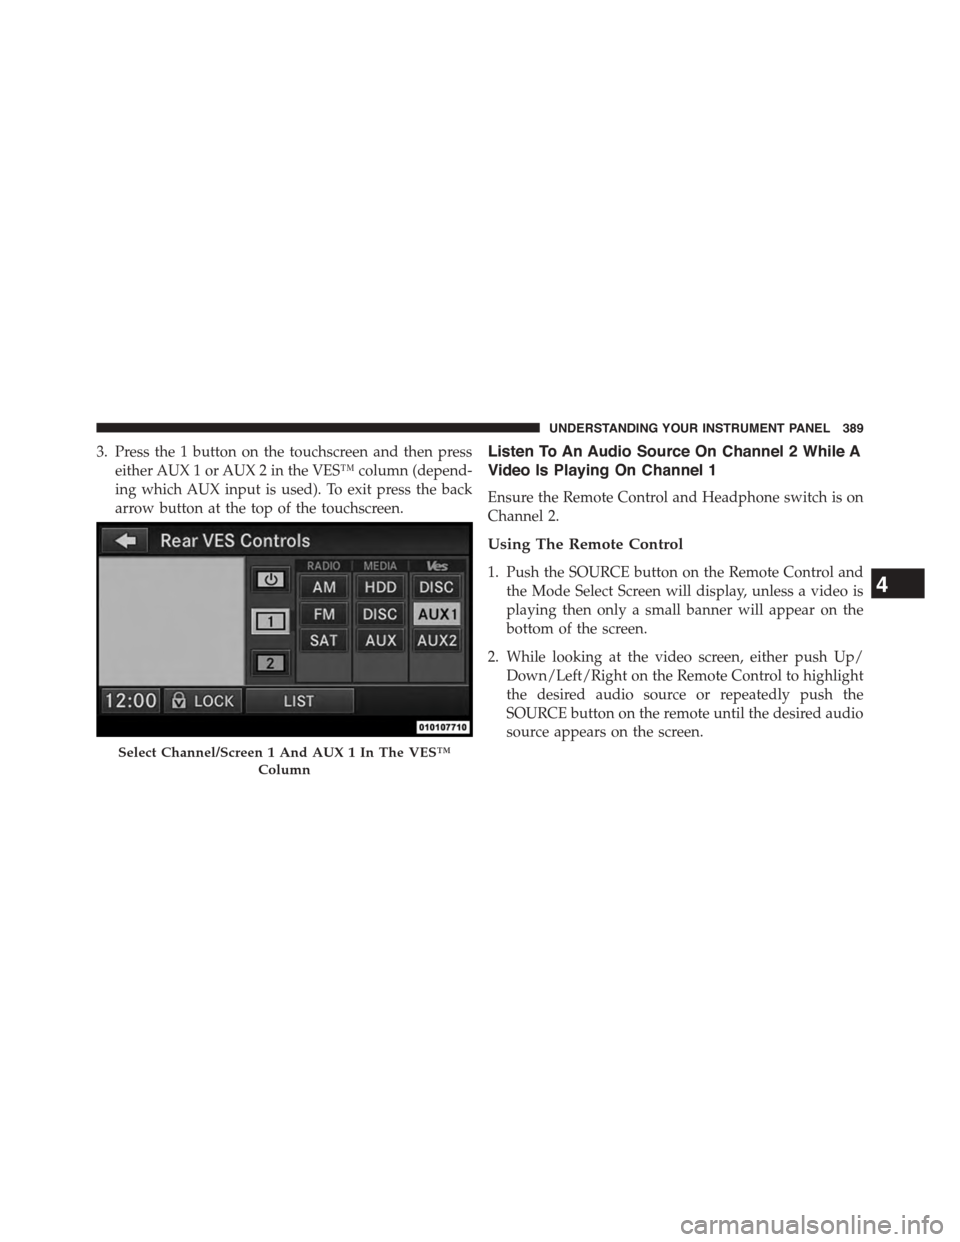
3. Press the 1 button on the touchscreen and then press
either AUX 1 or AUX 2 in the VES™ column (depend-
ing which AUX input is used). To exit press the back
arrow button at the top of the touchscreen.
Listen To An Audio Source On Channel 2 While A
Video Is Playing On Channel 1
Ensure the Remote Control and Headphone switch is on
Channel 2.
Using The Remote Control
1. Push the SOURCE button on the Remote Control and
the Mode Select Screen will display, unless a video is
playing then only a small banner will appear on the
bottom of the screen.
2. While looking at the video screen, either push Up/
Down/Left/Right on the Remote Control to highlight
the desired audio source or repeatedly push the
SOURCE button on the remote until the desired audio
source appears on the screen.
Select Channel/Screen 1 And AUX 1 In The VES™
Column
4
UNDERSTANDING YOUR INSTRUMENT PANEL 389
Page 392 of 703
Using The Touchscreen Radio Controls
1. Push the MENU button on the radio faceplate.
2. Press the Rear VES™ button on the touchscreen to
display the Rear VES™ Controls. If a channel list is
displayed, press the HIDE LIST button on the touch-
screen to display the Rear VES™ Controls screen.
3. To listen to an audio source on Channel 2 while a
video is playing on Channel 1, press the 2 button on
the touchscreen and choose an audio source. To exit
press the back arrow button at the top left of the left
screen.
Dual Video Screen
NOTE:Typically there are two different ways to operate
the features of the Video Entertainment System (VES™).
•The Remote Control
•The Touchscreen Radio (If Equipped)
Play A DVD Using The Touchscreen Radio
NOTE:Headunit DVD player does not play Blu-ray™
Discs.
1. Press the OPEN/CLOSE or LOAD button on the radio
faceplate (Touchscreen).
2. Insert the DVD with the label facing up. The radio
automatically selects the appropriate mode after the
disc is recognized and displays the menu screen or
starts playing the first track.
3. To watch a DVD on Screen 1 for second row passen-
gers, ensure the Remote Control and Headphone
switch is on Channel 1.
4. To watch a DVD on Screen 2 for third row passengers,
ensure the Remote Control and Headphone switch is
on Channel 2.
390 UNDERSTANDING YOUR INSTRUMENT PANEL
Page 393 of 703
Using The Remote Control
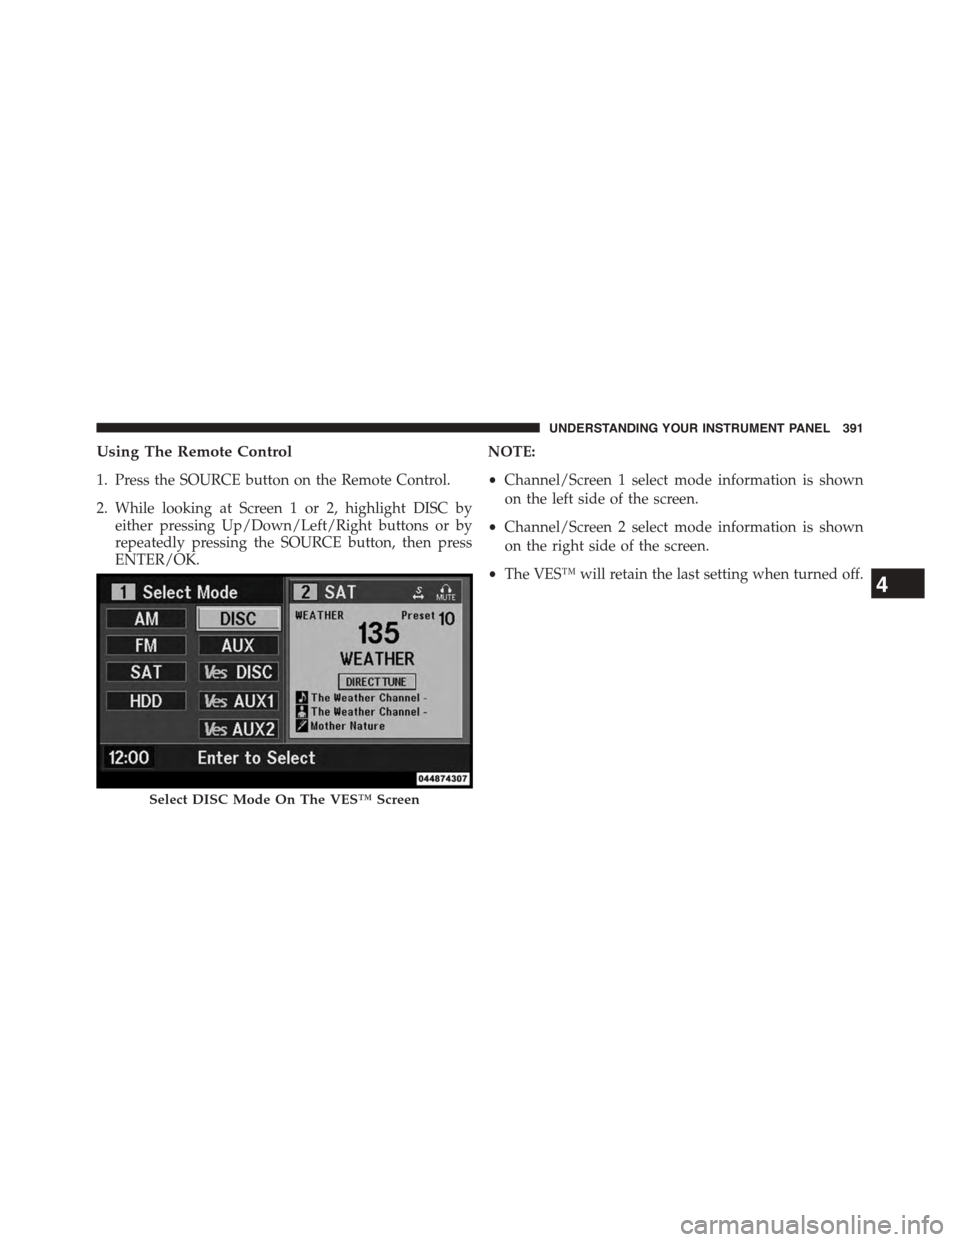
1. Press the SOURCE button on the Remote Control.
2. While looking at Screen 1 or 2, highlight DISC by
either pressing Up/Down/Left/Right buttons or by
repeatedly pressing the SOURCE button, then press
ENTER/OK.
NOTE:
•Channel/Screen 1 select mode information is shown
on the left side of the screen.
•Channel/Screen 2 select mode information is shown
on the right side of the screen.
•The VES™ will retain the last setting when turned off.
Select DISC Mode On The VES™ Screen
4
UNDERSTANDING YOUR INSTRUMENT PANEL 391
Page 394 of 703
Using The Touchscreen Radio Controls
1. Press the MENU button on the radio faceplate.
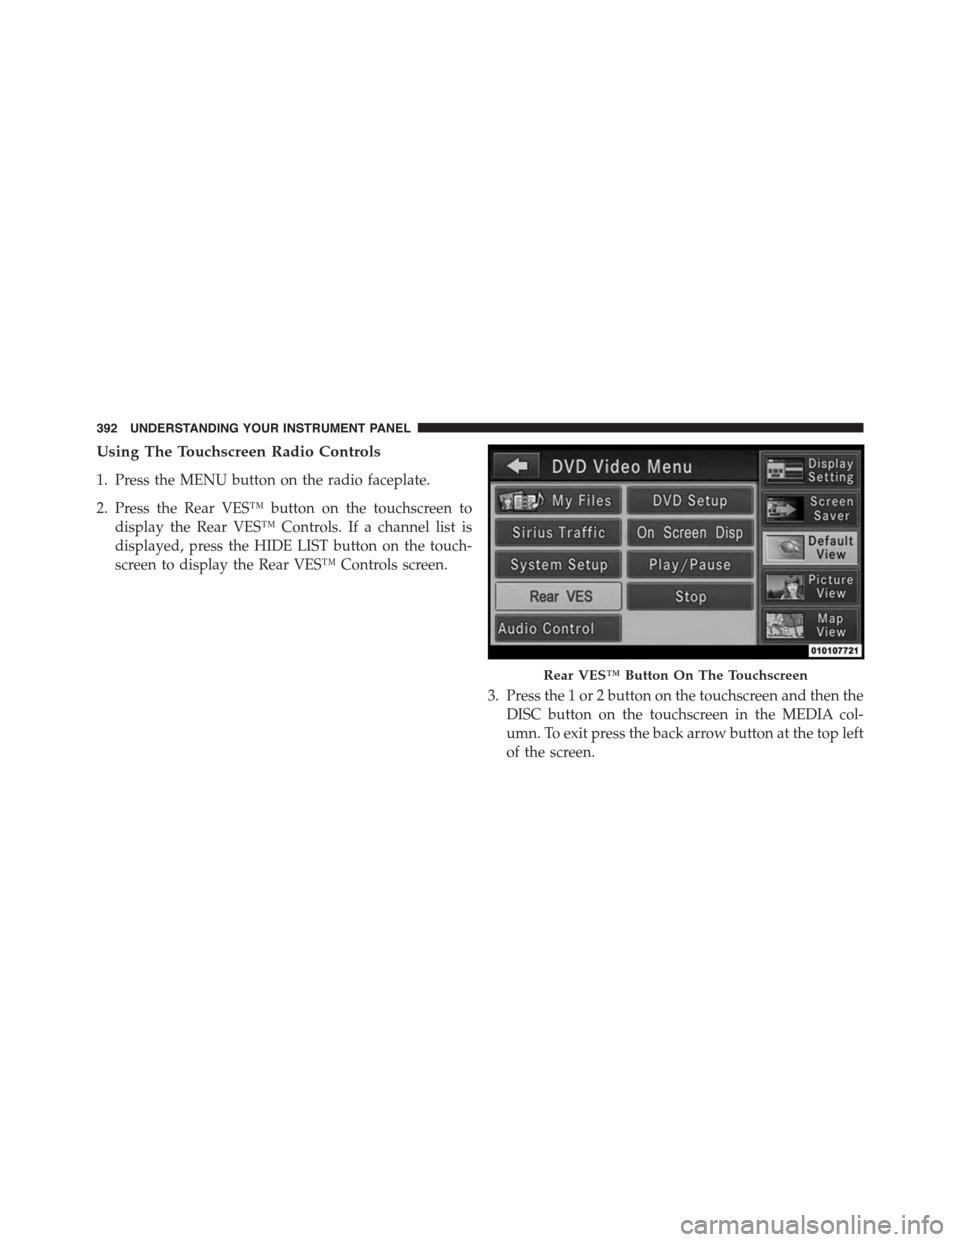
2. Press the Rear VES™ button on the touchscreen to
display the Rear VES™ Controls. If a channel list is
displayed, press the HIDE LIST button on the touch-
screen to display the Rear VES™ Controls screen.
3. Press the 1 or 2 button on the touchscreen and then the
DISC button on the touchscreen in the MEDIA col-
umn. To exit press the back arrow button at the top left
of the screen.
Rear VES™ Button On The Touchscreen
392 UNDERSTANDING YOUR INSTRUMENT PANEL
Page 395 of 703
NOTE:
•To view a DVD on the radio press the RADIO/MEDIA
button on the radio faceplate, then press the DISC tab
button on the touchscreen and then the VIEW VIDEO
button on the touchscreen.
•Viewing a DVD on the Touchscreen radio screen is not
available in all states/provinces. If available, the ve-
hicle must be stopped and the shift lever must be in the
PARK position for vehicles with an automatic trans-
mission. In vehicles with a manual transmission the
parking brake must be engaged.
•Pressing the screen on a Touchscreen radio while a
DVD is playing brings up basic remote control func-
tions for DVD play such as scene selection, Play, Pause,
FF, RW, and Stop. Pressing the X in the upper corner
will turn off the remote control screen functions.
Play A DVD Using The VES™ Player — If
Equipped
1. Insert the DVD with the label facing up. The VES™
player automatically selects the appropriate mode
after the disc is recognized and starts playing the
DVD.
NOTE:The VES™ player has basic DVD control func-
tion such as Menu, Play, Pause, FF, RW and Stop.
2. To watch a DVD on Screen 1 for second row passen-
gers, ensure the Remote Control and Headphone
switch is on Channel 1.
3. To watch a DVD on Screen 2 for third row passengers,
ensure the Remote Control and Headphone switch is
on Channel 2.
4
UNDERSTANDING YOUR INSTRUMENT PANEL 393
Page 396 of 703
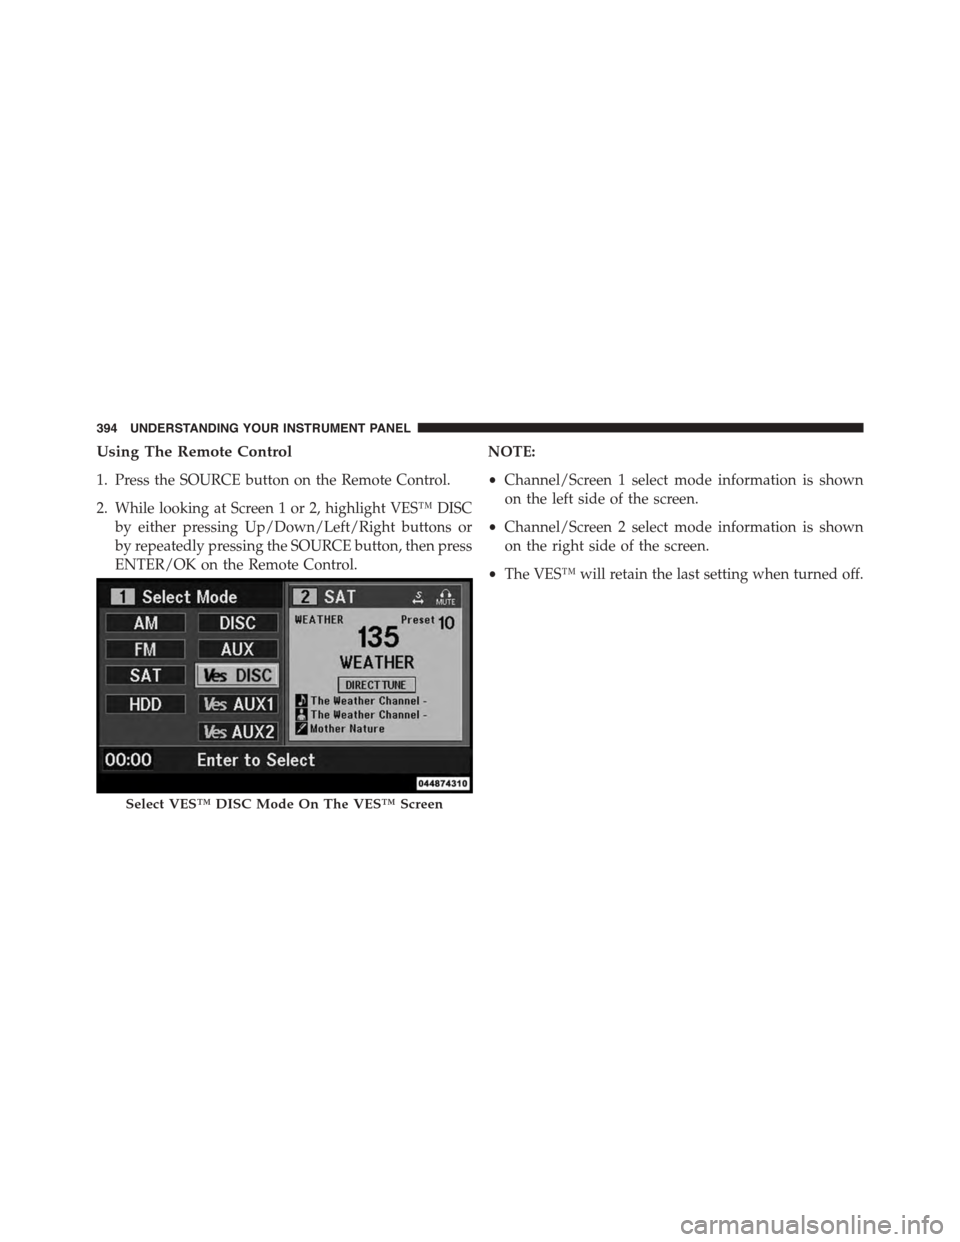
Using The Remote Control
1. Press the SOURCE button on the Remote Control.
2. While looking at Screen 1 or 2, highlight VES™ DISC
by either pressing Up/Down/Left/Right buttons or
by repeatedly pressing the SOURCE button, then press
ENTER/OK on the Remote Control.
NOTE:
•Channel/Screen 1 select mode information is shown
on the left side of the screen.
•Channel/Screen 2 select mode information is shown
on the right side of the screen.
•The VES™ will retain the last setting when turned off.
Select VES™ DISC Mode On The VES™ Screen
394 UNDERSTANDING YOUR INSTRUMENT PANEL
Page 397 of 703
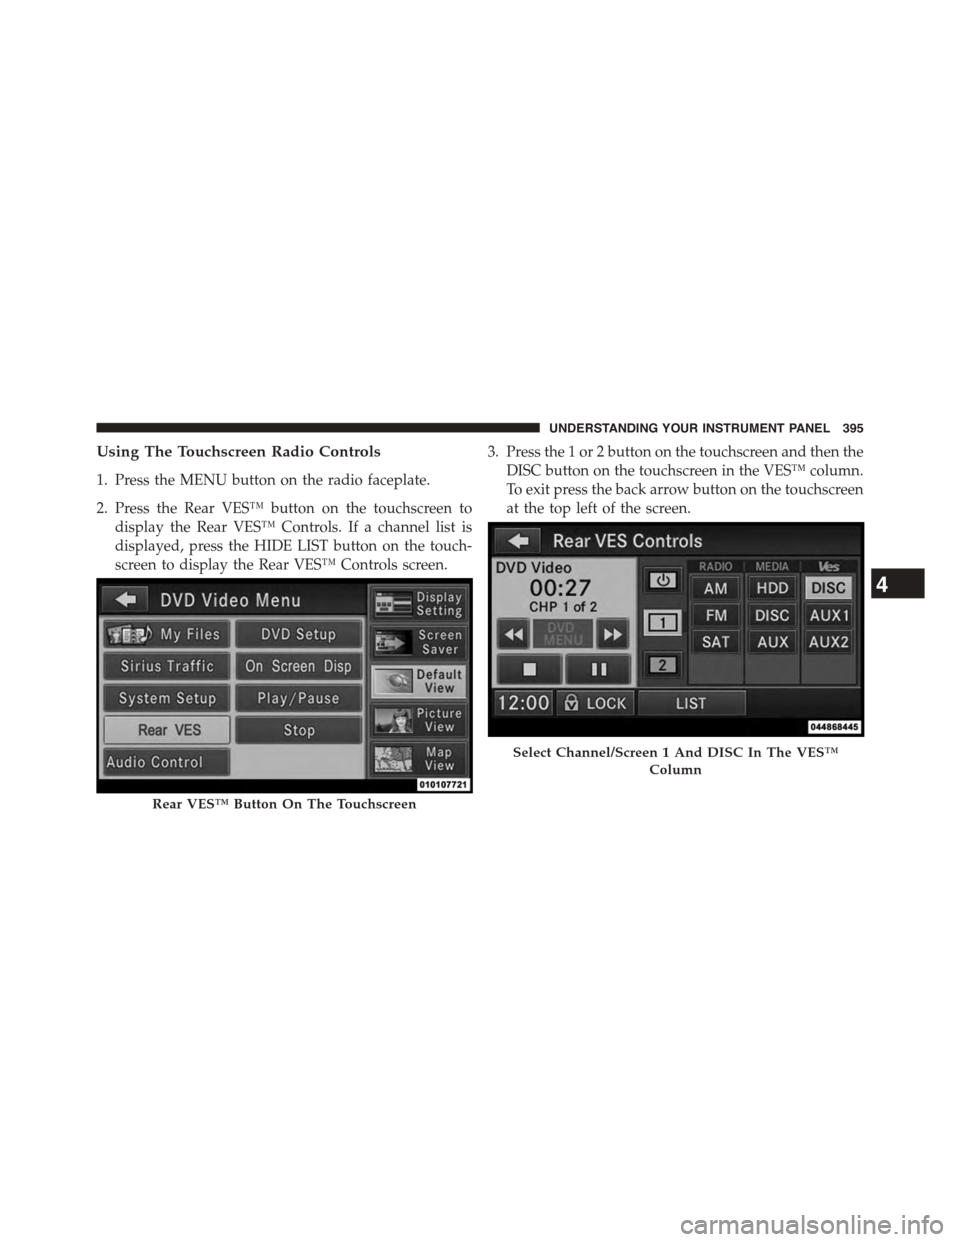
Using The Touchscreen Radio Controls
1. Press the MENU button on the radio faceplate.
2. Press the Rear VES™ button on the touchscreen to
display the Rear VES™ Controls. If a channel list is
displayed, press the HIDE LIST button on the touch-
screen to display the Rear VES™ Controls screen.
3. Press the 1 or 2 button on the touchscreen and then the
DISC button on the touchscreen in the VES™ column.
To exit press the back arrow button on the touchscreen
at the top left of the screen.
Rear VES™ Button On The Touchscreen
Select Channel/Screen 1 And DISC In The VES™
Column
4
UNDERSTANDING YOUR INSTRUMENT PANEL 395
Page 398 of 703
NOTE:
•To view a DVD on the radio press the RADIO/MEDIA
button on the radio faceplate, then press the DISC tab
button on the touchscreen and then the VIEW VIDEO
button on the touchscreen.
•Viewing a DVD on the Touchscreen radio screen is not
available in all states/provinces. If available, the ve-
hicle must be stopped and the shift lever must be in the
PARK position for vehicles with an automatic trans-
mission. In vehicles with a manual transmission the
parking brake must be engaged.
Play A Blu-ray™ Disc Using The Blu-ray™ Player
— If Equipped
1. Insert the Blu-ray™ Disc with the label facing up. The
Blu-ray™ Player automatically selects the appropriate
mode after the disc is recognized and starts playing
the Blu-ray™ Disc.
NOTE:The Blu-ray™ Player has basic control functions
such as Menu, Play, Pause, FF, RW and Stop.
2. To watch a Blu-ray™ Disc on Screen 1 for second row
passengers, ensure the Remote Control and Head-
phone switch is on Channel 1.
3. To watch a Blu-ray™ Disc on Screen 2 for third row
passengers, ensure the Remote Control and Head-
phone switch is on Channel 2.
Using The Remote Control
1. Press the SOURCE button on the Blu-ray™ Player
Remote Control.
2. While looking at Screen 1 or 2, highlight Blu-ray™ by
either pressing Up/Down/Left/Right buttons or by
repeatedly pressing the SOURCE button, then press
OK on the Remote Control.
396 UNDERSTANDING YOUR INSTRUMENT PANEL
Page 399 of 703
NOTE:
•Channel/Screen 1 select mode information is shown
on the left side of the screen.
•Channel/Screen 2 select mode information is shown
on the right side of the screen.
•The VES™ will retain the last setting when turned off.
Using The Touchscreen Radio Controls
1. Press the MENU button on the radio faceplate.
2. Press the Rear VES™ button on the touchscreen to
display the Rear VES™ Controls. If a channel list is
displayed, press the HIDE LIST button on the touch-
screen to display the Rear VES™ Controls screen.
3. Press the 1 or 2 button on the touchscreen and then the
VES™ Disc button on the touchscreen in the VES™
column. To exit press the back arrow button at the top
left of the screen.
NOTE:
•To view a Blu-ray™ Disc on the radio, press the
RADIO/MEDIA button on the radio faceplate, then
press the VES™ Disc tab button on the touchscreen
and then the VIEW VIDEO button on the touchscreen.
•Viewing a Blu-ray™ Disc on the Touchscreen radio
screen is not available in all states/provinces. If avail-
able, the vehicle must be stopped and the shift lever
must be in the PARK position for vehicles with an
automatic transmission. In vehicles with a manual
transmission the parking brake must be engaged.
Listen To An Audio Source While A Video Is
Playing
Ensure the Remote Control and Headphone switch are on
the same channel. If watching a video on Screen 1
4
UNDERSTANDING YOUR INSTRUMENT PANEL 397
Page 400 of 703
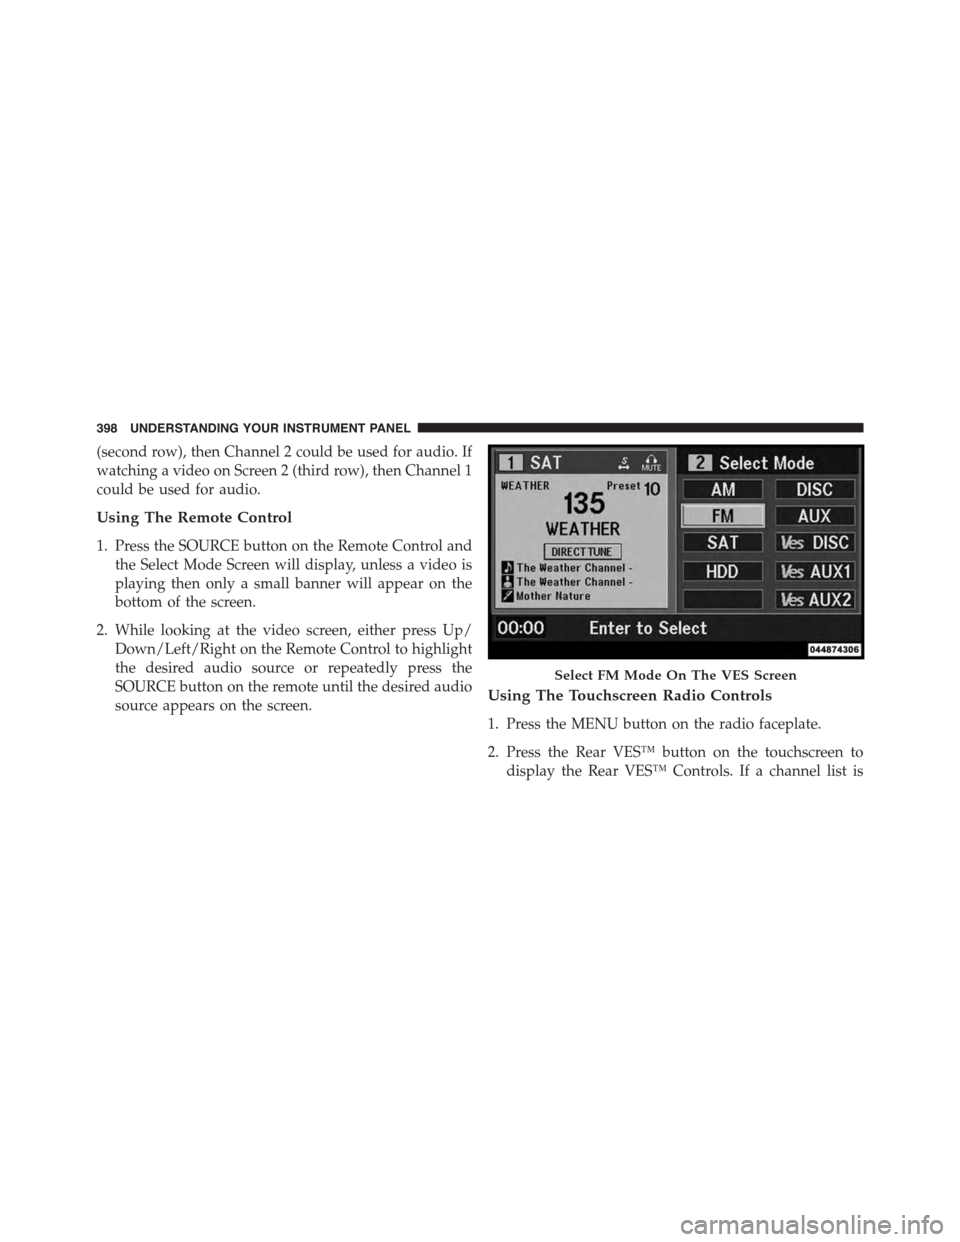
(second row), then Channel 2 could be used for audio. If
watching a video on Screen 2 (third row), then Channel 1
could be used for audio.
Using The Remote Control
1. Press the SOURCE button on the Remote Control and
the Select Mode Screen will display, unless a video is
playing then only a small banner will appear on the
bottom of the screen.
2. While looking at the video screen, either press Up/
Down/Left/Right on the Remote Control to highlight
the desired audio source or repeatedly press the
SOURCE button on the remote until the desired audio
source appears on the screen.Using The Touchscreen Radio Controls
1. Press the MENU button on the radio faceplate.
2. Press the Rear VES™ button on the touchscreen to
display the Rear VES™ Controls. If a channel list is
Select FM Mode On The VES Screen
398 UNDERSTANDING YOUR INSTRUMENT PANEL