climate control DODGE GRAND CARAVAN 2015 5.G Owners Manual
[x] Cancel search | Manufacturer: DODGE, Model Year: 2015, Model line: GRAND CARAVAN, Model: DODGE GRAND CARAVAN 2015 5.GPages: 703, PDF Size: 19.83 MB
Page 57 of 703
•During power operation, whether liftgate is fully open
or fully closed, the liftgate chime will beep several
times indicating power operation is in progress.
•The power liftgate must be in the full open or close
positions for any of the buttons to operate. If the
liftgate is not in the full open or close positions, it must
be opened or closed manually.
•If the liftgate release button is activated while the
power liftgate is closing, the liftgate will reverse to the
full open position.
•The power liftgate buttons will not operate if the shift
lever is in gear or the vehicle speed is above 0 mph
(0 km/h).
•The power liftgate will not operate in temperatures
below−12°F (−24°C) or temperatures above 143°F
(62°C). Be sure to remove any buildup of snow or ice
from the liftgate before pushing any of the power
liftgate buttons.
•If the power liftgate encounters multiple obstructions
within the same cycle, the system will automatically
stop and must be opened or closed manually.
WARNING!
•Driving with the liftgate open can allow poisonous
exhaust gases into your vehicle. You and your
passengers could be injured by these fumes. Keep
the liftgate closed when you are operating the
vehicle.
•If you are required to drive with the liftgate open,
make sure that all windows are closed, and the
climate control blower switch is set at high speed.
Do not use the recirculation mode.
2
THINGS TO KNOW BEFORE STARTING YOUR VEHICLE 55
Page 124 of 703
WARNING!(Continued)
eventually poison you. To avoid breathing (CO),
follow these safety tips:
•Do not run the engine in a closed garage or in
confined areas any longer than needed to move
your vehicle in or out of the area.
•If you are required to drive with the trunk/liftgate/
rear doors open, make sure that all windows are
closed and the climate control BLOWER switch is
set at high speed. DO NOT use the recirculation
mode.
•If it is necessary to sit in a parked vehicle with the
engine running, adjust your heating or cooling
controls to force outside air into the vehicle. Set the
blower at high speed.
The best protection against carbon monoxide entry into
the vehicle body is a properly maintained engine exhaust
system.
Whenever a change is noticed in the sound of the exhaust
system, when exhaust fumes can be detected inside the
vehicle, or when the underside or rear of the vehicle is
damaged, have a competent mechanic inspect the com-
plete exhaust system and adjacent body areas for broken,
damaged, deteriorated, or mispositioned parts. Open
seams or loose connections could permit exhaust fumes
to seep into the passenger compartment. In addition,
inspect the exhaust system each time the vehicle is raised
for lubrication or oil change. Replace as required.
Safety Checks You Should Make Inside The
Vehicle
Seat Belts
Inspect the seat belt system periodically, checking for
cuts, frays, and loose parts. Damaged parts must be
replaced immediately. Do not disassemble or modify the
system.
122 THINGS TO KNOW BEFORE STARTING YOUR VEHICLE
Page 191 of 703
WARNING!
•Persons who are unable to feel pain to the skin
because of advanced age, chronic illness, diabetes,
spinal cord injury, medication, alcohol use, exhaus-
tion or other physical condition must exercise care
when using the seat heater. It may cause burns
even at low temperatures, especially if used for
long periods of time.
•Do not place anything on the seat or seatback that
insulates against heat, such as a blanket or cushion.
This may cause the seat heater to overheat. Sitting
in a seat that has been overheated could cause
serious burns due to the increased surface tempera-
ture of the seat.
Vehicles Equipped With Remote Start
On models that are equipped with remote start, the
driver ’s heated seat can be programmed through the
Electronic Vehicle Information Center (EVIC) to come on
during a remote start. Refer to “Electronic Vehicle Infor-
mation Center (EVIC)” in “Understanding Your Instru-
ment Panel” for further information.
Front Heated Seats
There are two heated seat switches that allow the driver
and passenger to operate the seats independently. The
controls for each heater are located on the switch bank
below the climate controls.
You can choose from HIGH, LOW or OFF heat settings.
Amber indicator lights in each switch indicate the level of
heat in use. Two indicator lights will illuminate for
HIGH, one for LOW and none for OFF.
Press the switch once to select HIGH-level
heating. Press the switch a second time to select
LOW-level heating. Press the switch a third
time to shut the heating elements OFF.
3
UNDERSTANDING THE FEATURES OF YOUR VEHICLE 189
Page 236 of 703
To unlock the steering column, push the lever downward
(toward the floor). To tilt the steering column, move the
steering wheel upward or downward as desired. To
lengthen or shorten the steering column, pull the steering
wheel outward or push it inward as desired. To lock the
steering column in position, push the lever upward until
fully engaged.
WARNING!
Do not adjust the steering column while driving.
Adjusting the steering column while driving or driv-
ing with the steering column unlocked, could cause
the driver to lose control of the vehicle. Failure to
follow this warning may result in serious injury or
death.
HEATED STEERING WHEEL — IF EQUIPPED
The steering wheel contains a heating element that helps
warm your hands in cold weather. The heated steering
wheel has only one temperature setting. Once the heated
steering wheel has been turned on it will operate for
approximately 30 to 80 minutes before automatically
shutting off. The heated steering wheel can shut off early
or may not turn on when the steering wheel is already
warm.
The heated steering wheel control button is located on
the center of the instrument panel below the climate
controls.
•Press the heated steering wheel buttononce to
turn the heating element ON.
234 UNDERSTANDING THE FEATURES OF YOUR VEHICLE
Page 276 of 703
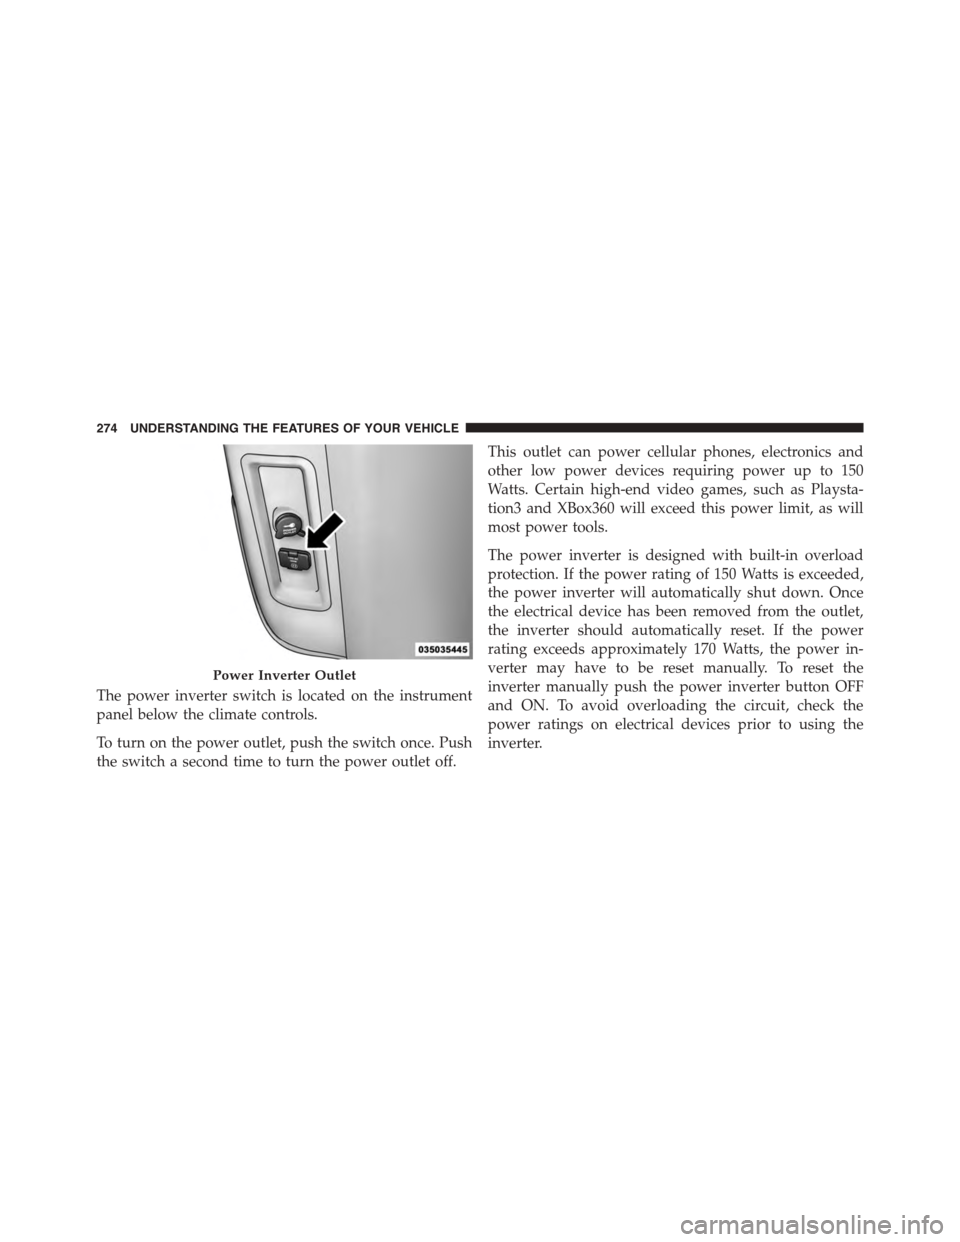
The power inverter switch is located on the instrument
panel below the climate controls.
To turn on the power outlet, push the switch once. Push
the switch a second time to turn the power outlet off.
This outlet can power cellular phones, electronics and
other low power devices requiring power up to 150
Watts. Certain high-end video games, such as Playsta-
tion3 and XBox360 will exceed this power limit, as will
most power tools.
The power inverter is designed with built-in overload
protection. If the power rating of 150 Watts is exceeded,
the power inverter will automatically shut down. Once
the electrical device has been removed from the outlet,
the inverter should automatically reset. If the power
rating exceeds approximately 170 Watts, the power in-
verter may have to be reset manually. To reset the
inverter manually push the power inverter button OFF
and ON. To avoid overloading the circuit, check the
power ratings on electrical devices prior to using the
inverter.
Power Inverter Outlet
274 UNDERSTANDING THE FEATURES OF YOUR VEHICLE
Page 295 of 703
REAR WINDOW FEATURES
Rear Window Defroster
The rear window defroster button is located on
the climate control (Mode) knob. Press this button
to turn on the rear window defroster and the heated
outside mirrors (if equipped). An indicator in the button
will illuminate when the rear window defroster is on. The
rear window defroster automatically turns off after ap-
proximately 10 minutes. For an additional five minutes of
operation, press the button a second time.
NOTE:
•You can turn off the heated mirror feature at anytime
by pressing the rear window defroster switch a second
time.
•To prevent excessive battery drain, use the rear win-
dow defroster only when the engine is operating.
CAUTION!
Failure to follow these cautions can cause damage to
the heating elements:
•Use care when washing the inside of the rear
window. Do not use abrasive window cleaners on
the interior surface of the window. Use a soft cloth
and a mild washing solution, wiping parallel to the
heating elements. Labels can be peeled off after
soaking with warm water.
•Do not use scrapers, sharp instruments, or abrasive
window cleaners on the interior surface of the
window.
•Keep all objects a safe distance from the window.
3
UNDERSTANDING THE FEATURES OF YOUR VEHICLE 293
Page 308 of 703
▫Listen To An Audio Source While A Video Is
Playing.............................397
▫Important Notes For Dual Video Screen
System.............................400
▫VES™ Remote Control — If Equipped.......401
▫Blu-ray™ Player Remote Control — If
Equipped...........................403
▫Remote Control Storage.................405
▫Locking The Remote Control.............406
▫Replacing The Remote Control Batteries......406
▫Headphones Operation.................407
▫Blu-ray™ Headphones Operation..........408
▫Controls............................409
▫Replacing The Headphone Batteries.........410
▫Unwired® Stereo Headphone Lifetime Limited
Warranty...........................410
▫System Information....................411
!STEERING WHEEL AUDIO CONTROLS — IF
EQUIPPED...........................430
▫Radio Operation......................430
▫CD Player...........................431
!CD/DVD/Blu-ray™ Disc MAINTENANCE . . . .431
!RADIO OPERATION AND MOBILE PHONES . .432
▫General Information...................432
!CLIMATE CONTROLS...................432
▫Manual Heating And Air Conditioning System —
If Equipped.........................433
▫Rear Manual Climate Control — If Equipped . .438
306 UNDERSTANDING YOUR INSTRUMENT PANEL
Page 310 of 703
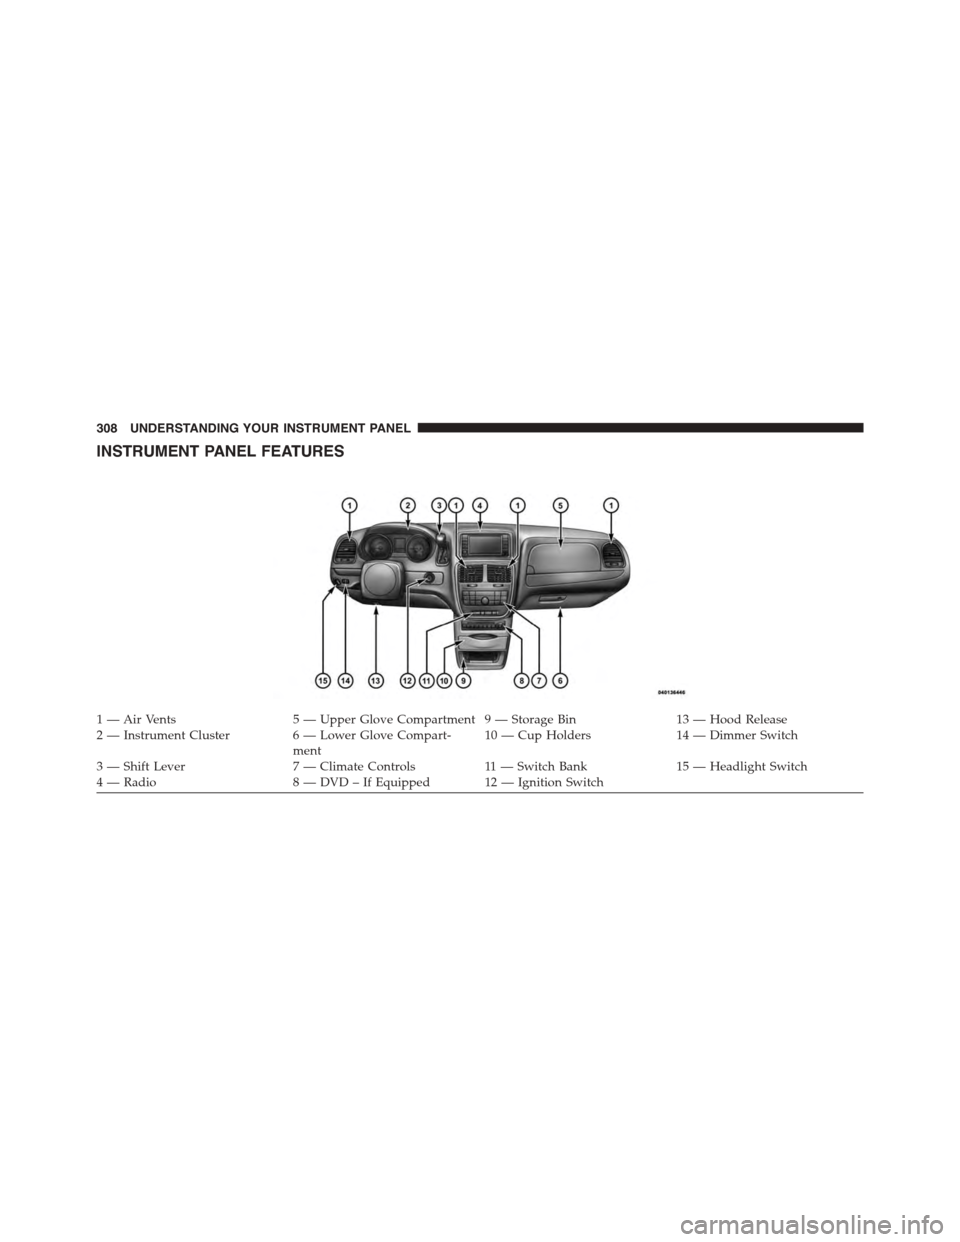
INSTRUMENT PANEL FEATURES
1 — Air Vents5 — Upper Glove Compartment 9 — Storage Bin13 — Hood Release2—InstrumentCluster6—LowerGloveCompart-ment10 — Cup Holders14 — Dimmer Switch
3 — Shift Lever7 — Climate Controls11 — Switch Bank15 — Headlight Switch4—Radio8—DVD–IfEquipped 12—IgnitionSwitch
308 UNDERSTANDING YOUR INSTRUMENT PANEL
Page 434 of 703
NOTE:If you experience difficulty in playing a particular
disc, it may be damaged (i.e., scratched, reflective coating
removed, a hair, moisture or dew on the disc) oversized,
or have protection encoding. Try a known good disc
before considering disc player service.
RADIO OPERATION AND MOBILE PHONES
Under certain conditions, the mobile phone being on in
your vehicle can cause erratic or noisy performance from
your radio. This condition may be lessened or eliminated
by relocating the mobile phone antenna. This condition is
not harmful to the radio. If your radio performance does
not satisfactorily “clear” by the repositioning of the
antenna, it is recommended that the radio volume be
turned down or off during mobile phone operation when
not using Uconnect® (if equipped).
General Information
This device complies with Part 15 of the FCC rules and
RSS 210 of Industry Canada. Operation is subject to the
following conditions:
•Changes or modifications not expressly approved by
the party responsible for compliance could void the
user’s authority to operate the equipment.
•This device may not cause harmful interference.
•This device must accept any interference received,
including interference that may cause undesired op-
eration.
CLIMATE CONTROLS
The Climate Control system allows you to regulate the
temperature, amount, and direction of air circulating
throughout the vehicle. The controls are located on the
instrument panel, below the radio.
432 UNDERSTANDING YOUR INSTRUMENT PANEL
Page 435 of 703
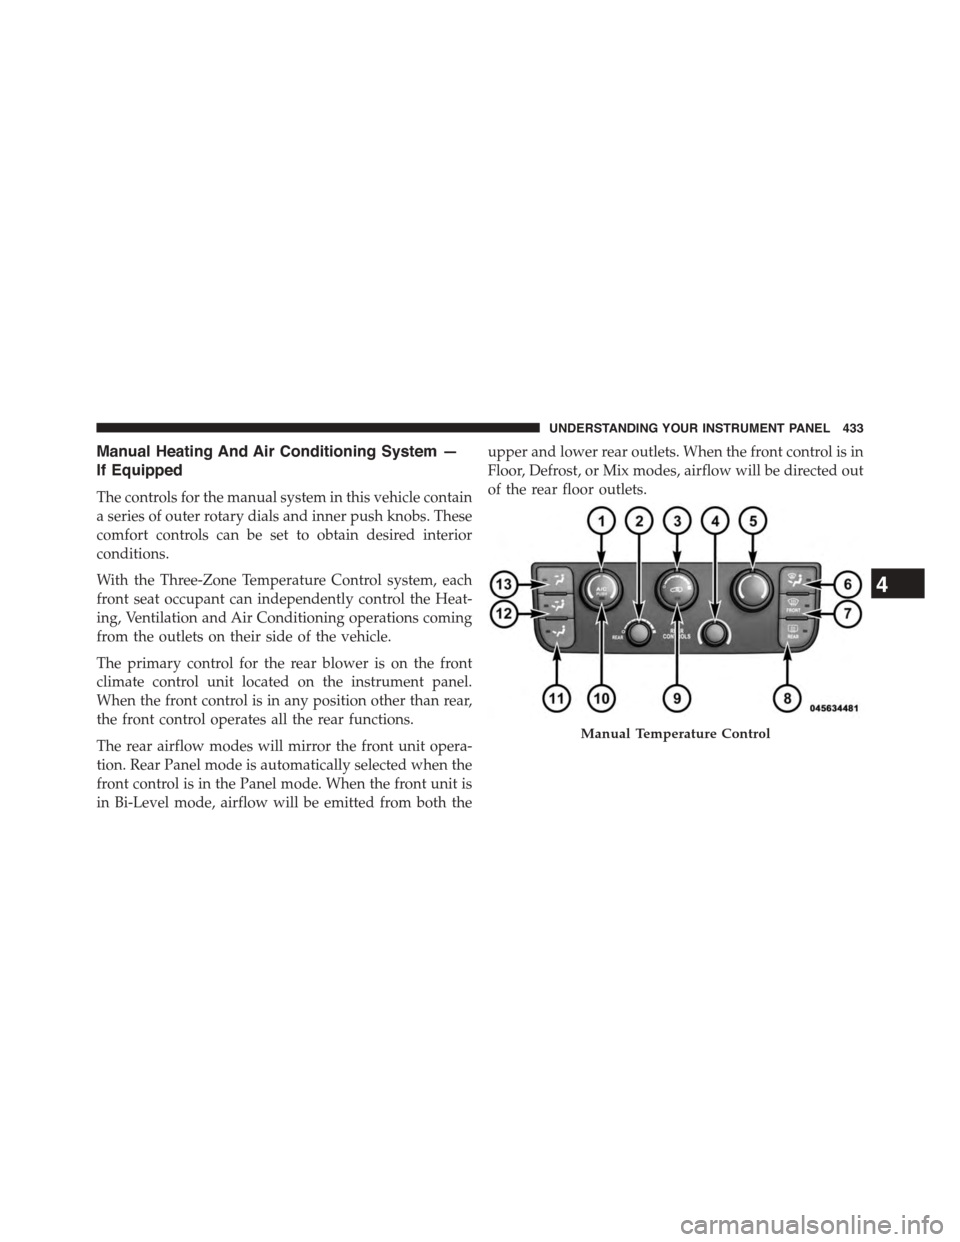
Manual Heating And Air Conditioning System —
If Equipped
The controls for the manual system in this vehicle contain
a series of outer rotary dials and inner push knobs. These
comfort controls can be set to obtain desired interior
conditions.
With the Three-Zone Temperature Control system, each
front seat occupant can independently control the Heat-
ing, Ventilation and Air Conditioning operations coming
from the outlets on their side of the vehicle.
The primary control for the rear blower is on the front
climate control unit located on the instrument panel.
When the front control is in any position other than rear,
the front control operates all the rear functions.
The rear airflow modes will mirror the front unit opera-
tion. Rear Panel mode is automatically selected when the
front control is in the Panel mode. When the front unit is
in Bi-Level mode, airflow will be emitted from both the
upper and lower rear outlets. When the front control is in
Floor, Defrost, or Mix modes, airflow will be directed out
of the rear floor outlets.
Manual Temperature Control
4
UNDERSTANDING YOUR INSTRUMENT PANEL 433