service DODGE GRAND CARAVAN 2017 5.G Manual Online
[x] Cancel search | Manufacturer: DODGE, Model Year: 2017, Model line: GRAND CARAVAN, Model: DODGE GRAND CARAVAN 2017 5.GPages: 530, PDF Size: 5.01 MB
Page 471 of 530

WARNING!
•Use only refrigerants and compressor lubricants ap-
proved by the manufacturer for your air conditioning
system. Some unapproved refrigerants are flam-
mable and can explode, injuring you. Other unap-
proved refrigerants or lubricants can cause the sys-
tem to fail, requiring costly repairs. Refer to
Warranty Information Book, located on the DVD, for
further warranty information.
• The air conditioning system contains refrigerant un-
der high pressure. To avoid risk of personal injury or
damage to the system, adding refrigerant or any
repair requiring lines to be disconnected should be
done by an experienced technician.
CAUTION!
Do not use chemical flushes in your air conditioning
system as the chemicals can damage your air condition-
ing components. Such damage is not covered by the
New Vehicle Limited Warranty.
Refrigerant Recovery And Recycling
R-134a Air Conditioning Refrigerant is a hydrofluoro-
carbon (HFC) that is endorsed by the Environmental
Protection Agency and is an ozone-saving product. How-
ever, the manufacturer recommends that air conditioning
service be performed by authorized dealer or other service
facilities using recovery and recycling equipment.
NOTE: Use only manufacturer approved A/C system PAG
compressor oil and refrigerants.
A/C Air Filter
Refer to the “Maintenance Schedule” for the proper main-
tenance intervals.
WARNING!
Do not remove the cabin air filter while the vehicle is
running, or while the ignition is in the ACC or ON/
RUN mode. With the cabin air filter removed and the
blower operating, the blower can contact hands and
may propel dirt and debris into your eyes, resulting in
personal injury.
7
MAINTAINING YOUR VEHICLE 469
Page 477 of 530
Cooling System Pressure Cap
The cap must be fully tightened to prevent loss of engine
coolant (antifreeze), and to ensure that engine coolant
(antifreeze) will return to the radiator from the coolant
recovery tank.
The cap should be inspected and cleaned if there is any
accumulation of foreign material on the sealing surfaces.
WARNING!
•Do not open hot engine cooling system. Never add
engine coolant (antifreeze) when the engine is over-
heated. Do not loosen or remove the cap to cool an
overheated engine. Heat causes pressure to build up
in the cooling system. To prevent scalding or injury,
do not remove the pressure cap while the system is
hot or under pressure.
• Do not use a pressure cap other than the one speci-
fied for your vehicle. Personal injury or engine
damage may result.
Disposal Of Used Engine Coolant
Used ethylene glycol-based engine coolant (antifreeze) is a
regulated substance requiring proper disposal. Check with
your local authorities to determine the disposal rules for your community. To prevent ingestion by animals or
children, do not store ethylene glycol-based engine coolant
in open containers or allow it to remain in puddles on the
ground. If ingested by a child or pet, seek emergency
assistance immediately. Clean up any ground spills imme-
diately.
Coolant Level
The coolant bottle provides a quick visual method for
determining that the coolant level is adequate. With the
engine OFF and cold, the level of the engine coolant
(antifreeze) in the bottle should be between the ranges
indicated on the bottle.
The radiator normally remains completely full, so there is
no need to remove the radiator/coolant pressure cap
unless checking for engine coolant (antifreeze) freeze point
or replacing coolant. Advise your service attendant of this.
As long as the engine operating temperature is satisfactory,
the coolant bottle need only be checked once a month.
When additional engine coolant (antifreeze) is needed to
maintain the proper level, only OAT coolant that meets the
requirements of FCA Material Standard MS.90032 should
be added to the coolant bottle. Do not overfill.
7
MAINTAINING YOUR VEHICLE 475
Page 479 of 530
WARNING!
Riding the brakes can lead to brake failure and possi-
bly a collision. Driving with your foot resting or riding
on the brake pedal can result in abnormally high brake
temperatures, excessive lining wear, and possible
brake damage. You would not have your full braking
capacity in an emergency.
Master Cylinder — Brake Fluid Level Check
The fluid level in the master cylinder should be checked
when performing underhood services, or immediately if
the “Brake System Warning Light” indicates system failure.
Clean the top of the master cylinder area before removing
the cap. Add fluid to bring the level up to the top of the
“FULL” mark on the side of the master cylinder reservoir.
Overfilling of fluid is not recommended because it may
cause leaking in the system.
Add enough fluid to bring the level up to the requirements
described on the brake fluid reservoir. With disc brakes,
fluid level can be expected to fall as the brake pads wear.
However, low fluid level may be caused by a leak and a
checkup may be needed.Use only manufacturer’s recommended brake fluid. Refer
to “Fluids, Lubricants, And Genuine Parts” in “Maintain-
ing Your Vehicle” for further information.
WARNING!
•
Use only manufacturer’s recommended brake fluid.
Refer to “Fluids, Lubricants, And Genuine Parts” in
“Maintaining Your Vehicle” for further information.
Using the wrong type of brake fluid can severely
damage your brake system and/or impair its perfor-
mance. The proper type of brake fluid for your
vehicle is also identified on the original factory
installed hydraulic master cylinder reservoir.
• To avoid contamination from foreign matter or mois-
ture, use only new brake fluid or fluid that has been
in a tightly closed container. Keep the master cylin-
der reservoir cap secured at all times. Brake fluid in
a open container absorbs moisture from the air
resulting in a lower boiling point. This may cause it
to boil unexpectedly during hard or prolonged brak-
ing, resulting in sudden brake failure. This could
result in a collision.
(Continued)
7
MAINTAINING YOUR VEHICLE 477
Page 481 of 530

CAUTION!
Do not use chemical flushes in your transmission as
the chemicals can damage your transmission compo-
nents. Such damage is not covered by the New Vehicle
Limited Warranty.
Fluid Level Check
The fluid level is preset at the factory and does not require
adjustment under normal operating conditions. Routine
fluid level checks are not required, therefore the transmis-
sion filler tube is capped and no dipstick is provided. Your
authorized dealer can check your transmission fluid level
using a special service dipstick. If you notice fluid leakage
or transmission malfunction, visit your authorized dealer
immediately to have the transmission fluid level checked.
Operating the vehicle with an improper fluid level can
cause severe transmission damage.
CAUTION!
If a transmission fluid leak occurs, visit your autho-
rized dealer immediately. Severe transmission damage
may occur. Your authorized dealer has the proper tools
to adjust the fluid level accurately.
Fluid And Filter Changes
Refer to the “Maintenance Schedule” for the proper main-
tenance intervals.
In addition, change the fluid and filter if the fluid becomes
contaminated (with water, etc.), or if the transmission is
disassembled for any reason.
Appearance Care And Protection From Corrosion
Protection Of Body And Paint From Corrosion
Vehicle body care requirements vary according to geo-
graphic locations and usage. Chemicals that make roads
passable in snow and ice and those that are sprayed on
trees and road surfaces during other seasons are highly
corrosive to the metal in your vehicle. Outside parking,
which exposes your vehicle to airborne contaminants, road
surfaces on which the vehicle is operated, extreme hot or
cold weather and other extreme conditions will have an
adverse effect on paint, metal trim, and underbody protec-
tion.
The following maintenance recommendations will enable
you to obtain maximum benefit from the corrosion resis-
tance built into your vehicle.7
MAINTAINING YOUR VEHICLE 479
Page 487 of 530

FUSES
WARNING!
•When replacing a blown fuse, always use an appro-
priate replacement fuse with the same amp rating as
the original fuse. Never replace a fuse with another
fuse of higher amp rating. Never replace a blown
fuse with metal wires or any other material. Failure
to use proper fuses may result in serious personal
injury, fire and/or property damage.
• Before replacing a fuse, make sure that the ignition is
off and that all the other services are switched off
and/or disengaged.
• If the replaced fuse blows again, contact an autho-
rized dealer.
• If a general protection fuse for safety systems (air
bag system, braking system), power unit systems
(engine system, gearbox system) or steering system
blows, contact an authorized dealer.
Totally Integrated Power Module (Fuses)
The Totally Integrated Power Module is located in the
engine compartment near the battery. Refer to the appli-
cable “Engine Compartment” illustration in this section.
This center contains cartridge fuses and mini-fuses. A label that identifies each component may be printed or em-
bossed on the inside of the cover.
CAUTION!
•
When installing the Totally Integrated Power Mod-
ule cover, it is important to ensure the cover is
properly positioned and fully latched. Failure to do
so may allow water to get into the Integrated Power
Module, and possibly result in a electrical system
failure.
(Continued)
Totally Integrated Power Module
7
MAINTAINING YOUR VEHICLE 485
Page 492 of 530
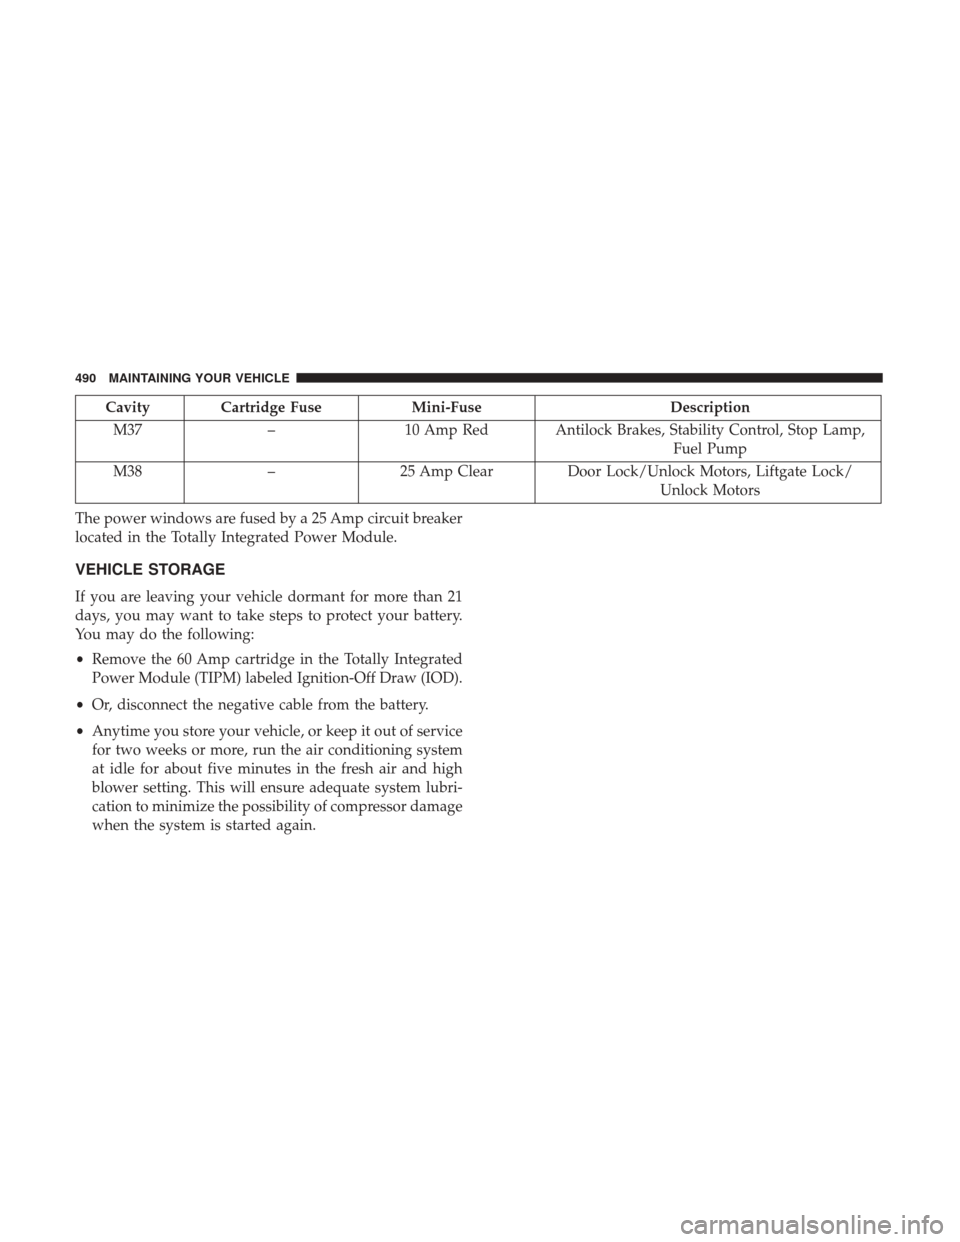
Cavity Cartridge FuseMini-FuseDescription
M37 –10 Amp Red Antilock Brakes, Stability Control, Stop Lamp,
Fuel Pump
M38 –25 Amp Clear Door Lock/Unlock Motors, Liftgate Lock/
Unlock Motors
The power windows are fused by a 25 Amp circuit breaker
located in the Totally Integrated Power Module.
VEHICLE STORAGE
If you are leaving your vehicle dormant for more than 21
days, you may want to take steps to protect your battery.
You may do the following:
• Remove the 60 Amp cartridge in the Totally Integrated
Power Module (TIPM) labeled Ignition-Off Draw (IOD).
• Or, disconnect the negative cable from the battery.
• Anytime you store your vehicle, or keep it out of service
for two weeks or more, run the air conditioning system
at idle for about five minutes in the fresh air and high
blower setting. This will ensure adequate system lubri-
cation to minimize the possibility of compressor damage
when the system is started again.
490 MAINTAINING YOUR VEHICLE
Page 494 of 530

Exterior Bulbs
Bulb Number
Headlamp H11LL
Fog Lamp – If Equipped PSX24W
Front Side Marker, Park/Turn Signal 3757A or PY27/7W
Rear Tail, Stop, Turn Signal Lamp LED (Serviced at Authorized Dealer)
Center High-Mounted Stop Lamp LED (Serviced at Authorized Dealer)
Backup Lamp 3157
License 168
NOTE: All of the interior bulbs are glass wedge base or
glass cartridge types. Aluminum base bulbs are not ap-
proved and should not be used for replacement.
BULB REPLACEMENT
NOTE: Lens fogging can occur under certain atmospheric
conditions. This will usually clear as atmospheric condi-
tions change to allow the condensation to change back into
a vapor. Turning the lamps on will usually accelerate the
clearing process.
Headlamps
1. Raise the hood to access the rear of the headlamp housing.
2. Slide the red lock tab rearward on the connector, then depress the tab and remove the connector from the bulb.
3. Twist the headlamp bulb and pull the bulb from the headlamp housing.
4. Install the new headlamp bulb and twist until locked into the headlamp housing.
492 MAINTAINING YOUR VEHICLE
Page 496 of 530
NOTE:•If a screwdriver is used, make sure a soft material is
placed between the vehicle body and tool so not to
scratch the paint.
• The PRY location is best closest to the studs while
dislodging them separately.
3. Twist the socket and remove from the lamp assembly.
4. Pull the bulb to remove it from the socket.
5. Replace the bulb, reinstall the socket, and reattach the lamp assembly.
Center High-Mounted Stop Lamp (CHMSL)
The CHMSL uses LED lamps that are not serviceable
separately. The CHMSL must be replaced as an assembly.
See your authorized dealer.
License Lamp
The license plate lamp is located under the tailgate light
bar and above the license plate.
1. Using a small screwdriver, press inward the locking tabon the outboard side of the lamp assembly and pull
down on the lamp assembly for removal.
2. Twist and remove the socket from the lamp assembly and pull the bulb out to remove.
3. Push the bulb into the socket, twist the socket into the lamp assembly and reinstall the lamp assembly into
place ensuring the locking tab is secure.
Tail Lamp Assembly Screws
494 MAINTAINING YOUR VEHICLE
Page 502 of 530
MAINTENANCE SCHEDULE
Your vehicle is equipped with an automatic oil change
indicator system. The oil change indicator system will
remind you that it is time to take your vehicle in for
scheduled maintenance.
Based on engine operation conditions, the oil change
indicator message will illuminate. This means that service
is required for your vehicle. Operating conditions such as
frequent short-trips, trailer tow, extremely hot or cold
ambient temperatures, and E85 fuel usage will influence
when the “Oil Change Required” message is displayed.
Severe Operating Conditions can cause the change oil
message to illuminate as early as 3,500 miles (5,600 km)
since last reset. Have your vehicle serviced as soon as
possible, within the next 500 miles (805 km).
Your authorized dealer will reset the oil change indicator
message after completing the scheduled oil change. If a
scheduled oil change is performed by someone other than
your authorized dealer, the message can be reset by
referring to the steps described under “Instrument Cluster
Display” in “Understanding Your Instrument Panel” for
further information.NOTE:
Under no circumstances should oil change inter-
vals exceed 10,000 miles (16,000 km), twelve months or 350
hours of engine run time, whichever comes first. The 350
hours of engine run or idle time is generally only a concern
for fleet customers.
Severe Duty All Models
Change Engine Oil at 4,000 miles (6,500 km) if the vehicle
is operated in a dusty and off road environment or is
operated predominately at idle or only very low engine
RPM’s. This type of vehicle use is considered Severe Duty.
Once A Month Or Before A Long Trip:
• Check engine oil level.
• Check windshield washer fluid level.
• Check tire pressure and look for unusual wear or
damage. Rotate tires at the first sign of irregular wear,
even if it occurs before the oil indicator system turns on.
• Check the fluid levels of the coolant reservoir, brake
master cylinder, and power steering and fill as needed.
• Check function of all interior and exterior lights.
500 MAINTENANCE SCHEDULES
Page 505 of 530
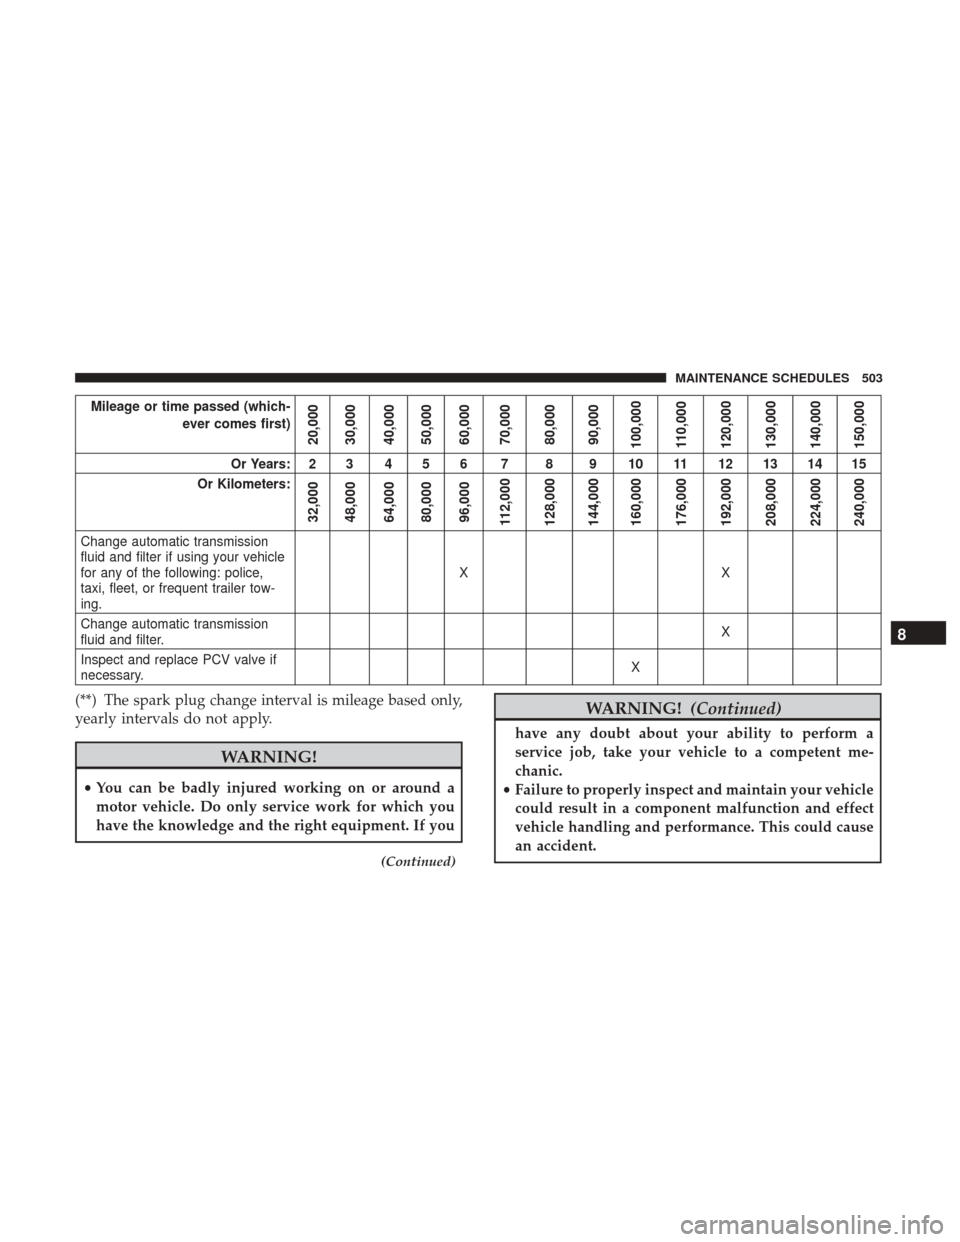
Mileage or time passed (which-ever comes first)
20,000
30,000
40,000
50,000
60,000
70,000
80,000
90,000
100,000
110,000
120,000
130,000
140,000
150,000
Or Years: 2 3 4 5 6 7 8 9 10 11 12 13 14 15
Or Kilometers:
32,000
48,000
64,000
80,000
96,000
112,000
128,000
144,000
160,000
176,000
192,000
208,000
224,000
240,000
Change automatic transmission
fluid and filter if using your vehicle
for any of the following: police,
taxi, fleet, or frequent trailer tow-
ing. XX
Change automatic transmission
fluid and filter. X
Inspect and replace PCV valve if
necessary. X
(**) The spark plug change interval is mileage based only,
yearly intervals do not apply.
WARNING!
•
You can be badly injured working on or around a
motor vehicle. Do only service work for which you
have the knowledge and the right equipment. If you
(Continued)
WARNING! (Continued)
have any doubt about your ability to perform a
service job, take your vehicle to a competent me-
chanic.
• Failure to properly inspect and maintain your vehicle
could result in a component malfunction and effect
vehicle handling and performance. This could cause
an accident.
8
MAINTENANCE SCHEDULES 503