tether DODGE GRAND CARAVAN 2019 Owners Manual
[x] Cancel search | Manufacturer: DODGE, Model Year: 2019, Model line: GRAND CARAVAN, Model: DODGE GRAND CARAVAN 2019Pages: 490, PDF Size: 3.84 MB
Page 55 of 490
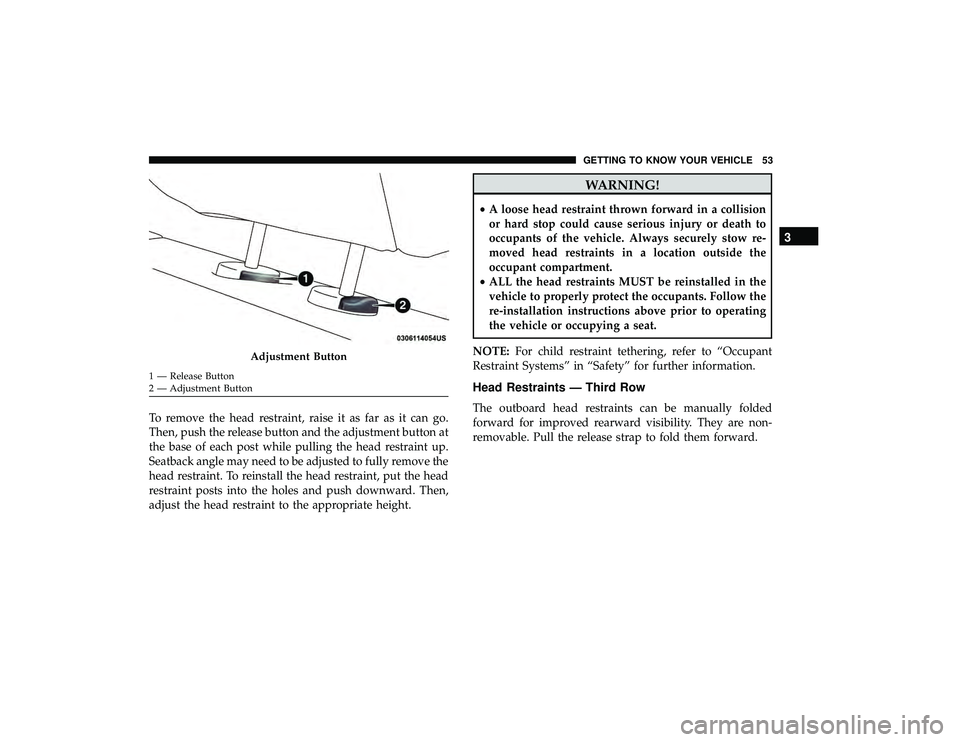
To remove the head restraint, raise it as far as it can go.
Then, push the release button and the adjustment button at
the base of each post while pulling the head restraint up.
Seatback angle may need to be adjusted to fully remove the
head restraint. To reinstall the head restraint, put the head
restraint posts into the holes and push downward. Then,
adjust the head restraint to the appropriate height.
WARNING!
•A loose head restraint thrown forward in a collision
or hard stop could cause serious injury or death to
occupants of the vehicle. Always securely stow re-
moved head restraints in a location outside the
occupant compartment.
• ALL the head restraints MUST be reinstalled in the
vehicle to properly protect the occupants. Follow the
re-installation instructions above prior to operating
the vehicle or occupying a seat.
NOTE: For child restraint tethering, refer to “Occupant
Restraint Systems” in “Safety” for further information.
Head Restraints — Third Row
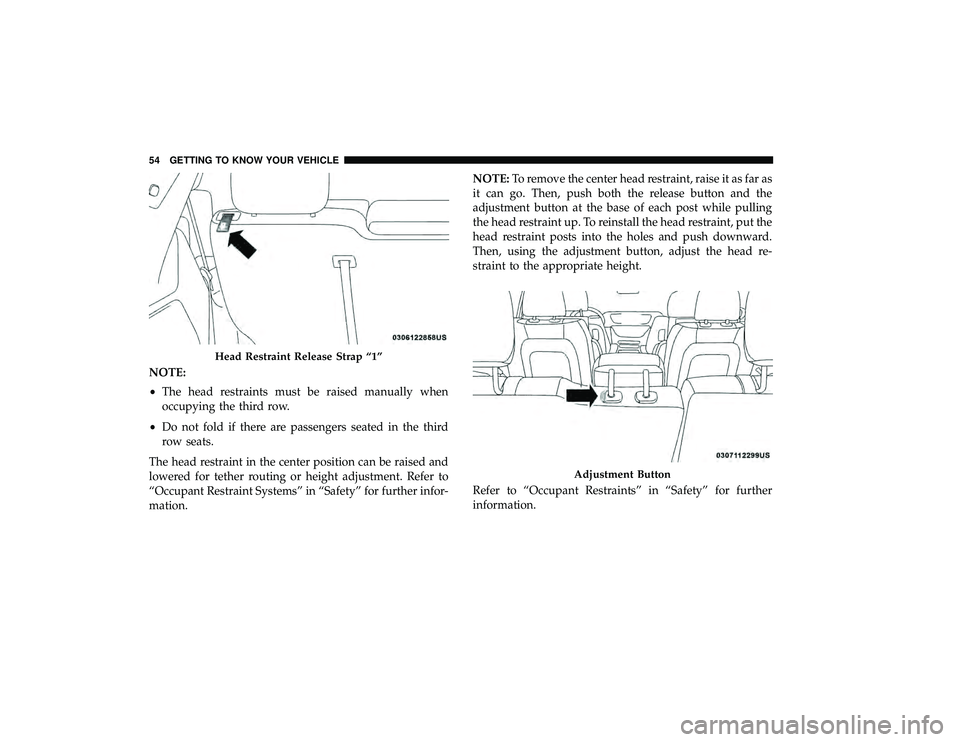
The outboard head restraints can be manually folded
forward for improved rearward visibility. They are non-
removable. Pull the release strap to fold them forward.
Adjustment Button
1 — Release Button
2 — Adjustment Button
3
GETTING TO KNOW YOUR VEHICLE 53
Page 56 of 490
NOTE:
•The head restraints must be raised manually when
occupying the third row.
• Do not fold if there are passengers seated in the third
row seats.
The head restraint in the center position can be raised and
lowered for tether routing or height adjustment. Refer to
“Occupant Restraint Systems” in “Safety” for further infor-
mation. NOTE:
To remove the center head restraint, raise it as far as
it can go. Then, push both the release button and the
adjustment button at the base of each post while pulling
the head restraint up. To reinstall the head restraint, put the
head restraint posts into the holes and push downward.
Then, using the adjustment button, adjust the head re-
straint to the appropriate height.
Refer to “Occupant Restraints” in “Safety” for further
information.
Head Restraint Release Strap “1”
Adjustment Button
54 GETTING TO KNOW YOUR VEHICLE
Page 119 of 490
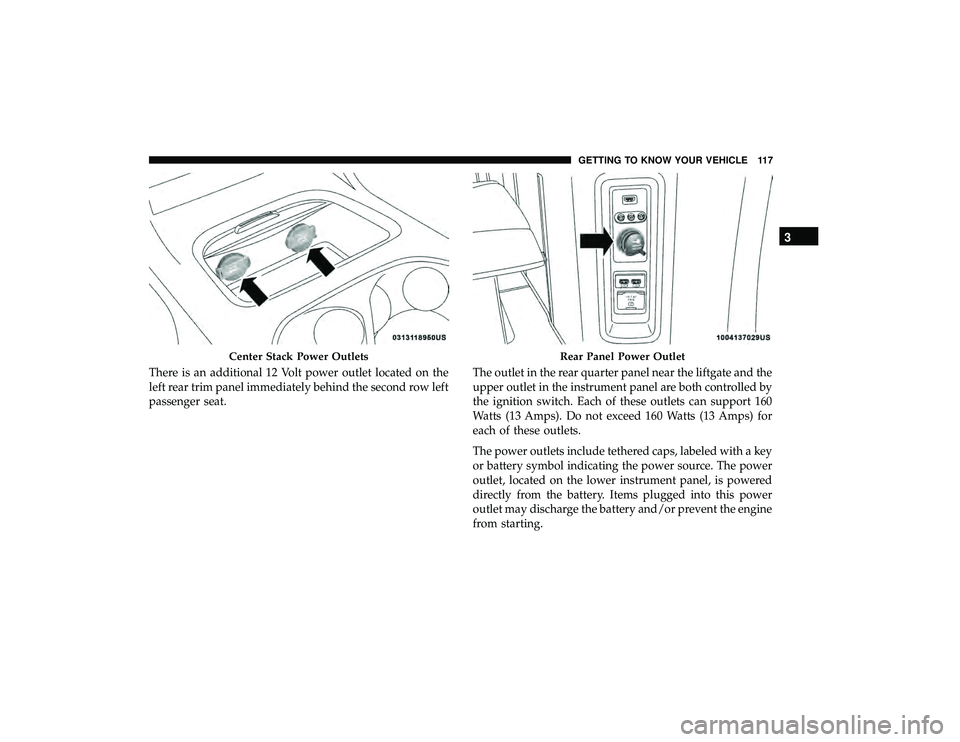
There is an additional 12 Volt power outlet located on the
left rear trim panel immediately behind the second row left
passenger seat.The outlet in the rear quarter panel near the liftgate and the
upper outlet in the instrument panel are both controlled by
the ignition switch. Each of these outlets can support 160
Watts (13 Amps). Do not exceed 160 Watts (13 Amps) for
each of these outlets.
The power outlets include tethered caps, labeled with a key
or battery symbol indicating the power source. The power
outlet, located on the lower instrument panel, is powered
directly from the battery. Items plugged into this power
outlet may discharge the battery and/or prevent the engine
from starting.
Center Stack Power OutletsRear Panel Power Outlet
3
GETTING TO KNOW YOUR VEHICLE 117
Page 217 of 490
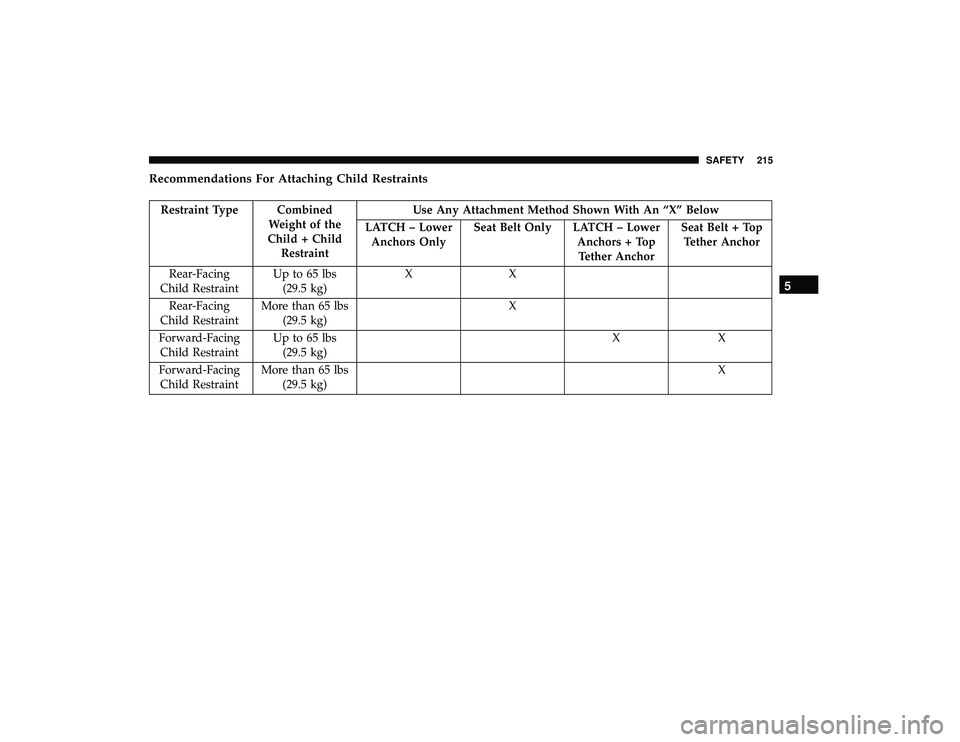
Recommendations For Attaching Child Restraints
Restraint Type CombinedWeight of the
Child + Child Restraint Use Any Attachment Method Shown With An “X” Below
LATCH – Lower Anchors Only Seat Belt Only LATCH – Lower
Anchors + TopTether Anchor Seat Belt + Top
Tether Anchor
Rear-Facing
Child Restraint Up to 65 lbs
(29.5 kg) XX
Rear-Facing
Child Restraint More than 65 lbs
(29.5 kg) X
Forward-Facing Child Restraint Up to 65 lbs
(29.5 kg) XX
Forward-Facing Child Restraint More than 65 lbs
(29.5 kg) X
5
SAFETY 215
Page 218 of 490
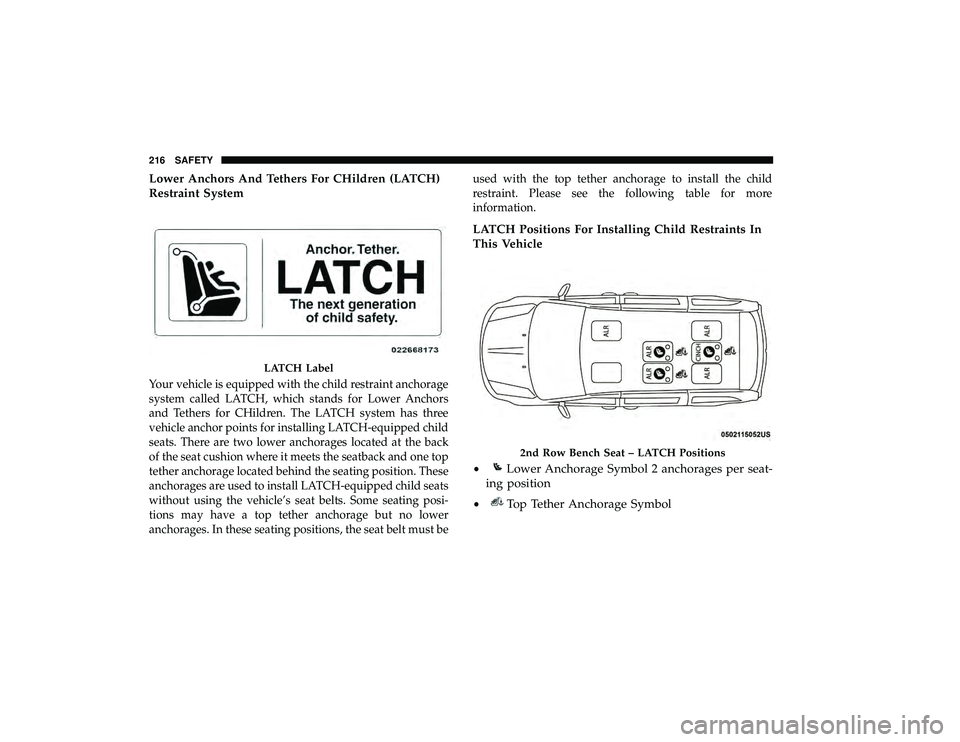
Lower Anchors And Tethers For CHildren (LATCH)
Restraint System
Your vehicle is equipped with the child restraint anchorage
system called LATCH, which stands for Lower Anchors
and Tethers for CHildren. The LATCH system has three
vehicle anchor points for installing LATCH-equipped child
seats. There are two lower anchorages located at the back
of the seat cushion where it meets the seatback and one top
tether anchorage located behind the seating position. These
anchorages are used to install LATCH-equipped child seats
without using the vehicle’s seat belts. Some seating posi-
tions may have a top tether anchorage but no lower
anchorages. In these seating positions, the seat belt must beused with the top tether anchorage to install the child
restraint. Please see the following table for more
information.
LATCH Positions For Installing Child Restraints In
This Vehicle
LATCH Label
2nd Row Bench Seat – LATCH Positions
•Lower Anchorage Symbol 2 anchorages per seat-
ing position
•Top Tether Anchorage Symbol
216 SAFETY
Page 219 of 490
Frequently Asked Questions About Installing Child Restraints With LATCH
What is the weight limit (child’s weight + weight of the child re-
straint) for using the LATCH anchor- age system to attach the child re- straint? 65 lbs (29.5 kg) Use the LATCH anchorage system
until the combined weight of the
child and the child restraint is 65 lbs
(29.5 kg). Use the seat belt and tether anchor instead of the LATCH system once the combined weight is more than 65 lbs (29.5 kg).
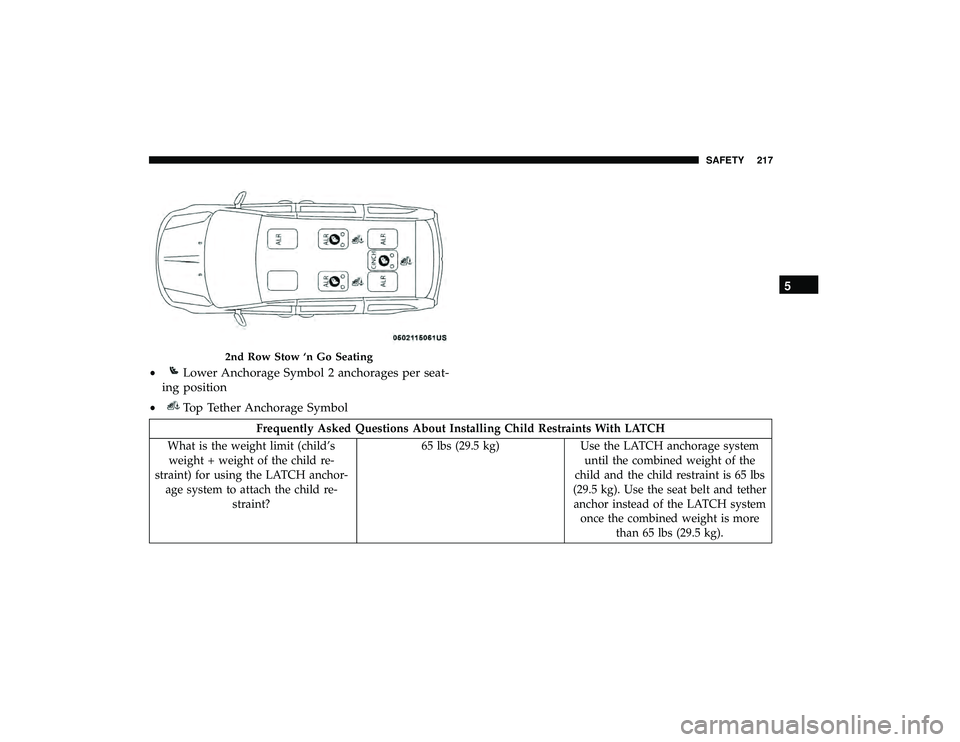
2nd Row Stow ‘n Go Seating
•Lower Anchorage Symbol 2 anchorages per seat-
ing position
•Top Tether Anchorage Symbol 5
SAFETY 217
Page 224 of 490
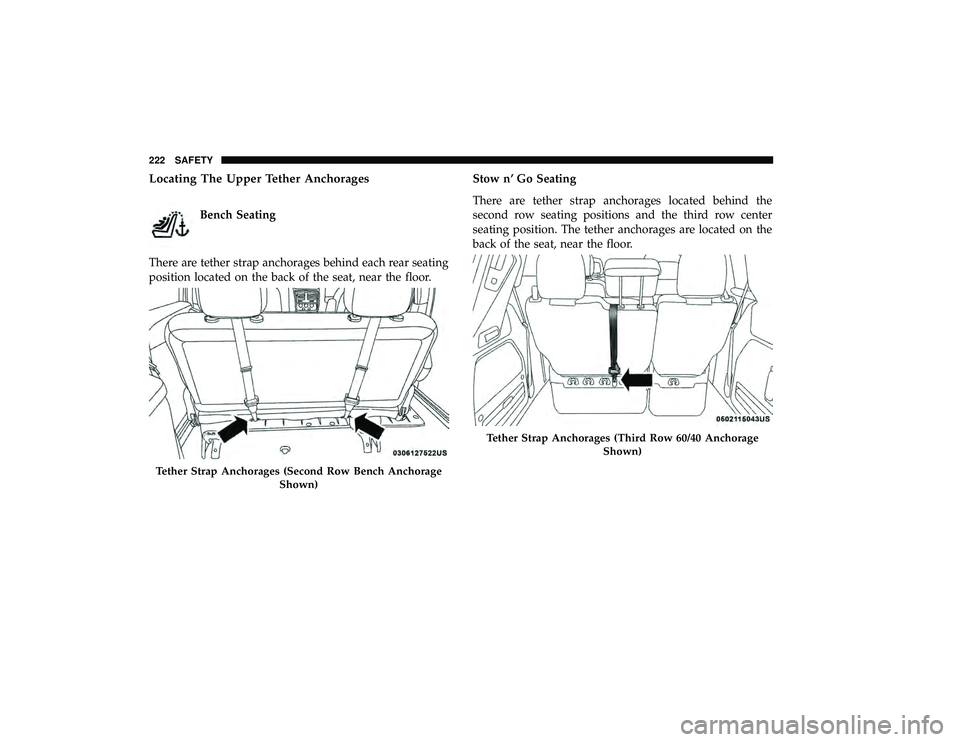
Locating The Upper Tether Anchorages
Bench Seating
There are tether strap anchorages behind each rear seating
position located on the back of the seat, near the floor. Stow n’ Go Seating
There are tether strap anchorages located behind the
second row seating positions and the third row center
seating position. The tether anchorages are located on the
back of the seat, near the floor.
Tether Strap Anchorages (Second Row Bench Anchorage
Shown)
Tether Strap Anchorages (Third Row 60/40 AnchorageShown)
222 SAFETY
Page 225 of 490
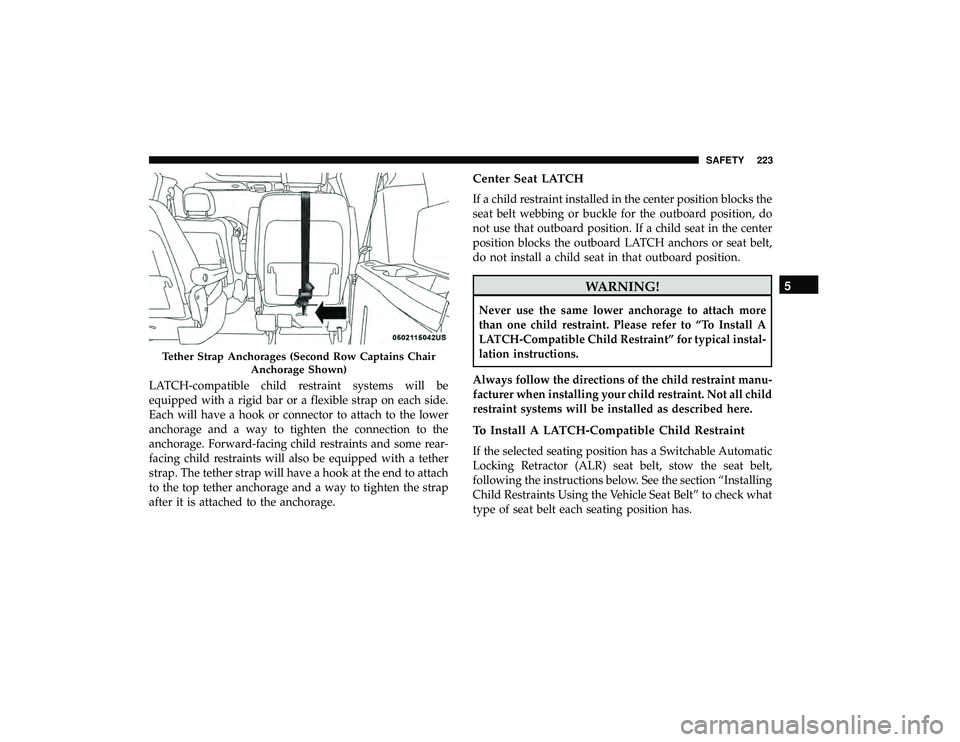
LATCH-compatible child restraint systems will be
equipped with a rigid bar or a flexible strap on each side.
Each will have a hook or connector to attach to the lower
anchorage and a way to tighten the connection to the
anchorage. Forward-facing child restraints and some rear-
facing child restraints will also be equipped with a tether
strap. The tether strap will have a hook at the end to attach
to the top tether anchorage and a way to tighten the strap
after it is attached to the anchorage.
Center Seat LATCH
If a child restraint installed in the center position blocks the
seat belt webbing or buckle for the outboard position, do
not use that outboard position. If a child seat in the center
position blocks the outboard LATCH anchors or seat belt,
do not install a child seat in that outboard position.
WARNING!
Never use the same lower anchorage to attach more
than one child restraint. Please refer to “To Install A
LATCH-Compatible Child Restraint” for typical instal-
lation instructions.
Always follow the directions of the child restraint manu-
facturer when installing your child restraint. Not all child
restraint systems will be installed as described here.
To Install A LATCH-Compatible Child Restraint
If the selected seating position has a Switchable Automatic
Locking Retractor (ALR) seat belt, stow the seat belt,
following the instructions below. See the section “Installing
Child Restraints Using the Vehicle Seat Belt” to check what
type of seat belt each seating position has.
Tether Strap Anchorages (Second Row Captains Chair Anchorage Shown)
5
SAFETY 223
Page 226 of 490
1. Loosen the adjusters on the lower straps and on thetether strap of the child seat so that you can more easily
attach the hooks or connectors to the vehicle anchor-
ages.
2. Place the child seat between the lower anchorages for that seating position. For some second row seats, you
may need to recline the seat and / or raise the head
restraint (if adjustable) to get a better fit. If the rear seat
can be moved forward and rearward in the vehicle, you
may wish to move it to its rear-most position to make
room for the child seat. You may also move the front seat
forward to allow more room for the child seat.
3. Attach the lower hooks or connectors of the child restraint to the lower anchorages in the selected seating
position.
4. If the child restraint has a tether strap, connect it to the top tether anchorage. See the section “Installing Child
Restraints Using the Top Tether Anchorage” for direc-
tions to attach a tether anchor.
5. Tighten all of the straps as you push the child restraint rearward and downward into the seat. Remove slack in
the straps according to the child restraint manufactur-
er ’s instructions. 6. Test that the child restraint is installed tightly by pulling
back and forth on the child seat at the belt path. It
should not move more than 1 inch (25.4 mm) in any
direction.
How To Stow An Unused Switchable-ALR (ALR)
Seat Belt:
When using the LATCH attaching system to install a child
restraint, stow all ALR seat belts that are not being used by
other occupants or being used to secure child restraints. An
unused belt could injure a child if they play with it and
accidentally lock the seat belt retractor. Before installing a
child restraint using the LATCH system, buckle the seat
belt behind the child restraint and out of the child’s reach.
If the buckled seat belt interferes with the child restraint
installation, instead of buckling it behind the child re-
straint, route the seat belt through the child restraint belt
path and then buckle it. Do not lock the seat belt. Remind
all children in the vehicle that the seat belts are not toys and
that they should not play with them.
224 SAFETY
Page 228 of 490
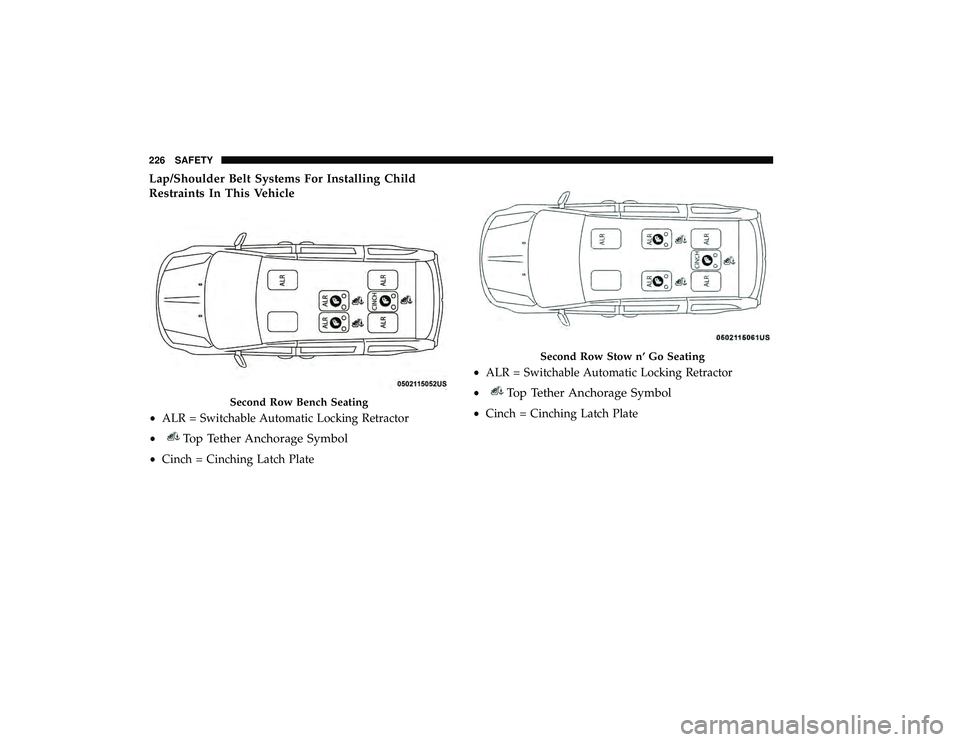
Lap/Shoulder Belt Systems For Installing Child
Restraints In This Vehicle
Second Row Bench Seating
•ALR = Switchable Automatic Locking Retractor
•
Top Tether Anchorage Symbol
• Cinch = Cinching Latch Plate
Second Row Stow n’ Go Seating
•ALR = Switchable Automatic Locking Retractor
•
Top Tether Anchorage Symbol
• Cinch = Cinching Latch Plate
226 SAFETY