tether DODGE GRAND CARAVAN 2019 User Guide
[x] Cancel search | Manufacturer: DODGE, Model Year: 2019, Model line: GRAND CARAVAN, Model: DODGE GRAND CARAVAN 2019Pages: 490, PDF Size: 3.84 MB
Page 229 of 490
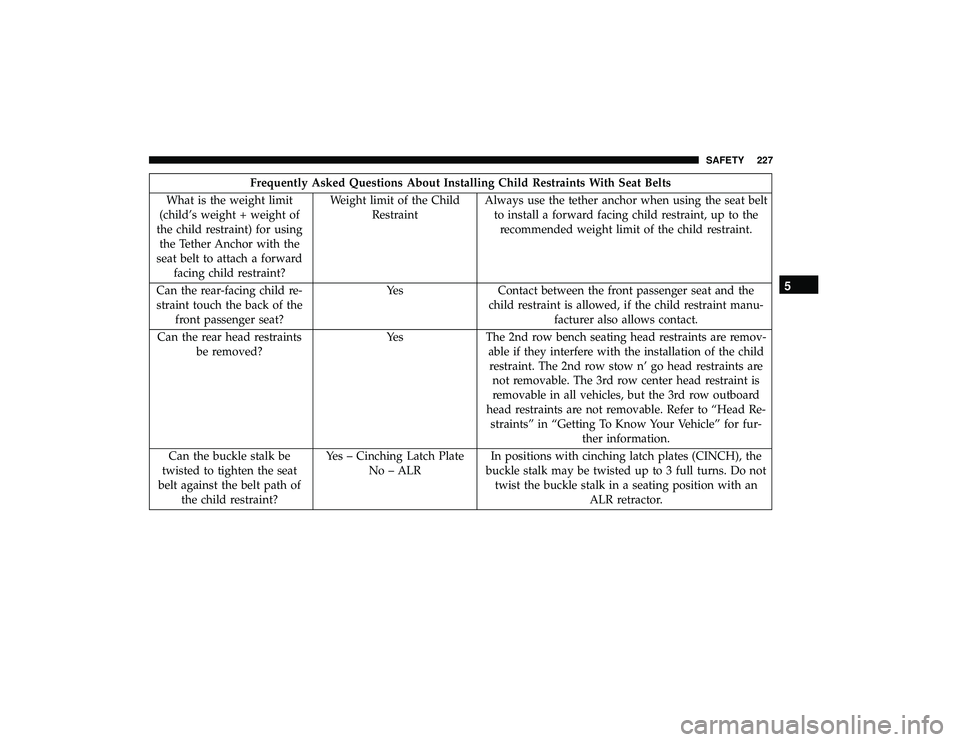
Frequently Asked Questions About Installing Child Restraints With Seat Belts
What is the weight limit
(child’s weight + weight of
the child restraint) for using the Tether Anchor with the
seat belt to attach a forward facing child restraint? Weight limit of the Child
Restraint Always use the tether anchor when using the seat belt
to install a forward facing child restraint, up to therecommended weight limit of the child restraint.
Can the rear-facing child re-
straint touch the back of the front passenger seat? Yes Contact between the front passenger seat and the
child restraint is allowed, if the child restraint manu-facturer also allows contact.
Can the rear head restraints be removed? Yes
The 2nd row bench seating head restraints are remov-
able if they interfere with the installation of the childrestraint. The 2nd row stow n’ go head restraints are not removable. The 3rd row center head restraint is
removable in all vehicles, but the 3rd row outboard
head restraints are not removable. Refer to “Head Re- straints” in “Getting To Know Your Vehicle” for fur- ther information.
Can the buckle stalk be
twisted to tighten the seat
belt against the belt path of the child restraint? Yes – Cinching Latch Plate
No – ALR In positions with cinching latch plates (CINCH), the
buckle stalk may be twisted up to 3 full turns. Do not twist the buckle stalk in a seating position with an ALR retractor.
5
SAFETY 227
Page 231 of 490
WARNING!
•Improper installation or failure to properly secure a
child restraint can lead to failure of the restraint. The
child could be badly injured or killed.
• Follow the child restraint manufacturer ’s directions
exactly when installing an infant or child restraint.
1. Place the child seat in the center of the seating position. For some second row seats, you may need to recline the
seat and/or raise the head restraint (if adjustable) to get
a better fit. If the rear seat can be moved forward and
rearward in the vehicle, you may wish to move it to its
rear-most position to make room for the child seat. You
may also move the front seat forward to allow more
room for the child seat.
2. Pull enough of the seat belt webbing from the retractor to pass it through the belt path of the child restraint. Do
not twist the belt webbing in the belt path.
3. Slide the latch plate into the buckle until you hear a “click.”
4. Pull on the webbing to make the lap portion tight against the child seat. 5. To lock the seat belt, pull down on the shoulder part of
the belt until you have pulled all the seat belt webbing
out of the retractor. Then, allow the webbing to retract
back into the retractor. As the webbing retracts, you will
hear a clicking sound. This means the seat belt is now in
the Automatic Locking mode.
6. Try to pull the webbing out of the retractor. If it is locked, you should not be able to pull out any webbing.
If the retractor is not locked, repeat step 5.
7. Finally, pull up on any excess webbing to tighten the lap portion around the child restraint while you push the
child restraint rearward and downward into the vehicle
seat.
8. If the child restraint has a top tether strap and the seating position has a top tether anchorage, connect the
tether strap to the anchorage and tighten the tether
strap. See the section “Installing Child Restraints Using
the Top Tether Anchorage” for directions to attach a
tether anchor.
9. Test that the child restraint is installed tightly by pulling back and forth on the child seat at the belt path. It
should not move more than 1 inch (25.4 mm) in any
direction.
5
SAFETY 229
Page 232 of 490
Any seat belt system will loosen with time, so check the
belt occasionally, and pull it tight if necessary.
Installing A Child Restraint With A Cinching Latch
Plate (CINCH) — If Equipped:
Child restraint systems are designed to be secured in
vehicle seats by lap belts or the lap belt portion of a
lap/shoulder belt.
WARNING!
•Improper installation or failure to properly secure a
child restraint can lead to failure of the restraint. The
child could be badly injured or killed.
• Follow the child restraint manufacturer ’s directions
exactly when installing an infant or child restraint.
1. Place the child seat in the center of the seating position. For some second row seats, you may need to recline the
seat and / or raise the head restraint (if adjustable) to get
a better fit. If the rear seat can be moved forward and
rearward in the vehicle, you may wish to move it to its
rear-most position to make room for the child seat. You
may also move the front seat forward to allow more
room for the child seat. 2. Next, pull enough of the seat belt webbing from the
retractor to pass it through the belt path of the child
restraint. Do not twist the belt webbing in the belt path.
3. Slide the latch plate into the buckle until you hear a “click.”
4. Finally, pull up on any excess webbing to tighten the lap portion around the child restraint while you push the
child restraint rearward and downward into the vehicle
seat.
5. If the child restraint has a top tether strap and the seating position has a top tether anchorage, connect the
tether strap to the anchorage and tighten the tether
strap. See the section “Installing Child Restraints Using
the Top Tether Anchorage” for directions to attach a
tether anchor.
6. Test that the child restraint is installed tightly by pulling back and forth on the child seat at the belt path. It
should not move more than 1 inch (25.4 mm) in any
direction.
Any seat belt system will loosen with time, so check the
belt occasionally, and pull it tight if necessary.
230 SAFETY
Page 233 of 490
If the buckle or the cinching latch plate is too close to the
belt path opening of the child restraint, you may have
trouble tightening the seat belt. If this happens, disconnect
the latch plate from the buckle and twist the short buckle-
end belt up to three full turns to shorten it. Insert the latch
plate into the buckle with the release button facing out,
away from the child restraint. Repeat steps 4 to 6, above, to
complete the installation of the child restraint.
If the belt still cannot be tightened after you shorten the
buckle, disconnect the latch plate from the buckle, turn the
buckle around one half turn, and insert the latch plate into
the buckle again. If you still cannot make the child restraint
installation tight, try a different seating position.Installing Child Restraints Using The Top Tether
Anchorage
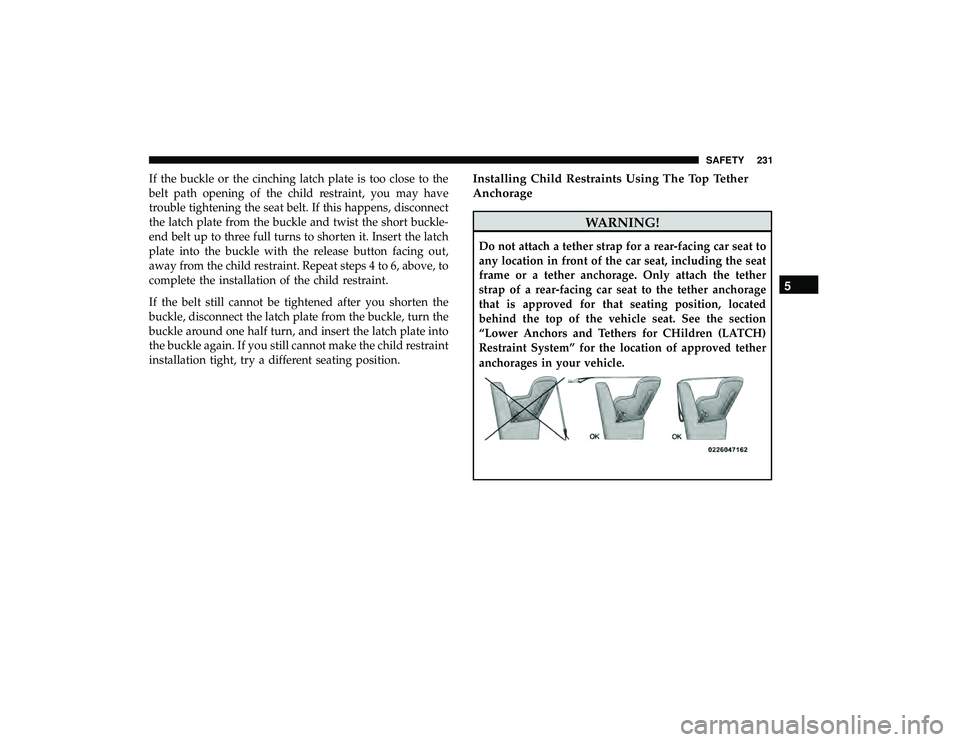
WARNING!
Do not attach a tether strap for a rear-facing car seat to
any location in front of the car seat, including the seat
frame or a tether anchorage. Only attach the tether
strap of a rear-facing car seat to the tether anchorage
that is approved for that seating position, located
behind the top of the vehicle seat. See the section
“Lower Anchors and Tethers for CHildren (LATCH)
Restraint System” for the location of approved tether
anchorages in your vehicle.
5
SAFETY 231
Page 234 of 490
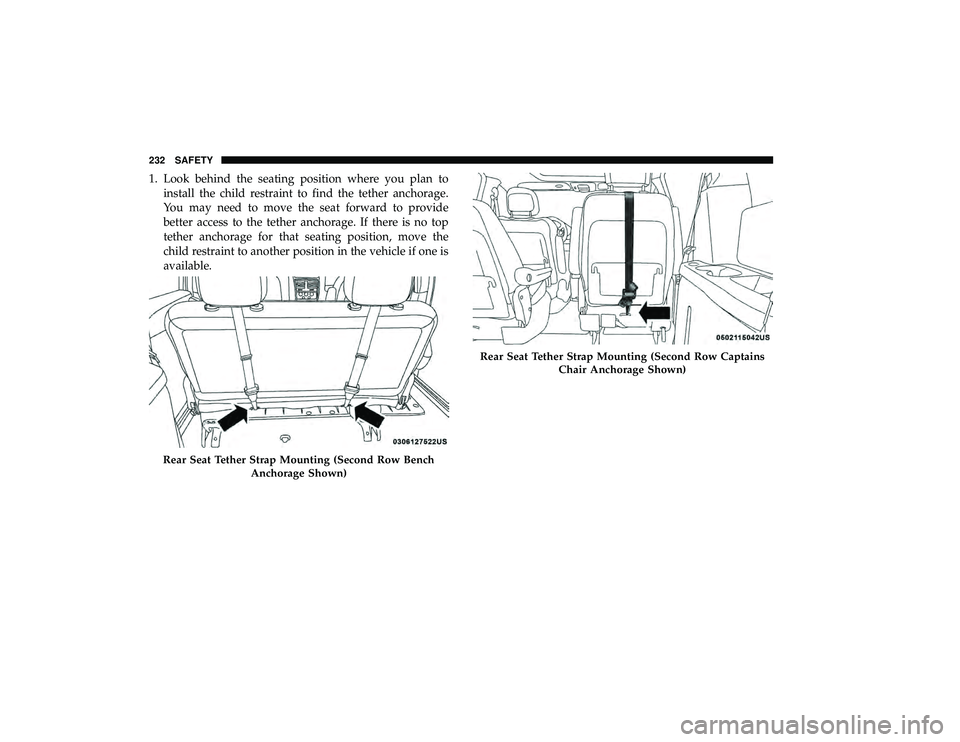
1. Look behind the seating position where you plan toinstall the child restraint to find the tether anchorage.
You may need to move the seat forward to provide
better access to the tether anchorage. If there is no top
tether anchorage for that seating position, move the
child restraint to another position in the vehicle if one is
available.
Rear Seat Tether Strap Mounting (Second Row Bench
Anchorage Shown)
Rear Seat Tether Strap Mounting (Second Row CaptainsChair Anchorage Shown)
232 SAFETY
Page 235 of 490
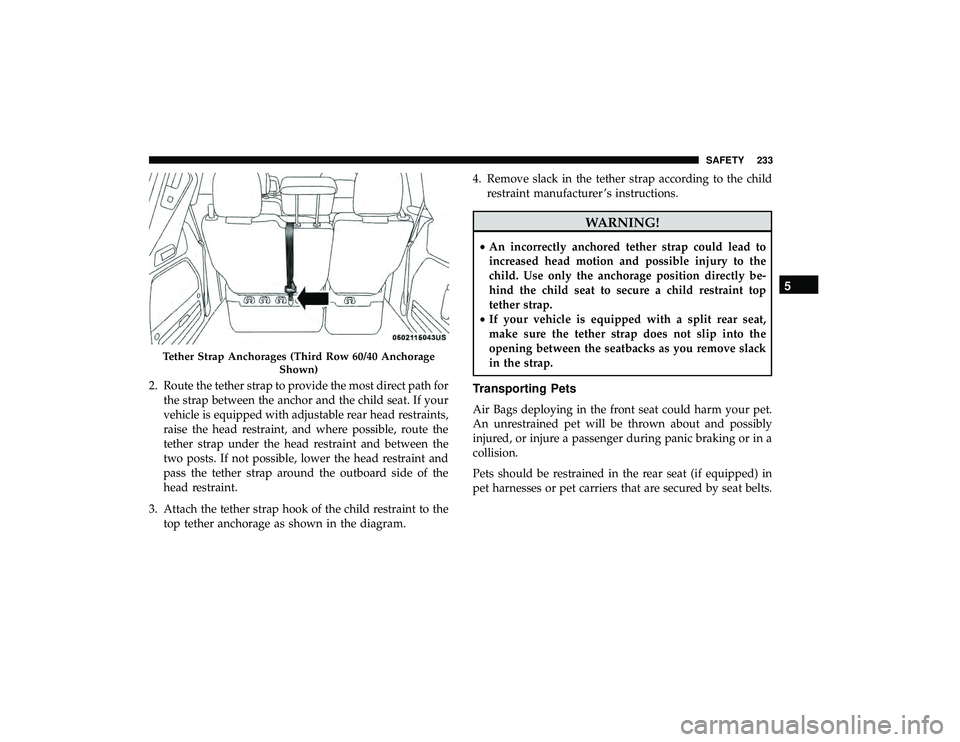
2. Route the tether strap to provide the most direct path forthe strap between the anchor and the child seat. If your
vehicle is equipped with adjustable rear head restraints,
raise the head restraint, and where possible, route the
tether strap under the head restraint and between the
two posts. If not possible, lower the head restraint and
pass the tether strap around the outboard side of the
head restraint.
3. Attach the tether strap hook of the child restraint to the top tether anchorage as shown in the diagram. 4. Remove slack in the tether strap according to the child
restraint manufacturer ’s instructions.
WARNING!
•An incorrectly anchored tether strap could lead to
increased head motion and possible injury to the
child. Use only the anchorage position directly be-
hind the child seat to secure a child restraint top
tether strap.
• If your vehicle is equipped with a split rear seat,
make sure the tether strap does not slip into the
opening between the seatbacks as you remove slack
in the strap.
Transporting Pets
Air Bags deploying in the front seat could harm your pet.
An unrestrained pet will be thrown about and possibly
injured, or injure a passenger during panic braking or in a
collision.
Pets should be restrained in the rear seat (if equipped) in
pet harnesses or pet carriers that are secured by seat belts.
Tether Strap Anchorages (Third Row 60/40 Anchorage
Shown)
5
SAFETY 233
Page 347 of 490
CAUTION!
Do not use chemical flushes in your air conditioning
system as the chemicals can damage your air condition-
ing components. Such damage is not covered by the
New Vehicle Limited Warranty.
Refrigerant Recovery And Recycling R-134a — If
Equipped
R-134a Air Conditioning Refrigerant is a hydrofluoro-
carbon (HFC) that is an ozone-friendly substance. The
manufacturer recommends that air conditioning service be
performed by an authorized dealer or other service facili-
ties using recovery and recycling equipment.
NOTE:Use only manufacturer approved A/C system PAG
compressor oil and refrigerants.
A/C Air Filter
Refer to the “Maintenance Plan” in the “Scheduled Servic-
ing” chapter for the proper maintenance intervals.
WARNING!
Do not remove the cabin air filter while the vehicle is
running, or while the ignition is in the ACC or ON/
RUN mode. With the cabin air filter removed and the
blower operating, the blower can contact hands and
may propel dirt and debris into your eyes, resulting in
personal injury.
The A/C air filter is located in the fresh air inlet behind the
glove compartment. Perform the following procedure to
replace the filter:
1. Open the glove compartment and remove all contents.
2. Push in on the sides of the glove compartment, remove tether and lower the door.
3. Pivot the glove compartment downward.
4. Disengage the two retaining tabs that secure the filter cover to the HVAC housing, and remove the cover.
8
SERVICING AND MAINTENANCE 345
Page 348 of 490
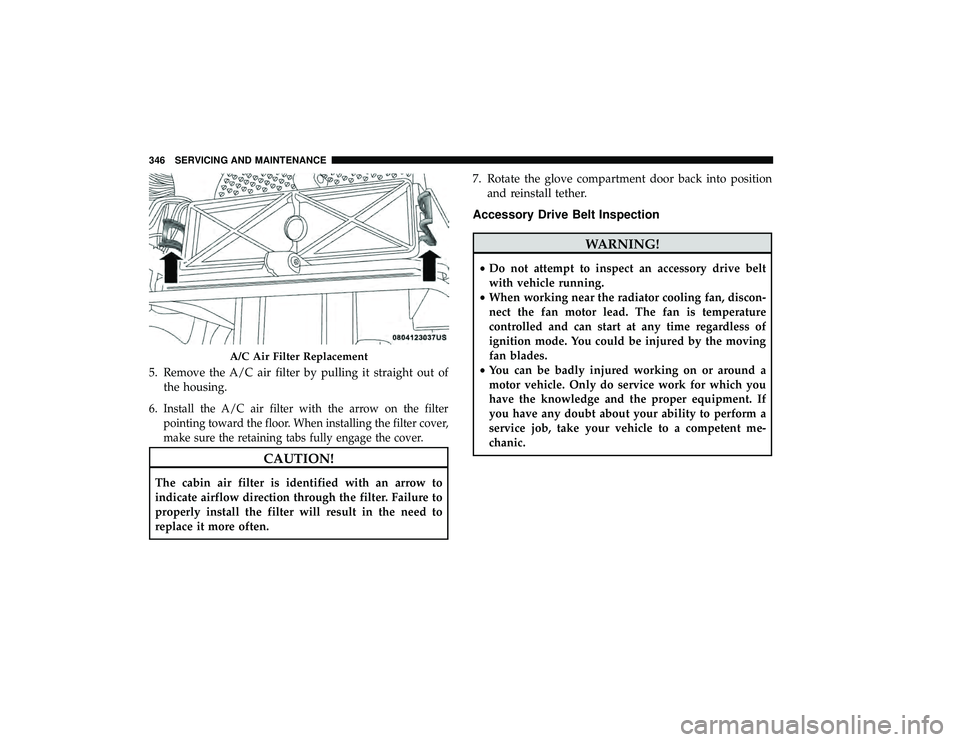
5. Remove the A/C air filter by pulling it straight out ofthe housing.
6.
Install the A/C air filter with the arrow on the filter
pointing toward the floor. When installing the filter cover,
make sure the retaining tabs fully engage the cover.
CAUTION!
The cabin air filter is identified with an arrow to
indicate airflow direction through the filter. Failure to
properly install the filter will result in the need to
replace it more often. 7. Rotate the glove compartment door back into position
and reinstall tether.
Accessory Drive Belt Inspection
WARNING!
•Do not attempt to inspect an accessory drive belt
with vehicle running.
• When working near the radiator cooling fan, discon-
nect the fan motor lead. The fan is temperature
controlled and can start at any time regardless of
ignition mode. You could be injured by the moving
fan blades.
• You can be badly injured working on or around a
motor vehicle. Only do service work for which you
have the knowledge and the proper equipment. If
you have any doubt about your ability to perform a
service job, take your vehicle to a competent me-
chanic.
A/C Air Filter Replacement
346 SERVICING AND MAINTENANCE
Page 476 of 490
Certification Label......................... .268
Chains, Tire ............................. .378
Change Oil Indicator ....................... .135
Changing A Flat Tire .................... .297, 357
Chart, Tire Sizing .......................... .359
Check Engine Light (Malfunction Indicator Light). . . .154
Checking Your Vehicle For Safety ...............234
Checks, Safety ............................ .234
Child Restraint ........................... .210
Child Restraints Booster Seats ........................... .214
Child Seat Installation ................. .226, 228
How To Stow An unused ALR Seat Belt ........224
Infant And Child Restraints .................212
Locating The LATCH Anchorages .............220
Lower Anchors And Tethers For Children .......216
Older Children And Child Restraints ...........213
Seating Positions ........................ .215
Using The Top Tether Anchorage .............231
Clean Air Gasoline ........................ .391
Cleaning Wheels ............................... .377
Climate Control ............................68
Automatic ..............................76
Manual ................................68 Coat Hook
...............................112
Cold Weather Operation ..................... .241
Compact Disc (CD) Maintenance ................463
Compact Spare Tire ........................ .375
Compass ................................ .137
Calibration ............................ .138
Variance .............................. .138
Computer, Trip/Travel ................... .136, 144
Console ................................ .105
Floor ................................ .105
Console, Overhead ........................ .108
Contract, Service .......................... .468
Cooling
Pressure Cap (Radiator Cap) ............353
Cooling System ........................... .350
Adding Coolant (Antifreeze) .................352
Cooling Capacity ........................ .397
Disposal Of Used Coolant ..................353
Drain, Flush, And Refill ................... .351
Inspection ............................. .350
Points To Remember ..................... .353
Pressure Cap ........................... .353
Radiator Cap .......................... .353
Selection Of Coolant (Antifreeze) .......351, 397, 398
Corrosion Protection ....................... .381
Cruise Light ............................. .152
474 INDEX