brakes DODGE GRAND CARAVAN 2019 User Guide
[x] Cancel search | Manufacturer: DODGE, Model Year: 2019, Model line: GRAND CARAVAN, Model: DODGE GRAND CARAVAN 2019Pages: 490, PDF Size: 3.84 MB
Page 281 of 490
NOTE:
•Disconnect trailer wiring connector from the vehicle
before launching a boat (or any other device plugged
into vehicle’s electrical connect) into water.
• Be sure to reconnect once clear from water area.
Towing Tips
Before setting out on a trip, practice turning, stopping, and
backing up the trailer in an area located away from heavy
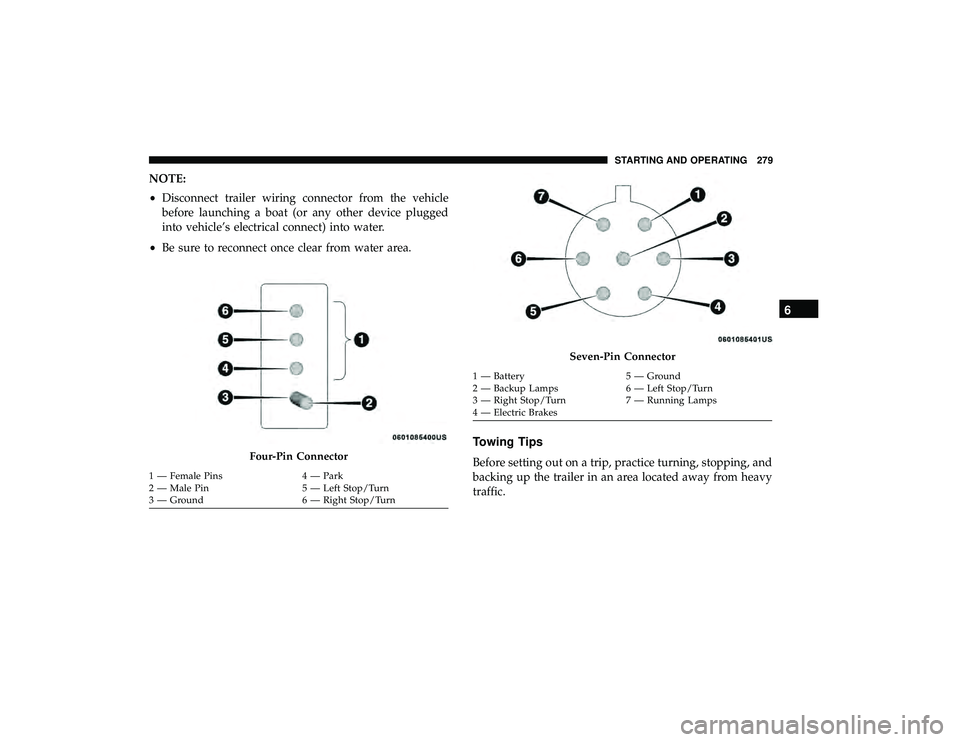
traffic.Four-Pin Connector
1 — Female Pins 4 — Park
2 — Male Pin 5 — Left Stop/Turn
3 — Ground 6 — Right Stop/Turn
Seven-Pin Connector
1 — Battery5 — Ground
2 — Backup Lamps 6 — Left Stop/Turn
3 — Right Stop/Turn 7 — Running Lamps
4 — Electric Brakes
6
STARTING AND OPERATING 279
Page 285 of 490
•Maintain sufficient distance between your vehicle and
the vehicle in front of you to avoid a collision in a
sudden stop.
Driving Through Water
Driving through water more than a few inches/centimeters
deep will require extra caution to ensure safety and pre-
vent damage to your vehicle.
Flowing/Rising Water
WARNING!
Do not drive on or across a road or path where water is
flowing and/or rising (as in storm run-off). Flowing
water can wear away the road or path’s surface and
cause your vehicle to sink into deeper water. Further-
more, flowing and/or rising water can carry your ve-
hicle away swiftly. Failure to follow this warning may
result in injuries that are serious or fatal to you, your
passengers, and others around you.
Shallow Standing Water
Although your vehicle is capable of driving through shal-
low standing water, consider the following Cautions and
Warnings before doing so.
WARNING!
• Driving through standing water limits your vehicle’s
traction capabilities. Do not exceed 5 mph (8 km/h)
when driving through standing water.
• Driving through standing water limits your vehicle’s
braking capabilities, which increases stopping dis-
tances. Therefore, after driving through standing
water, drive slowly and lightly press on the brake
pedal several times to dry the brakes.
• Failure to follow these warnings may result in inju-
ries that are serious or fatal to you, your passengers,
and others around you.
6
STARTING AND OPERATING 283
Page 295 of 490
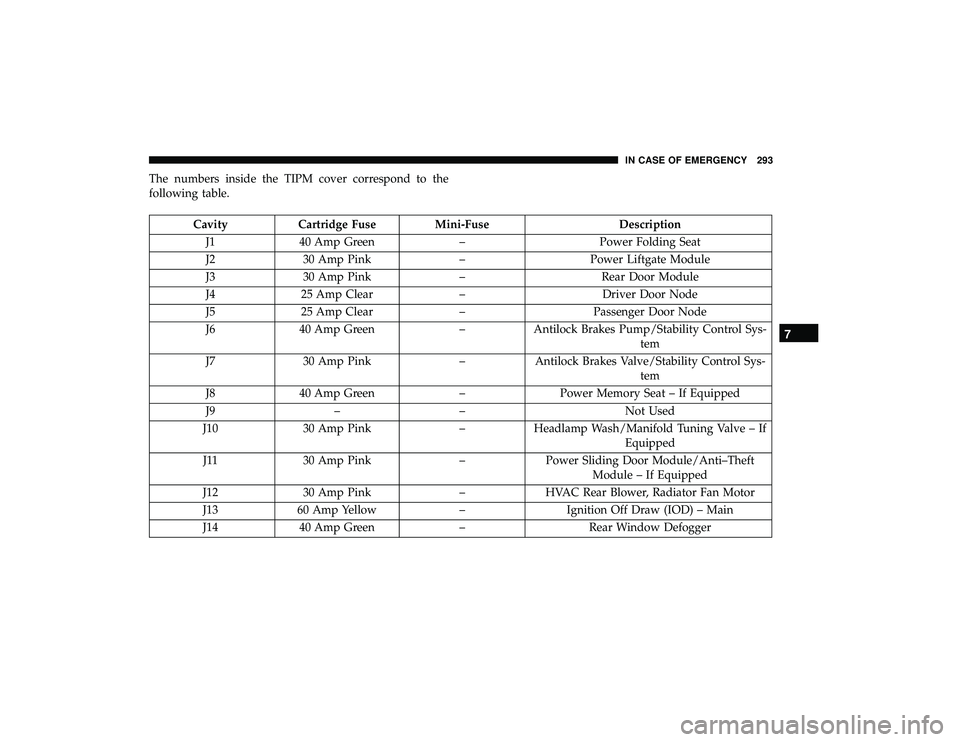
The numbers inside the TIPM cover correspond to the
following table.
CavityCartridge Fuse Mini-Fuse Description
J1 40 Amp Green –Power Folding Seat
J2 30 Amp Pink –Power Liftgate Module
J3 30 Amp Pink –Rear Door Module
J4 25 Amp Clear –Driver Door Node
J5 25 Amp Clear –Passenger Door Node
J6 40 Amp Green –Antilock Brakes Pump/Stability Control Sys-
tem
J7 30 Amp Pink –Antilock Brakes Valve/Stability Control Sys-
tem
J8 40 Amp Green –Power Memory Seat – If Equipped
J9 –– Not Used
J10 30 Amp Pink –Headlamp Wash/Manifold Tuning Valve – If
Equipped
J11 30 Amp Pink –Power Sliding Door Module/Anti–Theft
Module – If Equipped
J12 30 Amp Pink –HVAC Rear Blower, Radiator Fan Motor
J13 60 Amp Yellow –Ignition Off Draw (IOD) – Main
J14 40 Amp Green –Rear Window Defogger
7
IN CASE OF EMERGENCY 293
Page 299 of 490
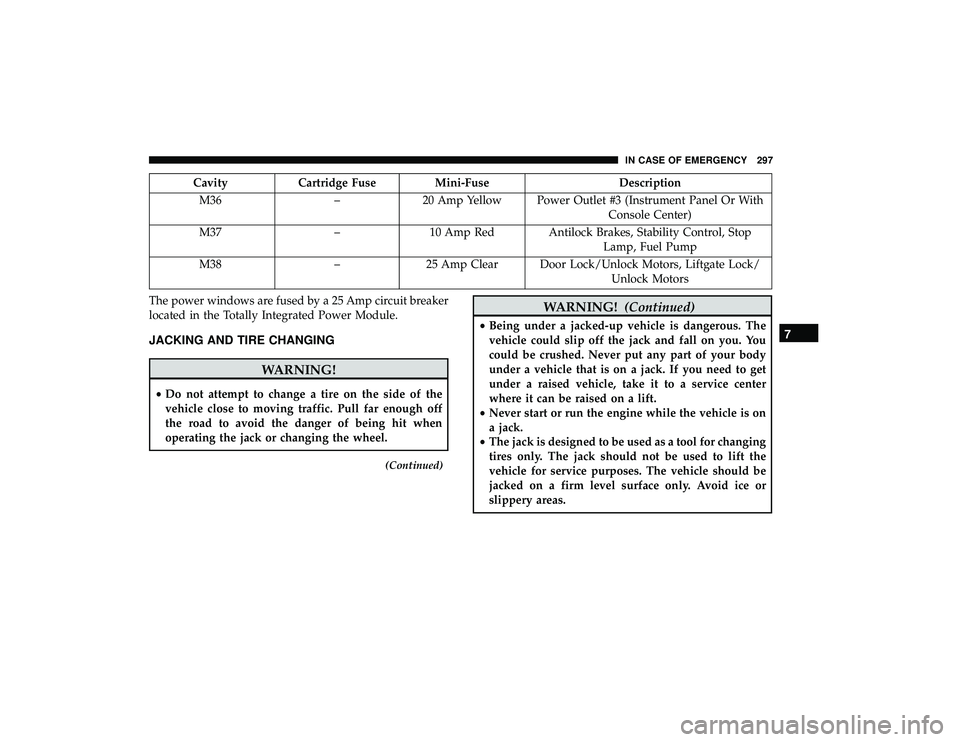
CavityCartridge Fuse Mini-Fuse Description
M36 –20 Amp Yellow Power Outlet #3 (Instrument Panel Or With
Console Center)
M37 –10 Amp Red Antilock Brakes, Stability Control, Stop
Lamp, Fuel Pump
M38 –25 Amp Clear Door Lock/Unlock Motors, Liftgate Lock/
Unlock Motors
The power windows are fused by a 25 Amp circuit breaker
located in the Totally Integrated Power Module.
JACKING AND TIRE CHANGING
WARNING!
• Do not attempt to change a tire on the side of the
vehicle close to moving traffic. Pull far enough off
the road to avoid the danger of being hit when
operating the jack or changing the wheel.
(Continued)
WARNING! (Continued)
•Being under a jacked-up vehicle is dangerous. The
vehicle could slip off the jack and fall on you. You
could be crushed. Never put any part of your body
under a vehicle that is on a jack. If you need to get
under a raised vehicle, take it to a service center
where it can be raised on a lift.
• Never start or run the engine while the vehicle is on
a jack.
• The jack is designed to be used as a tool for changing
tires only. The jack should not be used to lift the
vehicle for service purposes. The vehicle should be
jacked on a firm level surface only. Avoid ice or
slippery areas.7
IN CASE OF EMERGENCY 297
Page 356 of 490
If an examination of your engine compartment shows no
evidence of radiator or hose leaks, the vehicle may be
safely driven. The vapor will soon dissipate.
•Do not overfill the coolant expansion bottle.
• Check the coolant freeze point in the radiator and in the
coolant expansion bottle. If engine coolant (antifreeze)
needs to be added, the contents of the coolant expansion
bottle must also be protected against freezing.
• If frequent engine coolant (antifreeze) additions are
required, the cooling system should be pressure tested
for leaks.
• Maintain engine coolant (antifreeze) concentration at a
minimum of 50% OAT coolant (conforming to
MS.90032) and distilled water for proper corrosion pro-
tection of your engine which contains aluminum com-
ponents.
• Make sure that the coolant expansion bottle overflow
hoses are not kinked or obstructed.
• Keep the front of the radiator clean. If your vehicle is
equipped with air conditioning, keep the front of the
condenser clean. •
Do not change the thermostat for Summer or Winter
operation. If replacement is ever necessary, install ONLY
the correct type thermostat. Other designs may result in
unsatisfactory engine coolant (antifreeze) performance,
poor gas mileage, and increased emissions.
Brake System
In order to assure brake system performance, all brake
system components should be inspected periodically. Refer
to the “Maintenance Plan” in this section for the proper
maintenance intervals.
WARNING!
Riding the brakes can lead to brake failure and possi-
bly a collision. Driving with your foot resting or riding
on the brake pedal can result in abnormally high brake
temperatures, excessive lining wear, and possible
brake damage. You would not have your full braking
capacity in an emergency.
354 SERVICING AND MAINTENANCE
Page 357 of 490
Master Cylinder — Brake Fluid Level Check
The fluid level in the master cylinder should be checked
when performing underhood services, or immediately if
the “Brake System Warning Light” indicates system failure.
Clean the top of the master cylinder area before removing
the cap. Add fluid to bring the level up to the top of the
“FULL” mark on the side of the master cylinder reservoir.
Overfilling of fluid is not recommended because it may
cause leaking in the system.
Add enough fluid to bring the level up to the requirements
described on the brake fluid reservoir. With disc brakes,
fluid level can be expected to fall as the brake pads wear.
However, low fluid level may be caused by a leak and a
checkup may be needed.
Use only manufacturer’s recommended brake fluid. Refer
to “Fluids And Lubricants” in “Technical Specifications”
for further information.
WARNING!
•Use only manufacturer’s recommended brake fluid.
Refer to “Fluids And Lubricants” in “Technical
Specifications” for further information. Using the
wrong type of brake fluid can severely damage your
brake system and/or impair its performance. The
proper type of brake fluid for your vehicle is also
identified on the original factory installed hydraulic
master cylinder reservoir.
• To avoid contamination from foreign matter or mois-
ture, use only new brake fluid or fluid that has been
in a tightly closed container. Keep the master cylin-
der reservoir cap secured at all times. Brake fluid in
a open container absorbs moisture from the air
resulting in a lower boiling point. This may cause it
to boil unexpectedly during hard or prolonged brak-
ing, resulting in sudden brake failure. This could
result in a collision.
• Overfilling the brake fluid reservoir can result in
spilling brake fluid on hot engine parts, causing the
brake fluid to catch fire. Brake fluid can also damage
painted and vinyl surfaces, care should be taken to
avoid its contact with these surfaces.
(Continued)
8
SERVICING AND MAINTENANCE 355
Page 379 of 490
Wheel And Wheel Trim Care
All wheels and wheel trim, especially aluminum and chrome
plated wheels, should be cleaned regularly using mild (neu-
tral Ph) soap and water to maintain their luster and to
prevent corrosion. Wash wheels with the same soap solution
recommended for the body of the vehicle and remember to
always wash when the surfaces are not hot to the touch.
Your wheels are susceptible to deterioration caused by salt,
sodium chloride, magnesium chloride, calcium chloride,
etc., and other road chemicals used to melt ice or control
dust on dirt roads. Use a soft cloth or sponge and mild soap
to wipe away promptly. Do not use harsh chemicals or a
stiff brush. They can damage the wheel’s protective coating
that helps keep them from corroding and tarnishing.
CAUTION!
Avoid products or automatic car washes that use acidic
solutions or strong alkaline additives or harsh brushes.
Many aftermarket wheel cleaners and automatic car
washes may damage the wheel’s protective finish.
Such damage is not covered by the New Vehicle
Limited Warranty. Only car wash soap, Mopar Wheel
Cleaner or equivalent is recommended.When cleaning extremely dirty wheels including excessive
brake dust, care must be taken in the selection of tire and
wheel cleaning chemicals and equipment to prevent dam-
age to the wheels. Mopar Wheel Treatment or Mopar
Chrome Cleaner or their equivalent is recommended or
select a non-abrasive, non-acidic cleaner for aluminum or
chrome wheels.
CAUTION!
Do not use scouring pads, steel wool, a bristle brush,
metal polishes or oven cleaner. These products may
damage the wheel’s protective finish. Such damage is
not covered by the New Vehicle Limited Warranty.
Only car wash soap, Mopar Wheel Cleaner or equiva-
lent is recommended.
NOTE: If you intend parking or storing your vehicle for an
extended period after cleaning the wheels with wheel
cleaner, drive your vehicle and apply the brakes to remove
the water droplets from the brake components. This activ-
ity will remove the red rust on the brake rotors and prevent
vehicle vibration when braking.
8
SERVICING AND MAINTENANCE 377
Page 391 of 490

In the event power assist is lost for any reason (i.e.,
repeated brake applications with the engine OFF) the
brakes will still function. However, the effort required to
brake the vehicle will be much greater than that required
with the power system operating.
WHEEL AND TIRE TORQUE SPECIFICATIONS
Proper lug nut/bolt torque is very important to ensure that
the wheel is properly mounted to the vehicle. Any time a
wheel has been removed and reinstalled on the vehicle, the
lug nuts/bolts should be torqued using a properly cali-
brated torque wrench using a high quality six sided (hex)
deep wall socket.
Torque Specifications
Lug Nut/BoltTorque **Lug Nut/Bolt
Size Lug Nut/Bolt
Socket Size
100 Ft-Lbs (135 N·m) M12 x 1.5 19 mm
**Use only your authorized dealer recommended lug nuts/
bolts and clean or remove any dirt or oil before tightening.
Inspect the wheel mounting surface prior to mounting the
tire and remove any corrosion or loose particles. Tighten the lug nuts/bolts in a star pattern until each
nut/bolt has been tightened twice. Ensure that the socket is
fully engaged on the lug nut/bolt (do not insert it half-
way).
Wheel Mounting Surface
9
TECHNICAL SPECIFICATIONS 389
Page 474 of 490
About Your Brakes........................ .388
Adding Engine Coolant (Antifreeze) .............352
Adding Fuel ............................. .267
Adding Washing Fluid ...................... .340
Additives, Fuel ........................... .391
Adjust Down .................................46
Forward ................................46
Rearward ...............................46
Up....................................46
AirBag ................................ .198
Air Bag Operation ....................... .200
Air Bag Warning Light .................... .197
Driver Knee Air Bag ..................... .201
Enhanced Accident Response .............207, 331
Event Data Recorder (EDR) .................332
If Deployment Occurs .................... .206
Knee Impact Bolsters ..................... .201
Maintaining Your Air Bag System .............208
Maintenance ........................... .208
Side Air Bags .......................... .201
Transporting Pets ....................... .233
Air Bag Light ...................... .145, 197, 235
Air Cleaner, Engine (Engine Air Cleaner Filter) ......344
Air Conditioner Maintenance ..................344Air Conditioner Refrigerant
................344, 345
Air Conditioner System ..................... .344
Air Conditioning ............................85
Automatic Rear ...........................80
Rear ..................................72
Air Conditioning Filter ................... .88, 345
Air Conditioning, Operating Tips ................86
Air Filter ............................... .344
Air Pressure Tires................................. .368
Alarm Arm The System ..........................25
Disarm The System ........................25
Security Alarm ......................... .148
Alterations/Modifications Vehicle .................................5
Antifreeze (Engine Coolant) ................351,
397
Disposal .............................. .353
Anti-Lock Brake System (ABS) .................158
Anti-Lock Warning Light .................... .148
Ashtray ................................ .120
Assistance Towing ......................... .444
Assist, Hill Start .......................... .160
Automatic Dimming Mirror ....................56
Automatic Door Locks ........................29
472 INDEX
Page 483 of 490
Onboard Diagnostic System...................153
Operating Precautions ...................... .153
Operator Manual Owner’s Manual .......................5,470
Outside Rearview Mirrors ...................56, 58
Overhead Console ......................... .108
Overhead Travel Information Center .............108
Overheating, Engine ....................... .327
Owner ’s Manual (Operator Manual) ...............5
Paint Care ............................... .381
Parking Brake ............................ .243
ParkSense System, Rear ..................... .258
Personal Settings .......................... .139
Pets ................................... .233
Phone, Hands-Free (Uconnect) .................432
Placard, Tire And Loading Information ...........363
Power Brakes ............................... .388
Door Locks ..............................28
Inverter ...............................119
Mirrors ................................59
Outlet (Auxiliary Electrical Outlet) ............115
Seats ..................................45
Steering .............................. .254Vent Windows
...........................89
Power Seats Down .................................46
Forward ................................46
Rearward ...............................46
Up....................................46
Pregnant Women And Seat Belts ................192
Preparation For Jacking ..................... .303
Pretensioners Seat Belts ............................. .192
Programmable Electronic Features ...............139
Radial Ply Tires ........................... .369
Radiator Cap (Coolant Pressure Cap) .............353
Radio Frequency General Information ................. .20, 23, 24
Radio Operation ....................... .404, 456
Radio Remote Controls ..................... .405
Rear Air Conditioning ........................72
Rear
Camera ............................. .265
Rear Cross Path ........................... .172
Rear ParkSense System ..................... .258
Reclining Rear Seats .........................34
Recreational Towing ........................ .281
Reformulated Gasoline ...................... .391
12
INDEX 481