DODGE GRAND CARAVAN 2019 Service Manual
Manufacturer: DODGE, Model Year: 2019, Model line: GRAND CARAVAN, Model: DODGE GRAND CARAVAN 2019Pages: 490, PDF Size: 3.84 MB
Page 41 of 490
WARNING!
•In a collision, you or others in your vehicle could be
injured if seats are not properly latched to their floor
attachments. Always be sure the seats are fully
latched.
• Sitting in a seat with the head restraint in its lowered
position could result in serious injury or death in a
collision. Always make sure the head restraints are in
their upright positions when the seat is to be occu-
pied.
Stow ’n Go Seat — Folded And Latched Position
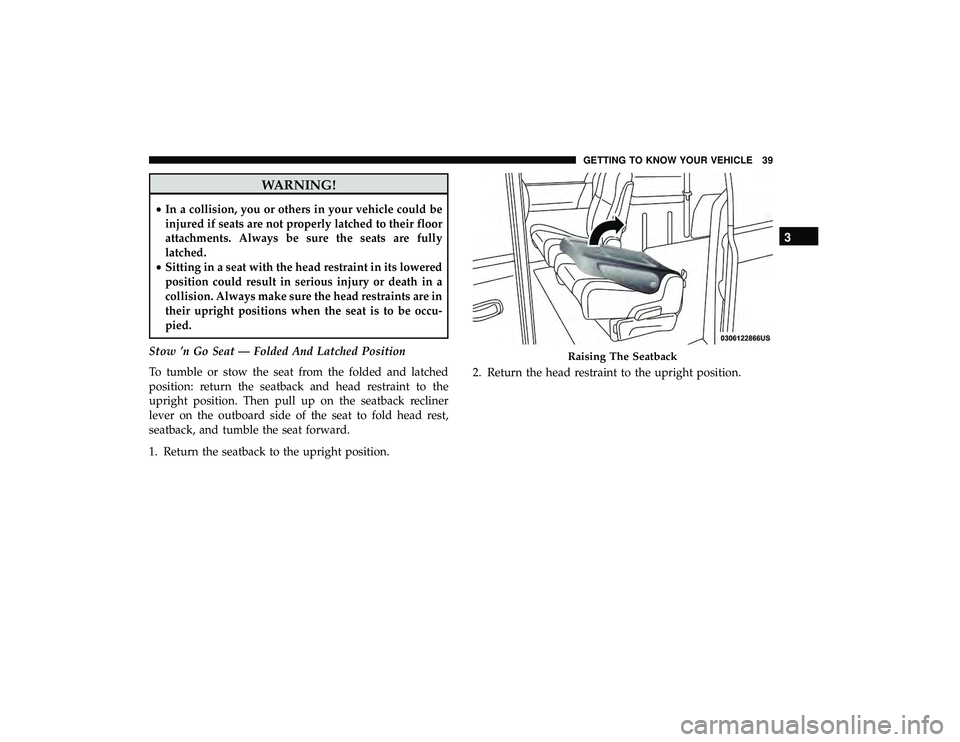
To tumble or stow the seat from the folded and latched
position: return the seatback and head restraint to the
upright position. Then pull up on the seatback recliner
lever on the outboard side of the seat to fold head rest,
seatback, and tumble the seat forward.
1. Return the seatback to the upright position. 2. Return the head restraint to the upright position.
Raising The Seatback
3
GETTING TO KNOW YOUR VEHICLE 39
Page 42 of 490
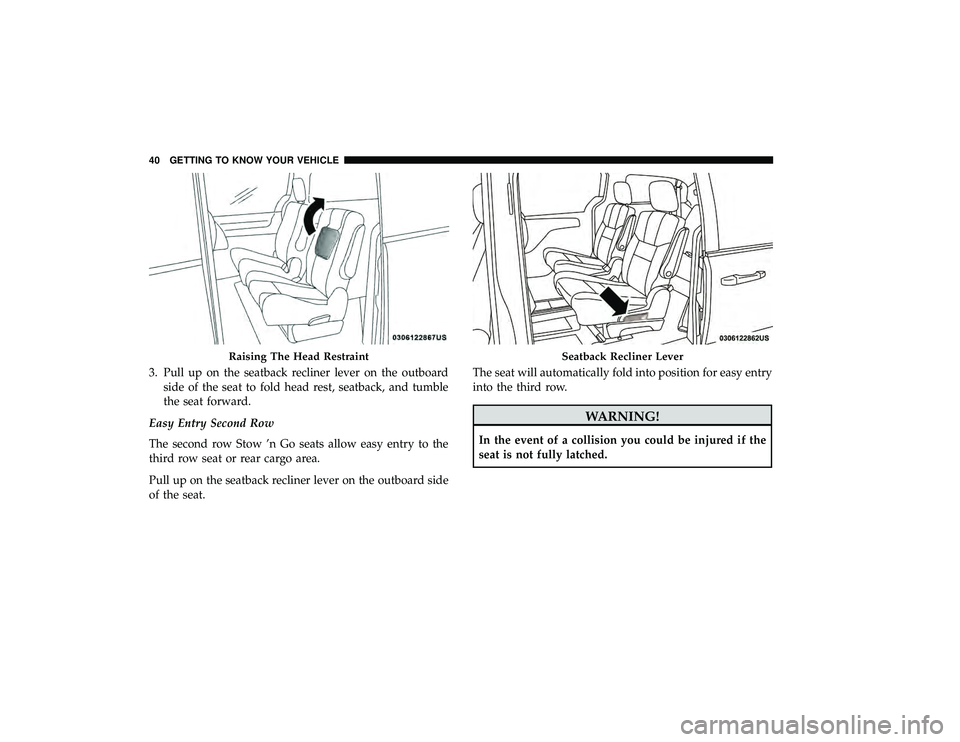
3. Pull up on the seatback recliner lever on the outboardside of the seat to fold head rest, seatback, and tumble
the seat forward.
Easy Entry Second Row
The second row Stow ’n Go seats allow easy entry to the
third row seat or rear cargo area.
Pull up on the seatback recliner lever on the outboard side
of the seat. The seat will automatically fold into position for easy entry
into the third row.
WARNING!
In the event of a collision you could be injured if the
seat is not fully latched.
Raising The Head RestraintSeatback Recliner Lever
40 GETTING TO KNOW YOUR VEHICLE
Page 43 of 490
Second Row Bench Seat — If Equipped
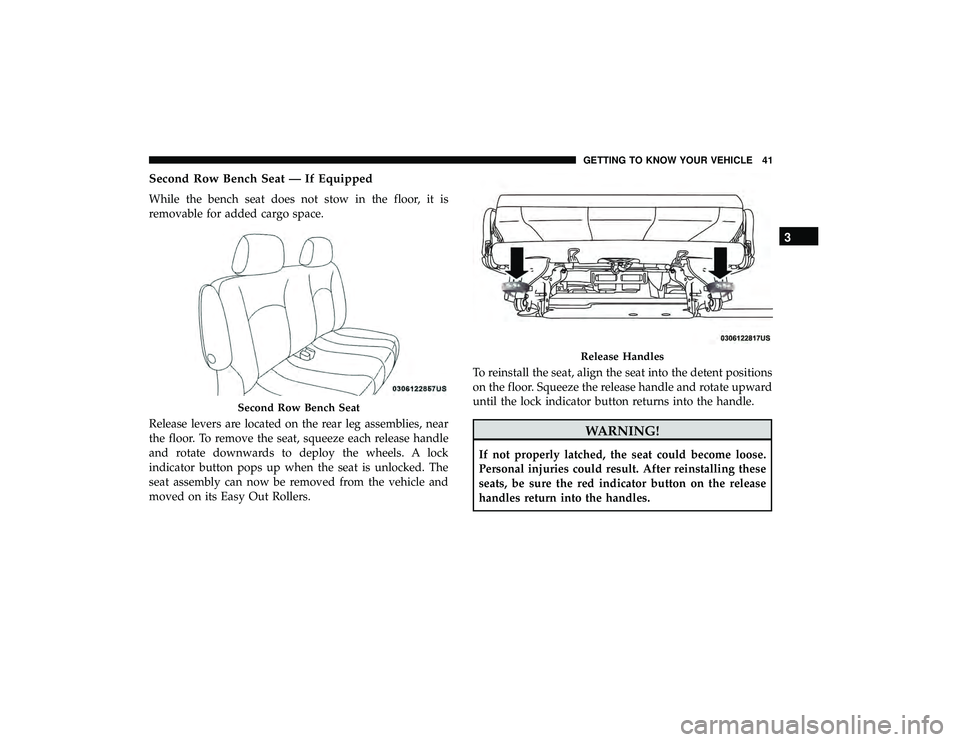
While the bench seat does not stow in the floor, it is
removable for added cargo space.
Release levers are located on the rear leg assemblies, near
the floor. To remove the seat, squeeze each release handle
and rotate downwards to deploy the wheels. A lock
indicator button pops up when the seat is unlocked. The
seat assembly can now be removed from the vehicle and
moved on its Easy Out Rollers.To reinstall the seat, align the seat into the detent positions
on the floor. Squeeze the release handle and rotate upward
until the lock indicator button returns into the handle.
WARNING!
If not properly latched, the seat could become loose.
Personal injuries could result. After reinstalling these
seats, be sure the red indicator button on the release
handles return into the handles.
Second Row Bench Seat
Release Handles
3
GETTING TO KNOW YOUR VEHICLE 41
Page 44 of 490
Manually Folding Third Row Seats — If Equipped
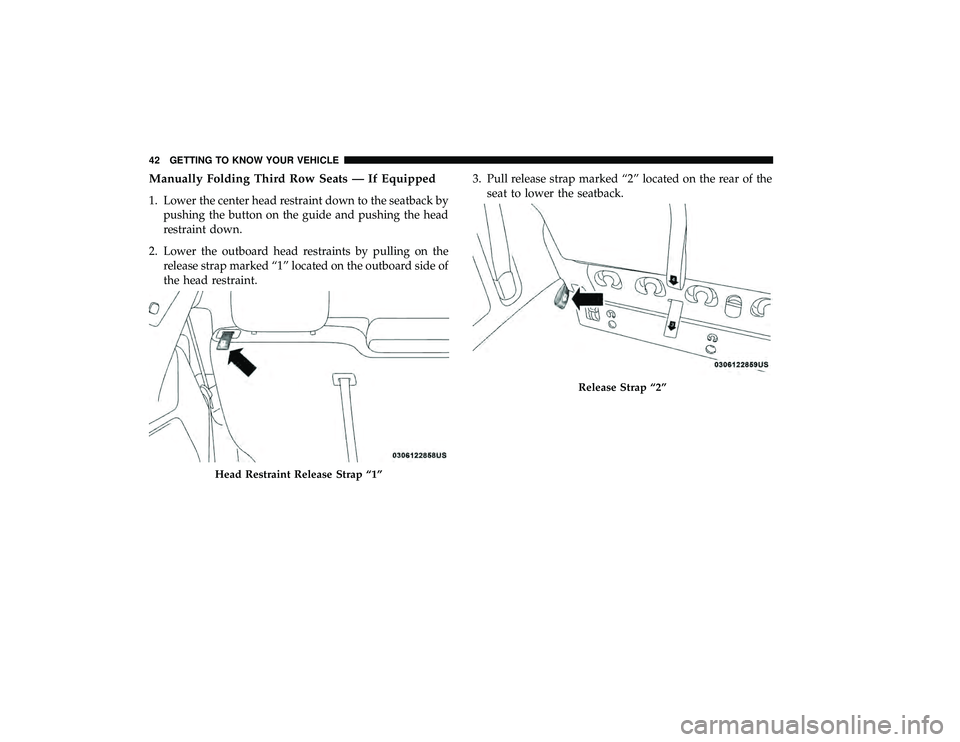
1. Lower the center head restraint down to the seatback bypushing the button on the guide and pushing the head
restraint down.
2. Lower the outboard head restraints by pulling on the release strap marked “1” located on the outboard side of
the head restraint. 3. Pull release strap marked “2” located on the rear of the
seat to lower the seatback.
Head Restraint Release Strap “1”
Release Strap “2”
42 GETTING TO KNOW YOUR VEHICLE
Page 45 of 490
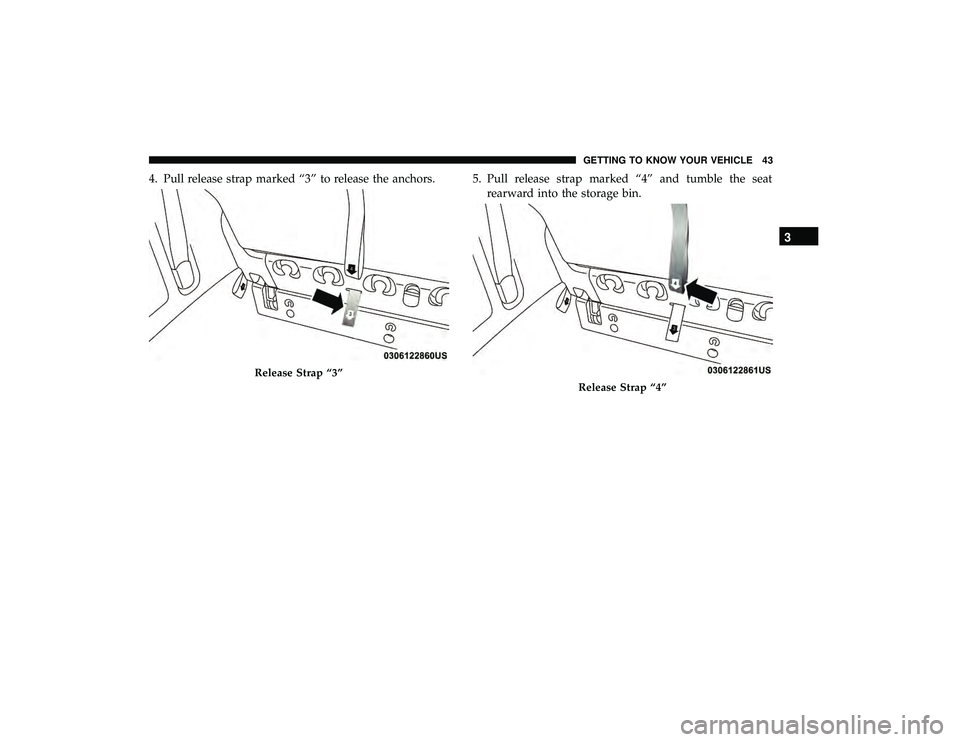
4. Pull release strap marked “3” to release the anchors. 5. Pull release strap marked “4” and tumble the seatrearward into the storage bin.
Release Strap “3”
Release Strap “4”
3
GETTING TO KNOW YOUR VEHICLE 43
Page 46 of 490
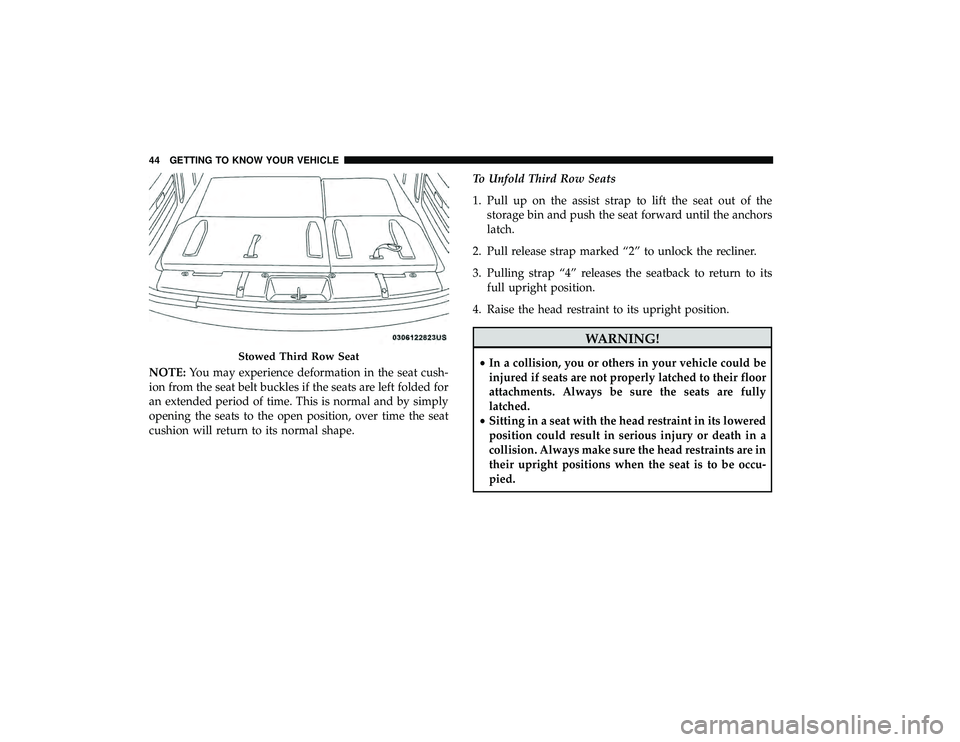
NOTE:You may experience deformation in the seat cush-
ion from the seat belt buckles if the seats are left folded for
an extended period of time. This is normal and by simply
opening the seats to the open position, over time the seat
cushion will return to its normal shape. To Unfold Third Row Seats
1. Pull up on the assist strap to lift the seat out of the
storage bin and push the seat forward until the anchors
latch.
2. Pull release strap marked “2” to unlock the recliner.
3. Pulling strap “4” releases the seatback to return to its full upright position.
4. Raise the head restraint to its upright position.
WARNING!
• In a collision, you or others in your vehicle could be
injured if seats are not properly latched to their floor
attachments. Always be sure the seats are fully
latched.
• Sitting in a seat with the head restraint in its lowered
position could result in serious injury or death in a
collision. Always make sure the head restraints are in
their upright positions when the seat is to be occu-
pied.Stowed Third Row Seat
44 GETTING TO KNOW YOUR VEHICLE
Page 47 of 490
Tailgate Mode
1. Pull release strap “3”, then pull release strap “4” torotate the entire seat rearward.
2. To restore the seat to its upright position, lift up on the seatback and push forward until the anchors latch.
WARNING!
To avoid serious injury or death, never operate the
vehicle with occupants in the third row seat while in
the tailgate mode.
Power Seats — If Equipped
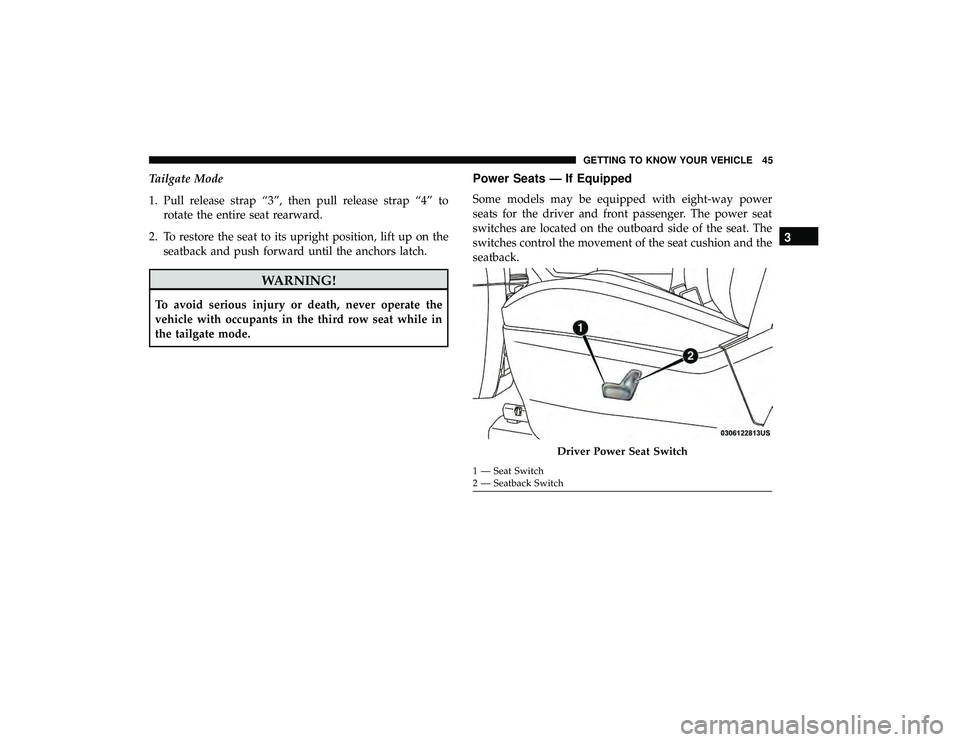
Some models may be equipped with eight-way power
seats for the driver and front passenger. The power seat
switches are located on the outboard side of the seat. The
switches control the movement of the seat cushion and the
seatback.
Driver Power Seat Switch
1 — Seat Switch
2 — Seatback Switch
3
GETTING TO KNOW YOUR VEHICLE 45
Page 48 of 490
WARNING!
•Adjusting a seat while driving may be dangerous.
Moving a seat while driving could result in loss of
control which could cause a collision and serious
injury or death.
• Seats should be adjusted before fastening the seat
belts and while the vehicle is parked. Serious injury
or death could result from a poorly adjusted seat belt.
• Do not ride with the seatback reclined so that the
shoulder belt is no longer resting against your chest.
In a collision you could slide under the seat belt,
which could result in serious injury or death.
CAUTION!
Do not place any article under a power seat or impede
its ability to move as it may cause damage to the seat
controls. Seat travel may become limited if movement
is stopped by an obstruction in the seat’s path.
Adjusting The Seat Forward Or Rearward
The seat can be adjusted both forward and rearward. Push
the seat switch forward or rearward. The seat will move in
the direction of the switch. Release the switch when the
desired position has been reached.
Adjusting The Seat Up Or Down
The height of the seats can be adjusted up or down. Pull
upward or push downward on the rear of seat switch, the
seat will move in the direction of the switch. Release the
switch when the desired position has been reached.
Tilting The Seat Up Or Down
The angle of the seat cushion can be adjusted in two
directions. Pull upward or push downward on the front of
the seat switch, the front of the seat cushion will move in
the direction of the switch. Release the switch when the
desired position has been reached.
Reclining The Seatback
The angle of the seatback can be adjusted forward or
rearward. Push the seatback switch forward or rearward,
the seat will move in the direction of the switch. Release the
switch when the desired position is reached.
46 GETTING TO KNOW YOUR VEHICLE
Page 49 of 490
WARNING!
•Adjusting a seat while driving may be dangerous.
Moving a seat while driving could result in loss of
control which could cause a collision and serious
injury or death.
• Seats should be adjusted before fastening the seat
belts and while the vehicle is parked. Serious injury
or death could result from a poorly adjusted seat belt.
• Do not ride with the seatback reclined so that the
shoulder belt is no longer resting against your chest.
In a collision you could slide under the seat belt,
which could result in serious injury or death.
CAUTION!
Do not place any article under a power seat or impede
its ability to move as it may cause damage to the seat
controls. Seat travel may become limited if movement
is stopped by an obstruction in the seat’s path.
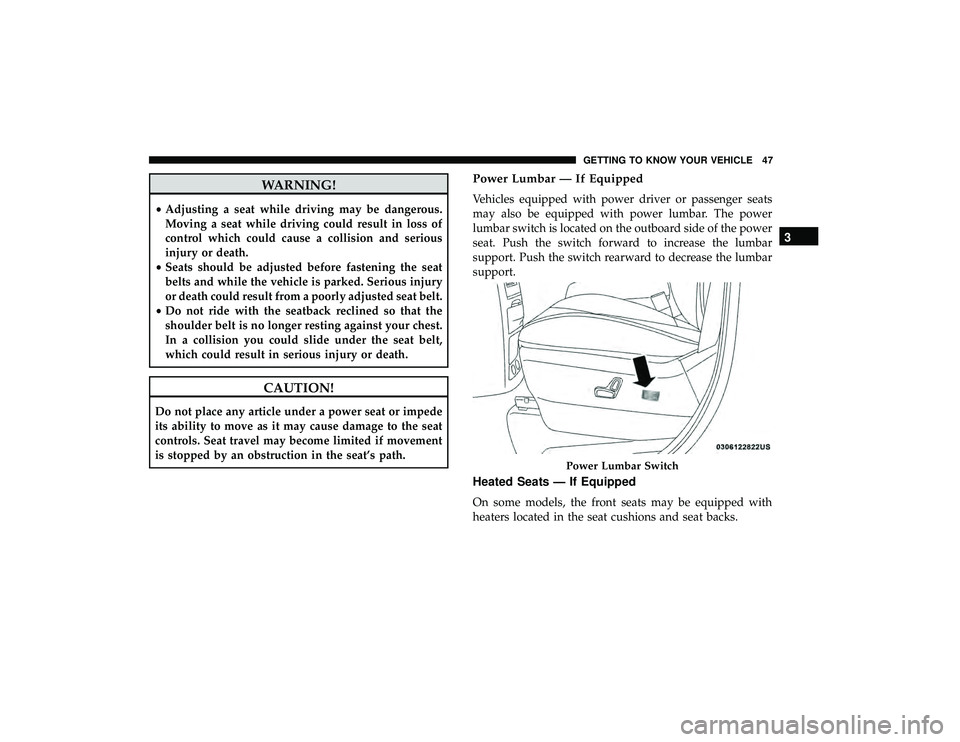
Power Lumbar — If Equipped
Vehicles equipped with power driver or passenger seats
may also be equipped with power lumbar. The power
lumbar switch is located on the outboard side of the power
seat. Push the switch forward to increase the lumbar
support. Push the switch rearward to decrease the lumbar
support.
Heated Seats — If Equipped
On some models, the front seats may be equipped with
heaters located in the seat cushions and seat backs.
Power Lumbar Switch
3
GETTING TO KNOW YOUR VEHICLE 47
Page 50 of 490

WARNING!
•Persons who are unable to feel pain to the skin
because of advanced age, chronic illness, diabetes,
spinal cord injury, medication, alcohol use, exhaus-
tion or other physical condition must exercise care
when using the seat heater. It may cause burns even
at low temperatures, especially if used for long
periods of time.
• Do not place anything on the seat or seatback that
insulates against heat, such as a blanket or cushion.
This may cause the seat heater to overheat. Sitting in
a seat that has been overheated could cause serious
burns due to the increased surface temperature of the
seat.
Front Heated Seats
There are two heated seat switches that allow the driver
and passenger to operate the seats independently. The
controls for each heater are located on the switch bank
below the climate controls.
You can choose from HI, LO or OFF heat settings. Amber
indicator lights in each switch indicate the level of heat in
use. Two indicator lights will illuminate for HI, one for LO
and none for OFF. •
Push the heated seat button
once to turn the HI
setting on.
• Push the heated seat buttona second time to turn
the LO setting on.
• Push the heated seat buttona third time to turn the
heating elements off.
NOTE: Once a heat setting is selected, heat will be felt
within two to five minutes.
If the HI-level setting is selected, the system will automati-
cally switch to LO-level after approximately 60 minutes of
continuous operation. At that time, the display will change
from HI to LO, indicating the change. The LO-level setting
will turn off automatically after approximately 45 minutes.
Vehicles Equipped With Remote Start
On models that are equipped with remote start, the heated
seats can be programmed to come on during a remote start.
This feature can be programmed through the instrument
cluster display. Refer to “Instrument Cluster Display” in
“Getting To Know Your Instrument Panel” for further
information.
48 GETTING TO KNOW YOUR VEHICLE