parking brake DODGE GRAND CARAVAN 2020 Owners Manual
[x] Cancel search | Manufacturer: DODGE, Model Year: 2020, Model line: GRAND CARAVAN, Model: DODGE GRAND CARAVAN 2020Pages: 380, PDF Size: 14.92 MB
Page 19 of 380
GETTING TO KNOW YOUR VEHICLE17
(Continued)
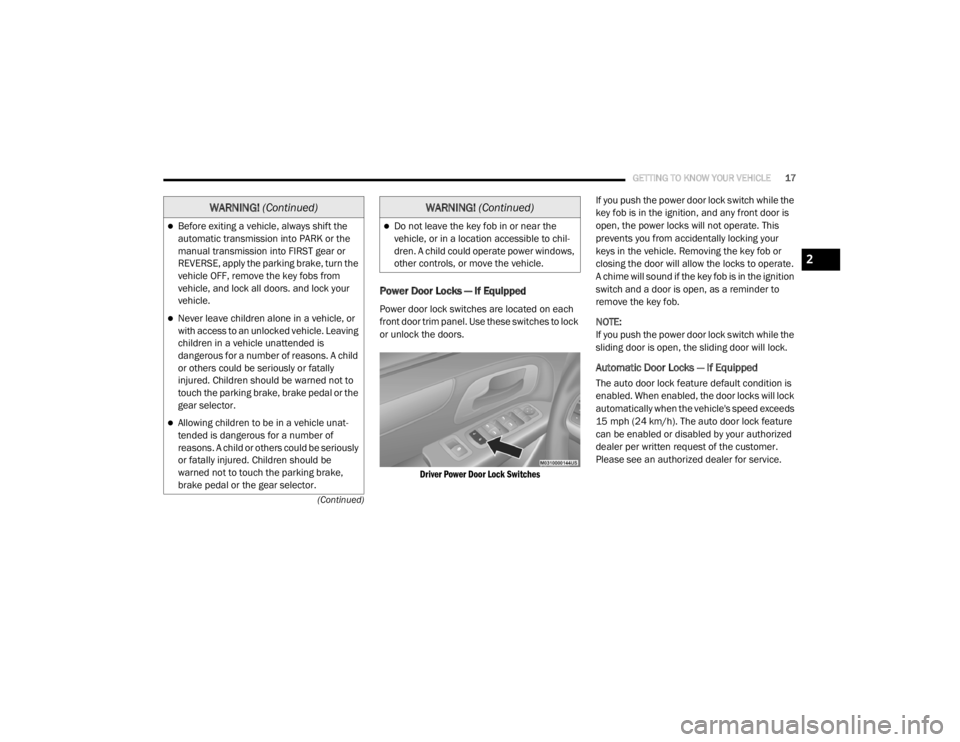
Power Door Locks — If Equipped
Power door lock switches are located on each
front door trim panel. Use these switches to lock
or unlock the doors.
Driver Power Door Lock Switches
If you push the power door lock switch while the
key fob is in the ignition, and any front door is
open, the power locks will not operate. This
prevents you from accidentally locking your
keys in the vehicle. Removing the key fob or
closing the door will allow the locks to operate.
A chime will sound if the key fob is in the ignition
switch and a door is open, as a reminder to
remove the key fob.
NOTE:
If you push the power door lock switch while the
sliding door is open, the sliding door will lock.
Automatic Door Locks — If Equipped
The auto door lock feature default condition is
enabled. When enabled, the door locks will lock
automatically when the vehicle's speed exceeds
15 mph (24 km/h). The auto door lock feature
can be enabled or disabled by your authorized
dealer per written request of the customer.
Please see an authorized dealer for service.
Before exiting a vehicle, always shift the
automatic transmission into PARK or the
manual transmission into FIRST gear or
REVERSE, apply the parking brake, turn the
vehicle OFF, remove the key fobs from
vehicle, and lock all doors. and lock your
vehicle.
Never leave children alone in a vehicle, or
with access to an unlocked vehicle. Leaving
children in a vehicle unattended is
dangerous for a number of reasons. A child
or others could be seriously or fatally
injured. Children should be warned not to
touch the parking brake, brake pedal or the
gear selector.
Allowing children to be in a vehicle unat
-
tended is dangerous for a number of
reasons. A child or others could be seriously
or fatally injured. Children should be
warned not to touch the parking brake,
brake pedal or the gear selector.
WARNING! (Continued)
Do not leave the key fob in or near the
vehicle, or in a location accessible to chil-
dren. A child could operate power windows,
other controls, or move the vehicle.
WARNING! (Continued)
2
20_RT_OM_EN_USC_t.book Page 17
Page 40 of 380

38GETTING TO KNOW YOUR VEHICLE
Daytime Running Lights (DRLs) — If
Equipped
The headlights on your vehicle will illuminate
when the engine is started and the
transmission is in any gear except PARK. This
provides a constant "lights on" condition until
the ignition is placed in the OFF position. The
lights illuminate at less than half of normal
intensity. If the parking brake is applied, the
Daytime Running Lights (DRLs) will turn off.
Also, if a turn signal is activated, the DRL lamp
on the same side of the vehicle may turn off for
the duration of the turn signal activation. Once
the turn signal is no longer active, the DRL lamp
will illuminate.
High/Low Beam Switch
Push the multifunction lever toward the
instrument panel to switch the headlights to
high beams. Pulling the multifunction lever
back toward the steering wheel will return the
lights to low beams.
Flash-To-Pass
You can signal another vehicle with your
headlights by lightly pulling the multifunction
lever toward you. This will cause the high beam
headlights to turn on, and remain on, until the
lever is released.
Automatic Headlights
This system automatically turns the headlights
on or off according to ambient light levels. To
turn the system on, rotate the headlight switch
counterclockwise to the AUTO position. When
the system is on, the headlight time delay
feature is also on. This means the headlights
will stay on for up to 90 seconds after you place
the ignition into the OFF position. The headlight
time delay can be programmed to 0, 30, 60, or
90 seconds. Refer to “Headlight Delay” in this
section for further information.
To turn the automatic system off, move the
headlight switch out of the AUTO position.
NOTE:
The engine must be running before the
headlights will come on in the automatic mode.
Headlights On With Wipers — If Equipped
When your headlights are in the AUTO mode
and the engine is running, the headlights will
automatically turn on when the wiper system is
also turned on. Headlights on when windshield
wipers are on may be found on vehicles
equipped with an automatic headlight system.
NOTE:
The Headlights with Wipers feature can be
turned on or off through the instrument cluster
display. Refer to “Instrument Cluster Display” in
“Getting To Know Your Instrument Panel” for
further information.
Headlight Delay — If Equipped
This feature provides the safety of headlight
illumination for up to 90 seconds after exiting
your vehicle.
To activate the delay feature, place the ignition
in the OFF position while the headlights are still
on. Then turn off the headlights within 45
seconds. The 90 second delay interval begins
when the headlight switch is turned off. If the
headlights or parking lights are turned back on
or the ignition switch is placed in the ON
position, the delay will be cancelled.
20_RT_OM_EN_USC_t.book Page 38
Page 96 of 380
94GETTING TO KNOW YOUR INSTRUMENT PANEL
WARNING LIGHTS AND MESSAGES
The warning/indicator lights will illuminate in
the instrument panel together with a dedicated
message and/or acoustic signal when
applicable. These indications are indicative and
precautionary and as such must not be
considered as exhaustive and/or alternative to
the information contained in the Owner’s
Manual, which you are advised to read carefully
in all cases. Always refer to the information in
this chapter in the event of a failure indication.
All active telltales will display first if applicable.
The system check menu may appear different
based upon equipment options and current
vehicle status. Some telltales are optional and
may not appear.
Red Warning Lights
Air Bag Warning Light
This warning light will illuminate to
indicate a fault with the air bag, and
will turn on for four to eight seconds
as a bulb check when the ignition is
placed in the ON/RUN or ACC/ON/RUN
position. This light will illuminate with a single
chime when a fault with the air bag has been
detected, it will stay on until the fault is cleared. If the light is either not on during startup, stays
on, or turns on while driving, have the system
inspected at an authorized dealer as soon as
possible.
Brake Warning Light
This warning light monitors various
brake functions, including brake fluid
level and parking brake application. If
the brake light turns on it may
indicate that the parking brake is applied, that
the brake fluid level is low, or that there is a
problem with the anti-lock brake system
reservoir.
If the light remains on when the parking brake
has been disengaged, and the fluid level is at
the full mark on the master cylinder reservoir, it
indicates a possible brake hydraulic system
malfunction or that a problem with the Brake
Booster has been detected by the Anti-Lock
Brake System (ABS) / Electronic Stability
Control (ESC) system. In this case, the light will
remain on until the condition has been
corrected. If the problem is related to the brake
booster, the ABS pump will run when applying
the brake, and a brake pedal pulsation may be
felt during each stop. The dual brake system provides a reserve
braking capacity in the event of a failure to a
portion of the hydraulic system. A leak in either
half of the dual brake system is indicated by the
Brake Warning Light, which will turn on when
the brake fluid level in the master cylinder has
dropped below a specified level.
The light will remain on until the cause is
corrected.
NOTE:
The light may flash momentarily during sharp
cornering maneuvers, which change fluid level
conditions. The vehicle should have service
performed, and the brake fluid level checked.
If brake failure is indicated, immediate repair is
necessary.
WARNING!
Driving a vehicle with the red brake light on is
dangerous. Part of the brake system may
have failed. It will take longer to stop the
vehicle. You could have a collision. Have the
vehicle checked immediately.
20_RT_OM_EN_USC_t.book Page 94
Page 97 of 380
GETTING TO KNOW YOUR INSTRUMENT PANEL95
Vehicles equipped with the Anti-Lock Brake
System (ABS) are also equipped with Electronic
Brake Force Distribution (EBD). In the event of
an EBD failure, the Brake Warning Light will turn
on along with the ABS Light. Immediate repair to
the ABS system is required.
Operation of the Brake Warning Light can be
checked by turning the ignition switch from the
OFF position to the ON/RUN position. The light
should illuminate for approximately two
seconds. The light should then turn off unless
the parking brake is applied or a brake fault is
detected. If the light does not illuminate, have
the light inspected by an authorized dealer.
The light also will turn on when the parking
brake is applied with the ignition switch in the
ON/RUN position.
NOTE:
This light shows only that the parking brake is
applied. It does not show the degree of brake
application.Battery Charge Warning Light
This warning light will illuminate when
the battery is not charging properly. If
it stays on while the engine is running,
there may be a malfunction with the
charging system. Contact an authorized dealer
as soon as possible.
This indicates a possible problem with the
electrical system or a related component.
Door Open Warning Light — If Equipped
This indicator will illuminate when a
door is ajar/open and not fully closed.
NOTE:
If the vehicle is moving, there will also be a
single chime.
Electronic Throttle Control (ETC) Warning
Light
This warning light will illuminate to
indicate a problem with the Electronic
Throttle Control (ETC) system. If a
problem is detected while the vehicle
is running, the light will either stay on or flash
depending on the nature of the problem. Cycle
the ignition when the vehicle is safely and
completely stopped and the transmission is placed in the PARK position. The light should
turn off. If the light remains on with the vehicle
running, your vehicle will usually be drivable;
however, see an authorized dealer for service
as soon as possible.
NOTE:
This light may turn on if the accelerator and
brake pedals are pressed at the same time.
If the light continues to flash when the vehicle is
running, immediate service is required and you
may experience reduced performance, an
elevated/rough idle, or engine stall and your
vehicle may require towing. The light will come
on when the ignition is placed in the ON/RUN or
ACC/ON/RUN position and remain on briefly as
a bulb check. If the light does not come on
during starting, have the system checked by an
authorized dealer.
3
20_RT_OM_EN_USC_t.book Page 95
Page 110 of 380
108SAFETY
The “ESC OFF Indicator Light”
indicates the customer has elected to
have the Electronic Stability Control
(ESC) in a reduced mode.
Hill Start Assist (HSA)
The Hill Start Assist (HSA) system is designed to
mitigate roll back from a complete stop while on
an incline. If the driver releases the brake while
stopped on an incline, HSA will continue to hold
the brake pressure for a short period. If the
driver does not apply the throttle before this
time expires, the system will release brake
pressure and the vehicle will roll down the hill as
normal.
The following conditions must be met in order
for HSA to activate:
The feature must be enabled.
The vehicle must be stopped.
The park brake must be off.
The driver door must be closed.
The vehicle must be on a sufficient grade.
The gear selection must match vehicle uphill
direction (i.e., vehicle facing uphill is in
forward gear; vehicle backing uphill is in
REVERSE gear).
HSA will work in REVERSE gear and all
forward gears. The system will not activate if
the transmission is in PARK or NEUTRAL. For
vehicles equipped with a manual transmis -
sion, if the clutch is pressed, HSA will remain
active.
Towing With HSA
HSA will also provide assistance to mitigate roll
back while towing a trailer.
WARNING!
There may be situations where the Hill Start
Assist (HSA) will not activate and slight rolling
may occur, such as on minor hills or with a
loaded vehicle, or while pulling a trailer. HSA
is not a substitute for active driving
involvement. It is always the driver’s
responsibility to be attentive to distance to
other vehicles, people, and objects, and most
importantly brake operation to ensure safe
operation of the vehicle under all road
conditions. Your complete attention is always
required while driving to maintain safe control
of your vehicle. Failure to follow these
warnings can result in a collision or serious
personal injury.
WARNING!
If you use a trailer brake controller with your
trailer, the trailer brakes may be activated
and deactivated with the brake switch. If
so, there may not be enough brake pres -
sure to hold both the vehicle and the trailer
on a hill when the brake pedal is released.
In order to avoid rolling down an incline
while resuming acceleration, manually acti -
vate the trailer brake or apply more vehicle
brake pressure prior to releasing the brake
pedal.
HSA is not a parking brake. Always apply
the parking brake fully when exiting your
vehicle. Also, be certain to place the trans -
mission in PARK.
Failure to follow these warnings can result
in a collision or serious personal injury.
20_RT_OM_EN_USC_t.book Page 108
Page 111 of 380

SAFETY109
Disabling And Enabling HSA
This feature can be turned on or turned off. To
change the current setting, proceed as follows:
For vehicles equipped with the instrument
cluster display, refer to “Instrument Cluster
Display” in “Getting To Know Your Instrument
Panel” for further information.
For vehicles not equipped with the instrument
cluster display, perform the following steps:
1. Center the steering wheel (front wheels
pointing straight forward).
2. Shift the transmission into PARK.
3. Apply the parking brake.
4. Start the engine.
5. Rotate the steering wheel slightly more than one-half turn to the left.
6. Push the “ESC OFF” button located in the lower switch bank below the climate control
four times within 20 seconds. The “ESC OFF
Indicator Light” should turn on and turn off
two times.
7. Rotate the steering wheel back to center and then an additional slightly more than
one-half turn to the right. 8. Place the ignition switch to the OFF position
and then back to the ON position. If the
sequence was completed properly, the
“ESC OFF Indicator Light” will blink several
times to confirm HSA is disabled.
9. Repeat these steps if you want to return this feature to its previous setting.
Traction Control System (TCS)
The Traction Control System (TCS) monitors the
amount of wheel spin of each of the driven
wheels. If wheel spin is detected, the TCS may
apply brake pressure to the spinning wheel(s)
and/or reduce vehicle power to provide
enhanced acceleration and stability. A feature
of the TCS, Brake Limited Differential (BLD),
functions similar to a limited slip differential
and controls the wheel spin across a driven
axle. If one wheel on a driven axle is spinning
faster than the other, the system will apply the
brake of the spinning wheel. This will allow more
vehicle torque to be applied to the wheel that is
not spinning. BLD may remain enabled even if
TCS and ESC are in a reduced mode.
Trailer Sway Control (TSC)
Trailer Sway Control (TSC) uses sensors in the
vehicle to recognize an excessively swaying
trailer and will take the appropriate actions to
attempt to stop the sway. TSC will become
active automatically once an excessively
swaying trailer is recognized. Note that TSC
cannot stop all trailers from swaying. Always
use caution when towing a trailer and follow the
trailer tongue weight recommendations. Refer
to “Trailer Towing” in “Starting And Operating”
for further information. When TSC is
functioning, the “ESC Activation/Malfunction
Indicator Light” will flash, the engine power may
be reduced and you may feel the brakes being
applied to individual wheels to attempt to stop
the trailer from swaying. TSC is disabled when
the ESC system is in the “Partial Off” mode.
WARNING!
If TSC activates while driving, slow the vehicle
down, stop at the nearest safe location, and
adjust the trailer load to eliminate trailer
sway.
4
20_RT_OM_EN_USC_t.book Page 109
Page 163 of 380
SAFETY161
(Continued)
Periodic Safety Checks You Should Make
Outside The Vehicle
Tires
Examine tires for excessive tread wear and
uneven wear patterns. Check for stones, nails,
glass, or other objects lodged in the tread or
sidewall. Inspect the tread for cuts and cracks.
Inspect sidewalls for cuts, cracks, and bulges.
Check the wheel nuts for tightness. Check the
tires (including spare) for proper cold inflation
pressure.
Lights
Have someone observe the operation of brake
lights and exterior lights while you work the
controls. Check turn signal and high beam
indicator lights on the instrument panel.
Door Latches
Check for proper closing, latching, and locking.
Fluid Leaks
Check area under the vehicle after overnight
parking for fuel, coolant, oil, or other fluid leaks.
Also, if gasoline fumes are detected or if fuel, or
brake fluid leaks are suspected, the cause
should be located and corrected immediately.
ALWAYS REMOVE THE EXISTING FLOOR
MAT FROM THE VEHICLE before
installing any other floor mat. NEVER install
or stack an additional floor mat on top of an
existing floor mat.
ONLY install floor mats designed to fit your
vehicle. NEVER install a floor mat that
cannot be properly attached and secured to
your vehicle. If a floor mat needs to be
replaced, only use a FCA approved floor
mat for the specific make, model, and year
of your vehicle.
ONLY use the driver’s side floor mat on the
driver’s side floor area. To check for inter -
ference, with the vehicle properly parked
with the engine off, fully depress the accel -
erator, the brake, and the clutch pedal (if
present) to check for interference. If your
floor mat interferes with the operation of
any pedal, or is not secure to the floor,
remove the floor mat from the vehicle and
place the floor mat in your trunk.
ONLY use the passenger’s side floor mat on
the passenger’s side floor area.
WARNING! (Continued)
ALWAYS make sure objects cannot fall or
slide into the driver’s side floor area when
the vehicle is moving. Objects can become
trapped under accelerator, brake, or clutch
pedals and could cause a loss of vehicle
control.
NEVER place any objects under the floor
mat (e.g., towels, keys, etc.). These objects
could change the position of the floor mat
and may cause interference with the accel -
erator, brake, or clutch pedals.
If the vehicle carpet has been removed and
re-installed, always properly attach carpet
to the floor and check the floor mat
fasteners are secure to the vehicle carpet.
Fully depress each pedal to check for inter -
ference with the accelerator, brake, or
clutch pedals then re-install the floor mats.
It is recommended to only use mild soap
and water to clean your floor mats. After
cleaning, always check your floor mat has
been properly installed and is secured to
your vehicle using the floor mat fasteners
by lightly pulling mat.
WARNING! (Continued)
4
20_RT_OM_EN_USC_t.book Page 161
Page 164 of 380
162 (Continued)
STARTING AND OPERATING
STARTING THE ENGINE
Before starting your vehicle, adjust your seat,
adjust both inside and outside mirrors, and
fasten your seat belts. Start the engine with the gear selector in the
NEUTRAL or PARK position. Apply the brake
before shifting to any driving range.
Normal Starting
1. Do not press the accelerator.
2. Use the fob with Integrated Key to briefly turn the ignition switch to the START
position and release it as soon as the
starter engages. The starter motor will
continue to run, and it will disengage
automatically when the engine is running.
3. If the engine fails to start, the starter will disengage automatically in 10 seconds. If
this occurs, turn the ignition switch to the
OFF position, wait 10 to 15 seconds, then
repeat the “Normal Starting” procedure
(Steps 1–3 above).
NOTE:
This vehicle is equipped with a transmission
shift interlocking system. The brake pedal must
be pressed to shift out of PARK.
WARNING!
When exiting the vehicle, always remove
the key fob from the vehicle and lock your
vehicle.
Never leave children alone in a vehicle, or
with access to an unlocked vehicle.
Allowing children to be in a vehicle unat -
tended is dangerous for a number of
reasons. A child or others could be seriously
or fatally injured. Children should be
warned not to touch the parking brake,
brake pedal or the transmission gear
selector.
Do not leave the key fob in or near the
vehicle, or in a location accessible to chil-
dren, and do not leave the ignition in the
ACC or ON/RUN mode. A child could
operate power windows, other controls, or
move the vehicle.
Do not leave children or animals inside
parked vehicles in hot weather. Interior
heat build-up may cause serious injury or
death.
WARNING! (Continued)
20_RT_OM_EN_USC_t.book Page 162
Page 166 of 380
164STARTING AND OPERATING
The engine oil installed in the engine at the
factory is a high-quality energy conserving type
lubricant. Oil changes should be consistent with
anticipated climate conditions under which
vehicle operations will occur. For the
recommended viscosity and quality grades,
refer to “Dealer Service” in “Servicing And
Maintenance”.
NOTE:
A new engine may consume some oil during its
first few thousand miles (kilometers) of
operation. This should be considered a normal
part of the break-in and not interpreted as a
problem.
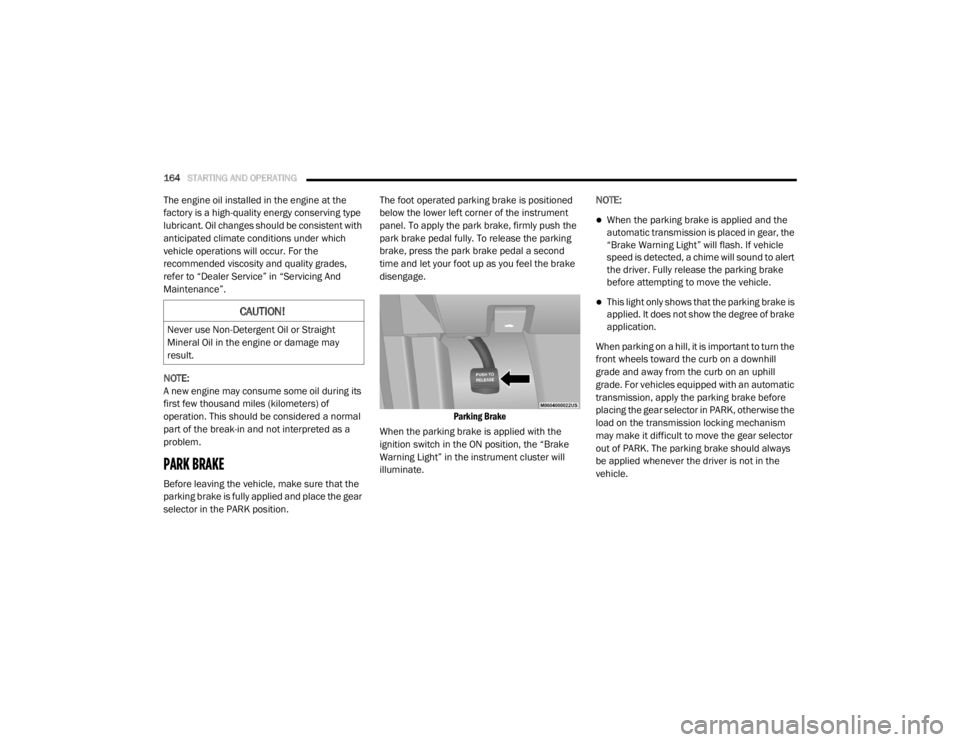
PARK BRAKE
Before leaving the vehicle, make sure that the
parking brake is fully applied and place the gear
selector in the PARK position. The foot operated parking brake is positioned
below the lower left corner of the instrument
panel. To apply the park brake, firmly push the
park brake pedal fully. To release the parking
brake, press the park brake pedal a second
time and let your foot up as you feel the brake
disengage.
Parking Brake
When the parking brake is applied with the
ignition switch in the ON position, the “Brake
Warning Light” in the instrument cluster will
illuminate. NOTE:
When the parking brake is applied and the
automatic transmission is placed in gear, the
“Brake Warning Light” will flash. If vehicle
speed is detected, a chime will sound to alert
the driver. Fully release the parking brake
before attempting to move the vehicle.
This light only shows that the parking brake is
applied. It does not show the degree of brake
application.
When parking on a hill, it is important to turn the
front wheels toward the curb on a downhill
grade and away from the curb on an uphill
grade. For vehicles equipped with an automatic
transmission, apply the parking brake before
placing the gear selector in PARK, otherwise the
load on the transmission locking mechanism
may make it difficult to move the gear selector
out of PARK. The parking brake should always
be applied whenever the driver is not in the
vehicle.CAUTION!
Never use Non-Detergent Oil or Straight
Mineral Oil in the engine or damage may
result.
20_RT_OM_EN_USC_t.book Page 164
Page 167 of 380
STARTING AND OPERATING165
(Continued)
(Continued)
AUTOMATIC TRANSMISSIONWARNING!
When exiting the vehicle, always remove
the key fob from the ignition and lock your
vehicle.
Never leave children alone in a vehicle, or
with access to an unlocked vehicle.
Allowing children to be in a vehicle unat
-
tended is dangerous for a number of
reasons. A child or others could be seriously
or fatally injured. Children should be
warned not to touch the parking brake,
brake pedal or the gear selector.
Do not leave the key fob in or near the
vehicle (or in a location accessible to chil -
dren), and do not leave the ignition in the
ACC or ON/ RUN mode. A child could
operate power windows, other controls, or
move the vehicle.
Be sure the parking brake is fully disen -
gaged before driving; failure to do so can
lead to brake failure and a collision.
Always fully apply the parking brake when
leaving your vehicle, or it may roll and
cause damage or injury. Also be certain to
leave the transmission in PARK. Failure to
do so may allow the vehicle to roll and
cause damage or injury.
CAUTION!
If the Brake System Warning Light remains on
with the parking brake released, a brake
system malfunction is indicated. Have the
brake system serviced by an authorized
dealer immediately.
WARNING! (Continued)
WARNING!
It is dangerous to shift out of PARK or
NEUTRAL if the engine speed is higher than
idle speed. If your foot is not firmly pressing
the brake pedal, the vehicle could accel -
erate quickly forward or in reverse. You
could lose control of the vehicle and hit
someone or something. Only shift into gear
when the engine is idling normally and your
foot is firmly pressing the brake pedal.
Unintended movement of a vehicle could
injure those in or near the vehicle. As with
all vehicles, you should never exit a vehicle
while the engine is running. Before exiting a
vehicle, always come to a complete stop,
then apply the parking brake, shift the
transmission into PARK, turn the engine
OFF, and remove the key fob. When the
ignition is in the LOCK/OFF (key removal)
position, the transmission is locked in
PARK, securing the vehicle against
unwanted movement.
5
20_RT_OM_EN_USC_t.book Page 165