weight DODGE GRAND CARAVAN 2020 Owners Manual
[x] Cancel search | Manufacturer: DODGE, Model Year: 2020, Model line: GRAND CARAVAN, Model: DODGE GRAND CARAVAN 2020Pages: 380, PDF Size: 14.92 MB
Page 6 of 380

4
ENGINE BREAK-IN RECOMMENDATIONS ...... 163
PARK BRAKE ..................................................... 164
AUTOMATIC TRANSMISSION............................ 165 Key Ignition Park Interlock ........................ 166Brake/Transmission Shift Interlock
System ........................................................ 166 Fuel Economy (ECON) Mode .....................167Six-Speed Automatic Transmission ..........167
Gear Ranges ..............................................168
POWER STEERING ............................................. 172
Power Steering Fluid Check ......................173
SPEED CONTROL — IF EQUIPPED .................... 173
To Activate .................................................. 174To Set A Desired Speed .............................174To Vary The Speed Setting ........................ 174To Accelerate For Passing ........................ 175To Resume Speed......................................175
To Deactivate .............................................175
PARKSENSE REAR PARK ASSIST
— IF EQUIPPED ................................................... 175
ParkSense Sensors ...................................176
ParkSense Warning Display ......................176
ParkSense Display ..................................... 176Enabling/Disabling ParkSense ................. 178
Service The ParkSense Rear Park Assist
System ........................................................ 178 Cleaning The ParkSense System ..............178
ParkSense System Usage Precautions ....178 PARKVIEW REAR BACK UP CAMERA ............. 179
REFUELING THE VEHICLE ................................. 181
Loose Fuel Filler Cap Message ................. 181
VEHICLE LOADING ............................................182
Certification Label ..................................... 182
TRAILER TOWING ............................................... 183
Common Towing Definitions ..................... 183Trailer Hitch Classification ........................ 184
Trailer Towing Weights
(Maximum Trailer Weight Ratings) .......... 186 Trailer And Tongue Weight ....................... 186
Towing Requirements ............................... 187Towing Tips ................................................ 189
RECREATIONAL TOWING
(BEHIND MOTORHOME, ETC.) .......................... 191
Towing This Vehicle Behind Another
Vehicle ........................................................ 191 Recreational Towing — All Models ............ 191
DRIVING TIPS ...................................................... 192
Driving On Slippery Surfaces .................... 192
Driving Through Water .............................. 192
IN CASE OF EMERGENCY
HAZARD WARNING FLASHERS .......................194
BULB REPLACEMENT ........................................ 194Replacement Bulbs .................................. 194Replacing Exterior Bulbs ........................... 196 FUSES .................................................................. 197
General Information .................................. 198
Totally Integrated Power Module
(Fuses) ....................................................... 198
JACKING AND TIRE CHANGING ....................... 202
Jack Location ............................................. 203
Spare Tire Tools ......................................... 203To Access Spare Tire Winch Drive Nut ..... 203Spare Tire Removal .................................. 205
Spare Tire Removal Instructions .............. 205
Preparations For Jacking ......................... 206
Jacking Instructions................................... 206
Securing The Compact Spare Tire ............ 210
Road Tire Installation ................................ 211
TIRE SERVICE KIT — IF EQUIPPED ................... 212
JUMP STARTING ................................................ 219
Preparations For Jump Start ..................... 219
Jump Starting Procedure .......................... 220
IF YOUR ENGINE OVERHEATS ......................... 221
GEAR SELECTOR OVERRIDE ........................... 222
FREEING A STUCK VEHICLE ............................. 223
TOWING A DISABLED VEHICLE ....................... 224
ENHANCED ACCIDENT RESPONSE
SYSTEM (EARS) ................................................. 225
EVENT DATA RECORDER (EDR) ....................... 225
20_RT_OM_EN_USC_t.book Page 4
Page 32 of 380

30GETTING TO KNOW YOUR VEHICLE
Plastic Grocery Bag Retainer Hooks
Retainer hooks which will hold plastic grocery
bag handles are built into the seatbacks of all
rear seats and some front seats. The floor
supports the partial weight of the bagged
goods.
HEAD RESTRAINTS
Head restraints are designed to reduce the risk
of injury by restricting head movement in the
event of a rear impact. Head restraints should
be adjusted so that the top of the head restraint
is located above the top of your ear.
Supplemental Active Head Restraints —
Front Seats
Active Head Restraints are passive, deployable
components, and vehicles with this equipment
cannot be readily identified by any markings,
only through visual inspection of the head
restraint. The Active Head Restraints (AHR) will
be split in two halves, with the front half being
soft foam and trim, the back half being
decorative plastic.
When AHRs deploy during a rear impact, the
front half of the head restraint extends forward
to reduce the gap between the back of the
occupant’s head and the AHR. This system is
design to reduce the risk of injury to the driver
or front passenger in certain types of rear
impacts. Refer to “Occupant Restraints” in
“Safety” for further information.
To raise the head restraint, pull upward on the
head restraint. To lower the head restraint,
push the adjustment button, located at the
base of the head restraint, and push downward
on the head restraint.
Adjustment Button
For comfort, the Active Head Restraints can be
tilted forward and rearward. To tilt the head
restraint closer to the back of your head, pull
forward on the bottom of the head restraint.
Push rearward on the bottom of the head
restraint to move the head restraint away from
your head.
Active Head Restraint (Normal Position)
WARNING!
All occupants, including the driver, should
not operate a vehicle or sit in a vehicle’s
seat until the head restraints are placed in
their proper positions in order to minimize
the risk of neck injury in the event of a
crash.
Head restraints should never be adjusted
while the vehicle is in motion. Driving a
vehicle with the head restraints improperly
adjusted or removed could cause serious
injury or death in the event of a collision.
20_RT_OM_EN_USC_t.book Page 30
Page 81 of 380
GETTING TO KNOW YOUR VEHICLE79
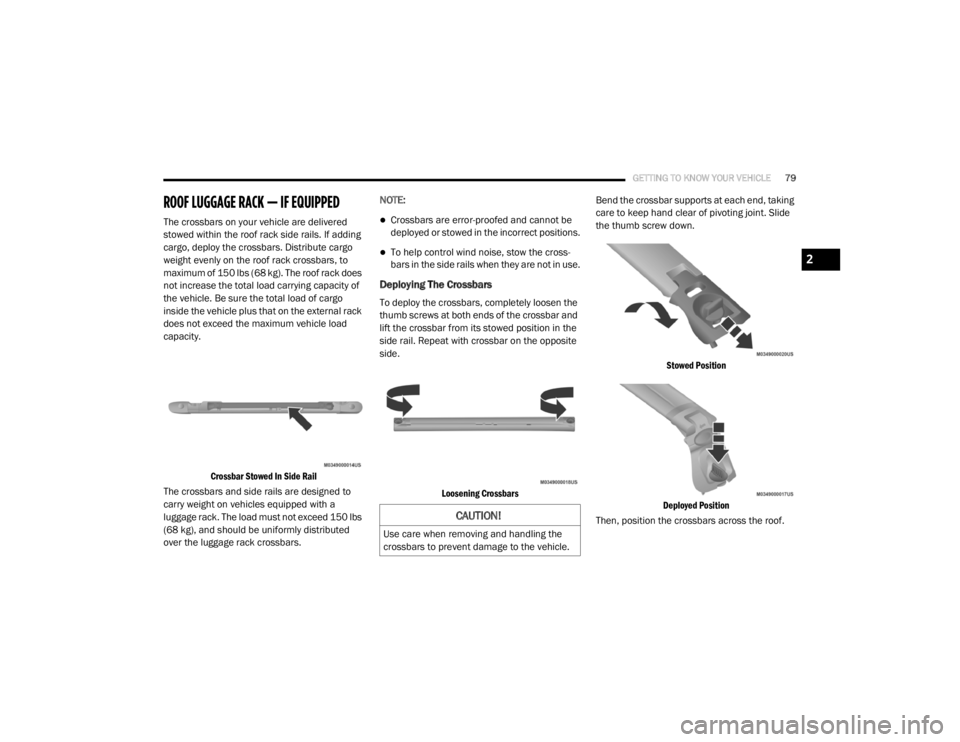
ROOF LUGGAGE RACK — IF EQUIPPED
The crossbars on your vehicle are delivered
stowed within the roof rack side rails. If adding
cargo, deploy the crossbars. Distribute cargo
weight evenly on the roof rack crossbars, to
maximum of 150 lbs (68 kg). The roof rack does
not increase the total load carrying capacity of
the vehicle. Be sure the total load of cargo
inside the vehicle plus that on the external rack
does not exceed the maximum vehicle load
capacity.
Crossbar Stowed In Side Rail
The crossbars and side rails are designed to
carry weight on vehicles equipped with a
luggage rack. The load must not exceed 150 lbs
(68 kg), and should be uniformly distributed
over the luggage rack crossbars. NOTE:Crossbars are error-proofed and cannot be
deployed or stowed in the incorrect positions.
To help control wind noise, stow the cross
-
bars in the side rails when they are not in use.
Deploying The Crossbars
To deploy the crossbars, completely loosen the
thumb screws at both ends of the crossbar and
lift the crossbar from its stowed position in the
side rail. Repeat with crossbar on the opposite
side.
Loosening Crossbars
Bend the crossbar supports at each end, taking
care to keep hand clear of pivoting joint. Slide
the thumb screw down.
Stowed Position
Deployed Position
Then, position the crossbars across the roof.
CAUTION!
Use care when removing and handling the
crossbars to prevent damage to the vehicle.
2
20_RT_OM_EN_USC_t.book Page 79
Page 111 of 380

SAFETY109
Disabling And Enabling HSA
This feature can be turned on or turned off. To
change the current setting, proceed as follows:
For vehicles equipped with the instrument
cluster display, refer to “Instrument Cluster
Display” in “Getting To Know Your Instrument
Panel” for further information.
For vehicles not equipped with the instrument
cluster display, perform the following steps:
1. Center the steering wheel (front wheels
pointing straight forward).
2. Shift the transmission into PARK.
3. Apply the parking brake.
4. Start the engine.
5. Rotate the steering wheel slightly more than one-half turn to the left.
6. Push the “ESC OFF” button located in the lower switch bank below the climate control
four times within 20 seconds. The “ESC OFF
Indicator Light” should turn on and turn off
two times.
7. Rotate the steering wheel back to center and then an additional slightly more than
one-half turn to the right. 8. Place the ignition switch to the OFF position
and then back to the ON position. If the
sequence was completed properly, the
“ESC OFF Indicator Light” will blink several
times to confirm HSA is disabled.
9. Repeat these steps if you want to return this feature to its previous setting.
Traction Control System (TCS)
The Traction Control System (TCS) monitors the
amount of wheel spin of each of the driven
wheels. If wheel spin is detected, the TCS may
apply brake pressure to the spinning wheel(s)
and/or reduce vehicle power to provide
enhanced acceleration and stability. A feature
of the TCS, Brake Limited Differential (BLD),
functions similar to a limited slip differential
and controls the wheel spin across a driven
axle. If one wheel on a driven axle is spinning
faster than the other, the system will apply the
brake of the spinning wheel. This will allow more
vehicle torque to be applied to the wheel that is
not spinning. BLD may remain enabled even if
TCS and ESC are in a reduced mode.
Trailer Sway Control (TSC)
Trailer Sway Control (TSC) uses sensors in the
vehicle to recognize an excessively swaying
trailer and will take the appropriate actions to
attempt to stop the sway. TSC will become
active automatically once an excessively
swaying trailer is recognized. Note that TSC
cannot stop all trailers from swaying. Always
use caution when towing a trailer and follow the
trailer tongue weight recommendations. Refer
to “Trailer Towing” in “Starting And Operating”
for further information. When TSC is
functioning, the “ESC Activation/Malfunction
Indicator Light” will flash, the engine power may
be reduced and you may feel the brakes being
applied to individual wheels to attempt to stop
the trailer from swaying. TSC is disabled when
the ESC system is in the “Partial Off” mode.
WARNING!
If TSC activates while driving, slow the vehicle
down, stop at the nearest safe location, and
adjust the trailer load to eliminate trailer
sway.
4
20_RT_OM_EN_USC_t.book Page 109
Page 144 of 380

142SAFETY
(Continued)
Summary Of Recommendations For Restraining Children In Vehicles
Infant And Child Restraints
Safety experts recommend that children ride
rear-facing in the vehicle until they are two years
old or until they reach either the height or
weight limit of their rear-facing child restraint.
Two types of child restraints can be used
rear-facing: infant carriers and convertible child
seats.The infant carrier is only used rear-facing in the
vehicle. It is recommended for children from
birth until they reach the weight or height limit of
the infant carrier. Convertible child seats can be
used either rear-facing or forward-facing in the
vehicle. Convertible child seats often have a
higher weight limit in the rear-facing direction
than infant carriers do, so they can be used
rear-facing by children who have outgrown their
infant carrier but are still less than at least two
years old. Children should remain rear-facing until they reach the highest weight or height
allowed by their convertible child seat.
Child Size, Height, Weight Or Age Recommended Type Of Child Restraint
Infants and Toddlers
Children who are two years old or younger and
who have not reached the height or weight limits
of their child restraint Either an Infant Carrier or a Convertible Child
Restraint, facing rearward in a rear seat of the
vehicle
Small Children Children who are at least two years old or who
have outgrown the height or weight limit of their
rear-facing child restraint Forward-Facing Child Restraint with a five-point
Harness, facing forward in a rear seat of the
vehicle
Larger Children Children who have outgrown their forward-facing
child restraint, but are too small to properly fit
the vehicle’s seat belt Belt Positioning Booster Seat and the vehicle
seat belt, seated in a rear seat of the vehicle
Children Too Large for Child Restraints Children 12 years old or younger, who have
outgrown the height or weight limit of their
booster seat Vehicle Seat Belt, seated in a rear seat of the
vehicle
WARNING!
Never place a rear-facing child restraint in
front of an air bag. A deploying passenger
front air bag can cause death or serious
injury to a child 12 years or younger,
including a child in a rear-facing child
restraint.
20_RT_OM_EN_USC_t.book Page 142
Page 145 of 380
SAFETY143
Older Children And Child Restraints
Children who are two years old or who have
outgrown their rear-facing convertible child seat
can ride forward-facing in the vehicle.
Forward-facing child seats and convertible child
seats used in the forward-facing direction are
for children who are over two years old or who
have outgrown the rear-facing weight or height
limit of their rear-facing convertible child seat.
Children should remain in a forward-facing child
seat with a harness for as long as possible, up
to the highest weight or height allowed by the
child seat.
All children whose weight or height is above the
forward-facing limit for the child seat should use
a belt-positioning booster seat until the
vehicle’s seat belts fit properly. If the child
cannot sit with knees bent over the vehicle’s
seat cushion while the child’s back is against
the seatback, they should use a belt-positioning
booster seat. The child and belt-positioning
booster seat are held in the vehicle by the
seat belt.Never install a rear-facing child restraint in
the front seat of a vehicle. Only use a
rear-facing child restraint in the rear seat. If
the vehicle does not have a rear seat, do
not transport a rear-facing child restraint in
that vehicle.
WARNING!
Do not install a rear-facing car seat using a
rear support leg in this vehicle. The floor of
this vehicle is not designed to manage the
crash forces of this type of car seat. In a
crash, the support leg may not function as it
was designed by the car seat manufacturer,
and your child may be more severely injured
as a result.
WARNING! (Continued)WARNING!
Improper installation can lead to failure of
an infant or child restraint. It could come
loose in a collision. The child could be badly
injured or killed. Follow the child restraint
manufacturer’s directions exactly when
installing an infant or child restraint.
After a child restraint is installed in the
vehicle, do not move the vehicle seat
forward or rearward because it can loosen
the child restraint attachments. Remove
the child restraint before adjusting the
vehicle seat position. When the vehicle seat
has been adjusted, reinstall the child
restraint.
When your child restraint is not in use,
secure it in the vehicle with the seat belt or
LATCH anchorages, or remove it from the
vehicle. Do not leave it loose in the vehicle.
In a sudden stop or accident, it could strike
the occupants or seatbacks and cause
serious personal injury.
4
20_RT_OM_EN_USC_t.book Page 143
Page 147 of 380
SAFETY145
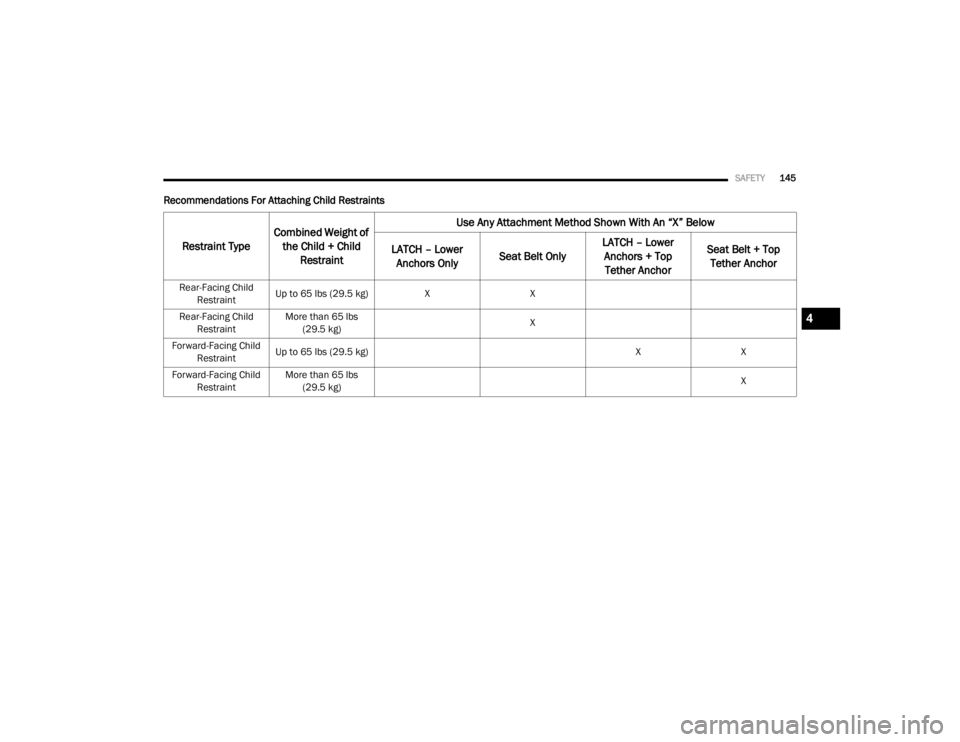
Recommendations For Attaching Child Restraints
Restraint Type Combined Weight of
the Child + Child Restraint Use Any Attachment Method Shown With An “X” Below
LATCH – Lower Anchors Only Seat Belt Only LATCH – Lower
Anchors + Top Tether Anchor Seat Belt + Top
Tether Anchor
Rear-Facing Child
Restraint Up to 65 lbs (29.5 kg)
XX
Rear-Facing Child Restraint More than 65 lbs
(29.5 kg) X
Forward-Facing Child Restraint Up to 65 lbs (29.5 kg)
XX
Forward-Facing Child Restraint More than 65 lbs
(29.5 kg) X
4
20_RT_OM_EN_USC_t.book Page 145
Page 149 of 380
SAFETY147
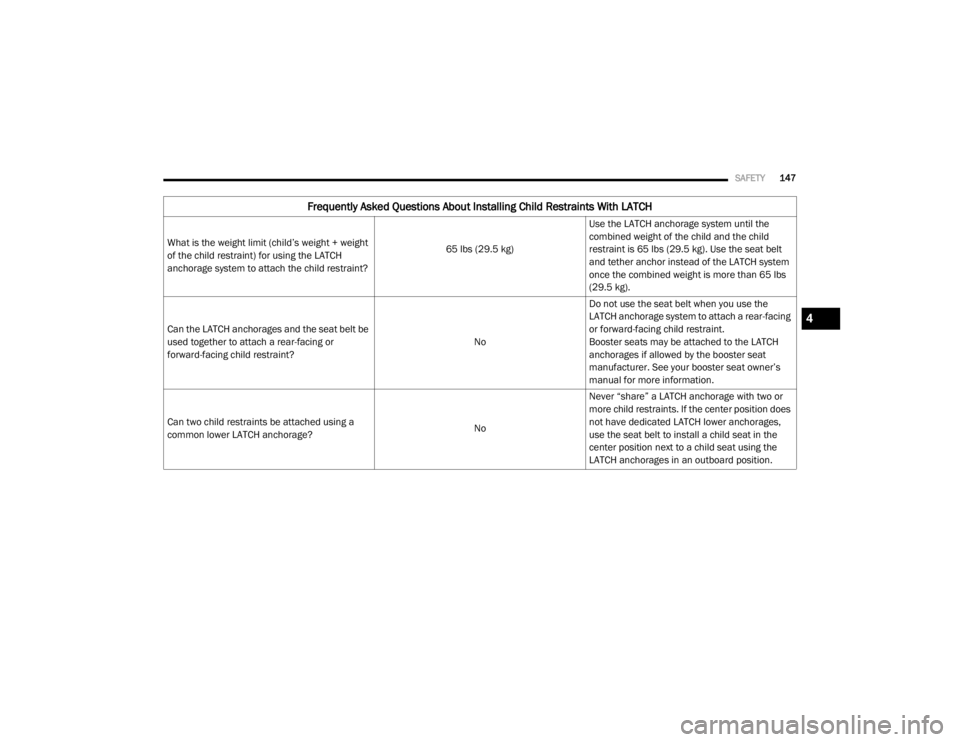
Frequently Asked Questions About Installing Child Restraints With LATCH
What is the weight limit (child’s weight + weight
of the child restraint) for using the LATCH
anchorage system to attach the child restraint? 65 lbs (29.5 kg)
Use the LATCH anchorage system until the
combined weight of the child and the child
restraint is 65 lbs (29.5 kg). Use the seat belt
and tether anchor instead of the LATCH system
once the combined weight is more than 65 lbs
(29.5 kg).
Can the LATCH anchorages and the seat belt be
used together to attach a rear-facing or
forward-facing child restraint? NoDo not use the seat belt when you use the
LATCH anchorage system to attach a rear-facing
or forward-facing child restraint.
Booster seats may be attached to the LATCH
anchorages if allowed by the booster seat
manufacturer. See your booster seat owner’s
manual for more information.
Can two child restraints be attached using a
common lower LATCH anchorage? NoNever “share” a LATCH anchorage with two or
more child restraints. If the center position does
not have dedicated LATCH lower anchorages,
use the seat belt to install a child seat in the
center position next to a child seat using the
LATCH anchorages in an outboard position.
4
20_RT_OM_EN_USC_t.book Page 147
Page 156 of 380

154SAFETY
Frequently Asked Questions About Installing Child Restraints With Seat Belts
What is the weight limit (child’s
weight + weight of the child
restraint) for using the Tether
Anchor with the seat belt to attach
a forward facing child restraint? Weight limit of the Child RestraintAlways use the tether anchor when
using the seat belt to install a
forward facing child restraint, up to
the recommended weight limit of
the child restraint.
Can the rear-facing child restraint
touch the back of the front
passenger seat? YesContact between the front
passenger seat and the child
restraint is allowed, if the child
restraint manufacturer also allows
contact.
Can the rear head restraints be
removed? YesThe 2nd row bench seating head
restraints are removable if they
interfere with the installation of the
child restraint. The 2nd row stow n’
go head restraints are not
removable. The 3rd row center
head restraint is removable in all
vehicles, but the 3rd row outboard
head restraints are not removable.
Refer to “Head Restraints” in
“Getting To Know Your Vehicle” for
further information.
20_RT_OM_EN_USC_t.book Page 154
Page 184 of 380
182STARTING AND OPERATING
VEHICLE LOADING
Certification Label
As required by National Highway Traffic Safety
Administration regulations, your vehicle has a
certification label affixed to the driver's side
door or pillar.
This label contains the month and year of
manufacture, Gross Vehicle Weight Rating
(GVWR), Gross Axle Weight Rating (GAWR) front
and rear, and Vehicle Identification Number
(VIN). A Month-Day-Hour (MDH) number is
included on this label and indicates the Month,
Day and Hour of manufacture. The bar code
that appears on the bottom of the label is your
VIN.
Gross Vehicle Weight Rating (GVWR)
The GVWR is the total permissible weight of your
vehicle including driver, passengers, vehicle,
options and cargo. The label also specifies
maximum capacities of front and rear axle
systems (GAWR). Total load must be limited so
GVWR and front and rear GAWR are not
exceeded.
Payload
The payload of a vehicle is defined as the
allowable load weight a truck can carry,
including the weight of the driver, all
passengers, options and cargo.
Gross Axle Weight Rating (GAWR)
The GAWR is the maximum permissible load on
the front and rear axles. The load must be
distributed in the cargo area so that the GAWR
of each axle is not exceeded.
Each axle GAWR is determined by the
components in the system with the lowest load
carrying capacity (axle, springs, tires or wheels).
Heavier axles or suspension components
sometimes specified by purchasers for
increased durability does not necessarily
increase the vehicle's GVWR.
Tire Size
The tire size on the Vehicle Certification Label
represents the actual tire size on your vehicle.
Replacement tires must be equal to the load
capacity of this tire size.
Rim Size
This is the rim size that is appropriate for the tire
size listed.
Inflation Pressure
This is the cold tire inflation pressure for your
vehicle for all loading conditions up to full
GAWR.
Curb Weight
The curb weight of a vehicle is defined as the
total weight of the vehicle with all fluids,
including vehicle fuel, at full capacity
conditions, and with no occupants or cargo
loaded into the vehicle. The front and rear curb
weight values are determined by weighing your
vehicle on a commercial scale before any
occupants or cargo are added.
Loading
The actual total weight and the weight of the
front and rear of your vehicle at the ground can
best be determined by weighing it when it is
loaded and ready for operation.
20_RT_OM_EN_USC_t.book Page 182