navigation system DODGE HORNET 2023 Owners Manual
[x] Cancel search | Manufacturer: DODGE, Model Year: 2023, Model line: HORNET, Model: DODGE HORNET 2023Pages: 288, PDF Size: 14.2 MB
Page 35 of 288
GETTING TO KNOW YOUR VEHICLE33
UCONNECT VOICE RECOGNITION QUICK
TIPS — IF EQUIPPED
INTRODUCING VOICE RECOGNITION
Start using Uconnect Voice Recognition with these helpful
quick tips. It provides the key Voice Commands and tips
you need to know to control your vehicle’s Voice
Recognition (VR) system.
BASIC VOICE COMMANDS
The following Voice Commands can be given at any point
while using your Uconnect system.
Push the Voice Recognition (VR) button. You can also say
the Wake Up word “Hey, Dodge” or “Hey, Uconnect”.
After the beep, say:
“Cancel ” to stop a current voice session.
“Help ” to hear a list of suggested Voice Commands.
“Repeat ” to listen to the system prompts again.
Notice the visual cues that inform you of your Voice
Recognition system’s status.
GET STARTED
The VR button is used to activate/deactivate your Voice
Recognition system. You can also use the system’s “Wake
Up” word to activate voice recognition. The Wake Up word
can be set through the Uconnect Settings
Úpage 130.
Helpful hints for using Voice Recognition:
Reduce background noise. Wind noise and passenger
conversations are examples of noise that may impact
recognition.
Speak clearly at a normal pace and volume while facing
straight ahead.
Each time you give a Voice Command, first push the
VR button or say the Wake Up word, wait until after the
beep, then say your Voice Command.
You can interrupt the help message or system prompts
by pushing the VR button and saying a Voice Command
from the current category.
You can also interrupt the help message or system
prompts by speaking. This feature is called “barge-in”
and can be set through the Uconnect Settings
Úpage 130.
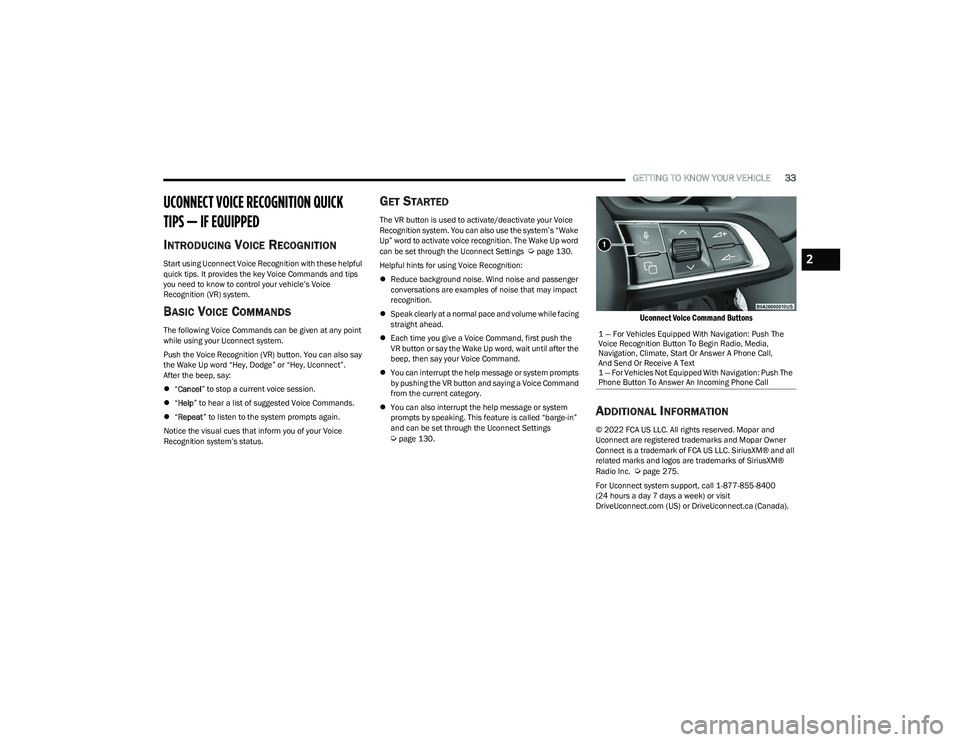
Uconnect Voice Command Buttons
ADDITIONAL INFORMATION
© 2022 FCA US LLC. All rights reserved. Mopar and
Uconnect are registered trademarks and Mopar Owner
Connect is a trademark of FCA US LLC. SiriusXM® and all
related marks and logos are trademarks of SiriusXM®
Radio Inc.
Úpage 275.
For Uconnect system support, call 1-877-855-8400
(24 hours a day 7 days a week) or visit
DriveUconnect.com (US) or DriveUconnect.ca (Canada). 1 — For Vehicles Equipped With Navigation: Push The
Voice Recognition Button To Begin Radio, Media,
Navigation, Climate, Start Or Answer A Phone Call,
And Send Or Receive A Text
1 — For Vehicles Not Equipped With Navigation: Push The
Phone Button To Answer An Incoming Phone Call
2
23_GG_OM_EN_USC_t.book Page 33
Page 71 of 288
GETTING TO KNOW YOUR INSTRUMENT PANEL69
SPEEDOMETER
The Speedometer menu options may consist of the
following:
Digital speed and speed unit (MPH or km/h)
Gear Shift Indicator (GSI)
Gear
Drive mode name
The speed units can be changed from MPH to km/h by
pressing the Thumbwheel.
NAVIGATION — IF EQUIPPED
Turn the Thumbwheel up or down to increase or decrease
the zoom on this screen. Press the Thumbwheel to go
back to the initial frame. The zoom level is automatically
reset to the factory settings whenever the engine is
restarted.
The following information is shown:
Direction Indicators
Distance to next change of direction (in miles or kilome -
ters, depending on instrument panel settings)
Suggested lanes
Address of the road to be followed after the change of
direction Press and hold the Thumbwheel to disable the indications
in the right-hand ring for the current navigation. If a
predicted route is selected, the route shall start without
further confirmation.
NOTE:During projection modes (Apple CarPlay® or
Android Auto™) the native map is not available.
PHONE
This menu displays the current status of a phone
connected to the vehicle via Bluetooth®. The System
supports up to two phones connected at the same time.
Information available in cluster depends on which phone
is dynamically selected by the user in each moment (i.e.
the phone in focus), to enter and select one of the phone
connected user should press Thumbwheel
If no phone is connected, the menu will not function when
the
OK button is pushed. Otherwise, if a phone is
connected, push the OK button to enter the menu.
The following items will display:
Recent calls: displays a list of the last 10 calls.
SMS reader: displays the last 10 text messages and if
they are read or unread.
Favorite numbers: displays a maximum of 10 favorite
numbers.
PERFORMANCE
Performance page content automatically changes
according to the selected drive mode.
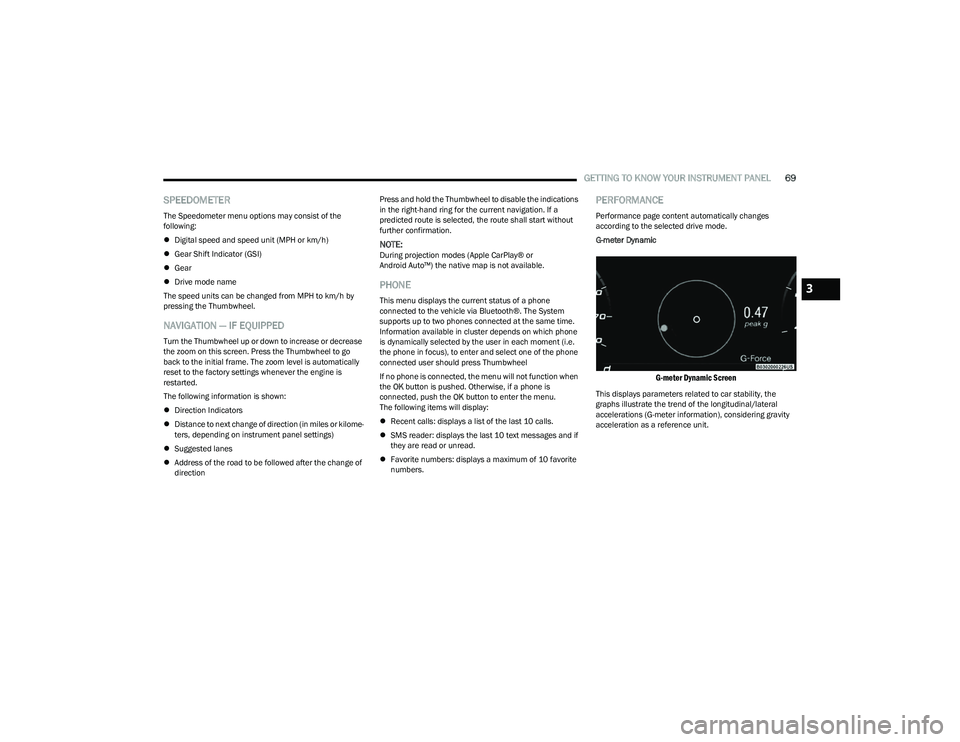
G-meter Dynamic
G-meter Dynamic Screen
This displays parameters related to car stability, the
graphs illustrate the trend of the longitudinal/lateral
accelerations (G-meter information), considering gravity
acceleration as a reference unit.
3
23_GG_OM_EN_USC_t.book Page 69
Page 101 of 288
STARTING AND OPERATING99
TRAFFIC SIGN RECOGNITION —
IF EQUIPPED
The Traffic Sign Recognition (TSR) system uses a camera
mounted on the windshield, as well as map data when the
vehicle is equipped with Navigation, to detect
recognizable road signs such as:
Speed limits
School zones
No passing zones
NOTE:
The TSR system will automatically display the road sign
detected in the unit of measurement (mph or km/h)
selected within Uconnect Settings, or within the instru -
ment cluster display.
If no speed limit signs are detected, the system will
revert to the speed limit signs that are stored in the
Navigation system.
The system always checks the traffic signs indicating
the current speed limit signs. The system is able to
recognize and display up to two different road signs in
the instrument cluster display.
ACTIVATION/DEACTIVATION
The TSR System can be enabled/disabled within the
Uconnect system Úpage 130. System ON is signaled by
road signs shown on the instrument cluster display.
NOTE:
The TSR system will keep the activated/deactivated
selection in memory between key cycles.
Even if the system is disabled, the speed limit sign will
be displayed when the driver selects it in the Driver
Assist menu.
TRAFFIC SIGN RECOGNITION MODES
TSR has three selectable modes of operation that are
available through the Uconnect system.
Visual
When Visual is selected, the system will alert the driver
when the current speed of the vehicle exceeds the
detected speed limit by showing a graphic in the
instrument cluster display. Visual + Chime
When Visual + Chime is selected, the system will alert the
driver when the current speed of the vehicle exceeds the
detected speed limit by showing a graphic in the
instrument cluster display, and by sounding an audible
alert. The audible alert will last for 10 seconds, and the
visual alert will remain on as long as the vehicle is
exceeding the speed limit.
NOTE:Whenever an audible alert is requested by the TSR
system, the radio is also muted.
TSR Off
When the TSR system is turned off, the system will not
show any traffic signs (unless selected in the Driver Assist
menu, which will show detected speed limit signs), and no
alerts will be issued to the driver.
4
23_GG_OM_EN_USC_t.book Page 99
Page 118 of 288
116STARTING AND OPERATING
CHANGING LANESENSE STATUS
The LaneSense system has settings to adjust the intensity
of the torque warning (low/med/high) and the warning
zone sensitivity (early/late) that you can configure through
the Uconnect system
Úpage 130.
NOTE:
When enabled the system operates above 37 mph
(60 km/h) and below 112 mph (180 km/h).
Use of the turn signal suppresses the warnings.
The system will not apply torque to the steering wheel
whenever a safety system engages (Anti-Lock Brakes,
Traction Control System, Electronic Stability Control,
Forward Collision Warning, etc.).
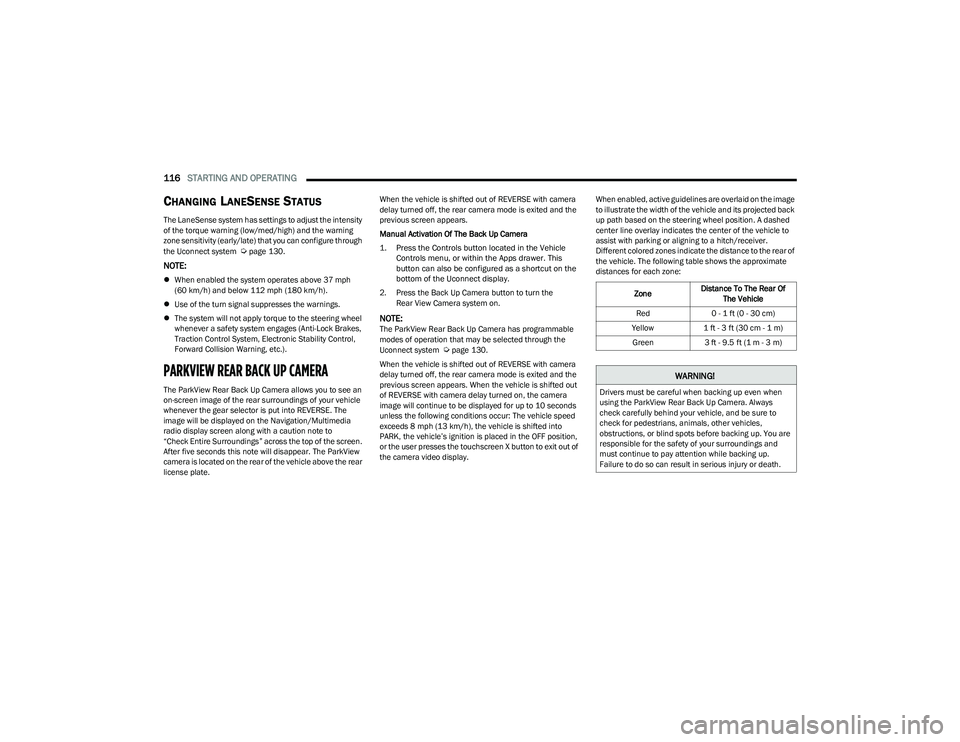
PARKVIEW REAR BACK UP CAMERA
The ParkView Rear Back Up Camera allows you to see an
on-screen image of the rear surroundings of your vehicle
whenever the gear selector is put into REVERSE. The
image will be displayed on the Navigation/Multimedia
radio display screen along with a caution note to
“Check Entire Surroundings” across the top of the screen.
After five seconds this note will disappear. The ParkView
camera is located on the rear of the vehicle above the rear
license plate. When the vehicle is shifted out of REVERSE with camera
delay turned off, the rear camera mode is exited and the
previous screen appears.
Manual Activation Of The Back Up Camera
1. Press the Controls button located in the Vehicle
Controls menu, or within the Apps drawer. This
button can also be configured as a shortcut on the
bottom of the Uconnect display.
2. Press the Back Up Camera button to turn the Rear View Camera system on.
NOTE:The ParkView Rear Back Up Camera has programmable
modes of operation that may be selected through the
Uconnect system
Úpage 130.
When the vehicle is shifted out of REVERSE with camera
delay turned off, the rear camera mode is exited and the
previous screen appears. When the vehicle is shifted out
of REVERSE with camera delay turned on, the camera
image will continue to be displayed for up to 10 seconds
unless the following conditions occur: The vehicle speed
exceeds 8 mph (13 km/h), the vehicle is shifted into PARK, the vehicle’s ignition is placed in the OFF position,
or the user presses the touchscreen X button to exit out of
the camera video display. When enabled, active guidelines are overlaid on the image
to illustrate the width of the vehicle and its projected back
up path based on the steering wheel position. A dashed
center line overlay indicates the center of the vehicle to
assist with parking or aligning to a hitch/receiver.
Different colored zones indicate the distance to the rear of
the vehicle. The following table shows the approximate
distances for each zone:
Zone Distance To The Rear Of
The Vehicle
Red 0 - 1 ft (0 - 30 cm)
Yellow 1 ft - 3 ft (30 cm - 1 m)
Green 3 ft - 9.5 ft (1 m - 3 m)
WARNING!
Drivers must be careful when backing up even when
using the ParkView Rear Back Up Camera. Always
check carefully behind your vehicle, and be sure to
check for pedestrians, animals, other vehicles,
obstructions, or blind spots before backing up. You are
responsible for the safety of your surroundings and
must continue to pay attention while backing up.
Failure to do so can result in serious injury or death.
23_GG_OM_EN_USC_t.book Page 116
Page 134 of 288
132MULTIMEDIA
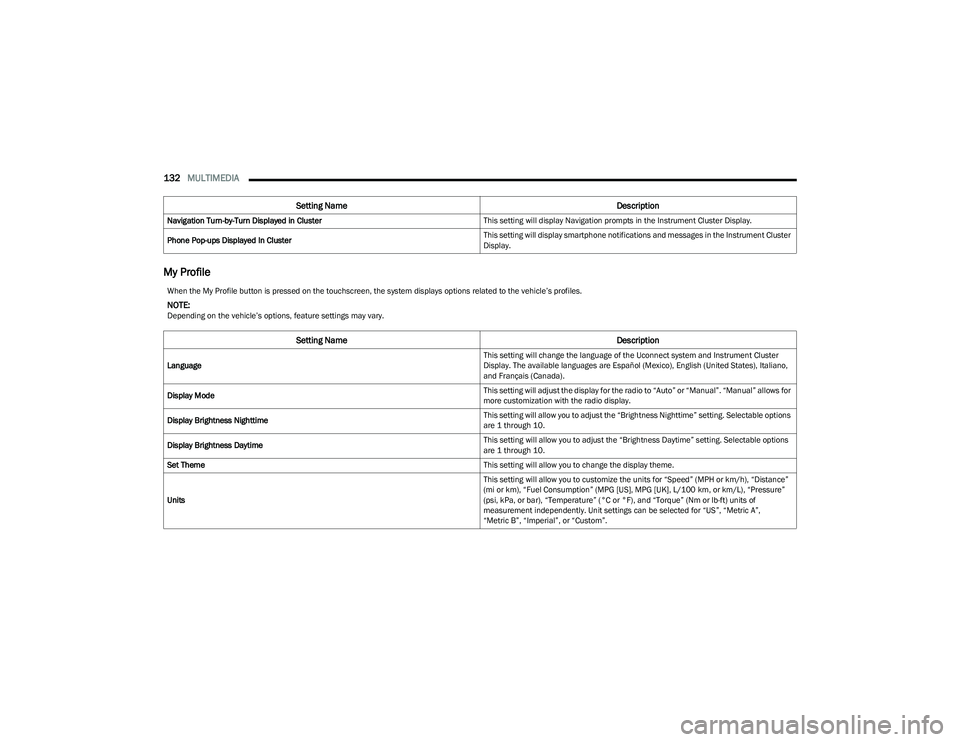
My Profile
Navigation Turn-by-Turn Displayed in Cluster This setting will display Navigation prompts in the Instrument Cluster Display.
Phone Pop-ups Displayed In Cluster This setting will display smartphone notifications and messages in the Instrument Cluster
Display.
Setting Name
Description
When the My Profile button is pressed on the touchscreen, the system displays options related to the vehicle’s profiles.
NOTE:Depending on the vehicle’s options, feature settings may vary.
Setting NameDescription
Language This setting will change the language of the Uconnect system and Instrument Cluster
Display. The available languages are Español (Mexico), English (United States), Italiano,
and Français (Canada).
Display Mode This setting will adjust the display for the radio to “Auto” or “Manual”. “Manual” allows for
more customization with the radio display.
Display Brightness Nighttime This setting will allow you to adjust the “Brightness Nighttime” setting. Selectable options
are 1 through 10.
Display Brightness Daytime This setting will allow you to adjust the “Brightness Daytime” setting. Selectable options
are 1 through 10.
Set Theme This setting will allow you to change the display theme.
Units This setting will allow you to customize the units for “Speed” (MPH or km/h), “Distance”
(mi or km), “Fuel Consumption” (MPG [US], MPG [UK], L/100 km, or km/L), “Pressure”
(psi, kPa, or bar), “Temperature” (°C or °F), and “Torque” (Nm or lb-ft) units of
measurement independently. Unit settings can be selected for “US”, “Metric A”,
“Metric B”, “Imperial”, or “Custom”.
23_GG_OM_EN_USC_t.book Page 132
Page 135 of 288
MULTIMEDIA133
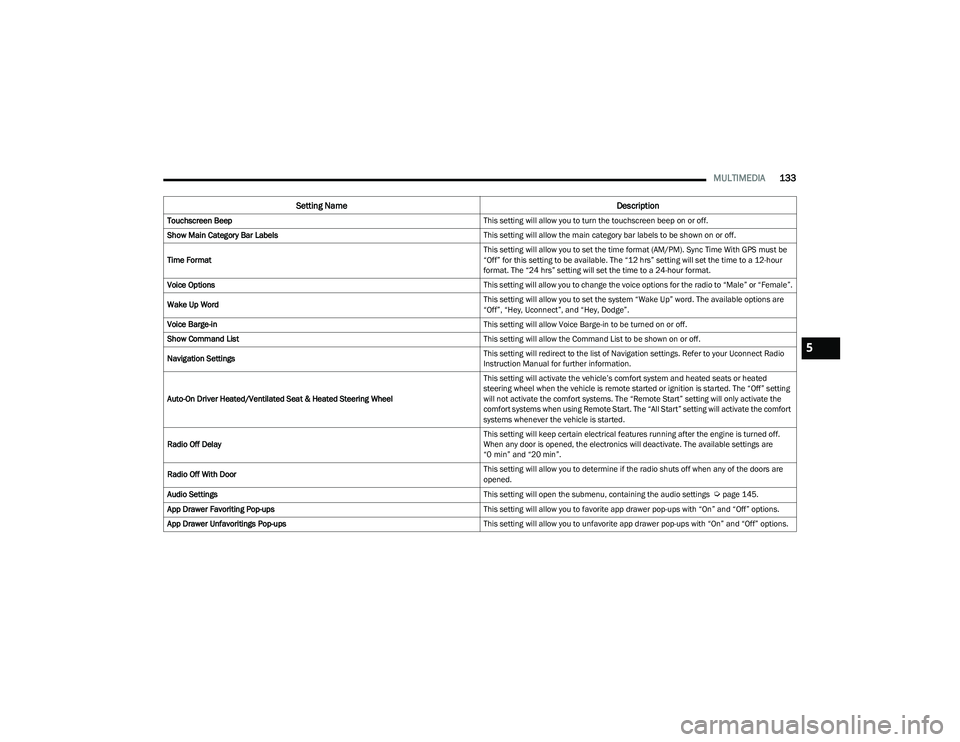
Touchscreen Beep This setting will allow you to turn the touchscreen beep on or off.
Show Main Category Bar Labels This setting will allow the main category bar labels to be shown on or off.
Time Format This setting will allow you to set the time format (AM/PM). Sync Time With GPS must be
“Off” for this setting to be available. The “12 hrs” setting will set the time to a 12-hour
format. The “24 hrs” setting will set the time to a 24-hour format.
Voice Options This setting will allow you to change the voice options for the radio to “Male” or “Female”.
Wake Up Word This setting will allow you to set the system “Wake Up” word. The available options are
“Off”, “Hey, Uconnect”, and “Hey, Dodge”.
Voice Barge-in This setting will allow Voice Barge-in to be turned on or off.
Show Command List This setting will allow the Command List to be shown on or off.
Navigation Settings This setting will redirect to the list of Navigation settings. Refer to your Uconnect Radio
Instruction Manual for further information.
Auto-On Driver Heated/Ventilated Seat & Heated Steering Wheel This setting will activate the vehicle’s comfort system and heated seats or heated
steering wheel when the vehicle is remote started or ignition is started. The “Off” setting
will not activate the comfort systems. The “Remote Start” setting will only activate the
comfort systems when using Remote Start. The “All Start” setting will activate the comfort
systems whenever the vehicle is started.
Radio Off Delay This setting will keep certain electrical features running after the engine is turned off.
When any door is opened, the electronics will deactivate. The available settings are
“0 min” and “20 min”.
Radio Off With Door This setting will allow you to determine if the radio shuts off when any of the doors are
opened.
Audio Settings This setting will open the submenu, containing the audio settings
Úpage 145.
App Drawer Favoriting Pop-ups This setting will allow you to favorite app drawer pop-ups with “On” and “Off” options.
App Drawer Unfavoritings Pop-ups This setting will allow you to unfavorite app drawer pop-ups with “On” and “Off” options.
Setting NameDescription
5
23_GG_OM_EN_USC_t.book Page 133
Page 136 of 288
134MULTIMEDIA
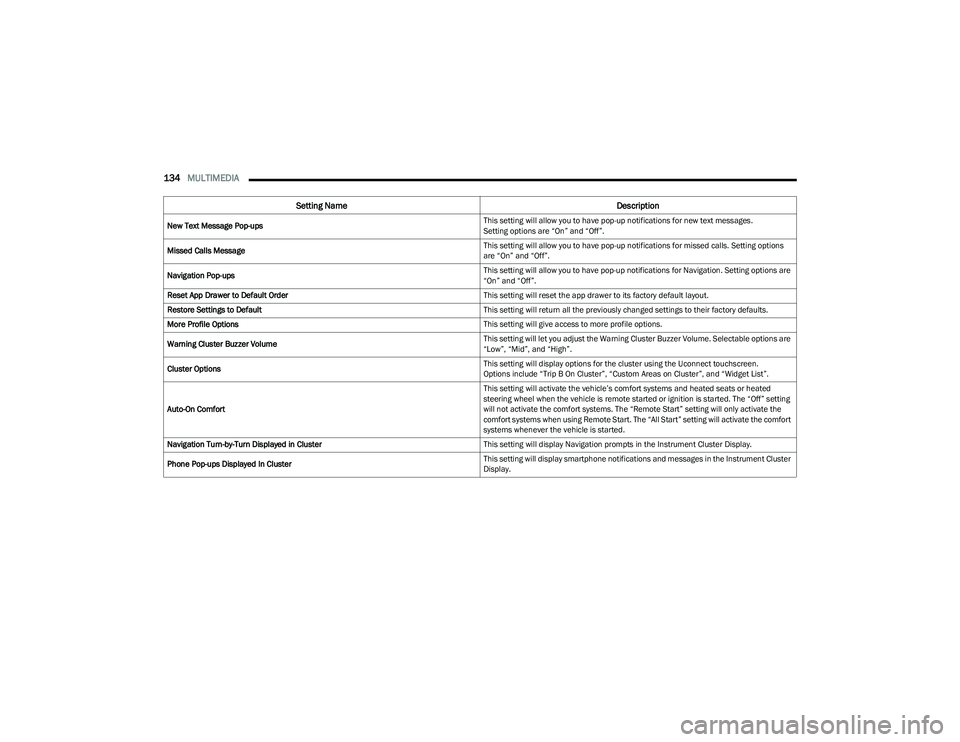
New Text Message Pop-ups This setting will allow you to have pop-up notifications for new text messages.
Setting options are “On” and “Off”.
Missed Calls Message This setting will allow you to have pop-up notifications for missed calls. Setting options
are “On” and “Off”.
Navigation Pop-ups This setting will allow you to have pop-up notifications for Navigation. Setting options are
“On” and “Off”.
Reset App Drawer to Default Order This setting will reset the app drawer to its factory default layout.
Restore Settings to Default This setting will return all the previously changed settings to their factory defaults.
More Profile Options This setting will give access to more profile options.
Warning Cluster Buzzer Volume This setting will let you adjust the Warning Cluster Buzzer Volume. Selectable options are
“Low”, “Mid”, and “High”.
Cluster Options This setting will display options for the cluster using the Uconnect touchscreen.
Options include “Trip B On Cluster”, “Custom Areas on Cluster”, and “Widget List”.
Auto-On Comfort This setting will activate the vehicle’s comfort systems and heated seats or heated
steering wheel when the vehicle is remote started or ignition is started. The “Off” setting
will not activate the comfort systems. The “Remote Start” setting will only activate the
comfort systems when using Remote Start. The “All Start” setting will activate the comfort
systems whenever the vehicle is started.
Navigation Turn-by-Turn Displayed in Cluster This setting will display Navigation prompts in the Instrument Cluster Display.
Phone Pop-ups Displayed In Cluster This setting will display smartphone notifications and messages in the Instrument Cluster
Display.
Setting Name
Description
23_GG_OM_EN_USC_t.book Page 134
Page 141 of 288
MULTIMEDIA139
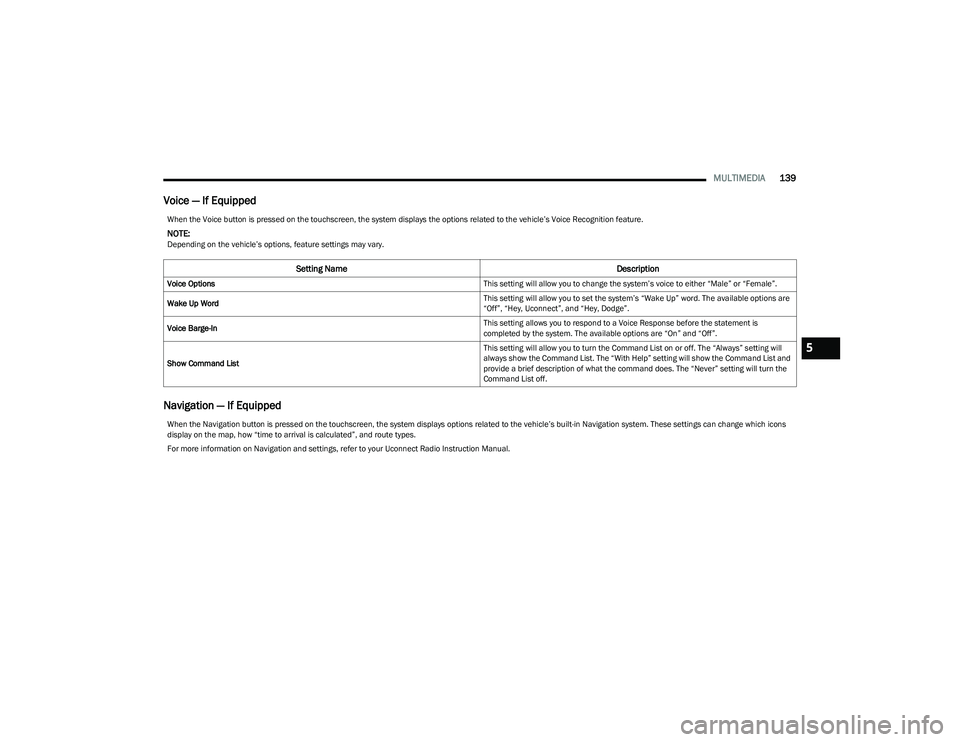
Voice — If Equipped
Navigation — If Equipped
When the Voice button is pressed on the touchscreen, the system displays the options related to the vehicle’s Voice Recognition feature.
NOTE:Depending on the vehicle’s options, feature settings may vary.
Setting Name Description
Voice Options This setting will allow you to change the system’s voice to either “Male” or “Female”.
Wake Up Word This setting will allow you to set the system’s “Wake Up” word. The available options are
“Off”, “Hey, Uconnect”, and “Hey, Dodge”.
Voice Barge-In This setting allows you to respond to a Voice Response before the statement is
completed by the system. The available options are “On” and “Off”.
Show Command List This setting will allow you to turn the Command List on or off. The “Always” setting will
always show the Command List. The “With Help” setting will show the Command List and
provide a brief description of what the command does. The “Never” setting will turn the
Command List off.
When the Navigation button is pressed on the touchscreen, the system displays options related to the vehicle’s built-in Navigation system. These settings can change which icons
display on the map, how “time to arrival is calculated”, and route types.
For more information on Navigation and settings, refer to your Uconnect Radio Instruction Manual.
5
23_GG_OM_EN_USC_t.book Page 139
Page 147 of 288
MULTIMEDIA145
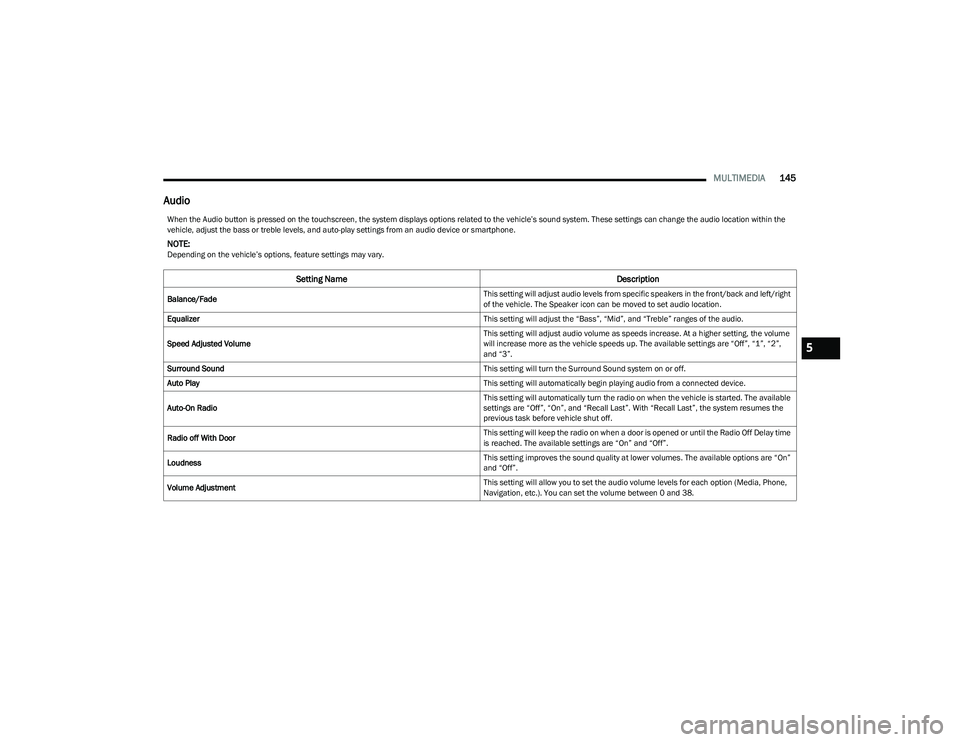
Audio
When the Audio button is pressed on the touchscreen, the system displays options related to the vehicle’s sound system. These settings can change the audio location within the
vehicle, adjust the bass or treble levels, and auto-play settings from an audio device or smartphone.
NOTE:Depending on the vehicle’s options, feature settings may vary.
Setting Name Description
Balance/Fade This setting will adjust audio levels from specific speakers in the front/back and left/right
of the vehicle. The Speaker icon can be moved to set audio location.
Equalizer This setting will adjust the “Bass”, “Mid”, and “Treble” ranges of the audio.
Speed Adjusted Volume This setting will adjust audio volume as speeds increase. At a higher setting, the volume
will increase more as the vehicle speeds up. The available settings are “Off”, “1”, “2”,
and “3”.
Surround Sound This setting will turn the Surround Sound system on or off.
Auto Play This setting will automatically begin playing audio from a connected device.
Auto-On Radio This setting will automatically turn the radio on when the vehicle is started. The available
settings are “Off”, “On”, and “Recall Last”. With “Recall Last”, the system resumes the
previous task before vehicle shut off.
Radio off With Door This setting will keep the radio on when a door is opened or until the Radio Off Delay time
is reached. The available settings are “On” and “Off”.
Loudness This setting improves the sound quality at lower volumes. The available options are “On”
and “Off”.
Volume Adjustment This setting will allow you to set the audio volume levels for each option (Media, Phone,
Navigation, etc.). You can set the volume between 0 and 38.
5
23_GG_OM_EN_USC_t.book Page 145
Page 282 of 288
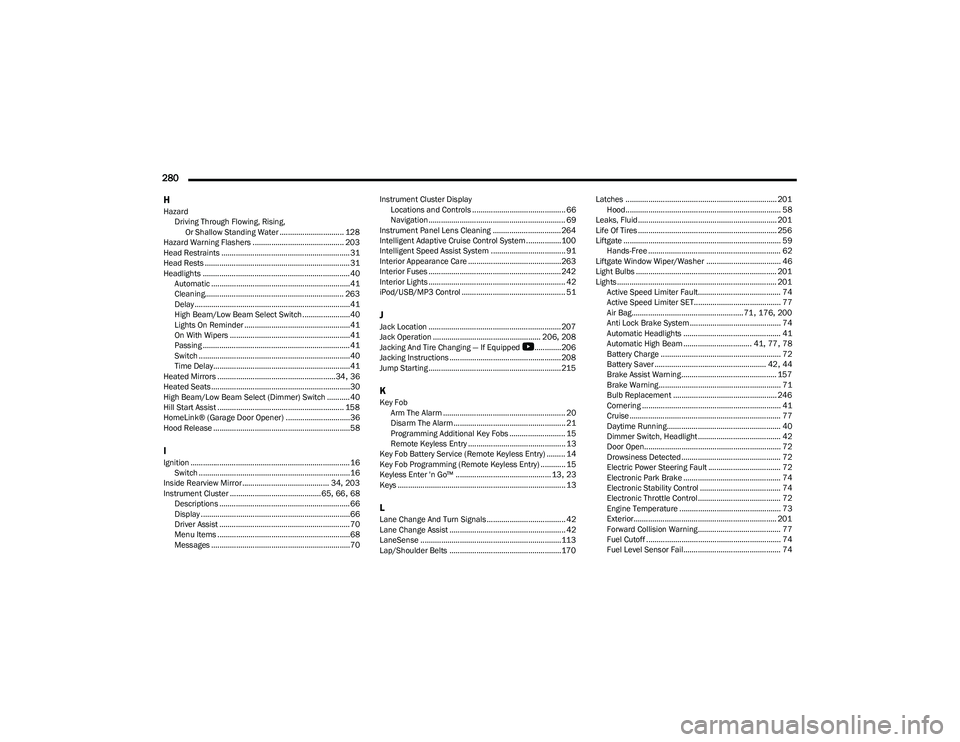
280 H
Hazard Driving Through Flowing, Rising, Or Shallow Standing Water ............................... 128
Hazard Warning Flashers ............................................ 203
Head Restraints .............................................................. 31
Head Rests ...................................................................... 31
Headlights ....................................................................... 40 Automatic ...................................................................41
Cleaning................................................................... 263
Delay ...........................................................................41
High Beam/Low Beam Select Switch .......................40
Lights On Reminder ...................................................41
On With Wipers ..........................................................41
Passing ....................................................................... 41
Switch .........................................................................40
Time Delay..................................................................41
Heated Mirrors .........................................................34
, 36
Heated Seats...................................................................30
High Beam/Low Beam Select (Dimmer) Switch ...........40
Hill Start Assist ............................................................. 158
HomeLink® (Garage Door Opener) ...............................36
Hood Release ..................................................................58
IIgnition .............................................................................16 Switch .........................................................................16
Inside Rearview Mirror.......................................... 34
, 203
Instrument Cluster ............................................ 65, 66, 68
Descriptions ............................................................... 66
Display ........................................................................66
Driver Assist ............................................................... 70
Menu Items ................................................................68
Messages ...................................................................70 Instrument Cluster Display
Locations and Controls ............................................. 66
Navigation .................................................................. 69
Instrument Panel Lens Cleaning ................................. 264
Intelligent Adaptive Cruise Control System.................100
Intelligent Speed Assist System .................................... 91
Interior Appearance Care ............................................. 263
Interior Fuses ................................................................ 242
Interior Lights .................................................................. 42
iPod/USB/MP3 Control .................................................. 51
JJack Location ................................................................ 207
Jack Operation .................................................... 206, 208
Jacking And Tire Changing — If Equipped
b
............. 206
Jacking Instructions ...................................................... 208
Jump Starting ................................................................ 215
KKey Fob Arm The Alarm ........................................................... 20
Disarm The Alarm ...................................................... 21
Programming Additional Key Fobs ........................... 15
Remote Keyless Entry ............................................... 13
Key Fob Battery Service (Remote Keyless Entry) ......... 14
Key Fob Programming (Remote Keyless Entry) ............ 15
Keyless Enter 'n Go™ .............................................. 13
, 23
Keys ................................................................................. 13
LLane Change And Turn Signals...................................... 42 Lane Change Assist ........................................................ 42
LaneSense ....................................................................113
Lap/Shoulder Belts ...................................................... 170 Latches ......................................................................... 201
Hood........................................................................... 58
Leaks, Fluid................................................................... 201
Life Of Tires ................................................................... 256
Liftgate ............................................................................ 59 Hands-Free ................................................................ 62
Liftgate Window Wiper/Washer .................................... 46
Light Bulbs .................................................................... 201
Lights ............................................................................. 201 Active Speed Limiter Fault........................................ 74
Active Speed Limiter SET.......................................... 77
Air Bag...................................................... 71
, 176, 200
Anti Lock Brake System ............................................ 74
Automatic Headlights ............................................... 41
Automatic High Beam ................................. 41
, 77, 78
Battery Charge .......................................................... 72
Battery Saver ...................................................... 42
, 44
Brake Assist Warning.............................................. 157
Brake Warning........................................................... 71
Bulb Replacement .................................................. 246
Cornering ................................................................... 41
Cruise ......................................................................... 77
Daytime Running....................................................... 40
Dimmer Switch, Headlight ........................................ 42
Door Open.................................................................. 72
Drowsiness Detected ................................................ 72
Electric Power Steering Fault ................................... 72
Electronic Park Brake ............................................... 74
Electronic Stability Control ....................................... 74
Electronic Throttle Control ........................................ 72
Engine Temperature ................................................. 73
Exterior..................................................................... 201 Forward Collision Warning........................................ 77
Fuel Cutoff ................................................................. 74
Fuel Level Sensor Fail............................................... 74
23_GG_OM_EN_USC_t.book Page 280