key DODGE INTREPID 2004 2.G Owner's Manual
[x] Cancel search | Manufacturer: DODGE, Model Year: 2004, Model line: INTREPID, Model: DODGE INTREPID 2004 2.GPages: 249, PDF Size: 4.87 MB
Page 129 of 249
After Starting
The idle speed will automatically decrease as the engine
warms up. At cooler ambient temperatures, the idle
speed for the 2.7L engine may increase during extended
idles for improved heater performance.
ENGINE BLOCK HEATER — Optional U.S. and
Standard Canada
These heaters use a common power cord which is stored
under the hood, behind the Air Cleaner housing. Plug the
cord into any 110 volt AC outlet and both heaters will be
energized. Use the heaters when temperatures below 0°F
(-18°C) are expected to last for several days.
AUTOMATIC TRANSAXLE
Brake/Transmission Interlock
This interlock system prevents you from moving the gear
selector out of the Park position unless the brake pedal is
pressed. This system is active only while the key is in the
RUN position.
CAUTION!
Damage to the transaxle may occur if the following
precautions are not observed:
•Shift into PARK only after the vehicle has come to a
complete stop.
•Shift into or out of REVERSE only after the vehicle has
come to a complete stop and the engine is at idle
speed.
•Do not shift from REVERSE, PARK or NEUTRAL into
any forward gear when the engine is above idle speed.
•Before shifting into any gear, make sure your foot is
firmly on the brake pedal.
The electronically controlled transaxle provides a precise
shift schedule. The transaxle electronics are self-
calibrating. Therefore, the first few shifts on a new
vehicle may be somewhat abrupt. This is a normal
condition, and precision shifts will develop within a few
shift cycles.
STARTING AND OPERATING 129
5
Page 130 of 249
Transaxle Reset Mode
The transaxle is monitored for abnormal conditions. If a
condition is detected that could cause damage, the trans-
axle automatically shifts into second gear. The transaxle
remains in second gear despite the forward gear selected.
Park (P), Reverse (R), and Neutral (N) will continue to
operate. This Reset feature allows the vehicle to be driven
to a dealer for service without damaging the transaxle.
If the problem has been momentary, the transaxle can be
reset to regain all forward gears.
•Stop the vehicle and shift into PARK (P).
•Turn the key to OFF then start the engine.
•Shift into “D” and resume driving.
NOTE:Even if the transaxle can be reset, we recom-
mend that you visit a dealer at your earliest possible
convenience. Your dealer has diagnostic equipment to
determine if the problem could recur.
If the transaxle cannot be reset, dealer service is required.
Gear Ranges
“P” Park
NOTE:
If the key is in the RUN position, you must
press the brake pedal to shift out of the “P” Park position.
Supplements the parking brake by locking the transaxle.
Engine can be started in this range. Never attempt to use
PARK while vehicle is in motion.
Apply parking brake when leaving vehicle in this range.
WARNING!
Your vehicle could move and injure you and others if
it is not completely in Park (P). Check by trying to
move the gearshift lever back and forth without
depressing the shift button after you have set it in P.
Make sure it is in Park before leaving the vehicle.
130 STARTING AND OPERATING
Page 133 of 249
When parking on a hill, you must set the parking brake
beforeplacing the gear selector in Park. If you don’t, the
load on the transmission locking mechanism may make it
difficult to move the selector out of Park. As an added
precaution, turn the front wheels toward the curb on a
downhill grade and away from the curb on an uphill
grade.
The parking brake should always be applied when the
driver is not in the vehicle.WARNING!
•Leaving children in a vehicle unattended is dan-
gerous for several reasons. A child or others could
be injured. Children should be warned not to
touch the parking brake or the gear selector. Don’t
leave the keys in the ignition. A child could
operate power windows, other controls, or move
the vehicle.
•Be sure the parking brake is fully disengaged
before driving; failure to do so can lead to brake
failure and an accident.
STARTING AND OPERATING 133
5
Page 152 of 249
HAZARD WARNING FLASHER
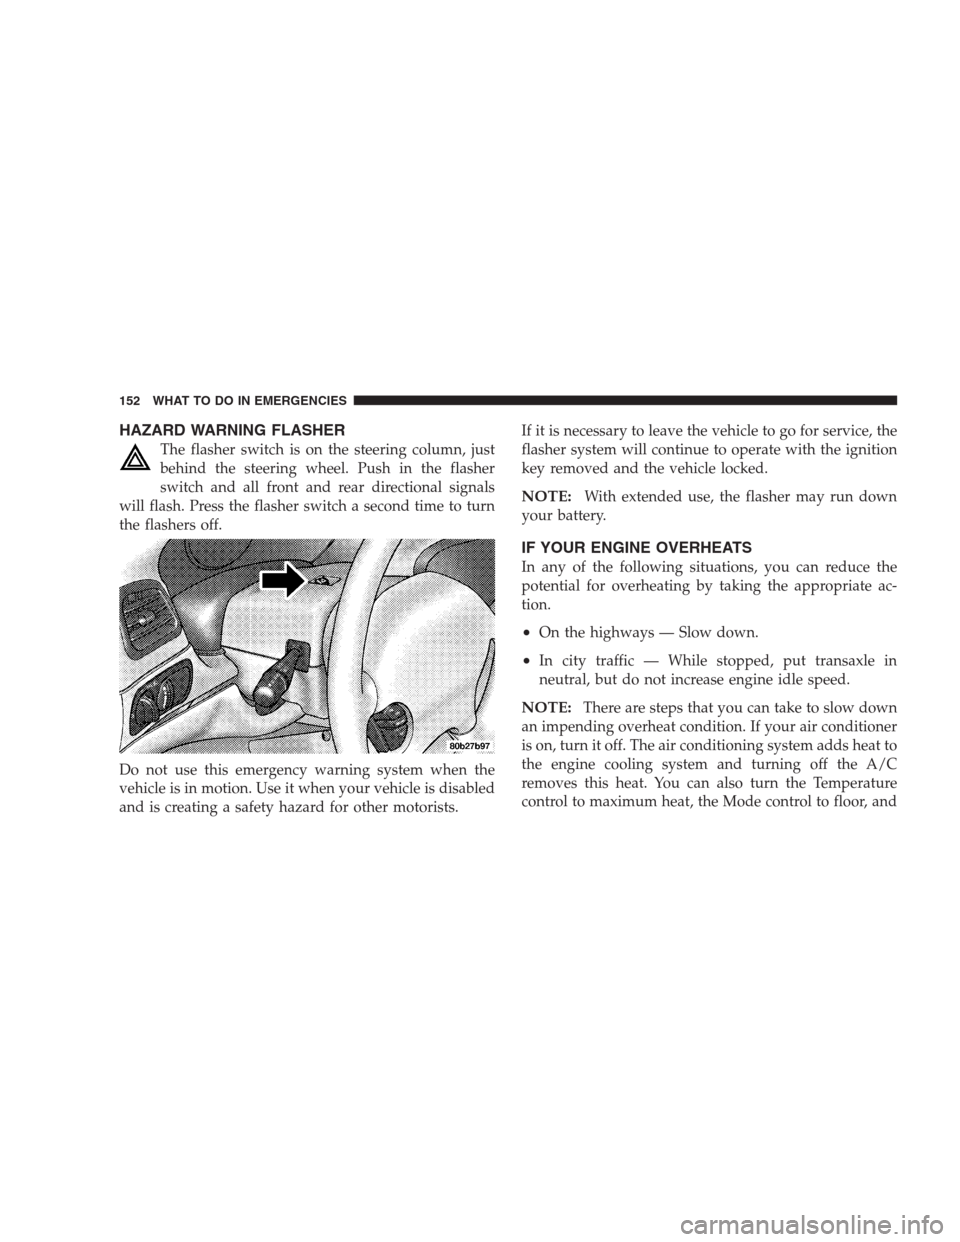
The flasher switch is on the steering column, just
behind the steering wheel. Push in the flasher
switch and all front and rear directional signals
will flash. Press the flasher switch a second time to turn
the flashers off.
Do not use this emergency warning system when the
vehicle is in motion. Use it when your vehicle is disabled
and is creating a safety hazard for other motorists.If it is necessary to leave the vehicle to go for service, the
flasher system will continue to operate with the ignition
key removed and the vehicle locked.
NOTE:With extended use, the flasher may run down
your battery.
IF YOUR ENGINE OVERHEATS
In any of the following situations, you can reduce the
potential for overheating by taking the appropriate ac-
tion.
•On the highways — Slow down.
•In city traffic — While stopped, put transaxle in
neutral, but do not increase engine idle speed.
NOTE:There are steps that you can take to slow down
an impending overheat condition. If your air conditioner
is on, turn it off. The air conditioning system adds heat to
the engine cooling system and turning off the A/C
removes this heat. You can also turn the Temperature
control to maximum heat, the Mode control to floor, and
152 WHAT TO DO IN EMERGENCIES
Page 170 of 249
EMISSIONS INSPECTION AND MAINTENANCE
PROGRAMS
In some localities, it may be a legal requirement to pass
an inspection of your vehicle’s emissions control system.
Failure to pass could prevent vehicle registration.
For states which have an I/M (Inspection and
Maintenance) requirement, this check verifies the
following: the MIL (Malfunction Indicator Lamp)
is functioning and is not on when the engine is running,
and that the OBD (On Board Diagnostic) system is ready
for testing.
Normally, the OBD system will be ready. The OBD
system maynotbe ready if your vehicle was recently
serviced, if you recently had a dead battery, or a battery
replacement. If the OBD system should be determined
not ready for the I/M test, your vehicle may fail the test.
Your vehicle has a simple ignition key actuated test
which you can use prior to going to the test station. To
check if your vehicle’s OBD system is ready, you must do
the following:
1. Insert your ignition key into the ignition switch.2. Turn the ignition to the ON position, but do not crank
or start the engine.
3. If you crank or start the engine, you will have to start
this test over.
4. As soon as you turn your key to the ON position, you
will see your MIL symbol come on as part of a normal
bulb check.
5. Approximately 15 seconds later, one of two things will
happen:
a. The MIL will flash for about 10 seconds and then
return to being fully illuminated until you turn off
the ignition key or start the engine. This means that
your vehicle’s OBD system isnot readyand you
shouldnotproceed to the I/M station.
b. The MIL will not flash at all and will remain fully
illuminated until you turn off the ignition key or
start the engine. This means that your vehicle’s OBD
system isreadyand you can proceed to the I/M
station.
170 MAINTAINING YOUR VEHICLE
Page 185 of 249
Hood Latch
When performing other under hood services, the hood
latch release mechanism and safety catch should be
inspected, cleaned, and lubricated.
It is important to maintain proper lubrication to insure
that the hood mechanisms work properly and safely.
Multi-Purpose Lubricant, NLGI Grade 2, should be ap-
plied sparingly to all pivot and sliding contact areas.
External Lock Cylinders
Lubricate the external lock cylinders twice a year, prefer-
ably in the fall and spring. Apply a small amount of
lubricant, such as Mopar Lock Cylinder Lubricant di-
rectly into the lock cylinder (avoid excess lubricant).
Insert the key into the lock cylinder and rotate from the
unlocked to the locked position; without adding more
lubricant. Repeat this procedure three or four times. Wipe
all the lubricant off the key with a clean cloth, to avoid
soiling clothing.
If you use a lubricant that cannot be dispensed directly
into the lock cylinder, apply a small amount of the
lubricant to the key. Insert the key into the lock cylinder,then proceed as described above, to distribute the lubri-
cant within the lock cylinder. Pay attention to trunk
hinges, especially during cold weather, to ensure ease of
trunk operation.
Other Body Mechanisms
The following body mechanisms should be inspected
and, if necessary, all pivot and sliding contact areas of
these components should be lubricated with the lubricant
specified as follows:
Engine Oil
•
Door hinges
•Hood hinges
•Trunk hinges
Smooth White Body Lubricant - Such as Mopar
Spray White Lube:
•
Hood hinge springs and links
•Lock cylinders
•Parking brake mechanism
MAINTAINING YOUR VEHICLE 185
7
Page 188 of 249
Cooling System
WARNING!
•When working near the radiator cooling fan, dis-
connect the fan motor lead or turn the ignition key
to the OFF position. The fan is temperature con-
trolled and can start at any time the ignition key is
in the ON position.
•You or others can be badly burned by hot coolant
or steam from your radiator. If you see or hear
steam coming from under the hood, don’t open
the hood until the radiator has had time to cool.
Never try to open a cooling system pressure cap
when the radiator is hot.
Coolant Checks
Check coolant protection every 12 months (before the
onset of freezing weather, where applicable). If coolant is
dirty or rusty in appearance, the system should be
drained, flushed and refilled with fresh coolant.Check the front of the radiator and condenser for any
accumulation of bugs, leaves, etc. Clean the radiator and
condenser by gently spraying water from a garden hose
at the back of the core.
Check the engine cooling system hoses for condition and
tightness of connection. Inspect the entire system for
leaks. Any hoses that show cuts or severe abrasion must
be replaced.
Cooling System — Drain, Flush and Refill
At the intervals shown on the Maintenance Schedules (5
years/100,000 miles), the system should be drained,
flushed and refilled.
If the solution is dirty and contains a considerable
amount of sediment, clean and flush with a reliable
cooling system cleaner. Follow with a thorough rinsing to
remove all deposits and chemicals.
Engine Coolant Disposal
Used ethylene glycol based engine coolant is a regulated
substance requiring proper disposal. Check with your
local authorities to determine the disposal rules for your
community. Do not store ethylene glycol based engine
188 MAINTAINING YOUR VEHICLE
Page 238 of 249
About Your Brakes...................... 134
ABS (Anti-Lock Brake) System...........91,134
Accident Damage....................... 199
Adding Engine Coolant (Antifreeze)......... 189
Adding Fuel.......................... 146
Air Cleaner, Engine..................... 180
Air Conditioner Maintenance.............. 182
Air Conditioning.................... 114,117
Air Conditioning Controls............. 114,117
Air Conditioning, Operating Tips........... 123
Air Conditioning Refrigerant.............. 182
Air Conditioning System................. 182
Air Pressure, Tires...................136,137
Airbag................................ 33
Airbag Deployment....................36,37
Airbag Light.....................37,40,48,90
Airbag Maintenance...................... 39
Alarm System.......................... 23
Alignment and Balance.................. 143
Antifreeze Disposal..................... 188
Antifreeze (Engine Coolant)............... 189
Anti-Lock Brake System.................. 134
Anti-Lock Warning Light.................. 91Anti-Theft Security Alarm................. 23
Anti-Theft System....................... 23
Appearance Care....................... 197
Auto Down Power Windows............... 25
Automatic Door Locks.................... 16
Automatic Mirrors....................... 53
Automatic Off, Interior Lights.............. 60
Automatic Temperature Control............ 117
Automatic Transaxle..................129,194
Fluid and Filter Changes................ 197
Fluid Level Check..................... 195
Reset Mode......................... 130
Selection Of Lubricant................. 194
Shifting............................ 130
Special Additives..................... 197
Backfire, Engine........................ 180
Ball Joints............................ 184
Battery............................158,181
Emergency Starting.................... 158
Gas Caution......................158,181
Jump Starting........................ 158
Keyless Transmitter Replacement.......... 22
238 INDEX
Page 242 of 249
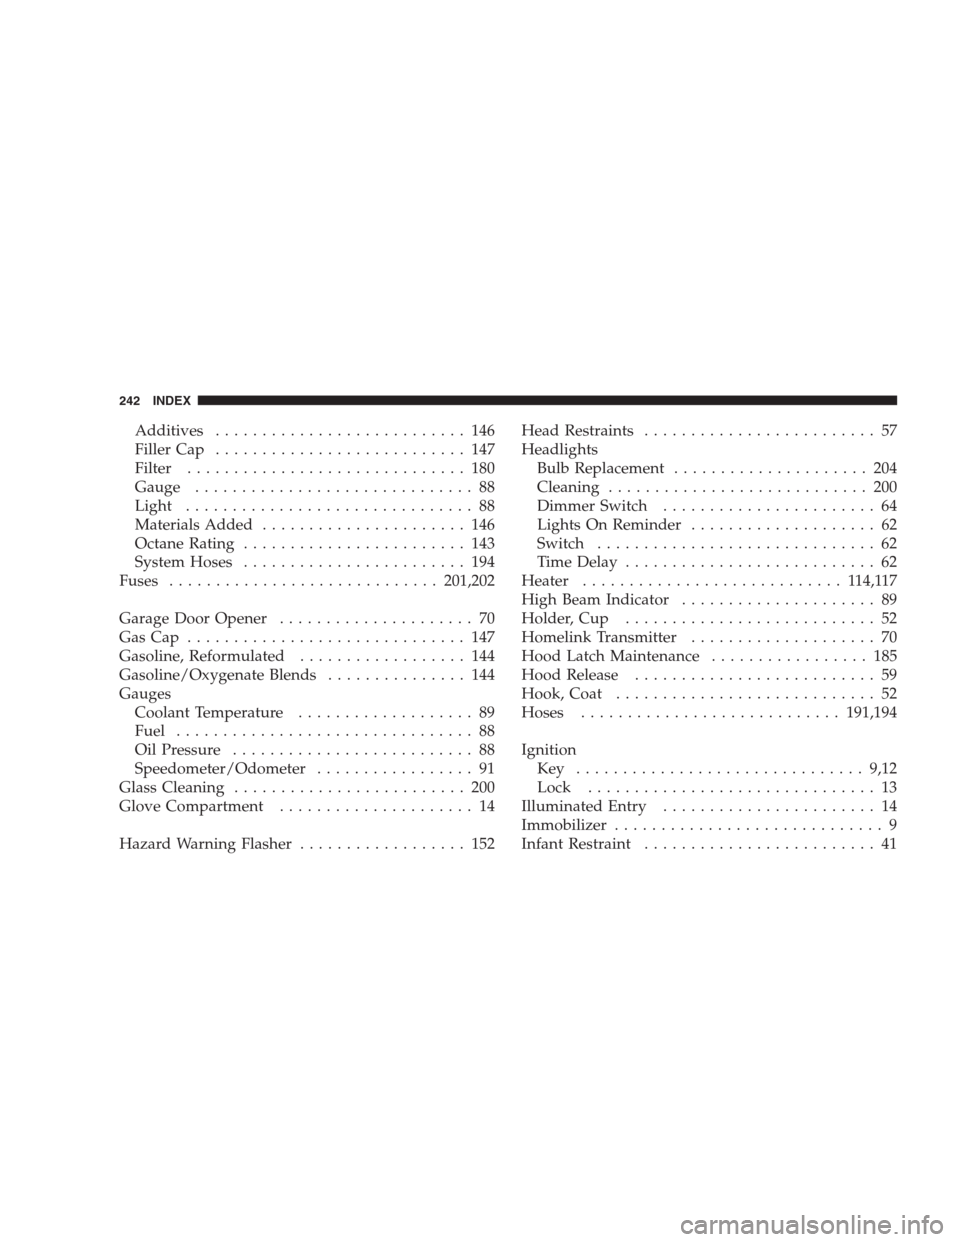
Additives........................... 146
Filler Cap........................... 147
Filter.............................. 180
Gauge.............................. 88
Light............................... 88
Materials Added...................... 146
Octane Rating........................ 143
System Hoses........................ 194
Fuses.............................201,202
Garage Door Opener..................... 70
GasCap .............................. 147
Gasoline, Reformulated.................. 144
Gasoline/Oxygenate Blends............... 144
Gauges
Coolant Temperature................... 89
Fuel................................ 88
Oil Pressure.......................... 88
Speedometer/Odometer................. 91
Glass Cleaning......................... 200
Glove Compartment..................... 14
Hazard Warning Flasher.................. 152Head Restraints......................... 57
Headlights
Bulb Replacement..................... 204
Cleaning............................ 200
Dimmer Switch....................... 64
Lights On Reminder.................... 62
Switch.............................. 62
Time Delay........................... 62
Heater............................ 114,117
High Beam Indicator..................... 89
Holder, Cup........................... 52
Homelink Transmitter.................... 70
Hood Latch Maintenance................. 185
Hood Release.......................... 59
Hook, Coat............................ 52
Hoses............................191,194
Ignition
Key ...............................9,12
Lock............................... 13
Illuminated Entry....................... 14
Immobilizer............................. 9
Infant Restraint......................... 41
242 INDEX
Page 243 of 249
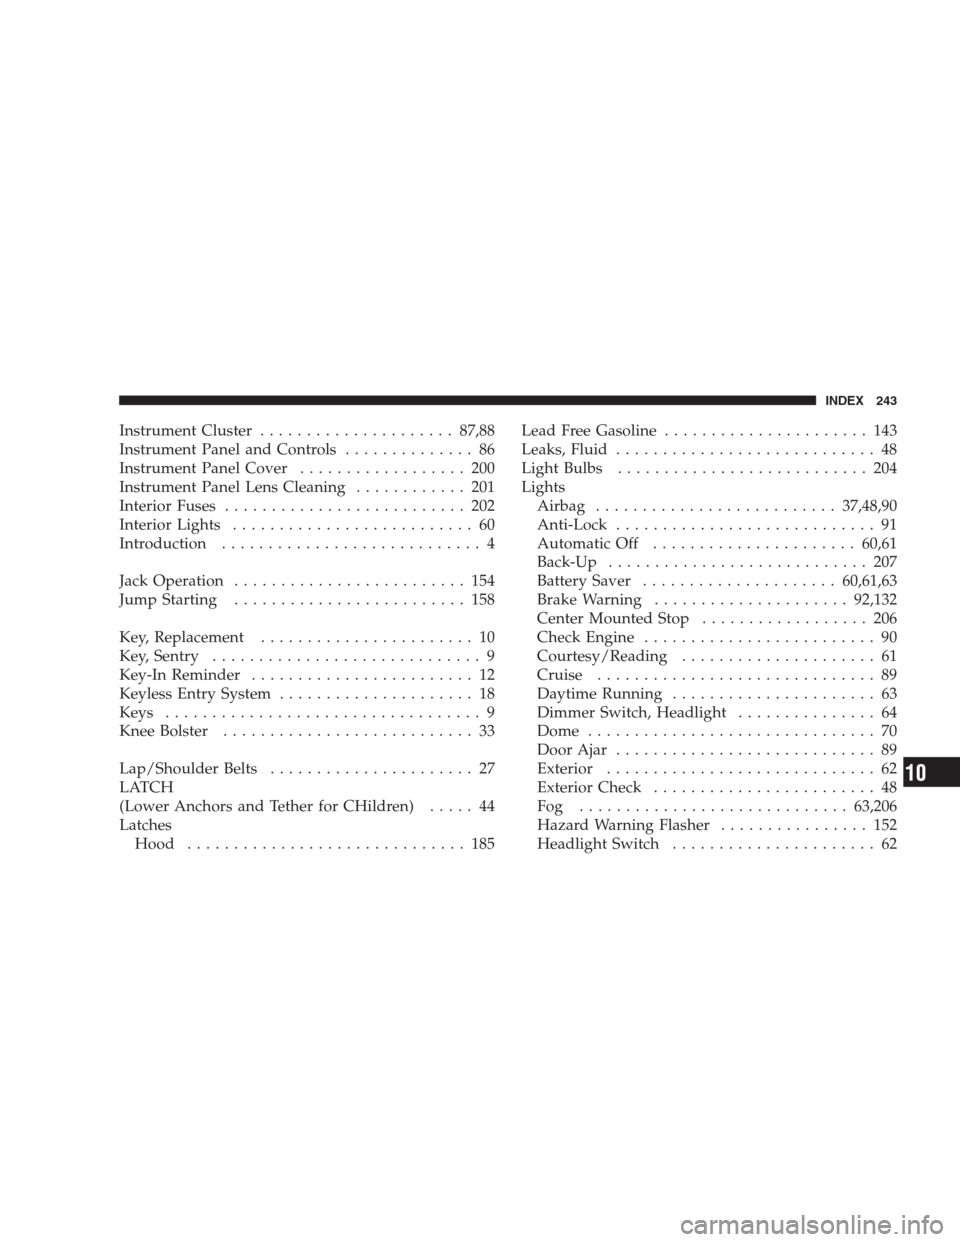
Instrument Cluster.....................87,88
Instrument Panel and Controls.............. 86
Instrument Panel Cover.................. 200
Instrument Panel Lens Cleaning............ 201
Interior Fuses.......................... 202
Interior Lights.......................... 60
Introduction............................ 4
Jack Operation......................... 154
Jump Starting......................... 158
Key, Replacement....................... 10
Key, Sentry............................. 9
Key-In Reminder........................ 12
Keyless Entry System..................... 18
Keys.................................. 9
Knee Bolster........................... 33
Lap/Shoulder Belts...................... 27
LATCH
(Lower Anchors and Tether for CHildren)..... 44
Latches
Hood.............................. 185Lead Free Gasoline...................... 143
Leaks, Fluid............................ 48
Light Bulbs........................... 204
Lights
Airbag..........................37,48,90
Anti-Lock............................ 91
Automatic Off......................60,61
Back-Up............................ 207
Battery Saver.....................60,61,63
Brake Warning.....................92,132
Center Mounted Stop.................. 206
Check Engine......................... 90
Courtesy/Reading..................... 61
Cruise.............................. 89
Daytime Running...................... 63
Dimmer Switch, Headlight............... 64
Dome............................... 70
Door Ajar............................ 89
Exterior............................. 62
Exterior Check........................ 48
Fog .............................63,206
Hazard Warning Flasher................ 152
Headlight Switch...................... 62
INDEX 243
10