wheel DODGE JOURNEY 2010 1.G Owner's Manual
[x] Cancel search | Manufacturer: DODGE, Model Year: 2010, Model line: JOURNEY, Model: DODGE JOURNEY 2010 1.GPages: 88, PDF Size: 12.49 MB
Page 58 of 88
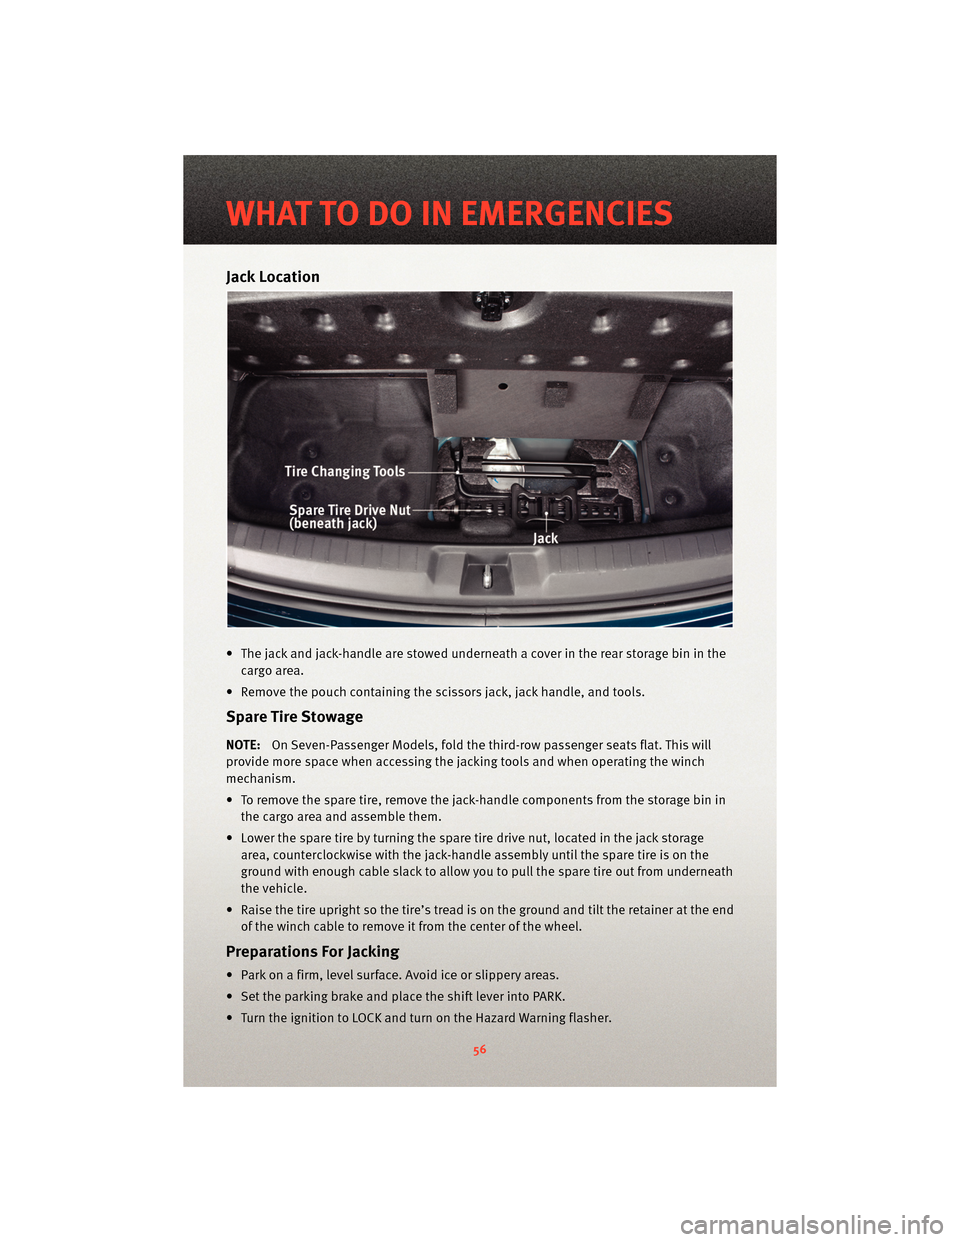
Jack Location
• The jack and jack-handle are stowed underneath a cover in the rear storage bin in thecargo area.
• Remove the pouch containing the scissors jack, jack handle, and tools.
Spare Tire Stowage
NOTE:On Seven-Passenger Models, fold the third-row passenger seats flat. This will
provide more space when accessing the jacking tools and when operating the winch
mechanism.
• To remove the spare tire, remove the jack-handle components from the storage bin in the cargo area and assemble them.
• Lower the spare tire by turning the spare tire drive nut, located in the jack storage area, counterclockwise with the jack-h andle assembly until the spare tire is on the
ground with enough cable slack to allow you to pull the spare tire out from underneath
the vehicle.
• Raise the tire upright so the tire’s tread is o n the ground and tilt the retainer at the end
of the winch cable to remove it from the center of the wheel.
Preparations For Jacking
• Park on a firm, level surface. Avoid ice or slippery areas.
• Set the parking brake and place the shift lever into PARK.
• Turn the ignition to LOCK and turn on the Hazard Warning flasher.
WHAT TO DO IN EMERGENCIES
56
Page 59 of 88
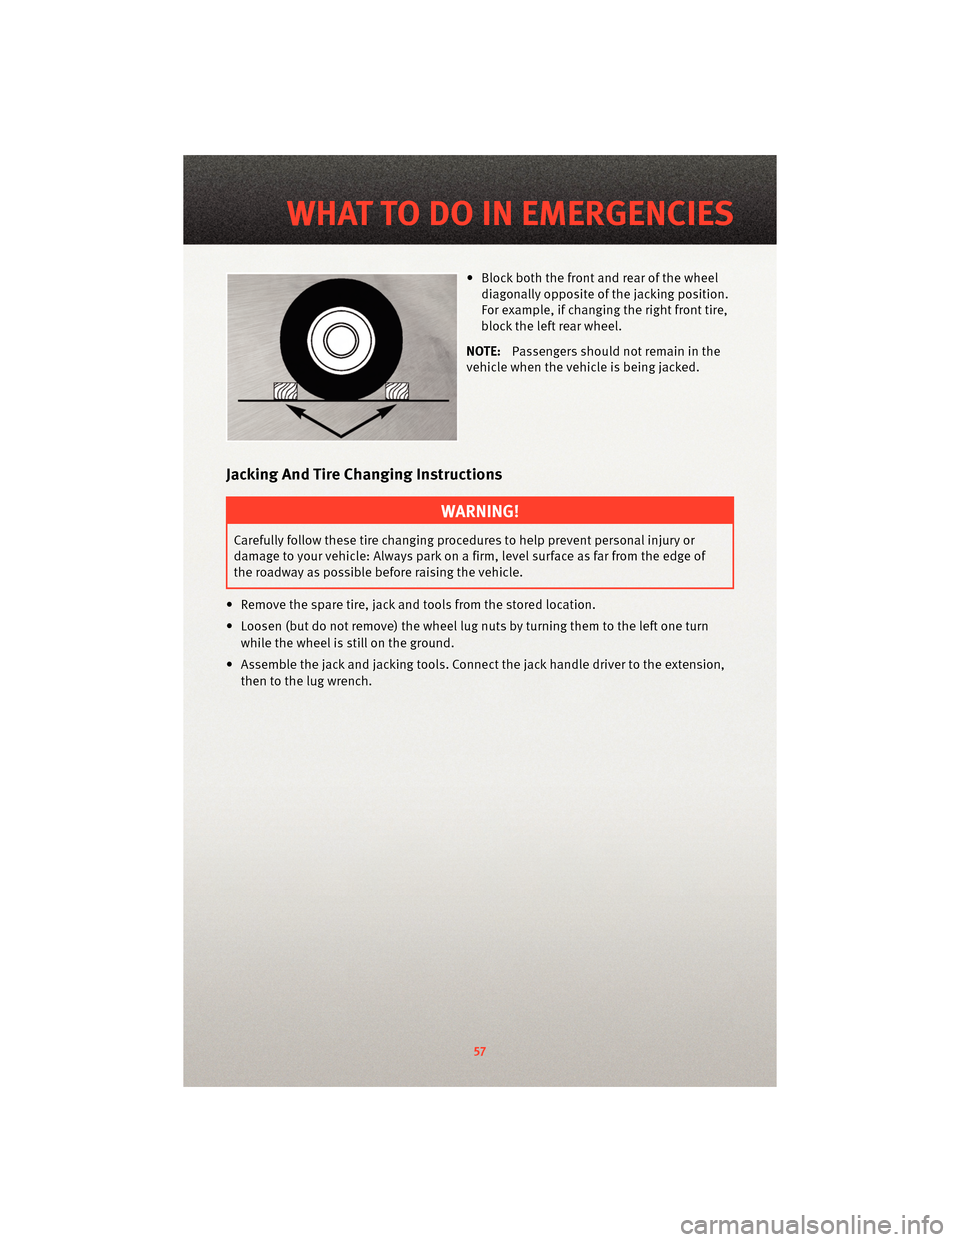
• Block both the front and rear of the wheeldiagonally opposite of the jacking position.
For example, if changing the right front tire,
block the left rear wheel.
NOTE: Passengers should not remain in the
vehicle when the vehicle is being jacked.
Jacking And Tire Changing Instructions
WARNING!
Carefully follow these tire changing p rocedures to help prevent personal injury or
damage to your vehicle: Always park on a firm, level surface as far from the edge of
the roadway as possible before raising the vehicle.
• Remove the spare tire, jack and tools from the stored location.
• Loosen (but do not remove) the wheel lug nuts by turning them to the left one turn while the wheel is still on the ground.
• Assemble the jack and jacking tools. Connect the jack handle driver to the extension, then to the lug wrench.
57
WHAT TO DO IN EMERGENCIES
Page 60 of 88
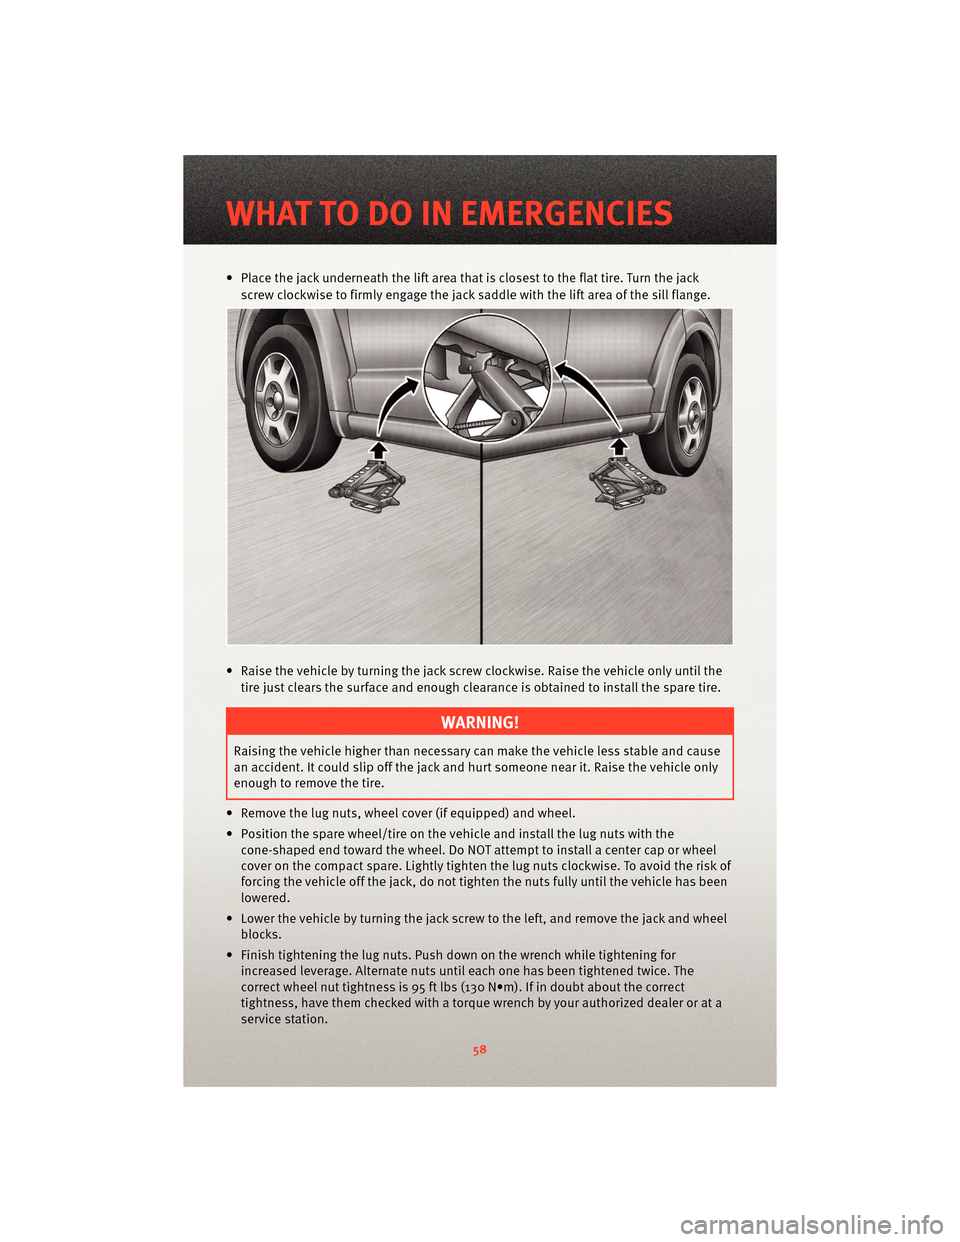
• Place the jack underneath the lift area that is closest to the flat tire. Turn the jackscrew clockwise to firmly engage the jack saddle with the lift area of the sill flange.
• Raise the vehicle by turning the jack screw clockwise. Raise the vehicle only until the tire just clears the surface and enough clearance is obtained to install the spare tire.
WARNING!
Raising the vehicle higher than necessary can make the vehicle less stable and cause
an accident. It could slip off the jack and hurt someone near it. Raise the vehicle only
enough to remove the tire.
• Remove the lug nuts, wheel cover (if equipped) and wheel.
• Position the spare wheel/tire on the vehicle and install the lug nuts with the cone-shaped end toward the wheel. Do NOT attempt to install a center cap or wheel
cover on the compact spare. Lightly tighten the lug nuts clockwise. To avoid the risk of
forcing the vehicle off the jack, do not tighten the nuts fully until the vehicle has been
lowered.
• Lower the vehicle by turning the jack screw to the left, and remove the jack and wheel blocks.
• Finish tightening the lug nuts. Push do wn on the wrench while tightening for
increased leverage. Alternate nuts until each one has been tightened twice. The
correct wheel nut tightness is 95 ft lbs (130 N•m). If in doubt about the correct
tightness, have them checked with a tor que wrench by your authorized dealer or at a
service station.
WHAT TO DO IN EMERGENCIES
58
Page 62 of 88
WARNING!
When temperatures are below the freezing point, electrolyte in a discharged battery
may freeze. Do not attempt jump-startingbecause the battery could rupture or
explode and cause personal injury. Battery temperature must be brought above the
freezing point before attempting a jump-start.
Preparations for Jump-Start
• The battery in your vehicle is located between the left front headlight assembly and
the left front wheel splash shield. To allow jump-starting there are remote battery
posts located on the left side of the engine compartment.
WARNING!
• Take care to avoid the radiator coolin g fan whenever the hood is raised. It can start
anytime the ignition switch is on. You can be injured by moving fan blades.
• Remove any metal jewelry such as watch bands or bracelets that might make an inadvertent electrical contact. You could be seriously injured.
• Batteries contain sulfuric acid that can burn your skin or eyes and generate hydrogen gas which is flammable and explosive. Keep open flames or sparks away
from the battery.
• Set the parking brake, shift the autom atic transmission into PARK and turn the ignition
to LOCK.
• Turn off the heater, radio, and all unnecessary electrical accessories.
• Remove the protective cover over the remote positive(+)battery post. To remove the
cover, press the locking tab and pull upward on the cover.
• If using a another vehicle to jump-start the battery, park the vehicle within the jumper
cables reach, set the parking brake and make sure the ignition is OFF.
WARNING!
Do not allow vehicles to touch each other as this could establish a ground connection
and personal injury could result.
Jump-Starting Procedure
WARNING!
Failure to follow this procedure could result in personal injury or property damage due
to battery explosion.
WHAT TO DO IN EMERGENCIES
60
Page 64 of 88
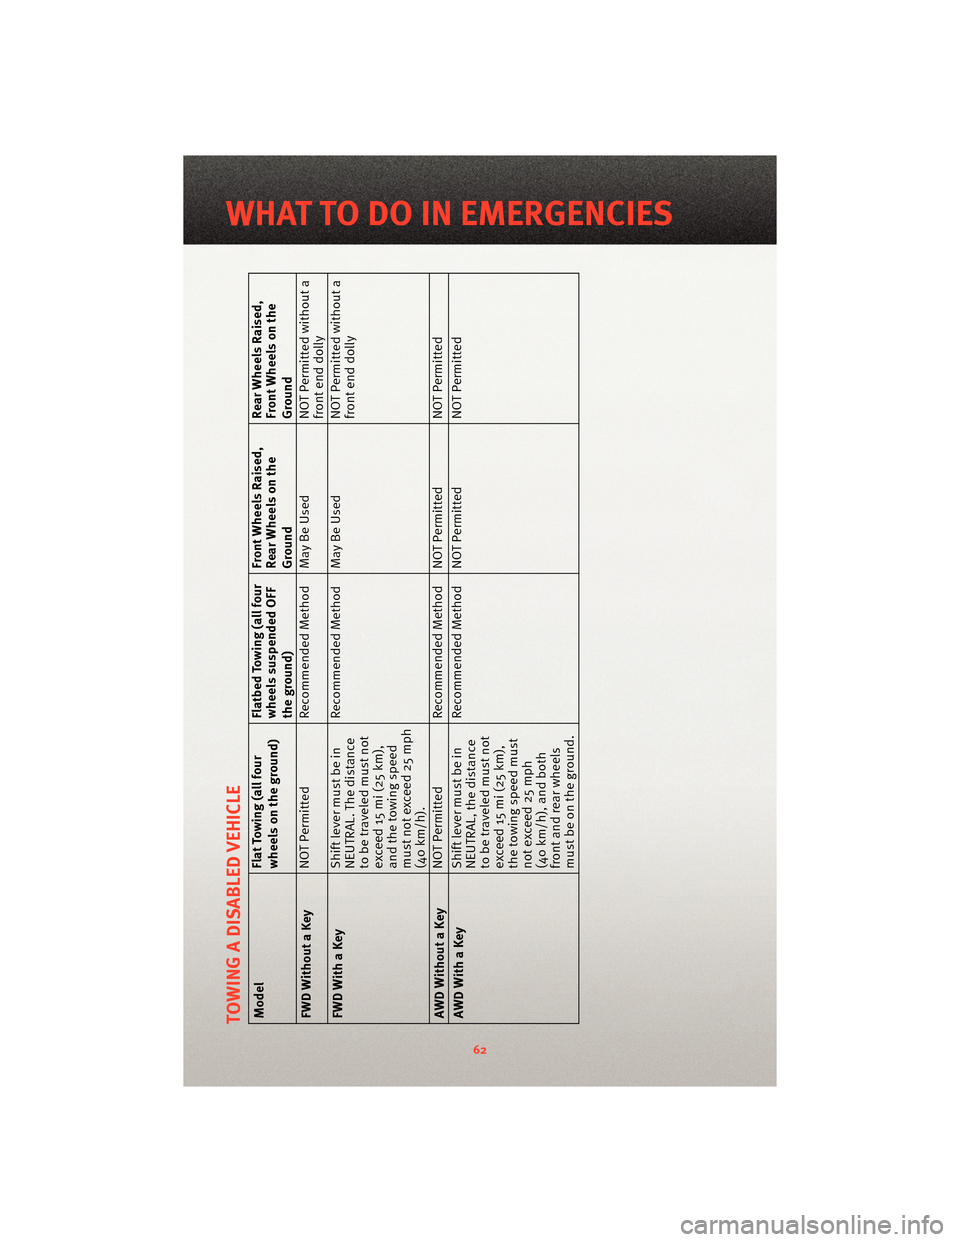
TOWING A DISABLED VEHICLEModelFlat Towing (all four
wheels on the ground)Flatbed Towing (all four
wheels suspended OFF
the ground)Front Wheels Raised,
Rear Wheels on the
GroundRear Wheels Raised,
Front Wheels on the
Ground
FWD Without a Key NOT Permitted
Recommended Method May Be Used NOT Permitted without a
front end dolly
FWD With a Key Shift lever must be in
NEUTRAL. The distance
to be traveled must not
exceed 15 mi (25 km),
and the towing speed
must not exceed 25 mph
(40 km/h).Recommended Method May Be Used
NOT Permitted without a
front end dolly
AWD Without a Key NOT Permitted
Recommended Method NOT Permitted NOT Permitted
AWD With a Key Shift lever must be in
NEUTRAL, the distance
to be traveled must not
exceed 15 mi (25 km),
the towing speed must
not exceed 25 mph
(40 km/h), and both
front and rear wheels
must be on the ground.Recommended Method NOT Permitted
NOT Permitted
62
WHAT TO DO IN EMERGENCIES
Page 65 of 88
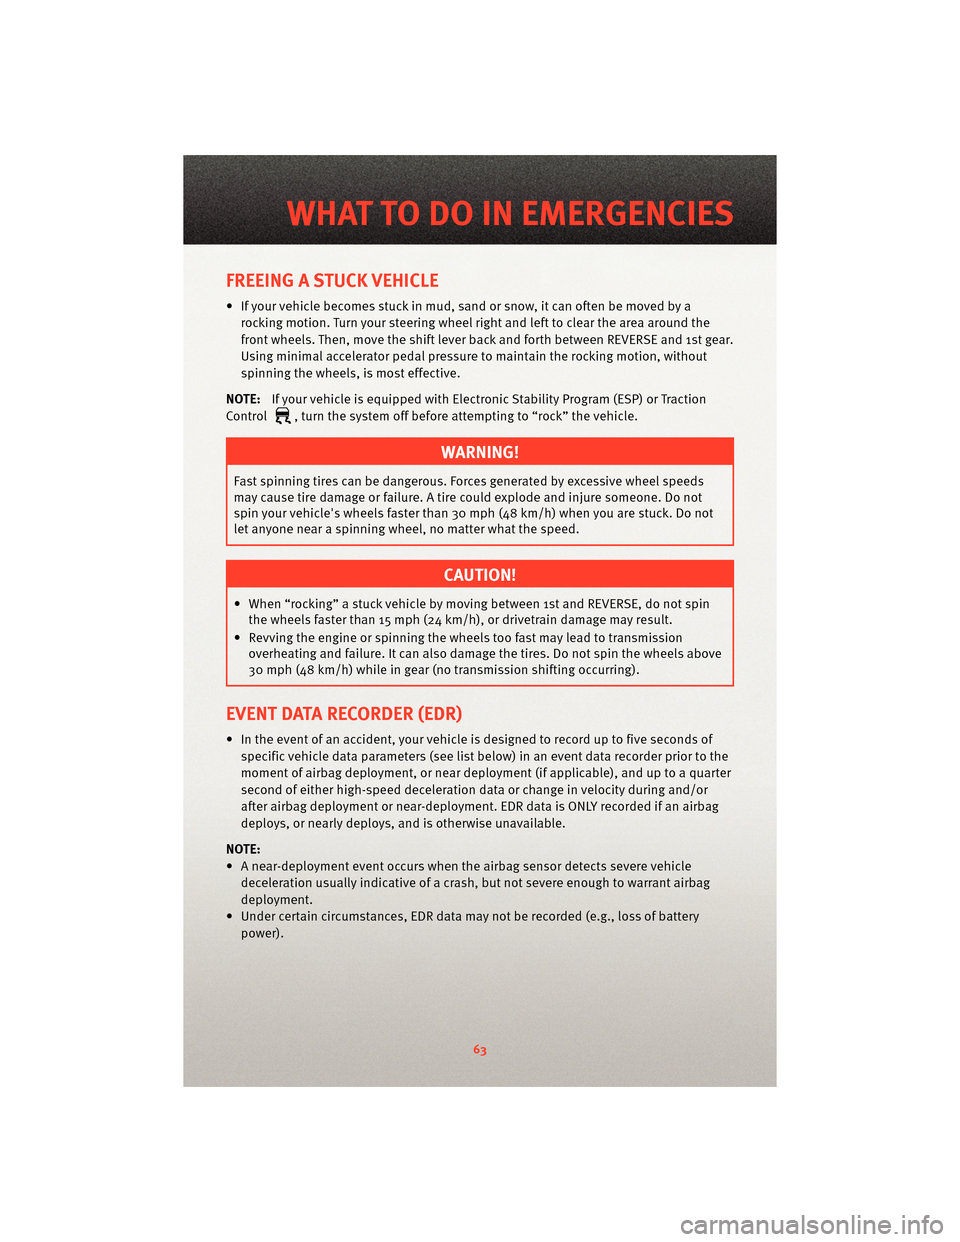
FREEING A STUCK VEHICLE
• If your vehicle becomes stuck in mud, sand or snow, it can often be moved by arocking motion. Turn your steering wheel right and left to clear the area around the
front wheels. Then, move the shift lever back and forth between REVERSE and 1st gear.
Using minimal accelerator pedal pressure to maintain the rocking motion, without
spinning the wheels, is most effective.
NOTE: If your vehicle is equipped with Electronic Stability Program (ESP) or Traction
Control
, turn the system off before attempting to “rock” the vehicle.
WARNING!
Fast spinning tires can be dangerous. Forces generated by excessive wheel speeds
may cause tire damage or failure. A tire could explode and injure someone. Do not
spin your vehicle's wheels faster than 30 mph (48 km/h) when you are stuck. Do not
let anyone near a spinning wheel, no matter what the speed.
CAUTION!
• When “rocking” a stuck vehicle by moving between 1st and REVERSE, do not spin the wheels faster than 15 mph (24 km/h), or drivetrain damage may result.
• Revving the engine or s pinning the wheels too fast ma y lead to transmission
overheating and failure. It can also damage the tires. Do not spin the wheels above
30 mph (48 km/h) while in gear (no transmission shifting occurring).
EVENT DATA RECORDER (EDR)
• In the event of an accident, your vehicle is designed to record up to five seconds of
specific vehicle data parameters (see list below) in an event data recorder prior to the
moment of airbag deployment, or ne ar deployment (if applicable), and up to a quarter
second of either high-speed deceleration data or change in velocity during and/or
after airbag deployment or ne ar-deployment. EDR data is ONLY recorded if an airbag
deploys, or nearly deploys, and is otherwise unavailable.
NOTE:
• A near-deployment event occurs when the airbag sensor detects severe vehicle
deceleration usually indicative of a crash, but not severe enough to warrant airbag
deployment.
• Under certain circumstances, EDR data ma y not be recorded (e.g., loss of battery
power).
63
WHAT TO DO IN EMERGENCIES
Page 70 of 88
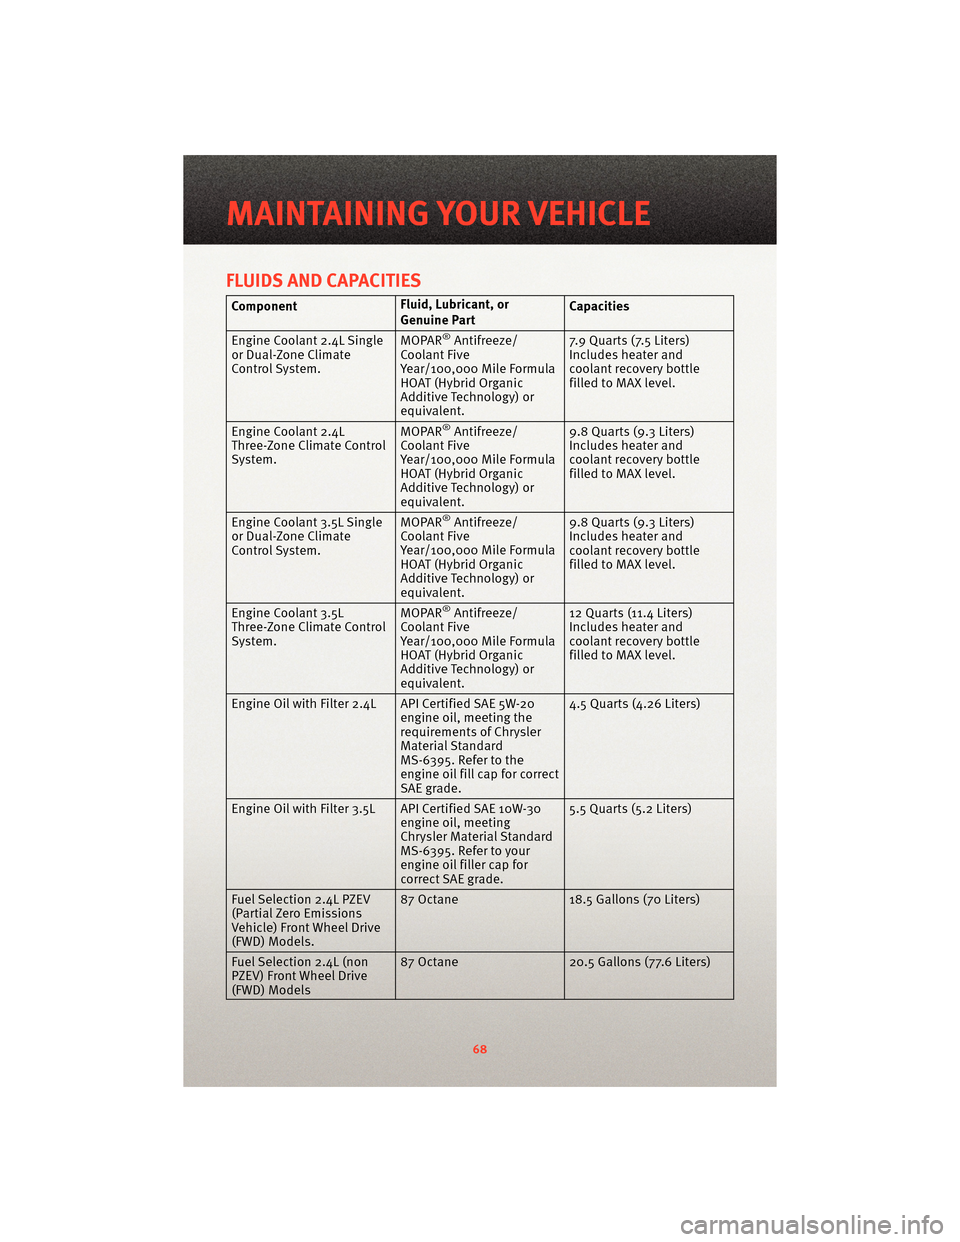
FLUIDS AND CAPACITIES
ComponentFluid, Lubricant, or
Genuine PartCapacities
Engine Coolant 2.4L Single
or Dual-Zone Climate
Control System. MOPAR
®Antifreeze/
Coolant Five
Year/100,000 Mile Formula
HOAT (Hybrid Organic
Additive Technology) or
equivalent. 7.9 Quarts (7.5 Liters)
Includes heater and
coolant recovery bottle
filled to MAX level.
Engine Coolant 2.4L
Three-Zone Climate Control
System. MOPAR
®Antifreeze/
Coolant Five
Year/100,000 Mile Formula
HOAT (Hybrid Organic
Additive Technology) or
equivalent. 9.8 Quarts (9.3 Liters)
Includes heater and
coolant recovery bottle
filled to MAX level.
Engine Coolant 3.5L Single
or Dual-Zone Climate
Control System. MOPAR
®Antifreeze/
Coolant Five
Year/100,000 Mile Formula
HOAT (Hybrid Organic
Additive Technology) or
equivalent. 9.8 Quarts (9.3 Liters)
Includes heater and
coolant recovery bottle
filled to MAX level.
Engine Coolant 3.5L
Three-Zone Climate Control
System. MOPAR
®Antifreeze/
Coolant Five
Year/100,000 Mile Formula
HOAT (Hybrid Organic
Additive Technology) or
equivalent. 12 Quarts (11.4 Liters)
Includes heater and
coolant recovery bottle
filled to MAX level.
Engine Oil with Filter 2.4L API Certified SAE 5W-20 engine oil, meeting the
requirements of Chrysler
Material Standard
MS-6395. Refer to the
engine oil fill cap for correct
SAE grade.4.5 Quarts (4.26 Liters)
Engine Oil with Filter 3.5L API Certified SAE 10W-30 engine oil, meeting
Chrysler Material Standard
MS-6395. Refer to your
engine oil filler cap for
correct SAE grade.5.5 Quarts (5.2 Liters)
Fuel Selection 2.4L PZEV
(Partial Zero Emissions
Vehicle) Front Wheel Drive
(FWD) Models. 87 Octane
18.5 Gallons (70 Liters)
Fuel Selection 2.4L (non
PZEV) Front Wheel Drive
(FWD) Models 87 Octane
20.5 Gallons (77.6 Liters)
MAINTAINING YOUR VEHICLE
68
Page 71 of 88
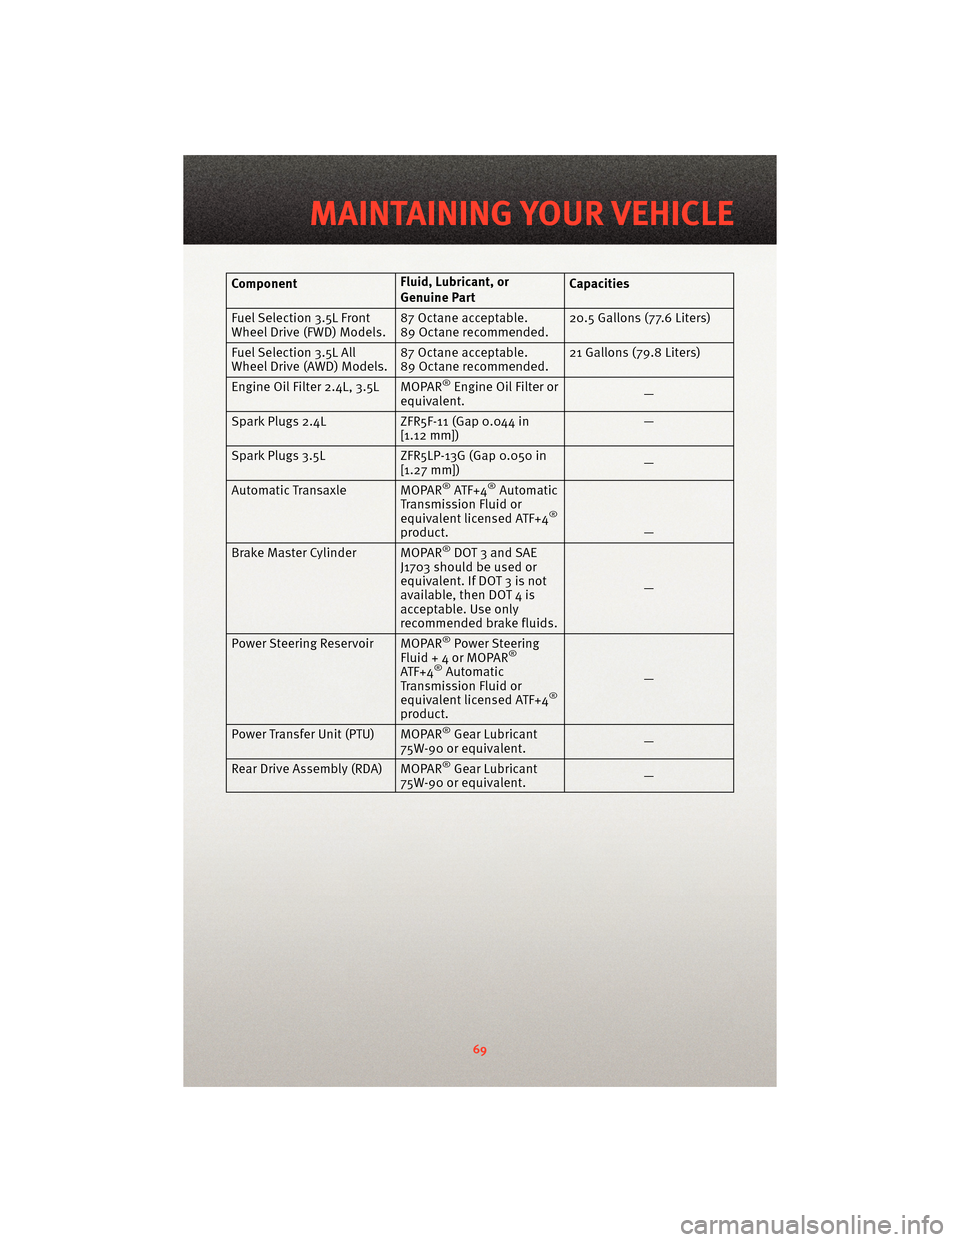
ComponentFluid, Lubricant, or
Genuine PartCapacities
Fuel Selection 3.5L Front
Wheel Drive (FWD) Models. 87 Octane acceptable.
89 Octane recommended.20.5 Gallons (77.6 Liters)
Fuel Selection 3.5L All
Wheel Drive (AWD) Models. 87 Octane acceptable.
89 Octane recommended.21 Gallons (79.8 Liters)
Engine Oil Filter 2.4L, 3.5L MOPAR
®Engine Oil Filter or
equivalent. —
Spark Plugs 2.4L ZFR5F-11 (Gap 0.044 in
[1.12 mm]) —
Spark Plugs 3.5L ZFR5LP-13G (Gap 0.050 in
[1.27 mm]) —
Automatic Transaxle MOPAR
®ATF+4®Automatic
Transmission Fluid or
equivalent licensed ATF+4
®
product. —
Brake Master Cylinder MOPAR®DOT 3 and SAE
J1703 should be used or
equivalent. If DOT 3 is not
available, then DOT 4 is
acceptable. Use only
recommended brake fluids. —
Power Steering Reservoir MOPAR
®Power Steering
Fluid+4orMOPAR®
ATF+4®Automatic
Transmission Fluid or
equivalent licensed ATF+4
®
product. —
Power Transfer Unit (PTU) MOPAR®Gear Lubricant
75W-90 or equivalent. —
Rear Drive Assembly (RDA) MOPAR
®Gear Lubricant
75W-90 or equivalent. —
69
MAINTAINING YOUR VEHICLE
Page 76 of 88
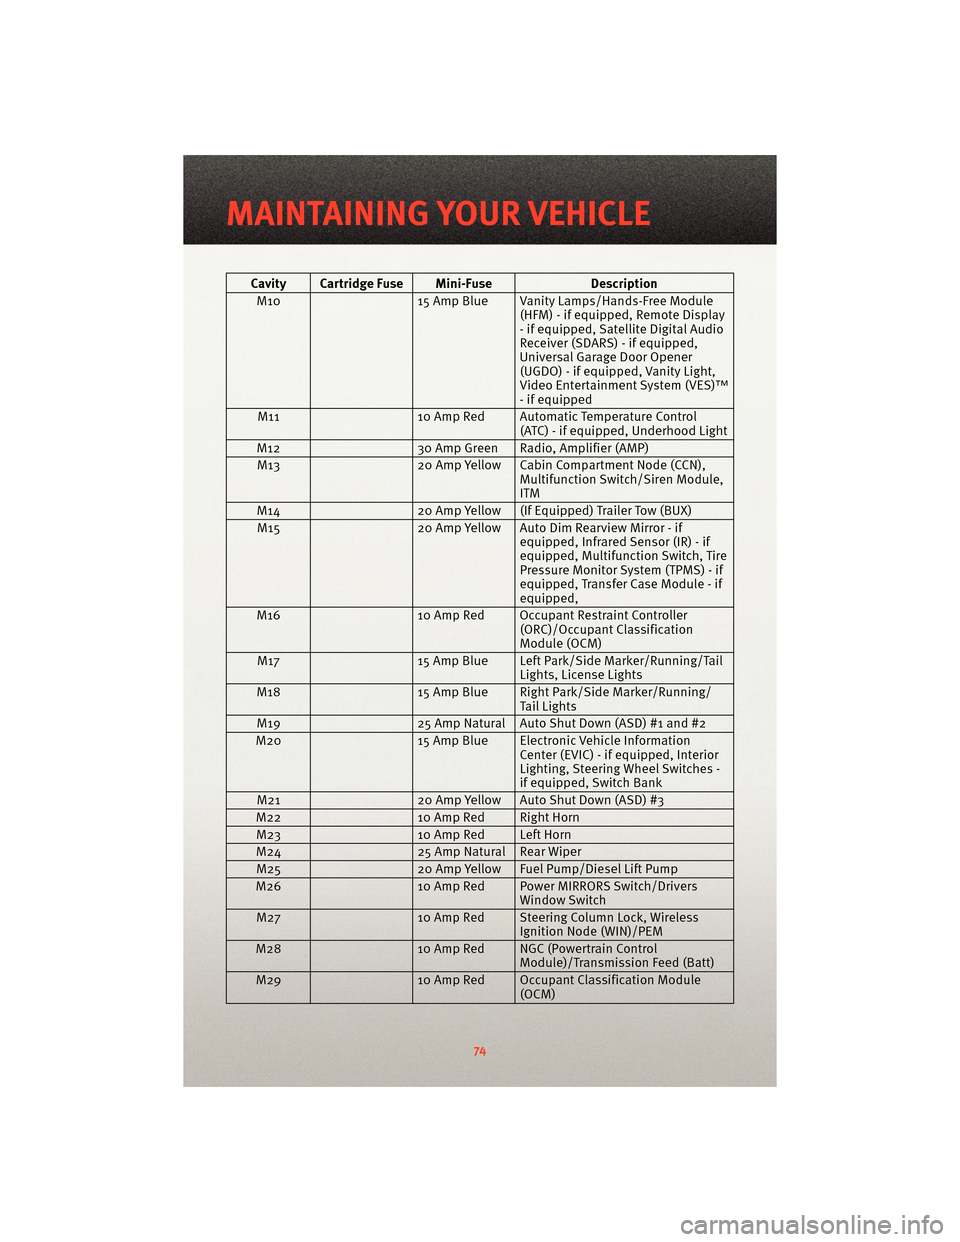
Cavity Cartridge Fuse Mini-FuseDescription
M10 15 Amp Blue Vanity Lamps/Hands-Free Module
(HFM) - if equipped, Remote Display
- if equipped, Satellite Digital Audio
Receiver (SDARS) - if equipped,
Universal Garage Door Opener
(UGDO) - if equipped, Vanity Light,
Video Entertainment System (VES)™
- if equipped
M11 10 Amp Red Automatic Temperature Control
(ATC) - if equipped, Underhood Light
M12 30 Amp Green Radio, Amplifier (AMP)
M13 20 Amp Yellow Cabin Compartment Node (CCN),
Multifunction Switch/Siren Module,
ITM
M14 20 Amp Yellow (If Equipped) Trailer Tow (BUX)
M15 20 Amp Yellow Auto Dim Rearview Mirror - if
equipped, Infrared Sensor (IR) - if
equipped, Multifunction Switch, Tire
Pressure Monitor System (TPMS) - if
equipped, Transfer Case Module - if
equipped,
M16 10 Amp Red Occupant Restraint Controller
(ORC)/OccupantClassification
Module (OCM)
M17 15 Amp Blue Left Park/Side Marker/Running/Tail
Lights, License Lights
M18 15 Amp Blue Right Park/Side Marker/Running/
Tail Lights
M19 25 Amp Natural Auto Shut Down (ASD) #1 and #2
M20 15 Amp Blue Electronic Vehicle Information
Center (EVIC) - if equipped, Interior
Lighting, Steering Wheel Switches -
if equipped, Switch Bank
M21 20 Amp Yellow Auto Shut Down (ASD) #3
M22 10 Amp Red Right Horn
M23 10 Amp Red Left Horn
M24 25 Amp Natural Rear Wiper
M25 20 Amp Yellow Fuel Pump/Diesel Lift Pump
M26 10 Amp Red Power MIRRORS Switch/Drivers
Window Switch
M27 10 Amp Red Steering Column Lock, Wireless
Ignition Node (WIN)/PEM
M28 10 Amp Red NGC (Powertrain Control
Module)/Transmission Feed (Batt)
M29 10 Amp Red Occupant Classification Module
(OCM)
MAINTAINING YOUR VEHICLE
74
Page 78 of 88
WHEEL AND WHEEL TRIM CARE
• All wheels and wheel trim, especially aluminum and chrome plated wheels, should becleaned regularly with a mild soap and water to prevent corrosion.
• To remove heavy soil and/or excessive brake dust, use MOPAR
®Wheel Cleaner or
equivalent or select a non-ab rasive,non-acidic cleaner.
CAUTION!
Do not use scouring pads, steel wool, a bristle brush, or metal polishes. Do not use
oven cleaner. These products may damage the wheel's protective finish. Avoid
automatic car washes that use acidic solution s or harsh brushes that may damage the
wheel's protective finish. Only MOPAR
®Wheel Cleaner or equivalent is recommended.
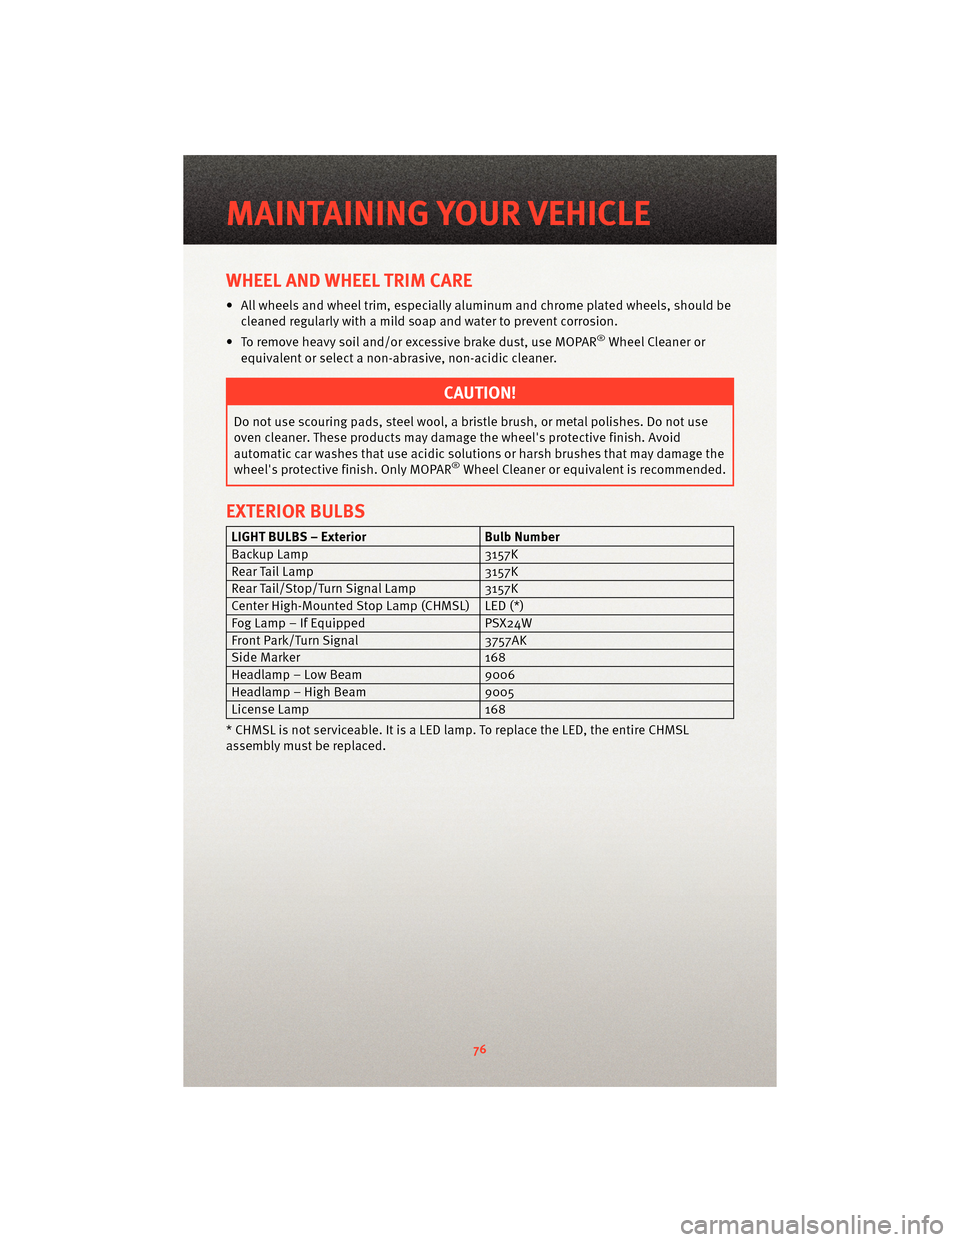
EXTERIOR BULBS
LIGHT BULBS – Exterior Bulb Number
Backup Lamp 3157K
Rear Tail Lamp 3157K
Rear Tail/Stop/Turn Signal Lamp 3157K
Center High-Mounted Stop Lamp (CHMSL) LED (*)
Fog Lamp – If Equipped PSX24W
Front Park/Turn Signal 3757AK
Side Marker 168
Headlamp – Low Beam 9006
Headlamp – High Beam 9005
License Lamp 168
* CHMSL is not serviceable. It is a LED lamp. To replace the LED, the entire CHMSL
assembly must be replaced.
MAINTAINING YOUR VEHICLE
76