wheel DODGE JOURNEY 2010 1.G User Guide
[x] Cancel search | Manufacturer: DODGE, Model Year: 2010, Model line: JOURNEY, Model: DODGE JOURNEY 2010 1.GPages: 88, PDF Size: 12.49 MB
Page 3 of 88
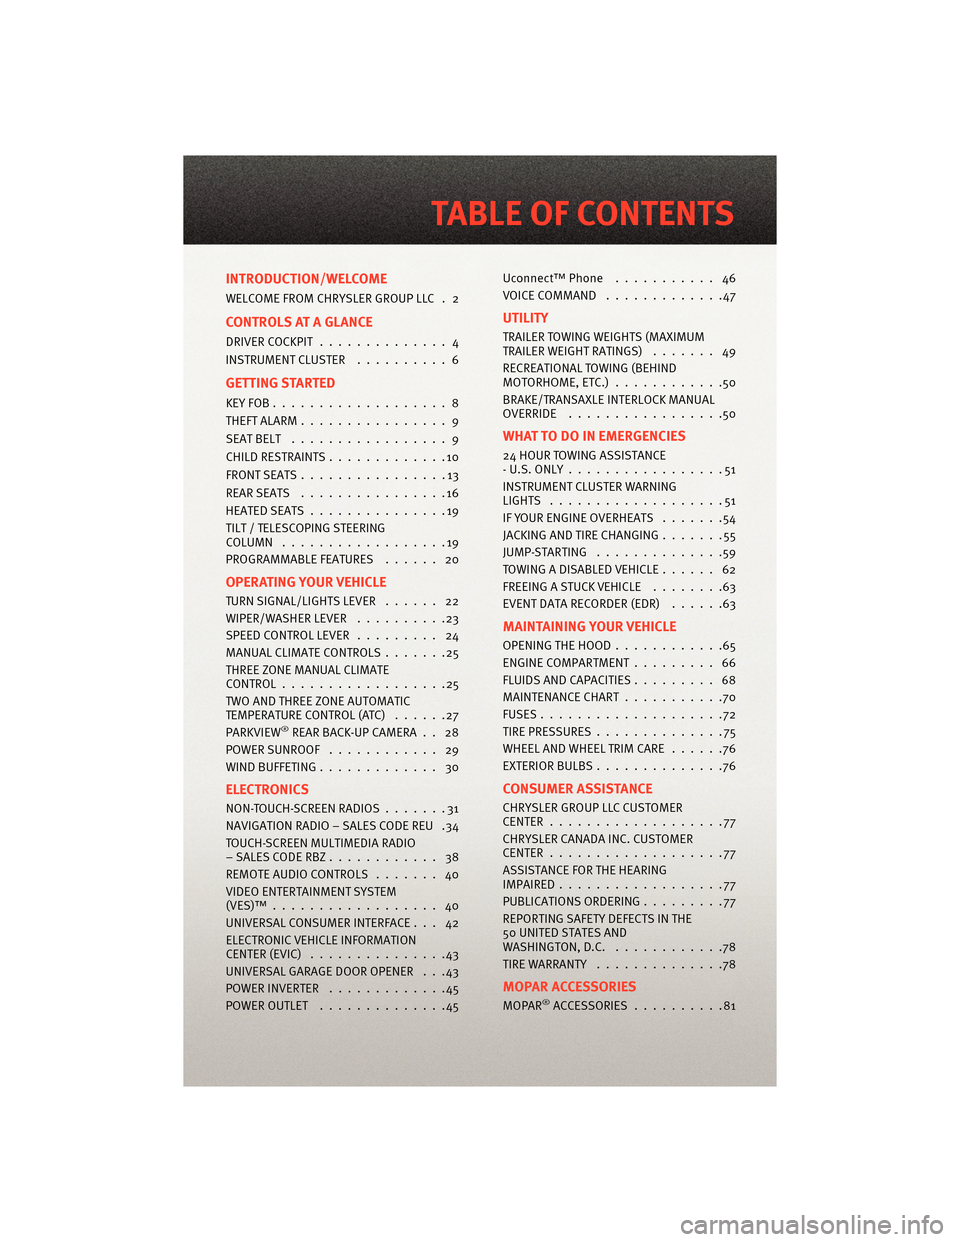
INTRODUCTION/WELCOME
WELCOME FROM CHRYSLER GROUP LLC . 2
CONTROLS AT A GLANCE
DRIVER COCKPIT.............. 4
INSTRUMENT CLUSTER ..........6
GETTING STARTED
KEYFOB...................8
THEFT ALARM................ 9
SEATBELT ................. 9
CHILD RESTRAINTS .............10
FRONTSEATS................13
REARSEATS ................16
HEATEDSEATS...............19
TILT / TELESCOPING STEERING
COLUMN ..................19
PROGRAMMABLEFEATURES ...... 20
OPERATING YOUR VEHICLE
TURN SIGNAL/LIGHTS LEVER ...... 22
WIPER/WASHER LEVER ..........23
SPEED CONTROL LEVER ......... 24
MANUAL CLIMATE CONTROLS .......25
THREE ZONE MANUAL CLIMATE
CONTROL..................25
TWO AND THREE ZONE AUTOMATIC
TEMPERATURE CONTROL (ATC) ......27
PARKVIEW
®REAR BACK-UP CAMERA . . 28
POWERSUNROOF ............ 29
WIND BUFFETING ............. 30
ELECTRONICS
NON-TOUCH-SCREENRADIOS.......31
NAVIGATION RADIO – SALES CODE REU .34
TOUCH-SCREEN MULTIMEDIA RADIO
–SALESCODERBZ............ 38
REMOTE AUDIO CONTROLS ....... 40
VIDEO ENTERTAINMENT SYSTEM
(VES)™.................. 40
UNIVERSAL CONSUMER INTERFACE . . . 42
ELECTRONIC VEHICLE INFORMATION
CENTER (EVIC) ...............43
UNIVERSAL GARAGE DOOR OPENER . . .43
POWERINVERTER .............45
POWER OUTLET ..............45 Uconnect™ Phone
........... 46
VOICECOMMAND .............47
UTILITY
TRAILER TOWING WEIGHTS (MAXIMUM
TRAILER WEIGHT RATINGS) ....... 49
RECREATIONAL TOWING (BEHIND
MOTORHOME, ETC.) ............50
BRAKE/TRANSAXLE INTERLOCK MANUAL
OVERRIDE .................50
WHAT TO DO IN EMERGENCIES
24 HOUR TOWING ASSISTANCE
- U.S. ONLY .................51
INSTRUMENT CLUSTER WARNING
LIGHTS ...................51
IF YOUR ENGINE OVERHEATS .......54
JACKINGANDTIRECHANGING.......55
JUMP-STARTING ..............59
TOWINGADISABLEDVEHICLE...... 62
FREEING A STUCK VEHICLE ........63
EVENT DATA RECORDER (EDR) ......63
MAINTAINING YOUR VEHICLE
OPENING THE HOOD............65
ENGINE COMPARTMENT ......... 66
FLUIDS AND CAPACITIES ......... 68
MAINTENANCE CHART ...........70
FUSES....................72
TIREPRESSURES..............75
WHEEL AND WHEEL TRIM CARE ......76
EXTERIOR BULBS ..............76
CONSUMER ASSISTANCE
CHRYSLER GROUP LLC CUSTOMER
CENTER...................77
CHRYSLER CANADA INC. CUSTOMER
CENTER...................77
ASSISTANCE FOR THE HEARING
IMPAIRED..................77
PUBLICATIONS ORDERING .........77
REPORTING SAFETY DEFECTS IN THE
50 UNITED STATES AND
WASHINGTON, D.C. ............78
TIRE WARRANTY ..............78
MOPAR ACCESSORIES
MOPAR®ACCESSORIES..........81
TABLE OF CONTENTS
Page 8 of 88
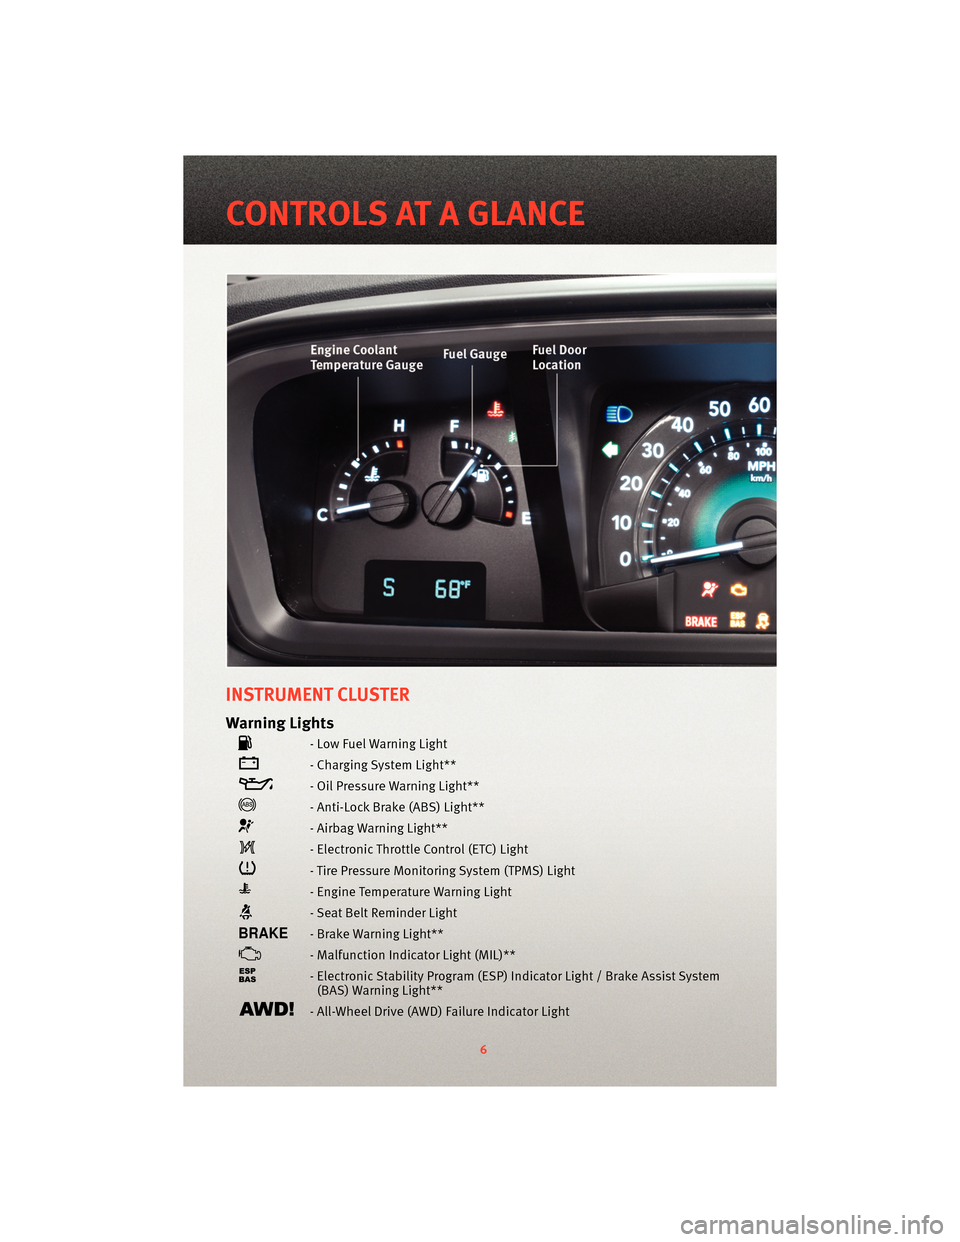
INSTRUMENT CLUSTER
Warning Lights
- Low Fuel Warning Light
- Charging System Light**
- Oil Pressure Warning Light**
- Anti-Lock Brake (ABS) Light**
- Airbag Warning Light**
- Electronic Throttle Control (ETC) Light
- Tire Pressure Monitoring System (TPMS) Light
- Engine Temperature Warning Light
- Seat Belt Reminder Light
- Brake Warning Light**
- Malfunction Indicator Light (MIL)**
- Electronic Stability Program (ESP) Indicator Light / Brake Assist System
(BAS) Warning Light**
- All-Wheel Drive (AWD) Failure Indicator Light
6
CONTROLS AT A GLANCE
Page 21 of 88
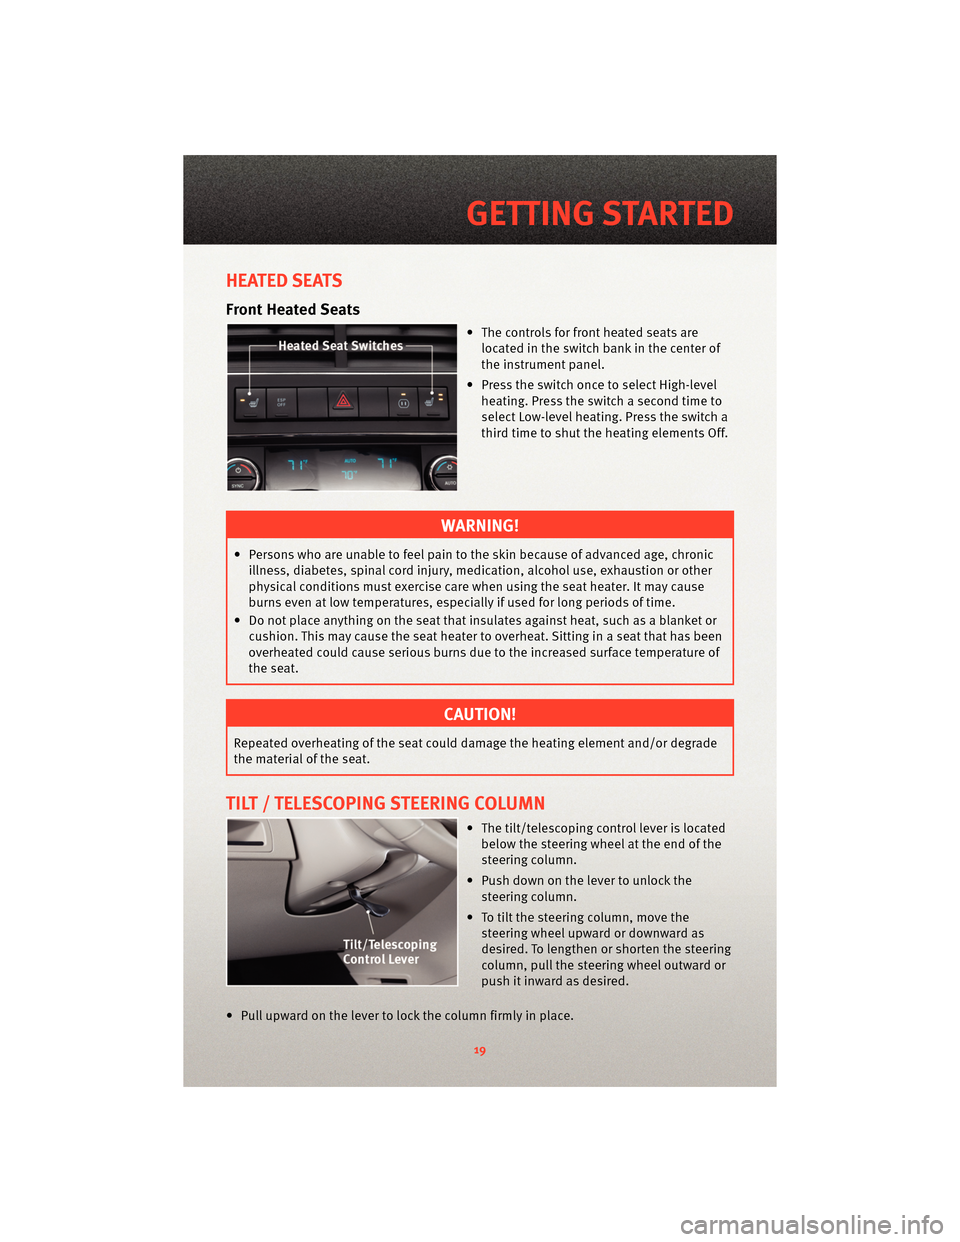
HEATED SEATS
Front Heated Seats
• The controls for front heatedseats are
located in the switch bank in the center of
the instrument panel.
• Press the switch once to select High-level heating. Press the switch a second time to
select Low-level heating. Press the switch a
third time to shut the heating elements Off.
WARNING!
• Persons who are unable to feel pain to the skin because of advanced age, chronicillness, diabetes, spinal cord injury, medication, alcohol use, exhaustion or other
physical conditions must exercise care when using the seat heater. It may cause
burns even at low temperatures, especially if used for long periods of time.
• Do not place anything on the seat that insulates against heat, such as a blanket or cushion. This may cause the seat heater to overheat. Sitting in a seat that has been
overheated could cause serious burns due to the increased surface temperature of
the seat.
CAUTION!
Repeated overheating of the seat could damage the heating element and/or degrade
the material of the seat.
TILT / TELESCOPING STEERING COLUMN
• The tilt/telescoping control lever is locatedbelow the steering wheel at the end of the
steering column.
• Push down on the lever to unlock the steering column.
• To tilt the steering column, move the steering wheel upward or downward as
desired. To lengthen or shorten the steering
column, pull the steering wheel outward or
push it inward as desired.
• Pull upward on the lever to lock the column firmly in place.
19
GETTING STARTED
Page 22 of 88
WARNING!
Do not adjust the steering wheel while driving. The tilt/telescoping adjustment must
be locked while driving. Adjusting the steering wheel while driving or driving without
the tilt/telescoping adjustment locked could cause the driver to lose control of the
vehicle. Failure to follow this warning may result in serious injury or death.
PROGRAMMABLE FEATURES
Electronic Vehicle Information Center (EVIC) – If Equipped
• The EVIC can be used to program the following Personal Settings. Press and release the MENU button
until Personal Settings displays, then press the SCROLL
button
to scroll through the settings. Press the FUNCTION SELECT buttonto
change the setting.
• Language • Headlamps With Wipers
• Auto UNLK On Exit • ILLUMIN Approach
• RKE Unlock • Key-Off Power Delay
• Sound Horn With Lock • NAV Turn By Turn
• Flash Lamp Lock • Display ECO Message
• Headlamp Off Delay • Display Units of Measure In
Key Fob Programmable Features
• The following features may also be programmed by using the Key Fob transmitter or the ignition switch and driver's door lock switch.
NOTE: Pressing the LOCK button while you are inside the vehicle will activate the
Vehicle Security Alarm. Opening a door with the Vehicle Security Alarm activated will
cause the alarm to sound. Press the UNLOCK button to deactivate the Vehicle Security
Alarm.
Unlock On First Press
• To unlock either the driver's side, or all doors, on the first press of the UNLOCK button:
• Press and hold the LOCK button for at least 4 seconds, but no longer than10 seconds. Then, press and hold the UNLOCK button while still holding the LOCK
button.
• Release both buttons at the same time.
GETTING STARTED
20
Page 42 of 88
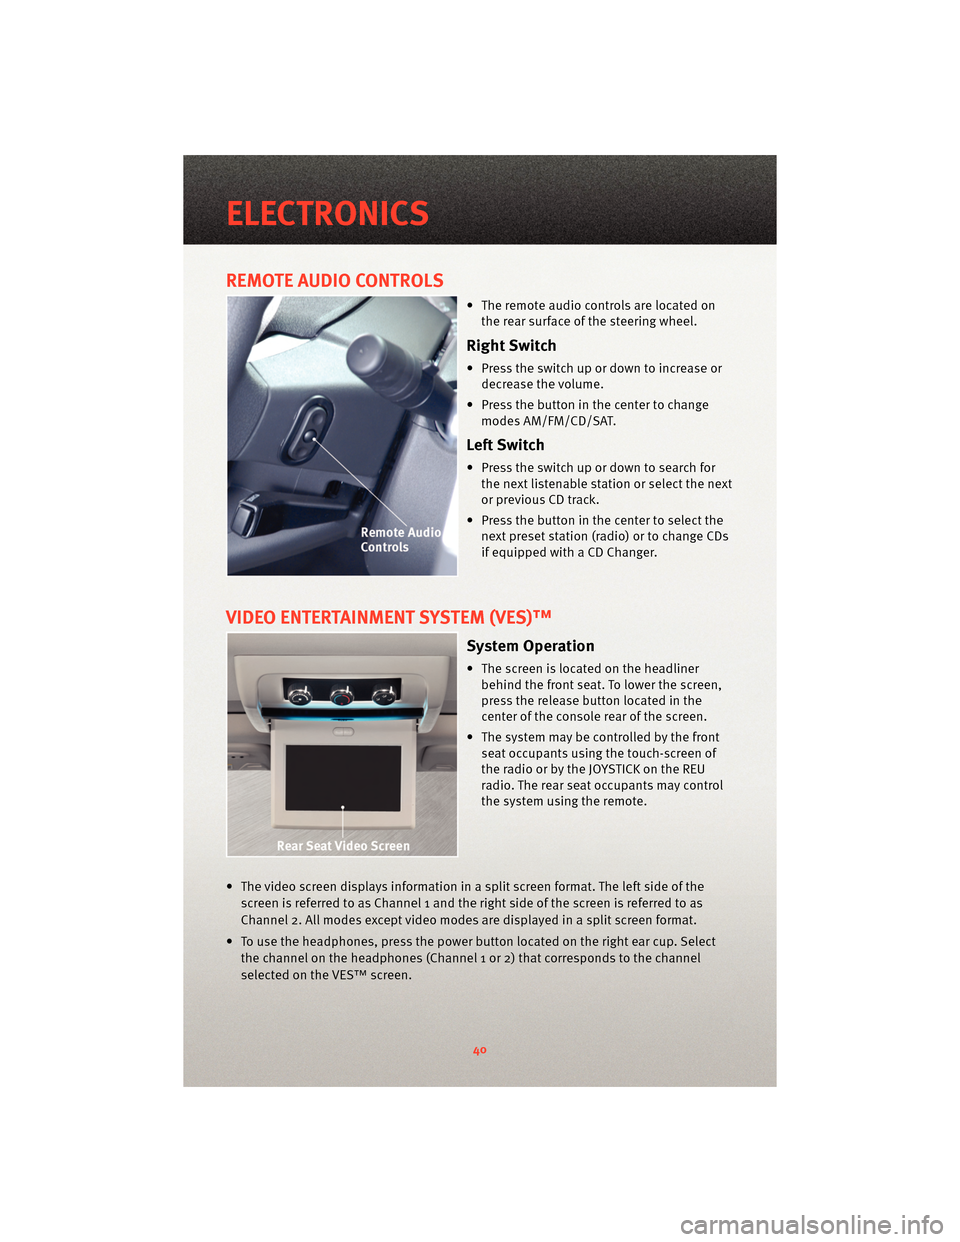
REMOTE AUDIO CONTROLS
• The remote audio controls are located onthe rear surface of the steering wheel.
Right Switch
• Press the switch up or down to increase ordecrease the volume.
• Press the button in the center to change modes AM/FM/CD/SAT.
Left Switch
• Press the switch up or down to search forthe next listenable station or select the next
or previous CD track.
• Press the button in the center to select the next preset station (radio) or to change CDs
if equipped with a CD Changer.
VIDEO ENTERTAINMENT SYSTEM (VES)™
System Operation
• The screen is located on the headlinerbehind the front seat. To lower the screen,
press the release button located in the
center of the console rear of the screen.
• The system may be controlled by the front seat occupants using the touch-screen of
the radio or by the JOYSTICK on the REU
radio. The rear seat occupants may control
the system using the remote.
• The video screen displays information in a split screen format. The left side of the screen is referred to as Channel 1 and the right side of the screen is referred to as
Channel 2. All modes except video modes are displayed in a split screen format.
• To use the headphones, press the power button located on the right ear cup. Select the channel on the headphones (Channel 1 or 2) that corresponds to the channel
selected on the VES™ screen.
ELECTRONICS
40
Page 45 of 88
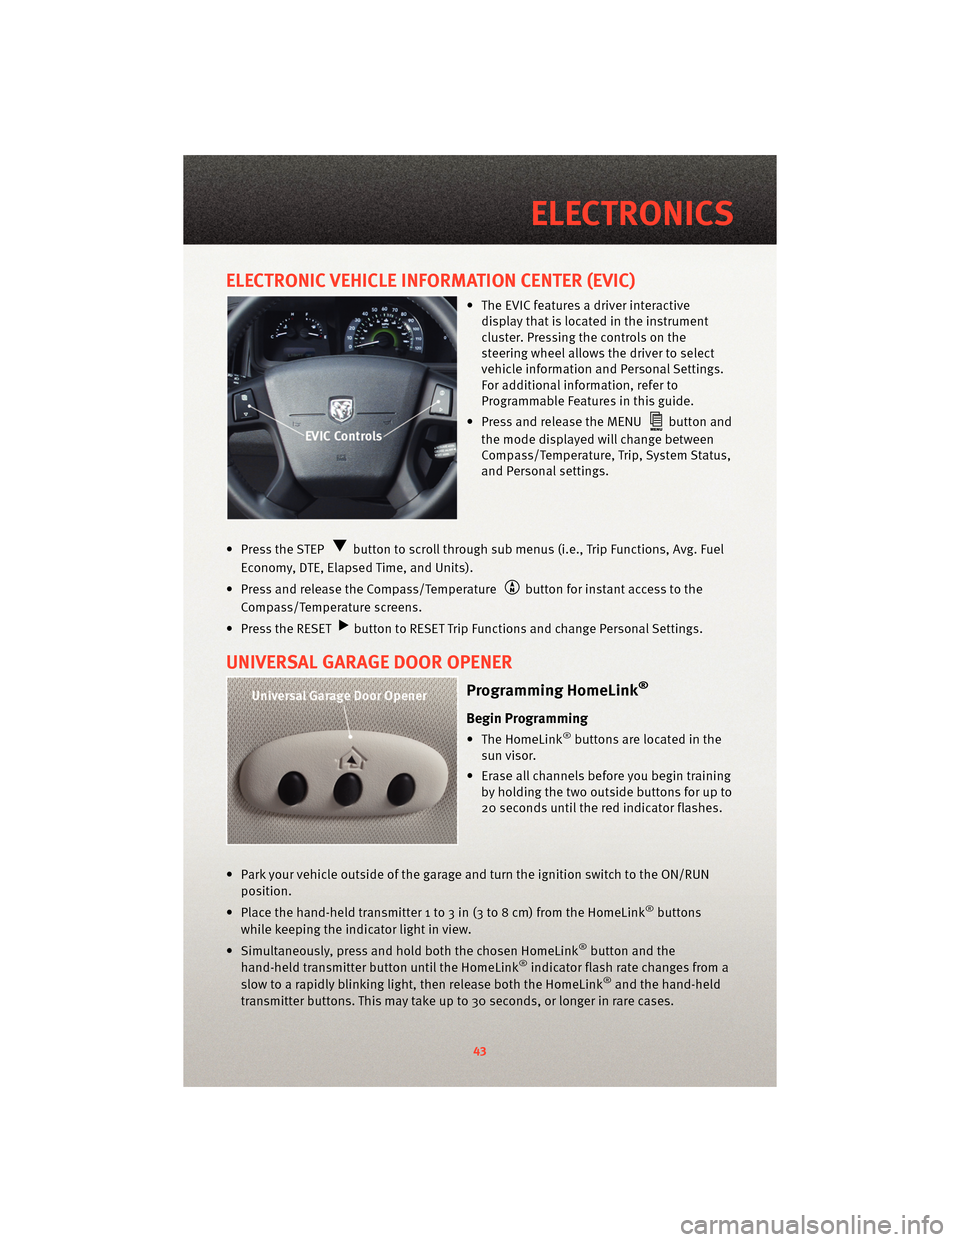
ELECTRONIC VEHICLE INFORMATION CENTER (EVIC)
• The EVIC features a driver interactivedisplay that is located in the instrument
cluster. Pressing the controls on the
steering wheel allows the driver to select
vehicle information and Personal Settings.
For additional information, refer to
Programmable Features in this guide.
• Press and release the MENU
button and
the mode displayed will change between
Compass/Temperature, Trip, System Status,
and Personal settings.
• Press the STEP
button to scroll through sub menus (i.e., Trip Functions, Avg. Fuel
Economy, DTE, Elapsed Time, and Units).
• Press and release the Compass/Temperature
button for instant access to the
Compass/Temperature screens.
• Press the RESET
button to RESET Trip Functions and change Personal Settings.
UNIVERSAL GARAGE DOOR OPENER
Programming HomeLink®
Begin Programming
• The HomeLink®buttons are located in the
sun visor.
• Erase all channels before you begin training by holding the two outside buttons for up to
20 seconds until the red indicator flashes.
• Park your vehicle outside of the garage and turn the ignition switch to the ON/RUN position.
• Place the hand-held transmitter 1 to 3 in (3 to 8 cm) from the HomeLink
®buttons
while keeping the indicator light in view.
• Simultaneously, press and hold both the chosen HomeLink
®button and the
hand-held transmitter button until the HomeLink®indicator flash rate changes from a
slow to a rapidly blinking light, then release both the HomeLink®and the hand-held
transmitter buttons. This may take up to 30 seconds, or longer in rare cases.
43
ELECTRONICS
Page 51 of 88
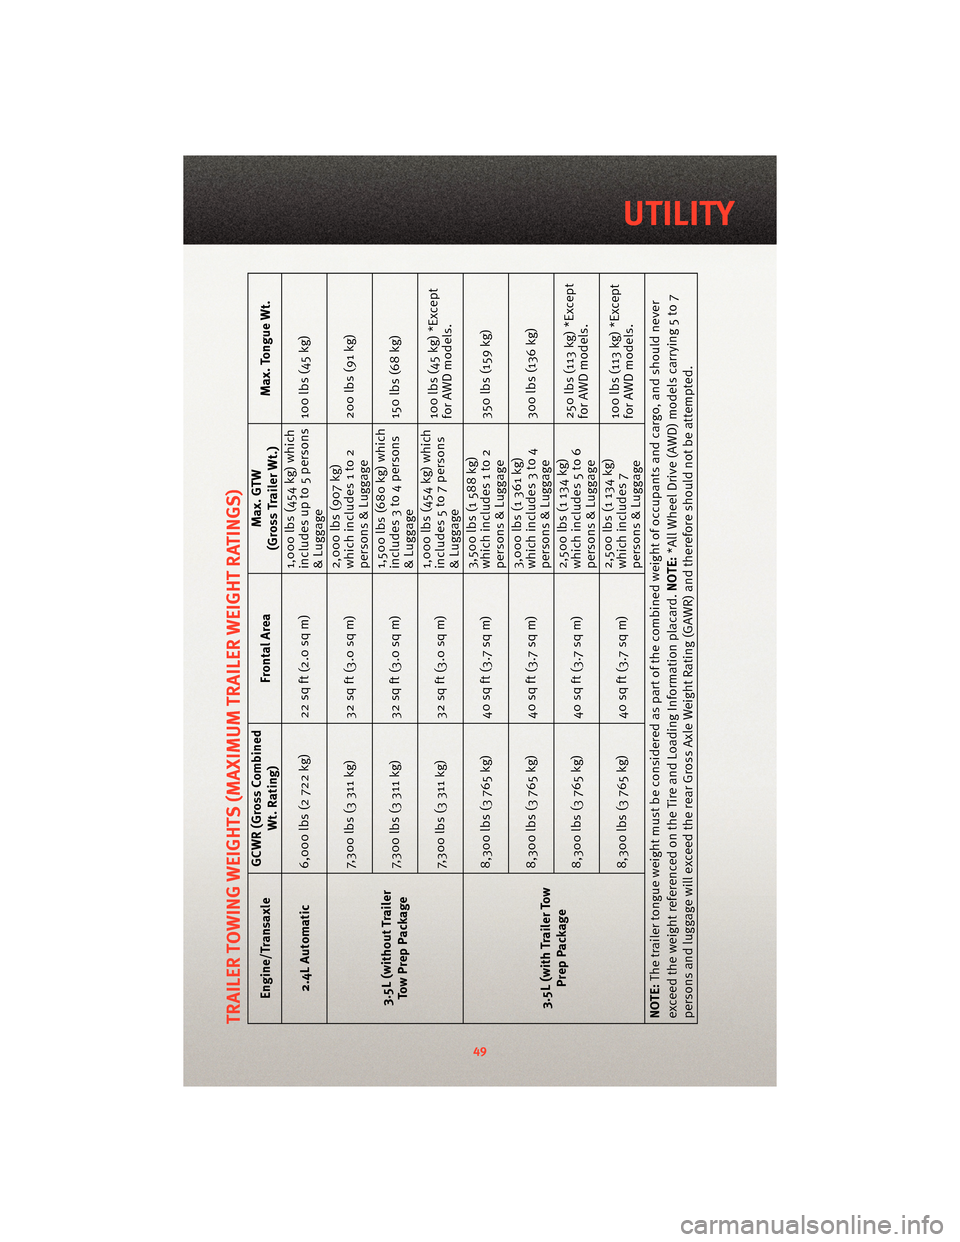
TRAILER TOWING WEIGHTS (MAXIMUM TRAILER WEIGHT RATINGS)
Engine/TransaxleGCWR (Gross Combined
Wt. Rating) Frontal Area Max. GTW
(Gross Trailer Wt.) Max. Tongue Wt.
2.4L Automatic 6,000 lbs (2 722 kg) 22 sq ft (2.0 sq m) 1,000 lbs (454 kg) which
includes up to 5 persons
& Luggage100 lbs (45 kg)
3.5L (without Trailer TowPrepPackage 7,300 lbs (3 311 kg) 32 sq ft (3.0 sq m)
2,000 lbs (907 kg)
which includes 1 to 2
persons & Luggage200 lbs (91 kg)
7,300 lbs (3 311 kg) 32 sq ft (3.0 sq m) 1,500 lbs (680 kg) which
includes 3 to 4 persons
& Luggage150 lbs (68 kg)
7,300 lbs (3 311 kg) 32 sq ft (3.0 sq m) 1,000 lbs (454 kg) which
includes 5 to 7 persons
& Luggage100 lbs (45 kg) *Except
for AWD models.
3.5L (with Trailer Tow Prep Package 8,300 lbs (3 765 kg) 40 sq ft (3.7 sq m)
3,500 lbs (1 588 kg)
which includes 1 to 2
persons & Luggage350 lbs (159 kg)
8,300 lbs (3 765 kg) 40 sq ft (3.7 sq m) 3,000 lbs (1 361 kg)
which includes 3 to 4
persons & Luggage300 lbs (136 kg)
8,300 lbs (3 765 kg) 40 sq ft (3.7 sq m) 2,500 lbs (1 134 kg)
which includes 5 to 6
persons & Luggage250 lbs (113 kg) *Except
for AWD models.
8,300 lbs (3 765 kg) 40 sq ft (3.7 sq m) 2,500 lbs (1 134 kg)
which includes 7
persons & Luggage100 lbs (113 kg) *Except
for AWD models.
NOTE: The trailer tongue weight must be considered as part of the combined weight of occupants and cargo, and should never
exceed the weight referenced on the Tir e and Loading Information placard.NOTE:*All Wheel Drive (AWD) models carrying 5 to 7
persons and luggage will exceed the rear Gross Axle Weight Rating (GAWR) and therefore should not be attempted.
49
UTILITY
Page 52 of 88
RECREATIONAL TOWING
(BEHIND MOTORHOME,
ETC.)
Towing This Vehicle Behind
Another Vehicle (Flat Towing
With All Four Wheels On The
Ground)
Recreational towing for this vehicle is
not recommended.
NOTE:If the vehicle requires towing,
make sure all four wheels are off the
ground.
BRAKE/TRANSAXLE
INTERLOCK MANUAL
OVERRIDE
• The manual override may be used in the event that the shift lever should
fail to move from PARK with the Key
Fob in the ON position and the brake
pedal pressed. • To operate the shift lock manual
override, perform the following steps:
• Firmly apply the parking brake.
• Insert the ignition Key Fob into the ignition switch and rotate it to the
ON position.
• Remove the cubby bin liner located in the center console behind the
shift lever.
• Insert a screwdriver or similar small tool into the hole at the front
of the cubby bin and push the
manual override release lever
forward.
• While holding the release lever forward, move the shift lever from
PARK to NEUTRAL.
• Release the manual override.
• Have your vehicle inspected by your local authorized dealer if the shift
lock manual override has been used.
UTILITY
50
Page 55 of 88
• We recommend you do not continue driving if the charging system light is on. Have thevehicle serviced immediately.
- Oil Pressure Warning Light
• This light indicates low engine oil pressure. If the light turns on while driving, stop thevehicle and shut off the engine as soon as possible. A chime will sound for four
minutes when this light turns on.
• We recommend you do not operate the vehicle or engine damage will occur. Have the vehicle serviced immediately.
- Anti-Lock Brake (ABS) Light
• This light monitors the Anti-Lock Brake System (ABS).
• If the light is not on during starting, stays on, or turns on while driving, we recommendyou do not operate the vehicle. Hav e the vehicle serviced immediately.
- Electronic Throttle Control (ETC) Light
• This light informs you of a problem with the Electronic Throttle Control (ETC) system.
• If a problem is detected, the light will come on while the engine is running. Cycle the
ignition when the vehicle has completely stopped and the shift lever is placed in the
PARK position; the light should turn off.
• If the light remains lit with the engine running, your vehicle will usually be drivable; however, see an authorized dealer for service as soon as possible. If the light is
flashing when the engine is running, immedi ate service is required and you may
experience reduced performance, an elevat ed/rough idle or engine stall and your
vehicle may require towing.
- Airbag Warning Light
• If the light is not on during starting, stays on, or turns on while driving, we recommend you do not operate the vehicle. Hav e the vehicle serviced immediately.
- All-Wheel Drive (AWD) Failure Indicator Light
• If the light stays on or comes on during driving, it means that the AWD system is not
functioning properly and that service is required. We recommend you drive to the
nearest service center as soon as possible.
Fuel Cap/Loose Gas Cap Message
• If a “gas cap” message (shown as gASCAP) appears, tighten the gas cap until a“clicking” sound is heard.
• Press the odometer reset button to turn the message off.
• If the message continues to appear for mor e than three days after tightening the gas
cap, see your authorized dealer.
53
WHAT TO DO IN EMERGENCIES
Page 57 of 88
JACKING AND TIRE CHANGING
WARNING!
• Do not attempt to change a tire on the side of the vehicle close to moving traffic.Pull far enough off the road to avoid the danger of being hit when operating the jack
or changing the wheel.
• Getting under a jacked-up vehicle is dangerous. The vehicle could slip off the jack and fall on you. You could be crushed. Never get any part of your body under a
vehicle that is on a jack. If you need to get under a raised vehicle, take it to a
service center where it can be raised on a lift.
• The jack is designed to use as a tool for changing tires only. The jack should not be used to lift the vehicle for service purposes. The vehicle should be jacked on a firm,
level surface only. Avoid ice or slippery areas.
• If it is necessary to retrieve the spare tire from under the vehicle on the side of the vehicle close to moving traffic, pull far enough off the road to avoid the danger of
being hit.
WARNING!
• The compact spare tire is for emergency use only. Installation of this compact sparetire affects vehicle handling.
• Do not drive more than 50 mph (80 km/h) with a compact spare tire.
• Keep the compact spare tire inflated to the cold tire inflation pressure, listed on either your tire placard or limited use spare tire and wheel assembly.
• Replace (or repair) the original tire at the first opportunity and reinstall it on your vehicle. Failure to do so could result in loss of vehicle control.
55
WHAT TO DO IN EMERGENCIES