fuel DODGE JOURNEY 2010 1.G User Guide
[x] Cancel search | Manufacturer: DODGE, Model Year: 2010, Model line: JOURNEY, Model: DODGE JOURNEY 2010 1.GPages: 88, PDF Size: 12.49 MB
Page 8 of 88
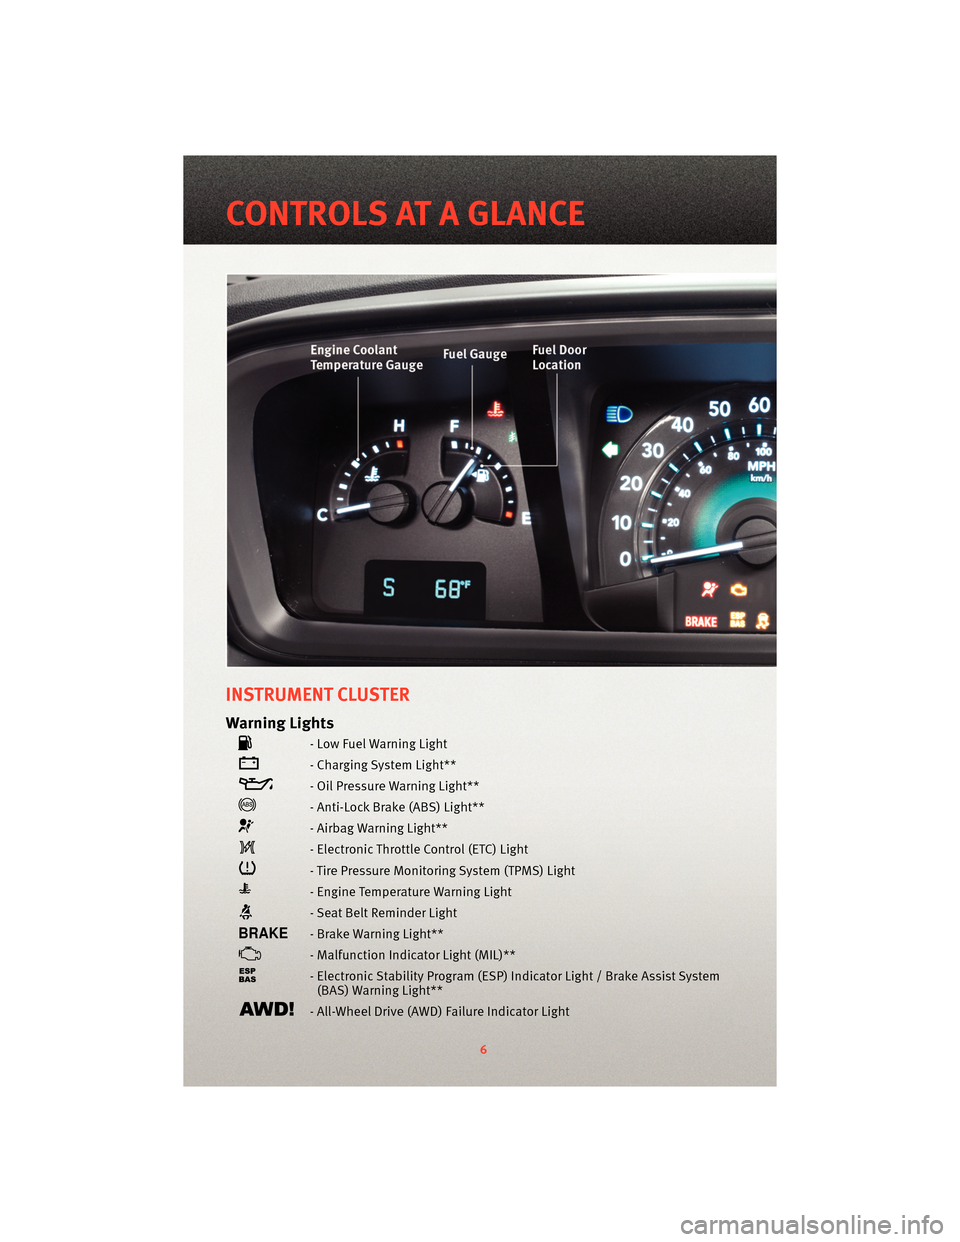
INSTRUMENT CLUSTER
Warning Lights
- Low Fuel Warning Light
- Charging System Light**
- Oil Pressure Warning Light**
- Anti-Lock Brake (ABS) Light**
- Airbag Warning Light**
- Electronic Throttle Control (ETC) Light
- Tire Pressure Monitoring System (TPMS) Light
- Engine Temperature Warning Light
- Seat Belt Reminder Light
- Brake Warning Light**
- Malfunction Indicator Light (MIL)**
- Electronic Stability Program (ESP) Indicator Light / Brake Assist System
(BAS) Warning Light**
- All-Wheel Drive (AWD) Failure Indicator Light
6
CONTROLS AT A GLANCE
Page 9 of 88
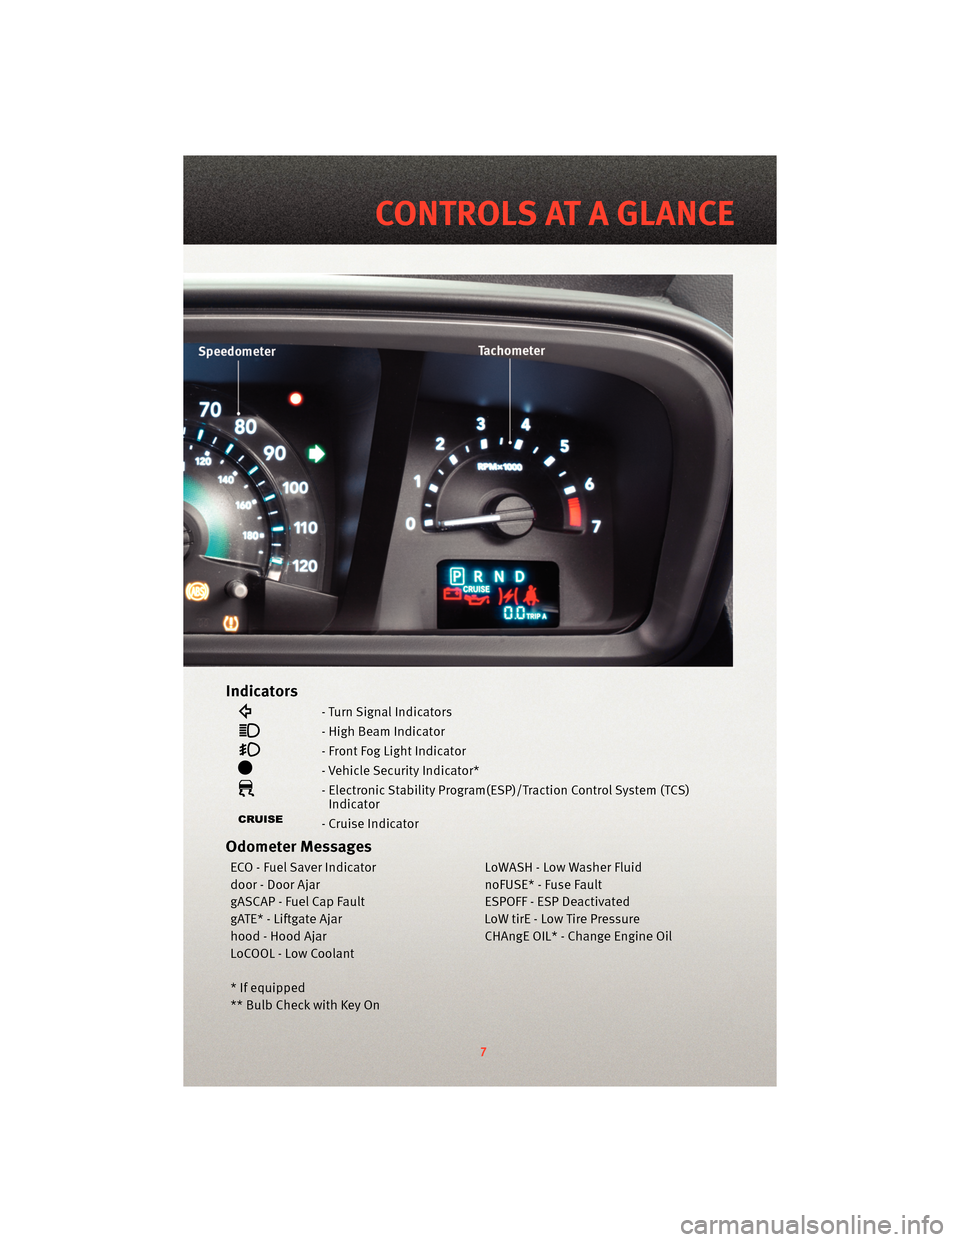
Indicators
- Turn Signal Indicators
- High Beam Indicator
- Front Fog Light Indicator
- Vehicle Security Indicator*
- Electronic Stability Program(ESP)/Traction Control System (TCS)Indicator
- Cruise Indicator
Odometer Messages
ECO - Fuel Saver Indicator LoWASH - Low Washer Fluid
door - Door Ajar noFUSE* - Fuse Fault
gASCAP - Fuel Cap Fault ESPOFF - ESP Deactivated
gATE* - Liftgate Ajar LoW tirE - Low Tire Pressure
hood - Hood Ajar CHAngE OIL* - Change Engine Oil
LoCOOL - Low Coolant
* If equipped
** Bulb Check with Key On
7
CONTROLS AT A GLANCE
Page 45 of 88
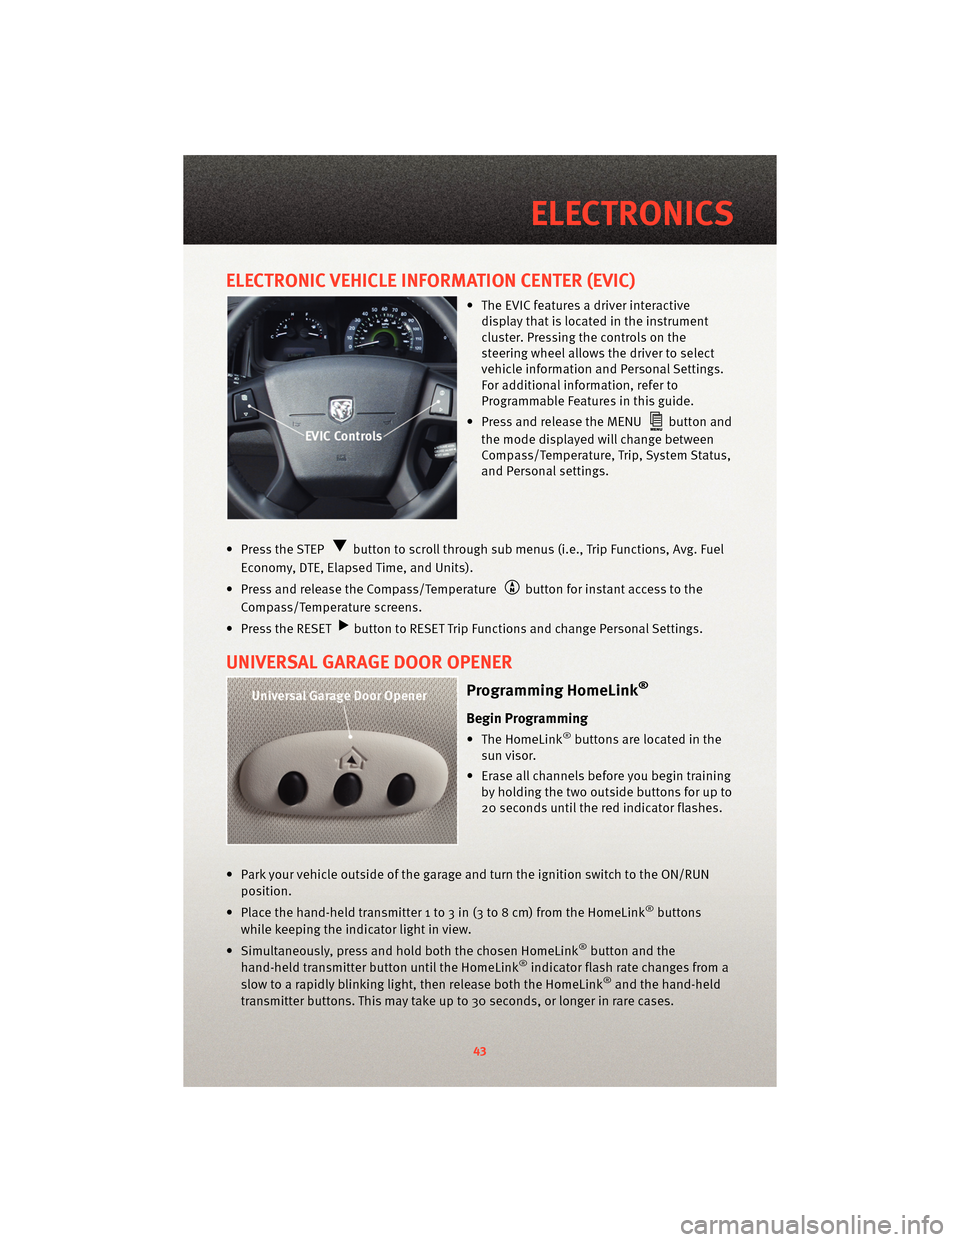
ELECTRONIC VEHICLE INFORMATION CENTER (EVIC)
• The EVIC features a driver interactivedisplay that is located in the instrument
cluster. Pressing the controls on the
steering wheel allows the driver to select
vehicle information and Personal Settings.
For additional information, refer to
Programmable Features in this guide.
• Press and release the MENU
button and
the mode displayed will change between
Compass/Temperature, Trip, System Status,
and Personal settings.
• Press the STEP
button to scroll through sub menus (i.e., Trip Functions, Avg. Fuel
Economy, DTE, Elapsed Time, and Units).
• Press and release the Compass/Temperature
button for instant access to the
Compass/Temperature screens.
• Press the RESET
button to RESET Trip Functions and change Personal Settings.
UNIVERSAL GARAGE DOOR OPENER
Programming HomeLink®
Begin Programming
• The HomeLink®buttons are located in the
sun visor.
• Erase all channels before you begin training by holding the two outside buttons for up to
20 seconds until the red indicator flashes.
• Park your vehicle outside of the garage and turn the ignition switch to the ON/RUN position.
• Place the hand-held transmitter 1 to 3 in (3 to 8 cm) from the HomeLink
®buttons
while keeping the indicator light in view.
• Simultaneously, press and hold both the chosen HomeLink
®button and the
hand-held transmitter button until the HomeLink®indicator flash rate changes from a
slow to a rapidly blinking light, then release both the HomeLink®and the hand-held
transmitter buttons. This may take up to 30 seconds, or longer in rare cases.
43
ELECTRONICS
Page 53 of 88
24 HOUR TOWING ASSISTANCE - U.S. ONLY
• Dial toll-free 1-800-521-2779 or 1-800-363-4869 for Canadian residents.
• Provide your name, vehicle identification number and license plate number.
• Provide your location, including telephone number, from which you are calling.
• Briefly describe the nature of the problem and answer a few simple questions.
• You will be given the name of the service provider and an estimated time of arrival. Ifyou feel you are in an “unsafe situation”, please let us know. With your consent, we
will contact local police or safety authorities.
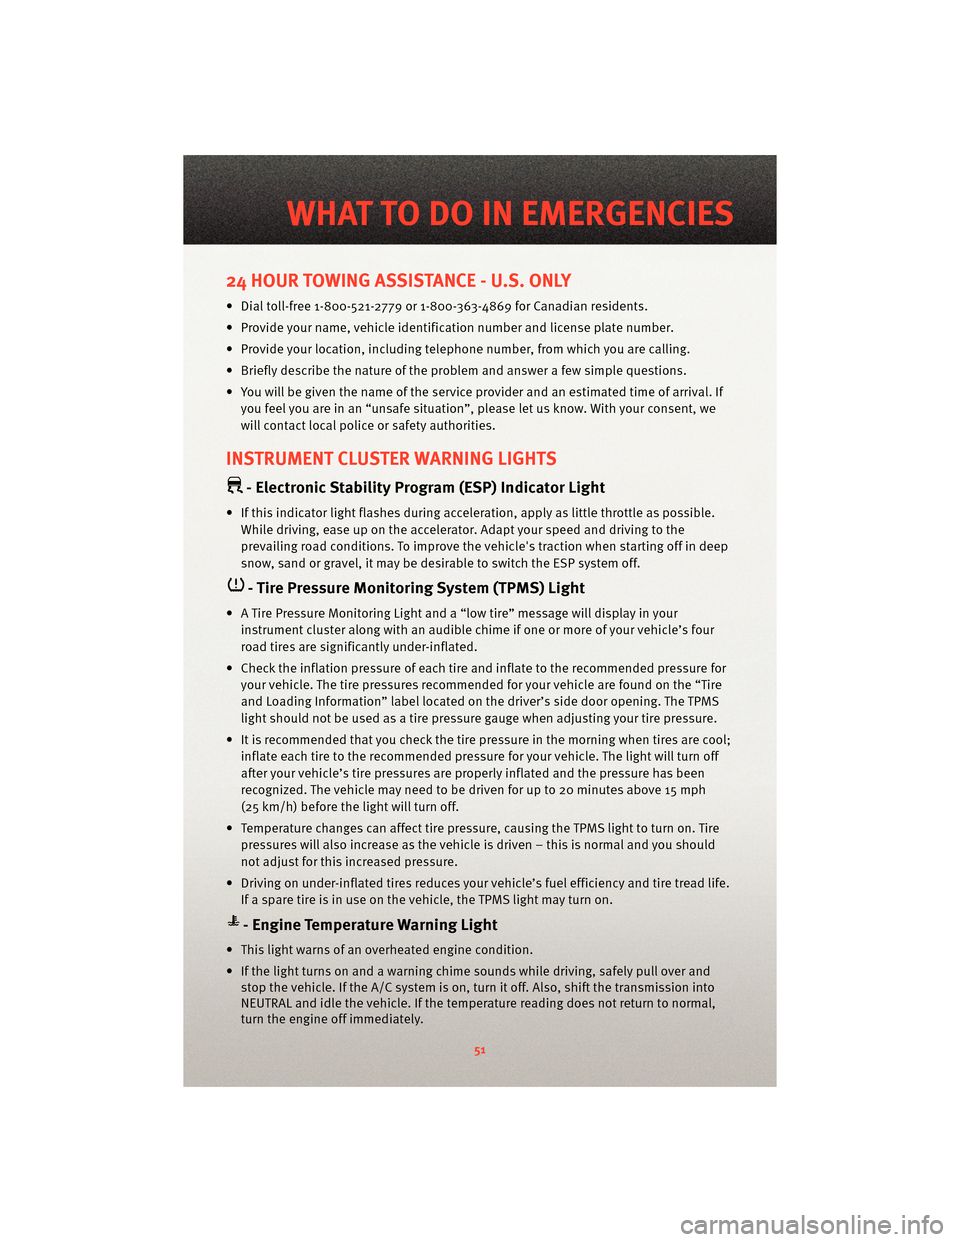
INSTRUMENT CLUSTER WARNING LIGHTS
- Electronic Stability Program (ESP) Indicator Light
• If this indicator light flashes during acceleration, apply as little throttle as possible.While driving, ease up on the accelerator. Adapt your speed and driving to the
prevailing road conditions. To improve the vehicle's traction when starting off in deep
snow, sand or gravel, it may be desirable to switch the ESP system off.
- Tire Pressure Monitoring System (TPMS) Light
• A Tire Pressure Monitoring Light and a “low tire” message will display in your instrument cluster along with an audible chime if one or more of your vehicle’s four
road tires are significantly under-inflated.
• Check the inflation pressure of each tire and inflate to the recommended pressure for your vehicle. The tire pressures recommended for your vehicle are found on the “Tire
and Loading Information” label located on the driver’s side door opening. The TPMS
light should not be used as a tire pressure gauge when adjusting your tire pressure.
• It is recommended that you check the tire pressure in the morning when tires are cool; inflate each tire to the recommended pressure for your vehicle. The light will turn off
after your vehicle’s tire pressures are properly inflated and the pressure has been
recognized. The vehicle may need to be driven for up to 20 minutes above 15 mph
(25 km/h) before the light will turn off.
• Temperature changes can affect tire pressure, causing the TPMS light to turn on. Tire pressures will also increase as the vehicle is driven – this is normal and you should
not adjust for this in creased pressure.
• Driving on under-inflated tires reduces your vehicle’s fuel efficiency and tire tread life.
If a spare tire is in use on the vehicle, the TPMS light may turn on.
- Engine Temperature Warning Light
• This light warns of an overheated engine condition.
• If the light turns on and a warning chime sounds while driving, safely pull over and stop the vehicle. If the A/C system is on, t urn it off. Also, shiftthe transmission into
NEUTRAL and idle the vehicle. If the temperat ure reading does not return to normal,
turn the engine off immediately.
51
WHAT TO DO IN EMERGENCIES
Page 54 of 88
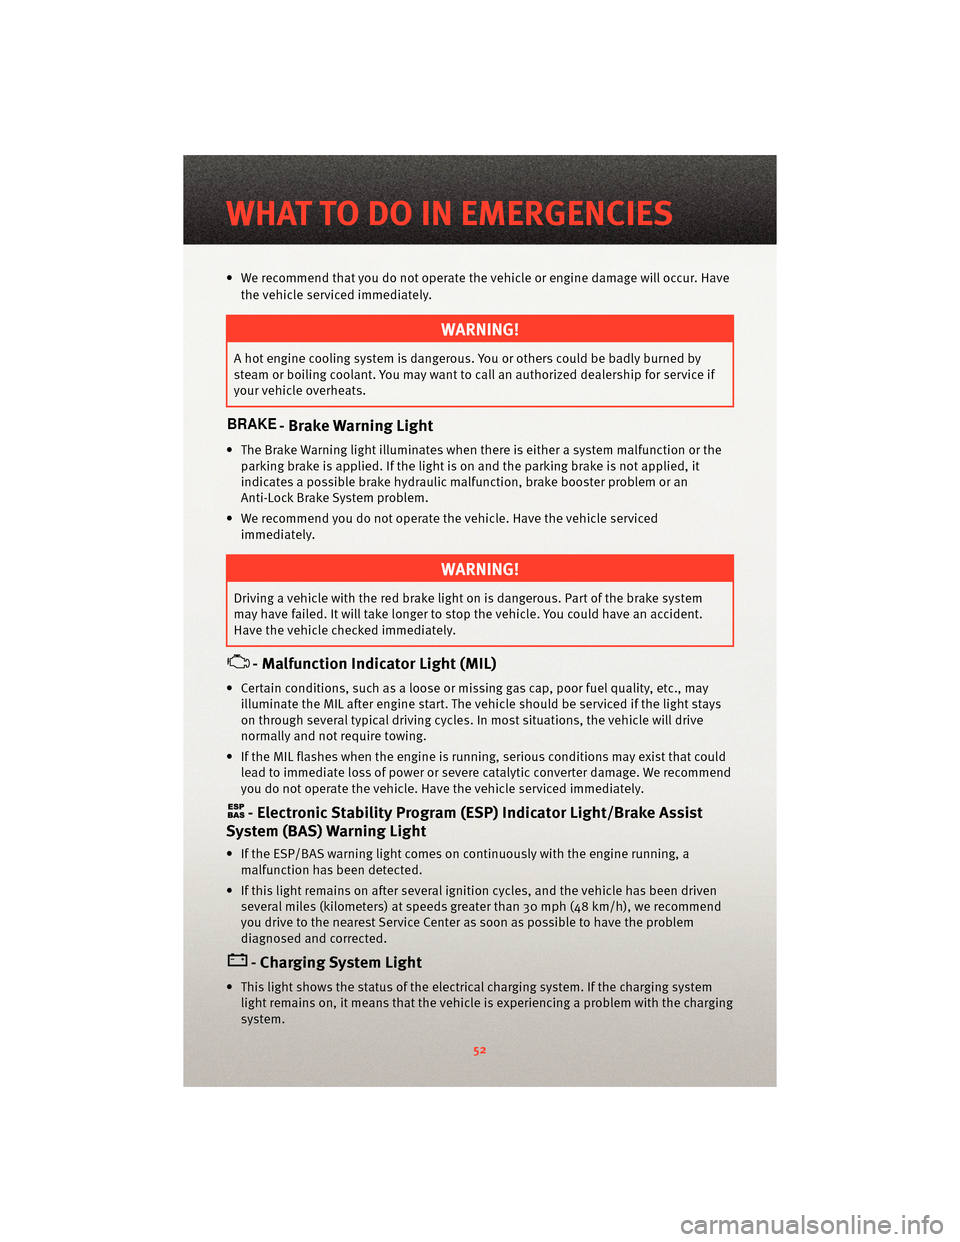
• We recommend that you do not operate the vehicle or engine damage will occur. Havethe vehicle serviced immediately.
WARNING!
A hot engine cooling system is dangero us. You or others could be badly burned by
steam or boiling coolant. You may want to call an authorized dealership for service if
your vehicle overheats.
- Brake Warning Light
• The Brake Warning light illuminates when there is either a system malfunction or the parking brake is applied. If the light is on and the parking brake is not applied, it
indicates a possible brake hydraulic malfunction, brake booster problem or an
Anti-Lock Brake System problem.
• We recommend you do not operate the vehicle. Have the vehicle serviced immediately.
WARNING!
Driving a vehicle with the red brake light on is dangerous. Part of the brake system
may have failed. It will take longer to stop the vehicle. You could have an accident.
Have the vehicle checked immediately.
- Malfunction Indicator Light (MIL)
• Certain conditions, such as a loose or m issing gas cap,poor fuel quality, etc., may
illuminate the MIL after engine start. The vehicle should be serviced if the light stays
on through several typical driving cycles. In most situations, the vehicle will drive
normally and not require towing.
• If the MIL flashes when the engine is running, serious conditions may exist that could lead to immediate loss of power or severe catalytic converter damage. We recommend
you do not operate the vehicle. Hav e the vehicle serviced immediately.
- Electronic StabilityProgram (ESP) Indicator Light/Brake Assist
System (BAS) Warning Light
• If the ESP/BAS warning light comes on continuously with the engine running, a
malfunction has been detected.
• If this light remains on after several ignition cycles, and the vehicle has been driven several miles (kilometers) at speeds g reater than 30 mph (48 km/h), we recommend
you drive to the nearest Service Center as soon as possible to have the problem
diagnosed and corrected.
- Charging System Light
• This light shows the status of the electrical ch arging system. If the charging system
light remains on, it means that the vehicle is experiencing a problem with the charging
system.
WHAT TO DO IN EMERGENCIES
52
Page 55 of 88
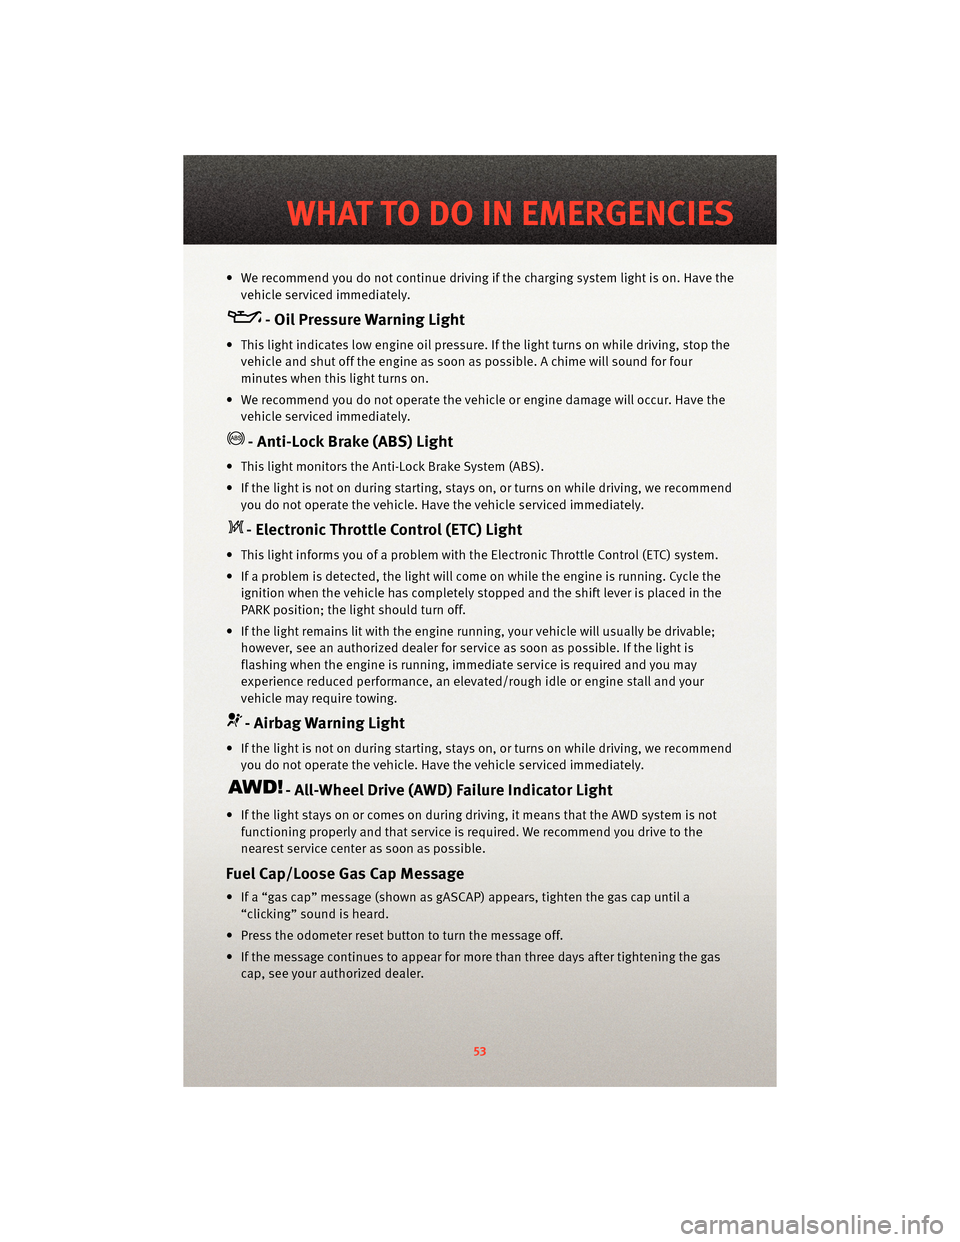
• We recommend you do not continue driving if the charging system light is on. Have thevehicle serviced immediately.
- Oil Pressure Warning Light
• This light indicates low engine oil pressure. If the light turns on while driving, stop thevehicle and shut off the engine as soon as possible. A chime will sound for four
minutes when this light turns on.
• We recommend you do not operate the vehicle or engine damage will occur. Have the vehicle serviced immediately.
- Anti-Lock Brake (ABS) Light
• This light monitors the Anti-Lock Brake System (ABS).
• If the light is not on during starting, stays on, or turns on while driving, we recommendyou do not operate the vehicle. Hav e the vehicle serviced immediately.
- Electronic Throttle Control (ETC) Light
• This light informs you of a problem with the Electronic Throttle Control (ETC) system.
• If a problem is detected, the light will come on while the engine is running. Cycle the
ignition when the vehicle has completely stopped and the shift lever is placed in the
PARK position; the light should turn off.
• If the light remains lit with the engine running, your vehicle will usually be drivable; however, see an authorized dealer for service as soon as possible. If the light is
flashing when the engine is running, immedi ate service is required and you may
experience reduced performance, an elevat ed/rough idle or engine stall and your
vehicle may require towing.
- Airbag Warning Light
• If the light is not on during starting, stays on, or turns on while driving, we recommend you do not operate the vehicle. Hav e the vehicle serviced immediately.
- All-Wheel Drive (AWD) Failure Indicator Light
• If the light stays on or comes on during driving, it means that the AWD system is not
functioning properly and that service is required. We recommend you drive to the
nearest service center as soon as possible.
Fuel Cap/Loose Gas Cap Message
• If a “gas cap” message (shown as gASCAP) appears, tighten the gas cap until a“clicking” sound is heard.
• Press the odometer reset button to turn the message off.
• If the message continues to appear for mor e than three days after tightening the gas
cap, see your authorized dealer.
53
WHAT TO DO IN EMERGENCIES
Page 70 of 88
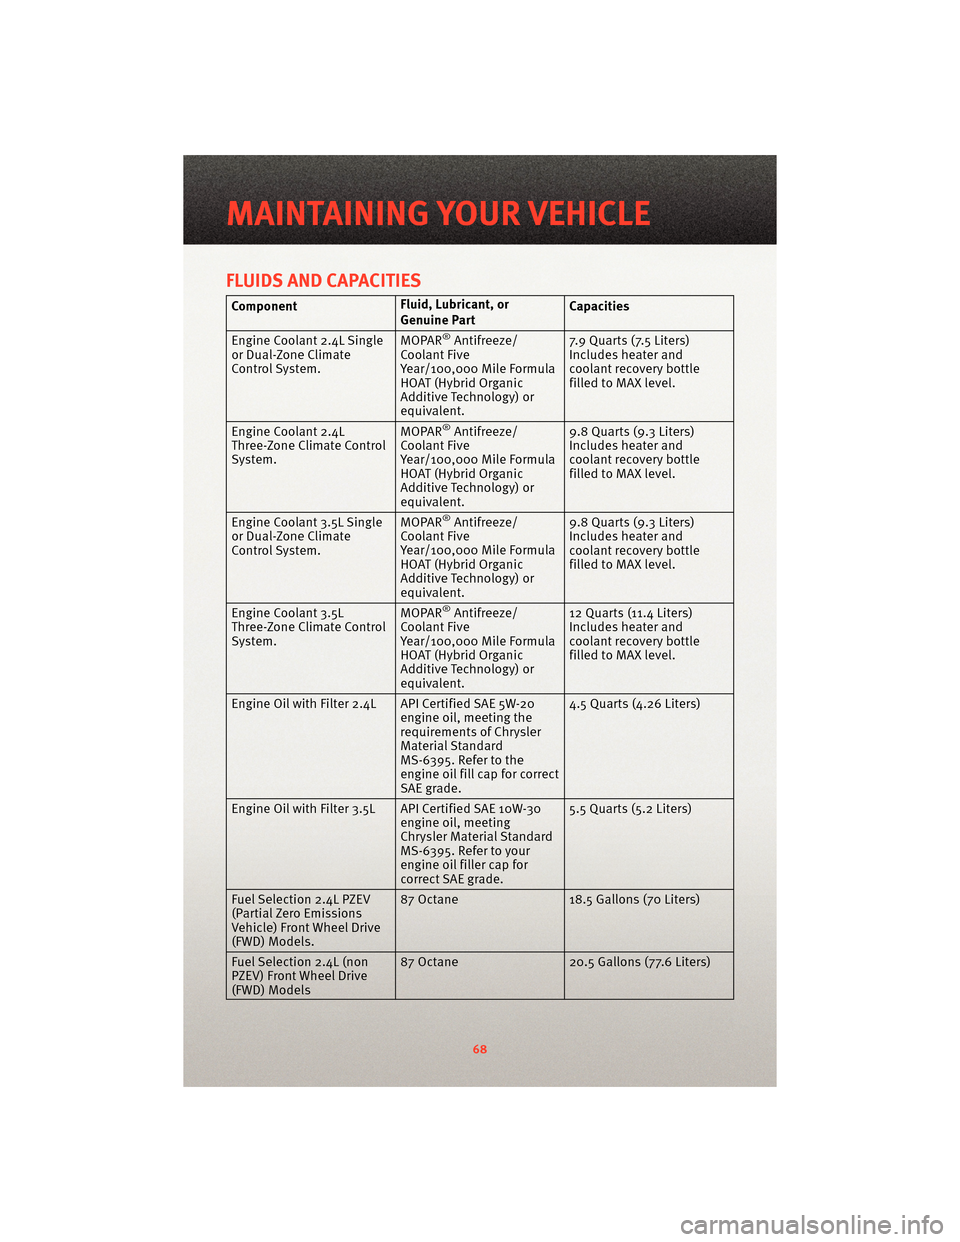
FLUIDS AND CAPACITIES
ComponentFluid, Lubricant, or
Genuine PartCapacities
Engine Coolant 2.4L Single
or Dual-Zone Climate
Control System. MOPAR
®Antifreeze/
Coolant Five
Year/100,000 Mile Formula
HOAT (Hybrid Organic
Additive Technology) or
equivalent. 7.9 Quarts (7.5 Liters)
Includes heater and
coolant recovery bottle
filled to MAX level.
Engine Coolant 2.4L
Three-Zone Climate Control
System. MOPAR
®Antifreeze/
Coolant Five
Year/100,000 Mile Formula
HOAT (Hybrid Organic
Additive Technology) or
equivalent. 9.8 Quarts (9.3 Liters)
Includes heater and
coolant recovery bottle
filled to MAX level.
Engine Coolant 3.5L Single
or Dual-Zone Climate
Control System. MOPAR
®Antifreeze/
Coolant Five
Year/100,000 Mile Formula
HOAT (Hybrid Organic
Additive Technology) or
equivalent. 9.8 Quarts (9.3 Liters)
Includes heater and
coolant recovery bottle
filled to MAX level.
Engine Coolant 3.5L
Three-Zone Climate Control
System. MOPAR
®Antifreeze/
Coolant Five
Year/100,000 Mile Formula
HOAT (Hybrid Organic
Additive Technology) or
equivalent. 12 Quarts (11.4 Liters)
Includes heater and
coolant recovery bottle
filled to MAX level.
Engine Oil with Filter 2.4L API Certified SAE 5W-20 engine oil, meeting the
requirements of Chrysler
Material Standard
MS-6395. Refer to the
engine oil fill cap for correct
SAE grade.4.5 Quarts (4.26 Liters)
Engine Oil with Filter 3.5L API Certified SAE 10W-30 engine oil, meeting
Chrysler Material Standard
MS-6395. Refer to your
engine oil filler cap for
correct SAE grade.5.5 Quarts (5.2 Liters)
Fuel Selection 2.4L PZEV
(Partial Zero Emissions
Vehicle) Front Wheel Drive
(FWD) Models. 87 Octane
18.5 Gallons (70 Liters)
Fuel Selection 2.4L (non
PZEV) Front Wheel Drive
(FWD) Models 87 Octane
20.5 Gallons (77.6 Liters)
MAINTAINING YOUR VEHICLE
68
Page 71 of 88
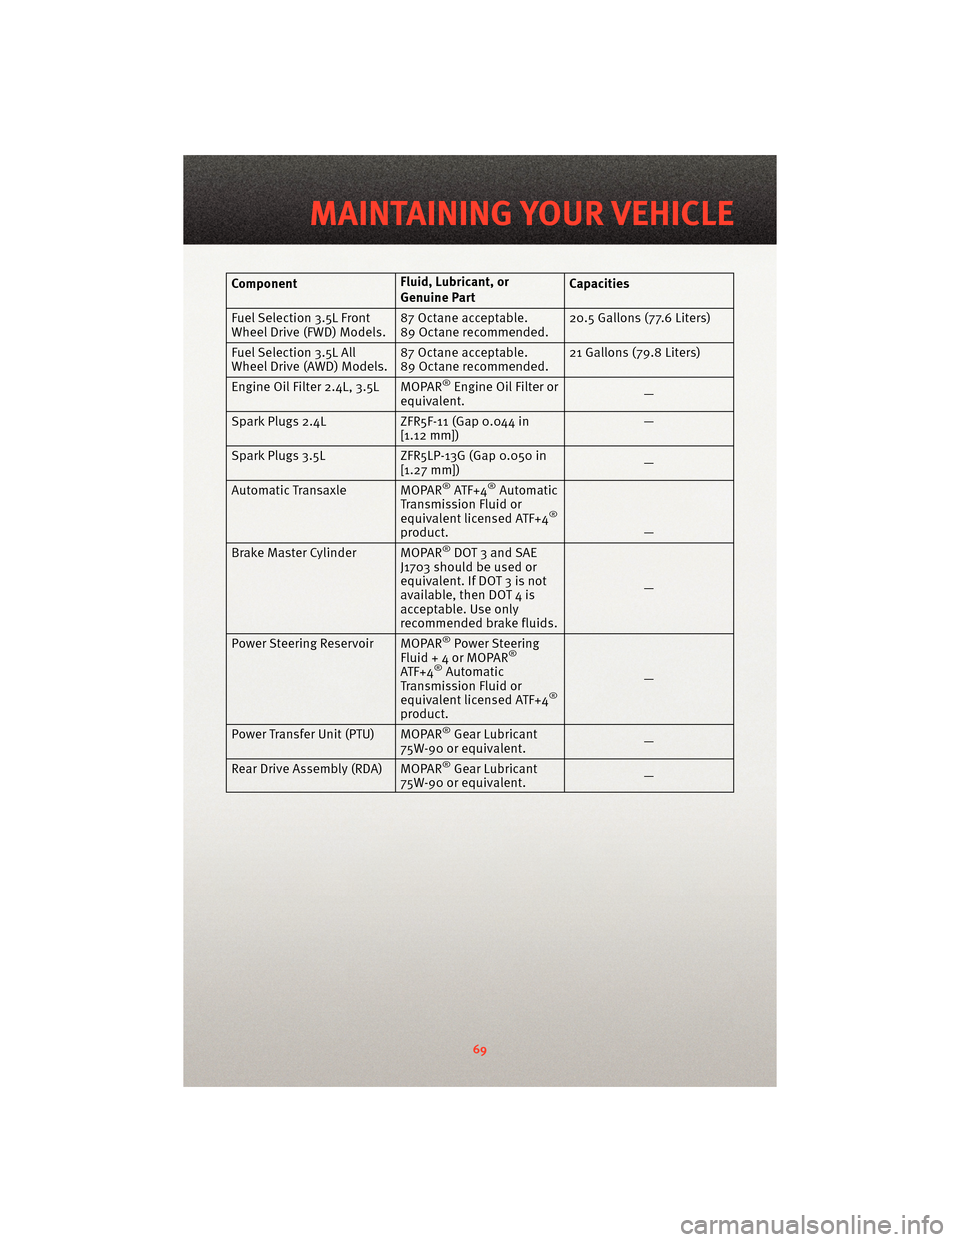
ComponentFluid, Lubricant, or
Genuine PartCapacities
Fuel Selection 3.5L Front
Wheel Drive (FWD) Models. 87 Octane acceptable.
89 Octane recommended.20.5 Gallons (77.6 Liters)
Fuel Selection 3.5L All
Wheel Drive (AWD) Models. 87 Octane acceptable.
89 Octane recommended.21 Gallons (79.8 Liters)
Engine Oil Filter 2.4L, 3.5L MOPAR
®Engine Oil Filter or
equivalent. —
Spark Plugs 2.4L ZFR5F-11 (Gap 0.044 in
[1.12 mm]) —
Spark Plugs 3.5L ZFR5LP-13G (Gap 0.050 in
[1.27 mm]) —
Automatic Transaxle MOPAR
®ATF+4®Automatic
Transmission Fluid or
equivalent licensed ATF+4
®
product. —
Brake Master Cylinder MOPAR®DOT 3 and SAE
J1703 should be used or
equivalent. If DOT 3 is not
available, then DOT 4 is
acceptable. Use only
recommended brake fluids. —
Power Steering Reservoir MOPAR
®Power Steering
Fluid+4orMOPAR®
ATF+4®Automatic
Transmission Fluid or
equivalent licensed ATF+4
®
product. —
Power Transfer Unit (PTU) MOPAR®Gear Lubricant
75W-90 or equivalent. —
Rear Drive Assembly (RDA) MOPAR
®Gear Lubricant
75W-90 or equivalent. —
69
MAINTAINING YOUR VEHICLE
Page 75 of 88
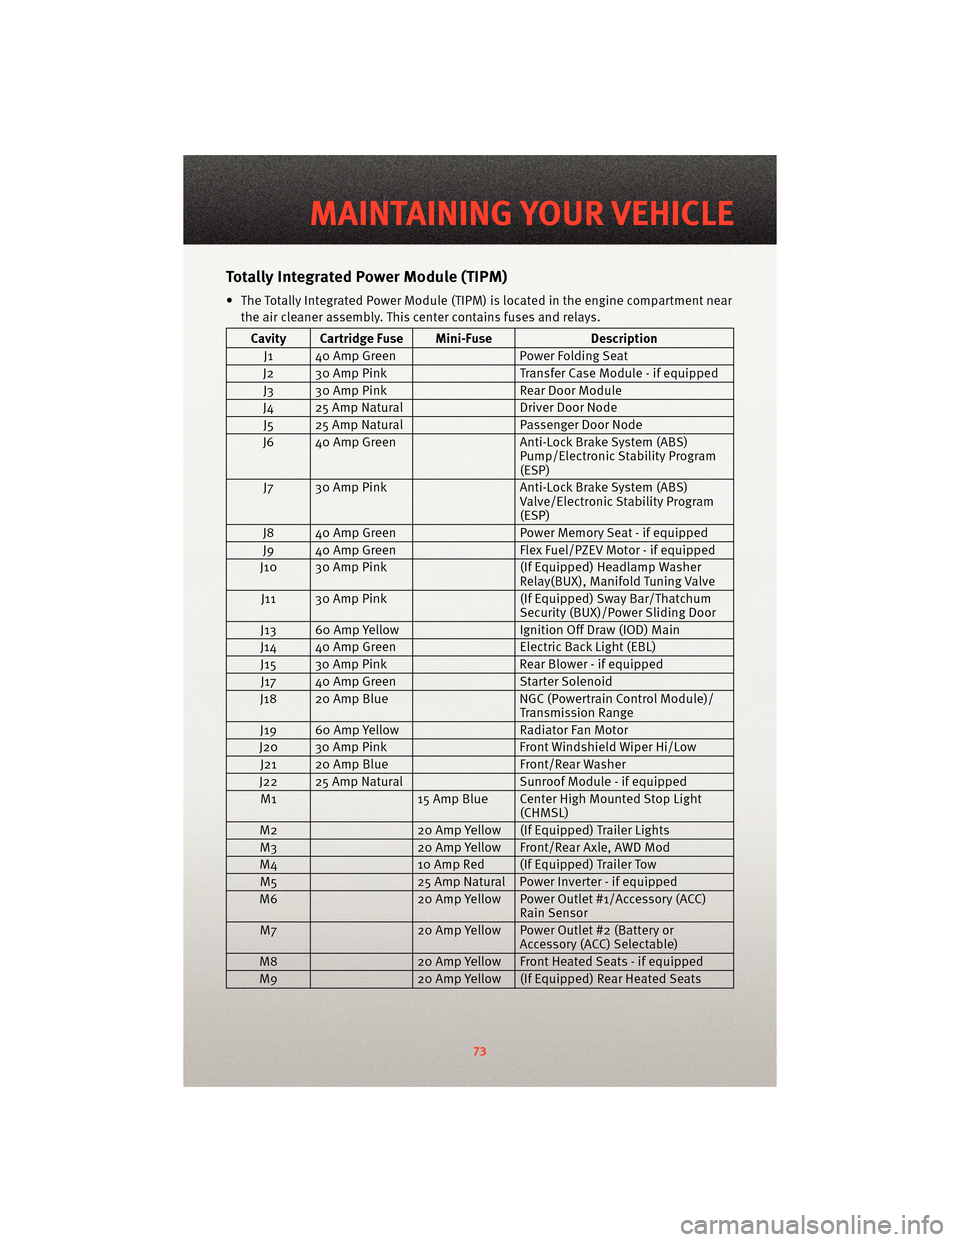
TotallyIntegrated Power Module (TIPM)
• The Totally Integrated Power Module (TIPM) is located in the engine compartment near
the air cleaner assembly. This center contains fuses and relays.
Cavity Cartridge Fuse Mini-Fuse Description
J1 40 Amp Green Power Folding Seat
J2 30 Amp Pink Transfer Case Module - if equipped
J3 30 Amp Pink Rear Door Module
J4 25 Amp Natural Driver Door Node
J5 25 Amp Natural Passenger Door Node
J6 40 Amp Green Anti-Lock Brake System (ABS)
Pump/Electronic Stability Program
(ESP)
J7 30 Amp Pink Anti-Lock Brake System (ABS)
Valve/Electronic Stability Program
(ESP)
J8 40 Amp Green Power Memory Seat - if equipped
J9 40 Amp Green Flex Fuel/PZEV Motor - if equipped
J10 30 Amp Pink (If Equipped) Headlamp Washer
Relay(BUX), Manifold Tuning Valve
J11 30 Amp Pink (If Equipped) Sway Bar/Thatchum
Security (BUX)/Power Sliding Door
J13 60 Amp Yellow Ignition Off Draw (IOD) Main
J14 40 Amp Green Electric Back Light (EBL)
J15 30 Amp Pink Rear Blower - if equipped
J17 40 Amp Green Starter Solenoid
J18 20 Amp Blue NGC (Powertrain Control Module)/
Transmission Range
J19 60 Amp Yellow Radiator Fan Motor
J20 30 Amp Pink Front Windshield Wiper Hi/Low
J21 20 Amp Blue Front/Rear Washer
J22 25 Amp Natural Sunroof Module - if equipped
M1 15 Amp Blue Center High Mounted Stop Light
(CHMSL)
M2 20 Amp Yellow (If Equipped) Trailer Lights
M3 20 Amp Yellow Front/Rear Axle, AWD Mod
M4 10 Amp Red (If Equipped) Trailer Tow
M5 25 Amp Natural Power Inverter - if equipped
M6 20 Amp Yellow Power Outlet #1/Accessory (ACC)
Rain Sensor
M7 20 Amp Yellow Power Outlet #2 (Battery or
Accessory (ACC) Selectable)
M8 20 Amp Yellow Front Heated Seats - if equipped
M9 20 Amp Yellow (If Equipped) Rear Heated Seats
73
MAINTAINING YOUR VEHICLE
Page 76 of 88
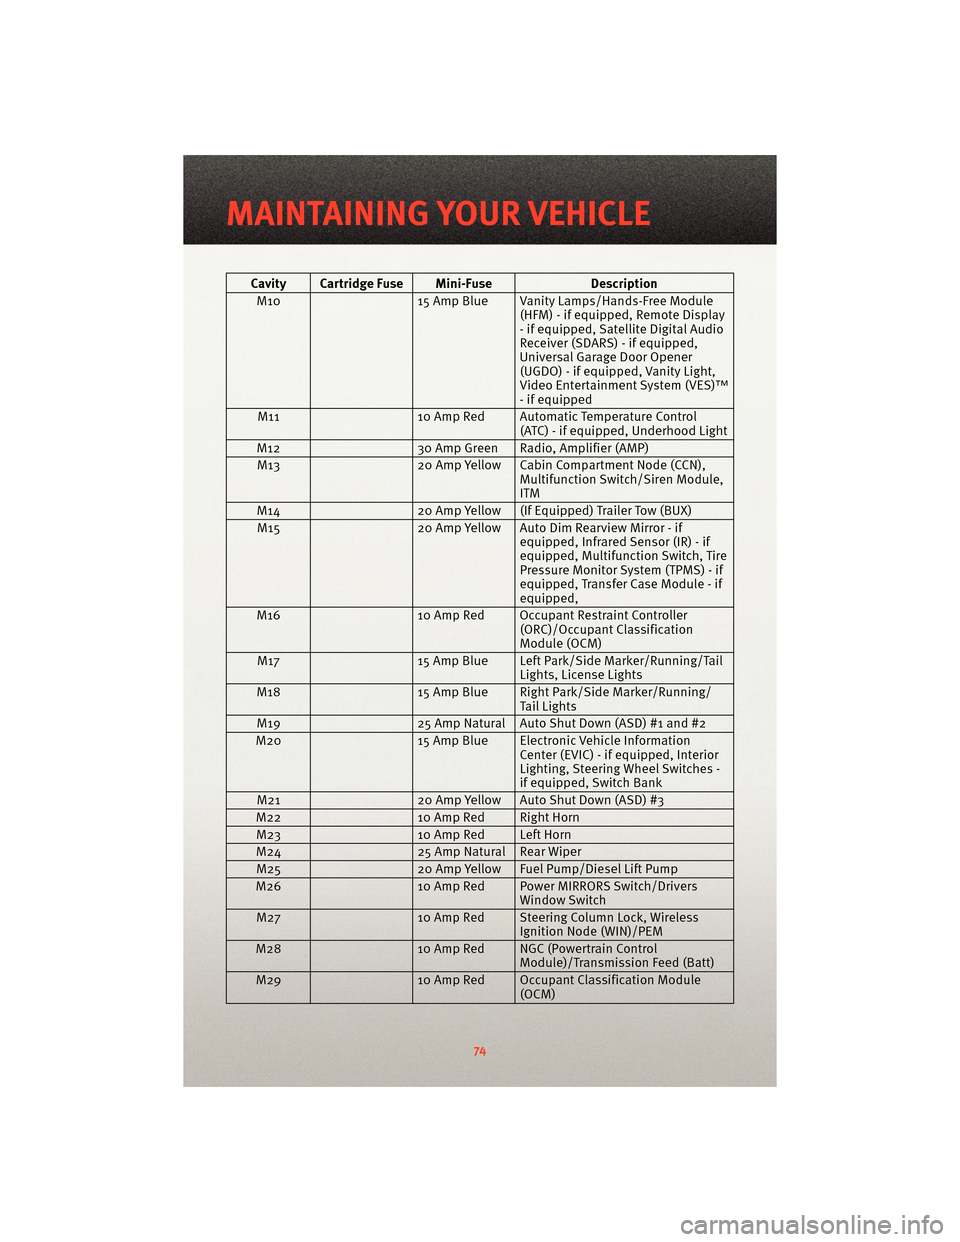
Cavity Cartridge Fuse Mini-FuseDescription
M10 15 Amp Blue Vanity Lamps/Hands-Free Module
(HFM) - if equipped, Remote Display
- if equipped, Satellite Digital Audio
Receiver (SDARS) - if equipped,
Universal Garage Door Opener
(UGDO) - if equipped, Vanity Light,
Video Entertainment System (VES)™
- if equipped
M11 10 Amp Red Automatic Temperature Control
(ATC) - if equipped, Underhood Light
M12 30 Amp Green Radio, Amplifier (AMP)
M13 20 Amp Yellow Cabin Compartment Node (CCN),
Multifunction Switch/Siren Module,
ITM
M14 20 Amp Yellow (If Equipped) Trailer Tow (BUX)
M15 20 Amp Yellow Auto Dim Rearview Mirror - if
equipped, Infrared Sensor (IR) - if
equipped, Multifunction Switch, Tire
Pressure Monitor System (TPMS) - if
equipped, Transfer Case Module - if
equipped,
M16 10 Amp Red Occupant Restraint Controller
(ORC)/OccupantClassification
Module (OCM)
M17 15 Amp Blue Left Park/Side Marker/Running/Tail
Lights, License Lights
M18 15 Amp Blue Right Park/Side Marker/Running/
Tail Lights
M19 25 Amp Natural Auto Shut Down (ASD) #1 and #2
M20 15 Amp Blue Electronic Vehicle Information
Center (EVIC) - if equipped, Interior
Lighting, Steering Wheel Switches -
if equipped, Switch Bank
M21 20 Amp Yellow Auto Shut Down (ASD) #3
M22 10 Amp Red Right Horn
M23 10 Amp Red Left Horn
M24 25 Amp Natural Rear Wiper
M25 20 Amp Yellow Fuel Pump/Diesel Lift Pump
M26 10 Amp Red Power MIRRORS Switch/Drivers
Window Switch
M27 10 Amp Red Steering Column Lock, Wireless
Ignition Node (WIN)/PEM
M28 10 Amp Red NGC (Powertrain Control
Module)/Transmission Feed (Batt)
M29 10 Amp Red Occupant Classification Module
(OCM)
MAINTAINING YOUR VEHICLE
74