remote control DODGE JOURNEY 2010 1.G User Guide
[x] Cancel search | Manufacturer: DODGE, Model Year: 2010, Model line: JOURNEY, Model: DODGE JOURNEY 2010 1.GPages: 88, PDF Size: 12.49 MB
Page 3 of 88
INTRODUCTION/WELCOME
WELCOME FROM CHRYSLER GROUP LLC . 2
CONTROLS AT A GLANCE
DRIVER COCKPIT.............. 4
INSTRUMENT CLUSTER ..........6
GETTING STARTED
KEYFOB...................8
THEFT ALARM................ 9
SEATBELT ................. 9
CHILD RESTRAINTS .............10
FRONTSEATS................13
REARSEATS ................16
HEATEDSEATS...............19
TILT / TELESCOPING STEERING
COLUMN ..................19
PROGRAMMABLEFEATURES ...... 20
OPERATING YOUR VEHICLE
TURN SIGNAL/LIGHTS LEVER ...... 22
WIPER/WASHER LEVER ..........23
SPEED CONTROL LEVER ......... 24
MANUAL CLIMATE CONTROLS .......25
THREE ZONE MANUAL CLIMATE
CONTROL..................25
TWO AND THREE ZONE AUTOMATIC
TEMPERATURE CONTROL (ATC) ......27
PARKVIEW
®REAR BACK-UP CAMERA . . 28
POWERSUNROOF ............ 29
WIND BUFFETING ............. 30
ELECTRONICS
NON-TOUCH-SCREENRADIOS.......31
NAVIGATION RADIO – SALES CODE REU .34
TOUCH-SCREEN MULTIMEDIA RADIO
–SALESCODERBZ............ 38
REMOTE AUDIO CONTROLS ....... 40
VIDEO ENTERTAINMENT SYSTEM
(VES)™.................. 40
UNIVERSAL CONSUMER INTERFACE . . . 42
ELECTRONIC VEHICLE INFORMATION
CENTER (EVIC) ...............43
UNIVERSAL GARAGE DOOR OPENER . . .43
POWERINVERTER .............45
POWER OUTLET ..............45 Uconnect™ Phone
........... 46
VOICECOMMAND .............47
UTILITY
TRAILER TOWING WEIGHTS (MAXIMUM
TRAILER WEIGHT RATINGS) ....... 49
RECREATIONAL TOWING (BEHIND
MOTORHOME, ETC.) ............50
BRAKE/TRANSAXLE INTERLOCK MANUAL
OVERRIDE .................50
WHAT TO DO IN EMERGENCIES
24 HOUR TOWING ASSISTANCE
- U.S. ONLY .................51
INSTRUMENT CLUSTER WARNING
LIGHTS ...................51
IF YOUR ENGINE OVERHEATS .......54
JACKINGANDTIRECHANGING.......55
JUMP-STARTING ..............59
TOWINGADISABLEDVEHICLE...... 62
FREEING A STUCK VEHICLE ........63
EVENT DATA RECORDER (EDR) ......63
MAINTAINING YOUR VEHICLE
OPENING THE HOOD............65
ENGINE COMPARTMENT ......... 66
FLUIDS AND CAPACITIES ......... 68
MAINTENANCE CHART ...........70
FUSES....................72
TIREPRESSURES..............75
WHEEL AND WHEEL TRIM CARE ......76
EXTERIOR BULBS ..............76
CONSUMER ASSISTANCE
CHRYSLER GROUP LLC CUSTOMER
CENTER...................77
CHRYSLER CANADA INC. CUSTOMER
CENTER...................77
ASSISTANCE FOR THE HEARING
IMPAIRED..................77
PUBLICATIONS ORDERING .........77
REPORTING SAFETY DEFECTS IN THE
50 UNITED STATES AND
WASHINGTON, D.C. ............78
TIRE WARRANTY ..............78
MOPAR ACCESSORIES
MOPAR®ACCESSORIES..........81
TABLE OF CONTENTS
Page 10 of 88
KEY FOB
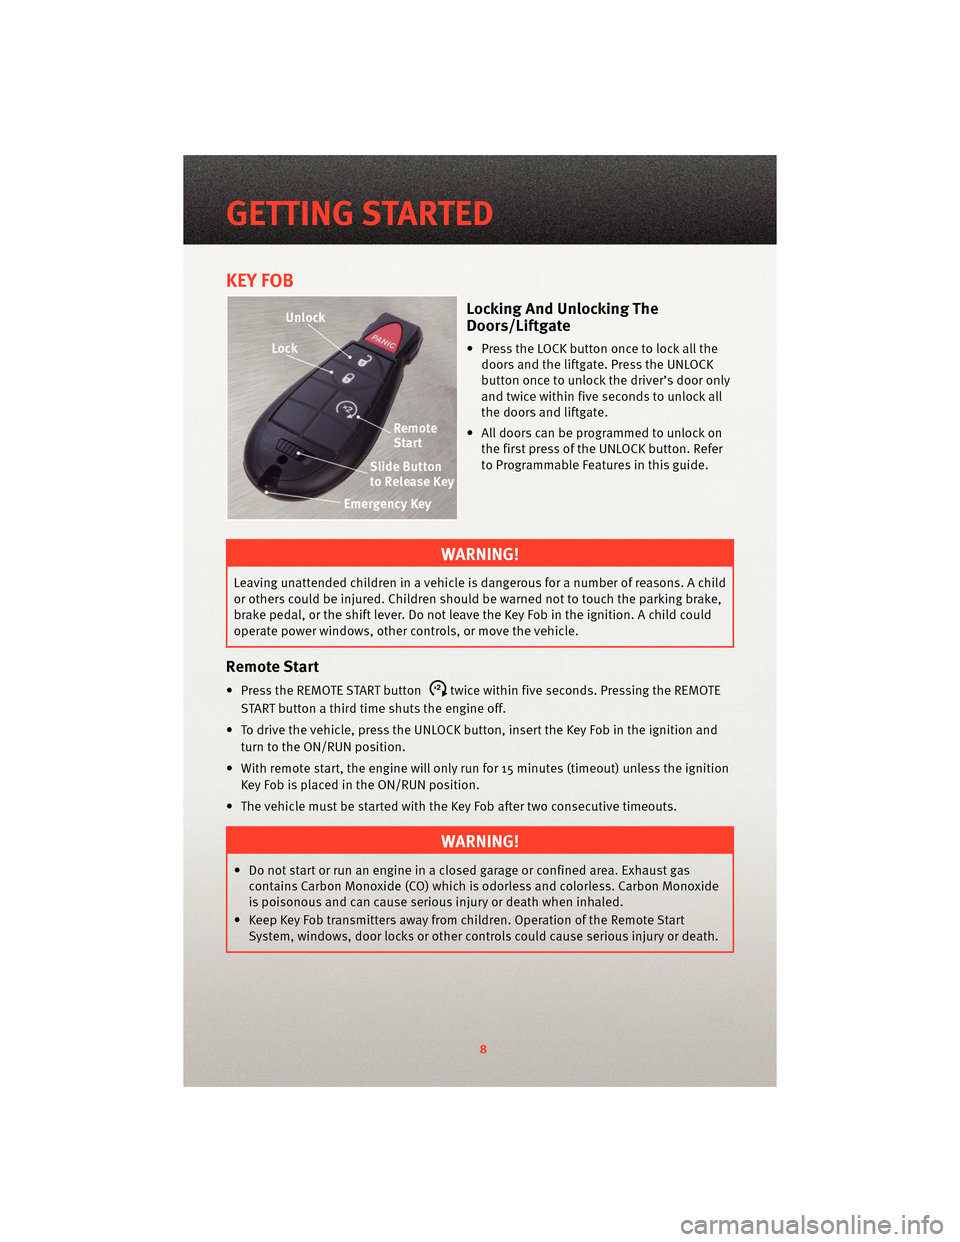
Locking And Unlocking The
Doors/Liftgate
• Press the LOCK button once to lock all thedoors and the liftgate. Press the UNLOCK
button once to unlock the driver’s door only
and twice within five seconds to unlock all
the doors and liftgate.
• All doors can be programmed to unlock on the first press of the UNLOCK button. Refer
to Programmable Features in this guide.
WARNING!
Leaving unattended children in a vehicle is dangerous for a number of reasons. A child
or others could be injured. Children should be warned not to touch the parking brake,
brake pedal, or the shift lever. Do not leave the Key Fob in the ignition. A child could
operate power windows, other controls, or move the vehicle.
Remote Start
• Press the REMOTE START buttonx2twice within five seconds. Pressing the REMOTE
START button a third time shuts the engine off.
• To drive the vehicle, press the UNLOCK button, insert the Key Fob in the ignition and turn to the ON/RUN position.
• With remote start, the engine will only run for 15 minutes (timeout) unless the ignition Key Fob is placed in the ON/RUN position.
• The vehicle must be started with the Key Fob after two consecutive timeouts.
WARNING!
• Do not start or run an engine in a closed garage or confined area. Exhaust gas contains Carbon Monoxide (CO) which is odorless and colorless. Carbon Monoxide
is poisonous and can cause serious injury or death when inhaled.
• Keep Key Fob transmitters away from children. Operation of the Remote Start System, windows, door locks or other controls could cause serious injury or death.
GETTING STARTED
8
Page 42 of 88
REMOTE AUDIO CONTROLS
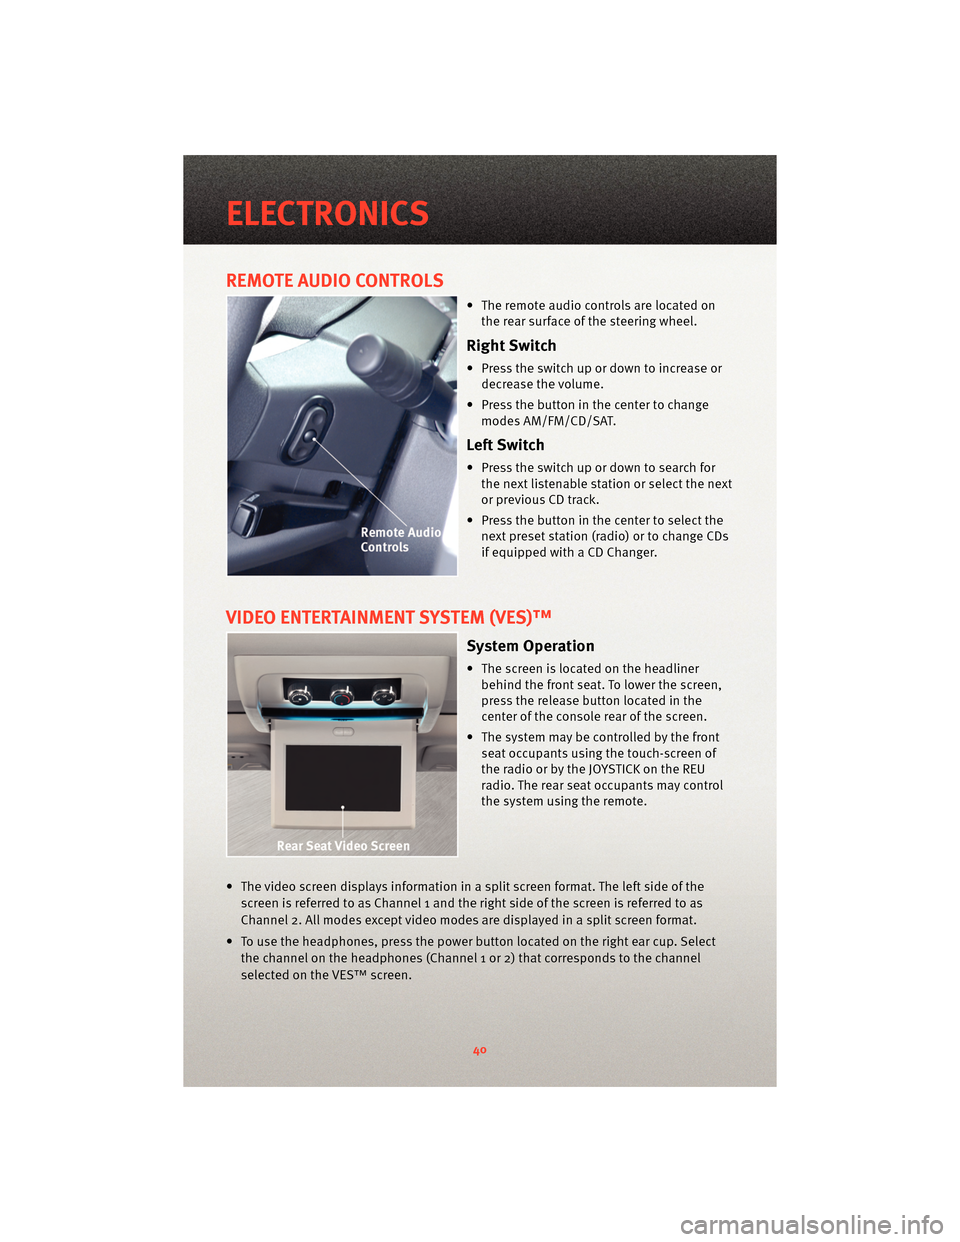
• The remote audio controls are located onthe rear surface of the steering wheel.
Right Switch
• Press the switch up or down to increase ordecrease the volume.
• Press the button in the center to change modes AM/FM/CD/SAT.
Left Switch
• Press the switch up or down to search forthe next listenable station or select the next
or previous CD track.
• Press the button in the center to select the next preset station (radio) or to change CDs
if equipped with a CD Changer.
VIDEO ENTERTAINMENT SYSTEM (VES)™
System Operation
• The screen is located on the headlinerbehind the front seat. To lower the screen,
press the release button located in the
center of the console rear of the screen.
• The system may be controlled by the front seat occupants using the touch-screen of
the radio or by the JOYSTICK on the REU
radio. The rear seat occupants may control
the system using the remote.
• The video screen displays information in a split screen format. The left side of the screen is referred to as Channel 1 and the right side of the screen is referred to as
Channel 2. All modes except video modes are displayed in a split screen format.
• To use the headphones, press the power button located on the right ear cup. Select the channel on the headphones (Channel 1 or 2) that corresponds to the channel
selected on the VES™ screen.
ELECTRONICS
40
Page 43 of 88
Operation Of The RBZ Radio
• To view a DVD press the OPEN/CLOSE hard-key and insert the disc. Playback will beginautomatically after the DVD is recognized by the disc drive. If playback does not begin
automatically follow these steps:
• Press the MENU hard-key, then touch the REAR VES™ soft-key. If a chapter list appears on the right side of the screen touch the HIDE LIST soft-key to display the Rear VES™
Control screen.
• Touch the 1 soft-key to select an audio channel then touch the DISC soft-key in the MEDIA column.
• SIRIUS Backseat TV™
• Press the MENU hard-key, then touch the REAR VES™ soft-key. If a chapter list appears on the right side of the screen touch the HIDE LIST soft-key to display the
Rear VES™ Control screen.
• Touch the 1 soft-key to select an audio channel then touch the TV soft-key in the RADIO column to select SIRIUS Backseat TV™.
Operation Of The REU Radio
• To view a DVD video insert a video disc. Playback will begin automatically after theDVD is recognized by the disc drive. If playback does not begin automatically follow
these steps:
• Press the MENU button, then turn the CENTER CONTROL knob and press the JOYSTICK to select VES™ CONTROLS.
• Select channel 1 or 2, then select DISC.
• Turn the CENTER CONTROL knob to select FUNCTIONS, then select SHOW VIDEO.
• SIRIUS Backseat TV™
• Press the RADIO button, to highlight SATV, then press the LIST button to display a list of available video channels.
• Select the desired channel, then press the MENU button and select SHOW VIDEO.
Operation Of The Remote
• The remote control operates similarly to any DVD remote you have used before and
allows the rear seat passengers to change stations, tracks, discs and audio/video
modes.
• The remote control is designed to control either channel by using the selector switch
located on the right side of the remote.
• Pressing the power button will turn the VES™ system ON/OFF.
• Pressing the MODE button causes the Mode Selection menu to appear on the VES™ screen. Use the remote control arrow button s to scroll through the available modes,
then press ENTER to select the desired mode.
41
ELECTRONICS
Page 44 of 88
•SIRIUS Backseat TV™
• To view SIRIUS Backseat TV™ set the remote control channel selector switch to channel 1. Press the MODE button, then using the arrow buttons select TV and press
enter.
Auxiliary Audio/Video Input Jacks
• The Aux jacks are located on the rear of the center console.
• Connect the video game or other external media devices to the AUX jacks following the color coding for VES™ jacks.
• Using either the touch-screen radio or remote control, select AUX from the Rear VES™ Control or Mode Selection screen.
• Refer to “Uconnect™ Multimedia – Video Entertainment System (VES)™” in the Uconnect™ User's Manual on the DVD for further details.
UNIVERSAL CONSUMER INTERFACE
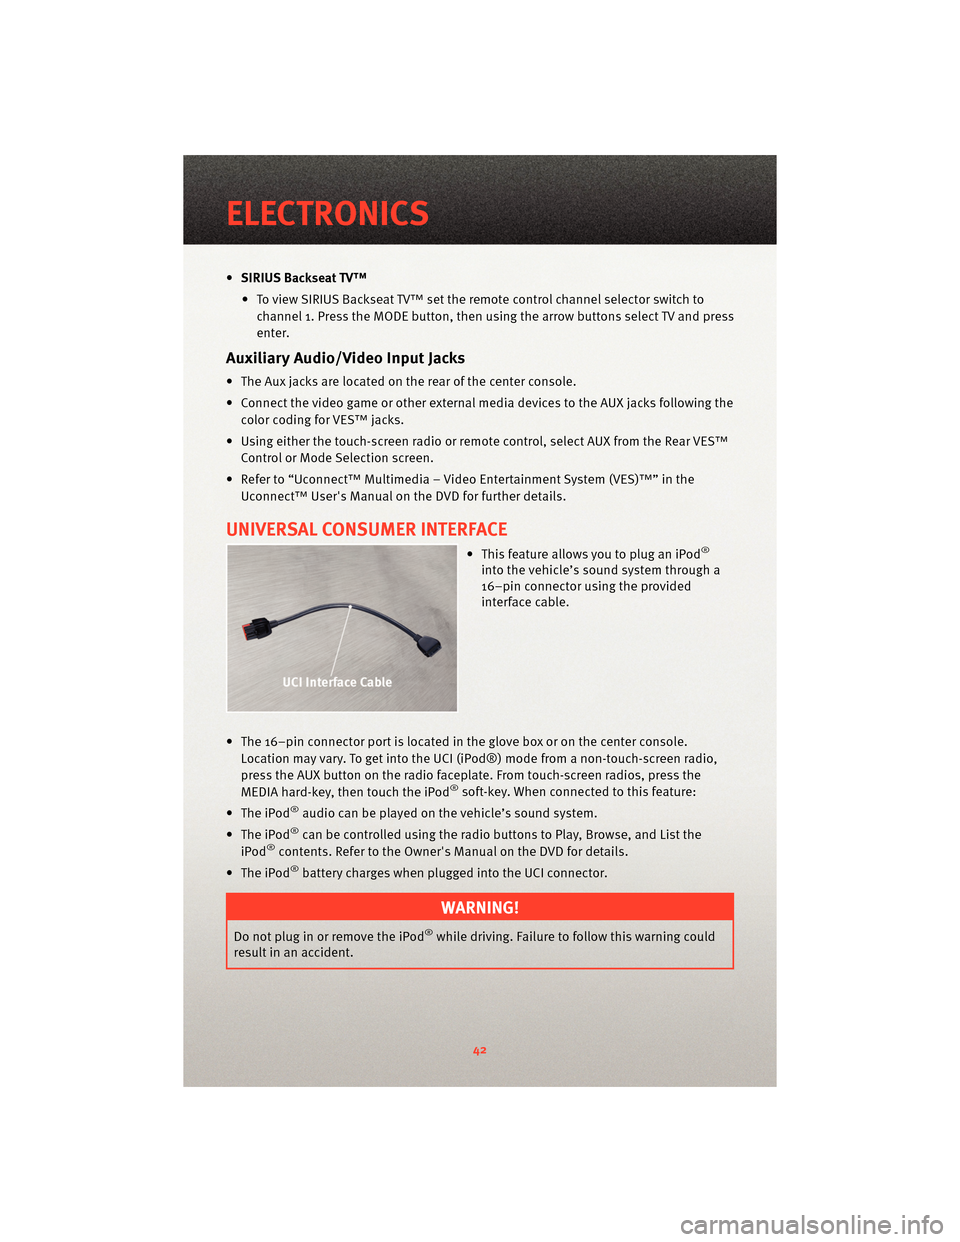
• This feature allows you to plug an iPod®
into the vehicle’s sound system through a
16–pin connector using the provided
interface cable.
• The 16–pin connector port is located in the glove box or on the center console. Location may vary. To get into the UCI (iPod®) mode from a non-touch-screen radio,
press the AUX button on the radio faceplat e. From touch-screenradios, press the
MEDIA hard-key, then touch the iPod
®soft-key. When connected to this feature:
• The iPod
®audio can be played on the vehicle’s sound system.
• The iPod
®can be controlled using the radio buttons to Play, Browse, and List the
iPod®contents. Refer to the Owner's Manual on the DVD for details.
• The iPod
®battery charges when plug ged into the UCI connector.
WARNING!
Do not plug in or remove the iPod®while driving. Failure to follow this warning could
result in an accident.
ELECTRONICS
42
Page 76 of 88
Cavity Cartridge Fuse Mini-FuseDescription
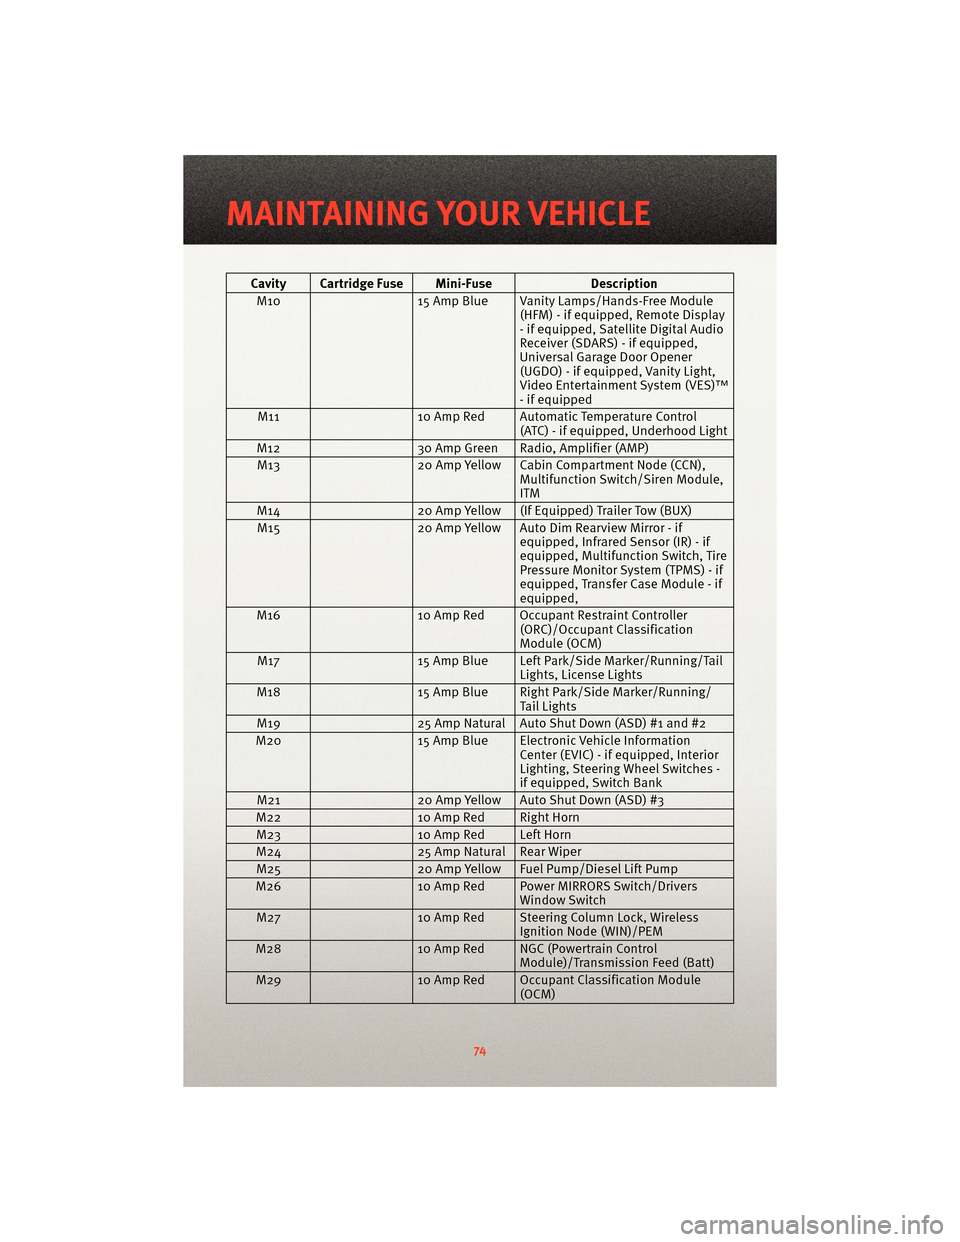
M10 15 Amp Blue Vanity Lamps/Hands-Free Module
(HFM) - if equipped, Remote Display
- if equipped, Satellite Digital Audio
Receiver (SDARS) - if equipped,
Universal Garage Door Opener
(UGDO) - if equipped, Vanity Light,
Video Entertainment System (VES)™
- if equipped
M11 10 Amp Red Automatic Temperature Control
(ATC) - if equipped, Underhood Light
M12 30 Amp Green Radio, Amplifier (AMP)
M13 20 Amp Yellow Cabin Compartment Node (CCN),
Multifunction Switch/Siren Module,
ITM
M14 20 Amp Yellow (If Equipped) Trailer Tow (BUX)
M15 20 Amp Yellow Auto Dim Rearview Mirror - if
equipped, Infrared Sensor (IR) - if
equipped, Multifunction Switch, Tire
Pressure Monitor System (TPMS) - if
equipped, Transfer Case Module - if
equipped,
M16 10 Amp Red Occupant Restraint Controller
(ORC)/OccupantClassification
Module (OCM)
M17 15 Amp Blue Left Park/Side Marker/Running/Tail
Lights, License Lights
M18 15 Amp Blue Right Park/Side Marker/Running/
Tail Lights
M19 25 Amp Natural Auto Shut Down (ASD) #1 and #2
M20 15 Amp Blue Electronic Vehicle Information
Center (EVIC) - if equipped, Interior
Lighting, Steering Wheel Switches -
if equipped, Switch Bank
M21 20 Amp Yellow Auto Shut Down (ASD) #3
M22 10 Amp Red Right Horn
M23 10 Amp Red Left Horn
M24 25 Amp Natural Rear Wiper
M25 20 Amp Yellow Fuel Pump/Diesel Lift Pump
M26 10 Amp Red Power MIRRORS Switch/Drivers
Window Switch
M27 10 Amp Red Steering Column Lock, Wireless
Ignition Node (WIN)/PEM
M28 10 Amp Red NGC (Powertrain Control
Module)/Transmission Feed (Batt)
M29 10 Amp Red Occupant Classification Module
(OCM)
MAINTAINING YOUR VEHICLE
74