DODGE JOURNEY 2011 1.G Owners Manual
JOURNEY 2011 1.G
DODGE
DODGE
https://www.carmanualsonline.info/img/12/5642/w960_5642-0.png
DODGE JOURNEY 2011 1.G Owners Manual
Trending: steering wheel, hood release, washer fluid, light, fuel additives, maintenance schedule, interior lights
Page 501 of 557
CAUTION!
Do not touch the new bulb with your fingers. Oil
contamination will severely shorten bulb life. If the
bulb comes in contact with an oily surface, clean the
bulb with rubbing alcohol.
4. Install the replacement bulb and connector assembly
straight into the fog lamp until it locks into place.
5. Reinstall the front lower wheel well access panel and
fasteners.
Rear Turn Signal And Backup Lamp
The taillamps are a two-piece design. The tail/stop/rear
turn signal lamps are located in the rear corner body
panels. The tail and backup lamps are located in the
liftgate.
Changing The Rear Turn Signal Lamp
1. Open the liftgate.
2. Remove the two fasteners from the inboard side of the
taillamp housing.
3. Carefully insert a trim stick (plastic flat-blade tool)
between the body panel and the outboard side of the
7
MAINTAINING YOUR VEHICLE 499
Page 502 of 557

taillamp housing with one hand and grasp the flange on
the inboard side of the taillamp housing with the other
hand. Use the trim stick and hand pressure together to
disengage the taillamp housing from the vehicle.
4. Rotate the applicable bulb’s electrical connector
1�4
turn counterclockwise and remove it from the taillamp
housing.
5. Remove the bulb from the connector socket and install
the replacement bulb.
6. Install the bulb and connector assembly into the
taillamp housing and rotate the connector
1�4turn clock-
wise to lock it in place.
7. Reinstall the taillamp housing and fasteners.
Changing The Backup Lamp
1. Open the liftgate. 2. Remove the two fasteners retaining the taillamp hous-
ing to the liftgate from the inboard face of the liftgate.
3. Carefully insert a trim stick (plastic flat-blade tool)
between the taillamp housing and the liftgate. Use the
trim stick and hand pressure together to disengage the
taillamp housing from the liftgate.
500 MAINTAINING YOUR VEHICLE
Page 503 of 557
4. Rotate the applicable bulb’s electrical connector1�4
turn counterclockwise and remove it from the housing.
5. Remove the bulb from the connector socket and install
the replacement bulb.
6. Install the bulb and connector assembly into the
housing and rotate the connector
1�4turn clockwise to
lock it in place. 7. Reinstall the taillamp housing and fasteners.
License Plate Lamp
1. Push the small locking tab sticking out of the end of
the lens toward the side of the vehicle and hold it in that
position.
License Lamp
7
MAINTAINING YOUR VEHICLE 501
Page 504 of 557
2. Insert a small flat-blade tool between the end of the
lens with the locking tab and the surrounding housing
and then pivot the tool to separate the lens from the
housing.
3. Hold the lens with one hand and rotate the bulb’s
electrical connector
1�4turn counterclockwise with the
other hand and then separate the bulb and connector
assembly from the lens.
4. Remove the bulb from the connector socket and install
the replacement bulb. 5. Install the bulb and connector assembly into the lens
and rotate the connector
1�4turn clockwise to lock it in
place.
6. Insert the end of the lens without the locking tab into
the housing on the liftgate and then push the opposite
end of the lens into the housing, making sure it locks in
the housing.
502 MAINTAINING YOUR VEHICLE
Page 505 of 557

Front Wheel Drive (FWD) Models 20.5 Gallons 77.6 Liters
All-Wheel Drive Models 21 Gallons 79.8 Liters
Engine Oil with Filter
2.4L Engine (SAE 5W-20, API")
FLUID CAPACITIES
U.S.Metric
Fuel (Approximate)
Front Wheel Drive (FWD) Models 20.5 Gallons 77.6 Liters
All-Wheel Drive Models 21 Gallons 79.8 Liters
Engine Oil with Filter
2.4L Engine (SAE 5W-20, API Certified) 4.5 Quarts 4.26 Liters
3.6L Engine (SAE 5W-30, API Certified) 6 Quarts 5.6 Liters
Cooling System *
2.4L Engine and Single- or Dual-Zone Climate Control System (MOPAR�
Antifreeze/Coolant 5 Year/100,000 Mile Formula or equivalent) 7.9 Quarts 7.5 Liters
2.4L Engine and Three-Zone Climate Control System (MOPAR�
Antifreeze/Coolant 5 Year/100,000 Mile Formula or equivalent) 9.8 Quarts 9.3 Liters
3.6L Engine and Single- or Dual-Zone Climate Control System (MOPAR�
Antifreeze/Coolant 5 Year/100,000 Mile Formula or equivalent) 9.8 Quarts 9.3 Liters
3.6L Engine and Three-Zone Climate Control System (MOPAR�
Antifreeze/Coolant 5 Year/100,000 Mile Formula or equivalent) 12 Quarts 11.4 Liters
* Includes heater and coolant recovery bottle filled to MAX level.
7
MAINTAINING YOUR VEHICLE 503
Page 506 of 557
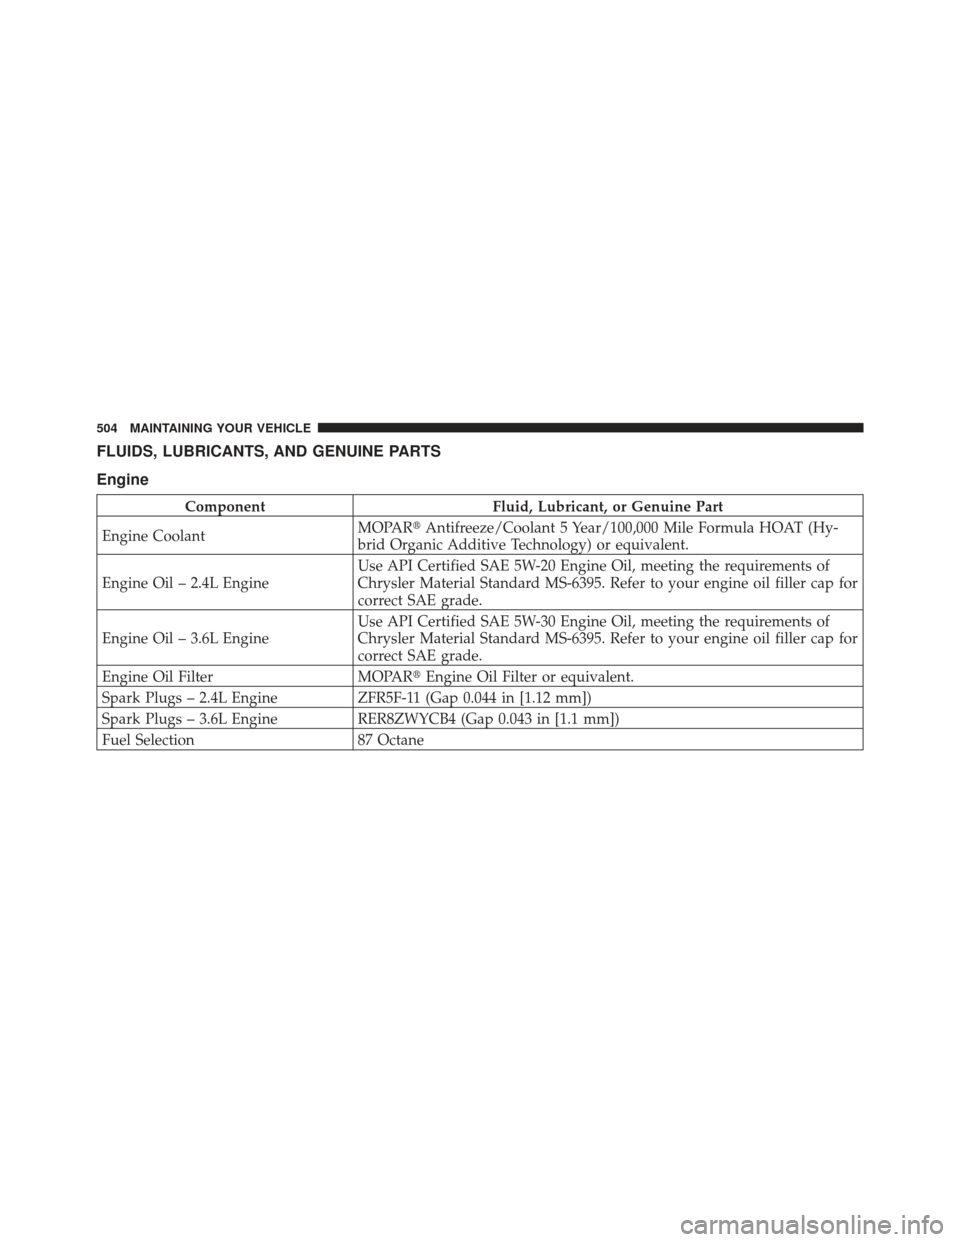
FLUIDS, LUBRICANTS, AND GENUINE PARTS
Engine
ComponentFluid, Lubricant, or Genuine Part
Engine Coolant MOPAR�
Antifreeze/Coolant 5 Year/100,000 Mile Formula HOAT (Hy-
brid Organic Additive Technology) or equivalent.
Engine Oil – 2.4L Engine Use API Certified SAE 5W-20 Engine Oil, meeting the requirements of
Chrysler Material Standard MS-6395. Refer to your engine oil filler cap for
correct SAE grade.
Engine Oil – 3.6L Engine Use API Certified SAE 5W-30 Engine Oil, meeting the requirements of
Chrysler Material Standard MS-6395. Refer to your engine oil filler cap for
correct SAE grade.
Engine Oil Filter MOPAR�Engine Oil Filter or equivalent.
Spark Plugs – 2.4L Engine ZFR5F-11 (Gap 0.044 in [1.12 mm])
Spark Plugs – 3.6L Engine RER8ZWYCB4 (Gap 0.043 in [1.1 mm])
Fuel Selection 87 Octane
504 MAINTAINING YOUR VEHICLE
Page 507 of 557
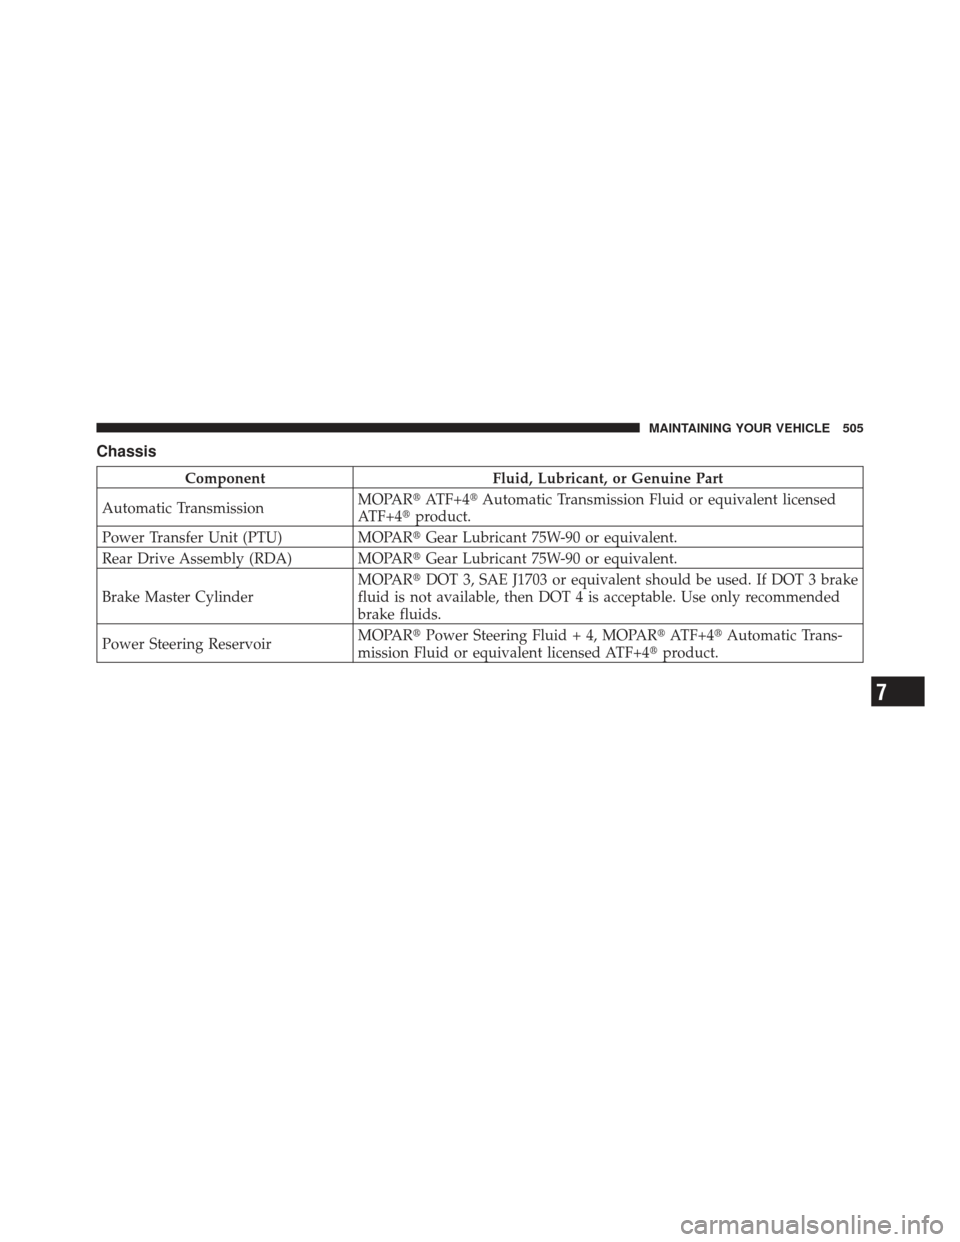
Chassis
ComponentFluid, Lubricant, or Genuine Part
Automatic Transmission MOPAR�
ATF+4�Automatic Transmission Fluid or equivalent licensed
ATF+4� product.
Power Transfer Unit (PTU) MOPAR�Gear Lubricant 75W-90 or equivalent.
Rear Drive Assembly (RDA) MOPAR� Gear Lubricant 75W-90 or equivalent.
Brake Master Cylinder MOPAR�
DOT 3, SAE J1703 or equivalent should be used. If DOT 3 brake
fluid is not available, then DOT 4 is acceptable. Use only recommended
brake fluids.
Power Steering Reservoir MOPAR�
Power Steering Fluid + 4, MOPAR� ATF+4�Automatic Trans-
mission Fluid or equivalent licensed ATF+4� product.
7
MAINTAINING YOUR VEHICLE 505
Page 508 of 557
Page 509 of 557
MAINTENANCE SCHEDULES
CONTENTS
�Maintenance Schedule .................. 508
▫ Required Maintenance Intervals .......... 510
8
M
A I
N T
E
N A
N CE
S
C
H E
D
U L
E
S
Page 510 of 557

MAINTENANCE SCHEDULE
The Scheduled Maintenance services listed in this
manual must be done at the times or mileages specified
to protect your vehicle warranty and ensure the best
vehicle performance and reliability. More frequent main-
tenance may be needed for vehicles in severe operating
conditions, such as dusty areas and very short trip
driving. Inspection and service should also be done
anytime a malfunction is suspected.
The oil change indicator system will remind you that it is
time to take your vehicle in for scheduled maintenance.
On Electronic Vehicle Information Center (EVIC)
equipped vehicles “Oil Change Required” will be dis-
played in the EVIC and a single chime will sound,
indicating that an oil change is necessary.
On Non-EVIC equipped vehicles “Change Oil” will flash
in the instrument cluster odometer and a single chime
will sound, indicating that an oil change is necessary.Based on engine operation conditions the oil change
indicator message will illuminate, this means that service
is required for your vehicle. Have your vehicle serviced
as soon as possible, within the next 500 miles (805 km).
NOTE:
•The oil change indicator message will not monitor the
time since the last oil change. Change your vehicles oil
if it has been 6 months since your last oil change even
if the oil change indicator message is NOT illumi-
nated.
•Change your engine oil more often if you drive your
vehicle off-road for an extended period of time.
•Under no circumstances should oil change intervals
exceed 8,000 miles (13 000 km) or six months, which-
ever comes first.
8
M
A I
N T
E
N A
N CE
S
C
H E
D
U L
E
S508 MAINTENANCE SCHEDULES
Trending: remote control, oil temperature, driver seat adjustment, radiator cap, AUX, tire type, automatic transmission