check engine DODGE JOURNEY 2013 1.G User Guide
[x] Cancel search | Manufacturer: DODGE, Model Year: 2013, Model line: JOURNEY, Model: DODGE JOURNEY 2013 1.GPages: 630
Page 403 of 630
Gear Ranges
DO NOT race the engine when shifting from PARK or
NEUTRAL into another gear range.
NOTE:After selecting any gear range, wait a moment to
allow the selected gear to engage before accelerating.
This is especially important when the engine is cold.
PARK
This range supplements the parking brake by locking the
transmission. The engine can be started in this range.
Never attempt to use PARK while the vehicle is in
motion. Apply the parking brake when leaving the
vehicle in this range.
When parking on a level surface, you may place the shift
lever in PARK first, and then apply the parking brake.
When parking on a hill, apply the parking brake before
placing the shift lever in PARK, otherwise the load on thetransmission locking mechanism may make it difficult to
move the shift lever out of PARK. As an added precau-
tion, turn the front wheels toward the curb on a downhill
grade and away from the curb on an uphill grade.
WARNING!
•Never use the PARK position as a substitute for the
parking brake. Always apply the parking brake
fully when parked to guard against vehicle move-
ment and possible injury or damage.
•Your vehicle could move and injure you and others
if it is not completely in PARK. Check by trying to
move the shift lever rearward (with the brake pedal
released) after you have placed it in PARK. Make
sure the transmission is in PARK before leaving
the vehicle.
(Continued)
5
STARTING AND OPERATING 401
Page 411 of 630
Gear Ranges
DO NOT race the engine when shifting from PARK or
NEUTRAL into another gear range.
NOTE:After selecting any gear range, wait a moment to
allow the selected gear to engage before accelerating.
This is especially important when the engine is cold.
PARK
This range supplements the parking brake by locking the
transmission. The engine can be started in this range. Never
attempt to use PARK while the vehicle is in motion. Apply
the parking brake when the leaving vehicle in this range.
When parking on a level surface, you may place the shift
lever in PARK first, and then apply the parking brake.
When parking on a hill, apply the parking brake before
placing the shift lever in PARK, otherwise the load on the
transmission locking mechanism may make it difficult tomove the shift lever out of PARK. As an added precau-
tion, turn the front wheels toward the curb on a downhill
grade and away from the curb on an uphill grade.
WARNING!
•Never use the PARK position as a substitute for the
parking brake. Always apply the parking brake
fully when parked to guard against vehicle move-
ment and possible injury or damage.
•Your vehicle could move and injure you and others
if it is not completely in PARK. Check by trying to
move the shift lever rearward (with the brake pedal
released) after you have placed it in PARK. Make
sure the transmission is in PARK before leaving
the vehicle.
(Continued)
5
STARTING AND OPERATING 409
Page 421 of 630
Shallow Standing Water
Although your vehicle is capable of driving through
shallow standing water, consider the following Caution
and Warning before doing so.
CAUTION!
•Always check the depth of the standing water
before driving through it. Never drive through
standing water that is deeper than the bottom of
the tire rims mounted on the vehicle.
•Determine the condition of the road or the path
that is under water and if there are any obstacles in
the way before driving through the standing water.
•Do not exceed 5 mph (8 km/h) when driving
through standing water. This will minimize wave
effects.
(Continued)
CAUTION!(Continued)
•Driving through standing water may cause damage
to your vehicle’s drivetrain components. Always
inspect your vehicle’s fluids (i.e., engine oil, trans-
mission, axle, etc.) for signs of contamination (i.e.,
fluid that is milky or foamy in appearance) after
driving through standing water. Do not continue to
operate the vehicle if any fluid appears contami-
nated, as this may result in further damage. Such
damage is not covered by the New Vehicle Limited
Warranty.
•Getting water inside your vehicle’s engine can
cause it to lock up and stall out, and cause serious
internal damage to the engine. Such damage is not
covered by the New Vehicle Limited Warranty.
5
STARTING AND OPERATING 419
Page 424 of 630
WARNING!
Fluid level should be checked on a level surface and
with the engine off to prevent injury from moving
parts and to ensure accurate fluid level reading. Do
not overfill. Use only manufacturer’s recommended
power steering fluid.
If necessary, add fluid to restore to the proper indicated
level. With a clean cloth, wipe any spilled fluid from all
surfaces. Refer to “Fluids, Lubricants, and Genuine Parts”
in “Maintaining Your Vehicle” for the correct fluid type.
PARKING BRAKE
Before leaving the vehicle, make sure that the parking
brake is fully applied. Also, be certain to leave the
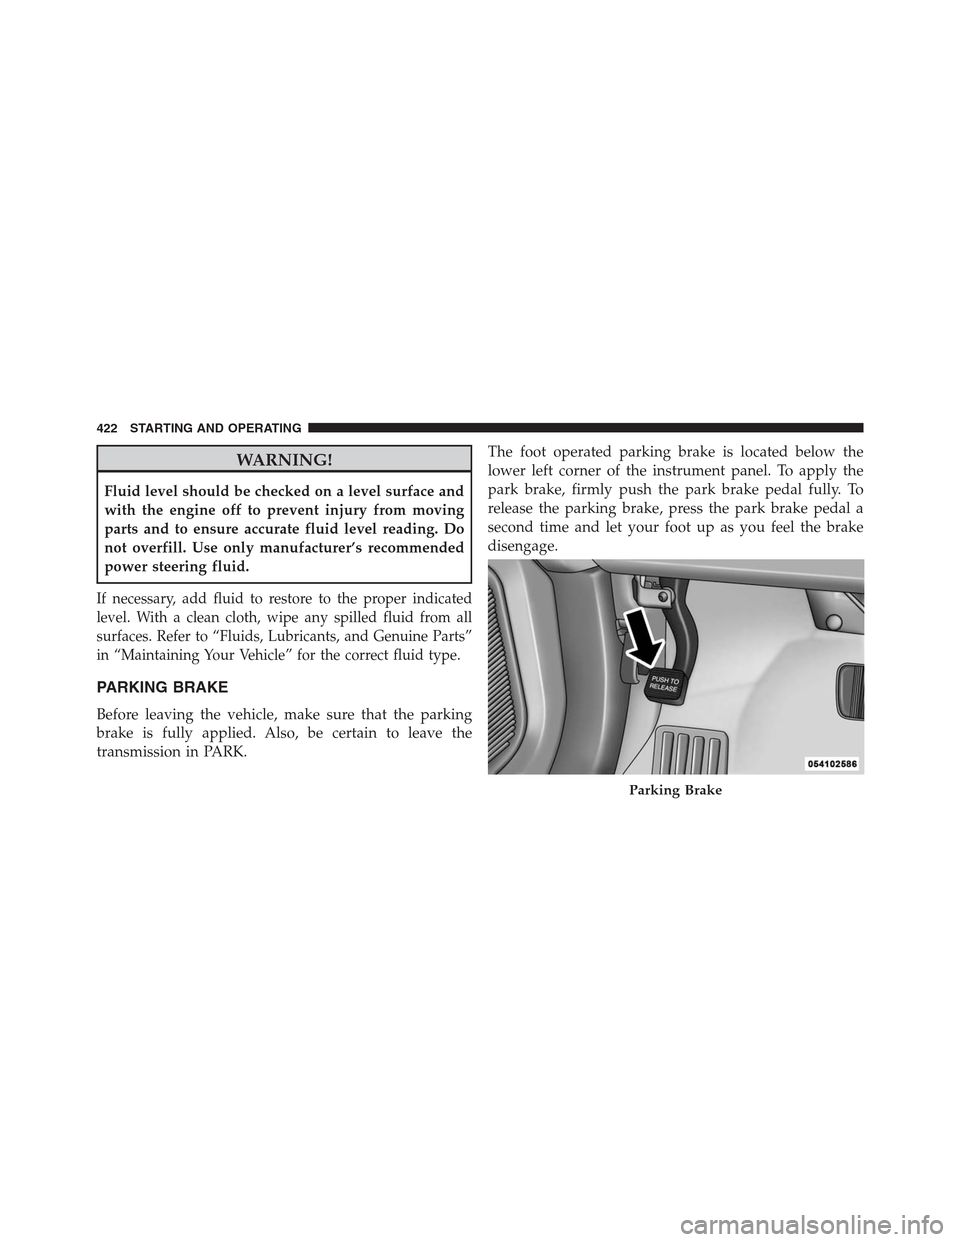
transmission in PARK.The foot operated parking brake is located below the
lower left corner of the instrument panel. To apply the
park brake, firmly push the park brake pedal fully. To
release the parking brake, press the park brake pedal a
second time and let your foot up as you feel the brake
disengage.
Parking Brake
422 STARTING AND OPERATING
Page 452 of 630
While studded tires improve performance on ice, skid
and traction capability on wet or dry surfaces may be
poorer than that of non-studded tires. Some states pro-
hibit studded tires; therefore, local laws should be
checked before using these tire types.
Spare Tire Matching Original Equipped Tire And
Wheel – If Equipped
Your vehicle may be equipped with a spare tire and
wheel equivalent in look and function to the original
equipment tire and wheel found on the front or rear axle
of your vehicle. This spare tire may be used in the tire
rotation for your vehicle. If your vehicle has this option
refer to an authorized tire dealer for the recommended
tire rotation pattern.If your vehicle is not equipped with an original equip-
ment tire and wheel as a spare, a non-matching tempo-
rary emergency use spare may be equipped with your
vehicle. Temporary use spares are engineered to be used
only with your vehicle. Your vehicle may be equipped
with one of the following types of non-matching tempo-
rary use spares; compact, full size, or limited-use. Do not
install more than one non-matching temporary use spare
tire/wheel on the vehicle at any given time.
CAUTION!
Because of the reduced ground clearance, do not take
your vehicle through an automatic car wash with a
compact, full size or limited-use temporary spare
installed. Damage to the vehicle may result.
450 STARTING AND OPERATING
Page 530 of 630
is heard and press the TRIP ODOMETER button to turn
off the message. If the problem persists, the message will
appear the next time the vehicle is started.
A loose, improperly installed, or damaged fuel filler cap
may also turn on the MIL.
EMISSIONS INSPECTION AND MAINTENANCE
PROGRAMS
In some localities, it may be a legal requirement to pass
an inspection of your vehicle’s emissions control system.
Failure to pass could prevent vehicle registration.
For states that require an Inspection and Mainte-
nance (I/M), this check verifies the “Malfunction
Indicator Light (MIL)” is functioning and is not
on when the engine is running, and that the OBD II
system is ready for testing.Normally, the OBD II system will be ready. The OBD II
system maynotbe ready if your vehicle was recently
serviced, recently had a dead battery or a battery replace-
ment. If the OBD II system should be determined not
ready for the I/M test, your vehicle may fail the test.
Your vehicle has a simple ignition key-actuated test,
which you can use prior to going to the test station. To
check if your vehicle’s OBD II system is ready, you must
do the following:
1. Turn the ignition switch to the ON position, but do not
crank or start the engine.
2. If you crank or start the engine, you will have to start
this test over.
3. As soon as you turn the ignition switch to the ON
position, you will see the MIL symbol come on as part
of a normal bulb check.
528 MAINTAINING YOUR VEHICLE
Page 531 of 630
4. Approximately 15 seconds later, one of two things will
happen:
•The MIL will flash for about 10 seconds and then
return to being fully illuminated until you turn OFF
the ignition or start the engine. This means that your
vehicle’s OBD II system isnot readyand you should
notproceed to the I/M station.
•The MIL will not flash at all and will remain fully
illuminated until you turn OFF the ignition or start the
engine. This means that your vehicle’s OBD II system
isreadyand you can proceed to the I/M station.
If your OBD II system isnot ready,you should see your
authorized dealer or repair facility. If your vehicle was
recently serviced or had a battery failure or replacement,
you may need to do nothing more than drive your
vehicle as you normally would in order for your OBD IIsystem to update. A recheck with the above test routine
may then indicate that the system is now ready.
Regardless of whether your vehicle’s OBD II system is
ready or not, if the MIL is illuminated during normal
vehicle operation you should have your vehicle serviced
before going to the I/M station. The I/M station can fail
your vehicle because the MIL is on with the engine
running.
REPLACEMENT PARTS
Use of genuine MOPAR® parts for normal/scheduled
maintenance and repairs is highly recommended to en-
sure the designed performance. Damage or failures
caused by the use of non-MOPAR® parts for mainte-
nance and repairs will not be covered by the manufac-
turer’s warranty.
7
MAINTAINING YOUR VEHICLE 529
Page 533 of 630
CAUTION!(Continued)
•Your vehicle has been built with improved fluids
that protect the performance and durability of your
vehicle and also allow extended maintenance inter-
vals. Do not use chemical flushes in these compo-
nents as the chemicals can damage your engine,
transmission, power steering or air conditioning.
Such damage is not covered by the New Vehicle
Limited Warranty. If a flush is needed because of
component malfunction, use only the specified
fluid for the flushing procedure.
Engine Oil
Checking Oil Level
To assure proper engine lubrication, the engine oil must
be maintained at the correct level. Check the oil level at
regular intervals, such as every fuel stop. The best time tocheck the engine oil level is about five minutes after a
fully warmed engine is shut off. Do not check oil level
before starting the engine after it has sat overnight.
Checking engine oil level when the engine is cold will
give you an incorrect reading.
Checking the oil while the vehicle is on level ground and
only when the engine is hot, will improve the accuracy of
the oil level readings. Maintain the oil level between the
range markings on the dipstick. Either the range mark-
ings consist of a crosshatch zone marked SAFE or a
crosshatch zone marked with MIN at the low end of the
range and MAX at the high end of the range. Adding
1.0 qt (1.0 l) of oil when the reading is at the low end of
the range marking will raise the oil level to the high end
of the range marking.
7
MAINTAINING YOUR VEHICLE 531
Page 545 of 630
4. Install the wiper blade pivot pin into the wiper blade
holder at the end of the wiper arm, and firmly press
the wiper blade until it snaps into place.
5. Lower the wiper blade and snap the pivot cap into
place.
Adding Washer Fluid
The windshield washer and the rear window washer
share the same fluid reservoir. The fluid reservoir is
located in the engine compartment. Be sure to check the
fluid level in the reservoir at regular intervals. Fill the
reservoir with windshield washer solvent (not radiator
antifreeze) and operate the system for a few seconds to
flush out the residual water.
When refilling the washer fluid reservoir, apply some
washer fluid to a cloth or towel and wipe the wiper
blades clean. This will help blade performance.To prevent freeze-up of your windshield washer system
in cold weather, select a solution or mixture that meets or
exceeds the temperature range of your climate. This
rating information can be found on most washer fluid
containers.
The fluid reservoir will hold nearly 1 gal (4 l) of washer
fluid when the message “LoWASH” appears in the
instrument cluster.
WARNING!
Commercially available windshield washer solvents
are flammable. They could ignite and burn you.
Care must be exercised when filling or working
around the washer solution.
7
MAINTAINING YOUR VEHICLE 543
Page 549 of 630
Coolant Checks
Check the engine coolant (antifreeze) protection every
12 months (before the onset of freezing weather, where
applicable). If the engine coolant (antifreeze) is dirty or
rusty in appearance, the system should be drained,
flushed, and refilled with fresh engine coolant (anti-
freeze). Check the front of the A/C condenser for any
accumulation of bugs, leaves, etc. If dirty, clean by gently
spraying water from a garden hose vertically down the
face of the condenser.
Check the coolant recovery bottle tubing for brittle rubber,
cracking, tears, cuts, and tightness of the connection at the
bottle and radiator. Inspect the entire system for leaks.
Cooling System – Drain, Flush, And Refill
If the engine coolant (antifreeze) is dirty or contains visible
sediment, clean and flush with OAT coolant (antifreeze)
that meets the requirements of Chrysler Material Standard
MS-12106.
Refer to the “Maintenance Schedule” for the proper mainte-
nance intervals.
Selection Of Coolant
Refer to “Fluids, Lubricants, and Genuine Parts” in “Main-
taining Your Vehicle” for further information.
7
MAINTAINING YOUR VEHICLE 547