clock setting DODGE JOURNEY 2014 1.G User Guide
[x] Cancel search | Manufacturer: DODGE, Model Year: 2014, Model line: JOURNEY, Model: DODGE JOURNEY 2014 1.GPages: 124, PDF Size: 3.37 MB
Page 43 of 124
Uconnect® 4.3 & 4.3S AT A GLANCE
Displaying The Time
• If the time is not currently displayed at the top of the screen when in Radio mode, pressthe SETTINGS button, then touch “Clock.” Select “Show Time,” then touch “On.”
Setting The Time
• Press the SETTINGS hard-key, then touch the “Clock” soft-key.
• Touch the “Time” soft-key.
• Touch the “Up or Down” soft-keys to adjust the hours, minutes or AM/PM.
NOTE:
12hr format and 24hr format can also be set.
• Once the time is set press the “Done” soft-key to exit the time screen.
Audio Settings
• Press the SETTINGS hard-key on the right side of the unit.
• Then scroll down and press the “Audio” soft-key to get to the Audio menu.
• The Audio Menu shows the following options for you to customize your audio settings. • Equalizer
• Balance/Fade
• Speed Adjust Volume
• Touch the “Exit” soft-key to exit from the Audio Menu.
ELECTRONICS
41
Page 44 of 124
Equalizer
•
Touch the “Equalizer” soft-key to adjust the Bass, Mid and Treble. Use the “+” or “–” soft-key
to adjust the equalizer to your desired settings. Press the “Done” soft-key when done.
Balance/Fade
• Touch the “Balance/Fade” soft-key to adjust the sound from the speakers. Use the “arrow” soft-key to adjust the sound level from the front and rear or right and left side
speakers. Touch the center “C” soft-key to reset the balance and fade to the factory
setting. Press the “Done” soft-key when done.
Speed Adjust Volume
• Touch the “Speed Adjust Volume” soft-key to select between OFF, 1, 2 or 3. This will decrease the radio volume relative to a decrease in vehicle speed. Press the “Done”
soft-key when done.
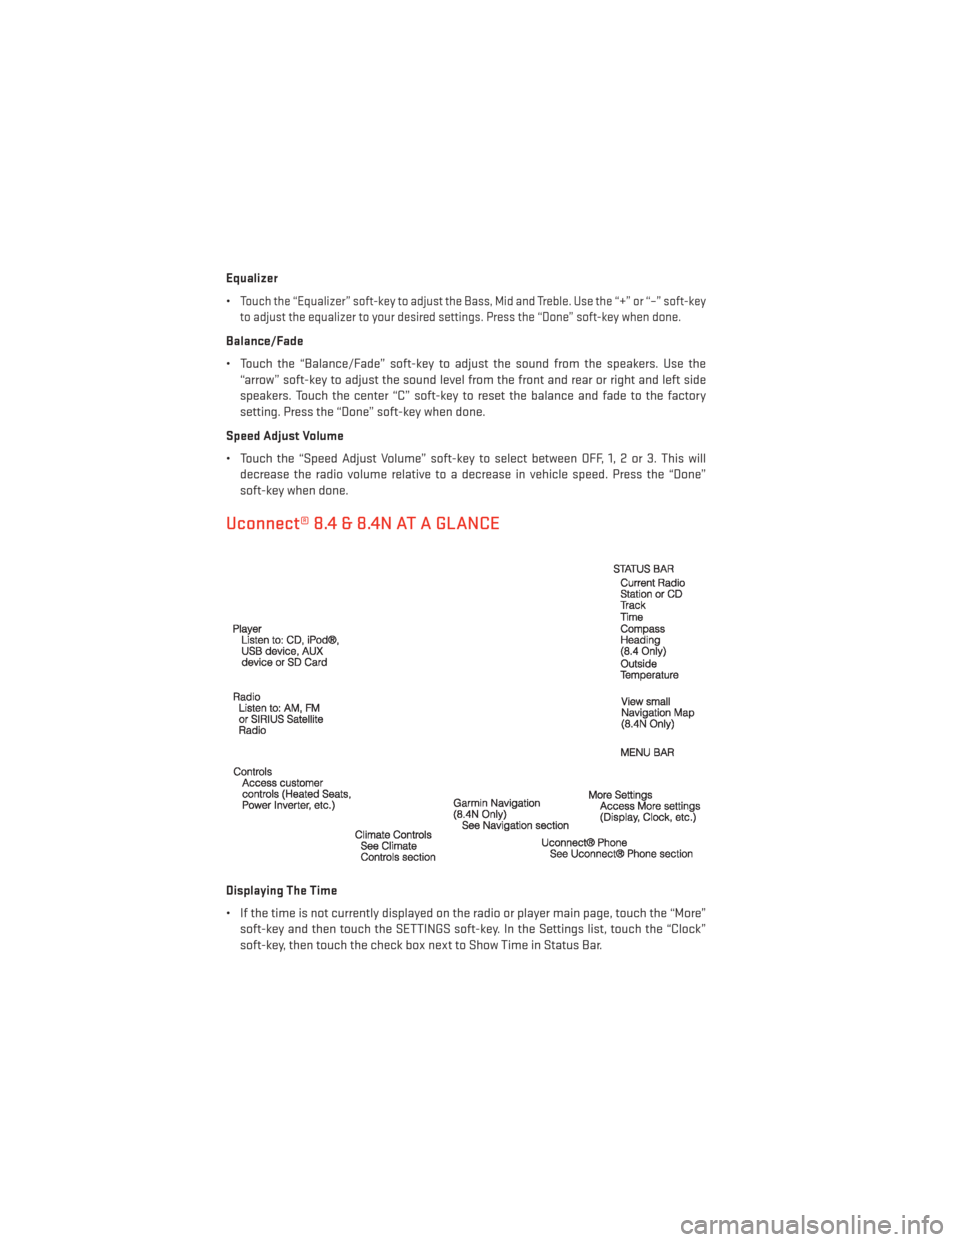
Uconnect® 8.4 & 8.4N AT A GLANCE
Displaying The Time
• If the time is not currently displayed on the radio or player main page, touch the “More”soft-key and then touch the SETTINGS soft-key. In the Settings list, touch the “Clock”
soft-key, then touch the check box next to Show Time in Status Bar.
ELECTRONICS
42
Page 45 of 124
Setting The Time
• Model 8.4N synchronizes time automatically via GPS, so should not require any timeadjustment. If you do need to set the time manually, follow the instructions below for
Model 8.4.
• For Model 8.4, turn the unit on, then touch the “Time Display” at the top of the screen. Touch “Yes”.
• If the time is not displayed at the top of the screen, touch “More” soft-key and then “Settings” soft-key. In the Settings screen, touch the “Clock” soft-key, then check or
uncheck this option.
• Touch “+” or “–” next to Set Time Hours and Set Time Minutes to adjust the time.
• If these features are not available, uncheck the “Sync” with GPS box.
• Touch “X” to save your settings and exit out of the Clock Setting screen.
Audio Settings
• Touch the “Audio” soft-key to activate the Audio settings screen to adjust Balance\Fade, Equalizer and Speed Adjusted Volume.
• You can return to the Radio screen by touching the “X” located at the top right.
Balance/Fade
• Touch the “Balance/Fade” soft-key to Balance audio between the front speakers or fade the audio between the rear and front speakers.
• Touching the “Front,” “Rear,” ”Left” or “Right” soft-keys or touch and drag the red Speaker Icon to adjust the Balance/Fade.
Equalizer
• Touch the “Equalizer” soft-key to activate the Equalizer screen.
• Touch the “+” or “ –” soft-keys, or by touching and dragging over the level bar for each of the equalizer bands. The level value, which spans between ±9, is displayed at the bottom
of each of the Bands.
Speed Adjusted Volume
• Touch the “Speed Adjusted Volume” soft-key to activate the Speed Adjusted Volume screen. The Speed Adjusted Volume is adjusted by touching the “+” and “–” buttons or by
touching and dragging over the level bar. This alters the automatic adjustment of the
audio volume with variation to vehicle speed.
ELECTRONICS
43
Page 67 of 124
Compass Calibration
This compass is self-calibrating, which eliminates the need to set the compass manually.
When the vehicle is new, the compass may appear erratic and the EVIC will display “CAL”
until the compass is calibrated.
You may also calibrate the compass by completing one or more 360 degree turns (in an area
free from large metal or metallic objects) until the “CAL” message displayed in the EVIC
turns off. The compass will now function normally.
PROGRAMMABLE FEATURES
Electronic Vehicle Information Center (EVIC) — If Equipped
• The EVIC can be used to view or change the following settings. Press the UPor
DOWN
button until System Setup displays, then press the SELECTbutton. Scroll
through the settings using the UP or DOWN buttons. Press the SELECT
button to
change the setting. Press the BACK button to scroll back to a previous menu or sub
menu.
• Fuel Economy • Average Fuel Economy
• Distance To Empty (DTE)
• Miles Per Gallon (MPG) • Trip Info
• Trip A
• Trip B
• Elapsed Time
• Vehicle Speed • Tire PSI
• Messages •
Vehicle Info (Customer Information
Features)
Uconnect® 4.3 Customer Programmable Features
• The Uconnect® 4.3 system allows you to access Customer Programmable feature set- tings such as Display, Clock, Safety/Assistance, Lights, Doors & Locks, Heated Seats,
Engine Off Operation, Compass Settings, Audio, Phone/ Bluetooth® and SIRIUS Setup
through hard-keys and soft-keys.
• Press the “Settings” hard-key to on the right side of the unit to access the Settings screen, use the “Page Up/Down” soft-keys to scroll through the following settings. The
following feature settings are available:
• Display • Auto On Comfort & Remote Start
• Clock • Engine Off Options
• Safety/Assistance • Audio
• Lights • Phone/Bluetooth®
• Doors & Locks • SIRIUS Setup
ELECTRONICS
65
Page 68 of 124
Uconnect® 8.4 Customer Programmable Features
• The Uconnect® 8.4 system allows you to access Customer Programmable feature set-tings such as Display, Clock, Safety/Assistance, Lights, Doors & Locks, Heated Seats,
Engine Off Operation, Compass Settings, Audio, Phone/Bluetooth® and SIRIUS Setup
through soft-keys.
• Touch the “More” soft-key on the bottom of the screen, then touch the “Settings” soft-key to access the Settings screen. When making a selection, scroll up or down until
the preferred setting is highlighted, then press and release the preferred setting until a
check-mark appears next to the setting, showing that setting has been selected.
The following feature settings are available:
• Display • Auto On Comfort & Remote Start
• Clock • Engine Off Options
• Safety/Assistance • Audio
• Lights • Phone/Bluetooth®
• Doors & Locks • SIRIUS Setup
UNIVERSAL GARAGE DOOR OPENER (HomeLink®)
• HomeLink® replaces up to three hand-held transmitters that operate devices such as
garage door openers, motorized gates, lighting or home security systems. The
HomeLink® unit is powered by your vehicles 12 Volt battery.
• The HomeLink® buttons that are located in the overhead console or sunvisor designate the three different HomeLink® channels.
• The HomeLink® indicator is located above the center button.
Before You Begin Programming
HomeLink®
Ensure that your vehicle is parked outside of
the garage before you begin programming.
For efficient programming and accurate
transmission of the radio-frequency signal,
it is recommended that a new battery be
placed in the hand-held transmitter of the
device that is being programmed to the
HomeLink® system.
Erase all channels before you begin pro-
gramming. To erase the channels, place the
ignition switch into the ON/RUN position,
then press and hold the two outside HomeLink® buttons (I and III) for up to 20 seconds or
until the red indicator flashes.
ELECTRONICS
66