Battery DODGE JOURNEY 2015 1.G Owner's Manual
[x] Cancel search | Manufacturer: DODGE, Model Year: 2015, Model line: JOURNEY, Model: DODGE JOURNEY 2015 1.GPages: 648
Page 313 of 648
![DODGE JOURNEY 2015 1.G Owners Manual •Turn Signal On (with a continuous warning chime if
the vehicle is driven more than 1 mile [1.6 km] with
either turn signal on)
•Lamp Out (with vehicle graphic showing which of the
4 turn signals DODGE JOURNEY 2015 1.G Owners Manual •Turn Signal On (with a continuous warning chime if
the vehicle is driven more than 1 mile [1.6 km] with
either turn signal on)
•Lamp Out (with vehicle graphic showing which of the
4 turn signals](/img/12/5650/w960_5650-312.png)
•Turn Signal On (with a continuous warning chime if
the vehicle is driven more than 1 mile [1.6 km] with
either turn signal on)
•Lamp Out (with vehicle graphic showing which of the
4 turn signals is/are out).
•Key Battery Low (with a single chime)
•Left/Right Front Door Ajar (one or more doors open,
with a single chime if speed is above 1 mph [1.6 km/ h])
•Low Washer Fluid (with a single chime)
•Low Tire Pressure (with a single chime). Refer to
information on “Tire Pressure” and “Tire Pressure
Monitor” in “Starting And Operating”
•Service TPM System (with a single chime). Refer to
information on “Tire Pressure Monitor” in “Starting
And Operating”
•Channel # Transmit
•Channel # Training
•Channel # Trained
•Clearing Channels
•Channels Cleared
•Did Not Train
•Check Gascap (refer to “Adding Fuel” in “Starting
And Operating”)
•Oil Change Due (with a single chime)
4
UNDERSTANDING YOUR INSTRUMENT PANEL 311
Page 359 of 648
Locking The Remote Control
All remote control functionality can be disabled as a
parental control feature.
1. Press the “MORE” button on the touchscreen.
2. Press the “Rear Entertainment” button on the touch-
screen to display the Rear Entertainment Controls.
3. Press the “Lock-out” button on the touchscreen to lock
the remote control. Pressing the “Lock-out” button on
the touchscreen a second time will unlock the remote
control.
NOTE:Remote control lock-out will only apply to the
current ignition cycle. The VES™ will automatically
remove the lock-out if the ignition is cycled to “OFF”.
Replacing The Remote Control Batteries
The remote control requires two AAA batteries for op-
eration. To replace the batteries:
•Locate the battery compartment on the back of the
remote, then slide the battery cover downward.
•Replace the batteries, making sure to orient them
according to the polarity diagram shown.
•Replace the battery compartment cover.
Headphones Operation
The headphones receive two separate channels of audio
using an infrared transmitter from the video screen.
If no audio is heard after increasing the volume control,
verify that the screen is turned on and in the down
position and that the channel is not muted and the
headphone channel selector switch is on the desired
4
UNDERSTANDING YOUR INSTRUMENT PANEL 357
Page 360 of 648
channel. If audio is still not heard, check that fully
charged batteries are installed in the headphones.
Replacing The Headphone Batteries
Each set of headphones requires two AAA batteries for
operation. To replace the batteries:
•Locate the battery compartment on the left ear cup of
the headphones, and then slide the battery cover
downward.
•Replace the batteries, making sure to orient them
according to the polarity diagram shown.
•Replace the battery compartment cover.
Controls
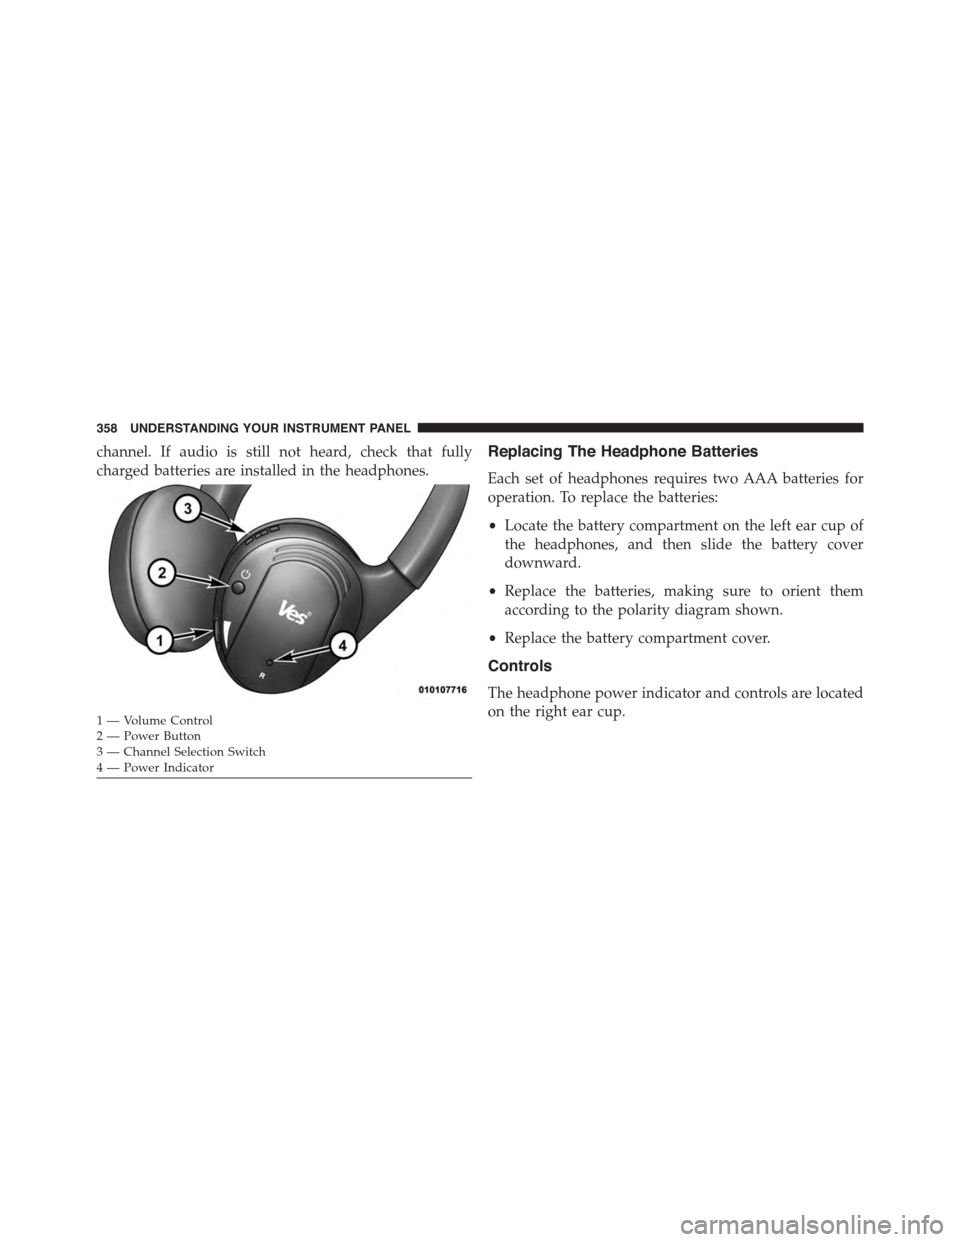
The headphone power indicator and controls are located
on the right ear cup.1—VolumeControl2—PowerButton3 — Channel Selection Switch4—PowerIndicator
358 UNDERSTANDING YOUR INSTRUMENT PANEL
Page 361 of 648
NOTE:The rear video system must be turned on before
sound can be heard from the headphones. To conserve
battery life, the headphones will automatically turn off
approximately three minutes after the rear video system
is turned off.
Changing The Audio Mode For Headphones
1. Ensure the Remote Control channel/screen selector
switch is in the same position as the headphone
selector switch.
NOTE:
•When both switches are on Channel 1, the Remote is
controlling Channel 1 and the headphones are tuned
to the audio of the VES™ Channel 1.
•When both switches are on Channel 2, the Remote is
controlling Channel 2 and the headphones are tuned
to the audio of the VES™ Channel 2.
2. Push the MODE button on the remote control.
3. If the video screen is displaying a video source (such
as a DVD Video), pushing STATUS shows the status
on a popup banner at the bottom of the screen.
Pushing the MODE button will advance to the next
mode. When the mode is in an audio only source (such
as FM), the Mode Selection menu appears on screen.
4. When the Mode Selection menu appears on screen,
use the cursor buttons on the remote control to navi-
gate to the available modes and push the ENTER
button to select the new mode.
5. To cancel out of the Mode Selection menu, push the
BACK button on the remote control.
Unwired® Stereo Headphone Lifetime Limited
Warranty
Who Does This Warranty Cover?This warranty covers
the initial user or purchaser (#you#or#your#) of this
4
UNDERSTANDING YOUR INSTRUMENT PANEL 359
Page 414 of 648
WARNING!(Continued)
•Do not attempt to push or tow your vehicle to get it
started. Vehicles equipped with an automatic trans-
mission cannot be started this way. Unburned fuel
could enter the catalytic converter and once the
engine has started, ignite and damage the converter
and vehicle.
•If the vehicle has a discharged battery, booster
cables may be used to obtain a start from a booster
battery or the battery in another vehicle. This type
of start can be dangerous if done improperly. Refer
to “Jump Starting” in “What To Do In Emergen-
cies” for further information.
Clearing A Flooded Engine (Using ENGINE
START/STOP Button)
If the engine fails to start after you have followed the
“Normal Starting” or “Extreme Cold Weather#proce-
dures, it may be flooded. To clear any excess fuel:
1. Press and hold the brake pedal.
2. Press the accelerator pedal all the way to the floor and
hold it.
3. Push and release the ENGINE START/STOP button
once.
The starter motor will engage automatically, run for 10
seconds, and then disengage. Once this occurs, release
the accelerator pedal and the brake pedal, wait 10 to 15
seconds, then repeat the “Normal Starting” procedure.
412 STARTING AND OPERATING
Page 484 of 648
Problems that result from using gasoline containing
Methanol or gasoline containing more than 10% Ethanol
are not the responsibility of the manufacturer and may
not be covered under New Vehicle Limited Warranty.
E-85 Usage In Non-Flex Fuel Vehicles
Non-Flex Fuel Vehicles (FFV) are compatible with gaso-
line containing 10% ethanol (E10). Gasoline with higher
ethanol content may void the New Vehicle Limited
Warranty.
If a Non-FFV vehicle is inadvertently fueled with E-85
fuel, the engine will have some or all of these symptoms:
•Operate in a lean mode.
•OBD II “Malfunction Indicator Light” on.
•Poor engine performance.
•Poor cold start and cold drivability.
•Increased risk for fuel system component corrosion.
To fix a Non-FFV vehicle inadvertently fueled once with
E-85 perform the following:
•Drain the fuel tank (see your authorized dealer).
•Change the engine oil and oil filter.
•Disconnect and reconnect the battery to reset the
engine controller memory.
More extensive repairs will be required for prolonged
exposure to E-85 fuel.
MMT In Gasoline
Methylcyclopentadienyl Manganese Tricarbonyl (MMT)
is a manganese-containing metallic additive that is
blended into some gasoline to increase octane. Gasoline
blended with MMT provides no performance advantage
beyond gasoline of the same octane number without
MMT. Gasoline blended with MMT reduces spark plug
life and reduces emissions system performance in some
vehicles. The manufacturer recommends that gasoline
482 STARTING AND OPERATING
Page 506 of 648
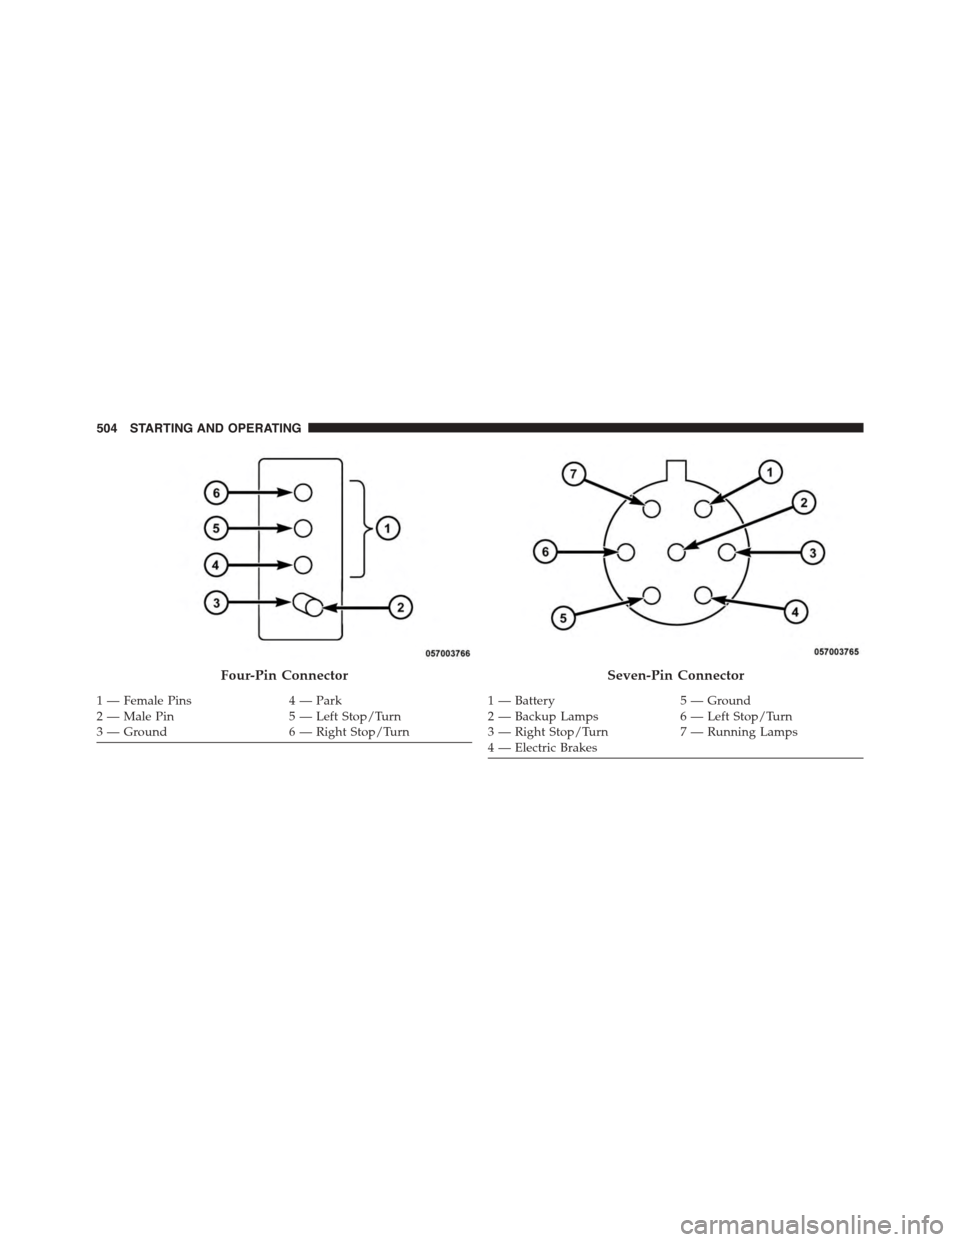
Four-Pin Connector
1 — Female Pins4 — Park2 — Male Pin5 — Left Stop/Turn3—Ground6—RightStop/Turn
Seven-Pin Connector
1—Battery5—Ground2—BackupLamps6—LeftStop/Turn3—RightStop/Turn7—RunningLamps4 — Electric Brakes
504 STARTING AND OPERATING
Page 513 of 648
HAZARD WARNING FLASHERS
The Hazard Warning flasher switch is located in the
instrument panel switch bank, above the climate controls.
Press the switch to turn on the Hazard Warning
flasher. When the switch is activated, all direc-
tional turn signals will flash on and off to warn oncoming
traffic of an emergency. Press the switch a second time to
turn off the Hazard Warning flashers.
This is an emergency warning system and it should not
be used when the vehicle is in motion. Use it when your
vehicle is disabled and it is creating a safety hazard for
other motorists.
When you must leave the vehicle to seek assistance, the
Hazard Warning flashers will continue to operate even
though the ignition is placed in the OFF position.
NOTE:With extended use the Hazard Warning flashers
may wear down your battery.
IF YOUR ENGINE OVERHEATS
In any of the following situations, you can reduce the
potential for overheating by taking the appropriate ac-
tion.
•On the highways — slow down.
•In city traffic — while stopped, place the transmission
in NEUTRAL, but do not increase engine idle speed.
NOTE:There are steps that you can take to slow down
an impending overheat condition:
•If your air conditioner (A/C) is on, turn it off. The A/C
system adds heat to the engine cooling system and
turning the A/C off can help remove this heat.
•You can also turn the temperature control to maximum
heat, the mode control to floor and the blower control
6
WHAT TO DO IN EMERGENCIES 511
Page 530 of 648
5. After 25 miles (40 km) check the lug nut torque with a
torque wrench to ensure that all lug nuts are properly
seated against the wheel.
JUMP-STARTING
If your vehicle has a discharged battery it can be jump-
started using a set of jumper cables and a battery in
another vehicle or by using a portable battery booster
pack. Jump-starting can be dangerous if done improperly
so please follow the procedures in this section carefully.
WARNING!
Do not attempt jump-starting if the battery is frozen.
It could rupture or explode and cause personal injury.
CAUTION!
Do not use a portable battery booster pack or any
other booster source with a system voltage greater
than 12 Volts or damage to the battery, starter motor,
alternator or electrical system may occur.
NOTE:When using a portable battery booster pack
follow the manufacturer’s operating instructions and
precautions.
Preparations For Jump-Start
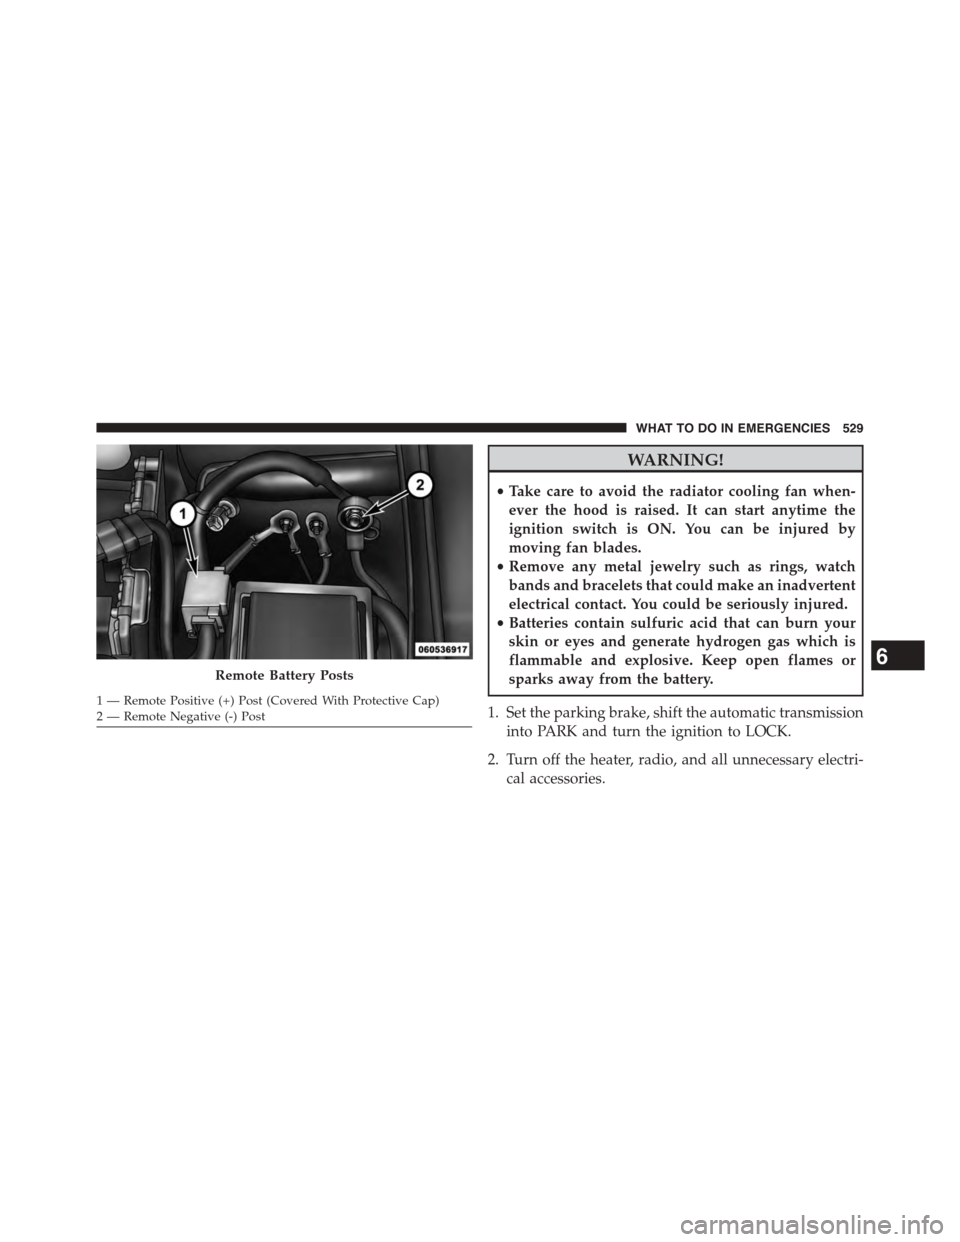
The battery in your vehicle is located between the left
front headlight assembly and the left front wheel splash
shield. To allow jump-starting, there are remote battery
posts located on the left side of the engine compartment.
528 WHAT TO DO IN EMERGENCIES
Page 531 of 648
WARNING!
•Take care to avoid the radiator cooling fan when-
ever the hood is raised. It can start anytime the
ignition switch is ON. You can be injured by
moving fan blades.
•Remove any metal jewelry such as rings, watch
bands and bracelets that could make an inadvertent
electrical contact. You could be seriously injured.
•Batteries contain sulfuric acid that can burn your
skin or eyes and generate hydrogen gas which is
flammable and explosive. Keep open flames or
sparks away from the battery.
1. Set the parking brake, shift the automatic transmission
into PARK and turn the ignition to LOCK.
2. Turn off the heater, radio, and all unnecessary electri-
cal accessories.
Remote Battery Posts
1—RemotePositive(+)Post(CoveredWithProtectiveCap)2 — Remote Negative (-) Post
6
WHAT TO DO IN EMERGENCIES 529