maintenance schedule DODGE JOURNEY 2015 1.G Owners Manual
[x] Cancel search | Manufacturer: DODGE, Model Year: 2015, Model line: JOURNEY, Model: DODGE JOURNEY 2015 1.GPages: 648
Page 3 of 648
TABLE OF CONTENTSSECTIONPAGE
1INTRODUCTION.............................................................3
2THINGS TO KNOW BEFORE STARTING YOUR VEHICLE.............................9
3UNDERSTANDING THE FEATURES OF YOUR VEHICLE. . . . . . . . . . . . . . . . . . . . . . . . . . . . 109
4UNDERSTANDING YOUR INSTRUMENT PANEL. . . . . . . . . . . . . . . . . . . . . . . . . . . . . . . . . . 293
5STARTING AND OPERATING. . . . . . . . . . . . . . . . . . . . . . . . . . . . . . . . . . . . . . . . . . . . . . . . . 403
6WHAT TO DO IN EMERGENCIES. . . . . . . . . . . . . . . . . . . . . . . . . . . . . . . . . . . . . . . . . . . . . . 509
7MAINTAINING YOUR VEHICLE. . . . . . . . . . . . . . . . . . . . . . . . . . . . . . . . . . . . . . . . . . . . . . . 539
8MAINTENANCE SCHEDULES. . . . . . . . . . . . . . . . . . . . . . . . . . . . . . . . . . . . . . . . . . . . . . . . . 603
9IF YOU NEED CONSUMER ASSISTANCE. . . . . . . . . . . . . . . . . . . . . . . . . . . . . . . . . . . . . . . . 611
10INDEX. . . . . . . . . . . . . . . . . . . . . . . . . . . . . . . . . . . . . . . . . . . . . . . . . . . . . . . . . . . . . . . . . . . . 621
1
2
3
4
5
6
7
8
9
10
Page 318 of 648
Unless reset, this message will continue to display each
time you cycle the ignition to the ON/RUN position. To
turn off the message temporarily, push and release the
MENU button. To reset the oil change indicator system
(after performing the scheduled maintenance), perform
the following procedure:
1. Without pushing the brake pedal, push the ENGINE
START/STOP button and cycle the ignition to the
ON/RUN position (do not start the engine.)
2. Fully depress the accelerator pedal, slowly, three times
within 10 seconds.
3. Without pushing the brake pedal, push the ENGINE
START/STOP button once to return the ignition to the
OFF/LOCK position.
NOTE:If the indicator message illuminates when you
start the vehicle, the oil change indicator system did not
reset. If necessary, repeat this procedure.
Fuel Economy
Push and release the UP or DOWN button until “Fuel
Economy” displays highlighted in the EVIC and push the
SELECT button. The following Fuel Economy functions
will display in the EVIC:
•Average Fuel Economy
•Distance To Empty (DTE)
•Miles Per Gallon (MPG)
Average Fuel Economy
Shows the average fuel economy since the last reset.
When the fuel economy is reset, the display will read
“RESET” or show dashes for two seconds. Then, the
history information will be erased, and the averaging will
continue from the last fuel average reading before the
reset.
316 UNDERSTANDING YOUR INSTRUMENT PANEL
Page 472 of 648
tires. Rotation will increase tread life, help to maintain
mud, snow and wet traction levels, and contribute to a
smooth, quiet ride.
Refer to the “Maintenance Schedule” for the proper
maintenance intervals. The reasons for any rapid or
unusual wear should be corrected prior to rotation being
performed.
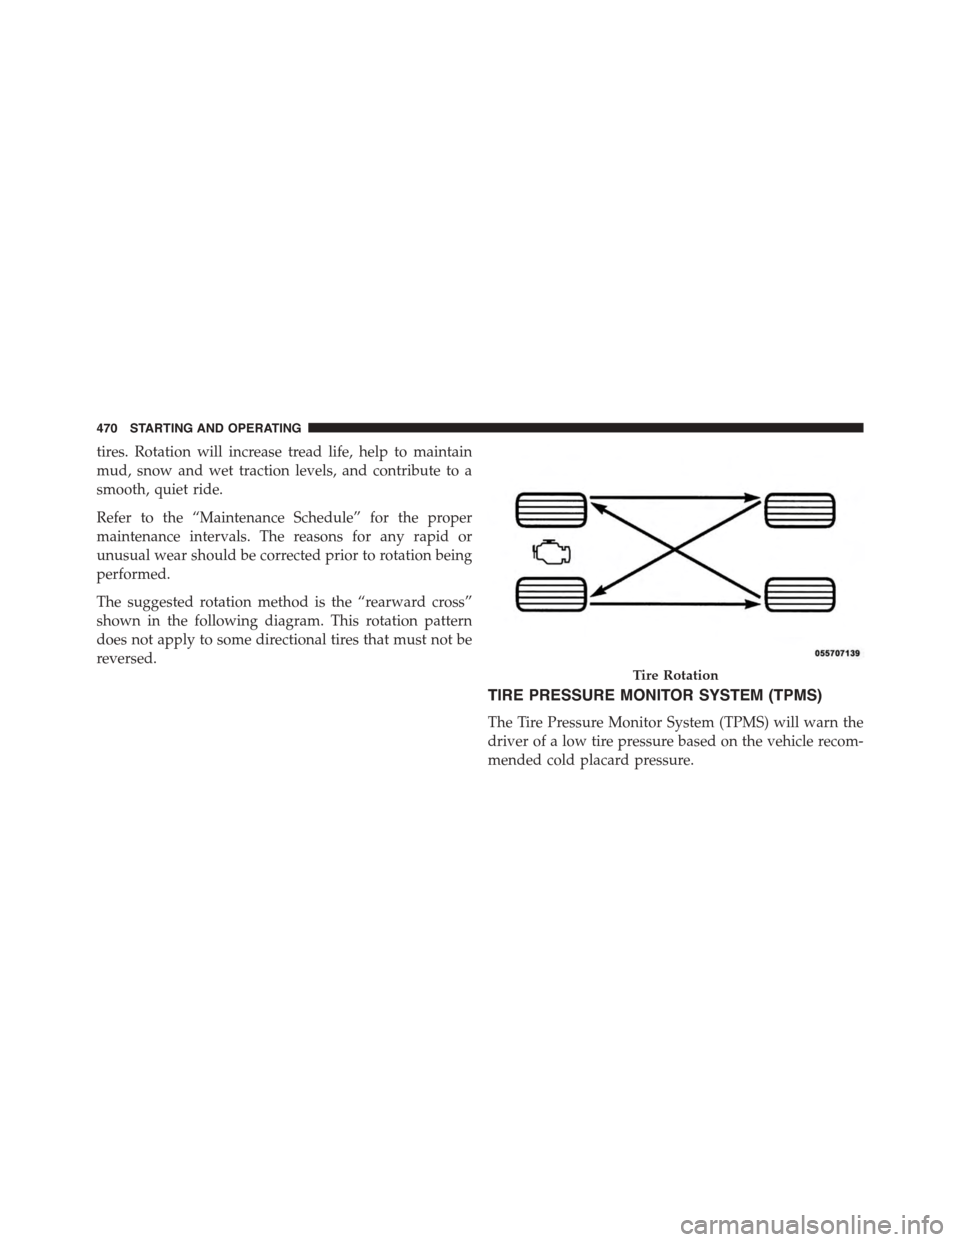
The suggested rotation method is the “rearward cross”
shown in the following diagram. This rotation pattern
does not apply to some directional tires that must not be
reversed.
TIRE PRESSURE MONITOR SYSTEM (TPMS)
The Tire Pressure Monitor System (TPMS) will warn the
driver of a low tire pressure based on the vehicle recom-
mended cold placard pressure.
Tire Rotation
470 STARTING AND OPERATING
Page 501 of 648
•The tongue weight of the trailer.
•The weight of any other type of cargo or equipment
put in or on your vehicle.
•The weight of the driver and all passengers.
NOTE:Remember that everything put into or on the
trailer adds to the load on your vehicle. Also, additional
factory-installed options or authorized dealer-installed
options must be considered as part of the total load on
your vehicle. Refer to the “Tire and Loading Information”
placard for the maximum combined weight of occupants
and cargo for your vehicle.
Towing Requirements
To promote proper break-in of your new vehicle drive-
train components the following guidelines are recom-
mended:
CAUTION!
•Do not tow a trailer at all during the first 500 miles
(805 km) the new vehicle is driven. The engine, axle
or other parts could be damaged.
•Then, during the first 500 miles (805 km) that a
trailer is towed, do not drive over 50 mph (80 km/h)
and do not make starts at full throttle. This helps
the engine and other parts of the vehicle wear in at
the heavier loads.
Perform the maintenance listed in the “Maintenance
Schedule”. Refer to “Maintenance Schedule” for further
information. When towing a trailer, never exceed the
GAWR, or GCWR, ratings.
5
STARTING AND OPERATING 499
Page 507 of 648
Towing Tips
Before setting out on a trip, practice turning, stopping,
and backing up the trailer in an area located away from
heavy traffic.
Automatic Transmission
The DRIVE range can be selected when towing. How-
ever, if frequent shifting occurs while in DRIVE, use the
Autostick® shift control to manually select a lower gear.
NOTE:Using a lower gear while operating the vehicle
under heavy loading conditions will improve perfor-
mance and extend transmission life by reducing exces-
sive shifting and heat build up. This action will also
provide better engine braking.
If you REGULARLY tow a trailer for more than 45
minutes of continuous operation, then change the trans-
mission fluid and filter as specified for “police, taxi, fleet,
or frequent trailer towing”. Refer to the “Maintenance
Schedule” for the proper maintenance intervals.
NOTE:Check the four-speed automatic transmission
fluid level before towing. The six-speed transmission
does not require a fluid level check before towing. If,
however, you notice fluid leakage or transmission mal-
function, see your authorized dealer immediately for
assistance.
Electronic Speed Control — If Equipped
•Do not use in hilly terrain or with heavy loads.
•When using the speed control, if you experience speed
drops greater than 10 mph (16 km/h), disengage until
you can get back to cruising speed.
•Use speed control in flat terrain and with light loads to
maximize fuel efficiency.
5
STARTING AND OPERATING 505
Page 547 of 648
the ignition or start the engine. This means that your
vehicle’s OBD II system isnot readyand you should
notproceed to the I/M station.
•The MIL will not flash at all and will remain fully
illuminated until you turn OFF the ignition or start the
engine. This means that your vehicle’s OBD II system
isreadyand you can proceed to the I/M station.
If your OBD II system isnot ready,you should see your
authorized dealer or repair facility. If your vehicle was
recently serviced or had a battery failure or replacement,
you may need to do nothing more than drive your
vehicle as you normally would in order for your OBD II
system to update. A recheck with the above test routine
may then indicate that the system isnow ready.
Regardless of whether your vehicle’s OBD II system is
ready or not, if the MIL is illuminated during normal
vehicle operation you should have your vehicle serviced
before going to the I/M station. The I/M station can fail
your vehicle because the MIL is on with the engine
running.
REPLACEMENT PARTS
Use of genuine MOPAR® parts for normal/scheduled
maintenance and repairs is highly recommended to en-
sure the designed performance. Damage or failures
caused by the use of non-MOPAR® parts for mainte-
nance and repairs will not be covered by the New Vehicle
Limited Warranty.
DEALER SERVICE
Your authorized dealer has the qualified service person-
nel, special tools, and equipment to perform all service
operations in an expert manner. Service Manuals are
available which include detailed service information for
your vehicle. Refer to these Service Manuals before
attempting any procedure yourself.
7
MAINTAINING YOUR VEHICLE 545
Page 548 of 648
NOTE:Intentional tampering with emissions control
systems may void your warranty and could result in civil
penalties being assessed against you.
WARNING!
You can be badly injured working on or around a
motor vehicle. Only do service work for which you
have the knowledge and the proper equipment. If
you have any doubt about your ability to perform a
service job, take your vehicle to a competent me-
chanic.
MAINTENANCE PROCEDURES
The pages that follow contain therequiredmaintenance
services determined by the engineers who designed your
vehicle.
Besides those maintenance items specified in the fixed
“Maintenance Schedule”, there are other components
which may require servicing or replacement in the future.
CAUTION!
•Failure to properly maintain your vehicle or per-
form repairs and service when necessary could
result in more costly repairs, damage to other
components or negatively impact vehicle perfor-
mance. Immediately have potential malfunctions
examined by an authorized dealer or qualified
repair center.
(Continued)
546 MAINTAINING YOUR VEHICLE
Page 550 of 648
CAUTION!(Continued)
could damage your engine. Also, be sure the oil fill
cap is replaced and tightened after adding oil.
Change Engine Oil
The oil change indicator system will remind you that it is
time to take your vehicle in for scheduled maintenance.
Refer to the “Maintenance Schedule” for further informa-
tion.
NOTE: Under no circumstances should oil change in-
tervals exceed 10,000 miles (16,000 km) or twelve
months, whichever occurs first.
Engine Oil Selection
For best performance and maximum protection under all
types of operating conditions, the manufacturer only
recommends engine oils that are API Certified and meet
the requirements of Chrysler Material Standard MS-6395.
American Petroleum Institute (API) Engine Oil
Identification Symbol
This symbol means that the oil has
been certified by the American
Petroleum Institute (API). The
manufacturer only recommends
API Certified engine oils.
CAUTION!
Do not use chemical flushes in your engine oil as the
chemicals can damage your engine. Such damage is
not covered by the New Vehicle Limited Warranty.
548 MAINTAINING YOUR VEHICLE
Page 552 of 648
Materials Added To Engine Oil
The manufacturer strongly recommends against the ad-
dition of any additives (other than leak detection dyes) to
the engine oil. Engine oil is an engineered product and its
performance may be impaired by supplemental addi-
tives.
Disposing Of Used Engine Oil And Oil Filters
Care should be taken in disposing of used engine oil and
oil filters from your vehicle. Used oil and oil filters,
indiscriminately discarded, can present a problem to the
environment. Contact your authorized dealer, service
station or governmental agency for advice on how and
where used oil and oil filters can be safely discarded in
your area.
Engine Oil Filter
The engine oil filter should be replaced with a new filter
at every engine oil change.
Engine Oil Filter Selection
This manufacturer’s engines have a full-flow type oil
filter. Use a filter of this type for replacement. The quality
of replacement filters varies considerably. Only high
quality filters should be used to assure most efficient
service. MOPAR® engine oil filters are a high quality oil
filter and are recommended.
Engine Air Cleaner Filter
Refer to the “Maintenance Schedule” for the proper
maintenance intervals.
WARNING!
The air induction system (air cleaner, hoses, etc.) can
provide a measure of protection in the case of engine
backfire. Do not remove the air induction system (air
cleaner, hoses, etc.) unless such removal is necessary
(Continued)
550 MAINTAINING YOUR VEHICLE
Page 556 of 648
A/C Air Filter — If Equipped
Refer to the “Maintenance Schedule” for the proper
maintenance intervals.
WARNING!
Do not remove the A/C air filter while the blower is
operating or personal injury may result.
The A/C air filter is located in the fresh air inlet behind
the glove box. Perform the following steps to replace the
filter:
1. Open the glove box and remove all contents.
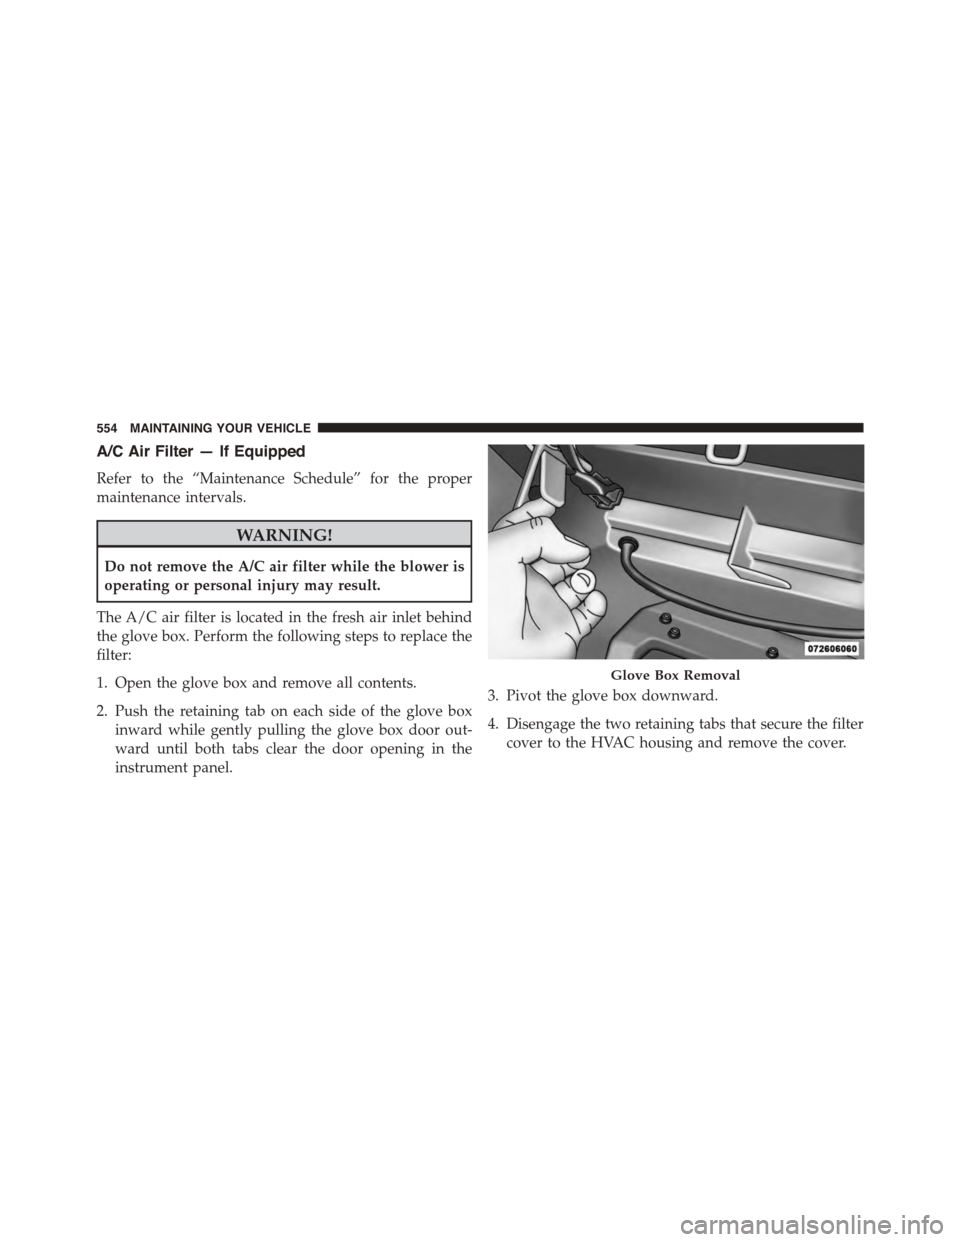
2. Push the retaining tab on each side of the glove box
inward while gently pulling the glove box door out-
ward until both tabs clear the door opening in the
instrument panel.
3. Pivot the glove box downward.
4. Disengage the two retaining tabs that secure the filter
cover to the HVAC housing and remove the cover.
Glove Box Removal
554 MAINTAINING YOUR VEHICLE