ECO DODGE JOURNEY 2015 1.G Owner's Manual
[x] Cancel search | Manufacturer: DODGE, Model Year: 2015, Model line: JOURNEY, Model: DODGE JOURNEY 2015 1.GPages: 140, PDF Size: 23.09 MB
Page 19 of 140
•TheORCturnsontheAirBagWarningLightintheinstrumentpanelforapproximately
four to eight seconds for a self-check when the ignition switch is first turned to the
ON/RUN position. After the self-check, the Air Bag Warning Light will turn off. If the
ORC detects a malfunction in any part of the system, it turns on the Air Bag Warning
Light, either momentarily or continuously. A single chime will sound to alert you if the
light comes on again after initial startup.
•TheORCmonitorsthereadinessoftheelectronicpartsoftheairbagsystemwhenever
the ignition switch is in the START or ON/RUN position. If the ignition switch is in the
OFF position or in the ACC position, the air bag system is not on and the air bags will
not inflate.
•IftheAirBagWarningLightintheinstrumentpanelisnotonduringthefourtoeight
seconds when the ignition switch is first turned to the ON/RUN position, stays on, or
turns on while driving, have the vehicle serviced by an authorized service center
immediately.
NOTE:
If the speedometer, tachometer, or any engine related gauges are not working, the
Occupant Restraint Controller (ORC) may also be disabled. In this condition the air bags
may not be ready to inflate for your protection. Have an authorized dealer service the air
bag system immediately.
•Afteranycollision,thevehicleshouldbetakentoanauthorizeddealerimmediately.
•Donotdriveyourvehicleaftertheairbagshavedeployed.Ifyouareinvolvedinanother
collision, the air bags will not be in place to protect you.
•Ifitisnecessarytomodifytheairbagsystemforpersonswithdisabilities,contactyour
authorized dealer.
•RefertotheOwner'sManualontheDVDforfurtherdetailsregardingtheSupplemental
Restraint System (SRS).
Supplemental Knee Air Bags
This vehicle is equipped with a Supplemental Driver Knee Air Bag mounted in the
instrument panel below the steering column. The Supplemental Driver Knee Air Bag
provides enhanced protection during a frontal impact by working together with the seat
belts, pretensioners, and Advanced Front Air Bags.
GETTING STARTED
17
Page 20 of 140
Supplemental Side Air Bags
•ThisvehicleisequippedwithSupplementalSeat-MountedSideAirBags(SABs)
located in the outboard side of the front seats. The SABs are marked with a SRS
AIRBAG or AIRBAG label sewn into the outboard side of the seats.
•ThisvehicleisequippedwithSupplementalSideAirBagInflatableCurtains(SABICs)
located above the side windows. The trim covering the SABICs is labeled SRS AIRBAG
or AIRBAG. The SABICs may help reduce the risk of partial or complete ejection of
vehicle occupants through side windows in certain side impact events.
•TheSABICsandSABs(“SideAirBags”)aredesignedtoactivateincertainside
impacts and certain rollover events. The Occupant Restraint Controller (“ORC”)
determines whether the deployment of the Side Air Bags in a particular side impact or
rollover event is appropriate, based on the severity and type of collision. Vehicle damage
by itself is not a good indicator of whether or not Side Air Bags should have deployed.
WARNING!
•SideAirBagsneedroomtoinflate.Donotleanagainstthedoororwindow.Sit
upright in the center of the seat.
•BeingtooclosetotheSideAirBagsduringdeploymentcouldcauseyoutobe
severely injured or killed.
•RelyingontheSideAirBagsalonecouldleadtomoresevereinjuriesinacollision.
The Side Air Bags work with your seat belt to restrain you properly. In some
collisions, Side Air Bags won’t deploy at all. Always wear your seat belt even though
you have Side Air Bags.
•This vehicle is equipped with left and right Supplemental Side Air Bag Inflatable
Curtains (SABICs). Do not stack luggage or other cargo up high enough to block the
deployment of the SABICs. The trim covering above the side windows where the SABIC
and its deployment path are located should remain free from any obstructions.
•ThisvehicleisequippedwithSABICs.InorderfortheSABICstoworkasintended,
do not install any accessory items in your vehicle which could alter the roof. Do not
add an aftermarket sunroof to your vehicle. Do not add roof racks that require
permanent attachments (bolts or screws) for installation on the vehicle roof. Do not
drill into the roof of the vehicle for any reason.
•DonotuseaccessoryseatcoversorplaceobjectsbetweenyouandtheSideAir
Bags; the performance could be adversely affected and/or objects could be pushed
into you, causing serious injury.
GETTING STARTED
18
Page 21 of 140
CHILD RESTRAINTS
Children 12 years or younger should ride properly buckled up in a rear seat, if available.
According to crash statistics, children are safer when properly restrained in the rear seats
rather than in the front.
Every state in the United States and all Canadian provinces require that small children
ride in proper restraint systems. This is the law, and you can be prosecuted for ignoring it.
NOTE:
•Foradditionalinformation,refertowww.Seatcheck.orgorcall1-866-SEATCHECK.
•CanadianresidentsshouldrefertoTransportCanada’swebsiteforadditionalinforma-
tion: http://www.tc.gc.ca/eng/motorvehiclesafety/safedrivers-childsafety-index-53.htm
LATCH — Lower Anchors And Tethers For CHildren
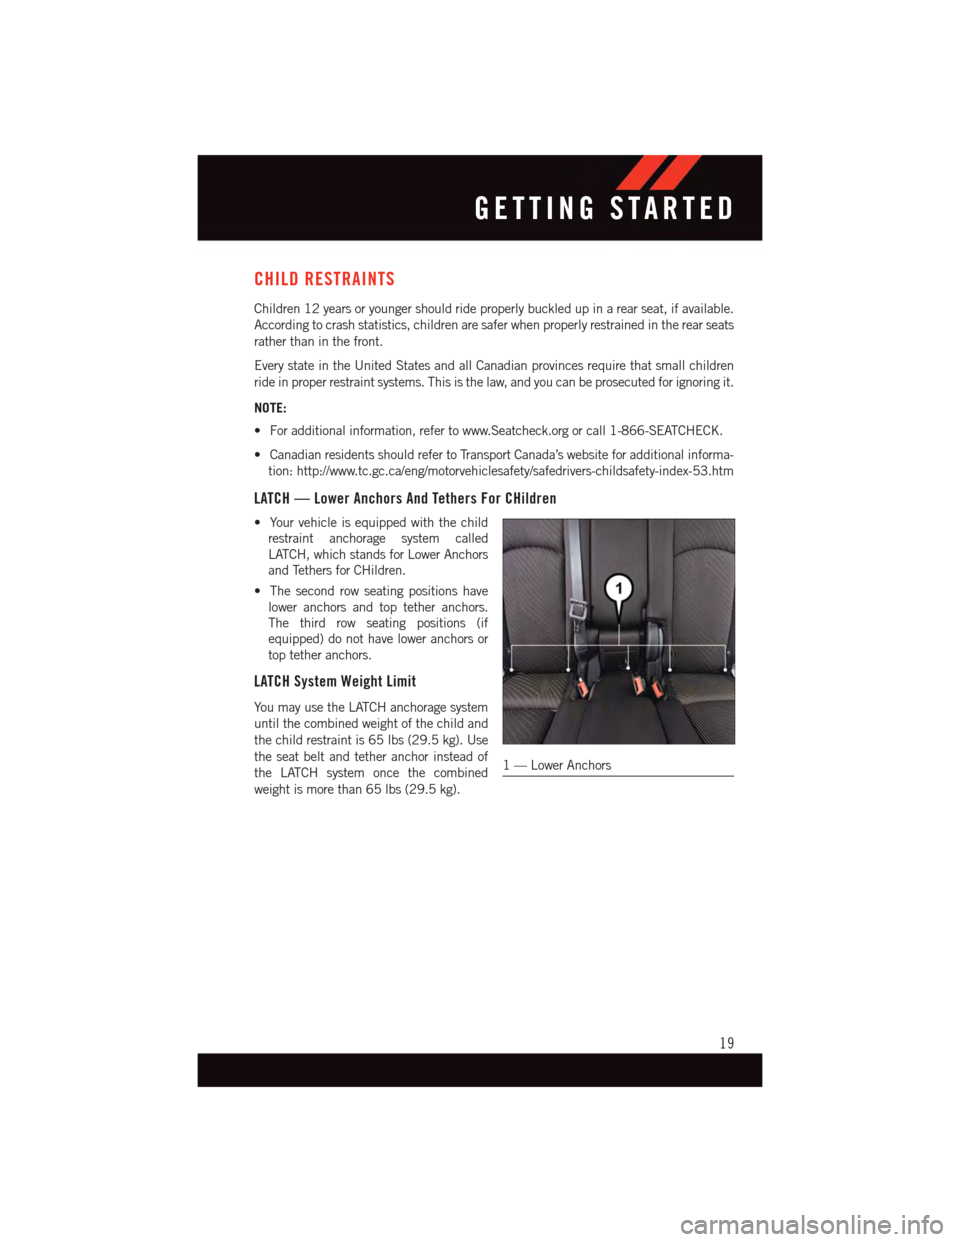
•Yourvehicleisequippedwiththechild
restraint anchorage system called
LATCH, which stands for Lower Anchors
and Tethers for CHildren.
•Thesecondrowseatingpositionshave
lower anchors and top tether anchors.
The third row seating positions (if
equipped) do not have lower anchors or
top tether anchors.
LATCH System Weight Limit
Yo u m a y u s e t h e L AT C H a n c h o r a g e s y s t e m
until the combined weight of the child and
the child restraint is 65 lbs (29.5 kg). Use
the seat belt and tether anchor instead of
the LATCH system once the combined
weight is more than 65 lbs (29.5 kg).
1—LowerAnchors
GETTING STARTED
19
Page 22 of 140
Locating The LATCH Lower Anchorages
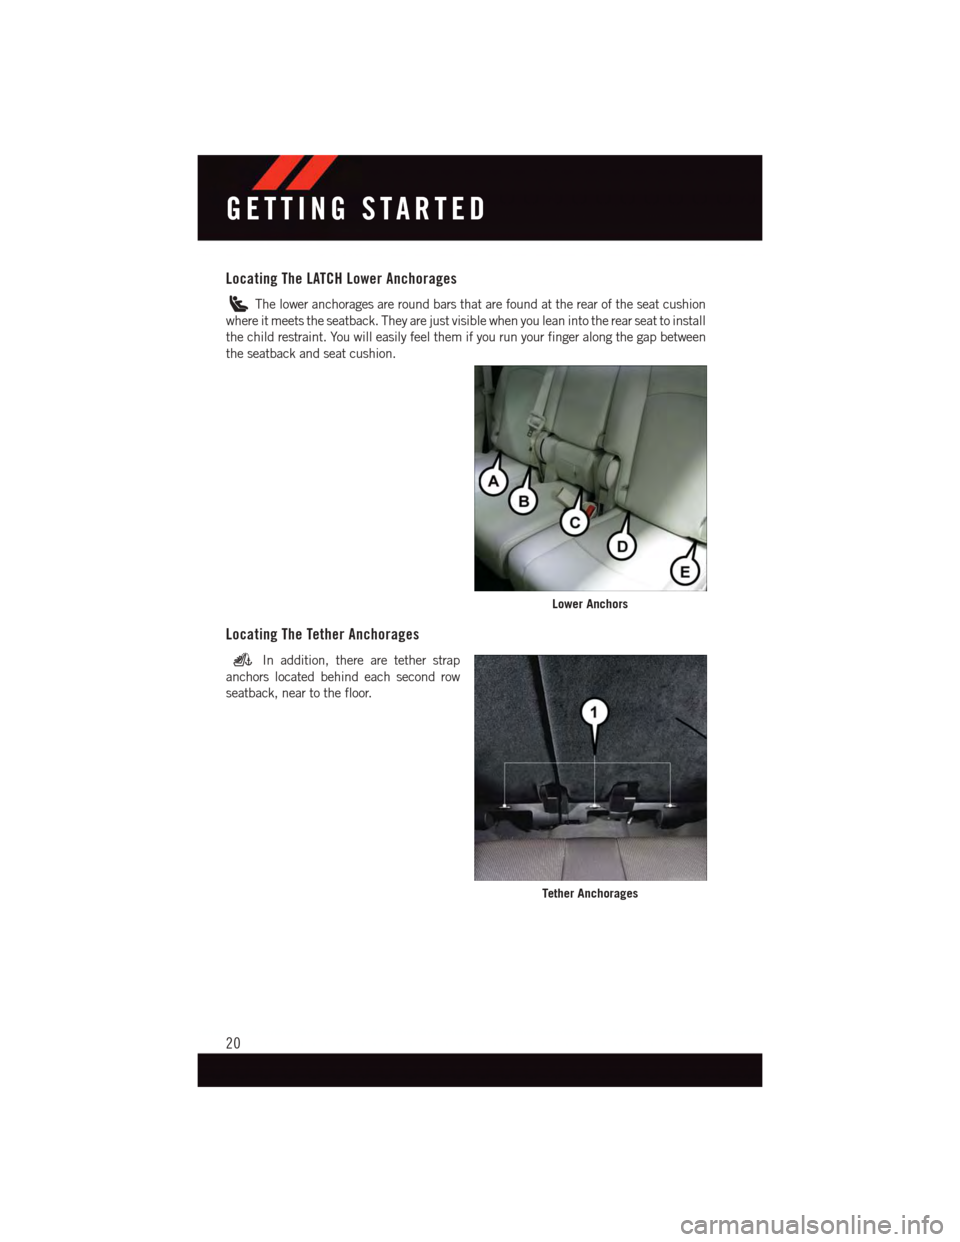
The lower anchorages are round bars that are found at the rear of the seat cushion
where it meets the seatback. They are just visible when you lean into the rear seat to install
the child restraint. You will easily feel them if you run your finger along the gap between
the seatback and seat cushion.
Locating The Tether Anchorages
In addition, there are tether strap
anchors located behind each second row
seatback, near to the floor.
Lower Anchors
Tether Anchorages
GETTING STARTED
20
Page 23 of 140
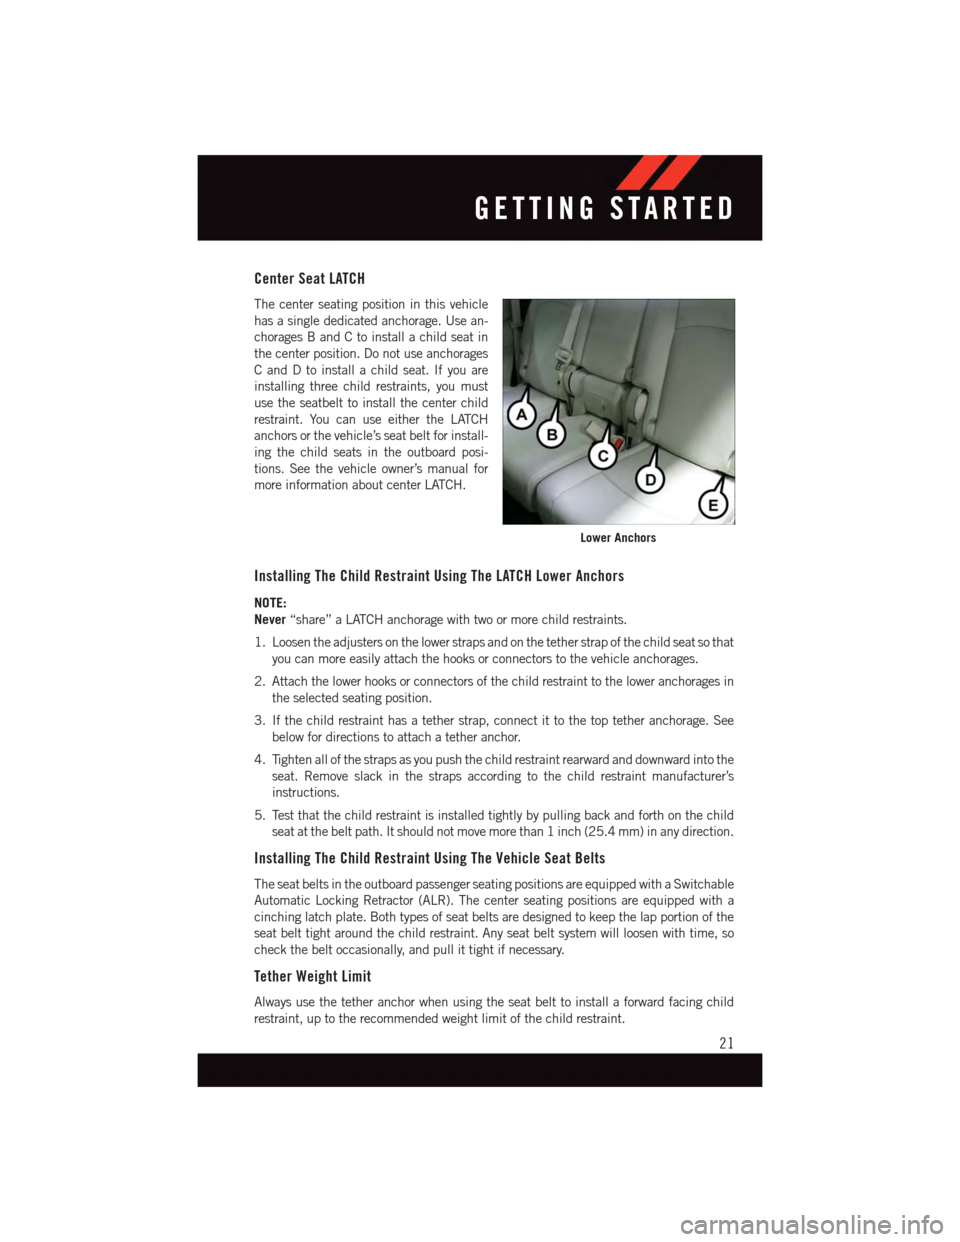
Center Seat LATCH
The center seating position in this vehicle
has a single dedicated anchorage. Use an-
chorages B and C to install a child seat in
the center position. Do not use anchorages
CandDtoinstallachildseat.Ifyouare
installing three child restraints, you must
use the seatbelt to install the center child
restraint. You can use either the LATCH
anchors or the vehicle’s seat belt for install-
ing the child seats in the outboard posi-
tions. See the vehicle owner’s manual for
more information about center LATCH.
Installing The Child Restraint Using The LATCH Lower Anchors
NOTE:
Never“share” a LATCH anchorage with two or more child restraints.
1. Loosen the adjusters on the lower straps and on the tether strap of the child seat so that
you can more easily attach the hooks or connectors to the vehicle anchorages.
2. Attach the lower hooks or connectors of the child restraint to the lower anchorages in
the selected seating position.
3. If the child restraint has a tether strap, connect it to the top tether anchorage. See
below for directions to attach a tether anchor.
4. Tighten all of the straps as you push the child restraint rearward and downward into the
seat. Remove slack in the straps according to the child restraint manufacturer’s
instructions.
5. Test that the child restraint is installed tightly by pulling back and forth on the child
seat at the belt path. It should not move more than 1 inch (25.4 mm) in any direction.
Installing The Child Restraint Using The Vehicle Seat Belts
The seat belts in the outboard passenger seating positions are equipped with a Switchable
Automatic Locking Retractor (ALR). The center seating positions are equipped with a
cinching latch plate. Both types of seat belts are designed to keep the lap portion of the
seat belt tight around the child restraint. Any seat belt system will loosen with time, so
check the belt occasionally, and pull it tight if necessary.
Tether Weight Limit
Always use the tether anchor when using the seat belt to install a forward facing child
restraint, up to the recommended weight limit of the child restraint.
Lower Anchors
GETTING STARTED
21
Page 25 of 140
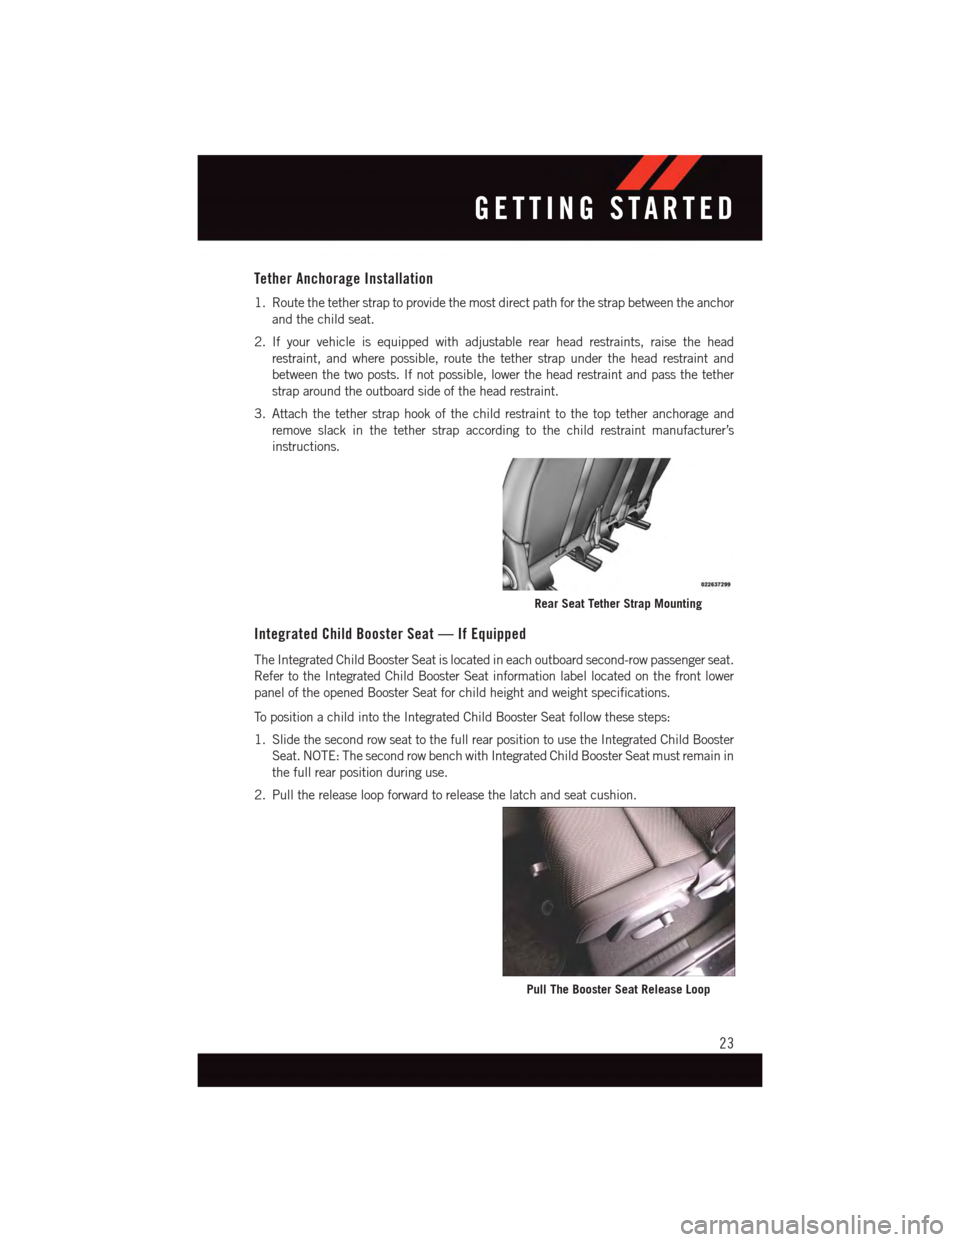
Tether Anchorage Installation
1. Route the tether strap to provide the most direct path for the strap between the anchor
and the child seat.
2. If your vehicle is equipped with adjustable rear head restraints, raise the head
restraint, and where possible, route the tether strap under the head restraint and
between the two posts. If not possible, lower the head restraint and pass the tether
strap around the outboard side of the head restraint.
3. Attach the tether strap hook of the child restraint to the top tether anchorage and
remove slack in the tether strap according to the child restraint manufacturer’s
instructions.
Integrated Child Booster Seat — If Equipped
The Integrated Child Booster Seat is located in each outboard second-row passenger seat.
Refer to the Integrated Child Booster Seat information label located on the front lower
panel of the opened Booster Seat for child height and weight specifications.
To p o s i t i o n a c h i l d i n t o t h e I n t e g r a t e d C h i l d B o o s t e r S e a t f o l l o w t h e s e s t e p s :
1. Slide the second row seat to the full rear position to use the Integrated Child Booster
Seat. NOTE: The second row bench with Integrated Child Booster Seat must remain in
the full rear position during use.
2. Pull the release loop forward to release the latch and seat cushion.
Rear Seat Tether Strap Mounting
Pull The Booster Seat Release Loop
GETTING STARTED
23
Page 26 of 140
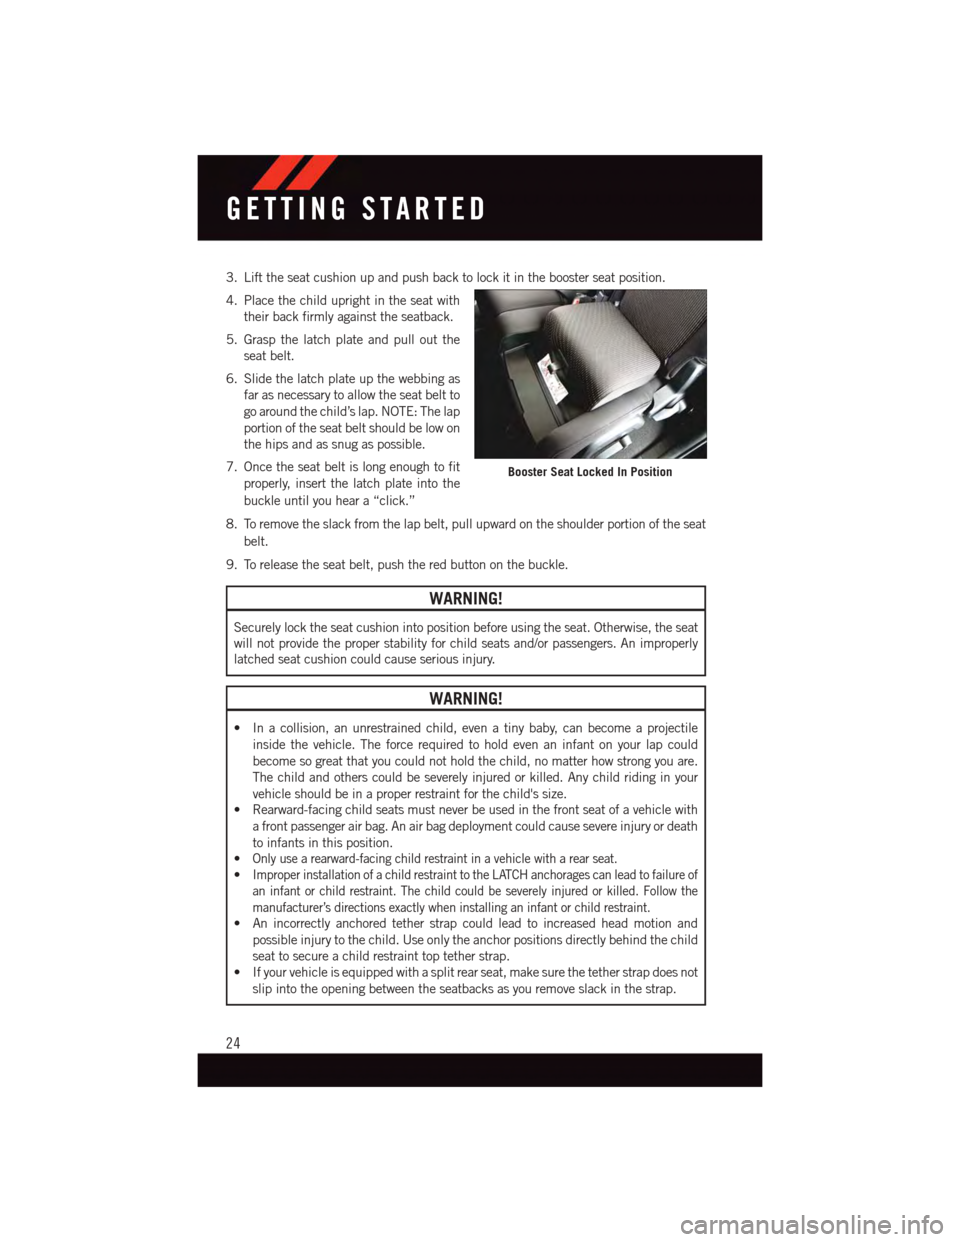
3. Lift the seat cushion up and push back to lock it in the booster seat position.
4. Place the child upright in the seat with
their back firmly against the seatback.
5. Grasp the latch plate and pull out the
seat belt.
6. Slide the latch plate up the webbing as
far as necessary to allow the seat belt to
go around the child’s lap. NOTE: The lap
portion of the seat belt should be low on
the hips and as snug as possible.
7. Once the seat belt is long enough to fit
properly, insert the latch plate into the
buckle until you hear a “click.”
8. To remove the slack from the lap belt, pull upward on the shoulder portion of the seat
belt.
9. To release the seat belt, push the red button on the buckle.
WARNING!
Securely lock the seat cushion into position before using the seat. Otherwise, the seat
will not provide the proper stability for child seats and/or passengers. An improperly
latched seat cushion could cause serious injury.
WARNING!
•Inacollision,anunrestrainedchild,evenatinybaby,canbecomeaprojectile
inside the vehicle. The force required to hold even an infant on your lap could
become so great that you could not hold the child, no matter how strong you are.
The child and others could be severely injured or killed. Any child riding in your
vehicle should be in a proper restraint for the child's size.
•Rearward-facingchildseatsmustneverbeusedinthefrontseatofavehiclewith
afrontpassengerairbag.Anairbagdeploymentcouldcausesevereinjuryordeath
to infants in this position.
•Only use a rearward-facing child restraint in a vehicle with a rear seat.
•Improper installation of a child restraint to the LATCH anchorages can lead to failure of
an infant or child restraint. The child could be severely injured or killed. Follow the
manufacturer’s directions exactly when installing an infant or child restraint.
•Anincorrectlyanchoredtetherstrapcouldleadtoincreasedheadmotionand
possible injury to the child. Use only the anchor positions directly behind the child
seat to secure a child restraint top tether strap.
•Ifyourvehicleisequippedwithasplitrearseat,makesurethetetherstrapdoesnot
slip into the opening between the seatbacks as you remove slack in the strap.
Booster Seat Locked In Position
GETTING STARTED
24
Page 27 of 140
HEAD RESTRAINTS
Head restraints are designed to reduce the risk of injury by restricting head movement in
the event of a rear impact. Head restraints should be adjusted so that the top of the head
restraint is located above the top of your ear.
WARNING!
The head restraints for all occupants must be properly adjusted prior to operating the
vehicle or occupying a seat. Head restraints should never be adjusted while the vehicle
is in motion. Driving a vehicle with the head restraints improperly adjusted or removed
could cause serious injury or death in the event of a collision.
Active Head Restraints (AHR) — Front Seats
Active Head Restraints are passive, deployable components, and vehicles with this
equipment can not be readily identified by any markings, only through visual inspection
of the head restraint. The head restraint will be split in two halves, with the front half being
soft foam and trim, the back half being decorative plastic.
When AHRs deploy during a rear impact, the front half of the head restraint extends
forward to minimize the gap between the back of the occupant’s head and the AHR. This
system is designed to help prevent or reduce the extent of injuries to the driver and front
passenger in certain types of rear impacts. Refer to “Occupant Restraints” in “Things To
Know Before Starting” in the Owner's Manual on the DVD for further information.
To r a i s e t h e h e a d r e s t r a i n t , p u l l u p w a r d o n t h e h e a d r e s t r a i n t . To l o w e r t h e h e a d r e s t r a i n t ,
press the push button, located at the base of the head restraint, and push downward on
the head restraint.
For comfort, the Active Head Restraints can be tilted forward and backward. To tilt the
head restraint closer to the back of your head, pull forward on the bottom of the head
restraint. Push rearward on the bottom of the head restraint to move the head restraint
away from your head.
NOTE:
•Theheadrestraintsshouldonlyberemovedbyqualifiedtechnicians,forservice
purposes only. If either of the head restraints require removal, see your authorized
dealer.
•IntheeventofdeploymentofanActiveHeadRestraint,referto“OccupantRestraints/
Supplemental Active Head Restraints (AHR)/Resetting Active Head Restraints (AHR)”
in “Things To Know Before Starting” in the Owner's Manual on the DVD for further
information.
GETTING STARTED
25
Page 28 of 140
WARNING!
•DonotplaceitemsoverthetopoftheActiveHeadRestraint,suchascoats,seat
covers or portable DVD players. These items may interfere with the operation of the
Active Head Restraint in the event of a collision and could result in serious injury or
death.
•ActiveHeadRestraintsmaybedeployediftheyarestruckbyanobjectsuchasa
hand, foot or loose cargo. To avoid accidental deployment of the Active Head
Restraint ensure that all cargo is secured, as loose cargo could contact the Active
Head Restraint during sudden stops. Failure to follow this warning could cause
personal injury if the Active Head Restraint is deployed.
Head Restraints — Second Row Seats
The rear seats are equipped with adjustable head restraints. To raise the head restraint,
pull upward on the head restraint. To lower the head restraint, press the adjustment
button, located on the base of the head restraint, and push downward on the head
restraint.
NOTE:
•Theheadrestraintsshouldonlyberemovedbyqualifiedtechnicians,forservice
purposes only. If any of the head restraints require removal, see your authorized dealer.
•ForproperroutingofaChildSeatTether,referto“OccupantRestraints”in“ThingsTo
Know Before Starting” in the Owner's Manual on the DVD for further information.
WARNING!
Driving a vehicle with the head restraints removed or improperly adjusted could cause
serious injury or death in the event of a collision. The head restraints should be checked
prior to operating the vehicle and never adjusted while the vehicle is in motion.
Third Row Passenger Seats — Seven Passenger Models
These head restraints are non-adjustable and non-removable. However, you can fold them
forward when they are not in use by passengers. Refer to “50/50 Split Third-Row
Passenger Seats With Fold-Flat Feature — Seven Passenger Models” in the Owner's
Manual on the DVD for further information.
WARNING!
Do not allow a passenger to sit in a third row seat without having the head restraint
unfolded and locked in place. Failure to follow this warning may result in personal
injury to the passenger in the event of a collision.
GETTING STARTED
26
Page 31 of 140
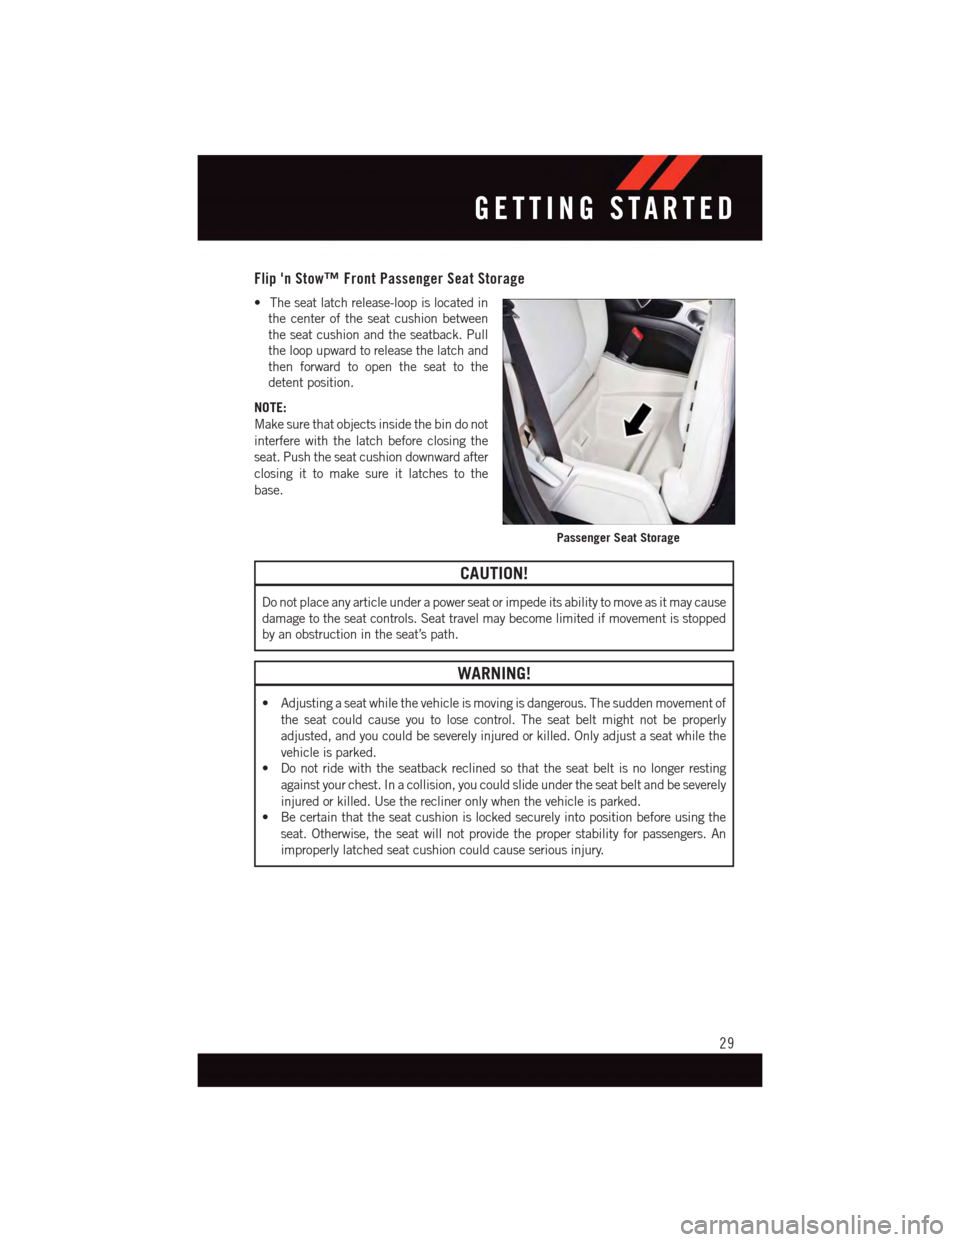
Flip 'n Stow™ Front Passenger Seat Storage
•Theseatlatchrelease-loopislocatedin
the center of the seat cushion between
the seat cushion and the seatback. Pull
the loop upward to release the latch and
then forward to open the seat to the
detent position.
NOTE:
Make sure that objects inside the bin do not
interfere with the latch before closing the
seat. Push the seat cushion downward after
closing it to make sure it latches to the
base.
CAUTION!
Do not place any article under a power seat or impede its ability to move as it may cause
damage to the seat controls. Seat travel may become limited if movement is stopped
by an obstruction in the seat’s path.
WARNING!
•Adjustingaseatwhilethevehicleismovingisdangerous.Thesuddenmovementof
the seat could cause you to lose control. The seat belt might not be properly
adjusted, and you could be severely injured or killed. Only adjust a seat while the
vehicle is parked.
•Donotridewiththeseatbackreclinedsothattheseatbeltisnolongerresting
against your chest. In a collision, you could slide under the seat belt and be severely
injured or killed. Use the recliner only when the vehicle is parked.
•Becertainthattheseatcushionislockedsecurelyintopositionbeforeusingthe
seat. Otherwise, the seat will not provide the proper stability for passengers. An
improperly latched seat cushion could cause serious injury.
Passenger Seat Storage
GETTING STARTED
29