ECO DODGE JOURNEY 2015 1.G Owner's Guide
[x] Cancel search | Manufacturer: DODGE, Model Year: 2015, Model line: JOURNEY, Model: DODGE JOURNEY 2015 1.GPages: 140, PDF Size: 23.09 MB
Page 44 of 140
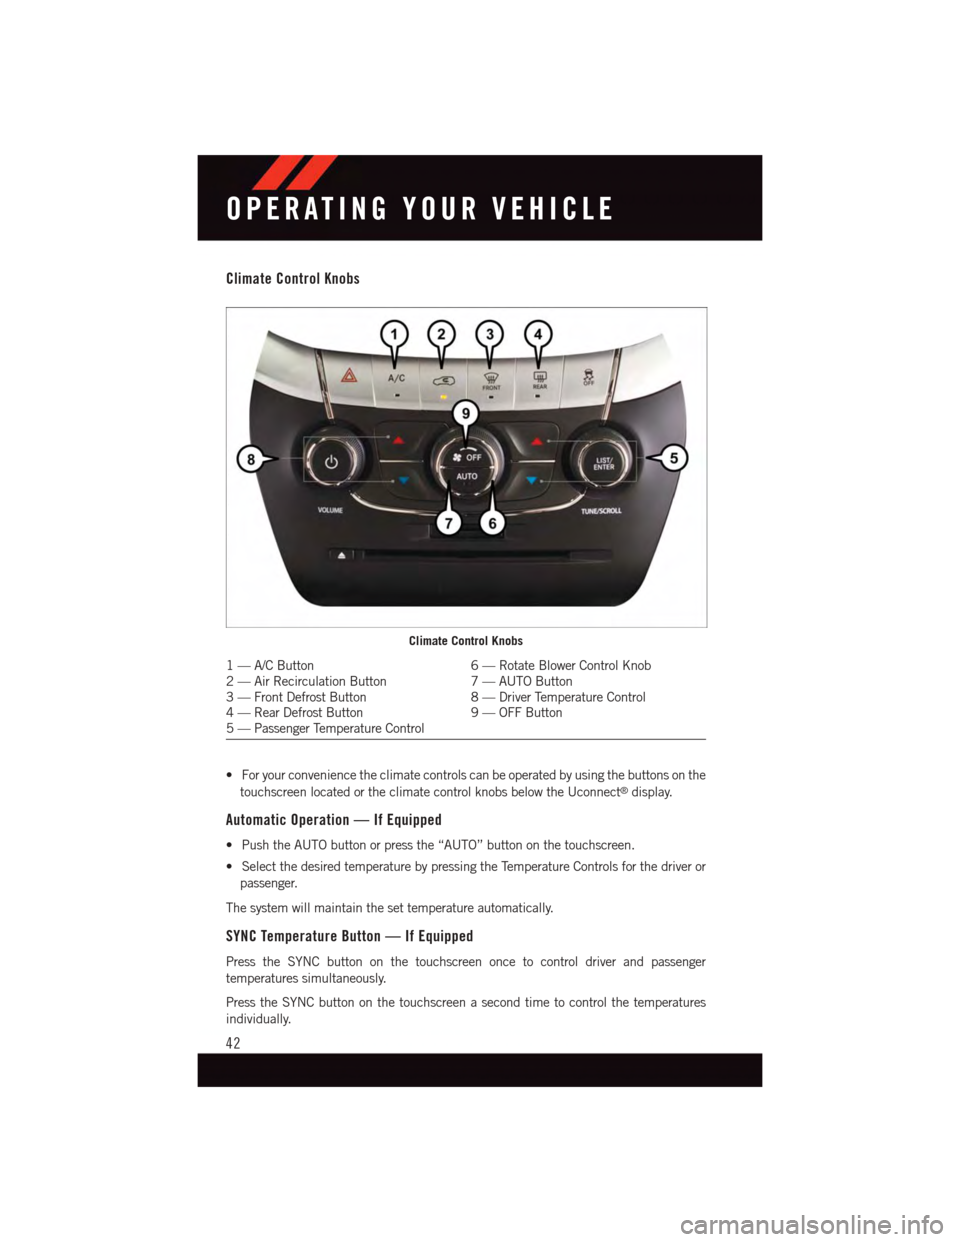
Climate Control Knobs
•Foryourconveniencetheclimatecontrolscanbeoperatedbyusingthebuttonsonthe
touchscreen located or the climate control knobs below the Uconnect®display.
Automatic Operation — If Equipped
•PushtheAUTObuttonorpressthe“AUTO”buttononthetouchscreen.
•SelectthedesiredtemperaturebypressingtheTemperatureControlsforthedriveror
passenger.
The system will maintain the set temperature automatically.
SYNC Temperature Button — If Equipped
Press the SYNC button on the touchscreen once to control driver and passenger
temperatures simultaneously.
Press the SYNC button on the touchscreen a second time to control the temperatures
individually.
Climate Control Knobs
1—A/CButton6—RotateBlowerControlKnob2—AirRecirculationButton7—AUTOButton3—FrontDefrostButton8—DriverTemperatureControl4—RearDefrostButton9—OFFButton5—PassengerTemperatureControl
OPERATING YOUR VEHICLE
42
Page 46 of 140
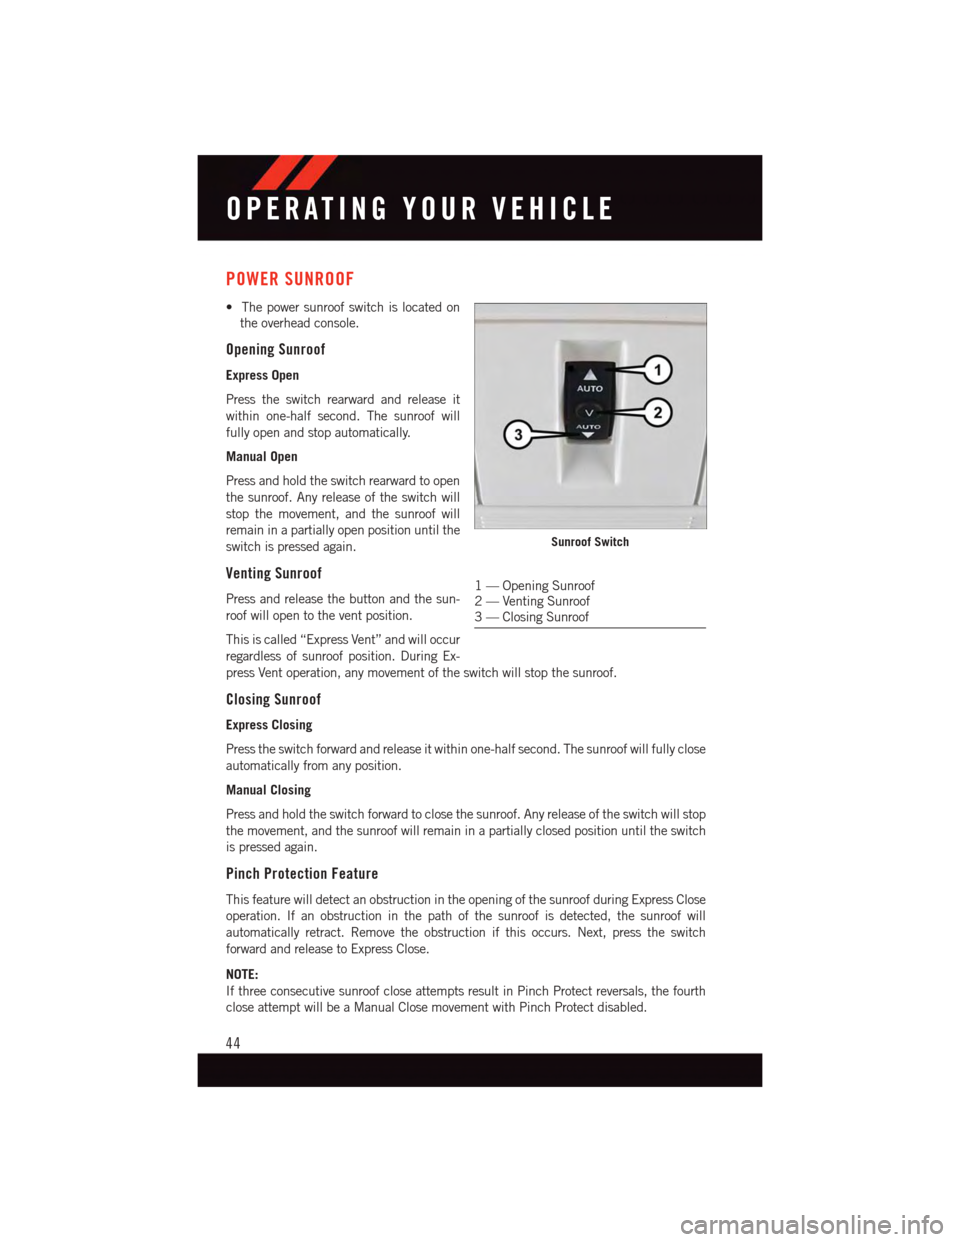
POWER SUNROOF
•Thepowersunroofswitchislocatedon
the overhead console.
Opening Sunroof
Express Open
Press the switch rearward and release it
within one-half second. The sunroof will
fully open and stop automatically.
Manual Open
Press and hold the switch rearward to open
the sunroof. Any release of the switch will
stop the movement, and the sunroof will
remain in a partially open position until the
switch is pressed again.
Venting Sunroof
Press and release the button and the sun-
roof will open to the vent position.
This is called “Express Vent” and will occur
regardless of sunroof position. During Ex-
press Vent operation, any movement of the switch will stop the sunroof.
Closing Sunroof
Express Closing
Press the switch forward and release it within one-half second. The sunroof will fully close
automatically from any position.
Manual Closing
Press and hold the switch forward to close the sunroof. Any release of the switch will stop
the movement, and the sunroof will remain in a partially closed position until the switch
is pressed again.
Pinch Protection Feature
This feature will detect an obstruction in the opening of the sunroof during Express Close
operation. If an obstruction in the path of the sunroof is detected, the sunroof will
automatically retract. Remove the obstruction if this occurs. Next, press the switch
forward and release to Express Close.
NOTE:
If three consecutive sunroof close attempts result in Pinch Protect reversals, the fourth
close attempt will be a Manual Close movement with Pinch Protect disabled.
Sunroof Switch
1—OpeningSunroof2—VentingSunroof3—ClosingSunroof
OPERATING YOUR VEHICLE
44
Page 47 of 140
WARNING!
•Donotletchildrenplaywiththesunroof.Neverleavechildrenunattendedina
vehicle, or with access to an unlocked vehicle. Do not leave the Key Fob in or near
the vehicle, and do not leave the ignition of a vehicle equipped with Keyless
Enter-N-Go™ in the ACC or ON/RUN mode. Occupants, particularly unattended
children, can become entrapped by the power sunroof while operating the power
sunroof switch. Such entrapment may result in serious injury or death.
•Inacollision,thereisagreaterriskofbeingthrownfromavehiclewithanopen
sunroof. You could also be severely injured or killed. Always fasten your seat belt
properly and make sure all passengers are properly secured.
•Do not allow small children to operate the sunroof. Never allow your fingers, other body
parts, or any object to project through the sunroof opening. Injury may result.
WIND BUFFETING
Wind buffeting can be described as a helicopter-type percussion sound. If buffeting
occurs with the rear windows open, adjust the front and rear windows together.
If buffeting occurs with the sunroof open, adjust the sunroof opening, or adjust any
window. This will minimize buffeting.
OPERATING YOUR VEHICLE
45
Page 53 of 140
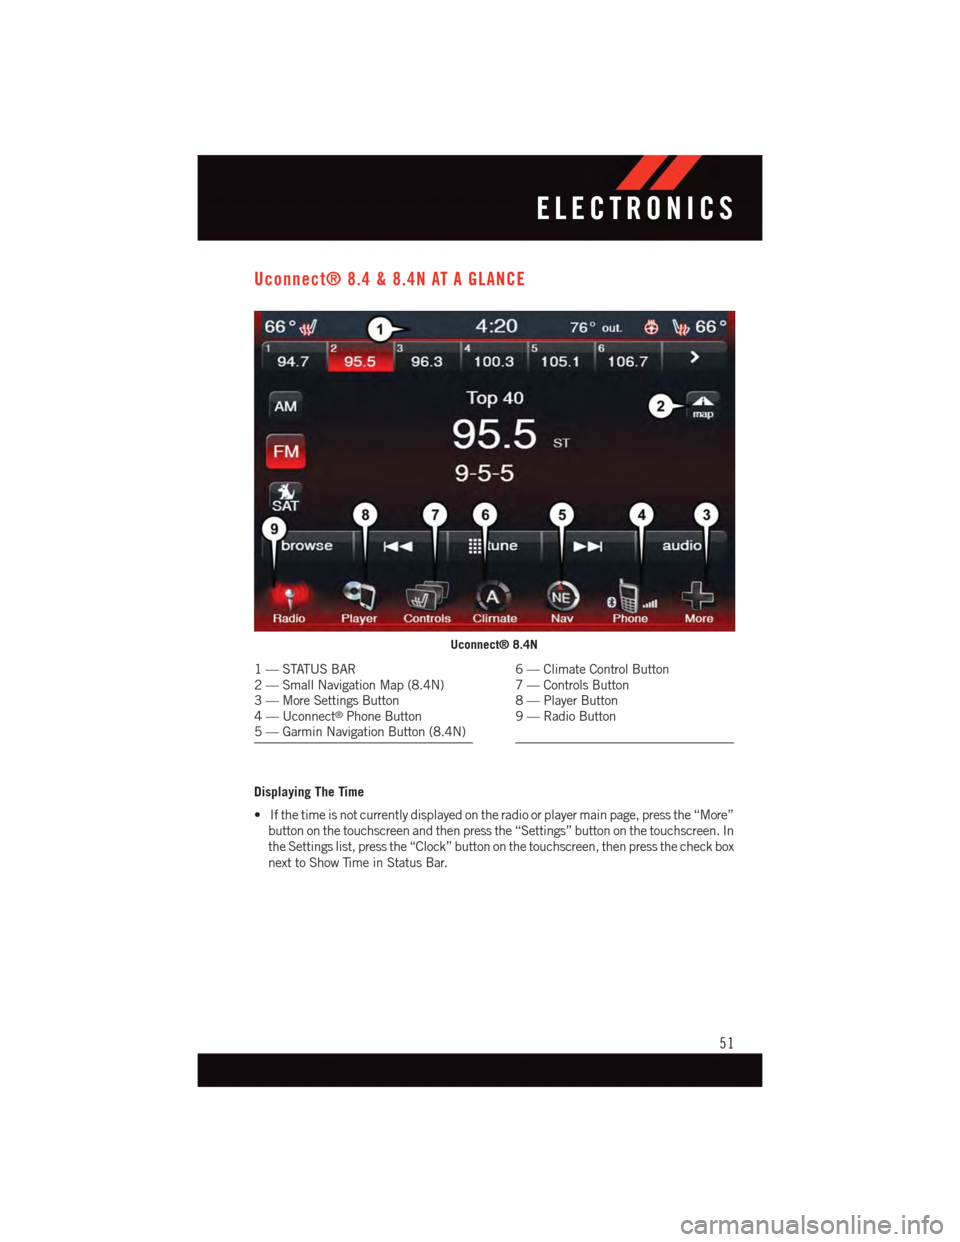
Uconnect® 8.4 & 8.4N AT A GLANCE
Displaying The Time
•Ifthetimeisnotcurrentlydisplayedontheradioorplayermainpage,pressthe“More”
button on the touchscreen and then press the “Settings” button on the touchscreen. In
the Settings list, press the “Clock” button on the touchscreen, then press the check box
next to Show Time in Status Bar.
Uconnect® 8.4N
1—STATUSBAR2—SmallNavigationMap(8.4N)3—MoreSettingsButton4—Uconnect®Phone Button5—GarminNavigationButton(8.4N)
6—ClimateControlButton7—ControlsButton8—PlayerButton9—RadioButton
ELECTRONICS
51
Page 56 of 140
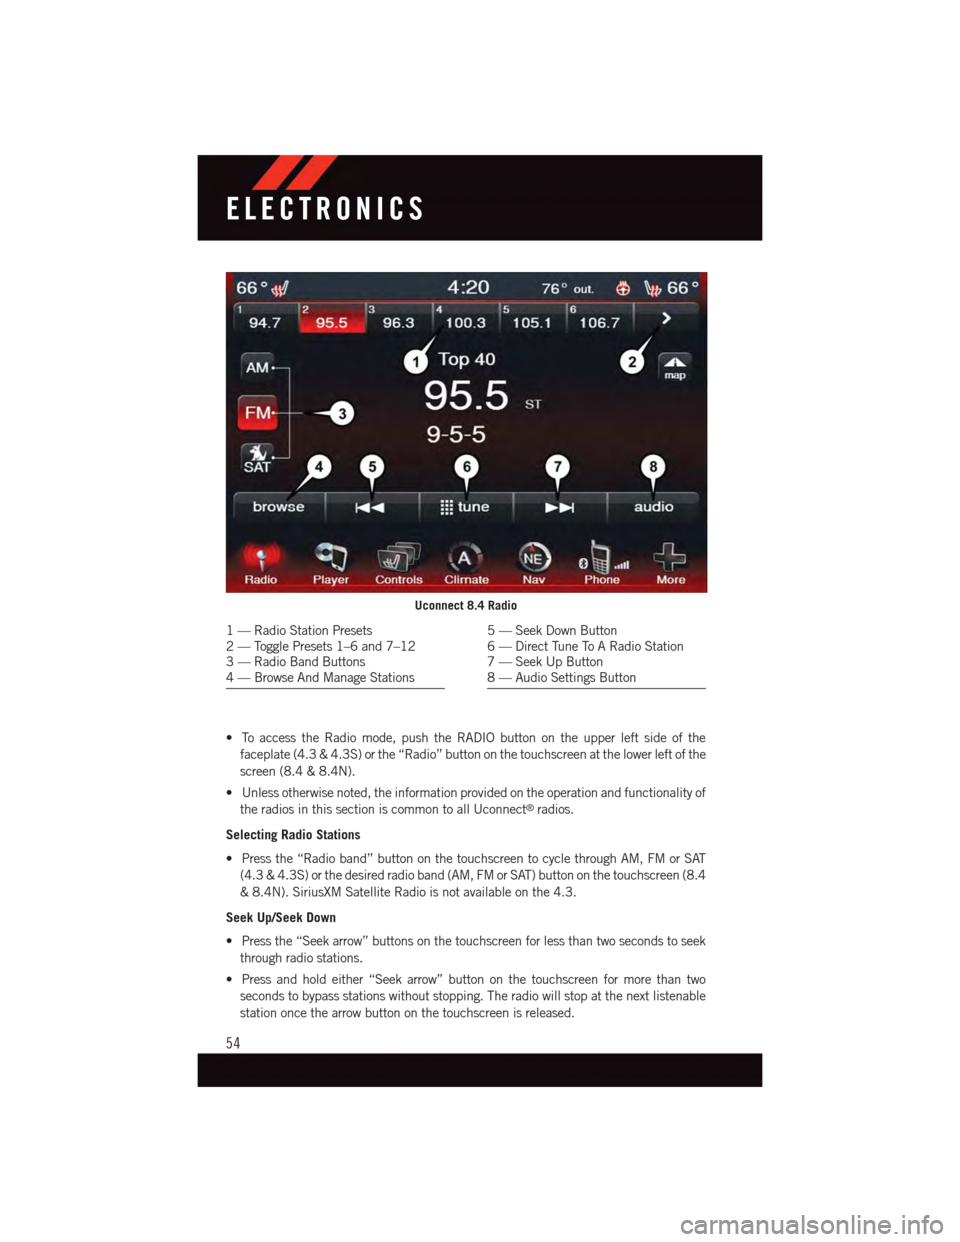
•ToaccesstheRadiomode,pushtheRADIObuttonontheupperleftsideofthe
faceplate (4.3 & 4.3S) or the “Radio” button on the touchscreen at the lower left of the
screen (8.4 & 8.4N).
•Unlessotherwisenoted,theinformationprovidedontheoperationandfunctionalityof
the radios in this section is common to all Uconnect®radios.
Selecting Radio Stations
•Pressthe“Radioband”buttononthetouchscreentocyclethroughAM,FMorSAT
(4.3 & 4.3S) or the desired radio band (AM, FM or SAT) button on the touchscreen (8.4
&8.4N).SiriusXMSatelliteRadioisnotavailableonthe4.3.
Seek Up/Seek Down
•Pressthe“Seekarrow”buttonsonthetouchscreenforlessthantwosecondstoseek
through radio stations.
•Pressandholdeither“Seekarrow”buttononthetouchscreenformorethantwo
seconds to bypass stations without stopping. The radio will stop at the next listenable
station once the arrow button on the touchscreen is released.
Uconnect 8.4 Radio
1—RadioStationPresets2—TogglePresets1–6and7–123—RadioBandButtons4—BrowseAndManageStations
5—SeekDownButton6—DirectTuneToARadioStation7—SeekUpButton8—AudioSettingsButton
ELECTRONICS
54
Page 57 of 140
Direct Tune
•Tunedirectlytoaradiostationbypressingthe“Tune”buttononthescreen,and
entering the desired station number.
Store Radio Presets
•Yourradiocanstore12totalpresetstations.Theyareshownatthetopofyourscreen.
To s e e a l l 1 2 s t a t i o n s , P r e s s t h e “ A l l ” b u t t o n o n t h e t o u c h s c r e e n ( 4 . 3 & 4 . 3 S ) o r p r e s s
the “arrow” button on the touchscreen at the top right of the screen to toggle between
the six presets (8.4 & 8.4N).
•Tosetastationintomemorypressandholdthedesirednumberedbuttononthe
touchscreen for more than two seconds or until you hear a confirmation beep.
SiriusXM SATELLITE RADIO
•SiriusXMSatelliteRadiogivesyouover130channels,including100%commercial-
free music from nearly every genre, plus all your favorite sports, news, talk and
entertainment channels – all with crystal clear, coast-to-coast coverage, all in one place
and all at your fingertips.
•ToaccessSiriusXMSatelliteRadio,pressthe“Radioband”buttononthetouchscreen
and select the “SAT” button on the touchscreen (4.3S) or press the “SAT” button on
the touchscreen on the main Radio screen (8.4 & 8.4N).
•ThefollowingdescribesfeaturesthatareavailablewheninSiriusXMSatelliteRadio
mode.
•Unlessotherwisenoted,theinformationprovidedontheoperationandfunctionalityof
the radios in this section is common to all Uconnect®radios.
Selecting SiriusXM Satellite Channels
Seek Up/Seek Down
•Pressthe“Seekarrow”buttonsonthetouchscreenforlessthantwosecondstoseek
through channels in SAT mode.
•Pressandholdeither“arrow”buttononthetouchscreenformorethantwosecondsto
bypass channels without stopping. The radio will stop at the next listenable channel
once the arrow button on the touchscreen is released.
Direct Tune
•TunedirectlytoaSATchannelbypressingthe“Tune”buttononthescreen,and
entering the desired station number.
Info (4.3S Only)
•ProvidesdetailedinformationaboutthecurrentSiriusXMSatelliteRadiochannel.
More... (4.3S Only)
•Accessmoremenus:Audio,Favorites,GameZone,andReplay.
ELECTRONICS
55
Page 59 of 140
Replay
•Letsyoureplayupto44minutesofthecontentofthecurrentSiriusXMSatelliteRadio
channel.
ReplayOptionOption Description
Play/Pause Press to Pause content playback. Press “Pause/Play” again to resumeplayback.
Rewind/RW Rewinds the channel content in steps of five seconds. Press and hold torewind continuously, then release to begin playing content at that point.
FastForward/FWForwards the content, and works similarly to Rewind/RW. However, FastForward/FW can only be used when content has been previously rewound.
Replay Time Displays the amount of time in the upper center of the screen by which yourcontent lags the Live channel.
Live Resumes playback of Live content at any time while replaying rewoundcontent.
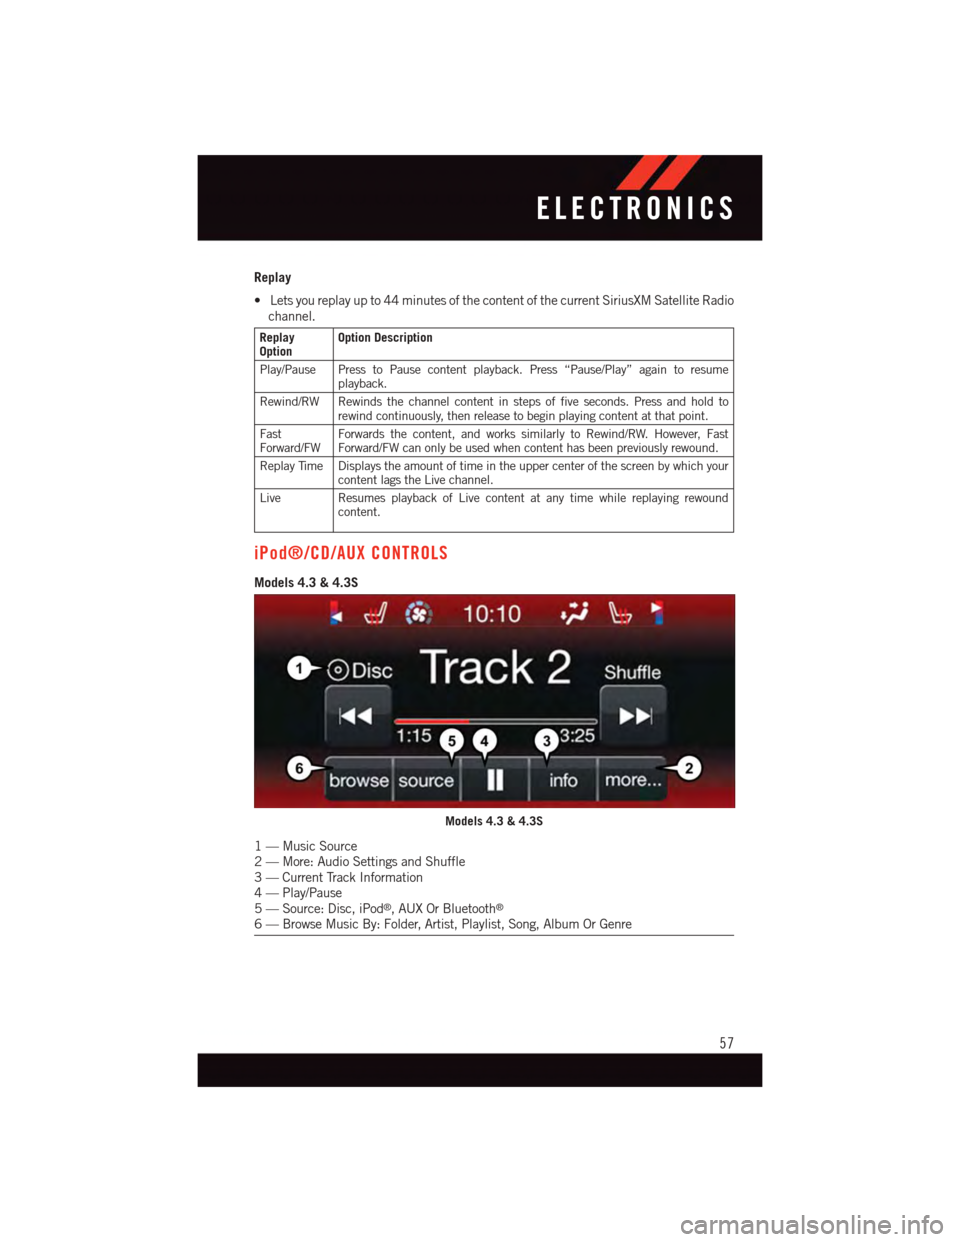
iPod®/CD/AUX CONTROLS
Models 4.3 & 4.3S
Models 4.3 & 4.3S
1—MusicSource2—More:AudioSettingsandShuffle3—CurrentTrackInformation4—Play/Pause5—Source:Disc,iPod®,AUXOrBluetooth®
6—BrowseMusicBy:Folder,Artist,Playlist,Song,AlbumOrGenre
ELECTRONICS
57
Page 62 of 140
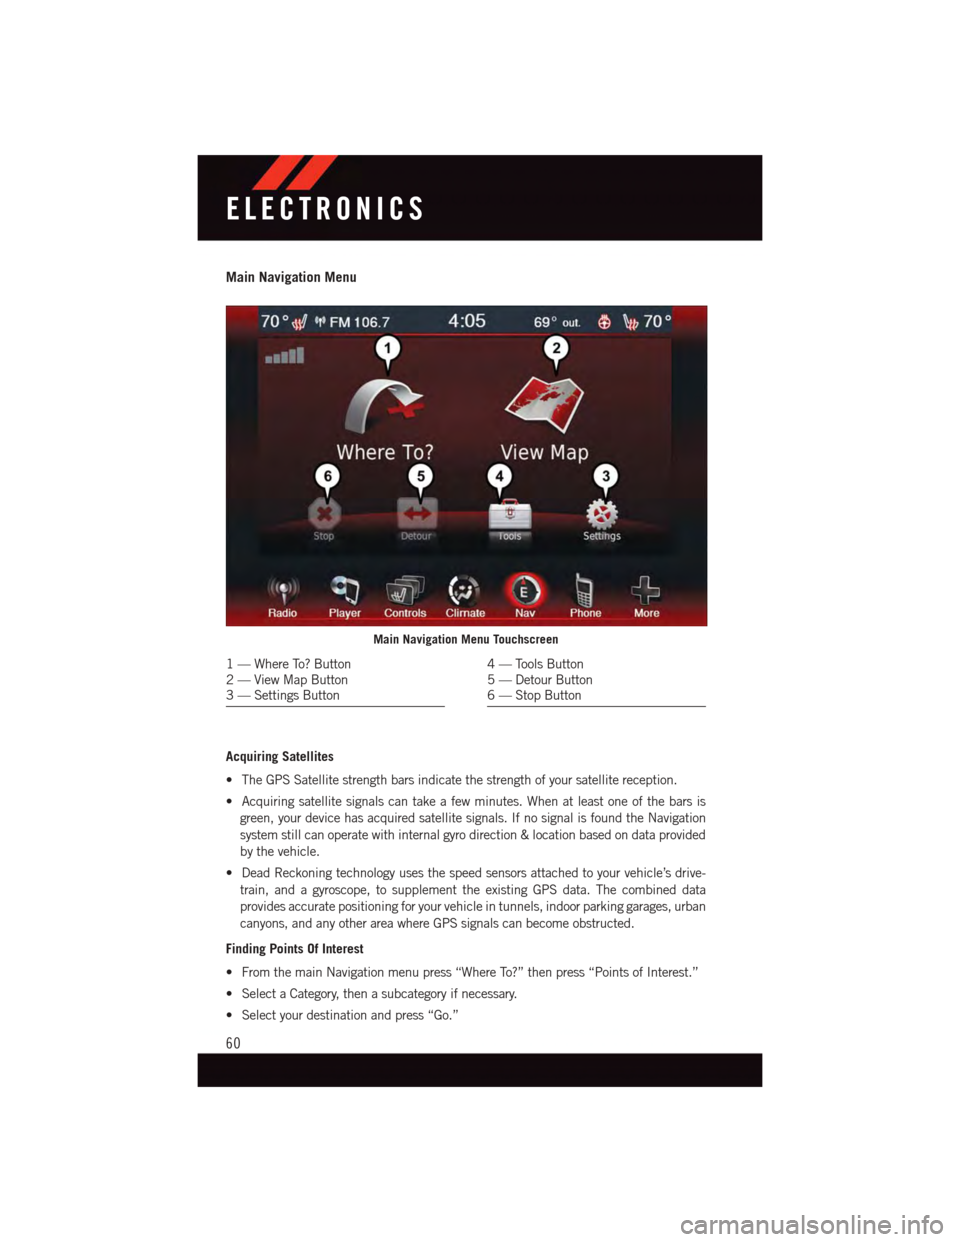
Main Navigation Menu
Acquiring Satellites
•TheGPSSatellitestrengthbarsindicatethestrengthofyoursatellitereception.
•Acquiringsatellitesignalscantakeafewminutes.Whenatleastoneofthebarsis
green, your device has acquired satellite signals. If no signal is found the Navigation
system still can operate with internal gyro direction & location based on data provided
by the vehicle.
•DeadReckoningtechnologyusesthespeedsensorsattachedtoyourvehicle’sdrive-
train, and a gyroscope, to supplement the existing GPS data. The combined data
provides accurate positioning for your vehicle in tunnels, indoor parking garages, urban
canyons, and any other area where GPS signals can become obstructed.
Finding Points Of Interest
•FromthemainNavigationmenupress“WhereTo?”thenpress“PointsofInterest.”
•SelectaCategory,thenasubcategoryifnecessary.
•Selectyourdestinationandpress“Go.”
Main Navigation Menu Touchscreen
1—WhereTo?Button2—ViewMapButton3—SettingsButton
4—ToolsButton5—DetourButton6—StopButton
ELECTRONICS
60
Page 67 of 140
PLAYING iPod®/USB/MP3 DEVICES
•TherearemanywaystoplaymusicfromiPod®/MP3 players or USB devices through
your vehicles sound system.
Audio Jack (AUX)
•TheAudioJack,locatedinthecenterconsole,allowsaportabledevice,suchasan
MP3 player or an iPod®,tobepluggedintotheradioandutilizethevehiclessound
system, using a 3.5 mm audio cable, to amplify the source and play through the vehicle
speakers.
•Pressingthe“Player”buttononthetouchscreenthenchooseAUXsourcewillchange
the mode to auxiliary device if the Audio Jack is connected, allowing the music from
your portable device to be heard through the vehicles speakers.
•Thefunctionsoftheportabledevicearecontrolledusingthedevicebuttons.The
volume may be controlled using the radio or portable device.
•Toroutetheaudiocableoutofthecenterconsole,usetheaccesscutoutinthefront
of the console.
USB Port
•ConnectyouriPod®or compatible device using a USB cable into the USB Port. The
USB Port is contained within the center console. USB Memory sticks with audio files
can also be used. Then, audio from the device can be played on the vehicles sound
system while providing metadata (artist, track title, album, etc.) information on the
radio display.
•Whenconnected,theiPod®/compatible USB device can be controlled using the radio
or Steering Wheel Audio Controls to play, skip to the next or previous track, browse, and
list the contents.
•TheiPod®battery charges when plugged into the USB port (if supported by the specific
device).
•ToroutetheUSB/iPod®cable out of the center console, use the access cut out in the
front of the console.
NOTE:
•WhenconnectingyouriPod®device for the first time, the system may take several
minutes to read your music, depending on the number of files. For example, the system
will take approximately five minutes for every 1000 songs loaded on the device. Also
during the reading process, the Shuffle and Browse functions will be disabled. This
process is needed to ensure the full use of your iPod®features and only happens the
first time it is connected. After the first time, the reading process of your iPod®will take
considerably less time unless changes are made or new songs are added to the playlist.
•TheUSBportsupportscertainMini,Classic,Nano,Touch,andiPhone®devices. The
USB port also supports playing music from compatible external USB Mass Storage
Class memory devices. Some iPod®software versions may not fully support the USB
port features. Please visit Apple’s website for iPod®software updates.
ELECTRONICS
65
Page 68 of 140
SD Card (8.4 and 8.4N Only)
•PlaysongsstoredonanSDcardinsertedintotheSDcardslot,locatedontheradio
faceplate.
•SongplaybackcanbecontrolledusingtheradioorSteeringWheelAudioControlsto
play, skip to the next or previous track, browse, and list the contents.
Bluetooth® Streaming Audio
•IfequippedwithUconnect®Voice Command, your Bluetooth®-equippediPod®
devices, cell phones or other media players, may also be able to stream music to your
vehicles sound system. Your connected device must be Bluetooth®-compatible,and
paired with your Uconnect®system (see Uconnect®Phone for pairing instructions).
Yo u c a n a c c e s s t h e m u s i c f r o m y o u r c o n n e c t e d B l u e t o o t h®device by pressing the
“Source” button on the touchscreen while in Player mode.
Uconnect® PHONE
Uconnect® Phone (Bluetooth® Hands Free Calling)
•IftheUconnect®Phone Buttonexists on your steering wheel, then you have the
Uconnect®Phone features.
•TheUconnect®Phone is a voice-activated, hands-free, in-vehicle communications
system with Voice Command Capability (see Voice Command section).
•TheUconnect®Phone allows you to dial a phone number with your mobile phone using
simple voice commands or using touchscreen buttons.
•Refertothe“UnderstandTheFeaturesOfYourVehicle”sectionofyourvehicle's
Owner's Manual on the DVD for further details.
NOTE:
The Uconnect®Phone requires a mobile phone equipped with the Bluetooth®Hands-Free
Profile, Version 1.0 or higher. For Uconnect®customer support: U.S. residents - visitUcon-
nectPhone.com or call 1–877–855–8400. Canadian Residents - call 1-800-465–2001
(English) or 1-800-387-9983 (French).
Pairing A Phone
•TousetheUconnect®Phone feature, you must first pair your Bluetooth®phone with
the Uconnect®system.
ELECTRONICS
66