warning DODGE JOURNEY 2015 1.G Owner's Manual
[x] Cancel search | Manufacturer: DODGE, Model Year: 2015, Model line: JOURNEY, Model: DODGE JOURNEY 2015 1.GPages: 140, PDF Size: 23.09 MB
Page 27 of 140
HEAD RESTRAINTS
Head restraints are designed to reduce the risk of injury by restricting head movement in
the event of a rear impact. Head restraints should be adjusted so that the top of the head
restraint is located above the top of your ear.
WARNING!
The head restraints for all occupants must be properly adjusted prior to operating the
vehicle or occupying a seat. Head restraints should never be adjusted while the vehicle
is in motion. Driving a vehicle with the head restraints improperly adjusted or removed
could cause serious injury or death in the event of a collision.
Active Head Restraints (AHR) — Front Seats
Active Head Restraints are passive, deployable components, and vehicles with this
equipment can not be readily identified by any markings, only through visual inspection
of the head restraint. The head restraint will be split in two halves, with the front half being
soft foam and trim, the back half being decorative plastic.
When AHRs deploy during a rear impact, the front half of the head restraint extends
forward to minimize the gap between the back of the occupant’s head and the AHR. This
system is designed to help prevent or reduce the extent of injuries to the driver and front
passenger in certain types of rear impacts. Refer to “Occupant Restraints” in “Things To
Know Before Starting” in the Owner's Manual on the DVD for further information.
To r a i s e t h e h e a d r e s t r a i n t , p u l l u p w a r d o n t h e h e a d r e s t r a i n t . To l o w e r t h e h e a d r e s t r a i n t ,
press the push button, located at the base of the head restraint, and push downward on
the head restraint.
For comfort, the Active Head Restraints can be tilted forward and backward. To tilt the
head restraint closer to the back of your head, pull forward on the bottom of the head
restraint. Push rearward on the bottom of the head restraint to move the head restraint
away from your head.
NOTE:
•Theheadrestraintsshouldonlyberemovedbyqualifiedtechnicians,forservice
purposes only. If either of the head restraints require removal, see your authorized
dealer.
•IntheeventofdeploymentofanActiveHeadRestraint,referto“OccupantRestraints/
Supplemental Active Head Restraints (AHR)/Resetting Active Head Restraints (AHR)”
in “Things To Know Before Starting” in the Owner's Manual on the DVD for further
information.
GETTING STARTED
25
Page 28 of 140
WARNING!
•DonotplaceitemsoverthetopoftheActiveHeadRestraint,suchascoats,seat
covers or portable DVD players. These items may interfere with the operation of the
Active Head Restraint in the event of a collision and could result in serious injury or
death.
•ActiveHeadRestraintsmaybedeployediftheyarestruckbyanobjectsuchasa
hand, foot or loose cargo. To avoid accidental deployment of the Active Head
Restraint ensure that all cargo is secured, as loose cargo could contact the Active
Head Restraint during sudden stops. Failure to follow this warning could cause
personal injury if the Active Head Restraint is deployed.
Head Restraints — Second Row Seats
The rear seats are equipped with adjustable head restraints. To raise the head restraint,
pull upward on the head restraint. To lower the head restraint, press the adjustment
button, located on the base of the head restraint, and push downward on the head
restraint.
NOTE:
•Theheadrestraintsshouldonlyberemovedbyqualifiedtechnicians,forservice
purposes only. If any of the head restraints require removal, see your authorized dealer.
•ForproperroutingofaChildSeatTether,referto“OccupantRestraints”in“ThingsTo
Know Before Starting” in the Owner's Manual on the DVD for further information.
WARNING!
Driving a vehicle with the head restraints removed or improperly adjusted could cause
serious injury or death in the event of a collision. The head restraints should be checked
prior to operating the vehicle and never adjusted while the vehicle is in motion.
Third Row Passenger Seats — Seven Passenger Models
These head restraints are non-adjustable and non-removable. However, you can fold them
forward when they are not in use by passengers. Refer to “50/50 Split Third-Row
Passenger Seats With Fold-Flat Feature — Seven Passenger Models” in the Owner's
Manual on the DVD for further information.
WARNING!
Do not allow a passenger to sit in a third row seat without having the head restraint
unfolded and locked in place. Failure to follow this warning may result in personal
injury to the passenger in the event of a collision.
GETTING STARTED
26
Page 31 of 140
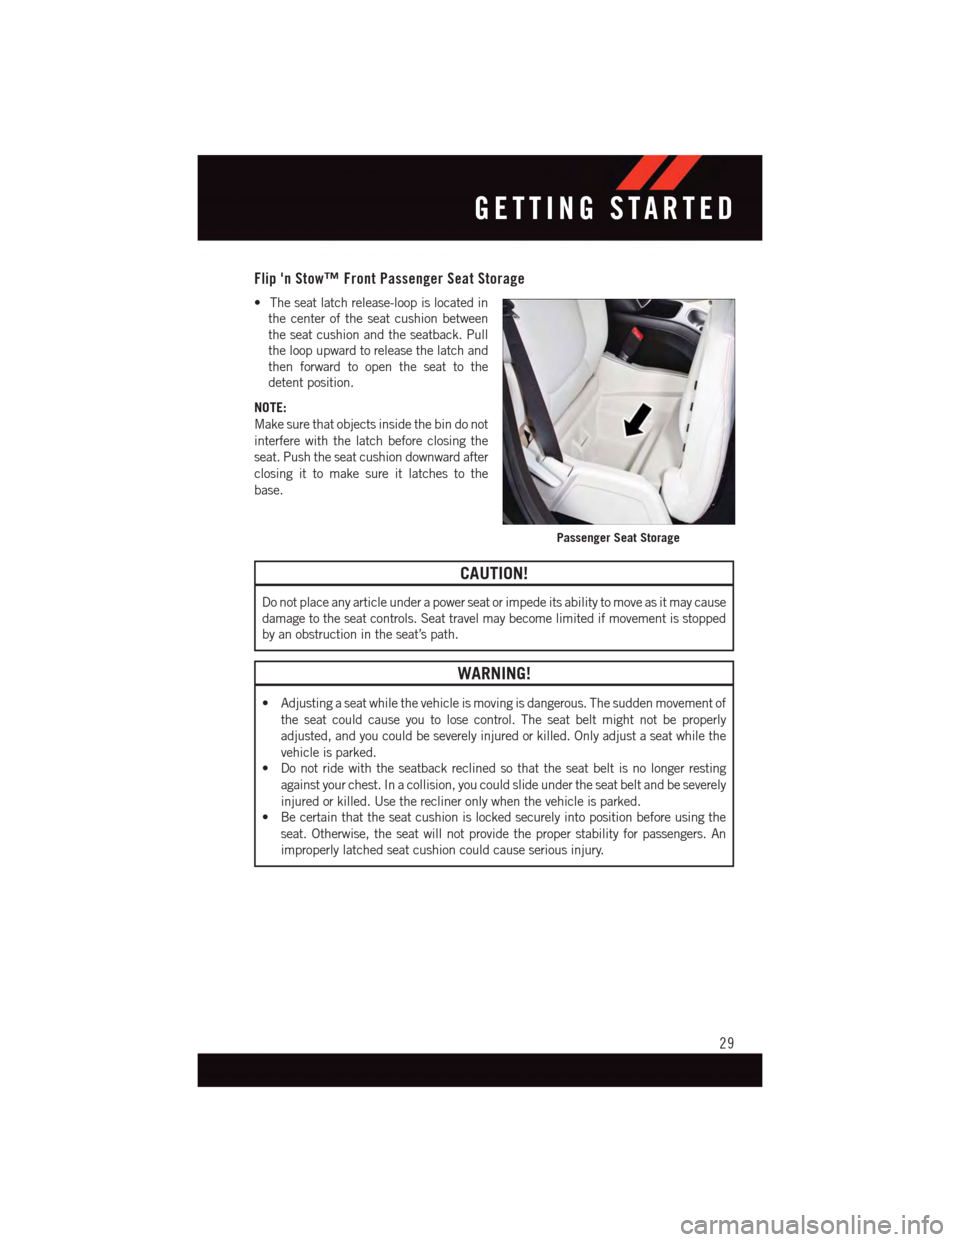
Flip 'n Stow™ Front Passenger Seat Storage
•Theseatlatchrelease-loopislocatedin
the center of the seat cushion between
the seat cushion and the seatback. Pull
the loop upward to release the latch and
then forward to open the seat to the
detent position.
NOTE:
Make sure that objects inside the bin do not
interfere with the latch before closing the
seat. Push the seat cushion downward after
closing it to make sure it latches to the
base.
CAUTION!
Do not place any article under a power seat or impede its ability to move as it may cause
damage to the seat controls. Seat travel may become limited if movement is stopped
by an obstruction in the seat’s path.
WARNING!
•Adjustingaseatwhilethevehicleismovingisdangerous.Thesuddenmovementof
the seat could cause you to lose control. The seat belt might not be properly
adjusted, and you could be severely injured or killed. Only adjust a seat while the
vehicle is parked.
•Donotridewiththeseatbackreclinedsothattheseatbeltisnolongerresting
against your chest. In a collision, you could slide under the seat belt and be severely
injured or killed. Use the recliner only when the vehicle is parked.
•Becertainthattheseatcushionislockedsecurelyintopositionbeforeusingthe
seat. Otherwise, the seat will not provide the proper stability for passengers. An
improperly latched seat cushion could cause serious injury.
Passenger Seat Storage
GETTING STARTED
29
Page 34 of 140
WARNING!
•Becertainthattheseatbackislockedsecurelyintoposition.Otherwise,theseatwill
not provide the proper stability for child seats and/or passengers. An improperly
latched seat could cause you and others to be severely injured or killed.
•Donotallowapassengertositinathirdrowseatwithouthavingtheheadrestraint
unfolded and locked in place or seatback(s) folded flat. Failure to follow this
warning may result in the passengers being severely injured or killed in the event of
acollision.
•DonotdrivethevehiclewiththeseatintheTip'nSlide™position,asitisonly
intended for entering and exiting the third row seats. Failure to follow this warning
may result in you and others being severely injured or killed.
•Becertainthattheseatbackandseatarelockedsecurelyintoposition.Otherwise,
the seat will not provide the proper stability for child seats and/or passengers. An
improperly latched seat could cause you or others to be severely injured or killed.
HEATED SEATS
Front Heated Seats
The front heated seats control buttons are located within the climate or controls screen of
the touchscreen.
•Presstheheatedseatbuttononce to turn the High setting On.
•PresstheheatedseatbuttonasecondtimetoturntheLowsettingOn.
•PresstheheatedseatbuttonathirdtimetoturntheheatingelementsOff.
If the High-level setting is selected, the system will automatically switch to Low-level after
approximately 60 minutes. The Low-level setting will turn Off automatically after approxi-
mately 45 minutes.
NOTE:
Vehicle Equipped With Remote Start
On models that are equipped with remote start, this feature can be programmed to come
on during a remote start through the Uconnect®system. Refer to “Uconnect®Settings”
in “Understanding Your Instrument Panel” in the Owner's Manual on the DVD.
GETTING STARTED
32
Page 35 of 140
WARNING!
•Personswhoareunabletofeelpaintotheskinbecauseofadvancedage,chronic
illness, diabetes, spinal cord injury, medication, alcohol use, exhaustion or other
physical conditions must exercise care when using the seat heater. It may cause
burns even at low temperatures, especially if used for long periods of time.
•Donotplaceanythingontheseatthatinsulatesagainstheat,suchasablanketor
cushion. This may cause the seat heater to overheat. Sitting in a seat that has been
overheated could cause serious burns due to the increased surface temperature of
the seat.
HEATED STEERING WHEEL
The steering wheel contains a heating element that heats the steering wheel to one
temperature setting.
The heated steering wheel control button is located within the Uconnect®system. You can
gain access to the control buttons through the climate screen or the controls screen.
•Presstheheatedsteeringwheelbuttononce to turn the heating element ON.
•Presstheheatedsteeringwheelbuttonasecondtimetoturntheheatingelement
OFF.
Once the heated steering wheel has been turned on, it will operate for up to 80 minutes
before automatically shutting off. The heated steering wheel can shut off early or may not
turn on when the steering wheel is already warm.
NOTE:
Vehicle Equipped With Remote Start
On models that are equipped with remote start, this feature can be programmed to come
on during a remote start through the Uconnect®system. Refer to “Uconnect®Settings”
in “Understanding Your Instrument Panel” in the Owner's Manual on the DVD.
WARNING!
•Personswhoareunabletofeelpaintotheskinbecauseofadvancedage,chronic
illness, diabetes, spinal cord injury, medication, alcohol use, exhaustion, or other
physical conditions must exercise care when using the steering wheel heater. It may
cause burns even at low temperatures, especially if used for long periods.
•Donotplaceanythingonthesteeringwheelthatinsulatesagainstheat,suchasa
blanket or steering wheel covers of any type and material. This may cause the
steering wheel heater to overheat.
GETTING STARTED
33
Page 36 of 140
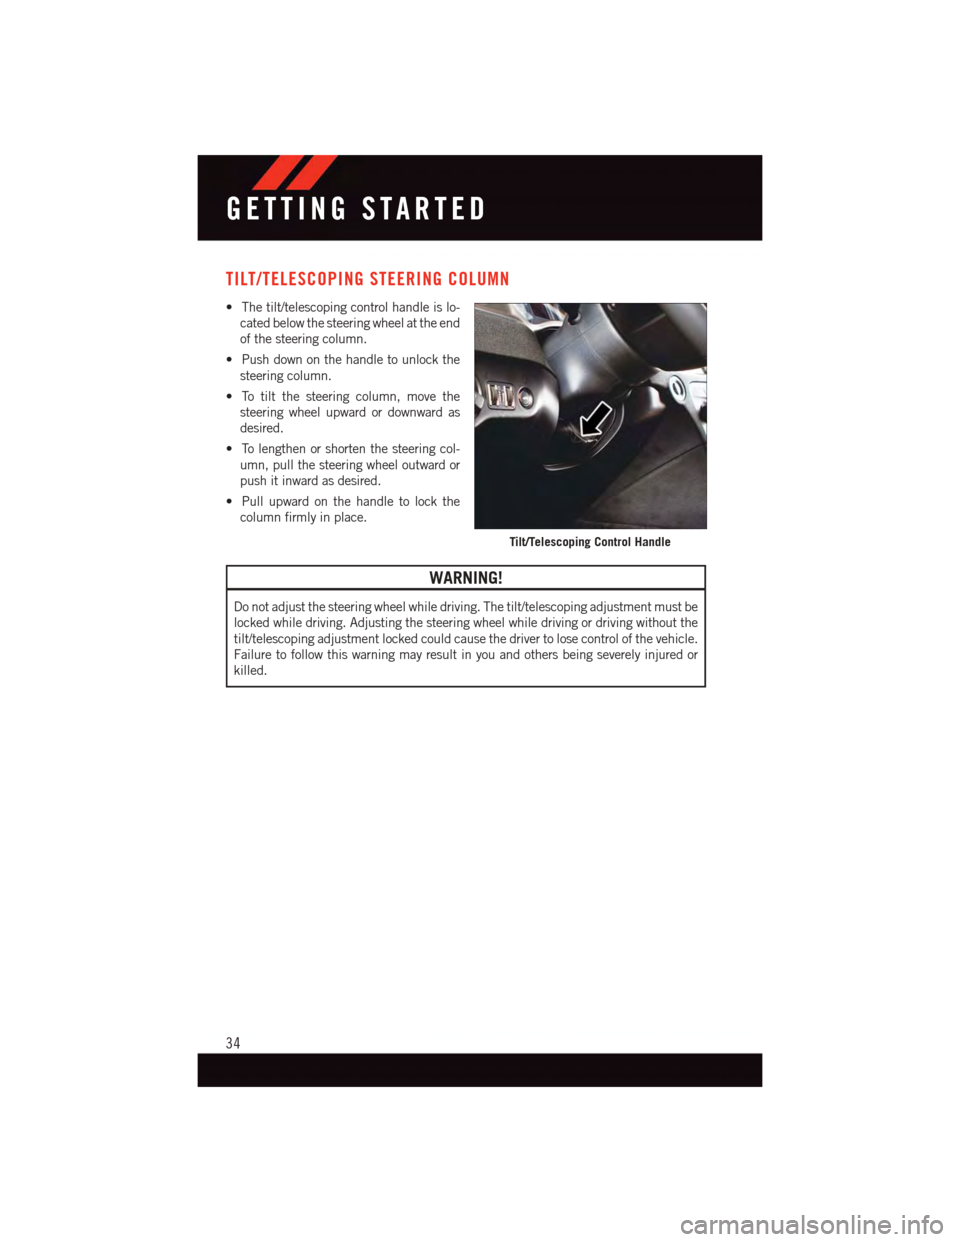
TILT/TELESCOPING STEERING COLUMN
•Thetilt/telescopingcontrolhandleislo-
cated below the steering wheel at the end
of the steering column.
•Pushdownonthehandletounlockthe
steering column.
•Totiltthesteeringcolumn,movethe
steering wheel upward or downward as
desired.
•Tolengthenorshortenthesteeringcol-
umn, pull the steering wheel outward or
push it inward as desired.
•Pullupwardonthehandletolockthe
column firmly in place.
WARNING!
Do not adjust the steering wheel while driving. The tilt/telescoping adjustment must be
locked while driving. Adjusting the steering wheel while driving or driving without the
tilt/telescoping adjustment locked could cause the driver to lose control of the vehicle.
Failure to follow this warning may result in you and others being severely injured or
killed.
Tilt/Telescoping Control Handle
GETTING STARTED
34
Page 41 of 140

To Decrease Speed
When the Electronic Speed Control is set, you can decrease speed by pushing the SET-
button.
The speed decrement shown is dependant on the chosen speed unit of U.S. (MPH) or
Metric (km/h):
U.S. Speed (MPH)
•PushingtheSET-button once will result in a 1 MPH decrease in set speed. Each
subsequent tap of the button results in a decrease of 1 MPH.
•Ifthebuttoniscontinuallypushed,thesetspeedwillcontinuetodecreaseuntilthe
button is released, then the new set speed will be established.
Metric Speed (km/h)
•PushingtheSET-button once will result in a 2 km/h decrease in set speed. Each
subsequent tap of the button results in a decrease of 2 km/h.
•Ifthebuttoniscontinuallypushed,thesetspeedwillcontinuetodecreaseuntilthe
button is released, then the new set speed will be established.
Resume
To r e s u m e a p r e v i o u s l y s e l e c t e d s e t s p e e d i n m e m o r y, p u s h t h e R E S + b u t t o n a n d r e l e a s e .
Cancel
Push the CANCEL button, or apply the brakes to cancel the set speed and maintain the set
speed memory.
Push the ON/OFF button to turn the system off and erase the set speed memory.
WARNING!
•LeavingtheElectronicSpeedControlsystemonwhennotinuseisdangerous.You
could accidentally set the system or cause it to go faster than you want. You could
lose control and have a collision. Always leave the Electronic Speed Control system
off when you are not using it.
•ElectronicSpeedControlcanbedangerouswherethesystemcannotmaintaina
constant speed. Your vehicle could go too fast for the conditions, and you could lose
control. A collision could be the result. Do not use Electronic Speed Control in
heavy traffic or on roads that are winding, icy, snow-covered or slippery.
OPERATING YOUR VEHICLE
39
Page 45 of 140
Air Recirculation
•UserecirculationformaximumA/Coperation.
•Forwindowdefogging,turntherecirculationbuttonoff.
•IftheRecirculationbuttononthefaceplateispushedwhileintheAUTOmode,the
indicator light may flash three times to indicate the cabin air is being controlled
automatically. The “Recirculation” button on the touchscreen will be greyed out in
these conditions.
Heated Mirrors
The mirrors are heated to melt frost or ice. This feature is activated whenever you turn on
the rear window defroster.
PARKVIEW® REAR BACK-UP CAMERA
Yo u c a n s e e a n o n - s c r e e n i m a g e o f t h e r e a r o f y o u r v e h i c l e w h e n e v e r t h e s h i f t l e v e r i s p u t
into REVERSE. The ParkView®Rear Back-Up Camera image will be displayed on the radio
display screen, located on the center stack of the instrument panel.
If the radio display screen appears foggy, clean the camera lens located on the liftgate.
Refer to your Owner's Manual on the DVD for further details.
WARNING!
Drivers must be careful when backing up; even when using the ParkView®Rear
Back-Up Camera. Always check carefully behind your vehicle, and be sure to check for
pedestrians, animals, other vehicles, obstructions, or blind spots before backing up.
Yo u m u s t c o n t i n u e t o p a y a t t e n t i o n w h i l e b a c k i n g u p . F a i l u r e t o d o s o c a n r e s u l t i n
serious injury or death.
OPERATING YOUR VEHICLE
43
Page 47 of 140
WARNING!
•Donotletchildrenplaywiththesunroof.Neverleavechildrenunattendedina
vehicle, or with access to an unlocked vehicle. Do not leave the Key Fob in or near
the vehicle, and do not leave the ignition of a vehicle equipped with Keyless
Enter-N-Go™ in the ACC or ON/RUN mode. Occupants, particularly unattended
children, can become entrapped by the power sunroof while operating the power
sunroof switch. Such entrapment may result in serious injury or death.
•Inacollision,thereisagreaterriskofbeingthrownfromavehiclewithanopen
sunroof. You could also be severely injured or killed. Always fasten your seat belt
properly and make sure all passengers are properly secured.
•Do not allow small children to operate the sunroof. Never allow your fingers, other body
parts, or any object to project through the sunroof opening. Injury may result.
WIND BUFFETING
Wind buffeting can be described as a helicopter-type percussion sound. If buffeting
occurs with the rear windows open, adjust the front and rear windows together.
If buffeting occurs with the sunroof open, adjust the sunroof opening, or adjust any
window. This will minimize buffeting.
OPERATING YOUR VEHICLE
45
Page 74 of 140
NOTE:
To a c c e s s h e l p , p r e s s t h e U c o n n e c t®Phonebutton on the steering wheel and say
"help." Press the display or push eitherorbutton and say "cancel" to cancel
the help session.
Voice Text Reply
•Uconnect®Phone can read or send new text messages on your mobile phone.
•YourmobilephonemustsupportVoiceTextReplyoverBluetooth®to use this feature.
If the Uconnect®Phone determines your mobile phone is not compatible with Voice
Te x t R e p l y m e s s a g i n g o v e r B l u e t o o t h®,the“Messaging”buttonwillbegreyedoutand
the feature will not be available for use.
NOTE:
•For mobile phone compatibility and pairing instructions, please visit
UconnectPhone.com
•Uconnect®Phone Voice Text Reply is only available when the vehicle is not moving.
WARNING!
•Anyvoicecommandedsystemshouldbeusedonlyinsafedrivingconditions
following applicable laws regarding phone use. Your attention should be focused on
safely operating the vehicle. Failure to do so may result in a collision causing you
and others to be severely injured or killed.
•Inanemergency,touseUconnect®Phone, your mobile phone must be:
•turnedon,
•pairedtoUconnect®Phone,
•andhavenetworkcoverage.
Uconnect® VOICE COMMAND (8.4 & 8.4N ONLY)
•IftheUconnect®Voice Commandbutton exists on your steering wheel, then
you have the Voice Command feature.
•TheVoiceCommandfeatureletsyoukeepyourhandsonthesteeringwheel,andyour
eyes on the road.
•WhenyoupresstheVoiceCommandbuttonlocated on the radio faceplate or
steering wheel, you will hear a beep. The beep is your signal to give a command. If you
do not know what commands to say, you can say "help" and the system will provide
options to you. If you ever wish to interrupt the system while it lists options, press the
Voice Command button,listenfortheBEEP,andsayyourcommand.
•Youcan“chain”commandstogetherforfasterresults.Say“PlaytheartistScott
Joplin”, for example.
ELECTRONICS
72