radio DODGE JOURNEY 2015 1.G Owner's Manual
[x] Cancel search | Manufacturer: DODGE, Model Year: 2015, Model line: JOURNEY, Model: DODGE JOURNEY 2015 1.GPages: 140, PDF Size: 23.09 MB
Page 74 of 140
NOTE:
To a c c e s s h e l p , p r e s s t h e U c o n n e c t®Phonebutton on the steering wheel and say
"help." Press the display or push eitherorbutton and say "cancel" to cancel
the help session.
Voice Text Reply
•Uconnect®Phone can read or send new text messages on your mobile phone.
•YourmobilephonemustsupportVoiceTextReplyoverBluetooth®to use this feature.
If the Uconnect®Phone determines your mobile phone is not compatible with Voice
Te x t R e p l y m e s s a g i n g o v e r B l u e t o o t h®,the“Messaging”buttonwillbegreyedoutand
the feature will not be available for use.
NOTE:
•For mobile phone compatibility and pairing instructions, please visit
UconnectPhone.com
•Uconnect®Phone Voice Text Reply is only available when the vehicle is not moving.
WARNING!
•Anyvoicecommandedsystemshouldbeusedonlyinsafedrivingconditions
following applicable laws regarding phone use. Your attention should be focused on
safely operating the vehicle. Failure to do so may result in a collision causing you
and others to be severely injured or killed.
•Inanemergency,touseUconnect®Phone, your mobile phone must be:
•turnedon,
•pairedtoUconnect®Phone,
•andhavenetworkcoverage.
Uconnect® VOICE COMMAND (8.4 & 8.4N ONLY)
•IftheUconnect®Voice Commandbutton exists on your steering wheel, then
you have the Voice Command feature.
•TheVoiceCommandfeatureletsyoukeepyourhandsonthesteeringwheel,andyour
eyes on the road.
•WhenyoupresstheVoiceCommandbuttonlocated on the radio faceplate or
steering wheel, you will hear a beep. The beep is your signal to give a command. If you
do not know what commands to say, you can say "help" and the system will provide
options to you. If you ever wish to interrupt the system while it lists options, press the
Voice Command button,listenfortheBEEP,andsayyourcommand.
•Youcan“chain”commandstogetherforfasterresults.Say“PlaytheartistScott
Joplin”, for example.
ELECTRONICS
72
Page 75 of 140
Changing The Volume
•StartadialoguebypressingtheVoiceCommandbutton,thensayacommand
(for example, “help”).
•UsetheradioON/OFFVOLUMErotaryknobtoadjustthevolumetoacomfortablelevel
while the Voice Command system is speaking. The volume setting for Voice Command
is different than the audio system.
•Refertothe“UnderstandTheFeaturesOfYourVehicle”sectionofyourvehicle's
Owner's Manual on the DVD for further details.
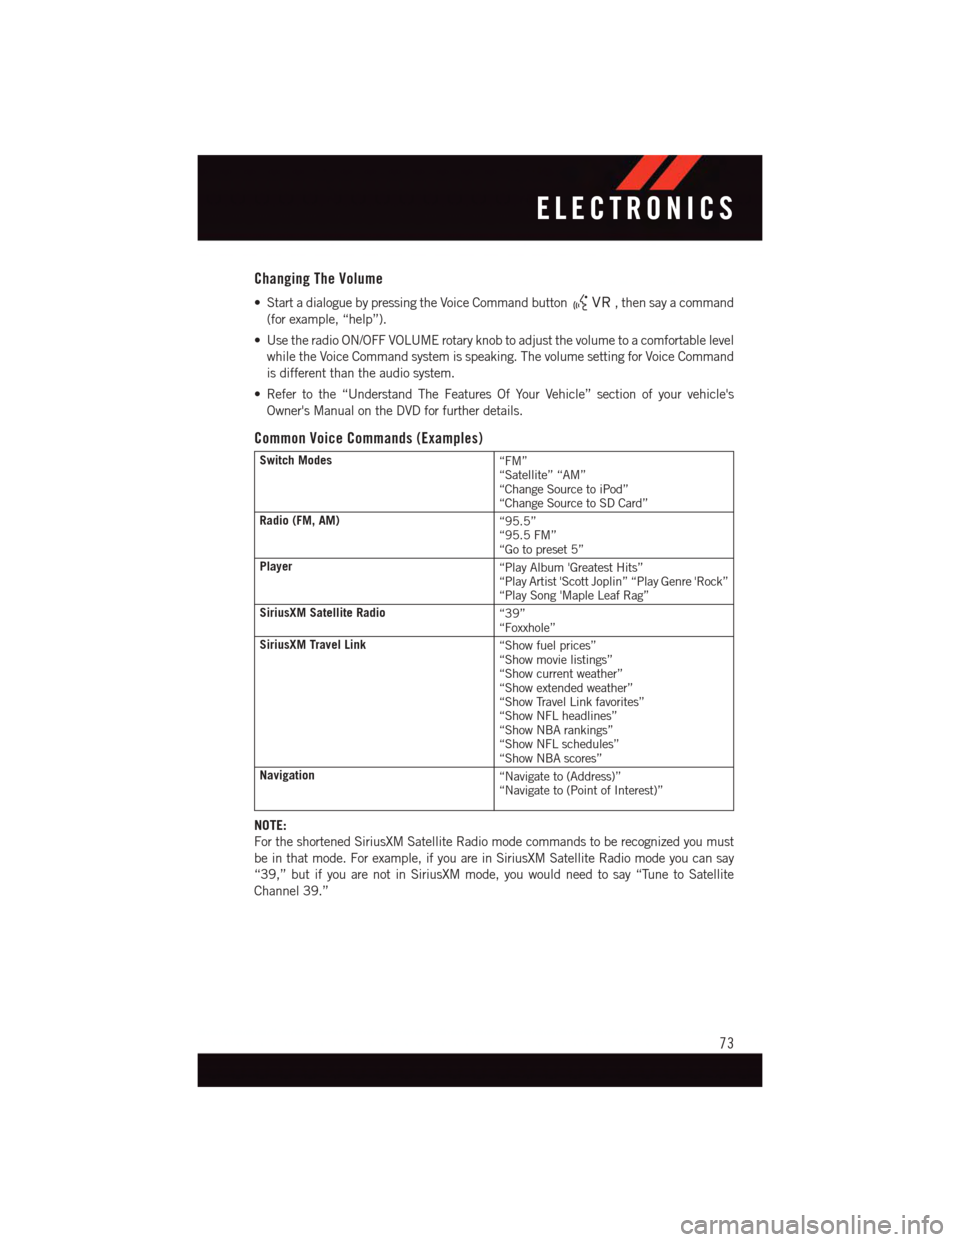
Common Voice Commands (Examples)
Switch Modes“FM”“Satellite” “AM”“Change Source to iPod”“Change Source to SD Card”
Radio (FM, AM)“95.5”“95.5 FM”“Go to preset 5”
Player“Play Album 'Greatest Hits”“Play Artist 'Scott Joplin” “Play Genre 'Rock”“Play Song 'Maple Leaf Rag”
SiriusXM Satellite Radio“39”“Foxxhole”
SiriusXM Travel Link“Show fuel prices”“Show movie listings”“Show current weather”“Show extended weather”“Show Travel Link favorites”“Show NFL headlines”“Show NBA rankings”“Show NFL schedules”“Show NBA scores”
Navigation“Navigate to (Address)”“Navigate to (Point of Interest)”
NOTE:
For the shortened SiriusXM Satellite Radio mode commands to be recognized you must
be in that mode. For example, if you are in SiriusXM Satellite Radio mode you can say
“39,” but if you are not in SiriusXM mode, you would need to say “Tune to Satellite
Channel 39.”
ELECTRONICS
73
Page 77 of 140
WARNING!
Any voice commanded system should be used only in safe driving conditions following
applicable laws regarding phone use. Your attention should be focused on safely
operating the vehicle. Failure to do so may result in a collision causing you and others
to be severely injured or killed.
VIDEO ENTERTAINMENT SYSTEM (VES™)
System Operation
•Thescreenislocatedontheheadlinerbehindthefrontseat.Tolowerthescreen,press
the release button located in the rear of the overhead console.
•Thesystemmaybecontrolledbythefrontseatoccupantsusingthetouchscreenradio,
or by the rear seat occupants using the remote control.
•Thevideoscreendisplaysinformationinasplit-screenformat.Theleftsideofthe
screen is referred to as Channel 1 and the right side of the screen is referred to as
Channel 2. All modes except video modes are displayed in a split-screen format.
•Tousetheheadphones,pressthepowerbuttonlocatedontherightearcup.Selectthe
channel on the headphones (1 or 2) that corresponds to the channel selected on the
VES™ screen.
Operation Of The Remote
The remote control operates similarly to any DVD remote you have used before and allows
the rear seat passengers to change stations, tracks, discs and audio/video modes and is
designed to control either channel by using the selector switch located on the right side of
the remote.
•Selectanaudiochannel(Rear1fordriver'ssiderearscreenandRear2forpassenger's
side rear screen), then press the “source” button and using the up and down arrows,
highlight disc from the menu and press the “OK” button.
•Pressthepopup/menubuttontonavigatethediscmenuandoptions.
Pressing the MODE button causes the Mode Selection menu to appear on the VES™
screen. Use the remote control arrow buttons to scroll through the available modes, then
press ENTER to select the desired mode.
Pressing the power button will turn the VES™ system ON/OFF.
Auxiliary Audio/Video Input Jacks
•TheAuxjacksarelocatedontherearofthecenterconsole.
•ConnectthevideogameorotherexternalmediadevicestotheAUXjacksfollowingthe
color coding for VES™ jacks.
•Usingeitherthetouchscreenradioorremotecontrol,selectAUXfromtheRearVES™
Control or Mode Selection screen.
•Refertoyourvehicle'sOwnersManualontheDVDforfurtherdetails.
ELECTRONICS
75
Page 78 of 140
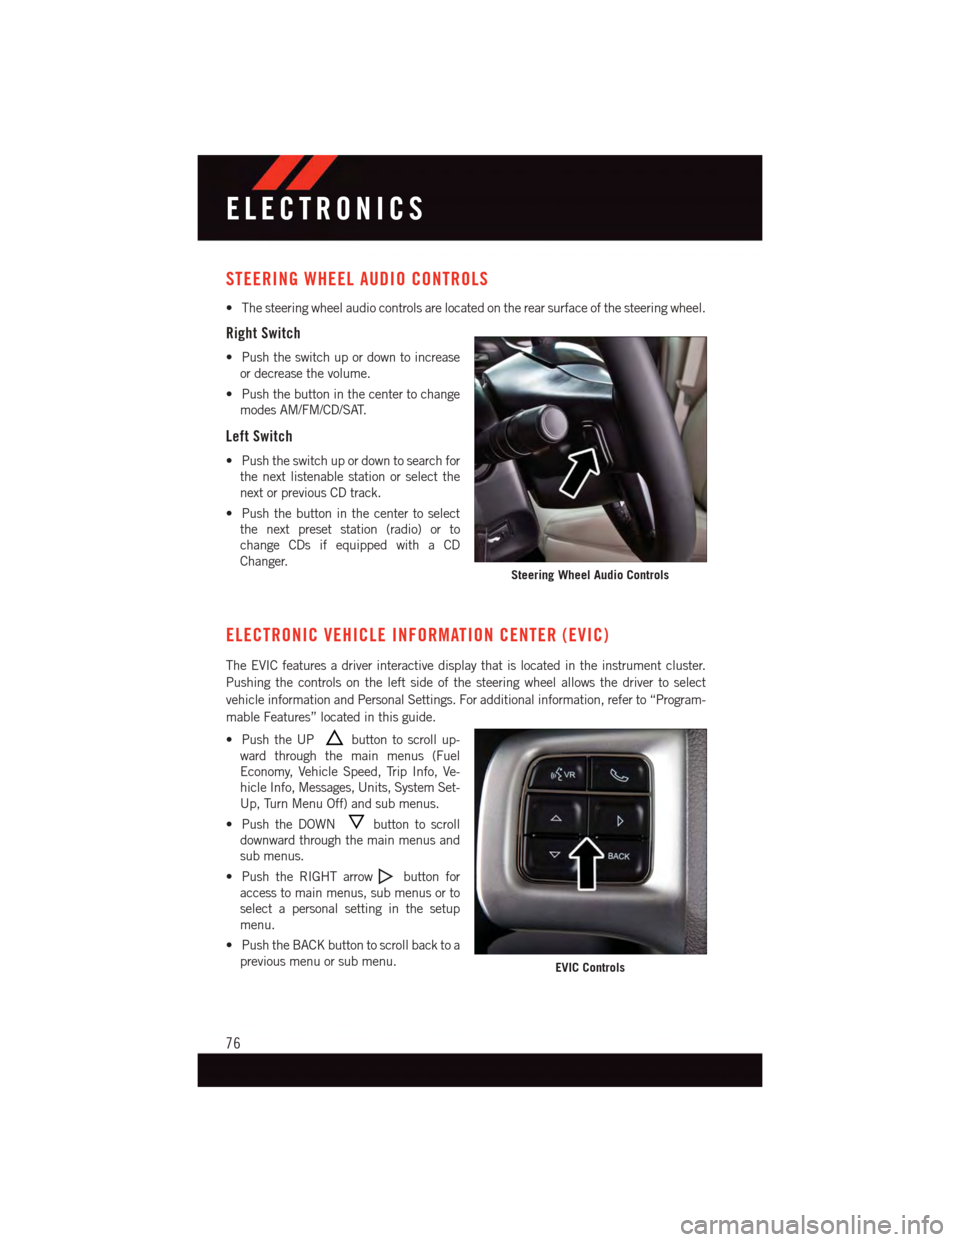
STEERING WHEEL AUDIO CONTROLS
•Thesteeringwheelaudiocontrolsarelocatedontherearsurfaceofthesteeringwheel.
Right Switch
•Pushtheswitchupordowntoincrease
or decrease the volume.
•Pushthebuttoninthecentertochange
modes AM/FM/CD/SAT.
Left Switch
•Pushtheswitchupordowntosearchfor
the next listenable station or select the
next or previous CD track.
•Pushthebuttoninthecentertoselect
the next preset station (radio) or to
change CDs if equipped with a CD
Changer.
ELECTRONIC VEHICLE INFORMATION CENTER (EVIC)
The EVIC features a driver interactive display that is located in the instrument cluster.
Pushing the controls on the left side of the steering wheel allows the driver to select
vehicle information and Personal Settings. For additional information, refer to “Program-
mable Features” located in this guide.
•PushtheUPbutton to scroll up-
ward through the main menus (Fuel
Economy, Vehicle Speed, Trip Info, Ve-
hicle Info, Messages, Units, System Set-
Up, Turn Menu Off) and sub menus.
•PushtheDOWNbutton to scroll
downward through the main menus and
sub menus.
•PushtheRIGHTarrowbutton for
access to main menus, sub menus or to
select a personal setting in the setup
menu.
•PushtheBACKbuttontoscrollbacktoa
previous menu or sub menu.
Steering Wheel Audio Controls
EVIC Controls
ELECTRONICS
76
Page 80 of 140
Uconnect® 8.4 Customer Programmable Features
•TheUconnect®8.4 system allows you to access Customer Programmable feature
settings such as Display, Clock, Safety/Assistance, Lights, Doors & Locks, Heated
Seats, Engine Off Operation, Compass Settings, Audio, Phone/Bluetooth®and SIRIUS
Setup through buttons on the touchscreen.
•Pressthe“More”buttononthebottomofthetouchscreen,thenpressthe“Settings”
button on the faceplate to access the Settings screen. When making a selection, scroll
up or down until the preferred setting is highlighted, then press and release the
preferred setting until a check-mark appears next to the setting, showing that setting
has been selected. The following feature settings are available:
•Display•AutoOnComfort&RemoteStart
•Clock•EngineOffOptions
•Safety/Assistance•Audio
•Lights•Phone/Bluetooth®
•Doors&Locks•SIRIUSSetup
UNIVERSAL GARAGE DOOR OPENER (HomeLink®)
•HomeLink®replaces up to three hand-held transmitters that operate devices such as
garage door openers, motorized gates, lighting or home security systems. The
HomeLink®unit is powered by your vehicles 12 Volt battery.
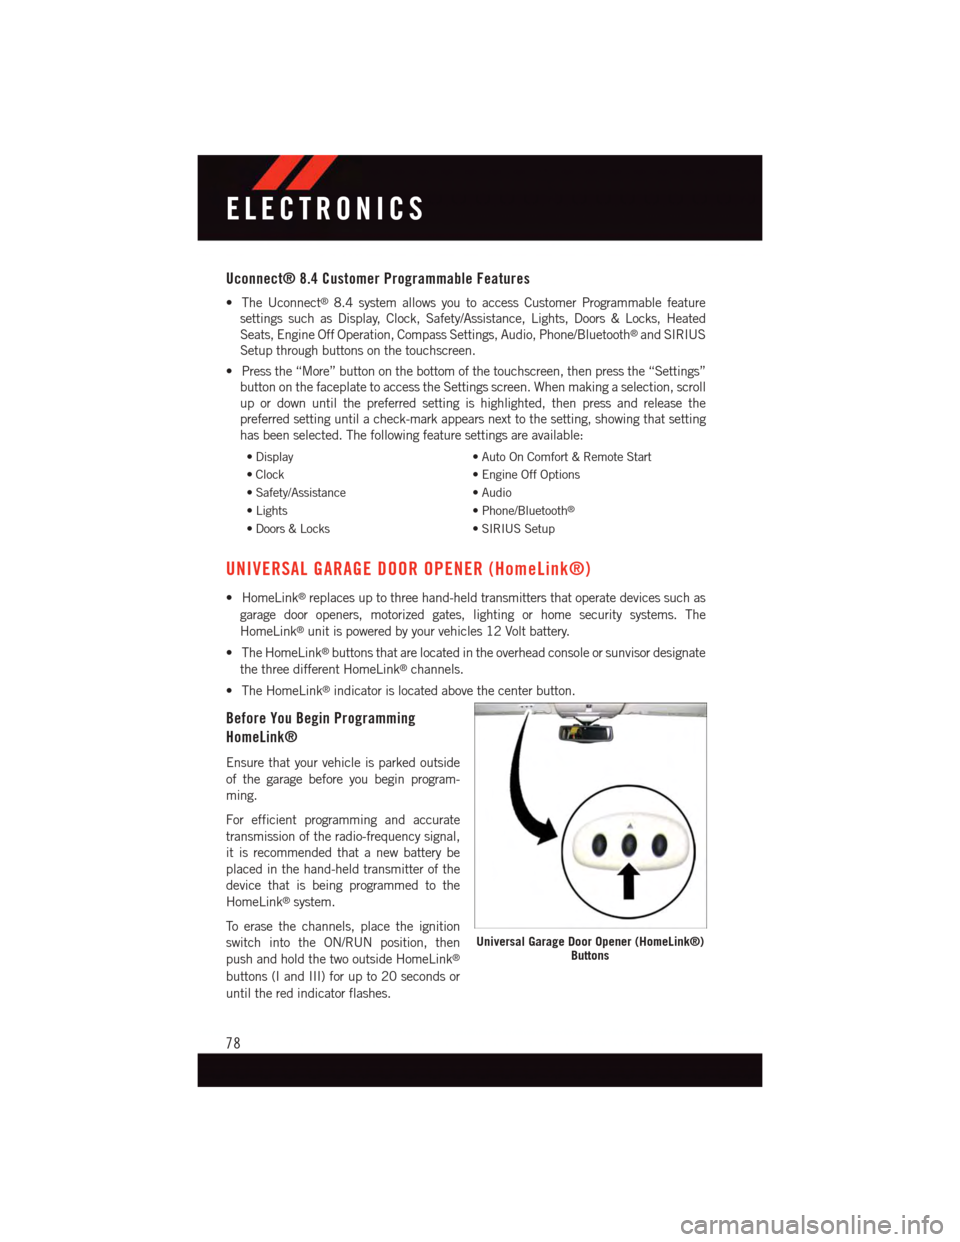
•TheHomeLink®buttons that are located in the overhead console or sunvisor designate
the three different HomeLink®channels.
•TheHomeLink®indicator is located above the center button.
Before You Begin Programming
HomeLink®
Ensure that your vehicle is parked outside
of the garage before you begin program-
ming.
For efficient programming and accurate
transmission of the radio-frequency signal,
it is recommended that a new battery be
placed in the hand-held transmitter of the
device that is being programmed to the
HomeLink®system.
To e r a s e t h e c h a n n e l s , p l a c e t h e i g n i t i o n
switch into the ON/RUN position, then
push and hold the two outside HomeLink®
buttons (I and III) for up to 20 seconds or
until the red indicator flashes.
Universal Garage Door Opener (HomeLink®)Buttons
ELECTRONICS
78
Page 84 of 140
POWER OUTLETS
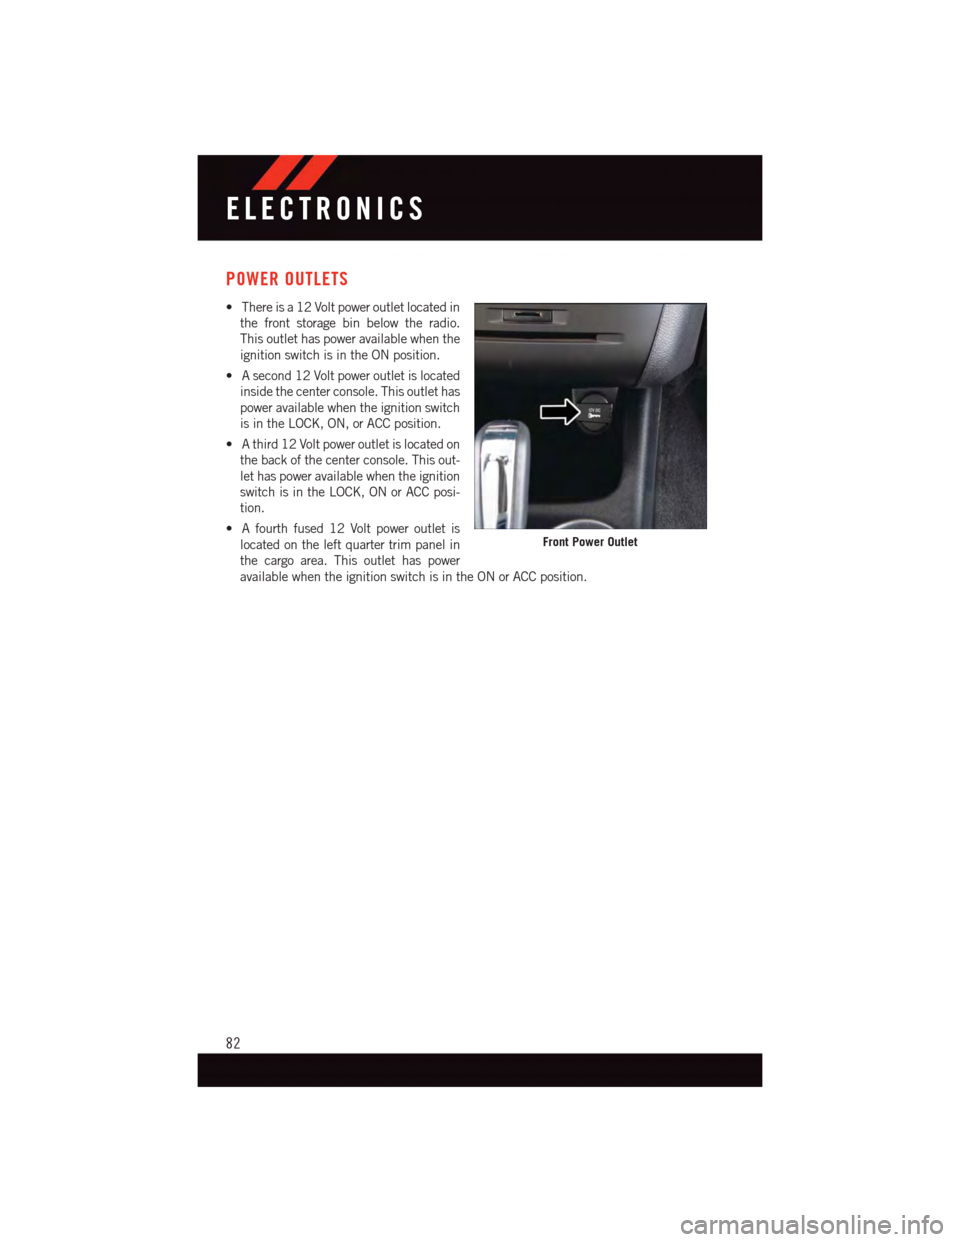
•Thereisa12Voltpoweroutletlocatedin
the front storage bin below the radio.
This outlet has power available when the
ignition switch is in the ON position.
•Asecond12Voltpoweroutletislocated
inside the center console. This outlet has
power available when the ignition switch
is in the LOCK, ON, or ACC position.
•Athird12Voltpoweroutletislocatedon
the back of the center console. This out-
let has power available when the ignition
switch is in the LOCK, ON or ACC posi-
tion.
•Afourthfused12Voltpoweroutletis
located on the left quarter trim panel in
the cargo area. This outlet has power
available when the ignition switch is in the ON or ACC position.
Front Power Outlet
ELECTRONICS
82
Page 103 of 140
JUMP-STARTING
•Ifyourvehiclehasadischargedbatteryit
can be jump-started using a set of
jumper cables and a battery in another
vehicle or by using a portable battery
booster pack.
•Jump-startingcanbedangerousifdone
improperly so please follow the proce-
dures in this section carefully.
NOTE:
When using a portable battery booster pack
follow the manufacturer's operating instruc-
tions and precautions.
Preparations For Jump-Start
•Thebatteryinyourvehicleislocated
between the left front headlight assem-
bly and the left front wheel splash shield.
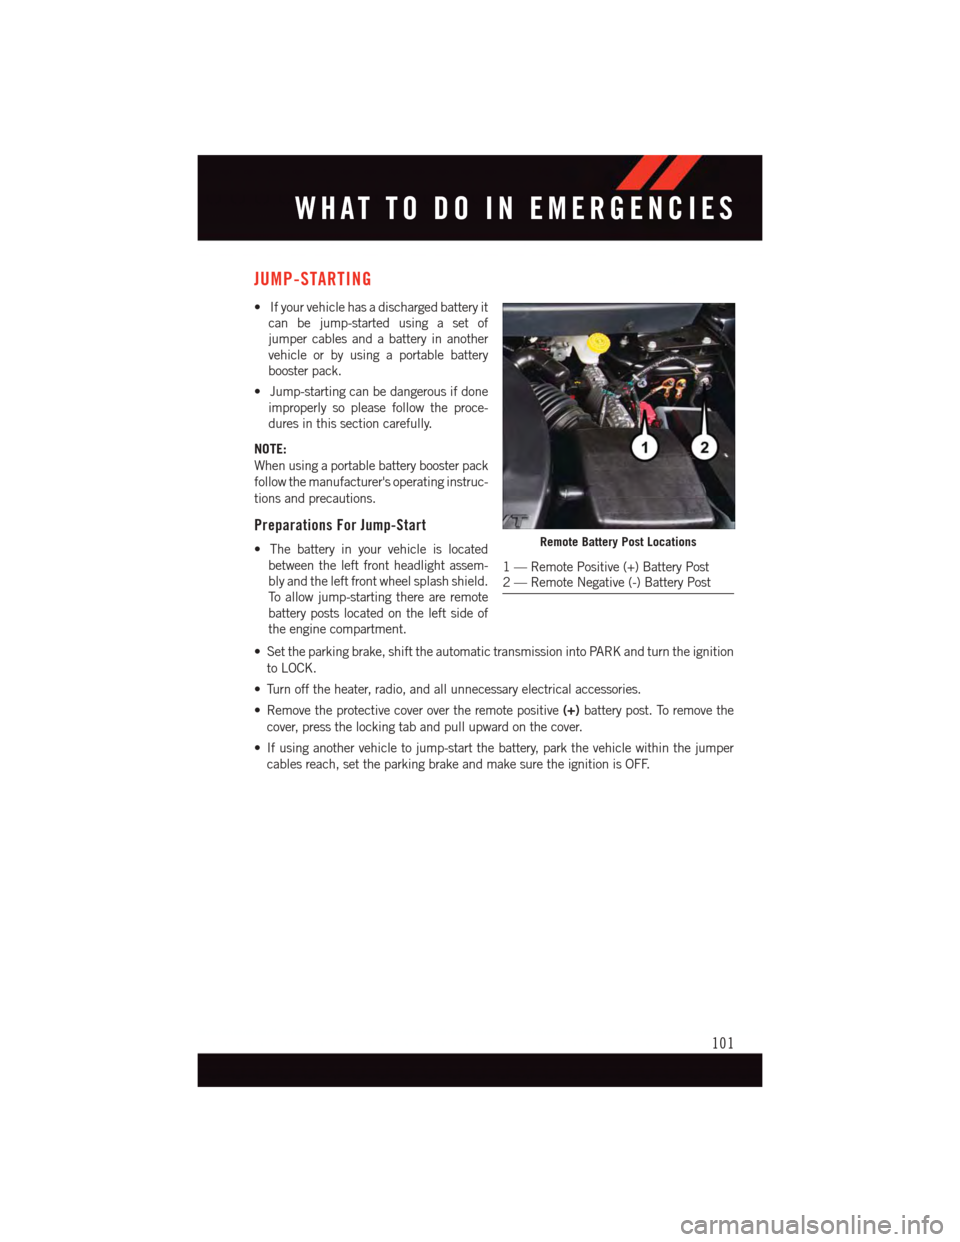
To a l l o w j u m p - s t a r t i n g t h e r e a r e r e m o t e
battery posts located on the left side of
the engine compartment.
•Settheparkingbrake,shifttheautomatictransmissionintoPARKandturntheignition
to LOCK.
•Turnofftheheater,radio,andallunnecessaryelectricalaccessories.
•Removetheprotectivecoverovertheremotepositive(+)battery post. To remove the
cover, press the locking tab and pull upward on the cover.
•Ifusinganothervehicletojump-startthebattery,parkthevehiclewithinthejumper
cables reach, set the parking brake and make sure the ignition is OFF.
Remote Battery Post Locations
1—RemotePositive(+)BatteryPost2—RemoteNegative(-)BatteryPost
WHAT TO DO IN EMERGENCIES
101
Page 121 of 140
FUSES
Interior Fuses
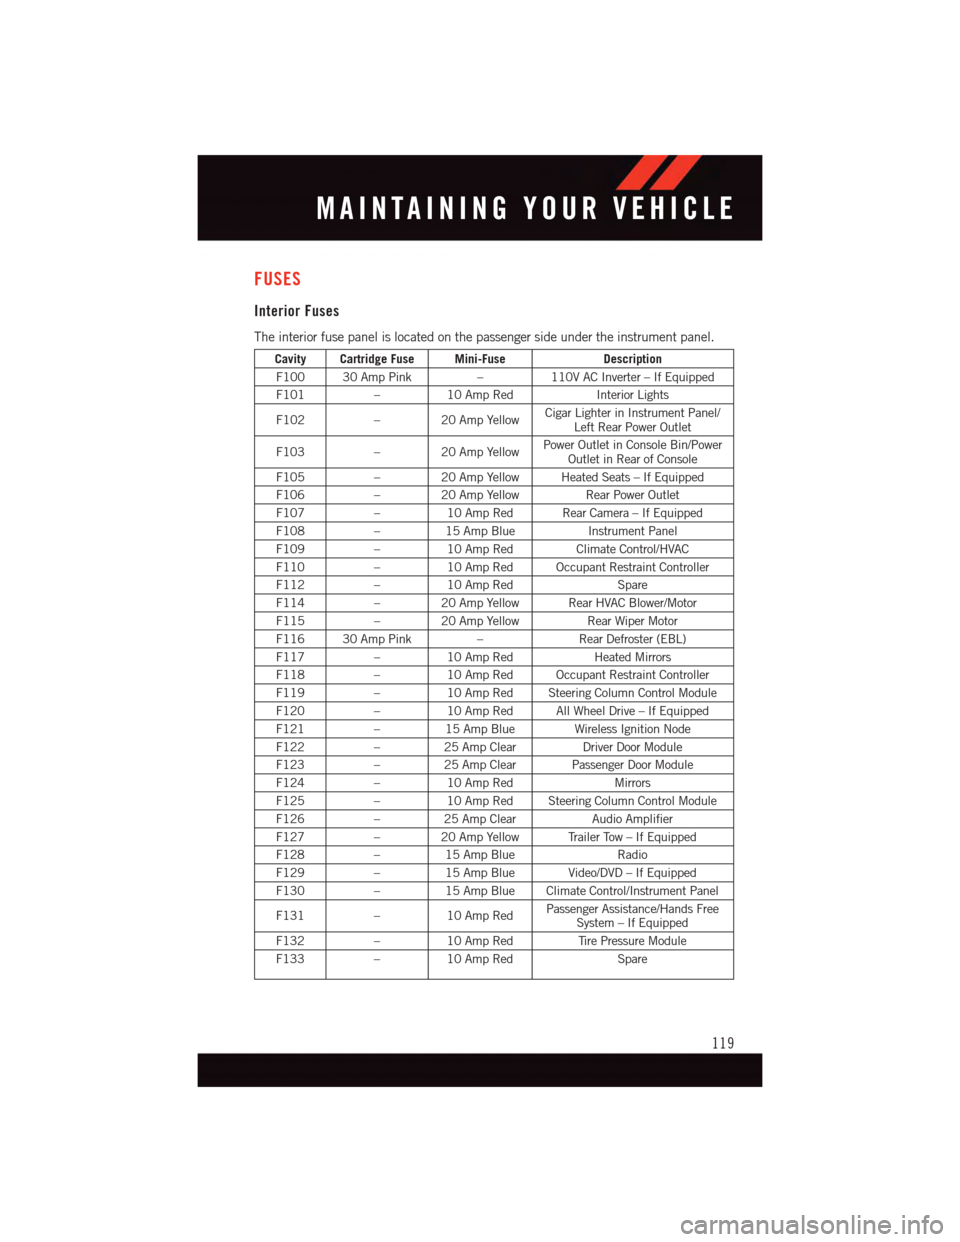
The interior fuse panel is located on the passenger side under the instrument panel.
Cavity Cartridge Fuse Mini-FuseDescription
F100 30 Amp Pink–110V AC Inverter – If Equipped
F101–10 Amp RedInterior Lights
F102–20AmpYellowCigar Lighter in Instrument Panel/Left Rear Power Outlet
F103–20AmpYellowPower Outlet in Console Bin/PowerOutlet in Rear of Console
F105–20AmpYellowHeatedSeats–IfEquipped
F106–20AmpYellowRear Power Outlet
F107–10 Amp Red Rear Camera – If Equipped
F108–15 Amp BlueInstrument Panel
F109–10 Amp RedClimate Control/HVAC
F110–10 Amp Red Occupant Restraint Controller
F112–10 Amp RedSpare
F114–20AmpYellowRearHVACBlower/Motor
F115–20AmpYellowRear Wiper Motor
F116 30 Amp Pink–Rear Defroster (EBL)
F117–10 Amp RedHeated Mirrors
F118–10 Amp Red Occupant Restraint Controller
F119–10 Amp Red Steering Column Control Module
F120–10 Amp Red All Wheel Drive – If Equipped
F121–15 Amp Blue Wireless Ignition Node
F122–25 Amp ClearDriver Door Module
F123–25 Amp Clear Passenger Door Module
F124–10 Amp RedMirrors
F125–10 Amp Red Steering Column Control Module
F126–25 Amp ClearAudio Amplifier
F127–20AmpYellowTrailerTow–IfEquipped
F128–15 Amp BlueRadio
F129–15 Amp Blue Video/DVD – If Equipped
F130–15 Amp Blue Climate Control/Instrument Panel
F131–10 Amp RedPassenger Assistance/Hands FreeSystem – If Equipped
F132–10 Amp RedTi r e P r e s s u r e M o d u l e
F133–10 Amp RedSpare
MAINTAINING YOUR VEHICLE
119
Page 128 of 140
CHRYSLER GROUP LLC CUSTOMER CENTER
P. O . B o x 2 1 – 8 0 0 4 A u b u r n H i l l s , M I 4 8 3 2 1 – 8 0 0 4 P h o n e : 1 – 8 0 0 – 4 2 3 – 6 3 4 3
CHRYSLER CANADA INC. CUSTOMER CENTER
P. O . B o x 1 6 2 1 W i n d s o r , O n t a r i o N 9 A 4 H 6 P h o n e : 1 – 8 0 0 – 4 6 5 – 2 0 0 1 ( E n g l i s h ) P h o n e :
1–800–387–9983 (French)
ASSISTANCE FOR THE HEARING IMPAIRED
To a s s i s t c u s t o m e r s w h o h a v e h e a r i n g d i f f i c u l t i e s , t h e m a n u f a c t u r e r h a s i n s t a l l e d s p e c i a l
TDD (Telecommunication Devices for the Deaf) equipment at its customer center. Any
hearing or speech impaired customer, who has access to a TDD or a conventional
teletypewriter (TTY) in the United States, can communicate with the manufacturer by
dialing 1–800–380–CHRY. Canadian residents with hearing difficulties that require
assistance can use the special needs relay service offered by Bell Canada. For TTY
teletypewriter users, dial 711 and for Voice callers, dial 1–800–855–0511 to connect
with a Bell Relay Service operator.
WARNING!
Engine exhaust, some of its constituents, and certain vehicle components contain, or
emit, chemicals known to the State of California to cause cancer and birth defects, or
other reproductive harm. In addition, certain fluids contained in vehicles and certain
products of component wear contain, or emit, chemicals known to the State of
California to cause cancer and birth defects, or other reproductive harm.
PUBLICATIONS ORDERING
•Ifyouarethefirstregisteredretailownerofyourvehicle,youmayobtainacomplimen-
tary printed copy of the Owner's Manual, Navigation/Uconnect®Manuals or Warranty
Booklet. United States customers may visit the Dodge Contact Us page at
www.dodge.com scroll to the bottom of the page and select the “Contact Us” link, then
select the “Owner’s Manual and Glove Box Material” from the left menu. You may
also obtain a complimentary copy by calling 1–800–423–6343 (U.S.) or
1–800–387–1143 (Canada).
•ReplacementUserGuidekitsorDVDsor,ifyouprefer,additionalprintedcopiesofthe
Owner's Manual, Warranty Booklet or Radio Manuals may be purchased by visiting
www.techauthority.com or by calling 1–800–890–4038 (U.S.) or 1–800–387–1143
(Canada). Visa, Master Card, American Express and Discover orders are accepted. If
you prefer mailing your order, please call the above numbers for an order form.
CONSUMER ASSISTANCE
126
Page 131 of 140
FREQUENTLY ASKED QUESTIONS
GETTING STARTED
•HowdoIinstallmyLATCHEquippedChildSeat?pg.21
•HowdoImovemyrearseats?pg.30
ELECTRONICS
•HowdoIknowwhichradioIhave?
•Uconnect®4.3 & 4.3S pg. 49
•Uconnect®8.4 & 8.4N pg. 51
•HowdoIselecttheAUXmusicsource?pg.65
•HowdoIsettheclockonmyradio?
•Uconnect®4.3 & 4.3S pg. 49
•Uconnect®8.4 & 8.4N pg. 51
•HowdoIusetheNavigationfeature?pg.59
•HowdoIpairmycellphoneviaBluetooth®with the Uconnect®Hands-Free Voice
Activation System? pg. 66
•HowdoIheartheaudiofrommyiPod®through the USB port using the radio?
•Uconnect®4.3 & 4.3S pg. 65
•Uconnect®8.4, 8.4N pg. 65
•HowdoIconfiguremyUniversalGarageDoorOpener(HomeLink®)? pg. 78
UTILITY
•HowdoIknowhowmuchIcantowwithmyDodgeJourney?pg.84
WHAT TO DO IN EMERGENCIES
•WhatdoIdoifmyTPMSwarninglightisblinking?pg.87
•HowdoIchangeaflattire?pg.93
•HowdoIJump-Startmyvehicle?pg.101
MAINTAINING YOUR VEHICLE
•WhereismyFuseBlocklocated?
•InteriorFusespg.119
•UnderhoodFusespg.120
•WhattypeofoildoIuse?pg.112
•HowoftenshouldIchangemyengine’soil?pg.114
•Whatshouldmytirepressurebesetat?pg.121
FREQUENTLY ASKED QUESTIONS
129