lock DODGE JOURNEY 2015 1.G User Guide
[x] Cancel search | Manufacturer: DODGE, Model Year: 2015, Model line: JOURNEY, Model: DODGE JOURNEY 2015 1.GPages: 140, PDF Size: 23.09 MB
Page 5 of 140
WARNING!
•Pedalsthatcannotmovefreelycancauselossofvehiclecontrolandincreasethe
risk of serious personal injury.
•Alwaysmakesurethatobjectscannotfallintothedriverfootwellwhilethevehicle
is moving. Objects can become trapped under the brake pedal and accelerator
pedal causing a loss of vehicle control.
•Failuretoproperlyfollowfloormatinstallationormountingcancauseinterference
with the brake pedal and accelerator pedal operation causing loss of control of the
vehicle.
•Neverleavechildrenaloneinavehicle,orwithaccesstoanunlockedvehicle.
Allowing children to be in a vehicle unattended is dangerous for a number of
reasons. A child or others could be seriously or fatally injured. Children should be
warned not to touch the parking brake, brake pedal or the shift lever/transmission
gear selector.
•Donotleavethekeyfobinornearthevehicle,orinalocationaccessibleto
children, and do not leave the ignition of a vehicle equipped with Keyless
Enter-N-Go in the ACC or ON/RUN mode. A child could operate power windows,
other controls, or move the vehicle.
•Neverusethe“PARK”positionasasubstitutefortheparkingbrake.Alwaysapply
the parking brake fully when parked to guard against vehicle movement and
possible injury or damage.
•RefertoyourOwner'sManualontheDVDforfurtherdetails.
USE OF AFTERMARKET PRODUCTS (ELECTRONICS)
The use of aftermarket devices including cell phones, MP3 players, GPS systems, or
chargers may affect the performance of on-board wireless features including Keyless
Enter-N-Go™ and Remote Start range. If you are experiencing difficulties with any of your
wireless features, try disconnecting your aftermarket devices to see if the situation
improves. If your symptoms persist, please see an authorized dealer.
CHRYSLER, DODGE, JEEP, RAM, SRT, MOPAR and Uconnect are registered trademarks
of Chrysler Group LLC.
COPYRIGHT ©2014 CHRYSLER GROUP LLC
INTRODUCTION/WELCOME
3
Page 7 of 140
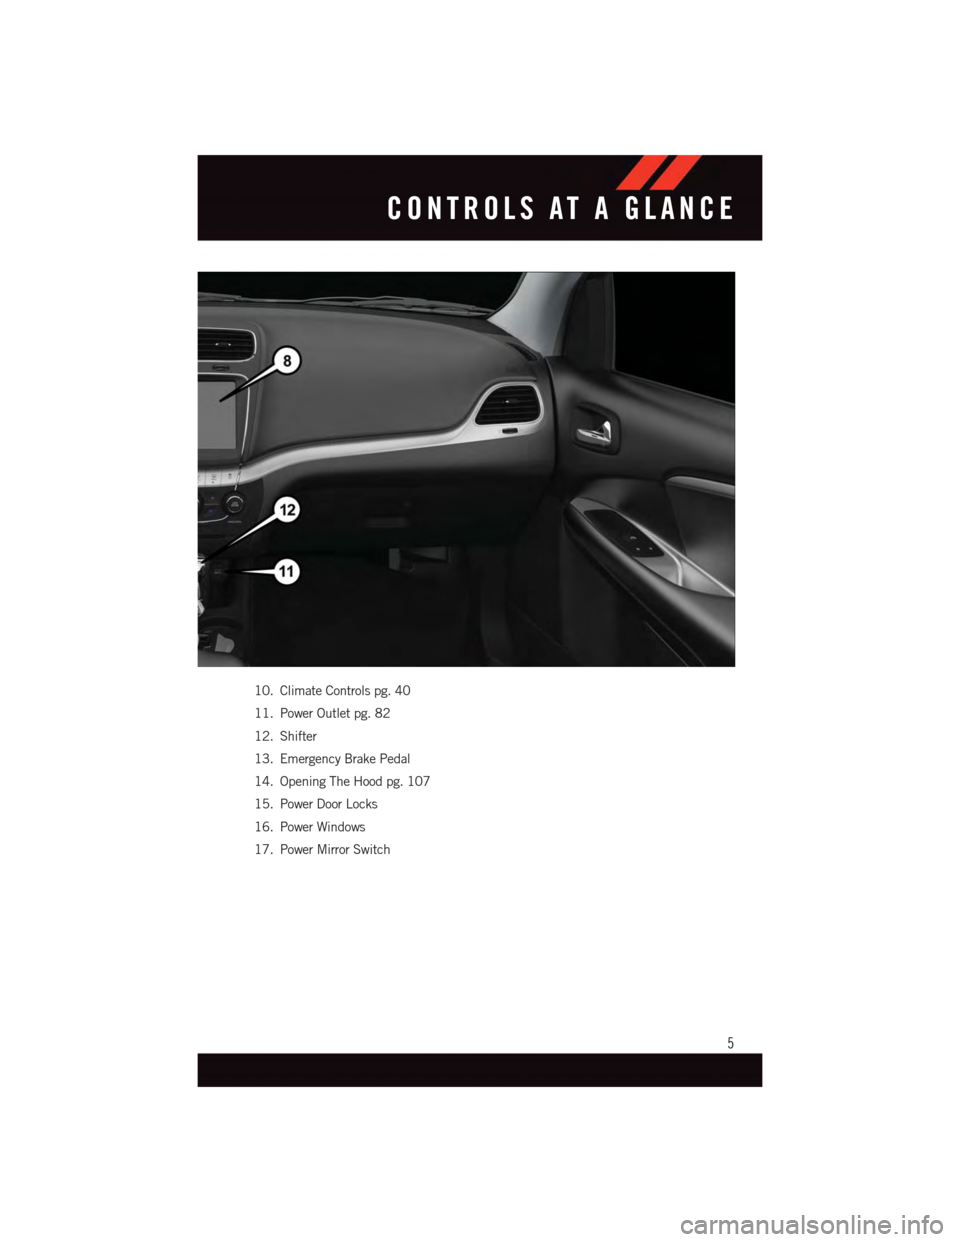
10. Climate Controls pg. 40
11. Power Outlet pg. 82
12. Shifter
13. Emergency Brake Pedal
14. Opening The Hood pg. 107
15. Power Door Locks
16. Power Windows
17. Power Mirror Switch
CONTROLS AT A GLANCE
5
Page 10 of 140
KEY FOB
Locking And Unlocking The Doors And
Liftgate
Lock The Doors And Liftgate
•PushandreleasetheLOCKbuttonon
the RKE transmitter to lock all doors and
liftgate. The turn signal lights will flash
and the horn will chirp to acknowledge
the signal.
Unlock The Doors And Liftgate
•PushandreleasetheUNLOCKbuttonon
the RKE transmitter once to unlock the
driver’s door, or twice within five seconds
to unlock all doors and liftgate. The turn
signal lights will flash to acknowledge the
unlock signal. The illuminated entry sys-
tem will also turn on.
All doors can be programmed to unlock on
the first push of the UNLOCK button. Refer
to “Programmable Features” in the “Elec-
tronics” section of this guide.
Panic Alarm
1. Push the PANIC button once to turn the panic alarm on.
2. Wait approximately three seconds and push the button a second time to turn the panic
alarm off.
Emergency Key
Should the battery in the vehicle or the Key Fob transmitter go dead, there is an
emergency key located in the Key Fob. To remove the emergency key, slide the button at
the back of the Key Fob sideways with your thumb and then pull the key out with your
other hand.
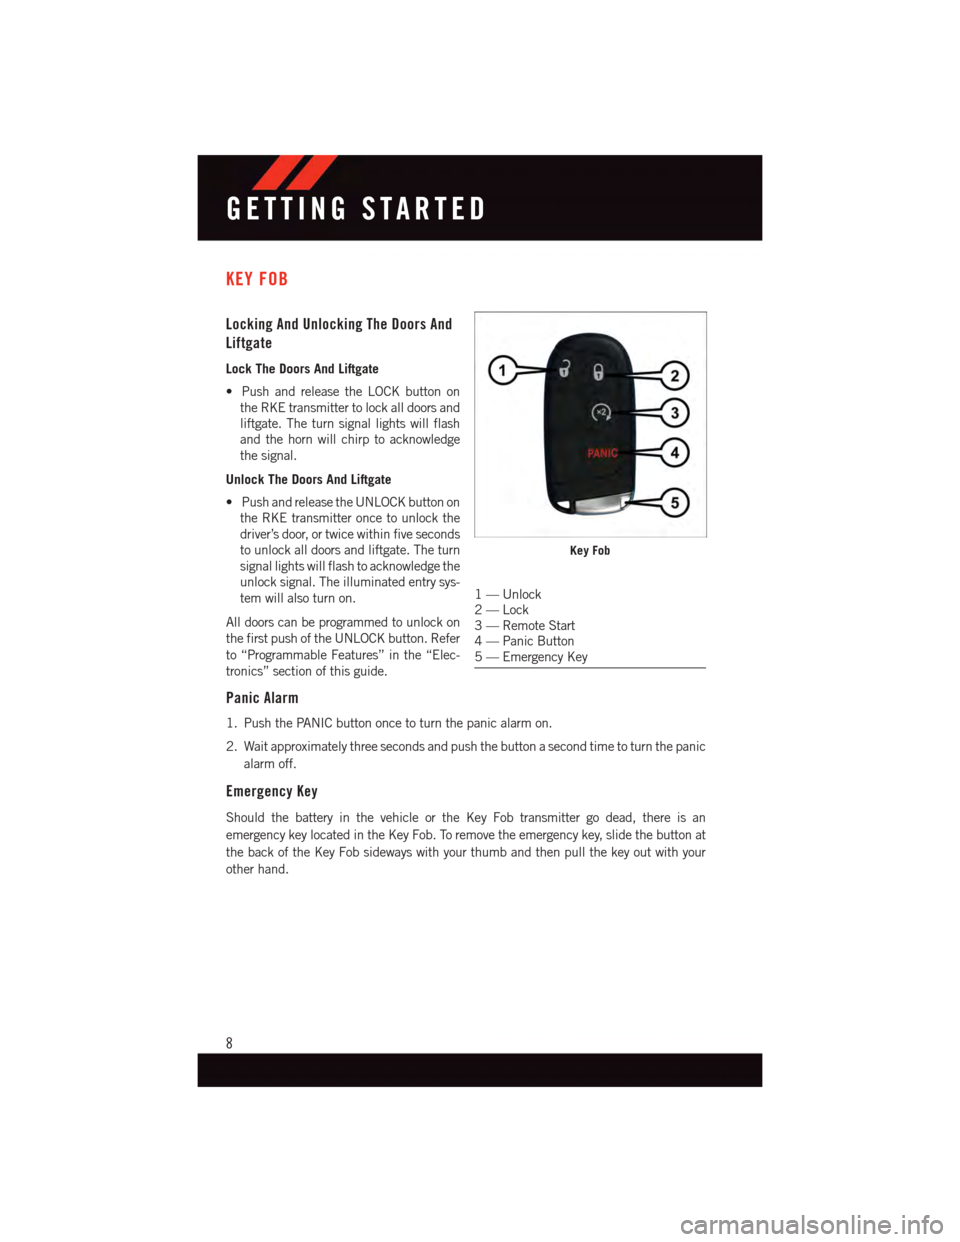
Key Fob
1—Unlock2—Lock3—RemoteStart4—PanicButton5—EmergencyKey
GETTING STARTED
8
Page 11 of 140
WARNING!
•Whenleavingthevehicle,alwaysremovetheKeyFobfromtheignitionandlock
your vehicle.
•Neverleavechildrenaloneinavehicle,orwithaccesstoanunlockedvehicle.
Allowing children to be in a vehicle unattended is dangerous for a number of
reasons. A child or others could be seriously or fatally injured. Children should be
warned not to touch the parking brake, brake pedal or the transmission gear
selector.
•DonotleavetheKeyFobinornearthevehicle(orinalocationaccessibleto
children), and do not leave the ignition of a vehicle equipped with Keyless
Enter-N-Go™ in the ACC or ON/RUN mode. A child could operate power windows,
other controls, or move the vehicle.
REMOTE START
•PushtheREMOTESTARTbuttonx2on the Key Fob twice within five seconds.
Pushing the REMOTE START button a third time shuts the engine off.
•Todrivethevehicle,pushtheUNLOCKbuttonandcycletheignitiontotheON/RUN
position.
•Withremotestart,theenginewillonlyrunfor15minutes(timeout)unlesstheignition
is cycled to the ON/RUN position.
•ThevehiclemustbecycledtotheON/RUNpositionaftertwoconsecutivetimeouts.
WARNING!
•Donotstartorrunanengineinaclosedgarageorconfinedarea.Exhaustgas
contains Carbon Monoxide (CO) which is odorless and colorless. Carbon Monoxide
is poisonous and can cause you or others to be severely injured or killed when
inhaled.
•KeepKeyFobtransmittersawayfromchildren.OperationoftheRemoteStart
System, windows, door locks or other controls could cause you and others to be
severely injured or killed.
GETTING STARTED
9
Page 12 of 140
KEYLESS ENTER-N-GO™
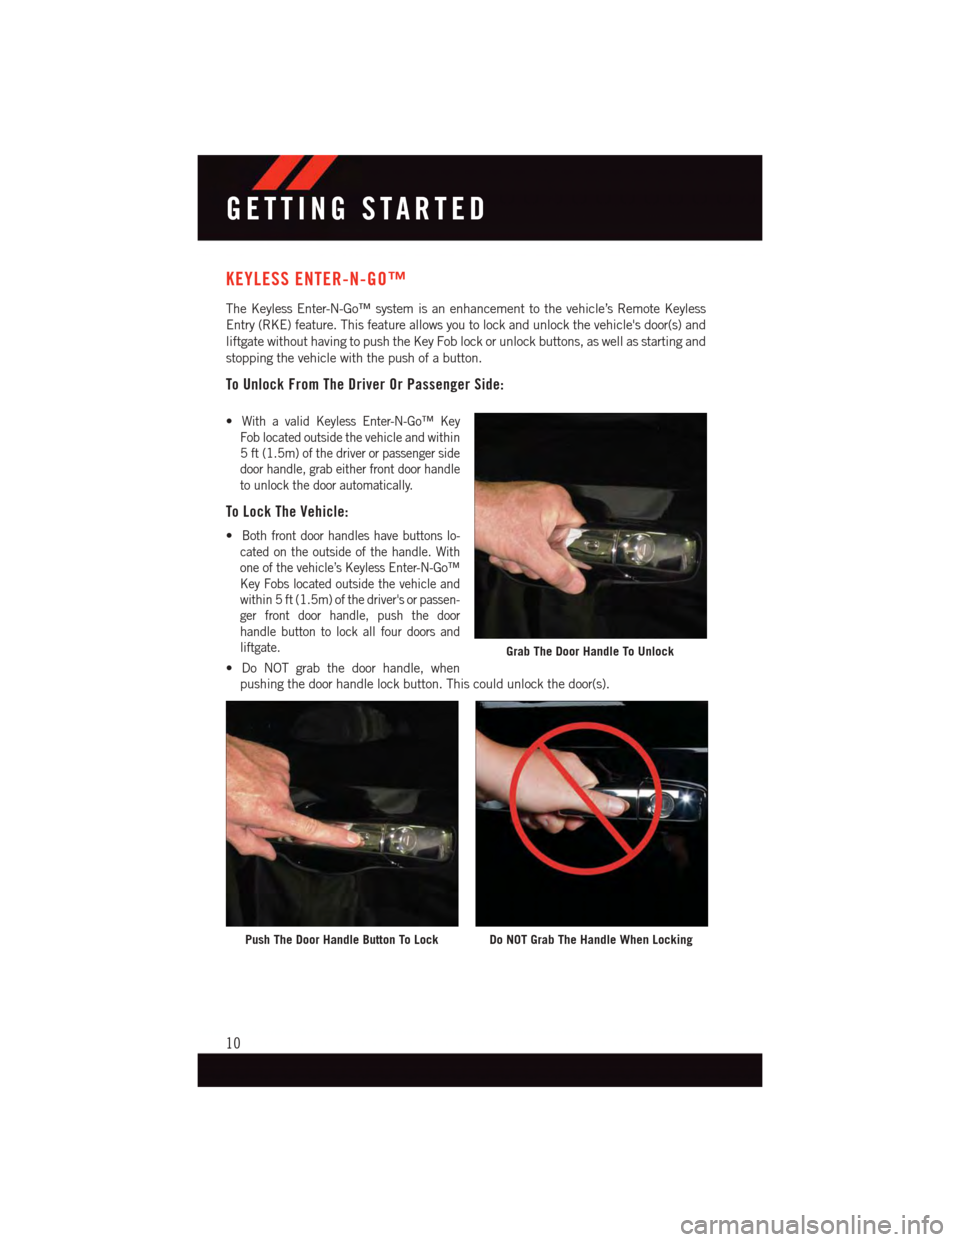
The Keyless Enter-N-Go™ system is an enhancement to the vehicle’s Remote Keyless
Entry (RKE) feature. This feature allows you to lock and unlock the vehicle's door(s) and
liftgate without having to push the Key Fob lock or unlock buttons, as well as starting and
stopping the vehicle with the push of a button.
To Unlock From The Driver Or Passenger Side:
•With a valid Keyless Enter-N-Go™ Key
Fob located outside the vehicle and within
5ft(1.5m)ofthedriverorpassengerside
door handle, grab either front door handle
to unlock the door automatically.
To Lock The Vehicle:
•Both front door handles have buttons lo-
cated on the outside of the handle. With
one of the vehicle’s Keyless Enter-N-Go™
Key Fobs located outside the vehicle and
within 5 ft (1.5m) of the driver's or passen-
ger front door handle, push the door
handle button to lock all four doors and
liftgate.
•DoNOTgrabthedoorhandle,when
pushing the door handle lock button. This could unlock the door(s).
Grab The Door Handle To Unlock
Push The Door Handle Button To LockDo NOT Grab The Handle When Locking
GETTING STARTED
10
Page 13 of 140
NOTE:
•If“UnlockAllDoors1stPress”isprogrammedalldoorswillunlockwhenyougrabhold
of the front driver's door handle. To select between “Unlock Driver Door 1st Press” and
“Unlock All Doors 1st Press”, refer to the “Uconnect®Settings” in your vehicle’s
Owner's Manual on the DVD or “Programmable Features” in this guide for further
information.
•If“UnlockAllDoors1stPress”isprogrammedalldoorsandliftgatewillunlockwhen
you push the liftgate button. If “Unlock Driver Door 1st Press” is programmed only the
liftgate will unlock when you push the liftgate button. To select between “Unlock Driver
Door 1st Press” and “Unlock All Doors 1st Press”, refer to the “Uconnect®Settings” in
your vehicle's Owner's Manual on the DVD or “Programmable Features” in this guide for
further information.
•IfaKeyFobisdetectedinthevehiclewhenlockingthevehicleusingthepowerdoor
lock switch, the doors and liftgate will unlock and the horn will chirp three times. On the
third attempt, your Key Fob can be locked inside the vehicle.
•AfterpushingtheKeylessEnter-N-Go™LOCKbutton,youmustwaittwoseconds
before you can lock or unlock the vehicle using the door handle. This is done to allow
you to check if the vehicle is locked by pulling the door handle, without the vehicle
reacting and unlocking.
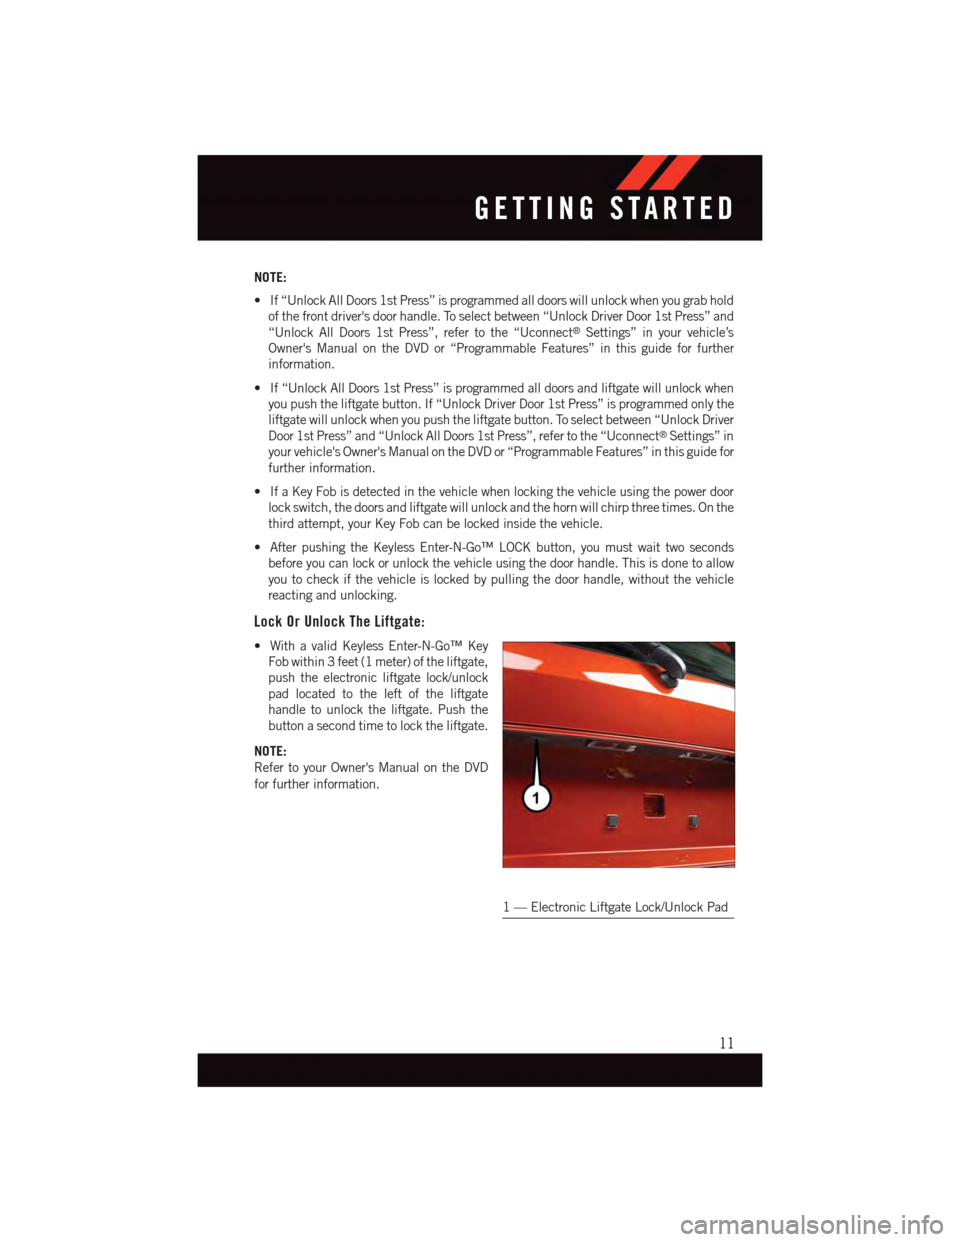
Lock Or Unlock The Liftgate:
•WithavalidKeylessEnter-N-Go™Key
Fob within 3 feet (1 meter) of the liftgate,
push the electronic liftgate lock/unlock
pad located to the left of the liftgate
handle to unlock the liftgate. Push the
button a second time to lock the liftgate.
NOTE:
Refer to your Owner's Manual on the DVD
for further information.
1—ElectronicLiftgateLock/UnlockPad
GETTING STARTED
11
Page 16 of 140
VEHICLE SECURITY ALARM
This Vehicle Security Alarm monitors the doors, liftgate, and ignition switch for unauthor-
ized operation.
When the alarm is activated, the interior switches for door locks are disabled. The Vehicle
Security Alarm provides both audio and visual signals repeatedly for three minutes. If the
disturbance is still present (driver's door, passenger door, other doors, ignition) after three
minutes, the parking lights and tail lights will flash for an additional 15 minutes.
To Arm:
•PushtheKeylessEnter-N-Go™START/STOPbuttonuntiltheElectronicVehicle
Information Center (EVIC) indicates that the vehicle ignition is “OFF”. Push the power
door lock switch while the door is open, push the Key Fob LOCK button, or with one of
the Key Fobs located outside the vehicle and within 5 ft (1.5 m) of the driver's and
passenger front door handles, push the Keyless Enter-N-Go™ LOCK button located on
the door handle.
NOTE:
After pushing the Keyless Enter-N-Go™ LOCK button, you must wait two seconds before
you can lock or unlock the vehicle via the door handle.
To Disarm:
•PushtheKeyFobUNLOCKbuttonorwithoneoftheKeyFobslocatedoutsidethe
vehicle and within 5 ft (1.5 m) of the driver's and passenger front door handles, grab the
Keyless Enter-N-Go™ door handle and enter the vehicle, then push the Keyless
Enter-N-Go™ START/STOP button (requires at least one valid Key Fob in the vehicle).
GETTING STARTED
14
Page 20 of 140
Supplemental Side Air Bags
•ThisvehicleisequippedwithSupplementalSeat-MountedSideAirBags(SABs)
located in the outboard side of the front seats. The SABs are marked with a SRS
AIRBAG or AIRBAG label sewn into the outboard side of the seats.
•ThisvehicleisequippedwithSupplementalSideAirBagInflatableCurtains(SABICs)
located above the side windows. The trim covering the SABICs is labeled SRS AIRBAG
or AIRBAG. The SABICs may help reduce the risk of partial or complete ejection of
vehicle occupants through side windows in certain side impact events.
•TheSABICsandSABs(“SideAirBags”)aredesignedtoactivateincertainside
impacts and certain rollover events. The Occupant Restraint Controller (“ORC”)
determines whether the deployment of the Side Air Bags in a particular side impact or
rollover event is appropriate, based on the severity and type of collision. Vehicle damage
by itself is not a good indicator of whether or not Side Air Bags should have deployed.
WARNING!
•SideAirBagsneedroomtoinflate.Donotleanagainstthedoororwindow.Sit
upright in the center of the seat.
•BeingtooclosetotheSideAirBagsduringdeploymentcouldcauseyoutobe
severely injured or killed.
•RelyingontheSideAirBagsalonecouldleadtomoresevereinjuriesinacollision.
The Side Air Bags work with your seat belt to restrain you properly. In some
collisions, Side Air Bags won’t deploy at all. Always wear your seat belt even though
you have Side Air Bags.
•This vehicle is equipped with left and right Supplemental Side Air Bag Inflatable
Curtains (SABICs). Do not stack luggage or other cargo up high enough to block the
deployment of the SABICs. The trim covering above the side windows where the SABIC
and its deployment path are located should remain free from any obstructions.
•ThisvehicleisequippedwithSABICs.InorderfortheSABICstoworkasintended,
do not install any accessory items in your vehicle which could alter the roof. Do not
add an aftermarket sunroof to your vehicle. Do not add roof racks that require
permanent attachments (bolts or screws) for installation on the vehicle roof. Do not
drill into the roof of the vehicle for any reason.
•DonotuseaccessoryseatcoversorplaceobjectsbetweenyouandtheSideAir
Bags; the performance could be adversely affected and/or objects could be pushed
into you, causing serious injury.
GETTING STARTED
18
Page 23 of 140
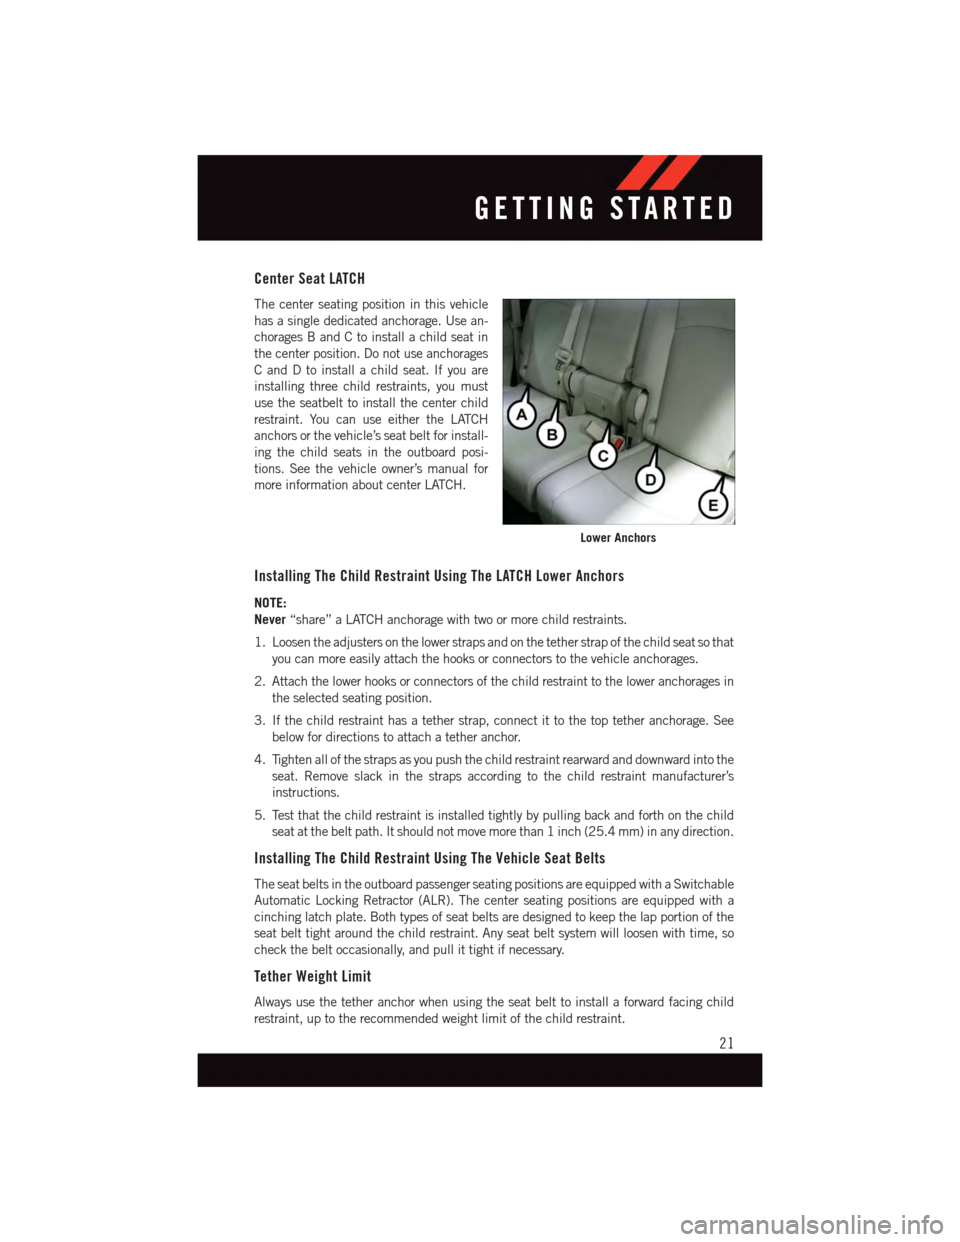
Center Seat LATCH
The center seating position in this vehicle
has a single dedicated anchorage. Use an-
chorages B and C to install a child seat in
the center position. Do not use anchorages
CandDtoinstallachildseat.Ifyouare
installing three child restraints, you must
use the seatbelt to install the center child
restraint. You can use either the LATCH
anchors or the vehicle’s seat belt for install-
ing the child seats in the outboard posi-
tions. See the vehicle owner’s manual for
more information about center LATCH.
Installing The Child Restraint Using The LATCH Lower Anchors
NOTE:
Never“share” a LATCH anchorage with two or more child restraints.
1. Loosen the adjusters on the lower straps and on the tether strap of the child seat so that
you can more easily attach the hooks or connectors to the vehicle anchorages.
2. Attach the lower hooks or connectors of the child restraint to the lower anchorages in
the selected seating position.
3. If the child restraint has a tether strap, connect it to the top tether anchorage. See
below for directions to attach a tether anchor.
4. Tighten all of the straps as you push the child restraint rearward and downward into the
seat. Remove slack in the straps according to the child restraint manufacturer’s
instructions.
5. Test that the child restraint is installed tightly by pulling back and forth on the child
seat at the belt path. It should not move more than 1 inch (25.4 mm) in any direction.
Installing The Child Restraint Using The Vehicle Seat Belts
The seat belts in the outboard passenger seating positions are equipped with a Switchable
Automatic Locking Retractor (ALR). The center seating positions are equipped with a
cinching latch plate. Both types of seat belts are designed to keep the lap portion of the
seat belt tight around the child restraint. Any seat belt system will loosen with time, so
check the belt occasionally, and pull it tight if necessary.
Tether Weight Limit
Always use the tether anchor when using the seat belt to install a forward facing child
restraint, up to the recommended weight limit of the child restraint.
Lower Anchors
GETTING STARTED
21
Page 24 of 140
To Install A Child Seat Using An ALR:
1. Pull enough of the seat belt webbing from the retractor to pass it through the belt path
of the child restraint. Do not twist the belt webbing in the belt path.
2. Slide the latch plate into the buckle until you hear a “click.”
3. Pull on the webbing to make the lap portion tight against the child seat.
4. To lock the seat belt, pull down on the shoulder part of the belt until you have pulled
all the seat belt webbing out of the retractor. Then, allow the webbing to retract back
into the retractor. As the webbing retracts, you will hear a clicking sound. This means
the seat belt is now in the Automatic Locking mode.
5. Try to pull the webbing out of the retractor. If it is locked, you should not be able to pull
out any webbing. If the retractor is not locked, repeat the last step.
6. Finally, pull up on any extra webbing to tighten the lap portion around the child
restraint while you push the child restraint rearward and downward into the vehicle
seat.
7. If the child restraint has a top tether strap and the seating position has a top tether
anchorage, connect the tether strap to the anchorage and tighten the tether strap. See
below for directions to attach a tether anchor.
8. Test that the child restraint is installed tightly by pulling back and forth on the child
seat at the belt path. It should not move more than 1 inch (25.4 mm) in any direction.
To Install A Child Seat Using A Cinching Latch Plate:
1. Place the child seat in the center of the seating position.
2. Next, pull enough of the seat belt webbing from the retractor to pass it through the belt
path of the child restraint. Do not twist the belt webbing in the belt path.
3. Slide the latch plate into the buckle until you hear a “click.”
4. Finally, pull up on any excess webbing to tighten the lap portion around the child
restraint while you push the child restraint rearward and downward into the vehicle
seat.
5. If the child restraint has a top tether strap and the seating position has a top tether
anchorage, connect the tether strap to the anchorage and tighten the tether strap. See
below for directions to attach a tether anchor.
6. Test that the child restraint is installed tightly by pulling back and forth on the child
seat at the belt path. It should not move more than 1 inch (25.4 mm) in any direction.
Installing The Top Tether Strap (With Either Lower Anchors Or Vehicle Seat Belt):
When installing a forward-facing child restraint, always secure the top tether strap, up to
the tether anchor weight limit, whether the child restraint is installed with the lower
anchors or the vehicle seat belt.
GETTING STARTED
22