buttons DODGE JOURNEY 2019 Owner's Manual
[x] Cancel search | Manufacturer: DODGE, Model Year: 2019, Model line: JOURNEY, Model: DODGE JOURNEY 2019Pages: 524, PDF Size: 5.29 MB
Page 119 of 524

3. Push and hold the HomeLink button you want toprogram while you push and hold the hand-held trans-
mitter button.
4. Continue to hold both buttons and observe the indicator light. The HomeLink indicator will flash slowly and
then rapidly after HomeLink has received the frequency
signal from the hand-held transmitter. Release both
buttons after the indicator light changes from slow to
rapid.
5. Push and hold the programmed HomeLink button and observe the indicator light.
• If the indicator light stays on constantly, programming
is complete and the garage door/device should acti-
vate when the HomeLink button is pushed.
• To program the two remaining HomeLink buttons,
repeat each step for each remaining button. DO NOT
erase the channels.
Canadian/Gate Operator Programming
For programming transmitters in Canada/United States
that require the transmitter signals to “time-out” after
several seconds of transmission: Canadian radio frequency laws require transmitter signals
to time-out (or quit) after several seconds of transmission,
which may not be long enough for HomeLink to pick up
the signal during programming. Similar to this Canadian
law, some U.S. gate operators are designed to time-out in
the same manner.
It may be helpful to unplug the device during the cycling
process to prevent possible overheating of the garage door
or gate motor.
1. Cycle the ignition to the ON/RUN position.
NOTE:
For vehicles equipped with Keyless Enter-N-Go,
place the ignition in the RUN position with the engine ON.
Make sure while programming HomeLink with the engine
ON that your vehicle is outside of your garage, or that the
garage door remains open at all times.
2. Place the hand-held transmitter 1 to 3 inches (3 to 8 cm) away from the HomeLink button you wish to program
while keeping the HomeLink indicator light in view.
3. Continue to push and hold the HomeLink button while you push and release (“cycle”) your hand-held trans-
mitter every two seconds until HomeLink has success-
fully accepted the frequency signal. The indicator light
will flash slowly and then rapidly when fully trained.
3
GETTING TO KNOW YOUR VEHICLE 117
Page 120 of 524
4. Watch for the HomeLink indicator to change flash rates.When it changes, it is programmed. It may take up to 30
seconds or longer in rare cases. The garage door may
open and close while you are programming.
5. Push and hold the programmed HomeLink button and observe the indicator light.
NOTE: •If the indicator light stays on constantly, programming
is complete and the garage door/device should acti-
vate when the HomeLink button is pushed.
• To program the two remaining HomeLink buttons,
repeat each step for each remaining button. DO NOT
erase the channels.
If you unplugged the garage door opener/device for
programming, plug it back in at this time.
Using HomeLink
To operate, push and release the programmed HomeLink
button. Activation will now occur for the programmed
device (i.e. garage door opener, gate operator, security
system, entry door lock, home/office lighting, etc.) The
hand-held transmitter of the device may also be used at
any time.
Security
It is advised to erase all channels before you sell or turn in
your vehicle.
To do this, push and hold the two outside buttons for 20
seconds until the red indicator flashes.
NOTE: All channels will be erased. Individual channels
cannot be erased.
The HomeLink Universal Transceiver is disabled when the
Vehicle Security Alarm is active.
Troubleshooting Tips
If you are having trouble programming HomeLink, here
are some of the most common solutions:
• Replace the battery in the Garage Door Opener hand-
held transmitter.
• Push the LEARN button on the Garage Door Opener to
complete the training for a Rolling Code.
• Did you unplug the device for programming and re-
member to plug it back in?
118 GETTING TO KNOW YOUR VEHICLE
Page 141 of 524
•Messages
• Turn Menu OFF
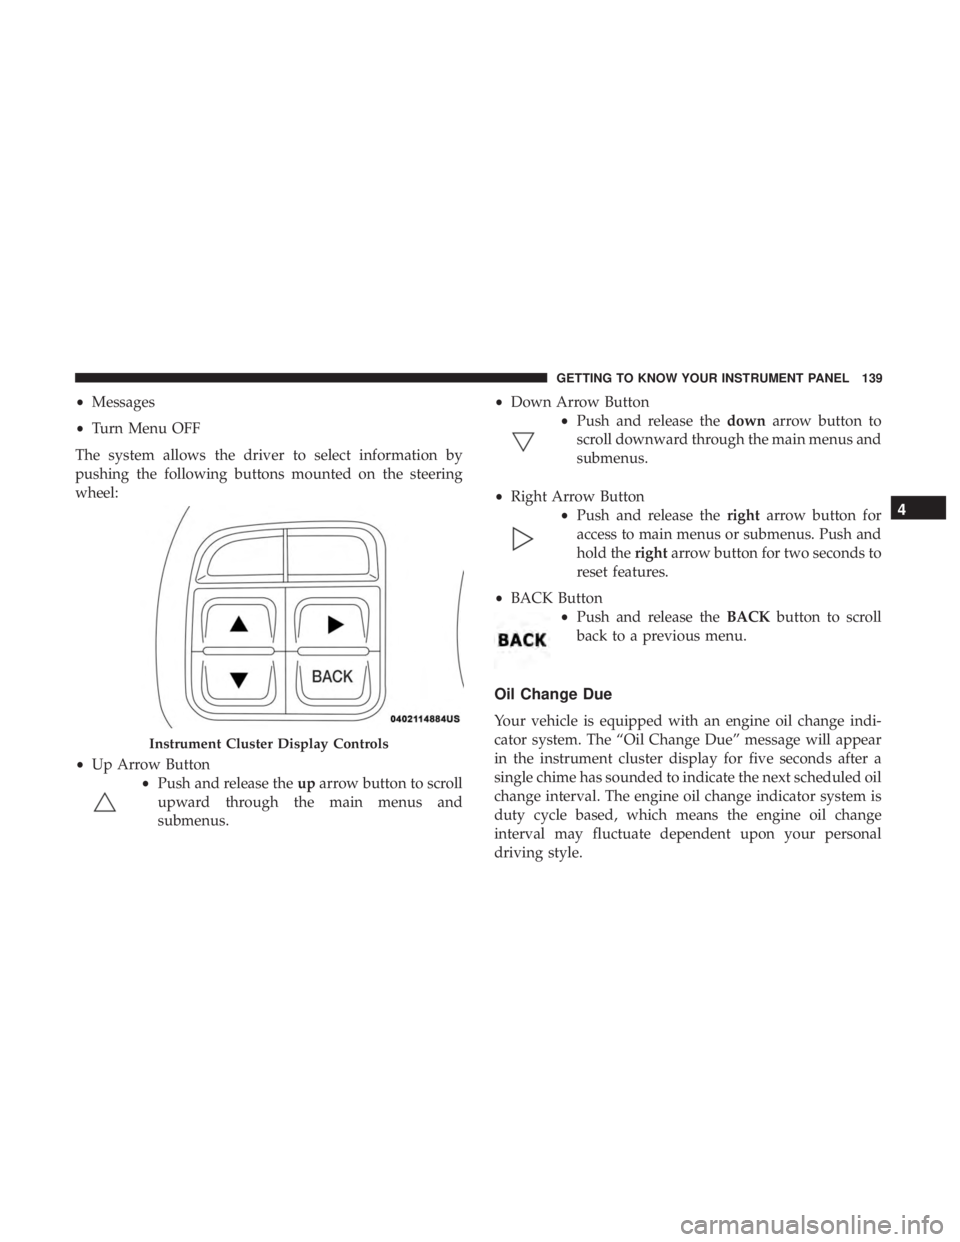
The system allows the driver to select information by
pushing the following buttons mounted on the steering
wheel:
• Up Arrow Button
•Push and release the uparrow button to scroll
upward through the main menus and
submenus. •
Down Arrow Button
•Push and release the downarrow button to
scroll downward through the main menus and
submenus.
• Right Arrow Button
•Push and release the rightarrow button for
access to main menus or submenus. Push and
hold the rightarrow button for two seconds to
reset features.
• BACK Button
•Push and release the BACKbutton to scroll
back to a previous menu.
Oil Change Due
Your vehicle is equipped with an engine oil change indi-
cator system. The “Oil Change Due” message will appear
in the instrument cluster display for five seconds after a
single chime has sounded to indicate the next scheduled oil
change interval. The engine oil change indicator system is
duty cycle based, which means the engine oil change
interval may fluctuate dependent upon your personal
driving style.
Instrument Cluster Display Controls
4
GETTING TO KNOW YOUR INSTRUMENT PANEL 139
Page 145 of 524
Tire Pressure
Push and release theupordown arrow button until “Tire
PSI:” displays highlighted in the instrument cluster dis-
play. Push and release the rightarrow button to view a
graphic of the vehicle with a tire pressure value at each
corner of the graphic.
Vehicle Info (Customer Information Features)
Push and release the upordown arrow button until
“Vehicle Info” displays in the instrument cluster display
and push the rightarrow button. Push the upordown
arrow button to scroll through the available information
displays.
• Coolant Temperature
Displays the actual coolant temperature.
• Oil Temperature
Displays the actual oil temperature.
• Oil Pressure — If Equipped
Displays the actual oil pressure.
• Transmission Temperature
Displays the actual transmission temperature. •
Engine Hours
Displays the number of hours of engine operation.
Messages
Push and release the upordown arrow button until
“Messages: XX” displays highlighted in the instrument
cluster display. If there is more than one message, pushing
the right arrow button will display a stored warning
message. Push and release the upordown arrow button if
there is more than one message to cycle through the
remaining stored messages. If there are no messages,
pushing the rightarrow button will not change the display.
Turn Menu OFF
Select from Main Menu using the upordown arrow
button. Pushing the rightarrow button clears the menu
display. Pushing any one of the four Display control
buttons will bring the menu back.
Battery Saver On/Battery Saver Mode Message —
Electrical Load Reduction Actions — If Equipped
This vehicle is equipped with an Intelligent Battery Sensor
(IBS) to perform additional monitoring of the electrical
system and status of the vehicle battery.
4
GETTING TO KNOW YOUR INSTRUMENT PANEL 143
Page 248 of 524
Additionally, on dry pavement under heavy throttle input
(where one may have no wheel spin), torque will be sent to
the rear in a pre-emptive effort to improve vehicle launch
and performance characteristics.
CAUTION!
All wheels must have the same size and type tires.
Unequal tire sizes must not be used. Unequal tire size
may cause failure of the power transfer unit.
SPEED CONTROL — IF EQUIPPED
When engaged, the Speed Control takes over accelerator
operations at speeds greater than 25 mph (40 km/h).
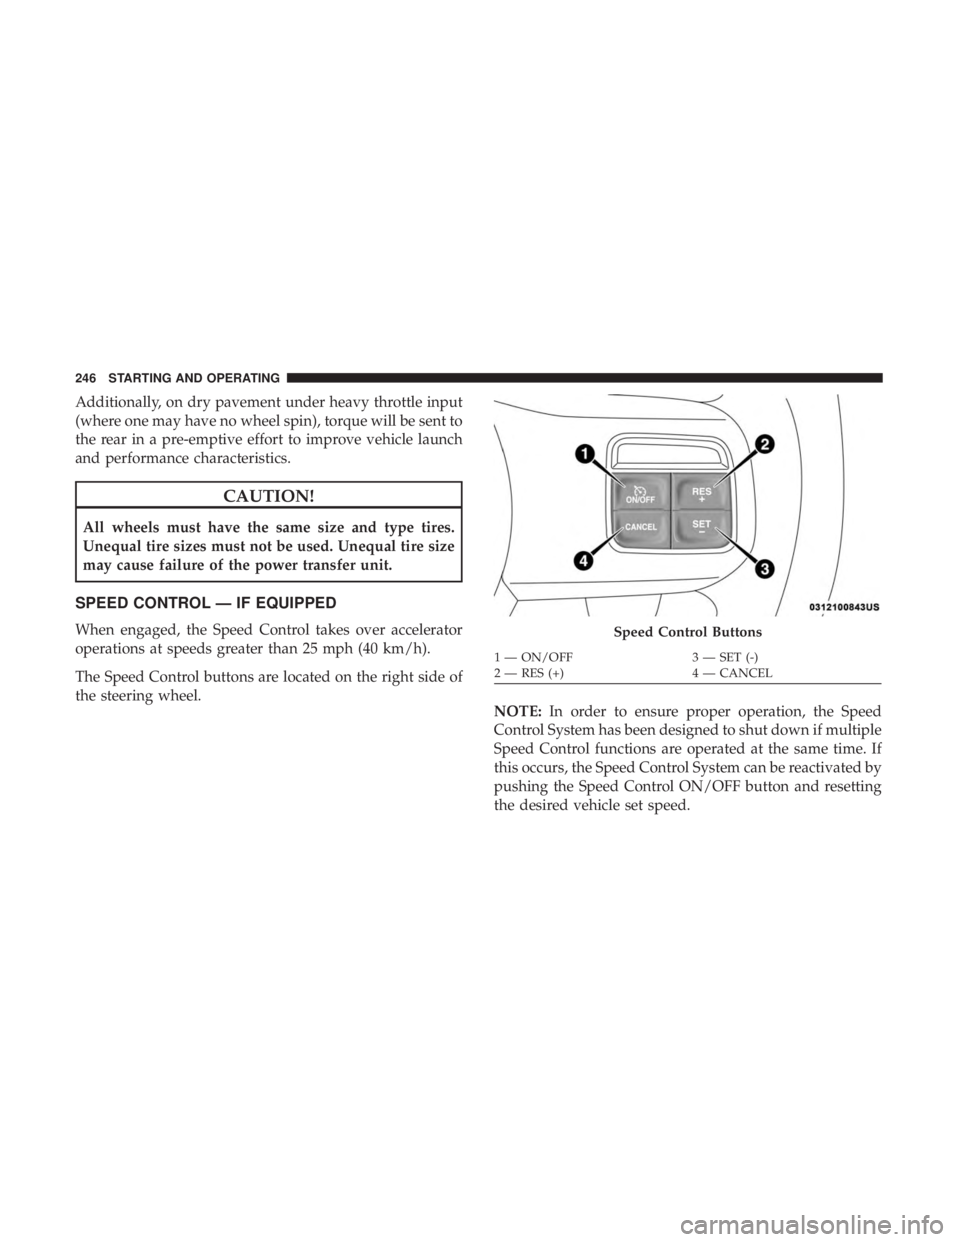
The Speed Control buttons are located on the right side of
the steering wheel.NOTE:In order to ensure proper operation, the Speed
Control System has been designed to shut down if multiple
Speed Control functions are operated at the same time. If
this occurs, the Speed Control System can be reactivated by
pushing the Speed Control ON/OFF button and resetting
the desired vehicle set speed.Speed Control Buttons
1 — ON/OFF 3 — SET (-)
2 — RES (+) 4 — CANCEL
246 STARTING AND OPERATING
Page 390 of 524
NOTE:
•FCA US LLC or your dealer may contact you directly
regarding software updates.
• To help further improve vehicle security and minimize
the potential risk of a security breach, vehicle owners
should:
• Routinely check www.driveuconnect.com/support/
software-update.html (U.S. Residents) or www.driveu-
connect.ca (Canadian Residents) to learn about avail-
able Uconnect software updates.
• Only connect and use trusted media devices (e.g.
personal mobile phones, USBs, CDs).
Privacy of any wireless and wired communications cannot
be assured. Third parties may unlawfully intercept infor-
mation and private communications without your consent.
For further information, refer to “Onboard Diagnostic
System (OBD II) Cybersecurity” in “Getting To Know Your
Instrument Panel”.
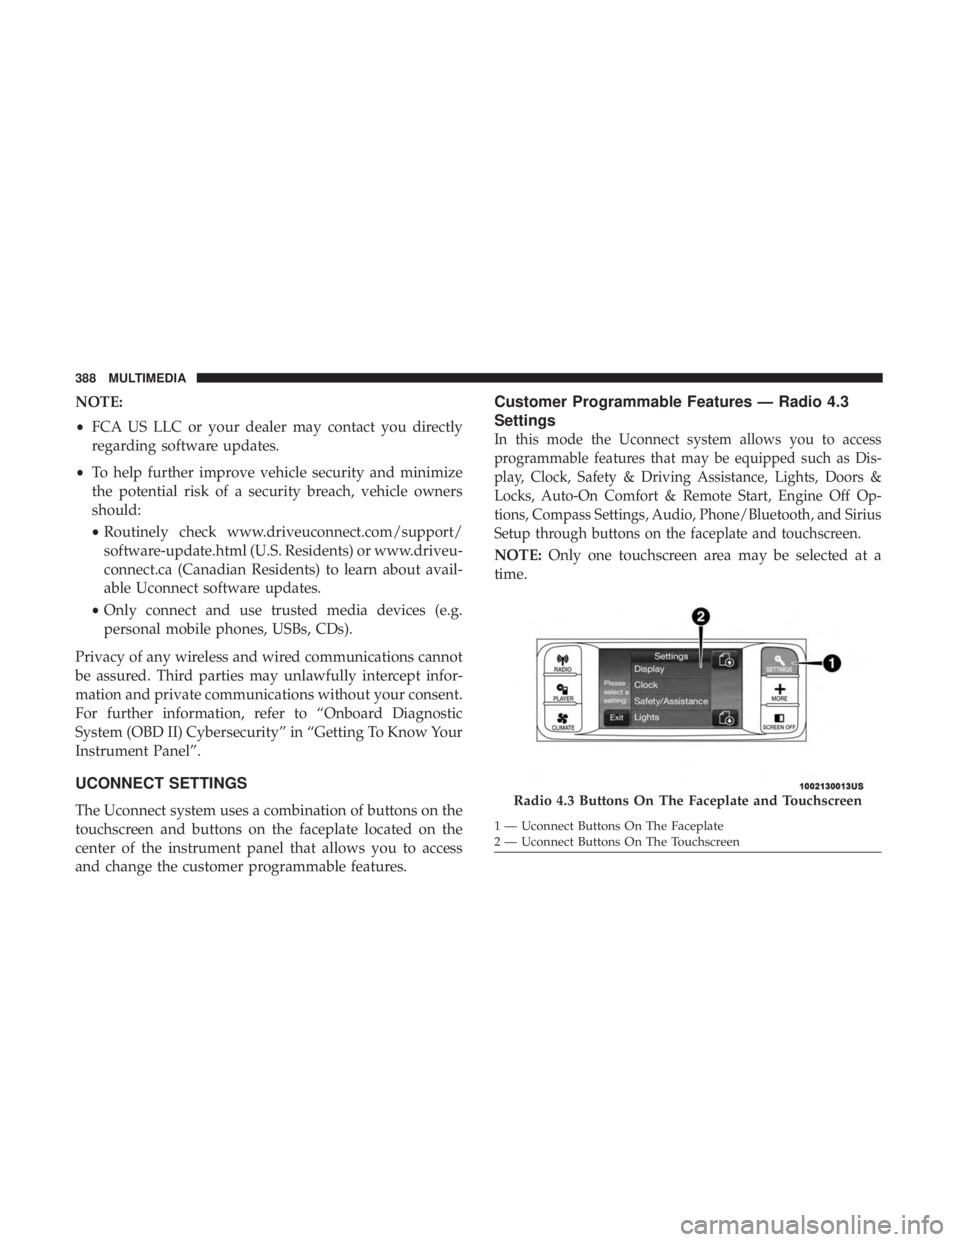
UCONNECT SETTINGS
The Uconnect system uses a combination of buttons on the
touchscreen and buttons on the faceplate located on the
center of the instrument panel that allows you to access
and change the customer programmable features.
Customer Programmable Features — Radio 4.3
Settings
In this mode the Uconnect system allows you to access
programmable features that may be equipped such as Dis-
play, Clock, Safety & Driving Assistance, Lights, Doors &
Locks, Auto-On Comfort & Remote Start, Engine Off Op-
tions, Compass Settings, Audio, Phone/Bluetooth, and Sirius
Setup through buttons on the faceplate and touchscreen.
NOTE: Only one touchscreen area may be selected at a
time.
Radio 4.3 Buttons On The Faceplate and Touchscreen
1 — Uconnect Buttons On The Faceplate
2 — Uconnect Buttons On The Touchscreen
388 MULTIMEDIA
Page 391 of 524
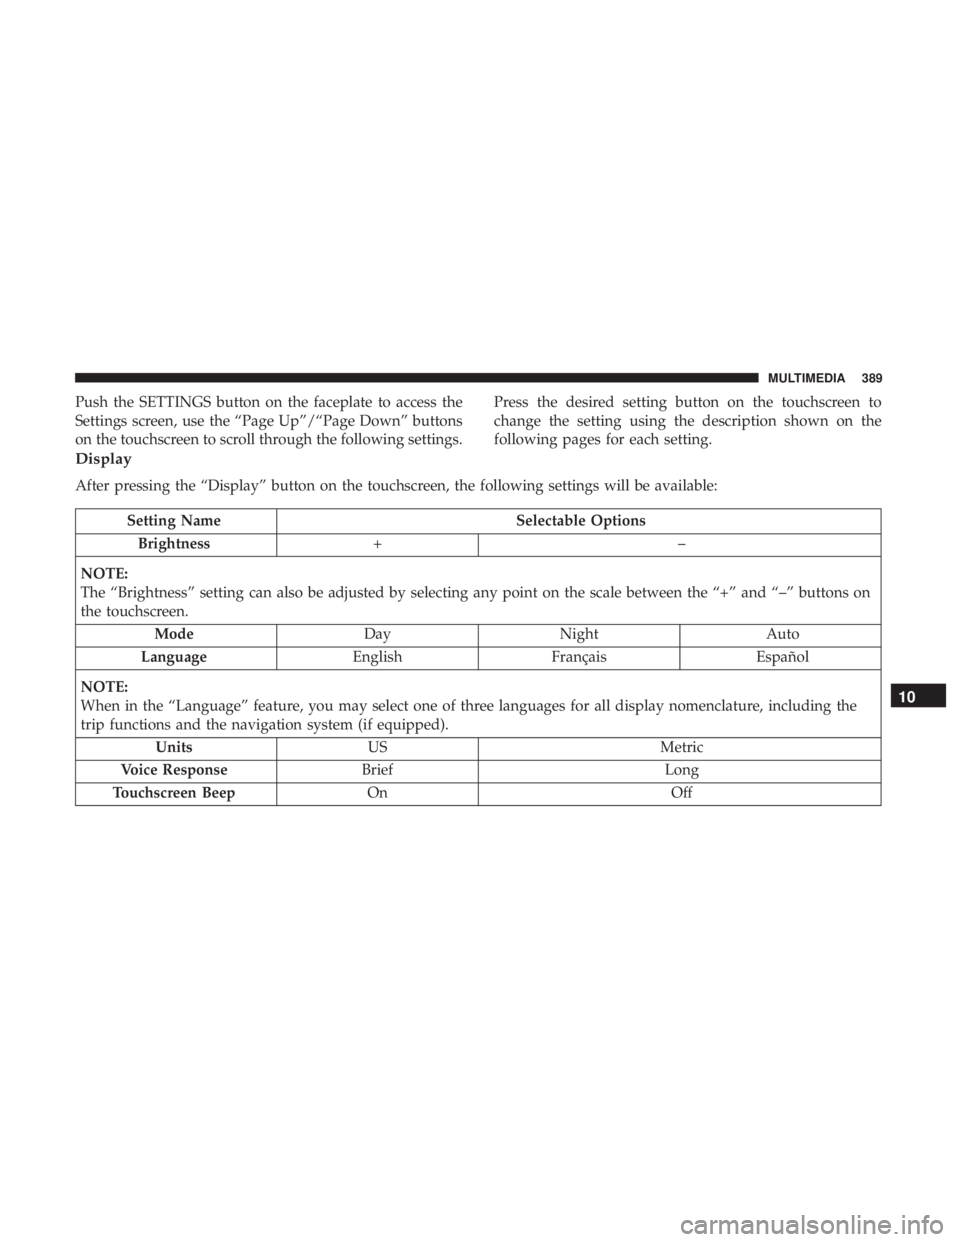
Push the SETTINGS button on the faceplate to access the
Settings screen, use the “Page Up”/“Page Down” buttons
on the touchscreen to scroll through the following settings.Press the desired setting button on the touchscreen to
change the setting using the description shown on the
following pages for each setting.
Display
After pressing the “Display” button on the touchscreen, the following settings will be available:
Setting Name
Selectable Options
Brightness +–
NOTE:
The “Brightness” setting can also be adjusted by selecting any point on the scale between the “+” and “–” buttons on
the touchscreen. Mode DayNight Auto
Language EnglishFrançais Español
NOTE:
When in the “Language” feature, you may select one of three languages for all display nomenclature, including the
trip functions and the navigation system (if equipped). Units US Metric
Voice Response Brief Long
Touchscreen Beep On Off
10
MULTIMEDIA 389
Page 392 of 524
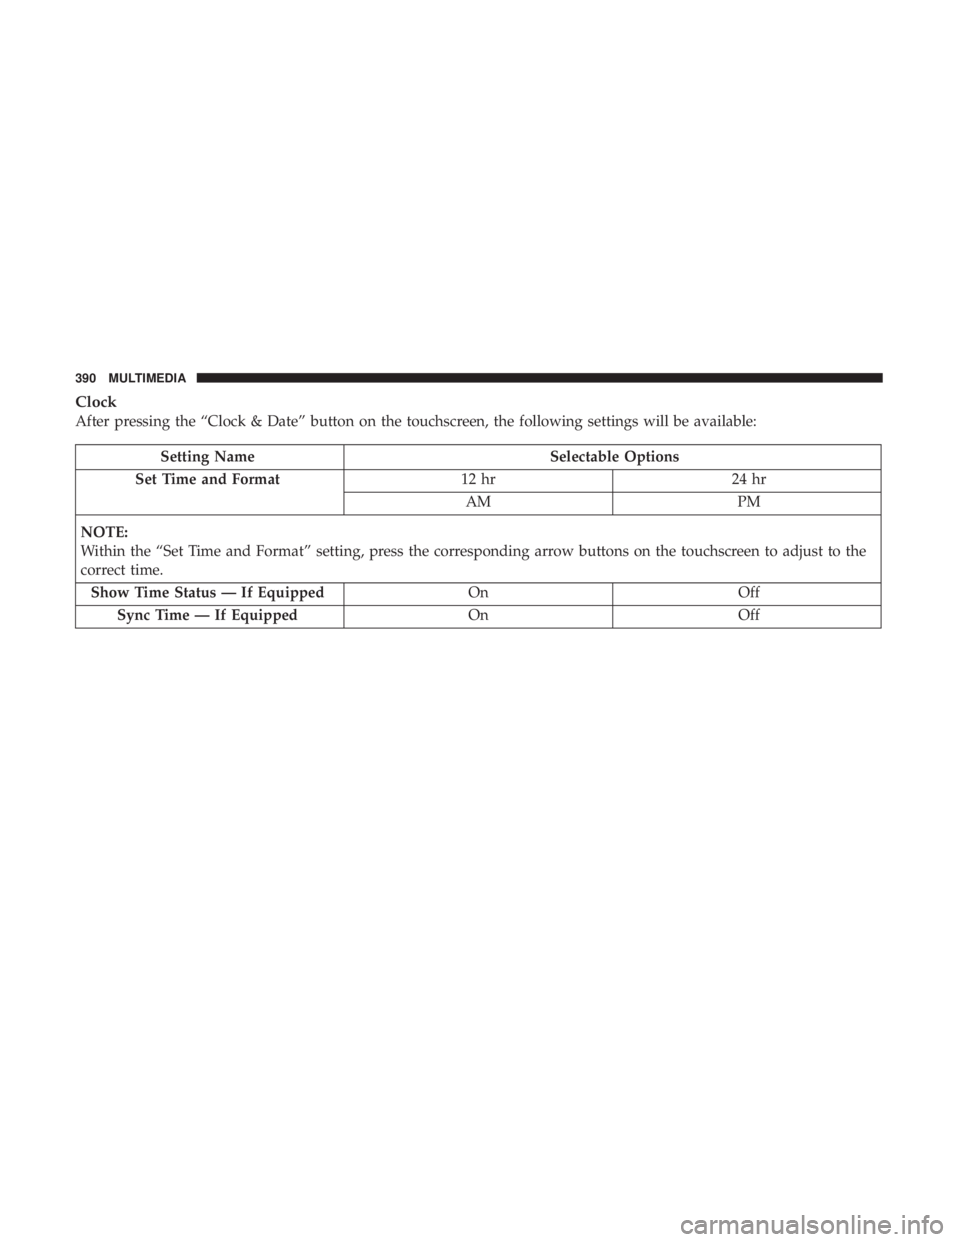
Clock
After pressing the “Clock & Date” button on the touchscreen, the following settings will be available:
Setting NameSelectable Options
Set Time and Format 12 hr24 hr
AM PM
NOTE:
Within the “Set Time and Format” setting, press the corresponding arrow buttons on the touchscreen to adjust to the
correct time. Show Time Status — If Equipped OnOff
Sync Time — If Equipped OnOff
390 MULTIMEDIA
Page 400 of 524
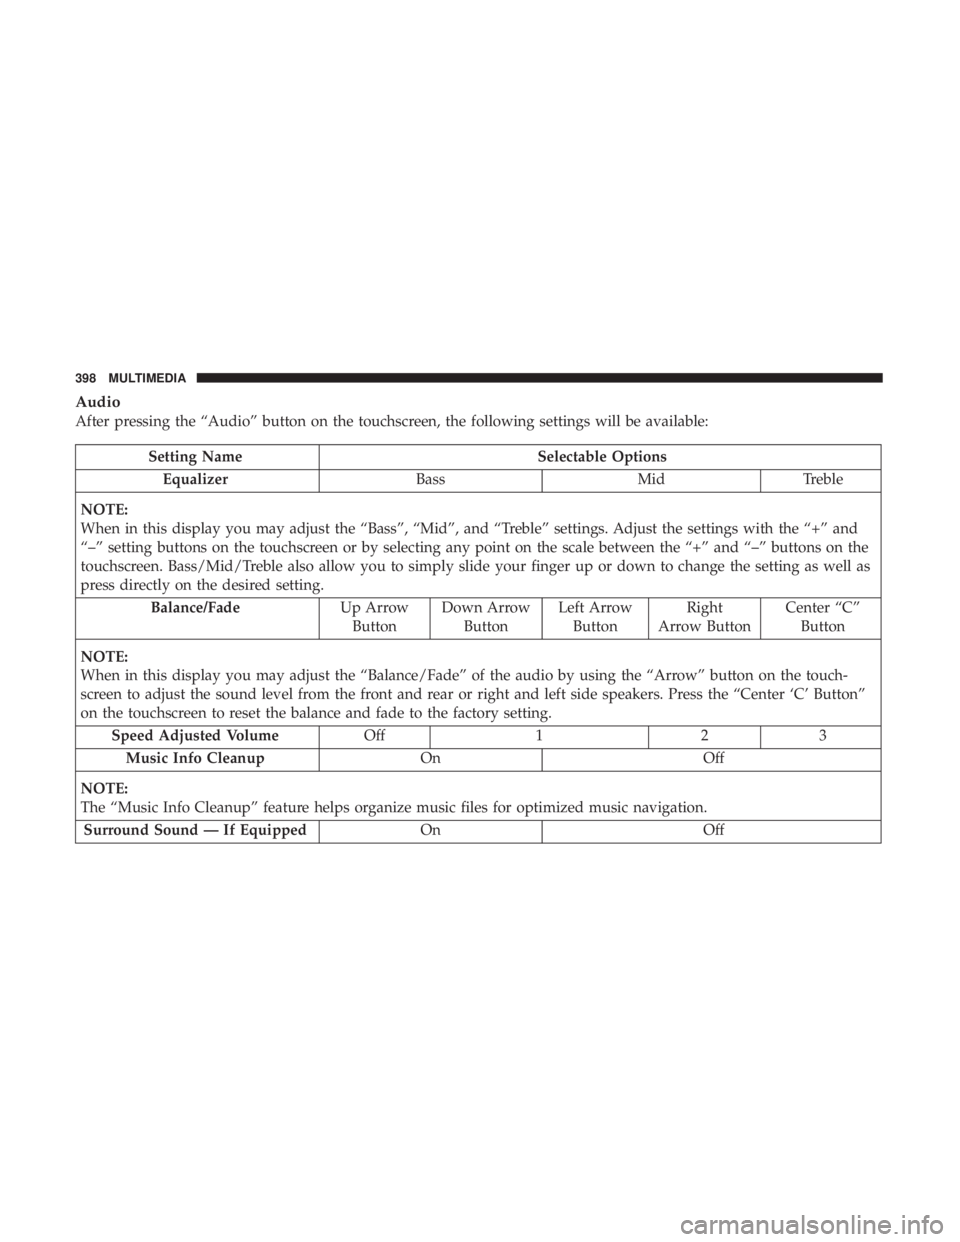
Audio
After pressing the “Audio” button on the touchscreen, the following settings will be available:
Setting NameSelectable Options
Equalizer BassMidTreble
NOTE:
When in this display you may adjust the “Bass”, “Mid”, and “Treble” settings. Adjust the settings with the “+” and
“–” setting buttons on the touchscreen or by selecting any point on the scale between the “+” and “–” buttons on the
touchscreen. Bass/Mid/Treble also allow you to simply slide your finger up or down to change the setting as well as
press directly on the desired setting. Balance/Fade Up Arrow
Button Down Arrow
Button Left Arrow
Button Right
Arrow Button Center “C”
Button
NOTE:
When in this display you may adjust the “Balance/Fade” of the audio by using the “Arrow” button on the touch-
screen to adjust the sound level from the front and rear or right and left side speakers. Press the “Center ‘C’ Button”
on the touchscreen to reset the balance and fade to the factory setting. Speed Adjusted Volume Off123
Music Info Cleanup OnOff
NOTE:
The “Music Info Cleanup” feature helps organize music files for optimized music navigation. Surround Sound — If Equipped OnOff
398 MULTIMEDIA
Page 402 of 524
Setting NameSelectable Options
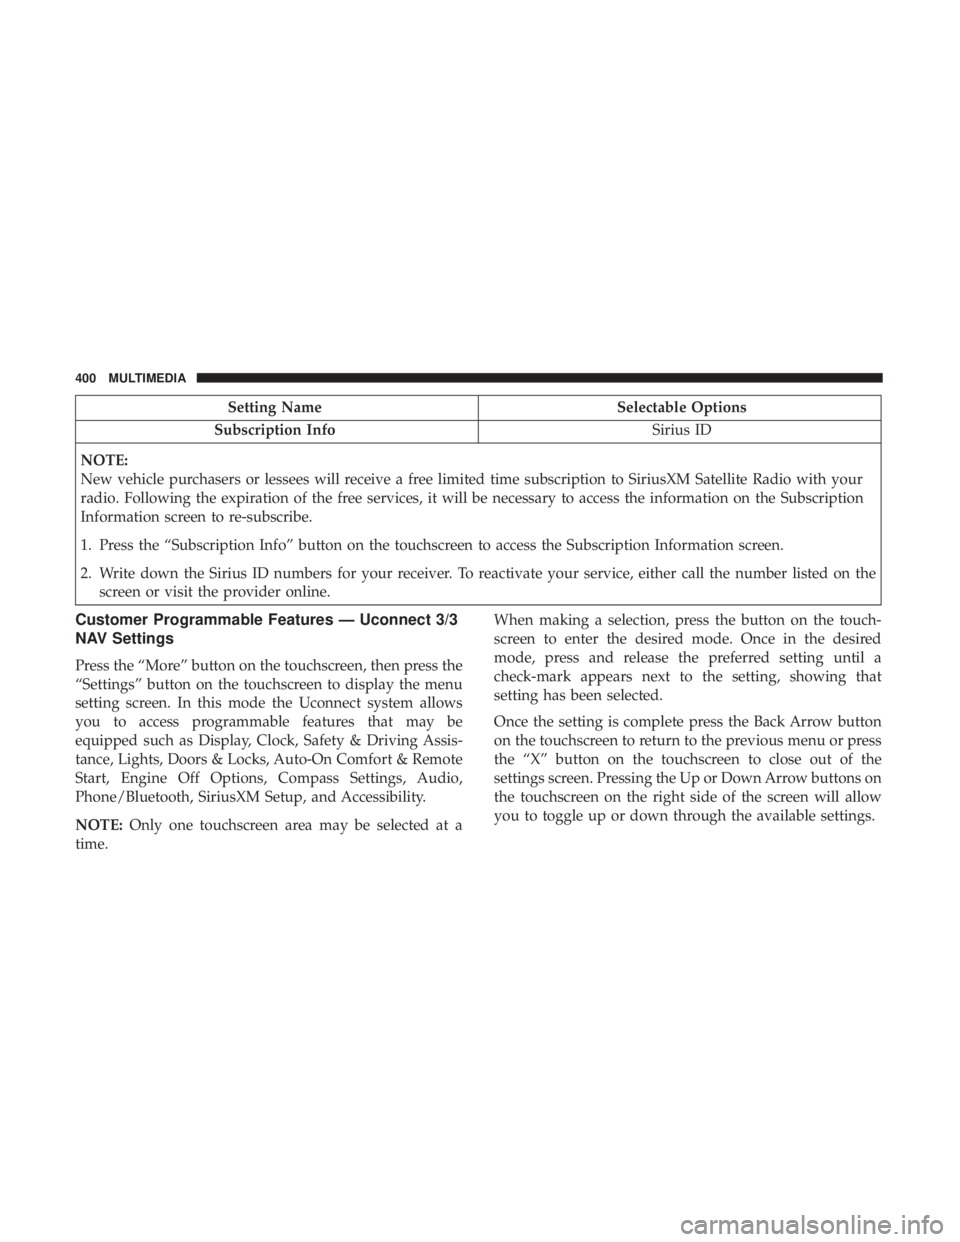
Subscription Info Sirius ID
NOTE:
New vehicle purchasers or lessees will receive a free limited time subscription to SiriusXM Satellite Radio with your
radio. Following the expiration of the free services, it will be necessary to access the information on the Subscription
Information screen to re-subscribe.
1. Press the “Subscription Info” button on the touchscreen to access the Subscription Information screen.
2. Write down the Sirius ID numbers for your receiver. To reactivate your service, either call the number listed on the screen or visit the provider online.
Customer Programmable Features — Uconnect 3/3
NAV Settings
Press the “More” button on the touchscreen, then press the
“Settings” button on the touchscreen to display the menu
setting screen. In this mode the Uconnect system allows
you to access programmable features that may be
equipped such as Display, Clock, Safety & Driving Assis-
tance, Lights, Doors & Locks, Auto-On Comfort & Remote
Start, Engine Off Options, Compass Settings, Audio,
Phone/Bluetooth, SiriusXM Setup, and Accessibility.
NOTE: Only one touchscreen area may be selected at a
time. When making a selection, press the button on the touch-
screen to enter the desired mode. Once in the desired
mode, press and release the preferred setting until a
check-mark appears next to the setting, showing that
setting has been selected.
Once the setting is complete press the Back Arrow button
on the touchscreen to return to the previous menu or press
the “X” button on the touchscreen to close out of the
settings screen. Pressing the Up or Down Arrow buttons on
the touchscreen on the right side of the screen will allow
you to toggle up or down through the available settings.
400 MULTIMEDIA