stop start DODGE JOURNEY 2020 Owner's Manual
[x] Cancel search | Manufacturer: DODGE, Model Year: 2020, Model line: JOURNEY, Model: DODGE JOURNEY 2020Pages: 396, PDF Size: 25.53 MB
Page 166 of 396
164 STARTING AND OPERATING
(Continued)
(Continued)
WARNING!
Never use the PARK position as a substi
-
tute for the parking brake. Always apply the
p a
rking brake fully when exiting the vehicle
to guard against vehicle movement and
possible injury or damage.
Your vehicle could move and injure you and
others if it is not in PARK. Check by trying to
move the gear selector out of PARK with the
brake pedal released. Make sure the trans -
mission is in PARK before exiting the vehicle.
It is dangerous to shift out of PARK or
NEUTRAL if the engine speed is higher than
idle speed. If your foot is not firmly pressing
the brake pedal, the vehicle could accel -
erate quickly forward or in reverse. You
c o
uld lose control of the vehicle and hit
someone or something. Only shift into gear
when the engine is idling normally and your
foot is firmly pressing the brake pedal.
Unintended movement of a vehicle could
injure those in or near the vehicle. As with all
vehicles, you should never exit a vehicle
while the engine is running. Before exiting a
vehicle, always come to a complete stop,
then apply the parking brake, shift the trans -
mission into PARK, and turn the ignition OFF.
W h
en the ignition is in the OFF mode, the
transmission is locked in PARK, securing the
vehicle against unwanted movement.
When leaving the vehicle, always make
sure the ignition is in the OFF mode,
remove the key fob from the vehicle, and
lock the vehicle.
Never leave children alone in a vehicle, or
with access to an unlocked vehicle. Allowing
children to be in a vehicle unattended is
dangerous for a number of reasons. A child
or others could be seriously or fatally injured.
Children should be warned not to touch the
parking brake, brake pedal or the transmis -
sion gear selector.
WARNING! (Continued)
Do not leave the key fob in or near the
vehicle (or in a location accessible to chil -
dren), and do not leave the ignition in the
A C
C or ON/RUN mode. A child could
operate power windows, other controls, or
move the vehicle.
CAUTION!
Before moving the transmission gear
selector out of PARK, you must turn the igni -
tion to the ON/RUN mode, and also press
t h
e brake pedal. Otherwise, damage to the
gear selector could result.
DO NOT race the engine when shifting from
PARK or NEUTRAL into another gear range,
as this can damage the drivetrain.
WARNING! (Continued)
Page 167 of 396
STARTING AND OPERATING 165
The following indicators should be used to
ensure that you have properly engaged the
transmission into the PARK position:
When shifting into PARK, firmly move the
gear selector all the way forward and to the
left until it stops and is fully seated.
Look at the transmission gear position
display and verify that it indicates the PARK
position.
With brake pedal released, verify that the
gear selector will not move out of PARK.
REVERSE (R)
This range is for moving the vehicle backward.
Shift into REVERSE only after the vehicle has
come to a complete stop.
NEUTRAL (N)
Use this range when the vehicle is standing for
prolonged periods with the engine running. The
engine may be started in this range. Apply the
parking brake and shift the transmission into
PARK if you must exit the vehicle.DRIVE (D)
This range should be used for most city and
highway driving. It provides the smoothest
upshifts and downshifts, and the best fuel
economy. The transmission automatically
upshifts through all forward gears. The DRIVE
position provides optimum driving characteristics
under all normal operating conditions.
When frequent transmission shifting occurs
(
s
uch as when operating the vehicle under
heavy loading conditions, in hilly terrain,
traveling into strong head winds, or while towing
a heavy trailer), use the AutoStick shift control
(refer to “AutoStick” in this section for further
information) to select a lower gear. Under these
conditions, using a lower gear will improve
performance and extend transmission life by
reducing excessive shifting and heat buildup.
If the transmission temperature exceeds
n o
rmal operating limits, the powertrain
controller will modify the transmission shift
schedule and expand the range of torque
converter clutch engagement. This is done
to prevent transmission damage due to
o v
erheating.
During cold temperatures, transmission
o p
eration may be modified depending on
engine and transmission temperature as well
as vehicle speed. This feature improves warm
up time of the engine and transmission to
achieve maximum efficiency. Engagement of
the torque converter clutch is inhibited until the
transmission fluid is warm (refer to the “Note”
under “Torque Converter Clutch” in this
section). During extremely cold temperatures
WARNING!
Do not coast in NEUTRAL and never turn off the
ignition to coast down a hill. These are unsafe
practices that limit your response to changing
traffic or road conditions. You might lose
control of the vehicle and have a collision.
CAUTION!
Towing the vehicle, coasting, or driving for any
other reason with the transmission in NEUTRAL
can cause severe transmission damage.
Refer to “Recreational Towing” in “Starting
An
d Operating” and “Towing A Disabled
Vehicle” in “In Case Of Emergency” for further
information.
5
Page 168 of 396
![DODGE JOURNEY 2020 Owners Manual
166 STARTING AND OPERATING
(-16°F [-27°C] or below), operation may briefly
be limited to only second gear. Normal
operation will resume once the transmission
temperature has risen to a su DODGE JOURNEY 2020 Owners Manual
166 STARTING AND OPERATING
(-16°F [-27°C] or below), operation may briefly
be limited to only second gear. Normal
operation will resume once the transmission
temperature has risen to a su](/img/12/40495/w960_40495-167.png)
166 STARTING AND OPERATING
(-16°F [-27°C] or below), operation may briefly
be limited to only second gear. Normal
operation will resume once the transmission
temperature has risen to a suitable level.
AutoStick
AutoStick is a driver-interactive transmission
feature providing manual shift control, giving
you more control of the vehicle. AutoStick allows
y o
u to maximize engine braking, eliminate
undesirable upshifts and downshifts, and
improve overall vehicle performance. This system
can also provide you with more control during
passing, city driving, cold slippery conditions,
mountain driving, trailer towing, and many other
situations.
Operation
When the gear selector is in the AutoStick
p o
sition (below the DRIVE position), it can be
moved from side to side. This allows the driver
to manually select the transmission gear being
used. Moving the gear selector to the left (-)
triggers a downshift and to the right (+) an
upshift. The current gear will be displayed in the
instrument cluster. In AutoStick mode, the transmission will shift up
o
r
down when the driver moves the gear
selector to the right (+) or left (-), unless an
engine lugging or overspeed condition would
result. It will remain in the selected gear until
another upshift or downshift is chosen, except
as described below.
The transmission will automatically upshift
when necessary to prevent engine
over-speed.
The transmission will automatically down -
shift as the vehicle slows (to prevent engine
l u
gging) and will display the current gear.
The transmission will automatically downshift
to first gear when coming to a stop. After a
stop, the driver should manually upshift (+) the
transmission as the vehicle is accelerated.
You can start out, from a stop, in any gear
except top gear. Tapping (+) (at a stop) will
allow starting in SECOND gear. Starting out in
SECOND gear can be helpful in snowy or icy
conditions.
If a requested downshift would cause the
engine to over-speed, that shift will not occur.
Avoid using speed control when AutoStick is
engaged.
Transmission shifting will be more noticeable
when AutoStick is enabled.
The system may revert to automatic shift
mode if a fault or overheat condition is
detected.
To disengage AutoStick mode, return the gear
s e
lector to the DRIVE position. You can shift in or
out of the AutoStick position at any time without
taking your foot off the accelerator pedal.
WARNING!
Do not downshift for additional engine braking
on a slippery surface. The drive wheels could
lose their grip and the vehicle could skid,
causing a collision or personal injury.
Page 177 of 396
STARTING AND OPERATING 175
(Continued)
PARKVIEW REAR BACK UP CAMERA
Your vehicle is equipped with the ParkView Rear
Back Up Camera that allows you to see an
on-screen image of the rear surroundings of
your vehicle whenever the gear selector is put
into REVERSE. The image will be displayed in
the touchscreen display along with a caution
note to “Check Entire Surroundings” across the
top of the screen. After five seconds this note
will disappear. The ParkView camera is located
on the rear of the vehicle above the rear license
plate.
When the vehicle is shifted out of REVERSE, the
r e
ar camera mode is exited and the last
selected touchscreen appears again.
The camera image is also available in the
r e
arview mirror if the touchscreen display is
unavailable. If your vehicle is equipped with the Camera
D
e
lay feature and it is turned on, the rear
camera image will be displayed for up to
10 seconds when the vehicle is shifted out of
R E
VERSE unless the forward vehicle speed
exceeds 8 mph (13 km/h), the transmission is
s h
ifted into PARK, the “X” button on the camera
display screen is pressed, or the vehicle's
ignition is placed in the OFF position.
Static grid lines will illustrate the width of the
v e
hicle. These lines will show separate zones
that will help indicate the distance to the rear of
the vehicle.
NOTE:
The ParkView Rear Back Up Camera has
p r
ogrammable modes of operation that may be
selected through the Uconnect system. Refer to
“Uconnect Settings” in “Multimedia” for further
information.
Different colored zones indicate the distance to
t h
e rear of the vehicle.
Before using ParkSense, it is strongly
recommended that the ball mount and
hitch ball assembly is disconnected from
the vehicle when the vehicle is not used for
towing. Failure to do so can result in injury
or damage to vehicles or obstacles
because the hitch ball will be much closer
to the obstacle than the rear fascia when
the loudspeaker sounds the continuous
tone. Also, the sensors could detect the ball
mount and hitch ball assembly, depending
on its size and shape, giving a false indica -
tion that an obstacle is behind the vehicle.
CAUTION!
ParkSense is only a parking aid and it is
unable to recognize every obstacle,
including small obstacles. Parking curbs
might be temporarily detected or not
detected at all. Obstacles located above or
below the sensors will not be detected
when they are in close proximity.
WARNING! (Continued)
The vehicle must be driven slowly when
using ParkSense in order to be able to stop
in time when an obstacle is detected. It is
recommended that the driver looks over
his/her shoulder when using ParkSense.
CAUTION! (Continued)
5
Page 178 of 396
176 STARTING AND OPERATING
The following table shows the approximate
distances for each zone:
NOTE:
If snow, ice, mud, or any foreign substance
bu
ilds up on the camera lens, clean the lens,
rinse with water, and dry with a soft cloth. Do
not cover the lens.
REFUELING THE VEHICLE
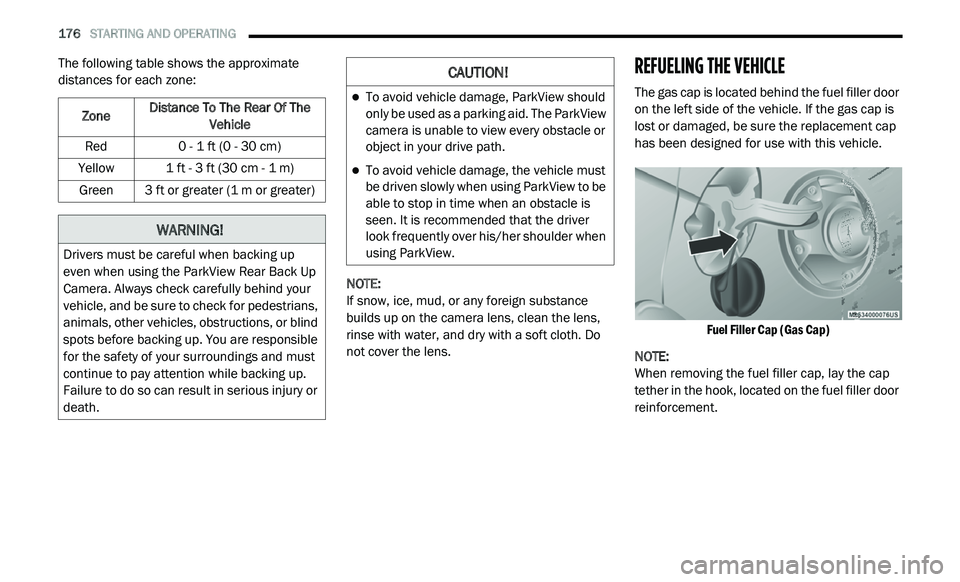
The gas cap is located behind the fuel filler door
on the left side of the vehicle. If the gas cap is
lost or damaged, be sure the replacement cap
has been designed for use with this vehicle.
Fuel Filler Cap (Gas Cap)
NOTE:
When removing the fuel filler cap, lay the cap
t e
ther in the hook, located on the fuel filler door
reinforcement.
Zone
Distance To The Rear Of The
Ve
hicle
Red 0 - 1 ft (0 - 30 cm)
Yellow 1 ft - 3 ft (30 cm - 1 m)
Green 3 ft or greater (1 m or greater)
WARNING!
Drivers must be careful when backing up
even when using the ParkView Rear Back Up
Camera. Always check carefully behind your
vehicle, and be sure to check for pedestrians,
animals, other vehicles, obstructions, or blind
spots before backing up. You are responsible
for the safety of your surroundings and must
continue to pay attention while backing up.
Failure to do so can result in serious injury or
death.
CAUTION!
To avoid vehicle damage, ParkView should
only be used as a parking aid. The ParkView
camera is unable to view every obstacle or
object in your drive path.
To avoid vehicle damage, the vehicle must
be driven slowly when using ParkView to be
able to stop in time when an obstacle is
seen. It is recommended that the driver
look frequently over his/her shoulder when
using ParkView.
Page 185 of 396
STARTING AND OPERATING 183
Perform the maintenance listed in the
“Maintenance Plan”. Refer to “Scheduled
Servicing” in “Servicing And Maintenance” for
further information. When towing a trailer,
never exceed the GAWR, or GCWR, ratings.
Towing Requirements — Tires
Do not attempt to tow a trailer while using a
compact spare tire.
Do not drive more than 50 mph (80 km/h)
wh
en towing while using a full size spare tire.
Proper tire inflation pressures are essential to
the safe and satisfactory operation of your
vehicle. Refer to “Tires” in “Servicing And Mainte -
nance” for proper tire inflation procedures.
Check the trailer tires for proper tire inflation
pressures before trailer usage.
Check for signs of tire wear or visible tire
damage before towing a trailer. Refer to
“Tires” in “Servicing And Maintenance” for
the proper inspection procedure.
When replacing tires, refer to “Tires” in
“Servicing And Maintenance” for the proper
tire replacement procedures. Replacing tires
with a higher load carrying capacity will not
increase the vehicle's GVWR and GAWR
limits.
Towing Requirements — Trailer Brakes
Do not interconnect the hydraulic brake
system or vacuum system of your vehicle
with that of the trailer. This could cause inad -
equate braking and possible personal injury.
An electronically actuated trailer brake
controller is required when towing a trailer
with electronically actuated brakes. When
towing a trailer equipped with a hydraulic
surge actuated brake system, an electronic
brake controller is not required.
Trailer brakes are recommended for trailers
over 1,000 lbs (453 kg) and required for
trailers in excess of 2,000 lbs (907 kg).
CAUTION!
Do not tow a trailer at all during the first
500 miles (805 km) the new vehicle is
d r
iven. The engine, axle or other parts could
be damaged.
Then, during the first 500 miles (805 km)
th
at a trailer is towed, do not drive over
50 mph (80 km/h) and do not make starts
a t
full throttle. This helps the engine and
other parts of the vehicle wear in at the
heavier loads.
WARNING!
Do not connect trailer brakes to your
vehicle's hydraulic brake lines. It can over -
load your brake system and cause it to fail.
Y o
u might not have brakes when you need
them and could have an accident.
Towing any trailer will increase your stop -
ping distance. When towing, you should
a l
low for additional space between your
vehicle and the vehicle in front of you.
Failure to do so could result in an accident.
CAUTION!
If the trailer weighs more than 1,000 lbs
(453 kg) loaded, it should have its own
b r
akes and they should be of adequate
capacity. Failure to do this could lead to
accelerated brake lining wear, higher brake
pedal effort, and longer stopping distances.
5
Page 186 of 396
184 STARTING AND OPERATING
Towing Requirements — Trailer Lights And
Wiring
Whenever you pull a trailer, regardless of the
trailer size, stoplights and turn signals on the
trailer are required for motoring safety.
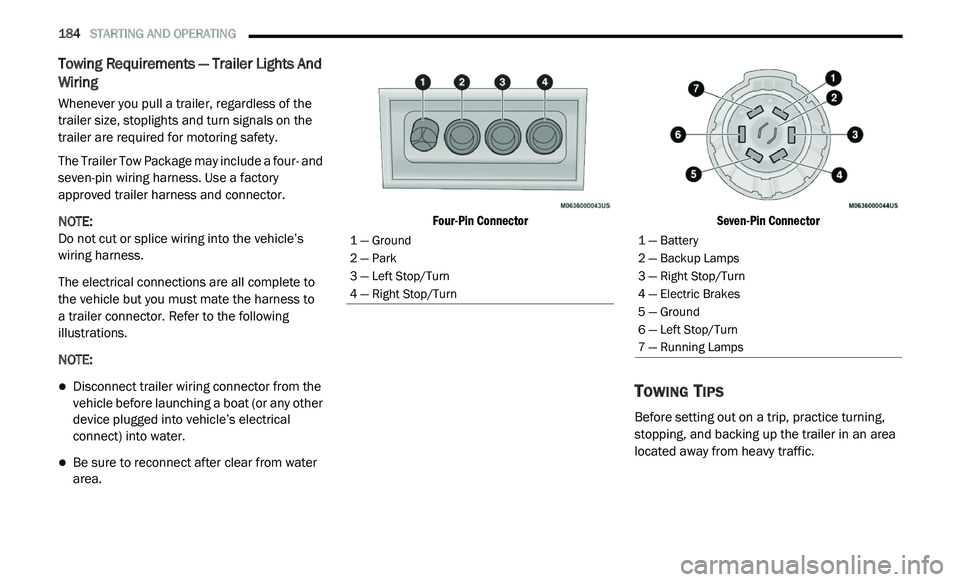
The Trailer Tow Package may include a four- and
se
ven-pin wiring harness. Use a factory
approved trailer harness and connector.
NOTE:
Do not cut or splice wiring into the vehicle’s
wi
ring harness.
The electrical connections are all complete to
t h
e vehicle but you must mate the harness to
a trailer connector. Refer to the following
i l
lustrations.
NOTE:
Disconnect trailer wiring connector from the
vehicle before launching a boat (or any other
device plugged into vehicle’s electrical
connect) into water.
Be sure to reconnect after clear from water
area.
Four-Pin Connector
Seven-Pin Connector
TOWING TIPS
Before setting out on a trip, practice turning,
stopping, and backing up the trailer in an area
located away from heavy traffic.
1 — Ground
2 — Park
3 — Left Stop/Turn
4 — Right Stop/Turn1 — Battery
2 — Backup Lamps
3 — Right Stop/Turn
4 — Electric Brakes
5 — Ground
6 — Left Stop/Turn
7 — Running Lamps
Page 187 of 396
STARTING AND OPERATING 185
Automatic Transmission
The DRIVE range can be selected when towing.
However, if frequent shifting occurs while in
DRIVE, use the AutoStick shift control to
manually select a lower gear.
NOTE:
Using a lower gear while operating the vehicle
u n
der heavy loading conditions will improve
performance and extend transmission life by
reducing excessive shifting and heat build up.
This action will also provide better engine
braking.
If you REGULARLY tow a trailer for more than
4 5
minutes of continuous operation, then
c h
ange the transmission fluid and filter as
specified for “police, taxi, fleet, or frequent
trailer towing”. Refer to the “Scheduled
Servicing” in “Servicing And Maintenance” for
the proper maintenance intervals.
NOTE:
Check the automatic transmission fluid level
b e
fore towing. If you notice fluid leakage or
transmission malfunction, see an authorized
dealer immediately for assistance.
Speed Control — If Equipped
Do not use on hilly terrain or with heavy
loads.
When using the Speed Control, if you experi -
ence speed drops greater than 10 mph
( 1
6 km/h), disengage until you can get back
t o
cruising speed.
Use Speed Control in flat terrain and with
light loads to maximize fuel efficiency.
AutoStick
When using the AutoStick shift control, select
the highest gear that allows for adequate
performance and avoids frequent down -
shifts. For example, choose “4” if the desired
s p
eed can be maintained. Choose “3” or “2”
if needed to maintain the desired speed.
To prevent excess heat generation, avoid
continuous driving at high RPM. Reduce
vehicle speed as necessary to avoid
extended driving at high RPM. Return to a
higher gear or vehicle speed when grade and
road conditions allow.
Cooling System
To reduce potential for engine and transmission
overheating, take the following actions:
City Driving
In city traffic — while stopped, place the
tr
ansmission in NEUTRAL, but do not increase
engine idle speed.
Highway Driving
Reduce speed.
Temporarily turn off air conditioning.5
Page 189 of 396
STARTING AND OPERATING 187
DRIVING TIPS
DRIVING ON SLIPPERY SURFACES
Acceleration
Rapid acceleration on snow covered, wet, or
other slippery surfaces may cause the driving
wheels to pull erratically to the right or left. This
phenomenon occurs when there is a difference
in the surface traction under the front (driving)
wheels.
Traction
When driving on wet or slushy roads, it is
possible for a wedge of water to build up
between the tire and road surface. This is
hydroplaning and may cause partial or
complete loss of vehicle control and stopping
ability. To reduce this possibility, the following
precautions should be observed:
Slow down during rainstorms or when the
roads are slushy.
Slow down if the road has standing water or
puddles.
Replace the tires when tread wear indicators
first become visible.
Keep tires properly inflated.
Maintain sufficient distance between your
vehicle and the vehicle in front of you to avoid
a collision in a sudden stop.
DRIVING THROUGH WATER
Driving through water more than a few inches/
centimeters deep will require extra caution to
ensure safety and prevent damage to your
vehicle.
Flowing/Rising Water
WARNING!
Rapid acceleration on slippery surfaces is
dangerous. Unequal traction can cause
sudden pulling of the front wheels. You could
lose control of the vehicle and possibly have a
collision. Accelerate slowly and carefully
whenever there is likely to be poor traction
(ice, snow, wet, mud, loose sand, etc.).
WARNING!
Do not drive on or across a road or path
where water is flowing and/or rising (as in
storm run-off). Flowing water can wear away
the road or path's surface and cause your
vehicle to sink into deeper water.
Furthermore, flowing and/or rising water can
carry your vehicle away swiftly. Failure to
follow this warning may result in injuries that
are serious or fatal to you, your passengers,
and others around you.
5
Page 190 of 396
188 STARTING AND OPERATING
(Continued)
Shallow Standing Water
Although your vehicle is capable of driving
through shallow standing water, consider the
following Cautions and Warnings before doing
so.
WARNING!
Driving through standing water limits your
vehicle’s traction capabilities. Do not
exceed 5 mph (8 km/h) when driving
t h
rough standing water.
Driving through standing water limits your
vehicle’s braking capabilities, which
increases stopping distances. Therefore,
after driving through standing water, drive
slowly and lightly press on the brake pedal
several times to dry the brakes.
Failure to follow these warnings may result
in injuries that are serious or fatal to you,
your passengers, and others around you.
CAUTION!
Always check the depth of the standing
water before driving through it. Never drive
through standing water that is deeper than
the bottom of the tire rims mounted on the
vehicle.
Determine the condition of the road or the
path that is under water and if there are any
obstacles in the way before driving through
the standing water.
Do not exceed 5 mph (8 km/h) when
dr
iving through standing water. This will
minimize wave effects.
Driving through standing water may cause
damage to your vehicle’s drivetrain compo -
nents. Always inspect your vehicle’s fluids
( i
.e., engine oil, transmission, axle, etc.) for
signs of contamination (i.e., fluid that is
milky or foamy in appearance) after driving
through standing water. Do not continue to
operate the vehicle if any fluid appears
contaminated, as this may result in further
damage. Such damage is not covered by
the New Vehicle Limited Warranty.
Getting water inside your vehicle’s engine
can cause it to lock up and stall out, and
cause serious internal damage to the
engine. Such damage is not covered by the
New Vehicle Limited Warranty.
CAUTION! (Continued)