sat nav DODGE JOURNEY 2020 Owners Manual
[x] Cancel search | Manufacturer: DODGE, Model Year: 2020, Model line: JOURNEY, Model: DODGE JOURNEY 2020Pages: 396, PDF Size: 25.53 MB
Page 306 of 396
304 MULTIMEDIA
Under this situation, after successfully dialing a
number the user may feel that the call did not
go through even though the call is in progress.
Once your call is answered, you will hear the
audio.
Mute/Un-Mute (Mute OFF)
When you mute the Uconnect Phone, you will
st
ill be able to hear the conversation coming
from the other party, but the other party will not
be able to hear you. To mute the Uconnect
Phone simply press the Mute button on the
Phone main screen.
Advanced Phone Connectivity
Transfer Call To And From Mobile Phone
The Uconnect Phone allows ongoing calls to be
t r
ansferred from your mobile phone to the
Uconnect Phone without terminating the call.
To transfer an ongoing call from your connected
m o
bile phone to the Uconnect Phone or vice
versa, press the Transfer button on the Phone
main screen. Connect Or Disconnect Link Between the
U
c
onnect Phone And Mobile Phone
If you would like to connect or disconnect the
B l
uetooth® connection between a Uconnect
Phone paired mobile phone and the Uconnect
Phone, follow the instructions described in your
mobile phone User's Manual.
Things You Should Know About Your
Uconnect Phone
Voice Command
For best performance:
Adjust the rearview mirror to provide at least
½-inch (1 cm) gap between the overhead
console (if equipped) and the mirror.
Always wait for the beep before speaking.
Speak normally without pausing, just as you
would speak to a person sitting a few feet/
meters away from you.
Make sure that no one other than you is
speaking during a Voice Command period. Performance is maximized under:
Low-to-medium blower setting
Low-to-medium vehicle speed
Low road noise
Smooth road surface
Fully closed windows
Dry weather conditions
NOTE:
Even though the system is designed for users
speaking in North American English, French,
and Spanish accents, the system may not
always work for some.
When navigating through an automated
system such as voice mail, or when sending
a page, at the end of speaking the digit string,
make sure to say “Send.”
Storing names in the phonebook when the
vehicle is not in motion is recommended.
It is not recommended to store similar
sounding names in the Uconnect Phonebook.
Page 308 of 396
306 MULTIMEDIA
2. Press the Up or Down Arrow button to adjust
the hours or minutes, next select the AM or
PM button. You can also select 12 hr or 24 hr
format by pressing the desired button.
Setting The Clock
Once the time is set, press the Done button
t o
exit the time screen.
UCONNECT 3/3 NAV WITH 8.4-INCH
DI
SPLAY
INTRODUCTION TO THE UCONNECT 3/
3 NAV W
ITH 8.4-INCH DISPLAY
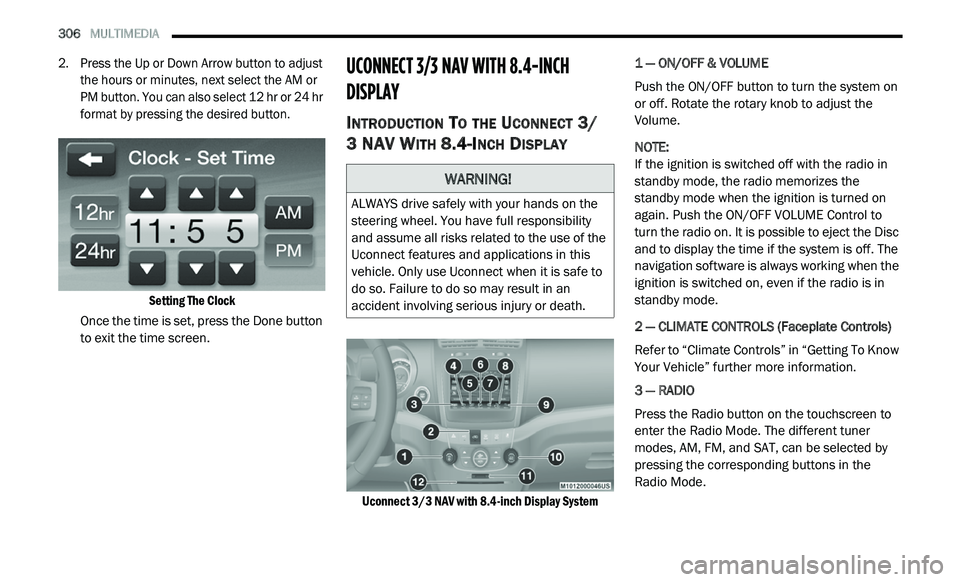
Uconnect 3/3 NAV with 8.4-inch Display System
1 — ON/OFF & VOLUME
Push the ON/OFF button to turn the system on
o
r
off. Rotate the rotary knob to adjust the
Volume.
NOTE:
If the ignition is switched off with the radio in
st
andby mode, the radio memorizes the
standby mode when the ignition is turned on
again. Push the ON/OFF VOLUME Control to
turn the radio on. It is possible to eject the Disc
and to display the time if the system is off. The
navigation software is always working when the
ignition is switched on, even if the radio is in
standby mode.
2 — CLIMATE CONTROLS (Faceplate Controls)
Refer to “Climate Controls” in “Getting To Know
Y o
ur Vehicle” further more information.
3 — RADIO
Press the Radio button on the touchscreen to
en
ter the Radio Mode. The different tuner
modes, AM, FM, and SAT, can be selected by
pressing the corresponding buttons in the
Radio Mode.
WARNING!
ALWAYS drive safely with your hands on the
steering wheel. You have full responsibility
and assume all risks related to the use of the
Uconnect features and applications in this
vehicle. Only use Uconnect when it is safe to
do so. Failure to do so may result in an
accident involving serious injury or death.
Page 309 of 396
MULTIMEDIA 307
4 — PLAYER
Press the Player button on the touchscreen to
ac
cess media sources such as: Disc, USB
Device, and AUX as long as the requested
media is present.
5 — CONTROLS
Press the Controls button on the touchscreen to
a c
cess the Settings list. Controls such as
Heated Seats, Heated Steering Wheel, Vented
Seats, etc. can be selected or turned on/off by
pressing the corresponding button.
6 — CLIMATE (Touchcreen Controls)
Refer to “Climate Controls” in “Getting To Know
Y o
ur Vehicle” for more information.
7 — NAV (Uconnect 3 NAV Only)
Press the Nav button on the touchscreen to
ac
cess the Navigation feature.
8 — PHONE — If Equipped
Press the Phone button on the touchscreen to
ac
cess the Uconnect Phone feature. Refer to
“Uconnect Phone” in this section for more
information. 9 — MORE
Press the More button on the touchscreen to
a
c
cess additional options. Options available
such as Settings and SiriusXM® Travel Link
(if equipped) can be accessed by pressing the
c o
rresponding button in the More Menu.
10 — ENTER/BROWSE & TUNE/SCROLL
Push the ENTER/BROWSE button to accept a
hi
ghlighted selection on the screen. Rotate the
TUNE/SCROLL rotary knob to scroll through a
list or tune a radio station.
11 — SD CARD SLOT
Insert an SD Card containing audio media files
t o
play them through the vehicle’s sound
system.
12 — DISC SLOT
When inserting a disc, ensure the label is facing
u p
. Push the Eject button to eject the disc.
RADIO MODE
Overview
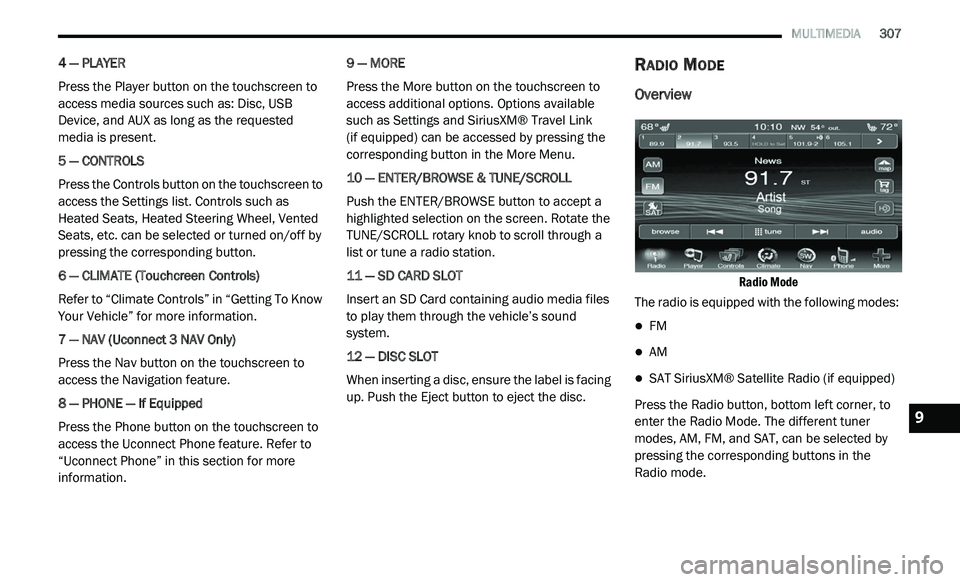
Radio Mode
The radio is equipped with the following modes:
FM
AM
SAT SiriusXM® Satellite Radio (if equipped)
Press the Radio button, bottom left corner, to
e n
ter the Radio Mode. The different tuner
modes, AM, FM, and SAT, can be selected by
pressing the corresponding buttons in the
Radio mode.9
Page 328 of 396
326 MULTIMEDIA
Operation
Voice commands can be used to operate the
Uconnect Phone and to navigate through the
Uconnect Phone menu structure. Voice
commands are required after most Uconnect
Phone prompts. There are two general methods
for how Voice Command works:
1. Say compound commands like “Call John
S
mith Mobile.”
2. S ay the individual commands and allow the
s
ystem to guide you to complete the task.
You will be prompted for a specific command
a n
d then guided through the available options.
Prior to giving a voice command, one must
wait for the beep, which follows the “Listen”
prompt or another prompt.
For certain operations, compound
commands can be used. For example,
instead of saying “Call” and then “John
Smith” and then “mobile”, the following
compound command can be said: “Call John
Smith mobile.”
For each feature explanation in this section, only
the compound command form of the voice
command is given. You can also break the
commands into parts and say each part of
the command when you are asked for it.
For example, you can use the compound
c o
mmand form voice command “Search for
John Smith,” or you can break the compound
c o
mmand form into two voice commands:
“Search Contact” and when asked “John Smith.”
Please remember, the Uconnect Phone works
best when you talk in a normal conversational
tone, as if speaking to someone sitting a few
feet/meters away from you.
Natural Speech
Your Uconnect Phone Voice system uses a
N a
tural Language Voice Recognition (VR)
engine.
Natural speech allows the user to speak
c o
mmands in phrases or complete sentences.
The system filters out certain non-word
utterances and sounds such as “ah” and “eh.”
The system handles fill-in words such as “I would
like to.”
The system handles multiple inputs in the same
p
h
rase or sentence such as “make a phone
call” and “to Kelly Smith.” For multiple inputs in
the same phrase or sentence, the system
identifies the topic or context and provides the
associated follow-up prompt such as “Who do
you want to call?” in the case where a phone
call was requested but the specific name was
not recognized.
The system utilizes continuous dialog; when the
s y
stem requires more information from the user
it will ask a question to which the user can
respond without pushing the Voice Recognition
button on your steering wheel.
Help Command
If you need assistance at any prompt, or if you
w a
nt to know your options at any prompt, say
“Help” following the beep.
To activate the Uconnect Phone from idle,
s i
mply push the Phone button (if active) on
your steering wheel and say a command or say
“ H
elp.” All Uconnect Phone sessions begin with
a push of the VR button or the Phone button
(if active) on the radio control head.
Page 342 of 396
340 MULTIMEDIA
Be careful of the ambient temperature. Using
the navigation system at extreme tempera -
tures can lead to malfunction or damage.
A ls
o note that the unit can be damaged by
strong vibration, metal objects, or by water
getting inside the unit. Notice
This navigation system can be used when the
i
g
nition key is turned to ON/RUN or ACC.
To preserve the battery, however, it should
be used with the engine running whenever
p o
ssible. Using the navigation system for a long
time with the engine switched off can cause the
battery to run down.
Map Data Information
Garmin® uses a combination of governmental
a n
d private data sources. Virtually all data
sources contain some inaccurate or incomplete
data. In some countries, complete and accurate
map information is either not available or is
prohibitively expensive.
Getting Started
To access the Navigation system, press the Nav
button on bottom of the screen.
Setting Up Your System
When using your navigation system for the first
t i
me, complete the following tasks:
1. Ac quire satellites.
2
. U nderstand the main menu. A
cquiring Satellites
The bars indicate satellite strength.
Go to an open area, away from tall buildings and
t r
ees.
Acquiring satellite signals can take a few
m i
nutes.
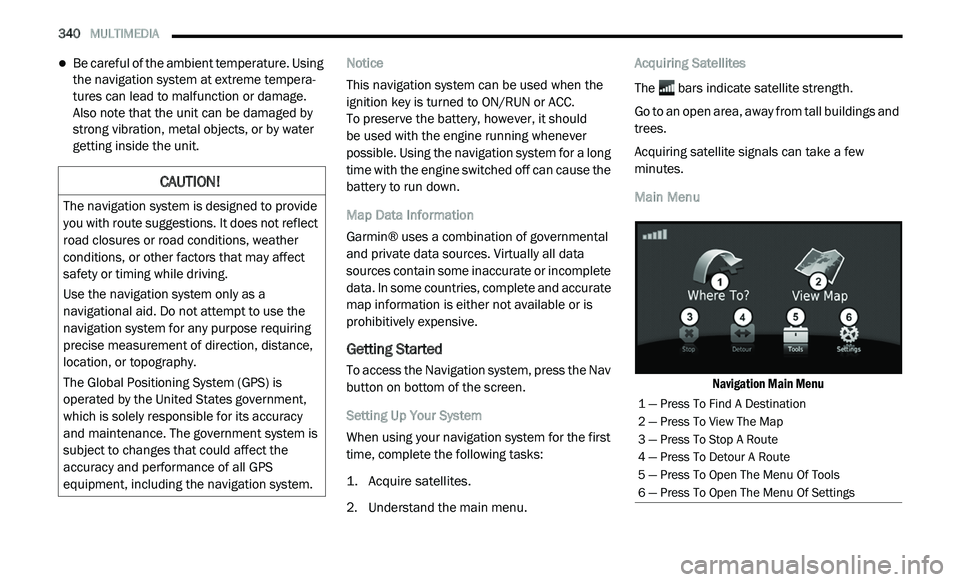
Main Menu
Navigation Main Menu
CAUTION!
The navigation system is designed to provide
you with route suggestions. It does not reflect
road closures or road conditions, weather
conditions, or other factors that may affect
safety or timing while driving.
Use the navigation system only as a
na
vigational aid. Do not attempt to use the
navigation system for any purpose requiring
precise measurement of direction, distance,
location, or topography.
The Global Positioning System (GPS) is
o p
erated by the United States government,
which is solely responsible for its accuracy
and maintenance. The government system is
subject to changes that could affect the
accuracy and performance of all GPS
equipment, including the navigation system.
1 — Press To Find A Destination
2 — Press To View The Map
3 — Press To Stop A Route
4 — Press To Detour A Route
5 — Press To Open The Menu Of Tools
6 — Press To Open The Menu Of Settings
Page 352 of 396
350 MULTIMEDIA
8. Repeat steps 5 and 6, if necessary.
9. Enter a value.
1
0. P ress Done .
S
etting Currency Conversion Rates Manually
You can update the currency conversion rates
m a
nually so that you are always using the most
current rates.
1. Fr om the main menu press
T
ools > Unit
Converter
.
2. P ress the box with a currency listed.
3
. S elect C
urrency.
4. P ress Save .
5
. P ress a currency box.
6
. S elect the currency you want to update.
7
. R epeat steps 3-6 to select a currency to
c
onvert to, if necessary.
8. P ress a box under a currency.
9
. E nter a new value for the currency.
1
0. P ress Done .
1
1. R epeat steps 8 and 9, if necessary.
Traffic
Notice
Garmin® is not responsible for the accuracy or
ti
meliness of the traffic information. Your
navigation system may receive traffic content
via Satellite Radio service in North America or
via FM broadcast in other regions.
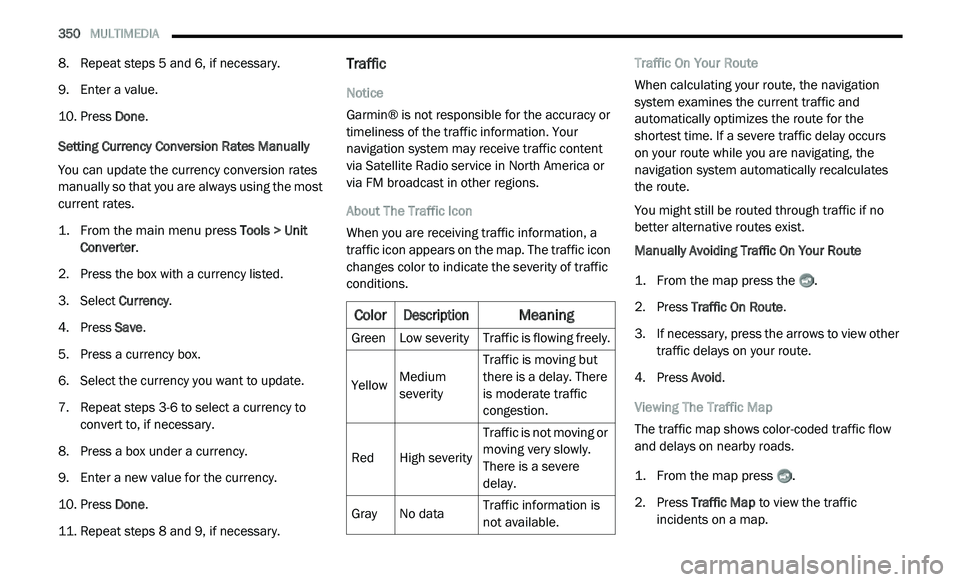
About The Traffic Icon
When you are receiving traffic information, a
t r
affic icon appears on the map. The traffic icon
changes color to indicate the severity of traffic
conditions. Traffic On Your Route
When calculating your route, the navigation
s
y
stem examines the current traffic and
automatically optimizes the route for the
shortest time. If a severe traffic delay occurs
on your route while you are navigating, the
n a
vigation system automatically recalculates
the route.
You might still be routed through traffic if no
b e
tter alternative routes exist.
Manually Avoiding Traffic On Your Route
1. Fr om the map press the .
2
. P ress Traffic On Route .
3
. I f necessary, press the arrows to view other
t
raffic delays on your route.
4. P ress Avoid .
V
iewing The Traffic Map
The traffic map shows color-coded traffic flow
a n
d delays on nearby roads.
1. Fr om the map press .
2
. P ress Traffic Map
to view the traffic
incidents on a map.
Color
Description
Meaning
GreenLow severity Traffic is flowing freely.
Yellow Medium
s
e
verity Traffic is moving but
t
h
ere is a delay. There
is moderate traffic
congestion.
Red High severity Traffic is not moving or
m
o
ving very slowly.
There is a severe
delay.
Gray No data Traffic information is
n
o
t available.
Page 355 of 396
MULTIMEDIA 353
Appendix
About GPS Satellite Signals
The navigation system must acquire satellite
si
gnals in order to navigate.
When the navigation system has acquired
s a
tellite signals, the signal strength bars on the
main menu are full . When it loses satellite
signals, the bars are clear .
For more information about GPS, go to
www.garmin.com/aboutGPS .
Updating The Software
To update the navigation system software, you
m u
st have a USB mass storage device and an
Internet connection.
1. G o to
a
uto-update.garmin.com
.
2. F ind your model and select S
oftware
Updates > Download . 3. R
ead and accept the terms of the Software
Li
cense Agreement.
4. F ollow the instructions on the Web site to
c
omplete the installation of the software
update.
Updating The Map Data
To update the navigation system map, you must
h a
ve a USB mass storage device and an
Internet connection, or visit your local dealer for
assistance. A map update can be purchased
once a year.
1. G o to
a
uto-update.garmin.com
.
2. S elect your vehicle from the drop-down lists.
3
. S elect O
rder Map Updates for your unit.
4. F ollow the Web site instructions to update
y
our map.
CAUTION!
Garmin® and FCA US LLC are not responsible
for the accuracy of, or the consequences of
using, a safety camera database.
Safety camera information is available in some
lo
cations. Go to
http://www.garmin.com
for
availability. For these locations, the navigation
s y
stem includes the locations of hundreds of
safety cameras. Your navigation system alerts you
when you are approaching a safety camera and
can warn you if you are driving too fast. The data
is updated at least weekly, so you always have
access to the most up-to-date information.
You can purchase a new region or extend an
e x
isting subscription at any time. Each region
that you purchase has an expiration date.
9
Page 374 of 396
372 MULTIMEDIA
What Will Aptiv Do?
Aptiv, at its option, will repair or replace any
d e
fective Product. Aptiv reserves the right to replace
any discontinued Product with a comparable model.
THIS WARRANTY IS THE SOLE WARRANTY FOR THIS
PRODUCT, SETS FORTH YOUR EXCLUSIVE REMEDY
REGARDING DEFECTIVE PRODUCTS, AND IS IN LIEU
OF ALL OTHER WARRANTIES (EXPRESS OR
IMPLIED), INCLUDING ANY WARRANTY FOR
MERCHANTABILITY OR FITNESS FOR A PARTICULAR
PURPOSE.
If you have any questions or comments
r e
garding your Aptiv wireless headphones,
please email [email protected] or phone:
888-293-3332
SYSTEM INFORMATION
Shared Modes
This allows the VES to output radio sources to the
headphones and the radio to output VES sources
to the vehicle speakers. When the radio and VES
channel 1 or 2 are in the same (shared) mode, a
VES icon will be visible on the radio’s display for
that channel, and the shared icon will be visible
on the VES screen. When in shared mode, the
same audio source is heard in the shared
headphone channel 1 or channel 2.
If the radio functions (FM, AM, or SAT) are in the
sh
ared mode with the VES, only the radio is able
to control the radio functions. In this case, VES
can share the radio mode, but not change
stations until the radio mode is changed to a
mode that is different from the VES selected
radio mode. When shared, the radio has priority
for all radio modes (FM, AM). The VES has the
ability to switch tuner (AM/FM), SEEK, TUNE,
and recall presets in radio modes as long as it is
not in shared mode.
When in shared disc, both the radio and the VES
h a
ve control of the video functions. The VES has
the ability to control the following video modes:
NOTE:
CD: Ability to Fast Forward, Rewind, and
Track Up/Down.
The VES can even control radio modes or video
m o
des while the radio is turned off. The VES can
access the radio modes or disc modes by
navigating to those modes on the VES and
activating a radio mode or disc mode.
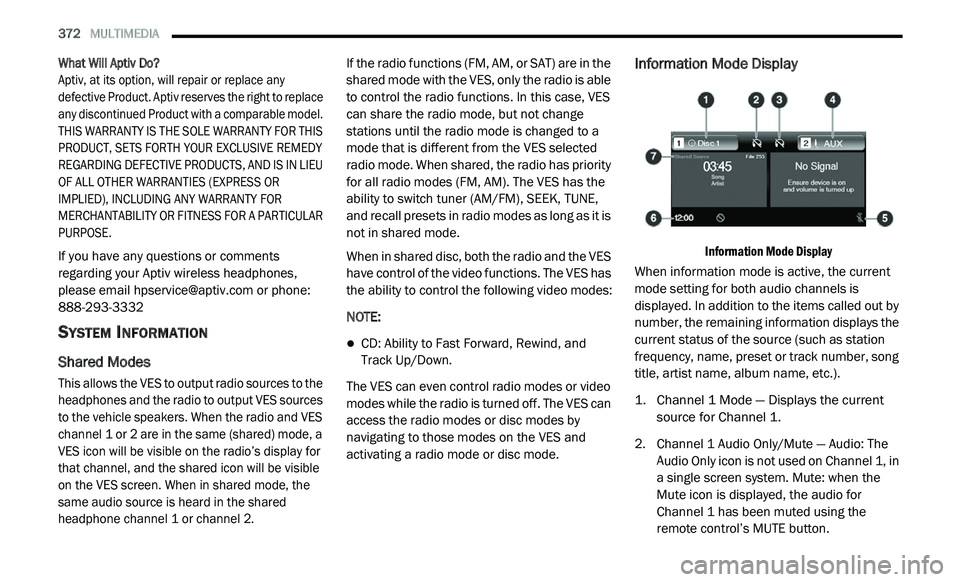
Information Mode Display
Information Mode Display
When information mode is active, the current
m o
de setting for both audio channels is
displayed. In addition to the items called out by
number, the remaining information displays the
current status of the source (such as station
frequency, name, preset or track number, song
title, artist name, album name, etc.).
1. C hannel 1 Mode — Displays the current
s
ource for Channel 1.
2. C hannel 1 Audio Only/Mute — Audio: The
A
udio Only icon is not used on Channel 1, in
a single screen system. Mute: when the
Mute icon is displayed, the audio for
Channel 1 has been muted using the
remote control’s MUTE button.
Page 380 of 396
378 MULTIMEDIA
If this equipment does cause harmful inter -
ference to radio or television reception,
w h
ich can be determined by turning the
equipment off and on, the user is encour -
aged to try to correct the interference by one
o r
more of the following measures:
a. I ncrease the separation between the
e
quipment and receiver.
b. C onsult an authorized dealer or an expe -
r
ienced radio technician for help.
VOICE COMMAND (UCONNECT 3/3 NAV)
UCONNECT 3/3 NAV
The Uconnect Voice Command
system allows you to control your AM,
FM
radio, satellite radio, disc player,
SD Card, USB/iPod® and SiriusXM®
Travel Link.
NOTE:
Take care to speak into the Voice Command
s y
stem as calmly and normally as possible.
The ability of the Voice Command system to
r e
cognize user voice commands may be nega-
tively affected by rapid speaking or a raised
v o
ice level. When you push the Uconnect Voice Command
button, you hear a beep. The beep is your
signal to give a command.
If no command is spoken the system says one
o f
two responses:
I didn't understand
I didn't get that
If a command is not spoken a second time, the
s y
stem will respond with an error and give some
direction as what can be said based on the
context you are in. After three consecutive
failures of a spoken command the VR session
will end. Pushing the Uconnect Voice Command
button while the system is speaking is known as
“ b
arging in.” The system will be interrupted, and
after the beep, you can say a command. This
becomes helpful once you start to learn the
options.
NOTE:
At any time, you can say the words “Cancel” or
“ H
elp.”
These commands are universal and can be
u s
ed from any menu. All other commands can
be used depending upon the active application.
When using this system, you should speak
c le
arly and at a normal speaking volume.
The system best recognizes your speech if
the windows are closed, and the heater/air
c o
nditioning fan is set to low.
At any point, if the system does not recognize
o n
e of your commands, you will be prompted to
repeat it.
To hear available commands, push the
U c
onnect Voice Command button and say
“Help.” You hear available commands for the
s c
reen displayed.
WARNING!
Any voice commanded system should be
used only in safe driving conditions following
all applicable laws, including laws regarding
phone use. Your attention should be focused
on safely operating the vehicle. Failure to do
so may result in a collision causing serious
injury or death.