eco mode DODGE JOURNEY 2020 Manual PDF
[x] Cancel search | Manufacturer: DODGE, Model Year: 2020, Model line: JOURNEY, Model: DODGE JOURNEY 2020Pages: 396, PDF Size: 25.53 MB
Page 371 of 396

MULTIMEDIA 369
REMOTE CONTROL STORAGE
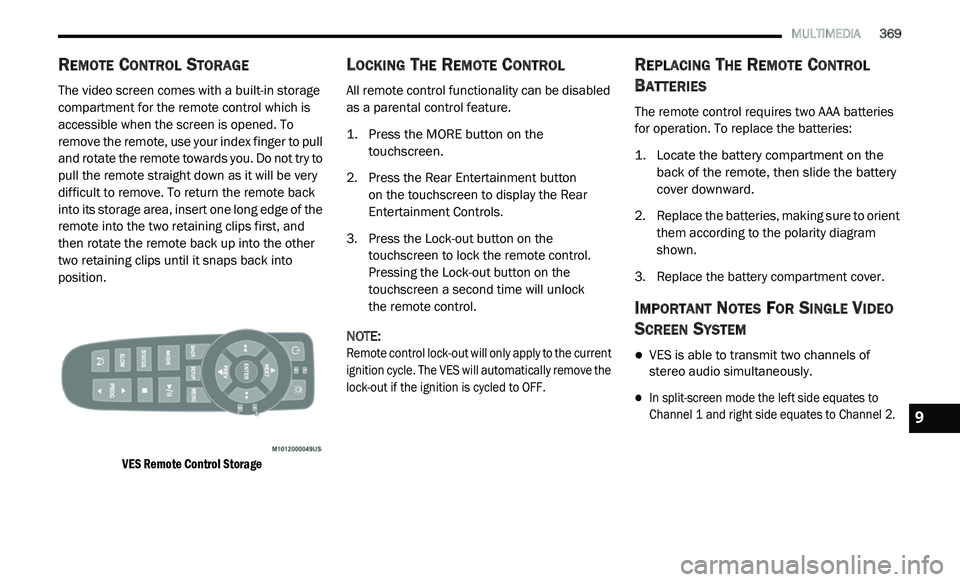
The video screen comes with a built-in storage
compartment for the remote control which is
accessible when the screen is opened. To
remove the remote, use your index finger to pull
and rotate the remote towards you. Do not try to
pull the remote straight down as it will be very
difficult to remove. To return the remote back
into its storage area, insert one long edge of the
remote into the two retaining clips first, and
then rotate the remote back up into the other
two retaining clips until it snaps back into
position.
VES Remote Control Storage
LOCKING THE REMOTE CONTROL
All remote control functionality can be disabled
as a parental control feature.
1. Press the MORE button on the
t
ouchscreen.
2. P ress the Rear Entertainment button
o
n the touchscreen to display the Rear
E n
tertainment Controls.
3. P ress the Lock-out button on the
t
ouchscreen to lock the remote control.
Pressing the Lock-out button on the
touchscreen a second time will unlock
the remote control.
NOTE:
Remote control lock-out will only apply to the current
i g
nition cycle. The VES will automatically remove the
lock-out if the ignition is cycled to OFF.
REPLACING THE REMOTE CONTROL
B
ATTERIES
The remote control requires two AAA batteries
for operation. To replace the batteries:
1. L ocate the battery compartment on the
b
ack of the remote, then slide the battery
cover downward.
2. R eplace the batteries, making sure to orient
t
hem according to the polarity diagram
shown.
3. R eplace the battery compartment cover.
IMPORTANT NOTES FOR SINGLE VIDEO
S
CREEN SYSTEM
VES is able to transmit two channels of
stereo audio simultaneously.
In split-screen mode the left side equates to
Channel 1 and right side equates to Channel 2.
9
Page 373 of 396

MULTIMEDIA 371
4. When the Mode Selection menu appears on
screen, use the cursor buttons on the
remote control to navigate to the available
modes and push the ENTER button to select
the new mode.
5. T o cancel out of the Mode Selection menu,
p
ush the BACK button on the remote
control.
REPLACING THE HEADPHONE
B
ATTERIES
Each set of headphones requires two AAA
batteries for operation. To replace the batteries:
1. L ocate the battery compartment on the left
e
ar cup of the headphones, and then slide
the battery cover downward.
2. R eplace the batteries, making sure to orient
t
hem according to the polarity diagram
shown.
3. R eplace the battery compartment cover.
ACCESSIBILITY
Accessibility is a feature of the DVD system that
announces a function prior to performing the
action. The first time a button is pressed the
system will identify the button, and will enact
the function of the button the second time it
is pressed. For further information, refer to
“ U
connect Settings” in “Multimedia.”
STEREO HEADPHONE LIFETIME LIMITED
W
ARRANTY
Who Does This Warranty Cover?
This warranty covers the initial user or
p u
rchaser ("you" or "your") of this particular
Aptiv PLC (“Aptiv”) wireless headphone
("Product"). The warranty is not transferable.
How Long Does the Coverage Last?
This warranty lasts as long as you own the
Pr
oduct.
What Does This Warranty Cover?
Except as specified below, this warranty covers
a n
y Product that in normal use is defective in
workmanship or materials. What Does This Warranty Not Cover?
This warranty does not cover any damage or
d e
fect that results from misuse, abuse or
modification of the Product other than by Aptiv.
Foam earpieces, which will wear over time
through normal use, are specifically not covered
(replacement foam is available for a nominal
charge). APTIV IS NOT LIABLE FOR ANY
INJURIES OR DAMAGES TO PERSONS OR
PROPERTY RESULTING FROM THE USE OF, OR
ANY FAILURE OR DEFECT IN, THE PRODUCT,
NOR IS APTIV LIABLE FOR ANY GENERAL,
SPECIAL, DIRECT, INDIRECT, INCIDENTAL,
CONSEQUENTIAL, EXEMPLARY, PUNITIVE OR
OTHER DAMAGES OF ANY KIND OR NATURE
WHATSOEVER. Some states and jurisdictions
may not allow the exclusion or limitation of
incidental or consequential damages, so
the above limitation may not apply to you.
This warranty gives you specific legal rights.
You may also have other rights, which vary from
j u
risdiction to jurisdiction.9
Page 377 of 396

MULTIMEDIA 375
DVD Audio Support
When a DVD-Audio disc is inserted in the DVD
pl
ayer, the DVD-Audio title on the disc is played
by default (most DVD-Audio discs also have a
Video title, but the Video title is ignored). All
multi-channel program material is automatically
mixed down to two channels, which may result
in a lowered apparent volume level. If you
increase the volume level to account for this
change in level, remember to lower the volume
before changing the disc or to another mode.
Recorded Discs
The DVD player will play CD-R and CD-RW discs
r e
corded in CD-Audio or Video-CD format, or as a
CD-ROM containing MP3 or WMA files. The player
will also play DVD-Video content recorded to a
DVD-R, DVD-RW and DVD-ROM discs.
If you record a disc using a personal computer,
th
ere may be cases where the DVD player may
not be able to play some or the entire disc, even
if it is recorded in a compatible format and is
playable on other players. To help avoid
playback problems, use the following guidelines
when recording discs.
Open sessions are ignored. Only sessions
that are closed are playable.
For multi-session CDs that contain only
multiple CD-Audio sessions, the player will
renumber the tracks so each track number is
unique.
For CD Data (or CD-ROM) discs, always use
the ISO-9660 (Level 1 or Level 2), Joliet, or
UDF format. CD-DA may also be used for PCM
Audio contained on CD-Based Data.
The player recognizes a maximum of 512
files and 99 folders per CD-R and CD-RW
disc.
Mixed media recordable DVD formats will
only play the Video_TS portion of the disc.
If you are still having trouble writing a disc that
i s
playable in the DVD player, check with the
disc recording software publisher for more
information about burning playable discs.
The recommended method for labeling
r e
cordable discs (CD-R, CD-RW, DVD-R and
DVD-RW) is with a permanent marker. Do not
use adhesive labels as they may separate from
the disc, become stuck, and cause permanent
damage to the DVD player. Compressed Audio Files (MP3, WMA And ACC)
The DVD player is capable of playing MP3
(
M
PEG-1 Audio Layer 3 with data bitrates from
32 to 320 kbit/s, including variable bit rates),
WMA (All Standard 8.x, 9.x Windows Media
Audio) and ACC (MPEG-4 audio; sampling
frequencies 8 to 48 kHz; mono and stereo)
audio files with the from CD Data disc (usually a
CD-R or CD-RW).
The DVD player always uses the file extension
to determine the audio format, so MP3 files
must always end with the extension ".mp3" or
".MP3", WMA files must always end with the
extension ".wma" or "WMA", and ACC files must
end with the extensions “.acc” or “.m4a”. To
prevent incorrect playback, do not use these
extensions for any other types of files.
For MP3 files, ID3 tag data v1, v1.1, v2 and
v2.4 (such as artist name, track title, album,
etc.) are supported.
Any file that is copy protected (such as those
downloaded from many online music stores)
will not play. The DVD player will automati -
cally skip the file and begin playing the next
a v
ailable file.
9
Page 381 of 396

MULTIMEDIA 379
Natural Speech
Natural speech allows the user to speak
commands in phrases or complete sentences.
The system filters out certain non-word
utterances and sounds such as “ah” and “eh.”
The system handles fill-in words such as “I would
like to.”
The system handles multiple inputs in the same
ph
rase or sentence such as “make a phone
call” and “to Kelly Smith.” For multiple inputs in
the same phrase or sentence, the system
identifies the topic or context and provides the
associated follow-up prompt such as “Who do
you want to call?” in the case where a phone
call was requested but the specific name was
not recognized.
The system utilizes continuous dialog; when the
s y
stem requires more information from the user
it will ask a question to which the user can
respond without pressing the Uconnect Voice
Command button.
UCONNECT VOICE COMMANDS
The Uconnect Voice Command system
understands two types of commands. Universal
commands are available at all times. Local
commands are available if the supported radio
mode is active.
Start a dialogue by pushing the Uconnect Voice
Co
mmand button.
Changing The Volume
1. Start a dialogue by pushing the Voice
Command button.
2. S ay a command (e.g., “Help”).
3
. U se the ON/OFF VOLUME rotary knob to
a
djust the volume to a comfortable level
while the Voice Command system is
speaking. Please note the volume setting
for Voice Command is different than the
audio system.
Starting Voice Recognition (VR) Session In
Radio/Player Modes
In this mode, you can say a command.
NOTE:
The commands can be said on any screen when
a
call is not active after pushing the Uconnect
Voice Command button.
Source
To switch to the audio source, say “Change
source to Disc” for example. This command can
be given in any mode or screen:
“Track” (#) (to change the track)
9