mileage DODGE JOURNEY 2020 Owners Manual
[x] Cancel search | Manufacturer: DODGE, Model Year: 2020, Model line: JOURNEY, Model: DODGE JOURNEY 2020Pages: 396, PDF Size: 25.53 MB
Page 99 of 396
GETTING TO KNOW YOUR INSTRUMENT PANEL 97
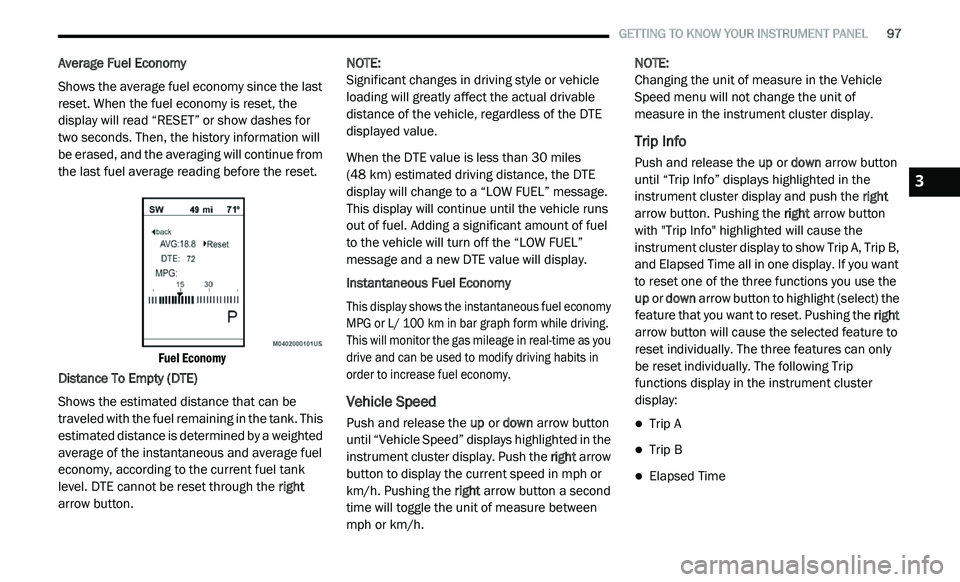
Average Fuel Economy
Shows the average fuel economy since the last
re
set. When the fuel economy is reset, the
display will read “RESET” or show dashes for
two seconds. Then, the history information will
be erased, and the averaging will continue from
the last fuel average reading before the reset.
Fuel Economy
Distance To Empty (DTE)
Shows the estimated distance that can be
t r
aveled with the fuel remaining in the tank. This
estimated distance is determined by a weighted
average of the instantaneous and average fuel
economy, according to the current fuel tank
level. DTE cannot be reset through the right
arrow button. NOTE:
Significant changes in driving style or vehicle
l o
ading will greatly affect the actual drivable
distance of the vehicle, regardless of the DTE
displayed value.
When the DTE value is less than 30 miles
(4
8 km) estimated driving distance, the DTE
d i
splay will change to a “LOW FUEL” message.
This display will continue until the vehicle runs
out of fuel. Adding a significant amount of fuel
to the vehicle will turn off the “LOW FUEL”
message and a new DTE value will display.
Instantaneous Fuel Economy
This display shows the instantaneous fuel economy
M P
G or L/ 100 km in bar graph form while driving.
T h
is will monitor the gas mileage in real-time as you
drive and can be used to modify driving habits in
order to increase fuel economy.
Vehicle Speed
Push and release the up or down arrow button
until “Vehicle Speed” displays highlighted in the
instrument cluster display. Push the right arrow
button to display the current speed in mph or
km/h. Pushing the right arrow button a second
time will toggle the unit of measure between
mph or km/h. NOTE:
Changing the unit of measure in the Vehicle
S p
eed menu will not change the unit of
measure in the instrument cluster display.
Trip Info
Push and release the up or down arrow button
until “Trip Info” displays highlighted in the
instrument cluster display and push the right
arrow button. Pushing the right arrow button
with "Trip Info" highlighted will cause the
instrument cluster display to show Trip A, Trip B,
and Elapsed Time all in one display. If you want
to reset one of the three functions you use the
up or down arrow button to highlight (select) the
feature that you want to reset. Pushing the right
arrow button will cause the selected feature to
reset individually. The three features can only
be reset individually. The following Trip
functions display in the instrument cluster
display:
Trip A
Trip B
Elapsed Time
3
Page 220 of 396
218 SERVICING AND MAINTENANCE
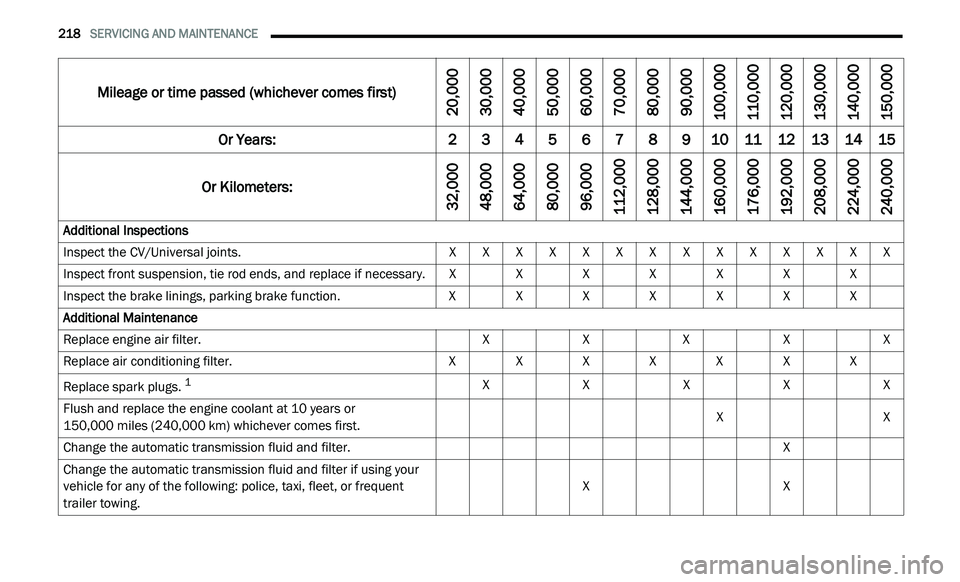
Mileage or time passed (whichever comes first)
20,000
30,0 00
40,0 00
50,0 00
60,0 00
70,0 00
80,0 00
90,0 00
100,0 00
110,0 00
120,0 00
130,0 00
140,0 00
150,0 00
Or Years: 2345678910 1112131415
Or Kilometers:
32,000
48,0 00
64,0 00
80,0 00
96,0 00
112,0 00
128,0 00
144,0 00
160,0 00
176,0 00
192,0 00
208,0 00
224,0 00
240,0 00
Additional Inspections
Inspect the CV/Universal joints. XXXXXXXXXXXXXX
Inspect front suspension, tie rod ends, and replace if necessary. XXXXXXX
Inspect the brake linings, parking brake function. XXXXXXX
Additional Maintenance
Replace engine air filter. XXXXX
Replace air conditioning filter. XXXXXXX
Replace spark plugs.
1X XXXX
Flush and replace the engine coolant at 10 years or
150,000 miles (240,000 km) whichever comes first. X
X
Change the automatic transmission fluid and filter. X
Change the automatic transmission fluid and filter if using your
v e
hicle for any of the following: police, taxi, fleet, or frequent
trailer towing. X
X
Page 221 of 396
SERVICING AND MAINTENANCE 219
Heavy Duty Use Of The Vehicle
Change engine oil at 4,000 miles (6,500 km) or
35
0 hours of engine run time if the vehicle is
operated in a dusty and off road environment or
is operated predominately at idle or only very
low engine RPM. This type of vehicle use is
considered Severe Duty.
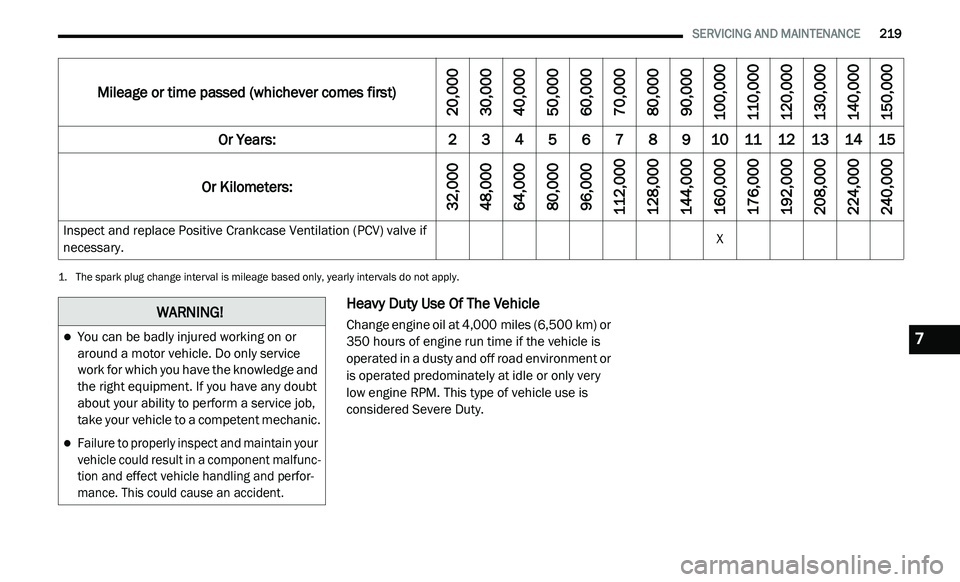
Inspect and replace Positive Crankcase Ventilation (PCV) valve if
ne
cessary. X
1. The spark plug change interval is mileage based only, yearly intervals do not apply.
Mileage or time passed (whichever comes first)
20,000
30,000
40,000
50,000
60,000
70,000
80,000
90,000
100,000
110,000
120,000
130,000
140,000
150,000
Or Years: 2 3 4 5 6 7 8 9 10 11 12 13 14 15
Or Kilometers:
32,000
48,000
64,000
80,000
96,000
112,000
128,000
144,000
160,000
176,000
192,000
208,000
224,000
240,000
WARNING!
You can be badly injured working on or
around a motor vehicle. Do only service
work for which you have the knowledge and
the right equipment. If you have any doubt
about your ability to perform a service job,
take your vehicle to a competent mechanic.
Failure to properly inspect and maintain your
vehicle could result in a component malfunc -
tion and effect vehicle handling and perfor -
mance. This could cause an accident.
7
Page 233 of 396

SERVICING AND MAINTENANCE 231
Coolant Level
The coolant bottle provides a quick visual
method for determining that the coolant level is
adequate. With the engine idling and warm to
normal operating temperature, the level of the
coolant in the bottle should be between the
“ADD” and “FULL” lines, shown on the bottle.
The radiator normally remains completely full,
so
there is no need to remove the radiator cap
unless checking for coolant freeze point or
replacing engine coolant (antifreeze). Advise
your service attendant of this. As long as the
engine operating temperature is satisfactory,
the coolant bottle need only be checked once a
month. When additional engine coolant
(antifreeze) is needed to maintain the proper
level, it should be added to the coolant bottle.
Do not overfill. See “Adding Coolant” in
“Servicing and Maintenance” for further
information.
Points To Remember
NOTE:
When the vehicle is stopped after a few miles/
k i
lometers of operation, you may observe vapor
coming from the front of the engine compart -
ment. This is normally a result of moisture from
r a
in, snow, or high humidity accumulating on
the radiator and being vaporized when the ther -
mostat opens, allowing hot engine coolant (anti -
freeze) to enter the radiator.
If an examination of your engine compartment
s h
ows no evidence of radiator or hose leaks,
the vehicle may be safely driven. The vapor will
soon dissipate.
Do not overfill the coolant expansion bottle.
Check the coolant freeze point in the radiator
and in the coolant expansion bottle. If engine
coolant (antifreeze) needs to be added, the
contents of the coolant expansion bottle
must also be protected against freezing.
If frequent engine coolant (antifreeze) addi-
tions are required, the cooling system should
b e
pressure tested for leaks.
Maintain engine coolant (antifreeze) concen -
tration at a minimum of 50% OAT coolant
( c
onforming to MS.90032) and distilled water
for proper corrosion protection of your engine
which contains aluminum components.
Make sure that the coolant expansion bottle
overflow hoses are not kinked or obstructed.
Keep the front of the radiator clean. If your
vehicle is equipped with air conditioning,
keep the front of the condenser clean.
Do not change the thermostat for Summer or
Winter operation. If replacement is ever
necessary, install ONLY the correct type ther -
mostat. Other designs may result in unsatis -
factory engine coolant (antifreeze)
p e
rformance, poor gas mileage, and
increased emissions.
7
Page 350 of 396
348 MULTIMEDIA
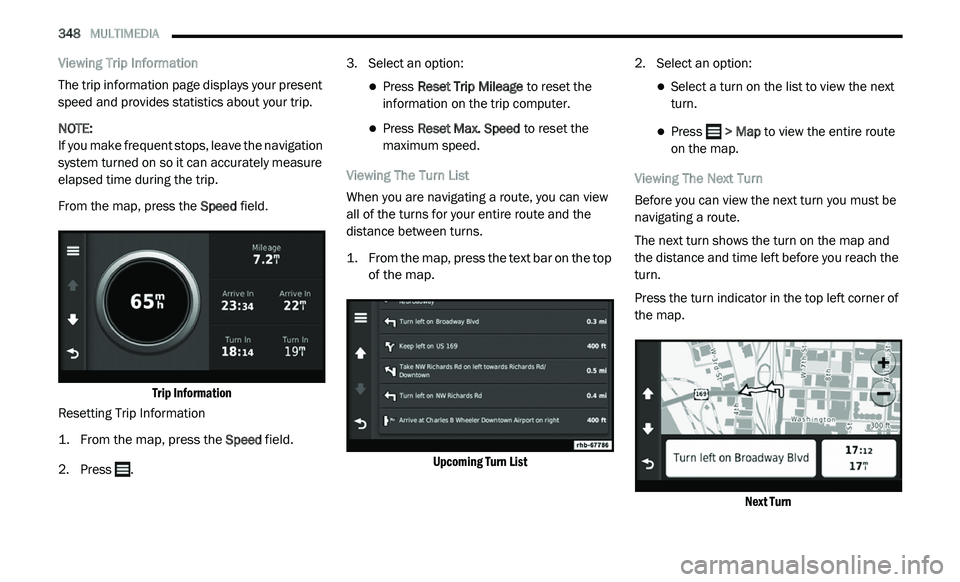
Viewing Trip Information
The trip information page displays your present
sp
eed and provides statistics about your trip.
NOTE:
If you make frequent stops, leave the navigation
s y
stem turned on so it can accurately measure
elapsed time during the trip.
From the map, press the Sp
eed field.
Trip Information
Resetting Trip Information
1. Fr om the map, press the
S
peed
field.
2. Press . 3
. S
elect an option:
Press Reset Trip Mileage to reset the
information on the trip computer.
Press Reset Max. Speed to reset the
maximum speed.
Viewing The Turn List
When you are navigating a route, you can view
al
l of the turns for your entire route and the
distance between turns.
1. Fr om the map, press the text bar on the top
o
f the map.
Upcoming Turn List
2. S
elect an option:
Select a turn on the list to view the next
turn.
Press > Map to view the entire route
o
n the map.
Viewing The Next Turn
Before you can view the next turn you must be
n a
vigating a route.
The next turn shows the turn on the map and
t h
e distance and time left before you reach the
turn.
Press the turn indicator in the top left corner of
t h
e map.
Next Turn
Page 382 of 396
380
CUSTOMER ASSISTANCE
SUGGESTIONS FOR OBTAINING SERVICE
FOR YOUR VEHICLE
PREPARE FOR THE APPOINTMENT
If you are having warranty work done, be sure to
have the right papers with you. Take your
warranty folder. All work to be performed may
not be covered by the warranty. Discuss
additional charges with the service manager.
Keep a maintenance log of your vehicle's
service history. This can often provide a clue to
the current problem.
PREPARE A LIST
Make a written list of your vehicle's problems or
the specific work you want done. If you've had
an accident or work done that is not on your
maintenance log, let the service advisor know.
BE REASONABLE WITH REQUESTS
If you list a number of items and you must have
your vehicle by the end of the day, discuss the
situation with the service advisor and list the
items in order of priority. At many authorized
dealers, you may obtain a rental vehicle at a
minimal daily charge. If you need a rental, it is
advisable to make these arrangements when
you call for an appointment.
IF YOU NEED ASSISTANCE
The manufacturer and its authorized dealers are
vitally interested in your satisfaction. We want you to
be happy with our products and services.
Warranty service must be done by an
au
thorized dealer. We strongly recommend that
you take the vehicle to an authorized dealer.
They know your vehicle the best, and are most
concerned that you get prompt and high quality
service. The manufacturer's authorized dealers
have the facilities, factory-trained technicians,
special tools, and the latest information to
ensure the vehicle is fixed correctly and in a
timely manner. This is why you should always talk to an
a
u
thorized dealer service manager first. Most
matters can be resolved with this process.
If for some reason you are still not satisfied,
talk to the general manager or owner of the
authorized dealer. They want to know if you
need assistance.
If an authorized dealer is unable to resolve
the concern, you may contact the manufac -
turer's customer center.
Any communication to the manufacturer's
c u
stomer center should include the following
information:
Owner's name and address
Owner's telephone number (home, mobile,
and office)
Authorized dealer name
Vehicle Identification Number (VIN)
Vehicle delivery date and mileage