odometer DODGE JOURNEY 2020 Owners Manual
[x] Cancel search | Manufacturer: DODGE, Model Year: 2020, Model line: JOURNEY, Model: DODGE JOURNEY 2020Pages: 396, PDF Size: 25.53 MB
Page 45 of 396
GETTING TO KNOW YOUR VEHICLE 43
INTERIOR LIGHTS
COURTESY/INTERIOR LIGHTING
The interior lights come on when a door is
opened.
To protect the battery, the interior lights will turn
of
f automatically 10 minutes after the ignition is
p l
aced in the OFF position. This will occur if the
interior lights were switched on manually or are
on because a door is open. The battery
protection also includes the glove compartment
light. To restore interior light operation after
automatic battery protection is enabled (lights
off), either place the ignition in the ON/RUN
position or cycle the light switch.
Courtesy Lights
The overhead console has two courtesy lights.
The lights turn on when a front door, a rear door
or the liftgate is opened. If your vehicle is
equipped with Remote Keyless Entry, the lights
will also turn on when the unlock button on the
key fob is pushed. The courtesy lights also
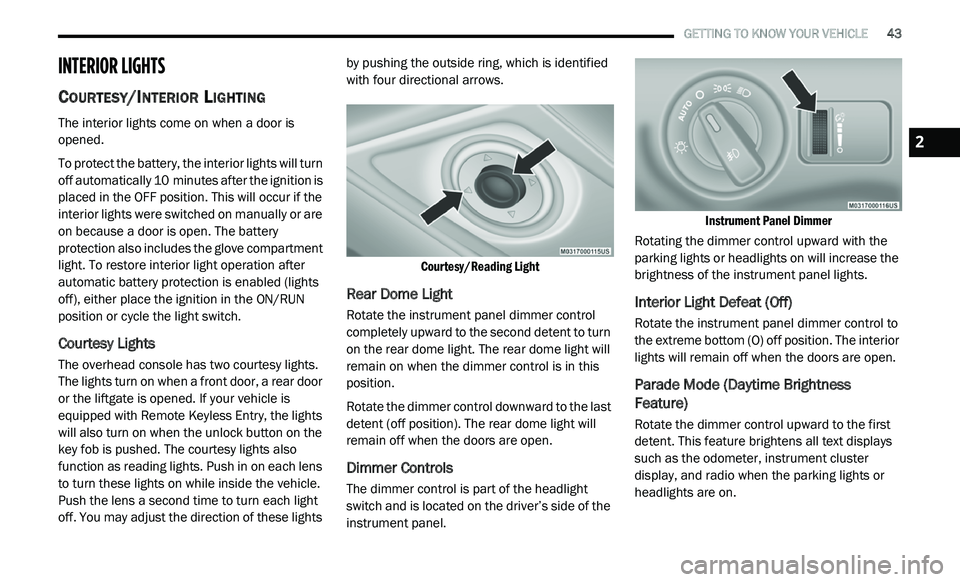
function as reading lights. Push in on each lens
to turn these lights on while inside the vehicle.
Push the lens a second time to turn each light
off. You may adjust the direction of these lights by pushing the outside ring, which is identified
with four directional arrows.
Courtesy/Reading Light
Rear Dome Light
Rotate the instrument panel dimmer control
completely upward to the second detent to turn
on the rear dome light. The rear dome light will
remain on when the dimmer control is in this
position.
Rotate the dimmer control downward to the last
de
tent (off position). The rear dome light will
remain off when the doors are open.
Dimmer Controls
The dimmer control is part of the headlight
switch and is located on the driver’s side of the
instrument panel.
Instrument Panel Dimmer
Rotating the dimmer control upward with the
p a
rking lights or headlights on will increase the
brightness of the instrument panel lights.
Interior Light Defeat (Off)
Rotate the instrument panel dimmer control to
the extreme bottom (O) off position. The interior
lights will remain off when the doors are open.
Parade Mode (Daytime Brightness
Feature)
Rotate the dimmer control upward to the first
detent. This feature brightens all text displays
such as the odometer, instrument cluster
display, and radio when the parking lights or
headlights are on.
2
Page 97 of 396
GETTING TO KNOW YOUR INSTRUMENT PANEL 95
INSTRUMENT CLUSTER DISPLAY
Your vehicle may be equipped with an
instrument cluster display, which offers useful
information to the driver. With the ignition in
the OFF mode, opening/closing of a door will
a c
tivate the display for viewing, and display
the total miles, or kilometers, in the odometer.
Y o
ur instrument cluster display is designed to
display important information about your
vehicle’s systems and features. Using a driver
interactive display located on the instrument
panel, your instrument cluster display can show
you how systems are working and give you
warnings when they aren’t. The steering wheel
mounted controls allow you to scroll through
and enter the main menus and submenus.
You can access the specific information you
w a
nt and make selections and adjustments.
INSTRUMENT CLUSTER DISPLAY
L
OCATION AND CONTROLS
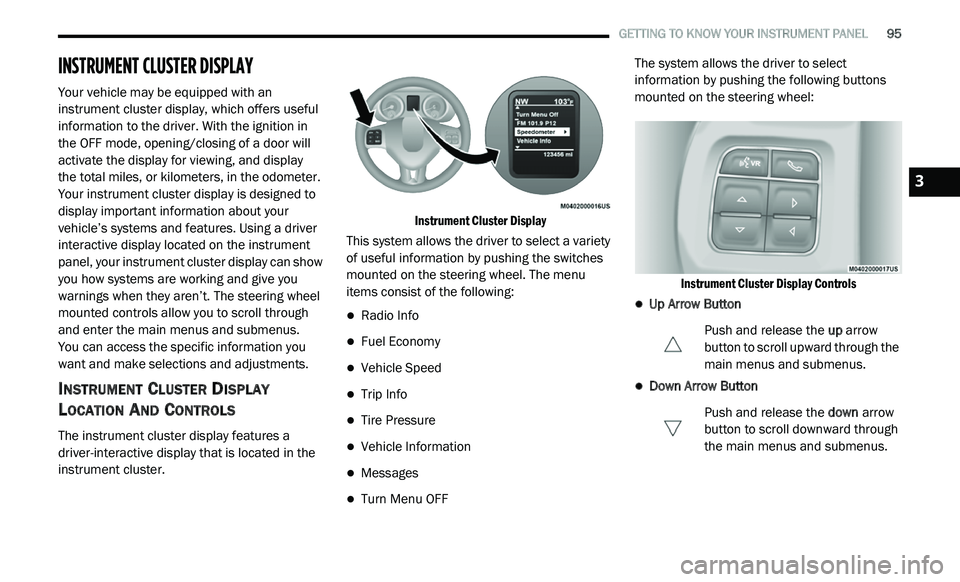
The instrument cluster display features a
driver-interactive display that is located in the
instrument cluster.
Instrument Cluster Display
This system allows the driver to select a variety
o f
useful information by pushing the switches
mounted on the steering wheel. The menu
items consist of the following:
Radio Info
Fuel Economy
Vehicle Speed
Trip Info
Tire Pressure
Vehicle Information
Messages
Turn Menu OFF The system allows the driver to select
i
n
formation by pushing the following buttons
mounted on the steering wheel:
Instrument Cluster Display Controls
Up Arrow Button Push and release the up
arrow
button to scroll upward through the
m a
in menus and submenus.
Down Arrow Button
Push and release the do
wn arrow
button to scroll downward through
t h
e main menus and submenus.
3
Page 179 of 396
STARTING AND OPERATING 177
(Continued)
NOTE:
Tighten the gas cap until you hear a “clicking”
s o
und. This is an indication that the gas cap is
tightened properly. The MIL in the instrument
cluster may turn on if the gas cap is not secured
properly. Make sure that the gas cap is tight -
ened each time the vehicle is refueled.
LOOSE FUEL FILLER CAP MESSAGE
If the vehicle diagnostic system determines that
the fuel filler cap is loose, improperly installed,
or damaged, a ”gASCAP” message will display in
the odometer or a “Check Gascap” message will
display in the instrument cluster. If this occurs,
tighten the fuel filler cap properly and press the
Trip Odometer button to turn off the message. If
the problem continues, the message will appear
the next time the vehicle is started.
A loose, improperly installed, or damaged fuel
f i
ller cap may also turn on the MIL.
VEHICLE LOADING
The load carrying capacity of your vehicle is
shown on the “Vehicle Certification Label”. This
information should be used for passenger and
luggage loading as indicated.
Do not exceed the specified Gross Vehicle
W e
ight Rating (GVWR) or the Gross Axle Weight
Rating (GAWR).
VEHICLE CERTIFICATION LABEL
Your vehicle has a Vehicle Certification Label
affixed to the drivers side B-pillar or the rear of
the driver’s door.
The label contains the following information:
Name of manufacturer
Month and year of manufacture
Gross Vehicle Weight Rating (GVWR)
Gross Axle Weight Rating (GAWR) front
Gross Axle Weight Rating (GAWR) rear
Vehicle Identification Number (VIN)
Type of vehicle
Month, Day, and Hour of manufacture (MDH)
WARNING!
Never have any smoking materials lit in or
near the vehicle when the gas cap is
removed or the tank is being filled.
Never add fuel to the vehicle when the
engine is running.
A fire may result if gasoline is pumped into
a portable container that is inside of a
vehicle. You could be burned. Always place
gas containers on the ground while filling.
Failure to follow this warning may result in
serious injury or death.
CAUTION!
Damage to the fuel system or emissions
control system could result from using an
improper fuel tank filler tube cap.
A poorly fitting fuel filler cap could let impu -
rities into the fuel system.
A poorly fitting fuel filler cap may cause the
“Malfunction Indicator Light (MIL)” to turn on.
To avoid fuel spillage and overfilling, do not
“top off” the fuel tank after filling. When the
fuel nozzle “clicks” or shuts off, the fuel
tank is full.
CAUTION! (Continued)
5
Page 212 of 396
210 IN CASE OF EMERGENCY
2.4L ENGINE — IF EQUIPPED
On hot days, the engine oil temperature may
become too hot during sustained high-speed
driving or if towing a trailer up long grades. If
this happens, a HOTOIL message will flash in
the odometer and the vehicle speed will be
reduced to 48
mph (77 km/h) maximum until
t h
e engine oil temperature is reduced.
NOTE:
The maximum vehicle speed is reduced to
4 8
mph (77 km/h), you may reduce vehicle
s p
eed further as needed. Once the engine oil
temperature is reduced, you may continue to
drive normally.
GEAR SELECTOR OVERRIDE
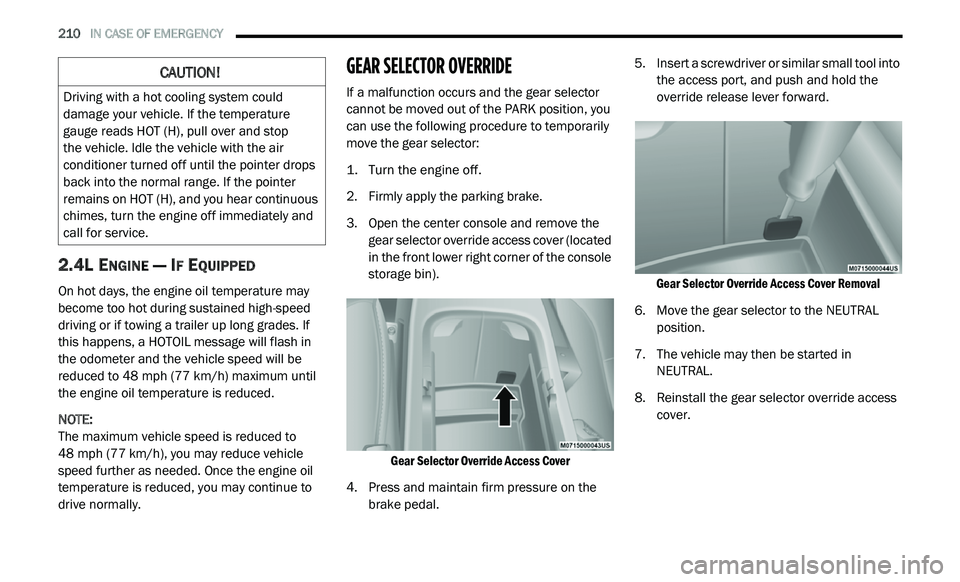
If a malfunction occurs and the gear selector
cannot be moved out of the PARK position, you
can use the following procedure to temporarily
move the gear selector:
1. Turn the engine off.
2
. F irmly apply the parking brake.
3
. O pen the center console and remove the
g
ear selector override access cover (located
in the front lower right corner of the console
storage bin).
Gear Selector Override Access Cover
4. P ress and maintain firm pressure on the
b
rake pedal. 5. I
nsert a screwdriver or similar small tool into
t
he access port, and push and hold the
override release lever forward.
Gear Selector Override Access Cover Removal
6. M ove the gear selector to the NEUTRAL
p
osition.
7. T he vehicle may then be started in
N
EUTRAL.
8. R einstall the gear selector override access
c
over.
CAUTION!
Driving with a hot cooling system could
damage your vehicle. If the temperature
gauge reads HOT (H), pull over and stop
the vehicle. Idle the vehicle with the air
c o
nditioner turned off until the pointer drops
back into the normal range. If the pointer
remains on HOT (H), and you hear continuous
chimes, turn the engine off immediately and
call for service.
Page 248 of 396
246 SERVICING AND MAINTENANCE
(Continued)
It is recommended to replace the two front tires
or two rear tires as a pair. Replacing just one tire
can seriously affect your vehicle’s handling.
If you ever replace a wheel, make sure that the
w h
eel’s specifications match those of the
original wheels.
It is recommended you contact an authorized
t i
re dealer or original equipment dealer with any
questions you may have on tire specifications
or capability. Failure to use equivalent
r e
placement tires may adversely affect the
safety, handling, and ride of your vehicle.
TIRE TYPES
All Season Tires — If Equipped
All Season tires provide traction for all seasons
(Spring, Summer, Autumn, and Winter). Traction
levels may vary between different all season
tires. All season tires can be identified by the
M+S, M&S, M/S or MS designation on the tire
sidewall. Use all season tires only in sets of four; failure to do so may adversely affect the safety
and handling of your vehicle.
Summer Or Three Season Tires — If
Equipped
Summer tires provide traction in both wet and
dry conditions, and are not intended to be
driven in snow or on ice. If your vehicle is
equipped with Summer tires, be aware these
tires are not designed for Winter or cold driving
conditions. Install Winter tires on your vehicle
when ambient temperatures are less than 40°F
(5°C) or if roads are covered with ice or snow.
For more information, contact an authorized
dealer.
Summer tires do not contain the all season
d
e
signation or mountain/snowflake symbol on
the tire sidewall. Use Summer tires only in sets
of four; failure to do so may adversely affect the
safety and handling of your vehicle.
WARNING!
Do not use a tire, wheel size, load rating, or
speed rating other than that specified for your
vehicle. Some combinations of unapproved
tires and wheels may change suspension
dimensions and performance characteristics,
resulting in changes to steering, handling, and
braking of your vehicle. This can cause unpre -
dictable handling and stress to steering and
s u
spension components. You could lose
control and have a collision resulting in serious
injury or death. Use only the tire and wheel
sizes with load ratings approved for your
vehicle.
Never use a tire with a smaller load index or
capacity, other than what was originally
equipped on your vehicle. Using a tire with
a smaller load index could result in tire
overloading and failure. You could lose
control and have a collision.
Failure to equip your vehicle with tires
having adequate speed capability can
result in sudden tire failure and loss of
vehicle control.
CAUTION!
Replacing original tires with tires of a
different size may result in false speedometer
and odometer readings.
WARNING! (Continued)
WARNING!
Do not use Summer tires in snow/ice
conditions. You could lose vehicle control,
resulting in severe injury or death. Driving too
fast for conditions also creates the possibility
of loss of vehicle control.