engine DODGE MAGNUM SRT 2007 1.G Manual Online
[x] Cancel search | Manufacturer: DODGE, Model Year: 2007, Model line: MAGNUM SRT, Model: DODGE MAGNUM SRT 2007 1.GPages: 380, PDF Size: 6.63 MB
Page 312 of 380
humidity accumulating on the radiator and being vapor-
ized when the thermostat opens, allowing hot coolant to
enter the radiator.
If an examination of your engine compartment shows no
evidence of radiator or hose leaks, the vehicle may be
safely driven. The vapor will soon dissipate.
²Do not overfill the coolant recovery bottle.
²Check coolant freeze point in the radiator and in the
coolant recovery bottle. If antifreeze needs to be
added, contents of coolant recovery bottle must also be
protected against freezing.
²If frequent coolant additions are required, or if the
level in the coolant recovery bottle does not drop when
the engine cools, the cooling system should be pres-
sure tested for leaks.
²Maintain coolant concentration at 50% HOAT engine
coolant (minimum) and distilled water for proper
corrosion protection of your engine, which contains
aluminum components.
²Make sure that the radiator and coolant recovery
bottle overflow hoses are not kinked or obstructed.
²Keep the front of the radiator clean. If your vehicle is
equipped with air conditioning, keep the front of the
condenser clean, also.
²Do not change the thermostat for summer or winter
operation. If replacement is ever necessary, install
ONLY the correct type thermostat. Other designs may
result in unsatisfactory coolant performance, poor gas
mileage, and increased emissions.
Hoses and Vacuum/Vapor Harnesses
Inspect surfaces of hoses and nylon tubing for evidence
of heat and mechanical damage. Hard or soft spots,
brittle rubber, cracking, tears, cuts, abrasions, and exces-
sive swelling indicate deterioration of the rubber.
Pay particular attention to those hoses nearest to high
heat sources such as the exhaust manifold. Inspect hose
routing to be sure hoses do not come in contact with any
heat source or moving component, which may cause heat
damage or mechanical wear.
MAINTAINING YOUR VEHICLE 311
7
Page 314 of 380
Insure nylon tubing in these areas has not melted or
collapsed.
Inspect all hose connections such as clamps and cou-
plings to make sure they are secure and no leaks are
present.
NOTE:
²
Often, fluid such as oil, power steering fluid, and
brake fluid are used during assembly plant operations
to facilitate the assembly of hoses to couplings. There-
fore, oil wetness at the hose-coupling area is not
necessarily an indication of leakage. Actual dripping
of hot fluid when systems are under pressure (during
vehicle operation), should be noted before a hose is
replaced based on leakage.
²Inspect the brake hoses whenever the brake system is
serviced and at every engine oil change. Inspect hy-
draulic brake hoses for surface cracking, scuffing, or
worn spots. If there is any evidence of cracking,
scuffing, or worn spots, the hose should be replaced
immediately! Eventual deterioration of the hose can
take place resulting in a possibility of a burst failure.
WARNING!
Worn brake hoses can burst and cause brake failure.
You could have an accident. If you see any signs of
cracking, scuffing, or worn spots, have the brake
hoses replaced immediately.
Master Cylinder - Brake Fluid Level Check
Check the fluid level in the master cylinder immediately
if the brake system warning light indicates system fail-
ure.
Check the fluid level in the master cylinder when per-
forming underhood services.
Clean the top of the master cylinder area before removing
the cap. Add fluid to bring the level up to the top of the
ªFULLº mark on the side of the master cylinder reservoir.
Overfilling of fluid is not recommended because it may
cause leaking in the system.
Add enough fluid to bring the level up to the require-
ments described on the brake fluid reservoir. With disc
MAINTAINING YOUR VEHICLE 313
7
Page 315 of 380
brakes, fluid level can be expected to fall as the brake
pads wear. However, low fluid level may be caused by a
leak and a checkup may be needed.
Use only manufacturer's recommended brake fluid. Re-
fer to ªFluids, Lubricants, and Genuine Partsº for the
correct fluid type.
WARNING!
²Overfilling the brake fluid reservoir can result in
spilling brake fluid on hot engine parts and the
brake fluid catching fire.
²Use of a brake fluid that has a lower initial boiling
point than the recommended MOPARtDOT 3
product or a brake fluid that is unidentified as to
FMVSS specification may result in sudden brake
failure during hard prolonged braking. You could
have an accident.
Use only brake fluid that has been in a tightly closed
container to avoid contamination from foreign matter or
moisture.
CAUTION!
Do not allow petroleum base fluid to contaminate
the brake fluid, all brake seal components could be
damaged causing partial or complete brake failure.
Automatic Transmission
Fluid Level Check
Regular automatic transmission fluid level checks are not
required. For this reason, the dipstick is omitted.
If you notice fluid loss or gear shift malfunction, have
your authorized dealer check the transmission fluid level.
314 MAINTAINING YOUR VEHICLE
Page 316 of 380
CAUTION!
²Using a transmission fluid other than the manu-
facturer's recommended fluid may cause deterio-
ration in transmission shift quality and/or torque
converter shudder. Using a transmission fluid
other than that recommended by the manufac-
turer will result in more frequent fluid and filter
changes. Refer to ªFluids, Lubricants, and Genu-
ine Partsº for the correct fluid type.
²The fluid level is preset at the factory and it does
not require adjustment under normal operating
conditions. If a transmission fluid leak occurs,
visit your authorized dealer immediately. Severe
damage to the transmission may occur. Your au-
thorized dealer has the proper tools to adjust the
fluid level accurately.
Fluid and Filter Changes
Automatic transmission fluid and filter should be
changed as follows:
Normal Usage Ð No change necessarySevere Usage (fluid and filter) Ð Refer to Maintenance
Schedule ªBº
Severe Usage is defined as:
²Police, taxi, limousine, commercial type operation, or
trailer towing where the vehicle is drivenregularlyfor
more than 45 minutes of continuous operation.
If the transmission is disassembled for any reason, the
fluid and filter should be changed.
Special Additives
Automatic Transmission Fluid (ATF) is an engineered
product and its performance may be impaired by supple-
mental additives. Therefore, do not add any fluid addi-
tives to the transmission. The only exception to this
policy is the use of special dyes to aid in detecting fluid
leaks. In addition, avoid using transmission sealers as
they may adversely affect seals.
Front and Rear Wheel Bearings
Front and rear wheel bearings are permanently sealed.
No regular maintenance is required for these compo-
nents.
MAINTAINING YOUR VEHICLE 315
7
Page 321 of 380
²Carefully tuck the front, followed by the rear, then side
edges of the cup holder into the center console.
FUSES (POWER DISTRIBUTION CENTERS)
Fuses (Front Power Distribution Center)
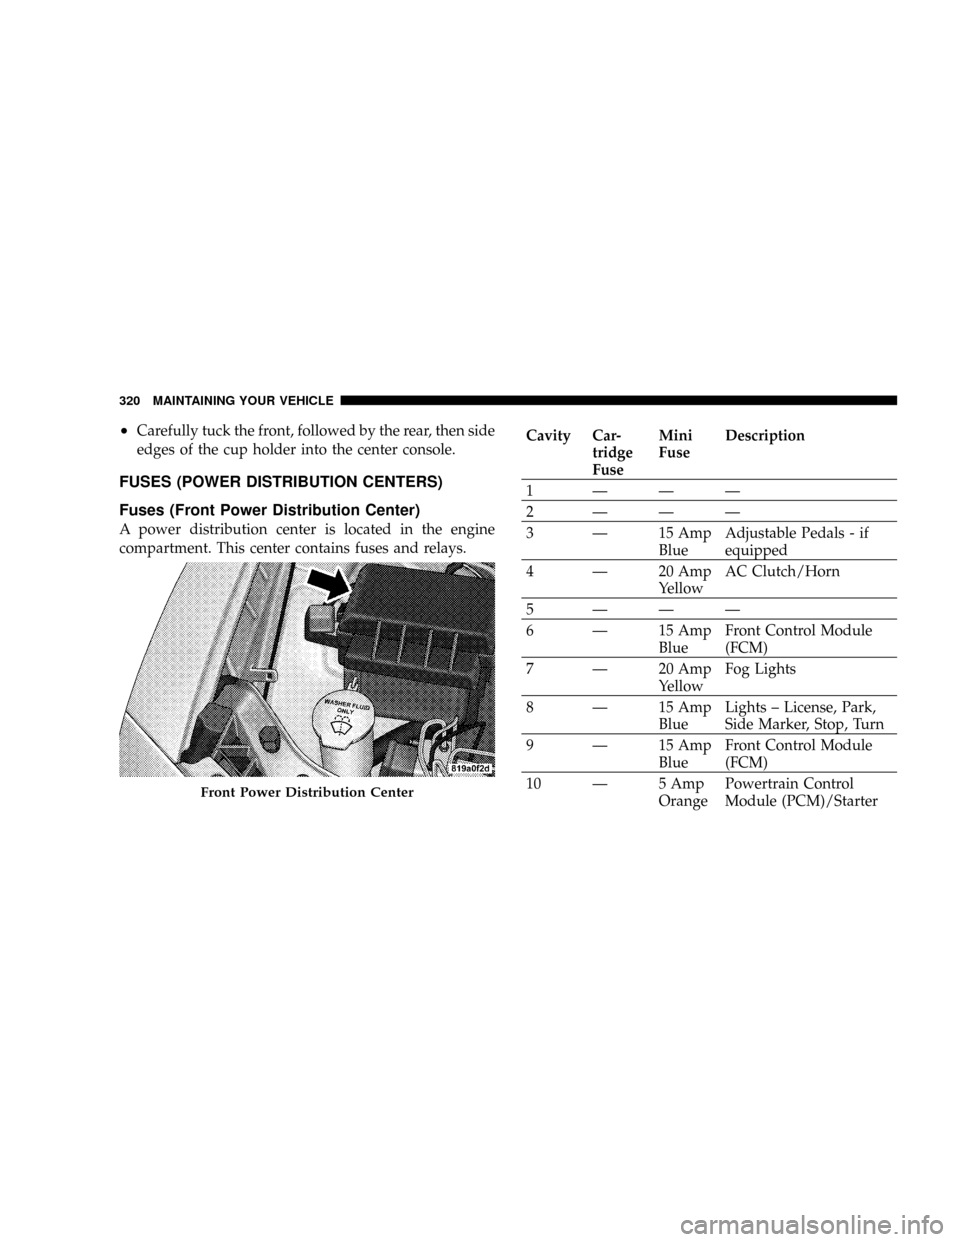
A power distribution center is located in the engine
compartment. This center contains fuses and relays.
Cavity Car-
tridge
FuseMini
FuseDescription
1ÐÐÐ
2ÐÐÐ
3 Ð 15 Amp
BlueAdjustable Pedals - if
equipped
4 Ð 20 Amp
YellowAC Clutch/Horn
5ÐÐÐ
6 Ð 15 Amp
BlueFront Control Module
(FCM)
7 Ð 20 Amp
YellowFog Lights
8 Ð 15 Amp
BlueLights ± License, Park,
Side Marker, Stop, Turn
9 Ð 15 Amp
BlueFront Control Module
(FCM)
10 Ð 5 Amp
OrangePowertrain Control
Module (PCM)/Starter
Front Power Distribution Center
320 MAINTAINING YOUR VEHICLE
Page 332 of 380
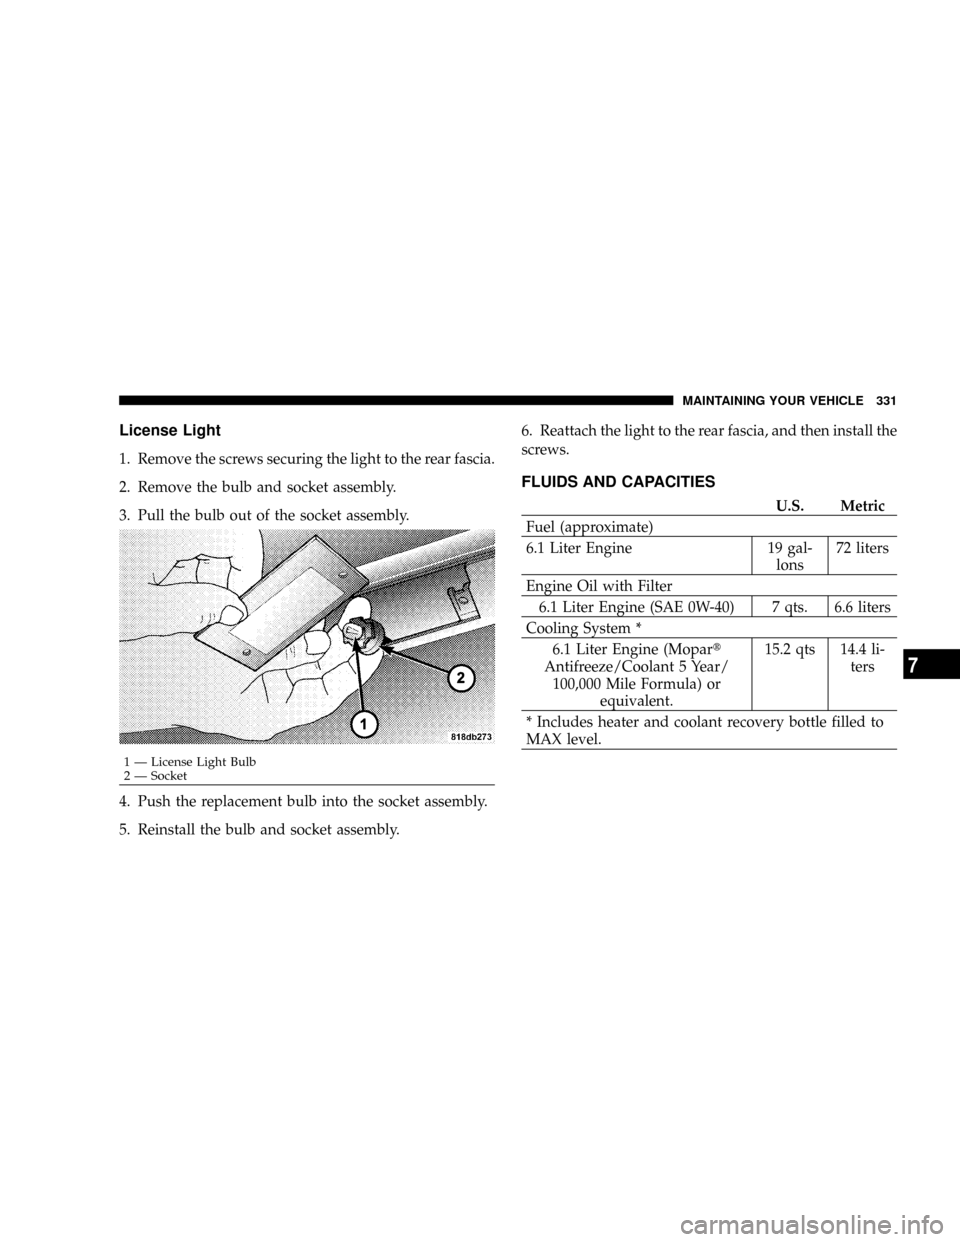
License Light
1. Remove the screws securing the light to the rear fascia.
2. Remove the bulb and socket assembly.
3. Pull the bulb out of the socket assembly.
4. Push the replacement bulb into the socket assembly.
5. Reinstall the bulb and socket assembly.6. Reattach the light to the rear fascia, and then install the
screws.
FLUIDS AND CAPACITIES
U.S. Metric
Fuel (approximate)
6.1 Liter Engine 19 gal-
lons72 liters
Engine Oil with Filter
6.1 Liter Engine (SAE 0W-40) 7 qts. 6.6 liters
Cooling System *
6.1 Liter Engine (Mopart
Antifreeze/Coolant 5 Year/
100,000 Mile Formula) or
equivalent.15.2 qts 14.4 li-
ters
* Includes heater and coolant recovery bottle filled to
MAX level.
1 Ð License Light Bulb
2 Ð SocketMAINTAINING YOUR VEHICLE 331
7
Page 333 of 380
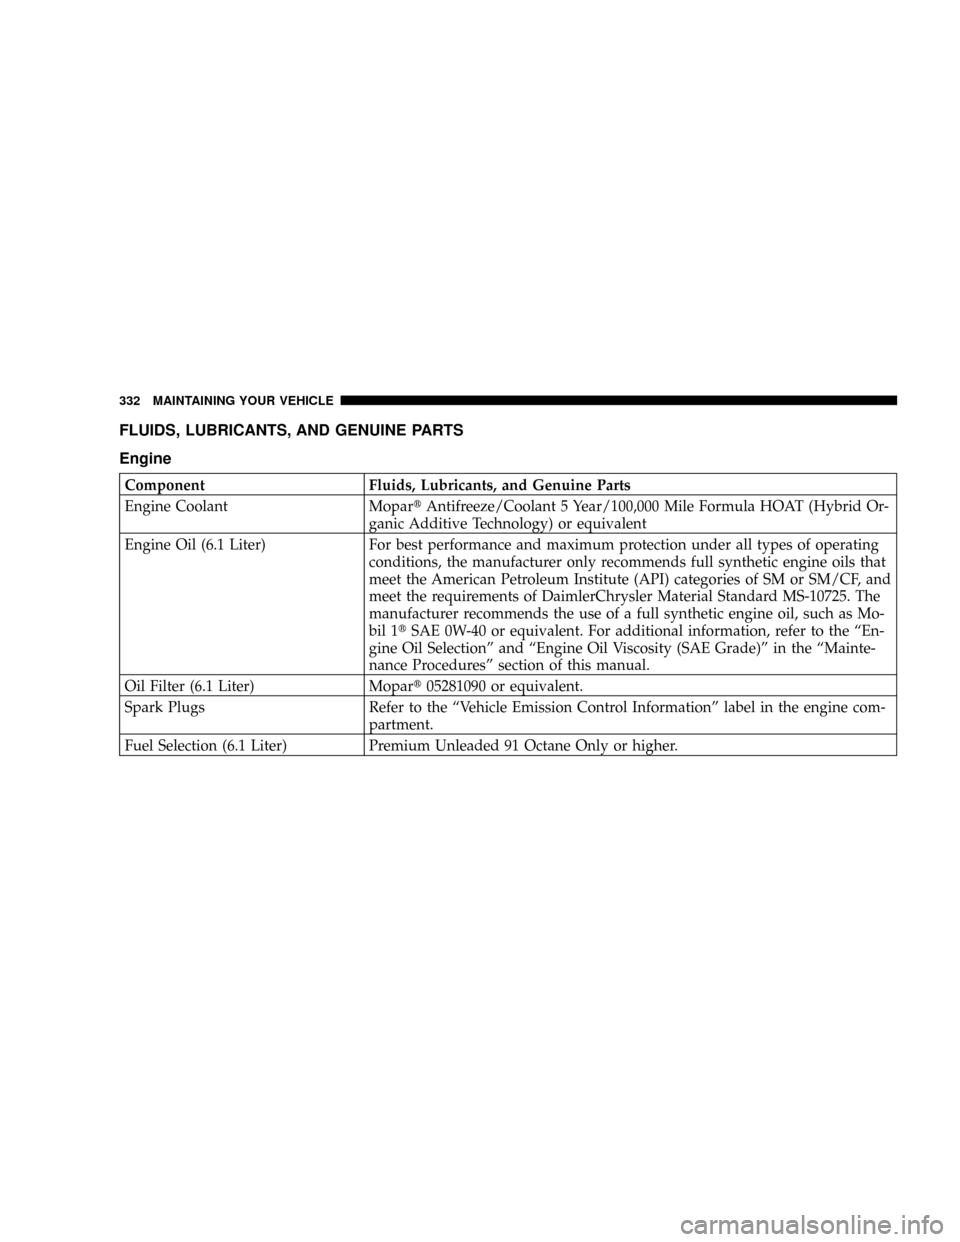
FLUIDS, LUBRICANTS, AND GENUINE PARTS
Engine
Component Fluids, Lubricants, and Genuine Parts
Engine Coolant MopartAntifreeze/Coolant 5 Year/100,000 Mile Formula HOAT (Hybrid Or-
ganic Additive Technology) or equivalent
Engine Oil (6.1 Liter) For best performance and maximum protection under all types of operating
conditions, the manufacturer only recommends full synthetic engine oils that
meet the American Petroleum Institute (API) categories of SM or SM/CF, and
meet the requirements of DaimlerChrysler Material Standard MS-10725. The
manufacturer recommends the use of a full synthetic engine oil, such as Mo-
bil 1tSAE 0W-40 or equivalent. For additional information, refer to the ªEn-
gine Oil Selectionº and ªEngine Oil Viscosity (SAE Grade)º in the ªMainte-
nance Proceduresº section of this manual.
Oil Filter (6.1 Liter) Mopart05281090 or equivalent.
Spark Plugs Refer to the ªVehicle Emission Control Informationº label in the engine com-
partment.
Fuel Selection (6.1 Liter) Premium Unleaded 91 Octane Only or higher.
332 MAINTAINING YOUR VEHICLE
Page 337 of 380
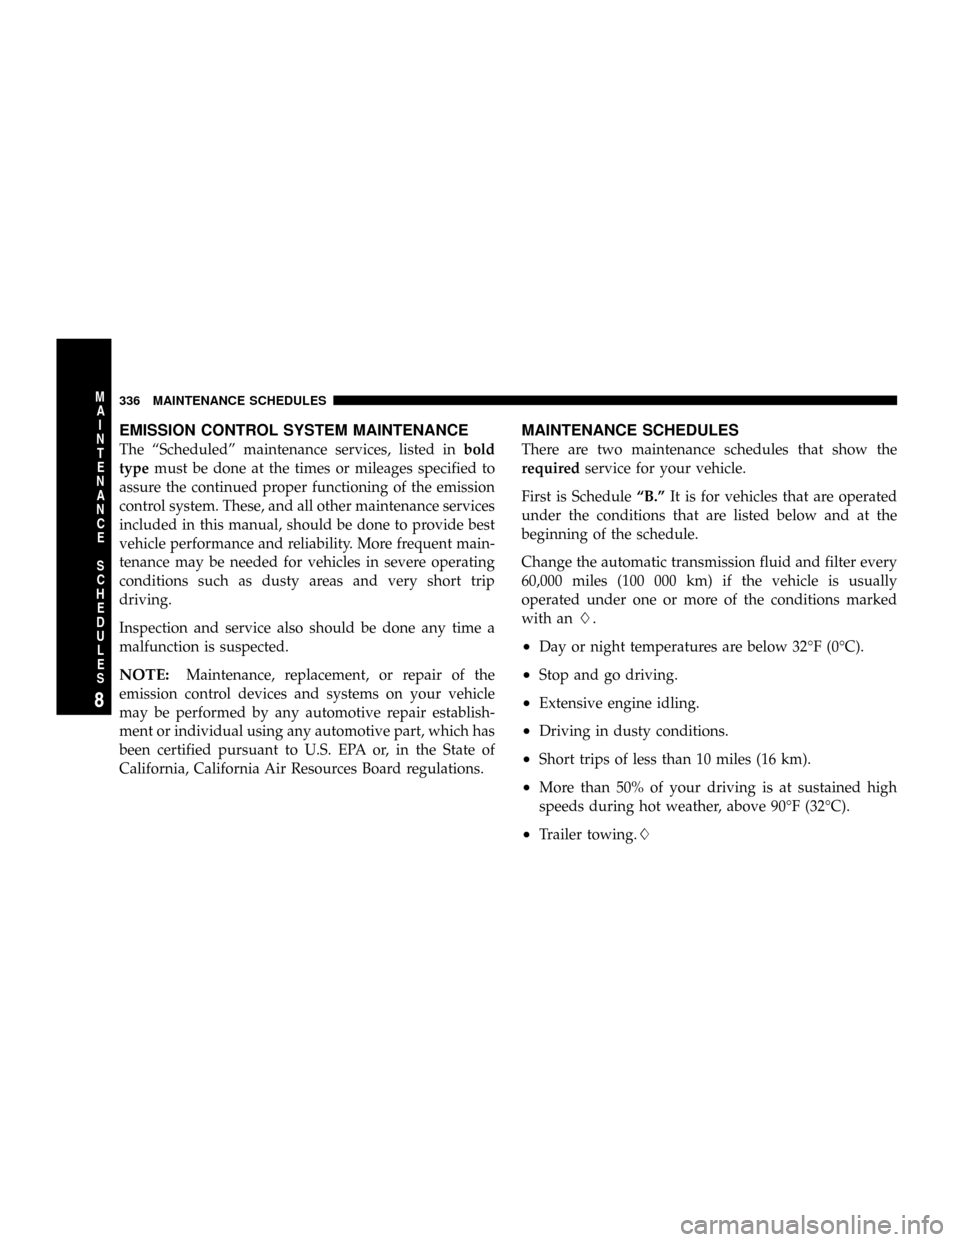
EMISSION CONTROL SYSTEM MAINTENANCE
The ªScheduledº maintenance services, listed inbold
typemust be done at the times or mileages specified to
assure the continued proper functioning of the emission
control system. These, and all other maintenance services
included in this manual, should be done to provide best
vehicle performance and reliability. More frequent main-
tenance may be needed for vehicles in severe operating
conditions such as dusty areas and very short trip
driving.
Inspection and service also should be done any time a
malfunction is suspected.
NOTE:Maintenance, replacement, or repair of the
emission control devices and systems on your vehicle
may be performed by any automotive repair establish-
ment or individual using any automotive part, which has
been certified pursuant to U.S. EPA or, in the State of
California, California Air Resources Board regulations.
MAINTENANCE SCHEDULES
There are two maintenance schedules that show the
requiredservice for your vehicle.
First is ScheduleªB.ºIt is for vehicles that are operated
under the conditions that are listed below and at the
beginning of the schedule.
Change the automatic transmission fluid and filter every
60,000 miles (100 000 km) if the vehicle is usually
operated under one or more of the conditions marked
with anL.
²Day or night temperatures are below 32ÉF (0ÉC).
²Stop and go driving.
²Extensive engine idling.
²Driving in dusty conditions.
²Short trips of less than 10 miles (16 km).
²More than 50% of your driving is at sustained high
speeds during hot weather, above 90ÉF (32ÉC).
²Trailer towing.L
336 MAINTENANCE SCHEDULES
8
M
A
I
N
T
E
N
A
N
C
E
S
C
H
E
D
U
L
E
S
Page 338 of 380
²Taxi, police, or delivery service (commercial ser-
vice).L
²Off-road or desert operation.
NOTE:IfANYof these apply to you, then change your
engine oil every 3,000 miles (5 000 km) or 3 months,
whichever comes first, and follow the maintenance rec-
ommendations in Schedule ªBº in this section.
NOTE:IfANYof these apply to you, then flush and
replace the engine coolant every 102,000 miles (170 000
km) or 60 months, whichever comes first, and follow the
maintenance recommendations in Schedule ªBº in this
section.
NOTE:Most vehicles are operated under the conditions
listed for Schedule9B.9
Second is ScheduleªA.ºIt is for vehicles that are not
operated under any of the conditions listed under Sched-
ule9B.9
Use the schedule that best describes your driving condi-
tions. Where time and mileage are listed, follow the
interval that occurs first.
NOTE:Under no circumstances should oil change
intervals exceed 6,000 miles (10 000 km) or 6 months
whichever comes first.
CAUTION!
Failure to perform the required maintenance items
may result in damage to the vehicle.
At Each Stop for Fuel
²
Check the engine oil level about 5 minutes after a fully
warmed engine is shut off. Checking the oil level while
the vehicle is on level ground will improve the accu-
racy of the oil level reading. Add oil only when the
level is at or below the ADD or MIN mark.
²Check the windshield washer solvent and add if
required.
MAINTENANCE SCHEDULES 337
8
M
A
I
N
T
E
N
A
N
C
E
S
C
H
E
D
U
L
E
S
Page 339 of 380
Once a Month
²
Check tire pressure and look for unusual wear or
damage.
²Inspect the battery, and clean, and tighten the termi-
nals as required.
²Check the fluid levels of coolant reservoir and brake
master cylinder, and add as needed.
²Check all lights and all other electrical items for correct
operation.
²Check rubber seals on each side of the radiator for
proper fit.
At Each Oil Change
²
Change the engine oil filter.
²Inspect the exhaust system.
²Inspect the brake hoses.
²Inspect the CV joints and front and rear suspension
components.
²Check the coolant level, hoses, and clamps.
338 MAINTENANCE SCHEDULES
8
M
A
I
N
T
E
N
A
N
C
E
S
C
H
E
D
U
L
E
S