air condition DODGE MAGNUM SRT 2007 1.G Owners Manual
[x] Cancel search | Manufacturer: DODGE, Model Year: 2007, Model line: MAGNUM SRT, Model: DODGE MAGNUM SRT 2007 1.GPages: 380, PDF Size: 6.63 MB
Page 21 of 380
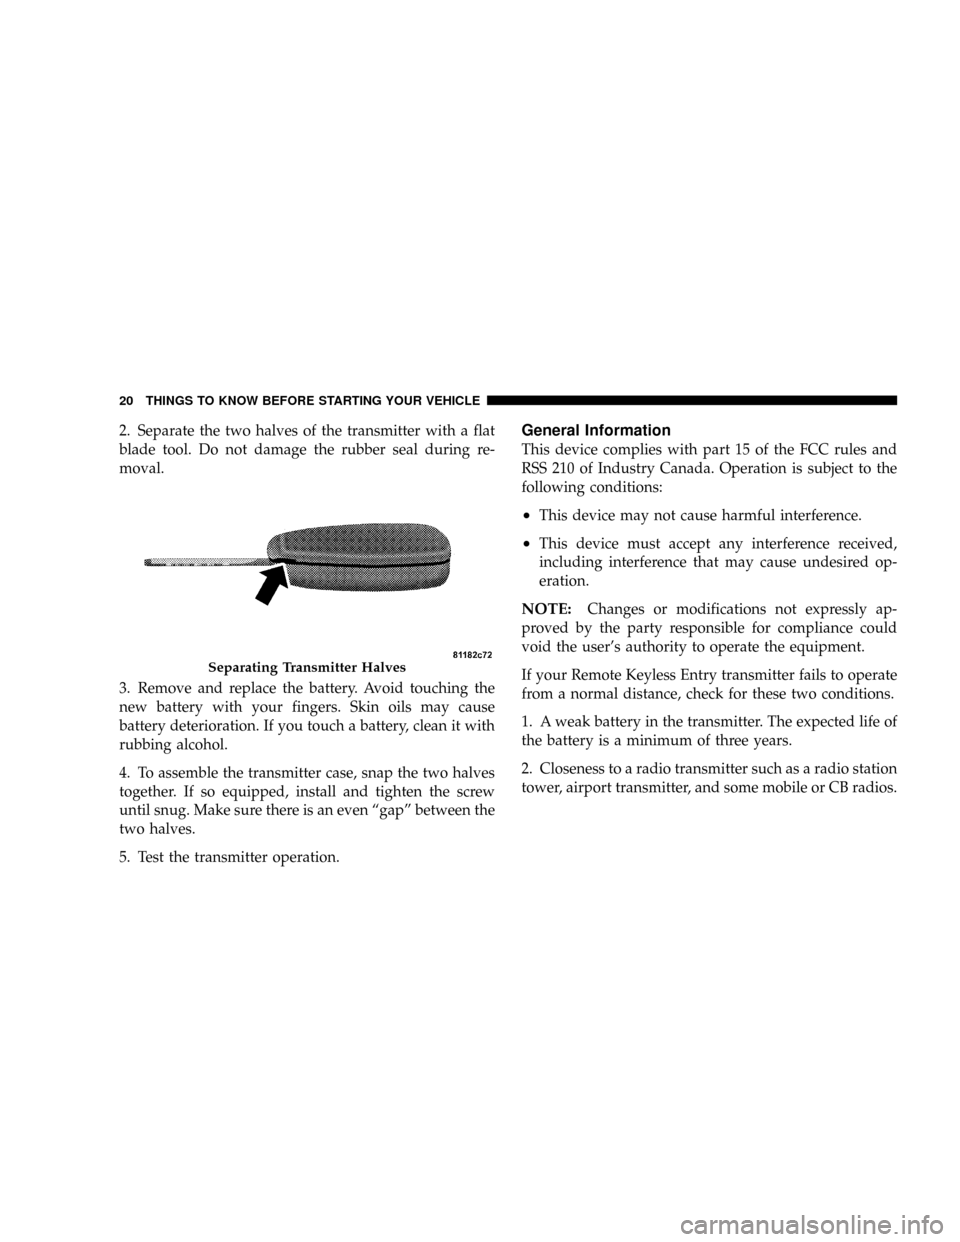
2. Separate the two halves of the transmitter with a flat
blade tool. Do not damage the rubber seal during re-
moval.
3. Remove and replace the battery. Avoid touching the
new battery with your fingers. Skin oils may cause
battery deterioration. If you touch a battery, clean it with
rubbing alcohol.
4. To assemble the transmitter case, snap the two halves
together. If so equipped, install and tighten the screw
until snug. Make sure there is an even ªgapº between the
two halves.
5. Test the transmitter operation.General Information
This device complies with part 15 of the FCC rules and
RSS 210 of Industry Canada. Operation is subject to the
following conditions:
²This device may not cause harmful interference.
²This device must accept any interference received,
including interference that may cause undesired op-
eration.
NOTE:Changes or modifications not expressly ap-
proved by the party responsible for compliance could
void the user's authority to operate the equipment.
If your Remote Keyless Entry transmitter fails to operate
from a normal distance, check for these two conditions.
1. A weak battery in the transmitter. The expected life of
the battery is a minimum of three years.
2. Closeness to a radio transmitter such as a radio station
tower, airport transmitter, and some mobile or CB radios.
Separating Transmitter Halves
20 THINGS TO KNOW BEFORE STARTING YOUR VEHICLE
Page 57 of 380
WARNING!
An incorrectly anchored tether strap could lead to
increased head motion and possible injury to the
child. Use only the anchor positions directly behind
the child seat to secure a child restraint top tether
strap.
Transporting Pets
Airbags deploying in the front seat could harm your pet.
An unrestrained pet will be thrown about and possibly
injured, or injure a passenger during panic braking or in
a collision.
Pets should be restrained in the rear seat in pet harnesses
or pet carriers that are secured by seat belts.
BREAK-IN RECOMMENDATIONS
A long break-in period is not required for the drivetrain
(engine, transmission, and rear axle) in your new vehicle.
Drive moderately during the first 500 miles (800 km).
After the initial 60 miles (100 km), speeds up to 50 or 55
mph (80 or 90 km/h) are desirable.
While cruising, brief full-throttle acceleration, within the
limits of local traffic laws, contributes to a good break-in.
However, wide-open throttle acceleration in low gear can
be detrimental and should be avoided.
The engine oil, transmission fluid, and axle lubricant
installed at the factory is high quality and energy con-
serving. Oil, fluid, and lubricant changes should be
consistent with anticipated climate and conditions under
which vehicle operations will occur. The recommended
viscosity and quality grades is shown in Section 7 of this
manual.
56 THINGS TO KNOW BEFORE STARTING YOUR VEHICLE
Page 60 of 380
Front seat belt assemblies must be replaced after a
collision. Rear seat belt assemblies must be replaced after
a collision if they have been damaged (bent retractor, torn
webbing, etc. If there is any question regarding belt or
retractor condition, replace the belt.
Airbag Warning Light
The light should come on and remain on for 6 to 8
seconds as a bulb check when the ignition switch is first
turned ON. If the light is not lit during starting, see you
authorized dealer. If the light stays on, flickers, or comes
on while driving, have the system checked by an autho-
rized dealer.
Defroster
Check operation by selecting the defrost mode and place
the blower control on high speed. You should be able to
feel the air directed against the windshield.
Periodic Safety Checks You Should Make Outside
The Vehicle
Tires
Examine tires for excessive tread wear and uneven wear
patterns. Check for stones, nails, glass, or other objects
lodged in the tread. Inspect tread and sidewall for cuts
and cracks. Check the wheel nuts for tightness. Check the
tires (including spare) for proper pressure.
Lights
Have someone observe the operation of exterior lights
while you work the controls. Check turn signal and high
beam indicator lights on the instrument panel.
Door Latches
Check for positive closing, latching, and locking.
Fluid Leaks
Check area under vehicle after overnight parking for fuel,
engine coolant, oil, or other fluid leaks. Also, if gasoline
fumes are detected or if fuel, power steering fluid, or
brake fluid leaks are suspected, the cause should be
located and corrected immediately.
THINGS TO KNOW BEFORE STARTING YOUR VEHICLE 59
2
Page 77 of 380
²After ignition key is switched off, a call can continue
on the UConnectŸ system either until the call ends or
until the vehicle battery condition dictates cessation of
the call on the UConnectŸ system and transfer of the
call to the mobile phone.
²After ignition key is switched to off, a call can continue
on the UConnectŸ system for certain duration, after
which the call is automatically transferred from the
UConnectŸ system to the mobile phone.
²An active call is automatically transferred to the
mobile phone after ignition key is switched to off.
UConnectŸ System Features
Language Selection
To change the language that the UConnectŸ system is
using,
²Press the 'Phone' button to begin.
²After the9Ready9prompt and the following beep, say
the name of the language you wish to switch to
(English, Espanol, or Francais, if so equipped).
²Continue to follow the system prompts to complete
language selection.
After selecting one of the languages, all prompts and
voice commands will be in that language.
NOTE:After every UConnectŸ language change op-
eration, only the language specific 32-name phonebook is
usable. The paired phone name is not language specific
and usable across all languages.
Emergency Assistance
If you are in an emergency and the mobile phone is
reachable:
²Pick up the phone and manually dial the emergency
number for your area.
If the phone is not reachable and the UConnectŸ system
is operational, you may reach the emergency number as
follows:
²Press the 'Phone' button to begin.
²After the9Ready9prompt and the following beep, say
9Emergency9and the UConnectŸ system will instruct
the paired cellular phone to call the emergency num-
ber. This feature is only supported in the USA.
76 UNDERSTANDING THE FEATURES OF YOUR VEHICLE
Page 82 of 380
²You can also press the8Voice Recognition' button
anytime while the list is being played, and then choose
the phone that you wish to select.
²The selected phone will be used for the next phone
call. If the selected phone is not available, the UCon-
nectŸ system will return to using the highest priority
phone present in or near (approximately with in 30
feet) the vehicle.
Delete UConnectŸ Paired Cellular Phones
²
Press the 'Phone' button to begin.
²After the9Ready9prompt and the following beep, say
9Setup Phone Pairing.9
²At the next prompt, say9Delete9and follow the
prompts.
²You can also press the8Voice Recognition' button
anytime while the list is being played and then choose
the phone you wish to delete.
Things You Should Know About Your UConnectŸ
System
Voice Recognition (VR)
²
Always wait for the beep before speaking.
²Speak normally, without pausing, just as you would
speak to a person sitting approximately eight (8) feet
away from you.
²Make sure that no one other than you is speaking
during a voice recognition period.
²Performance is maximized under:
²low-to-medium blower setting,
²low-to-medium vehicle speed,
²low road noise,
²smooth road surface,
²fully closed windows,
²dry weather condition.
UNDERSTANDING THE FEATURES OF YOUR VEHICLE 81
3
Page 132 of 380
NAudio Clock Display...................176
mVideo Entertainment System (Sales Code XRV) Ð
If Equipped
..........................177
NKicker Mobile Surround (Kms1)...........179
mSatellite Radio Ð If Equipped.............179
NSystem Activation.....................179
NElectronic Serial Number/Sirius Identification
Number (ESN/SID)....................180
NSelecting Satellite Mode In REF, RAQ, And
RAK Radios.........................180
NSelecting a Channel....................181
NStoring And Selecting Pre-Set Channels......181
NUsing The PTY (Program Type) Button (If
Equipped)..........................181
NPTY Button9Scan9.....................181
NPTY Button9Seek9.....................182
NSatellite Antenna......................182NReception Quality.....................182
mRemote Sound System Controls...........183
NRadio Operation......................184
NTape Player Operation..................184
NCD Player Operation...................184
NSatellite Radio Operation................185
mCassette Tape And Player Maintenance......185
mCD/DVD Disc Maintenance..............186
mRadio Operation And Cellular Phones.......186
mClimate Controls......................186
NManual Air Conditioning And Heating
System.............................187
NAutomatic Temperature Control Ð If
Equipped...........................189
NOperating Tips.......................194
mRear Window Features..................197
UNDERSTANDING YOUR INSTRUMENT PANEL 131
4
Page 137 of 380
engine running, your vehicle will usually be drivable.
However, see your dealer for service as soon as possible.
If the light is flashing when the engine is running,
immediate service is required. In this case, you may
experience reduced performance, an elevated/rough idle
or engine stall, and your vehicle may require towing.
Also, have the system checked by an authorized dealer if
the light does not come on during starting.
8. Temperature Gauge
The temperature gauge shows engine coolant tempera-
ture. Any reading within the normal range indicates that
the engine cooling system is operating satisfactorily.
The gauge pointer will likely indicate a higher tempera-
ture when driving in hot weather, up mountain grades,
or when towing a trailer. It should not be allowed to
exceed the upper limits of the normal operating range.
CAUTION!
Driving with a hot cooling system could damage
your vehicle. If temperature gauge reads 240ÉF
(116ÉC) or greater, pull over and stop the vehicle. Idle
the vehicle with the air conditioner turned off until
the pointer drops back into the normal range 200±
230ÉF (93±110ÉC). If the pointer remains at 240ÉF
(116ÉC) or greater and you hear a chime, turn the
engine off immediately, and call for service.
WARNING!
A hot engine cooling system is dangerous. You or
others could be badly burned by steam or boiling
coolant. You may want to call a service center if your
vehicle overheats. If you decide to look under the
hood yourself, see Section 7 of this manual. Follow
the warnings under the Cooling System Pressure
Cap paragraph.
136 UNDERSTANDING YOUR INSTRUMENT PANEL
Page 150 of 380
1. Turn the ignition switch ON.
2. Press and hold the compass button for approximately
2 seconds.
3. Press the SCROLL button until ªCompass Varianceº
message and the last variance zone number displays in
the EVIC.
4. Press and release FUNCTION SELECT button until
the proper variance zone is selected according to the
map.
5. Press and release the compass button to exit.
Telephone Ð If Equipped
Press and release the MENU button until ªTelephoneº
displays in the EVIC.
When the appropriate conditions exist, the EVIC pro-
vides the following telephone information:
²Phone status: idle, voice mail, roaming, battery
strength, and signal strength in increments of 20
percent.
²Call status: Incoming call, connecting, connected, air
time in minutes and seconds, call ended, call failed,
roaming, and no phone connection.
²UConnect Active.
²Caller ID phone number display.
When the appropriate conditions exist, and if supported
by the cell phone, the EVIC will display the following
telephone symbols:
The EVIC displays this symbol to indicate the
signal strength of the UConnectŸ phone. The
number of horizontal bars increases as the
strength of the UConnectŸ phone signal in-
creases.
The EVIC displays this symbol to indicate an
incoming call.
Signal
Strength
Incom-
ing Call
UNDERSTANDING YOUR INSTRUMENT PANEL 149
4
Page 187 of 380
CD/DVD DISC MAINTENANCE
To keep the CD/DVD discs in good condition, take the
following precautions:
1. Handle the disc by its edge; avoid touching the
surface.
2. If the disc is stained, clean the surface with a soft cloth,
wiping from center to edge.
3. Do not apply paper, paper CD labels, or tape to the
disc; avoid scratching the disc.
4. Do not use solvents such as benzine, thinner, cleaners,
or antistatic sprays.
5. Store the disc in its case after playing.
6. Do not expose the disc to direct sunlight.
7. Do not store the disc where temperatures may become
too high.
RADIO OPERATION AND CELLULAR PHONES
Under certain conditions, the cellular phone being On in
your vehicle can cause erratic or noisy performance from
your radio. This condition may be lessened or eliminated
by relocating the cellular phone antenna. This condition
is not harmful to the radio. If your radio performance
does not satisfactorily ªclearº by the repositioning of the
antenna, it is recommended that the radio volume be
turned down or off during cellular phone operation.
CLIMATE CONTROLS
The Air Conditioning and Heating System is designed to
make you comfortable in all types of weather.
186 UNDERSTANDING YOUR INSTRUMENT PANEL
Page 188 of 380
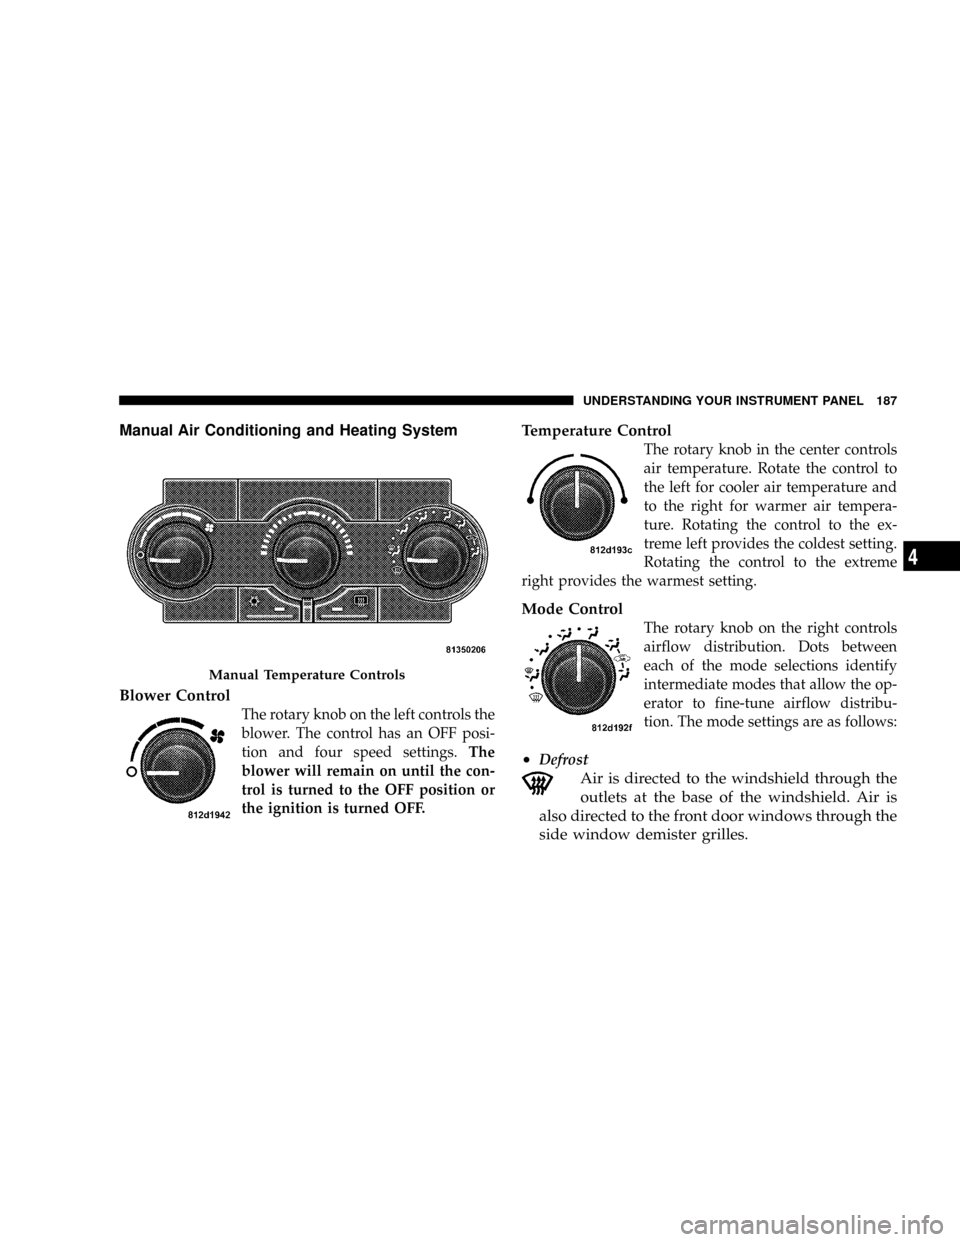
Manual Air Conditioning and Heating System
Blower Control
The rotary knob on the left controls the
blower. The control has an OFF posi-
tion and four speed settings.The
blower will remain on until the con-
trol is turned to the OFF position or
the ignition is turned OFF.
Temperature Control
The rotary knob in the center controls
air temperature. Rotate the control to
the left for cooler air temperature and
to the right for warmer air tempera-
ture. Rotating the control to the ex-
treme left provides the coldest setting.
Rotating the control to the extreme
right provides the warmest setting.
Mode Control
The rotary knob on the right controls
airflow distribution. Dots between
each of the mode selections identify
intermediate modes that allow the op-
erator to fine-tune airflow distribu-
tion. The mode settings are as follows:
²Defrost
Air is directed to the windshield through the
outlets at the base of the windshield. Air is
also directed to the front door windows through the
side window demister grilles.
Manual Temperature Controls
UNDERSTANDING YOUR INSTRUMENT PANEL 187
4