battery location DODGE NEON 2000 Service Owner's Manual
[x] Cancel search | Manufacturer: DODGE, Model Year: 2000, Model line: NEON, Model: DODGE NEON 2000Pages: 1285, PDF Size: 29.42 MB
Page 310 of 1285
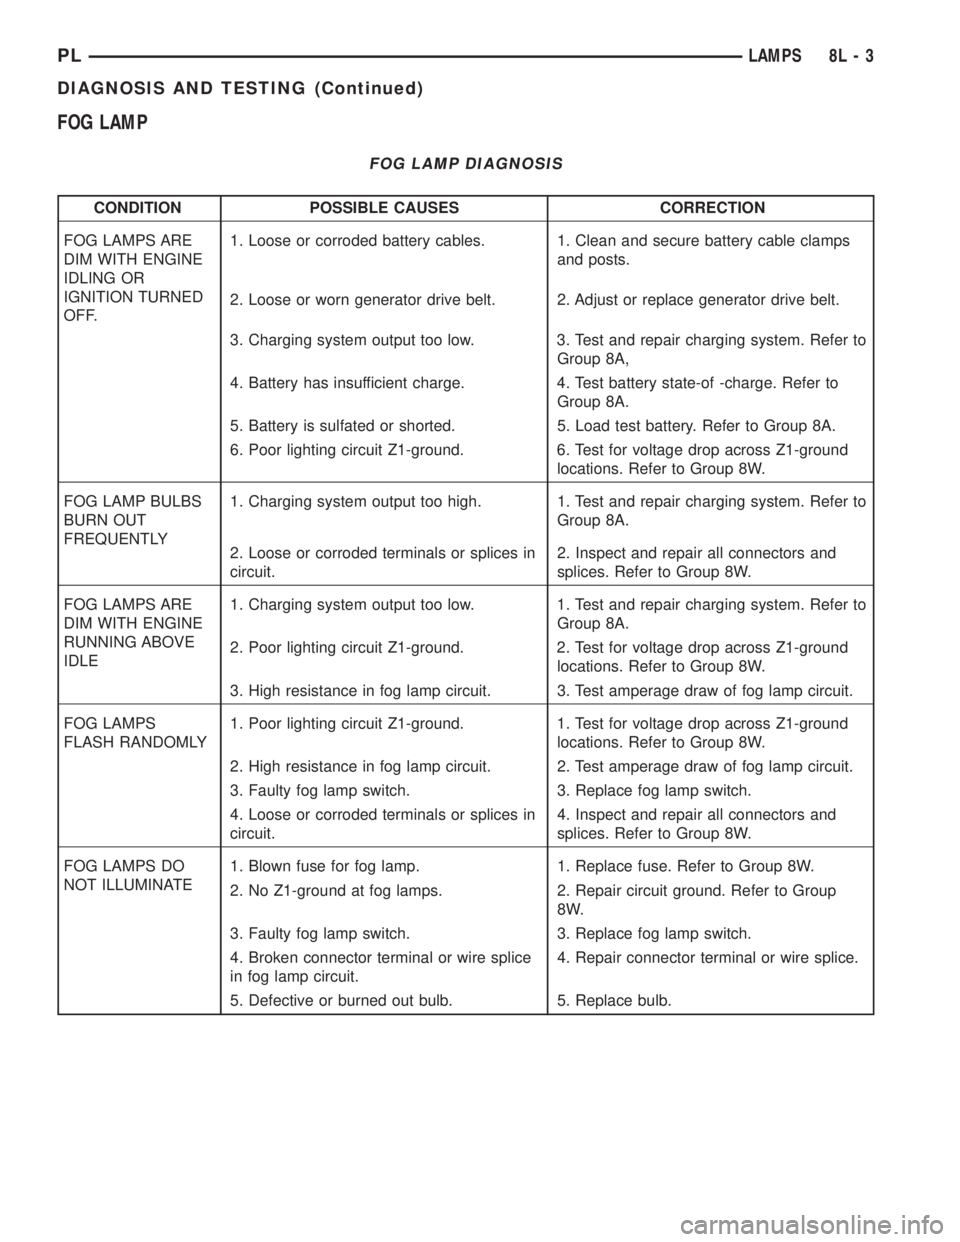
FOG LAMP
FOG LAMP DIAGNOSIS
CONDITION POSSIBLE CAUSES CORRECTION
FOG LAMPS ARE
DIM WITH ENGINE
IDLING OR
IGNITION TURNED
OFF.1. Loose or corroded battery cables. 1. Clean and secure battery cable clamps
and posts.
2. Loose or worn generator drive belt. 2. Adjust or replace generator drive belt.
3. Charging system output too low. 3. Test and repair charging system. Refer to
Group 8A,
4. Battery has insufficient charge. 4. Test battery state-of -charge. Refer to
Group 8A.
5. Battery is sulfated or shorted. 5. Load test battery. Refer to Group 8A.
6. Poor lighting circuit Z1-ground. 6. Test for voltage drop across Z1-ground
locations. Refer to Group 8W.
FOG LAMP BULBS
BURN OUT
FREQUENTLY1. Charging system output too high. 1. Test and repair charging system. Refer to
Group 8A.
2. Loose or corroded terminals or splices in
circuit.2. Inspect and repair all connectors and
splices. Refer to Group 8W.
FOG LAMPS ARE
DIM WITH ENGINE
RUNNING ABOVE
IDLE1. Charging system output too low. 1. Test and repair charging system. Refer to
Group 8A.
2. Poor lighting circuit Z1-ground. 2. Test for voltage drop across Z1-ground
locations. Refer to Group 8W.
3. High resistance in fog lamp circuit. 3. Test amperage draw of fog lamp circuit.
FOG LAMPS
FLASH RANDOMLY1. Poor lighting circuit Z1-ground. 1. Test for voltage drop across Z1-ground
locations. Refer to Group 8W.
2. High resistance in fog lamp circuit. 2. Test amperage draw of fog lamp circuit.
3. Faulty fog lamp switch. 3. Replace fog lamp switch.
4. Loose or corroded terminals or splices in
circuit.4. Inspect and repair all connectors and
splices. Refer to Group 8W.
FOG LAMPS DO
NOT ILLUMINATE1. Blown fuse for fog lamp. 1. Replace fuse. Refer to Group 8W.
2. No Z1-ground at fog lamps. 2. Repair circuit ground. Refer to Group
8W.
3. Faulty fog lamp switch. 3. Replace fog lamp switch.
4. Broken connector terminal or wire splice
in fog lamp circuit.4. Repair connector terminal or wire splice.
5. Defective or burned out bulb. 5. Replace bulb.
PLLAMPS 8L - 3
DIAGNOSIS AND TESTING (Continued)
Page 348 of 1285
DIAGNOSIS AND TESTING
AIRBAG SYSTEM
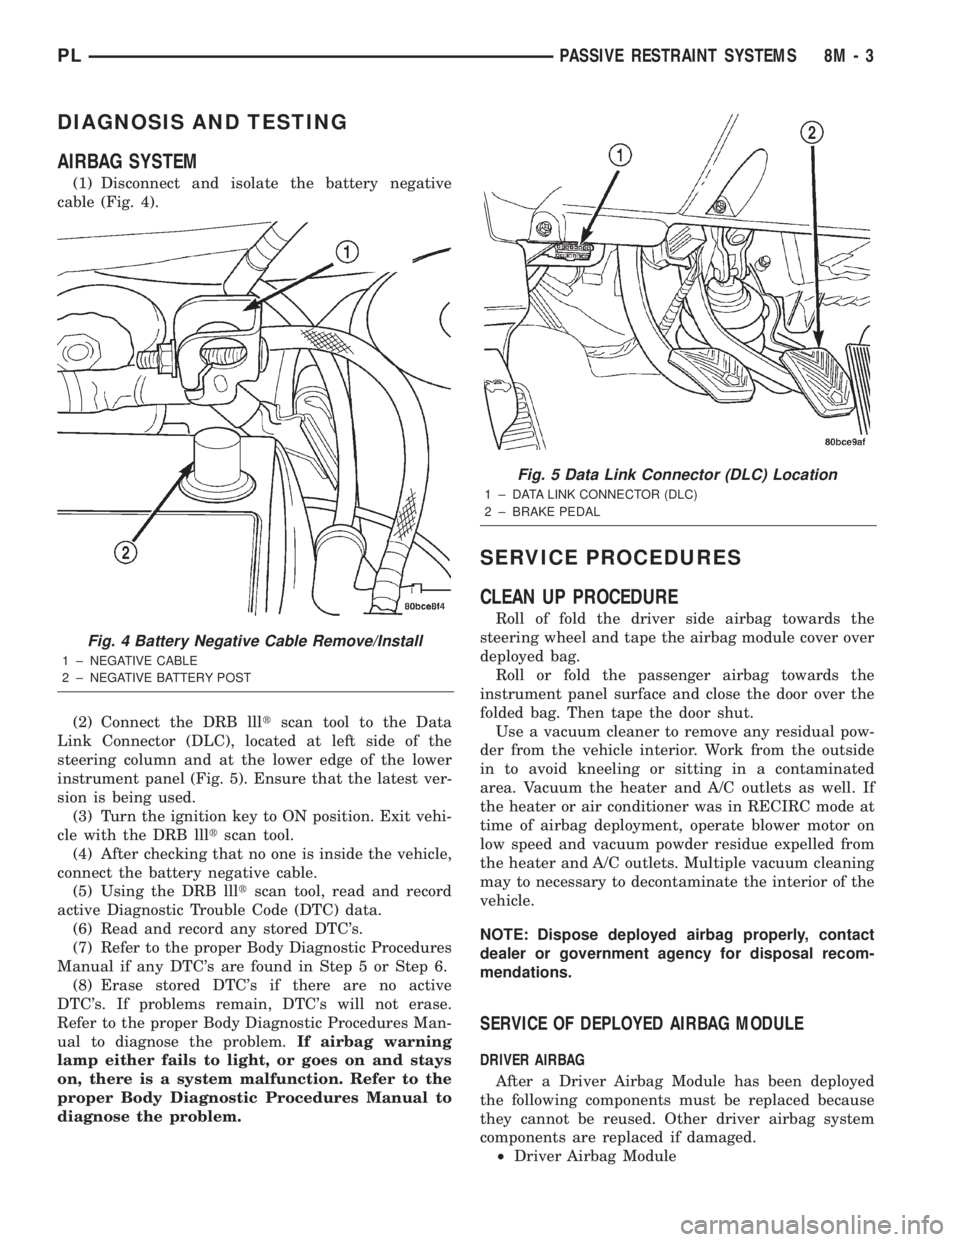
(1) Disconnect and isolate the battery negative
cable (Fig. 4).
(2) Connect the DRB llltscan tool to the Data
Link Connector (DLC), located at left side of the
steering column and at the lower edge of the lower
instrument panel (Fig. 5). Ensure that the latest ver-
sion is being used.
(3) Turn the ignition key to ON position. Exit vehi-
cle with the DRB llltscan tool.
(4) After checking that no one is inside the vehicle,
connect the battery negative cable.
(5) Using the DRB llltscan tool, read and record
active Diagnostic Trouble Code (DTC) data.
(6) Read and record any stored DTC's.
(7) Refer to the proper Body Diagnostic Procedures
Manual if any DTC's are found in Step 5 or Step 6.
(8) Erase stored DTC's if there are no active
DTC's. If problems remain, DTC's will not erase.
Refer to the proper Body Diagnostic Procedures Man-
ual to diagnose the problem.If airbag warning
lamp either fails to light, or goes on and stays
on, there is a system malfunction. Refer to the
proper Body Diagnostic Procedures Manual to
diagnose the problem.
SERVICE PROCEDURES
CLEAN UP PROCEDURE
Roll of fold the driver side airbag towards the
steering wheel and tape the airbag module cover over
deployed bag.
Roll or fold the passenger airbag towards the
instrument panel surface and close the door over the
folded bag. Then tape the door shut.
Use a vacuum cleaner to remove any residual pow-
der from the vehicle interior. Work from the outside
in to avoid kneeling or sitting in a contaminated
area. Vacuum the heater and A/C outlets as well. If
the heater or air conditioner was in RECIRC mode at
time of airbag deployment, operate blower motor on
low speed and vacuum powder residue expelled from
the heater and A/C outlets. Multiple vacuum cleaning
may to necessary to decontaminate the interior of the
vehicle.
NOTE: Dispose deployed airbag properly, contact
dealer or government agency for disposal recom-
mendations.
SERVICE OF DEPLOYED AIRBAG MODULE
DRIVER AIRBAG
After a Driver Airbag Module has been deployed
the following components must be replaced because
they cannot be reused. Other driver airbag system
components are replaced if damaged.
²Driver Airbag Module
Fig. 4 Battery Negative Cable Remove/Install
1 ± NEGATIVE CABLE
2 ± NEGATIVE BATTERY POST
Fig. 5 Data Link Connector (DLC) Location
1 ± DATA LINK CONNECTOR (DLC)
2 ± BRAKE PEDAL
PLPASSIVE RESTRAINT SYSTEMS 8M - 3
Page 360 of 1285
POWER DISTRIBUTION SYSTEMS
TABLE OF CONTENTS
page page
DESCRIPTION AND OPERATION
POWER DISTRIBUTION SYSTEM.............1
POWER DISTRIBUTION CENTER (PDC).......1
FUSE BLOCK.............................2REMOVAL AND INSTALLATION
FUSE BLOCK.............................2
POWER DISTRIBUTION CENTER (PDC).......2
DESCRIPTION AND OPERATION
POWER DISTRIBUTION SYSTEM
This group covers the various standard and
optional power distribution components used on this
model. Refer to the Component Index of Group 8W -
Wiring Diagrams for complete circuit diagrams of the
various power distribution components.
The power distribution system for this vehicle is
designed to provide safe, reliable, centralized and
convenient to access distribution of the electrical cur-
rent required to operate all of the many standard
and optional factory-installed electrical and electronic
powertrain, chassis, safety, comfort and convenience
systems. At the same time, these systems were
designed to provide centralized locations for conduct-
ing diagnosis of faulty circuits, and for sourcing the
additional current requirements of many aftermarket
vehicle accessory and convenience items.
These power distribution systems also incorporate
various types of circuit control and protection fea-
tures, including:
²Fuses
²Fuse cartridges
²Fusible links
²Automatic resetting circuit breakers
²Relays
²Flashers
²Timers
²Circuit splice blocks.
The power distribution system for this vehicle con-
sists of the following components:
²Power Distribution Center (PDC)
²Fuse Block
Following are general descriptions of the major
components in the power distribution system. Refer
to the owner's manual in the vehicle glove box for
more information on the features, use and operation
of all of the power distribution system components.
POWER DISTRIBUTION CENTER (PDC)
All of the electrical current distributed throughout
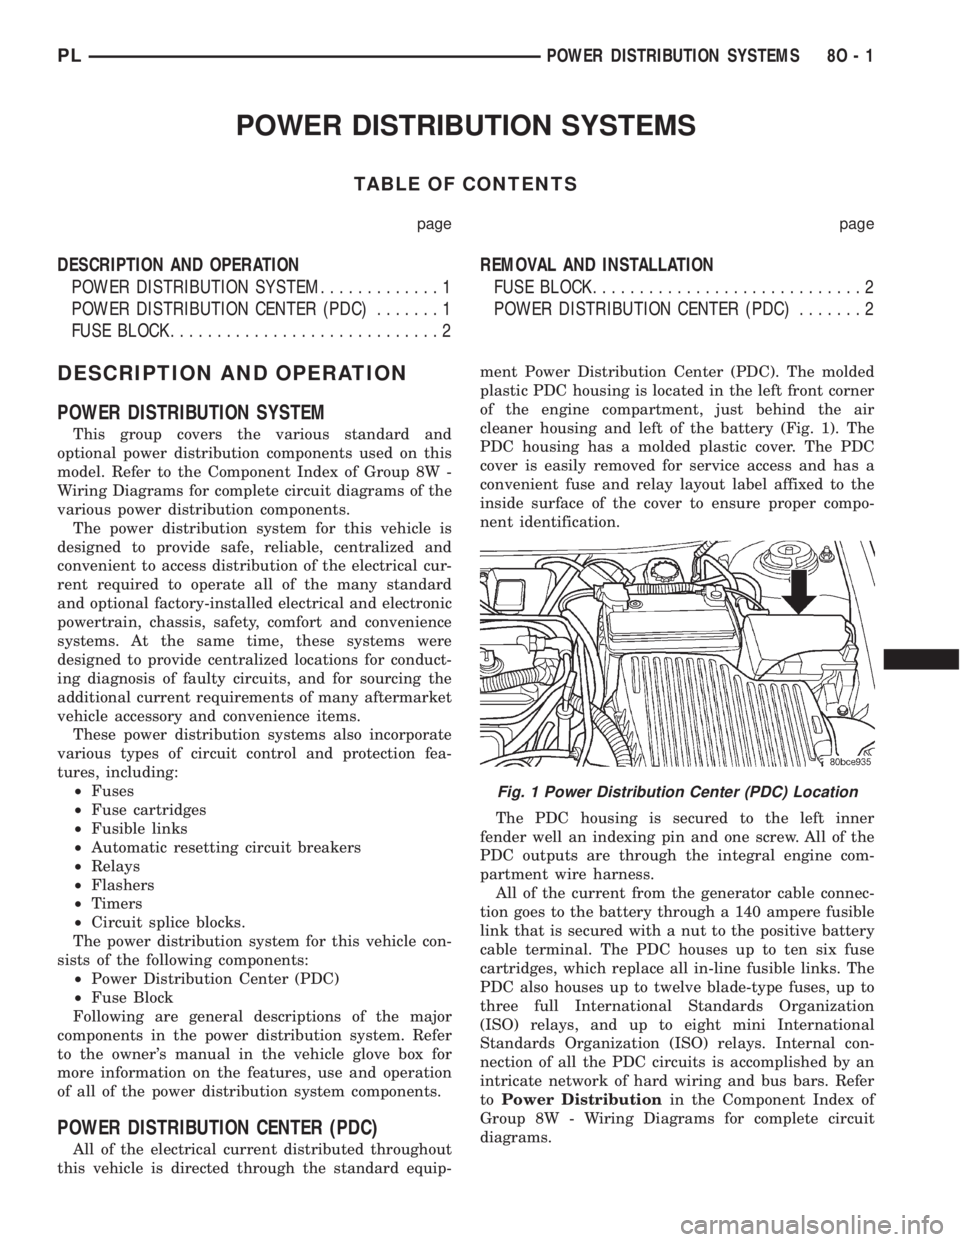
this vehicle is directed through the standard equip-ment Power Distribution Center (PDC). The molded
plastic PDC housing is located in the left front corner
of the engine compartment, just behind the air
cleaner housing and left of the battery (Fig. 1). The
PDC housing has a molded plastic cover. The PDC
cover is easily removed for service access and has a
convenient fuse and relay layout label affixed to the
inside surface of the cover to ensure proper compo-
nent identification.
The PDC housing is secured to the left inner
fender well an indexing pin and one screw. All of the
PDC outputs are through the integral engine com-
partment wire harness.
All of the current from the generator cable connec-
tion goes to the battery through a 140 ampere fusible
link that is secured with a nut to the positive battery
cable terminal. The PDC houses up to ten six fuse
cartridges, which replace all in-line fusible links. The
PDC also houses up to twelve blade-type fuses, up to
three full International Standards Organization
(ISO) relays, and up to eight mini International
Standards Organization (ISO) relays. Internal con-
nection of all the PDC circuits is accomplished by an
intricate network of hard wiring and bus bars. Refer
toPower Distributionin the Component Index of
Group 8W - Wiring Diagrams for complete circuit
diagrams.
Fig. 1 Power Distribution Center (PDC) Location
PLPOWER DISTRIBUTION SYSTEMS 8O - 1
Page 362 of 1285
REMOVAL
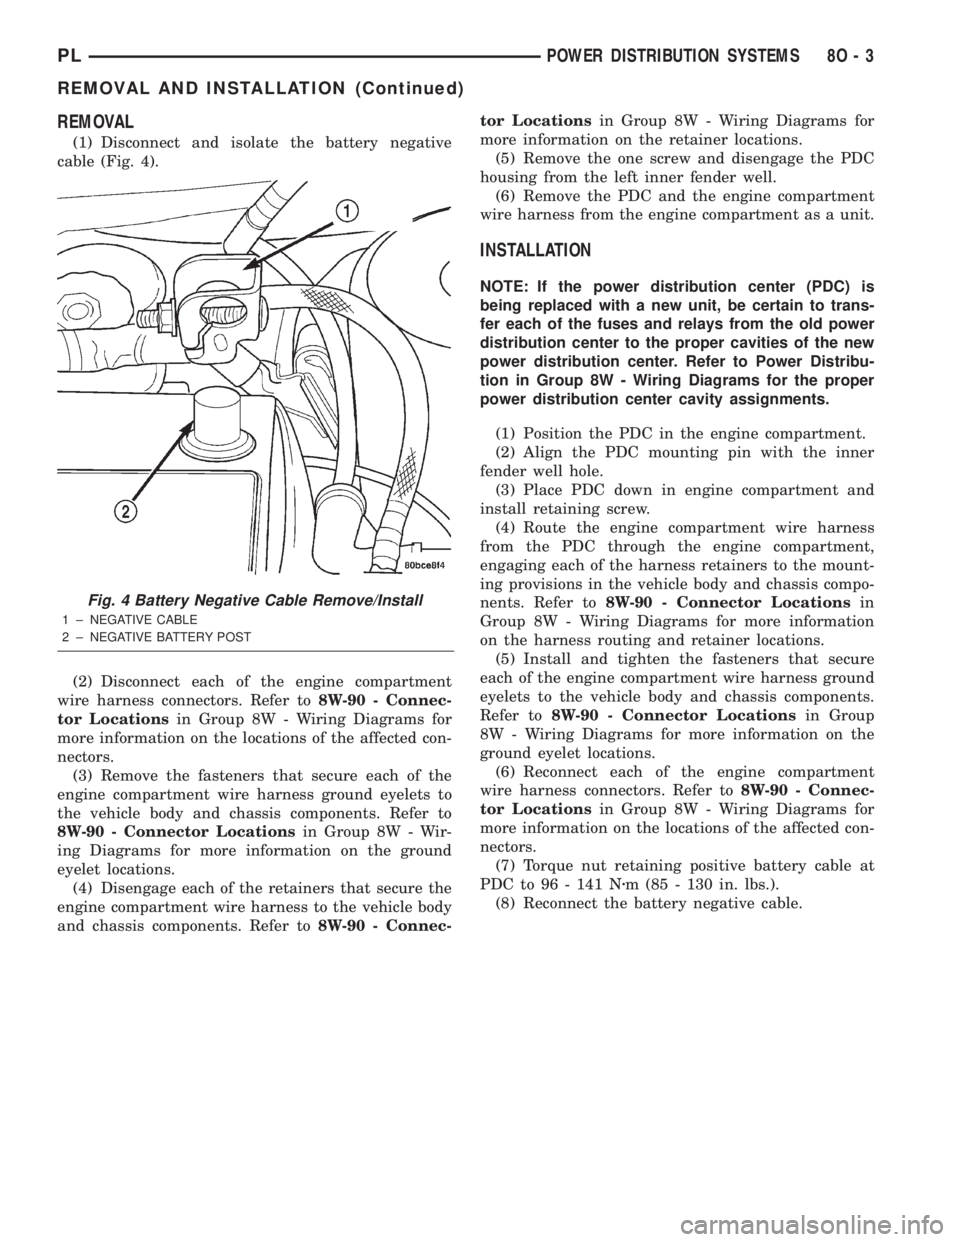
(1) Disconnect and isolate the battery negative
cable (Fig. 4).
(2) Disconnect each of the engine compartment
wire harness connectors. Refer to8W-90 - Connec-
tor Locationsin Group 8W - Wiring Diagrams for
more information on the locations of the affected con-
nectors.
(3) Remove the fasteners that secure each of the
engine compartment wire harness ground eyelets to
the vehicle body and chassis components. Refer to
8W-90 - Connector Locationsin Group 8W - Wir-
ing Diagrams for more information on the ground
eyelet locations.
(4) Disengage each of the retainers that secure the
engine compartment wire harness to the vehicle body
and chassis components. Refer to8W-90 - Connec-tor Locationsin Group 8W - Wiring Diagrams for
more information on the retainer locations.
(5) Remove the one screw and disengage the PDC
housing from the left inner fender well.
(6) Remove the PDC and the engine compartment
wire harness from the engine compartment as a unit.
INSTALLATION
NOTE: If the power distribution center (PDC) is
being replaced with a new unit, be certain to trans-
fer each of the fuses and relays from the old power
distribution center to the proper cavities of the new
power distribution center. Refer to Power Distribu-
tion in Group 8W - Wiring Diagrams for the proper
power distribution center cavity assignments.
(1) Position the PDC in the engine compartment.
(2) Align the PDC mounting pin with the inner
fender well hole.
(3) Place PDC down in engine compartment and
install retaining screw.
(4) Route the engine compartment wire harness
from the PDC through the engine compartment,
engaging each of the harness retainers to the mount-
ing provisions in the vehicle body and chassis compo-
nents. Refer to8W-90 - Connector Locationsin
Group 8W - Wiring Diagrams for more information
on the harness routing and retainer locations.
(5) Install and tighten the fasteners that secure
each of the engine compartment wire harness ground
eyelets to the vehicle body and chassis components.
Refer to8W-90 - Connector Locationsin Group
8W - Wiring Diagrams for more information on the
ground eyelet locations.
(6) Reconnect each of the engine compartment
wire harness connectors. Refer to8W-90 - Connec-
tor Locationsin Group 8W - Wiring Diagrams for
more information on the locations of the affected con-
nectors.
(7) Torque nut retaining positive battery cable at
PDC to 96 - 141 Nzm (85 - 130 in. lbs.).
(8) Reconnect the battery negative cable.
Fig. 4 Battery Negative Cable Remove/Install
1 ± NEGATIVE CABLE
2 ± NEGATIVE BATTERY POST
PLPOWER DISTRIBUTION SYSTEMS 8O - 3
REMOVAL AND INSTALLATION (Continued)
Page 365 of 1285
first turn) will cause all vehicle doors to unlock elec-
trically. When this feature is disabled, all vehicle
doors will be unlocked electrically upon the first turn
of a key cylinder to the UNLOCK position. The vehi-
cle is locked electrically by turning the key cylinder
to the LOCK position once, regardless of the state of
the double activation unlock feature.
POWER DOOR LOCKS
The Remote Keyless Entry (RKE) Module actuates
the power door lock relays when a door lock switch is
activated. If the door lock switch is pressed for longer
than eight consecutive seconds, the RKE module will
de-energize the door lock motors.
The system includes the rolling door locking fea-
ture. The vehicle is shipped with the system enabled.
When the system is disabled the door locks will work
by use of the door lock switches and the Remote Key-
less Entry system only. When the rolling door lock
system is enabled, the RKE module will automati-
cally lock all the vehicle doors when all of the follow-
ing conditions are met:
²All doors are closed
²The vehicle speed exceeds 15 +/- 1 mph.
²The throttle position sensor tip-in is greater
than 10 +/- 2 degrees.
The RKE module will automatically re-lock all
doors if the above conditions are met and if any of
the doors become ajar and then closed again.
The enabling/disabling of the rolling door lock fea-
ture is customer programmable, as well as program-
mable with the DRB IIItscan tool.
The power lock motors are also equipped with a
thermal protection system which prevents the motors
from burning out. The motors may chatter if they are
continuously activated.
CHILD PROTECTION LOCKS
The child protection locks are on the rear doors
only. The lock, when engaged, will disable the inside
door handle from opening the door. The lock is part
of the latch/lock assembly. The lock is engaged by
moving a lever that is located on the rearward inside
edge of the door.
DOOR LOCK INHIBIT
With the key in the ignition switch and the driver
door open, the Remote Keyless Entry (RKE) Modulewill ignore the command to lock the power door locks
via the interior driver door lock switch. Once the key
is removed, or the driver door is closed, the RKE
module will allow the power door locks to lock via the
interior door lock switches.
DIAGNOSIS AND TESTING
DOOR LOCK MOTOR
(1) Make certain battery is in normal condition
and fuses powering the RKE module aren't blown
before circuits are tested.
(2) To determine which motor is faulty, check each
individual door for electrical lock and unlock or dis-
connect the motor connectors one at a time, while
operating the door lock switch.
(3) In the event that none of the motors work, the
problem maybe caused by a shorted motor, a bad
switch or a bad relay internal to the RKE module.
Disconnecting a defective motor will allow the others
to work.
(4) To test an individual door lock motor, discon-
nect the electrical connector from the motor.
(5) To lock the door, connect a 12 volt power source
to one pin of the lock motor and a ground wire to the
other pin.
(6) To unlock the door, reverse the wire connec-
tions at the motor pin terminals.
(7) If these results are NOT obtained, replace the
motor.
DOOR LOCK SWITCH
(1) Remove the switch from its mounting location,
and disconnect from vehicle wiring harness. Refer to
Door Lock Switch Removal and Installation in this
section.
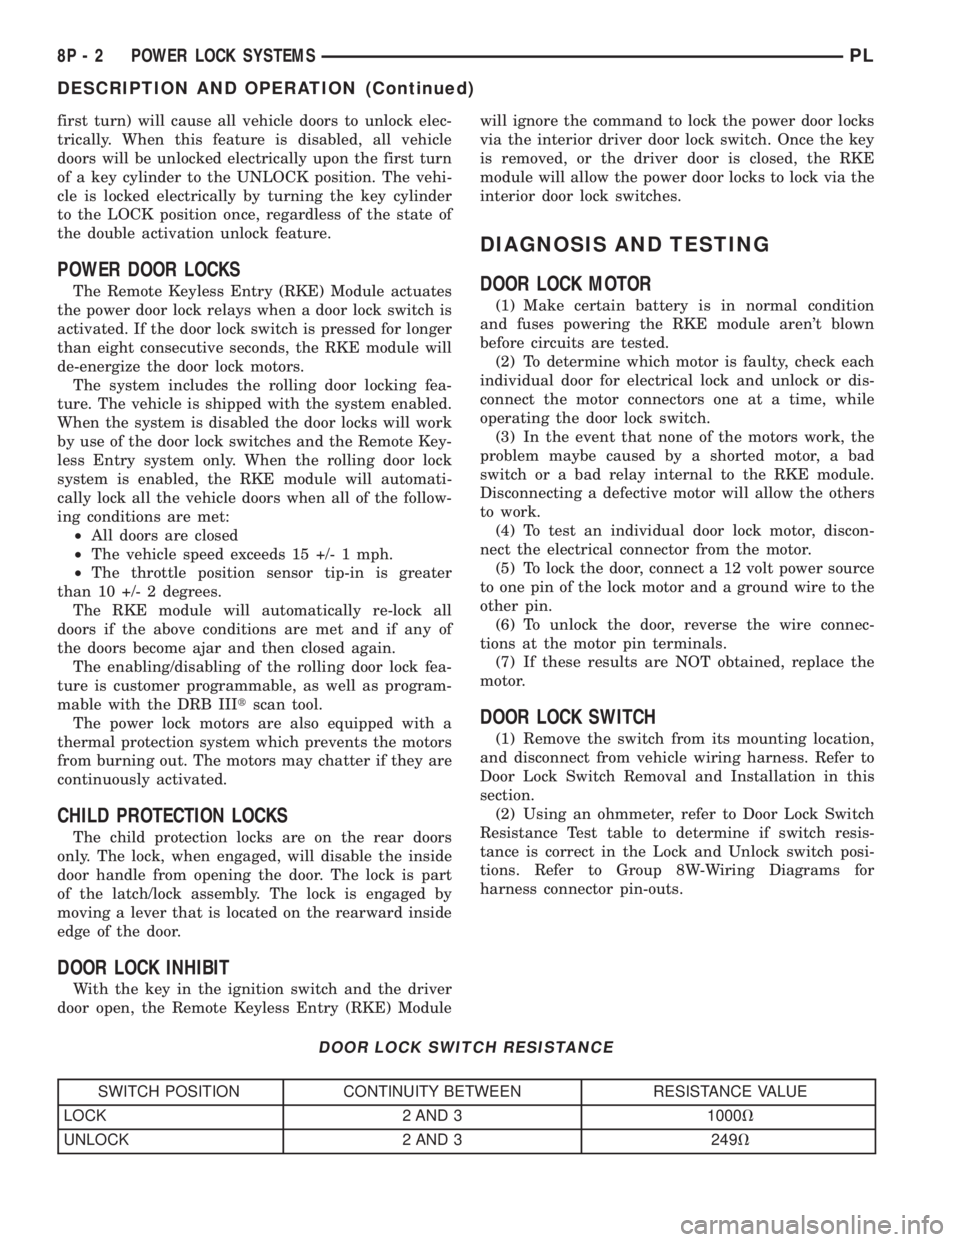
(2) Using an ohmmeter, refer to Door Lock Switch
Resistance Test table to determine if switch resis-
tance is correct in the Lock and Unlock switch posi-
tions. Refer to Group 8W-Wiring Diagrams for
harness connector pin-outs.
DOOR LOCK SWITCH RESISTANCE
SWITCH POSITION CONTINUITY BETWEEN RESISTANCE VALUE
LOCK 2 AND 3 1000V
UNLOCK 2 AND 3 249V
8P - 2 POWER LOCK SYSTEMSPL
DESCRIPTION AND OPERATION (Continued)
Page 370 of 1285
INSTALLATION
For installation, reverse above the procedures.
SPECIFICATIONS
TRANSMITTER BATTERY
The transmitter has two 3 volt batteries, which can
be removed and replaced without special tools. Insert
a dime in the side slot of the transmitter and twist.
The halves should separate and the batteries are
stacked on top of each other (Fig. 1). The batteries
are available at local retail stores. Recommended bat-
teries are Panasonic CR 2016 or equivalent. Battery
life is approximately two years. Transmitter pro-
gramming is not necessary after replacement of the
transmitter batteries.
TRANSMITTER RANGE
Operation range is within 7 meters (23 ft.) of the
module/receiver.
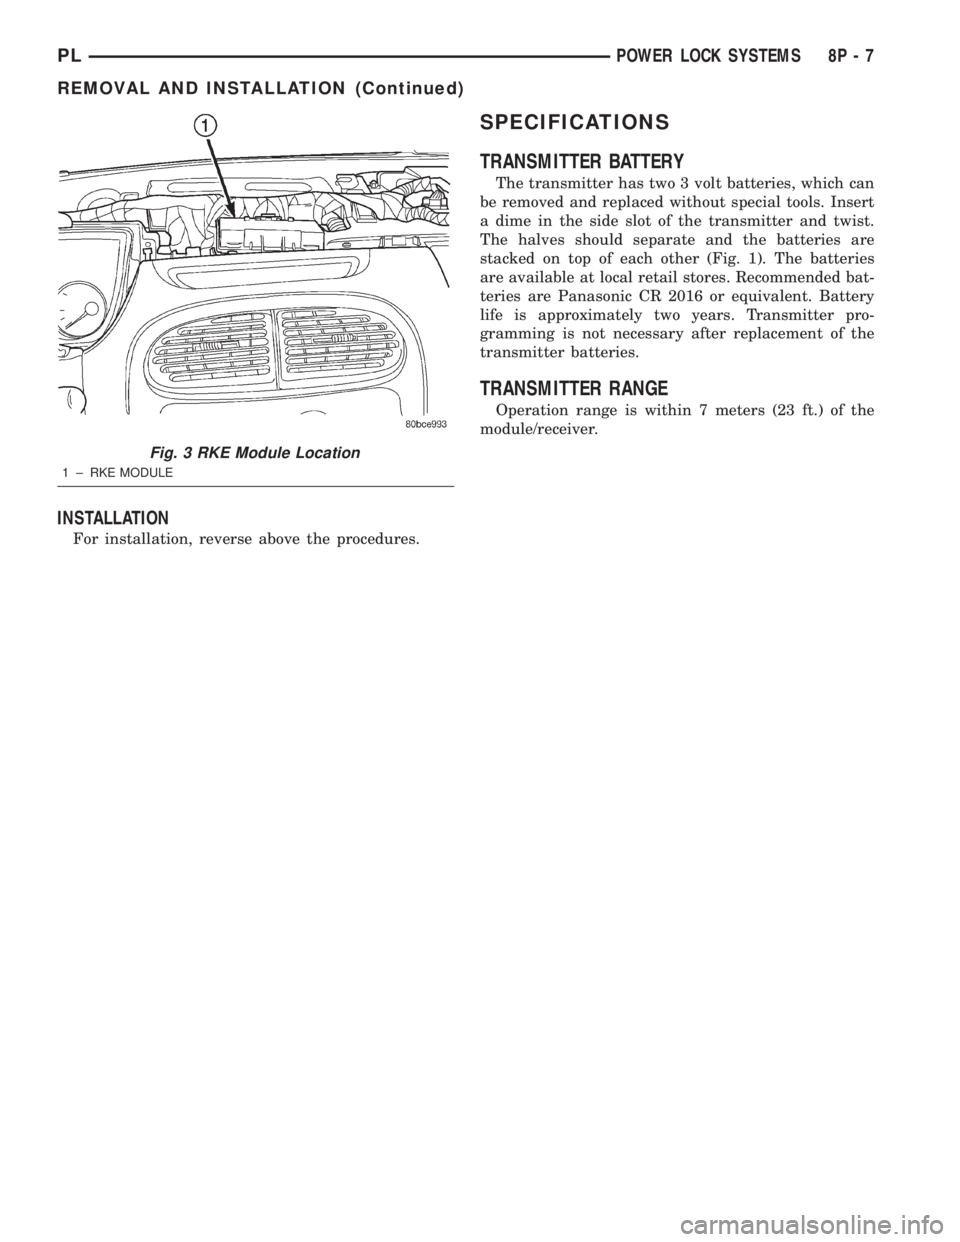
Fig. 3 RKE Module Location
1 ± RKE MODULE
PLPOWER LOCK SYSTEMS 8P - 7
REMOVAL AND INSTALLATION (Continued)
Page 378 of 1285
REMOVAL AND INSTALLATION
DOOR CYLINDER LOCK SWITCH
REMOVAL
(1) Refer to Group 23, Body for door trim and
water shield Removal and Installation.
(2) Remove illuminated entry switch wiring clip
and disconnect connector.
(3) Remove door cylinder lock switch from door
handle.
INSTALLATION
For installation reverse the above procedures.
HOOD AJAR SWITCH
REMOVAL
(1) Open hood.
(2) Disconnect and isolate the battery negative
remote cable (Fig. 3).
(3) Using a trim stick (special tool #C-4755) or
equivalent, gently pry switch up and out of mounting
bracket.
(4) Disconnect wire harness connector from hood
ajar switch.
(5) Remove switch from vehicle.
INSTALLATION
For installation reverse above procedures.
SENTRY KEY IMMOBILIZER MODULE (SKIM)
WARNING: ON VEHICLES EQUIPPED WITH AIR-
BAGS, REFER TO GROUP 8M - PASSIVE
RESTRAINT SYSTEMS BEFORE ATTEMPTING ANY
STEERING WHEEL, STEERING COLUMN, OR
INSTRUMENT PANEL COMPONENT DIAGNOSIS OR
SERVICE. FAILURE TO TAKE THE PROPER PRE-
CAUTIONS COULD RESULT IN ACCIDENTAL AIR-
BAG DEPLOYMENT AND POSSIBLE PERSONAL
INJURY.
REMOVAL
(1) Disconnect and isolate the battery negative
remote cable (Fig. 3).
(2) Remove Lower Instrument Panel Cover. Refer
to Group 8E-Instrument Panel and Systems, Lower
Instrument Panel Cover Removal and Installation.
(3) Remove the steering column upper and lower
shrouds. Refer to Group 8E-Inatrument Panel and
Systems, Steering Column Shroud Removal and
Installation.
(4) Disengage the steering column wire harness
from the Sentry Key Immobilizer Module (SKIM).
(5) Remove the two screws securing the SKIM
module to the top of the steering column.
(6) Rotate the SKIM and its mounting bracket
upwards and then to the side away from the steering
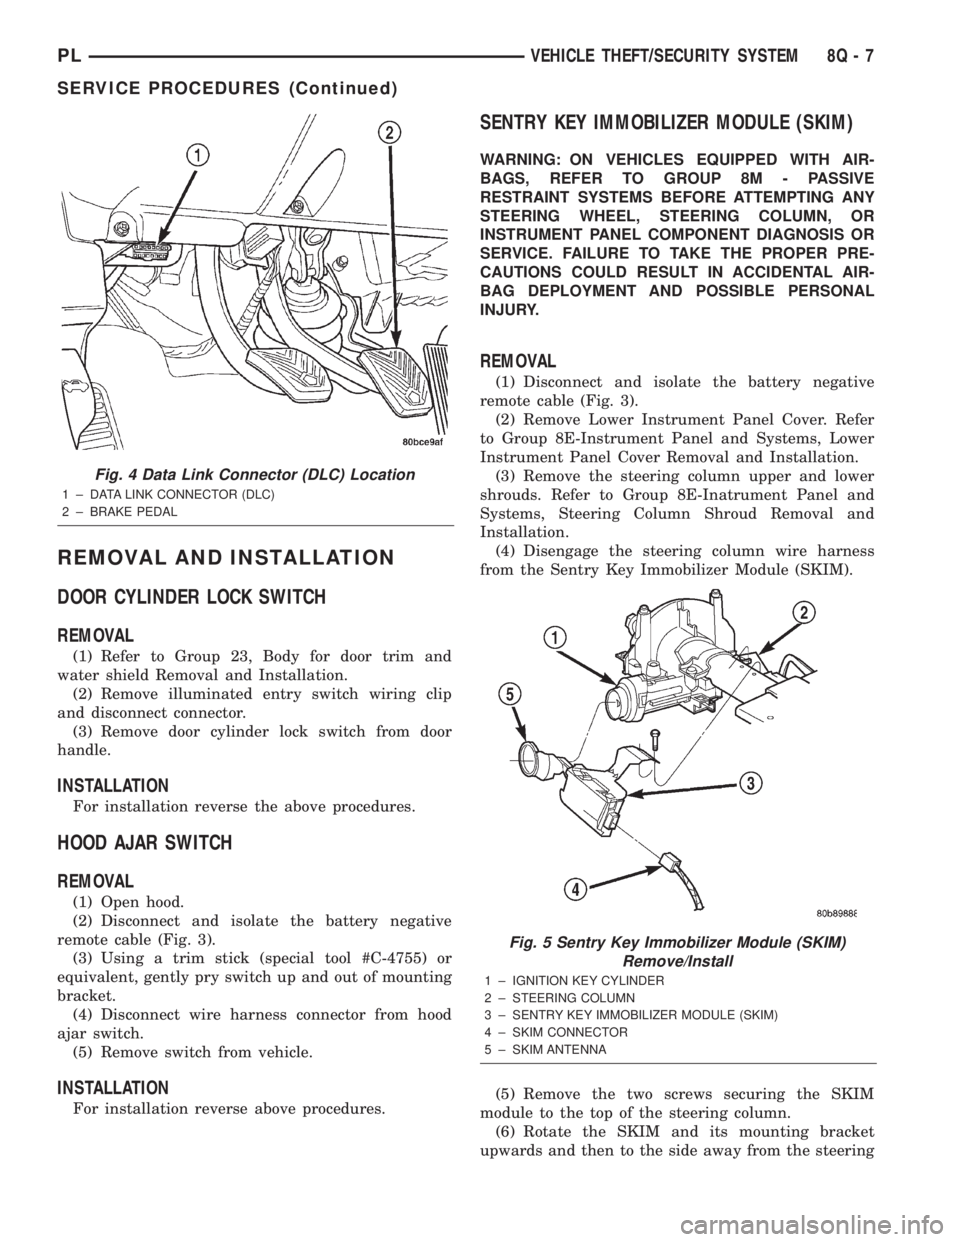
Fig. 4 Data Link Connector (DLC) Location
1 ± DATA LINK CONNECTOR (DLC)
2 ± BRAKE PEDAL
Fig. 5 Sentry Key Immobilizer Module (SKIM)
Remove/Install
1 ± IGNITION KEY CYLINDER
2 ± STEERING COLUMN
3 ± SENTRY KEY IMMOBILIZER MODULE (SKIM)
4 ± SKIM CONNECTOR
5 ± SKIM ANTENNA
PLVEHICLE THEFT/SECURITY SYSTEM 8Q - 7
SERVICE PROCEDURES (Continued)
Page 386 of 1285
POWER MIRRORS
TABLE OF CONTENTS
page page
GENERAL INFORMATION
INTRODUCTION..........................1
DIAGNOSIS AND TESTING
POWER FOLD AWAY MIRROR SWITCH TEST...1POWER FOLD AWAY MIRROR MOTOR........1
REMOVAL AND INSTALLATION
POWER FOLD-AWAY MIRROR SWITCH.......1
POWER FOLD-AWAY MIRROR...............2
GENERAL INFORMATION
INTRODUCTION
These vehicles may be equipped with Power Fold
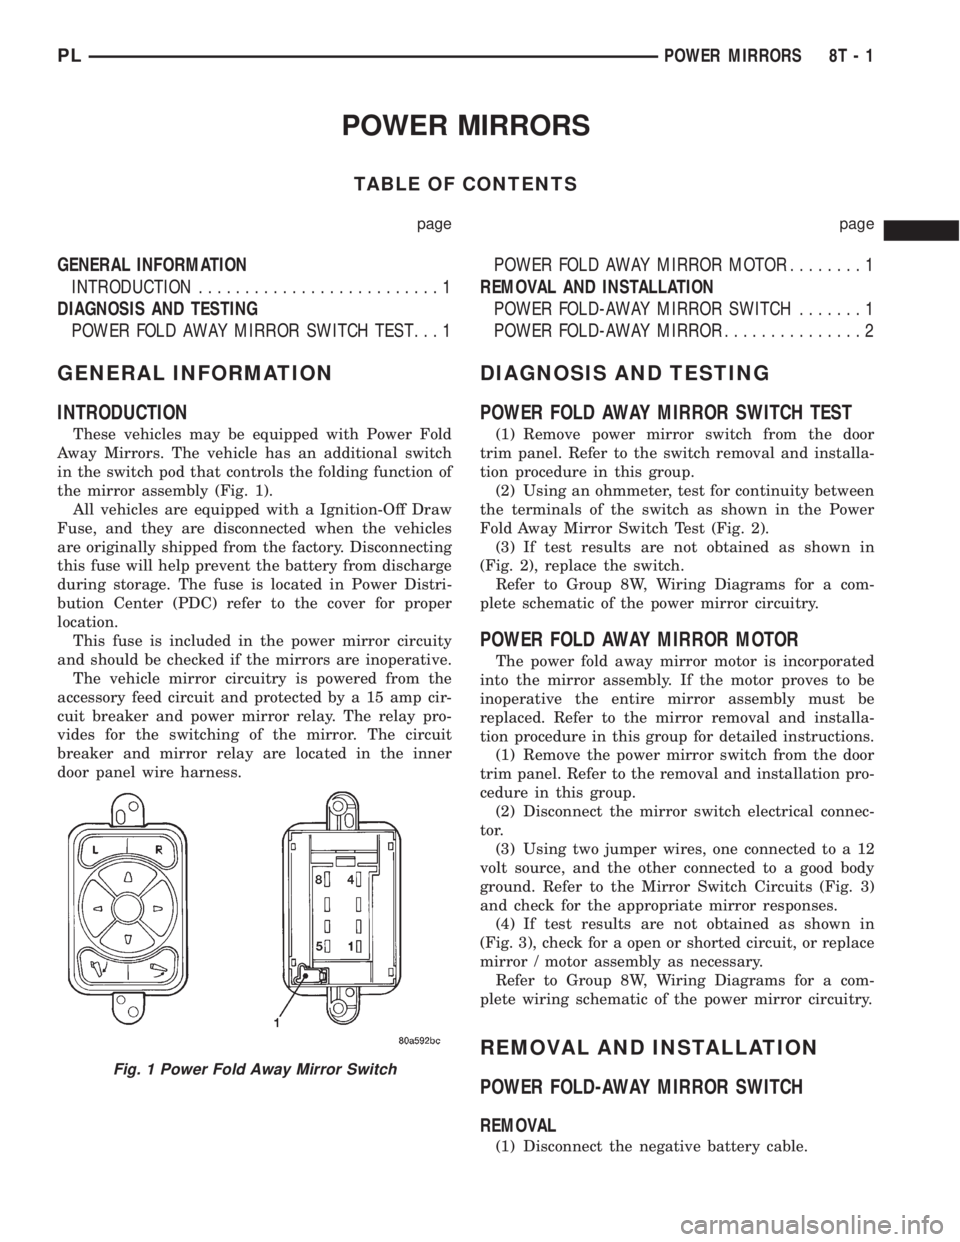
Away Mirrors. The vehicle has an additional switch
in the switch pod that controls the folding function of
the mirror assembly (Fig. 1).
All vehicles are equipped with a Ignition-Off Draw
Fuse, and they are disconnected when the vehicles
are originally shipped from the factory. Disconnecting
this fuse will help prevent the battery from discharge
during storage. The fuse is located in Power Distri-
bution Center (PDC) refer to the cover for proper
location.
This fuse is included in the power mirror circuity
and should be checked if the mirrors are inoperative.
The vehicle mirror circuitry is powered from the
accessory feed circuit and protected by a 15 amp cir-
cuit breaker and power mirror relay. The relay pro-
vides for the switching of the mirror. The circuit
breaker and mirror relay are located in the inner
door panel wire harness.
DIAGNOSIS AND TESTING
POWER FOLD AWAY MIRROR SWITCH TEST
(1) Remove power mirror switch from the door
trim panel. Refer to the switch removal and installa-
tion procedure in this group.
(2) Using an ohmmeter, test for continuity between
the terminals of the switch as shown in the Power
Fold Away Mirror Switch Test (Fig. 2).
(3) If test results are not obtained as shown in
(Fig. 2), replace the switch.
Refer to Group 8W, Wiring Diagrams for a com-
plete schematic of the power mirror circuitry.
POWER FOLD AWAY MIRROR MOTOR
The power fold away mirror motor is incorporated
into the mirror assembly. If the motor proves to be
inoperative the entire mirror assembly must be
replaced. Refer to the mirror removal and installa-
tion procedure in this group for detailed instructions.
(1) Remove the power mirror switch from the door
trim panel. Refer to the removal and installation pro-
cedure in this group.
(2) Disconnect the mirror switch electrical connec-
tor.
(3) Using two jumper wires, one connected to a 12
volt source, and the other connected to a good body
ground. Refer to the Mirror Switch Circuits (Fig. 3)
and check for the appropriate mirror responses.
(4) If test results are not obtained as shown in
(Fig. 3), check for a open or shorted circuit, or replace
mirror / motor assembly as necessary.
Refer to Group 8W, Wiring Diagrams for a com-
plete wiring schematic of the power mirror circuitry.
REMOVAL AND INSTALLATION
POWER FOLD-AWAY MIRROR SWITCH
REMOVAL
(1) Disconnect the negative battery cable.
Fig. 1 Power Fold Away Mirror Switch
PLPOWER MIRRORS 8T - 1
Page 401 of 1285
WARNING: DO NOT ALLOW FLAME OR SPARKS
NEAR THE BATTERY. GASES ARE ALWAYS
PRESENT IN AND AROUND THE BATTERY.
WARNING: ALWAYS REMOVE RINGS, WATCHES,
LOOSE HANGING JEWELRY, AND LOOSE CLOTH-
ING.
TAKE OUTS
The abbreviation T/O is used in the component
location section to indicate a point in which the wir-
ing harness branches out to a component.
ELECTROSTATIC DISCHARGE (ESD) SENSITIVE
DEVICES
All ESD sensitive components are solid state and a
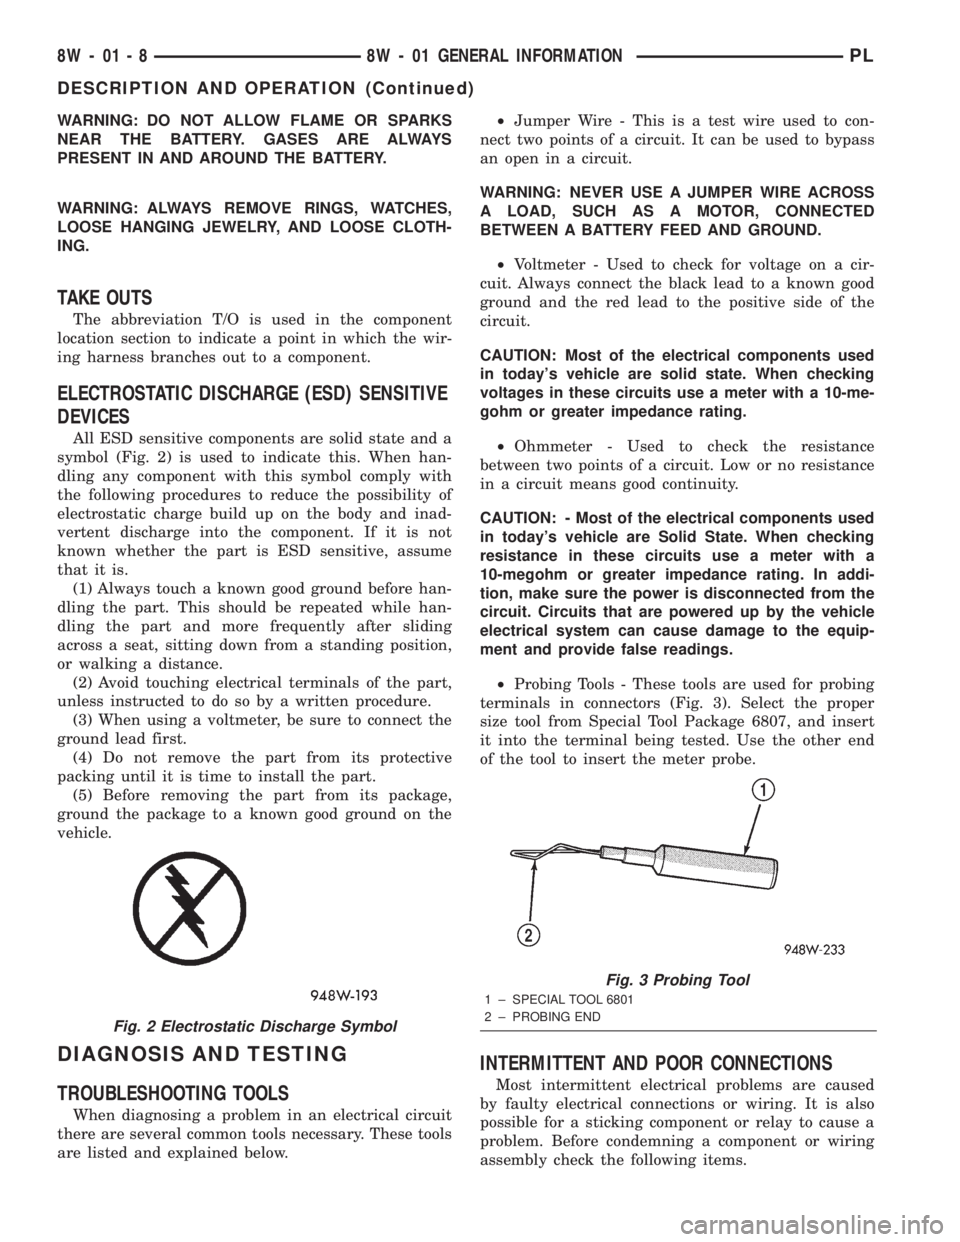
symbol (Fig. 2) is used to indicate this. When han-
dling any component with this symbol comply with
the following procedures to reduce the possibility of
electrostatic charge build up on the body and inad-
vertent discharge into the component. If it is not
known whether the part is ESD sensitive, assume
that it is.
(1) Always touch a known good ground before han-
dling the part. This should be repeated while han-
dling the part and more frequently after sliding
across a seat, sitting down from a standing position,
or walking a distance.
(2) Avoid touching electrical terminals of the part,
unless instructed to do so by a written procedure.
(3) When using a voltmeter, be sure to connect the
ground lead first.
(4) Do not remove the part from its protective
packing until it is time to install the part.
(5) Before removing the part from its package,
ground the package to a known good ground on the
vehicle.
DIAGNOSIS AND TESTING
TROUBLESHOOTING TOOLS
When diagnosing a problem in an electrical circuit
there are several common tools necessary. These tools
are listed and explained below.²Jumper Wire - This is a test wire used to con-
nect two points of a circuit. It can be used to bypass
an open in a circuit.
WARNING: NEVER USE A JUMPER WIRE ACROSS
A LOAD, SUCH AS A MOTOR, CONNECTED
BETWEEN A BATTERY FEED AND GROUND.
²Voltmeter - Used to check for voltage on a cir-
cuit. Always connect the black lead to a known good
ground and the red lead to the positive side of the
circuit.
CAUTION: Most of the electrical components used
in today's vehicle are solid state. When checking
voltages in these circuits use a meter with a 10-me-
gohm or greater impedance rating.
²Ohmmeter - Used to check the resistance
between two points of a circuit. Low or no resistance
in a circuit means good continuity.
CAUTION: - Most of the electrical components used
in today's vehicle are Solid State. When checking
resistance in these circuits use a meter with a
10-megohm or greater impedance rating. In addi-
tion, make sure the power is disconnected from the
circuit. Circuits that are powered up by the vehicle
electrical system can cause damage to the equip-
ment and provide false readings.
²Probing Tools - These tools are used for probing
terminals in connectors (Fig. 3). Select the proper
size tool from Special Tool Package 6807, and insert
it into the terminal being tested. Use the other end
of the tool to insert the meter probe.
INTERMITTENT AND POOR CONNECTIONS
Most intermittent electrical problems are caused
by faulty electrical connections or wiring. It is also
possible for a sticking component or relay to cause a
problem. Before condemning a component or wiring
assembly check the following items.
Fig. 2 Electrostatic Discharge Symbol
Fig. 3 Probing Tool
1 ± SPECIAL TOOL 6801
2 ± PROBING END
8W - 01 - 8 8W - 01 GENERAL INFORMATIONPL
DESCRIPTION AND OPERATION (Continued)
Page 660 of 1285
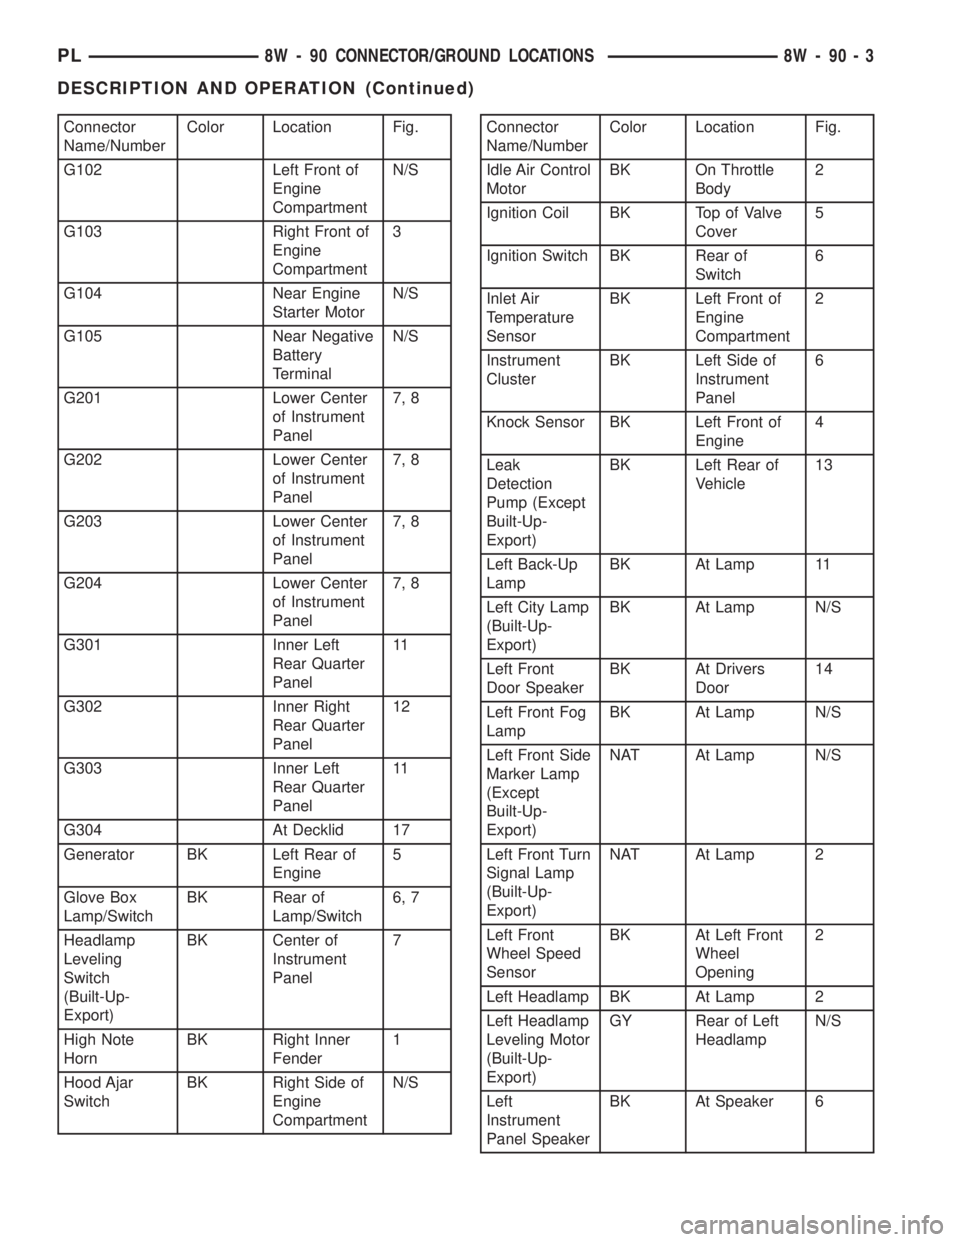
Connector
Name/NumberColor Location Fig.
G102 Left Front of
Engine
CompartmentN/S
G103 Right Front of
Engine
Compartment3
G104 Near Engine
Starter MotorN/S
G105 Near Negative
Battery
TerminalN/S
G201 Lower Center
of Instrument
Panel7, 8
G202 Lower Center
of Instrument
Panel7, 8
G203 Lower Center
of Instrument
Panel7, 8
G204 Lower Center
of Instrument
Panel7, 8
G301 Inner Left
Rear Quarter
Panel11
G302 Inner Right
Rear Quarter
Panel12
G303 Inner Left
Rear Quarter
Panel11
G304 At Decklid 17
Generator BK Left Rear of
Engine5
Glove Box
Lamp/SwitchBK Rear of
Lamp/Switch6, 7
Headlamp
Leveling
Switch
(Built-Up-
Export)BK Center of
Instrument
Panel7
High Note
HornBK Right Inner
Fender1
Hood Ajar
SwitchBK Right Side of
Engine
CompartmentN/SConnector
Name/NumberColor Location Fig.
Idle Air Control
MotorBK On Throttle
Body2
Ignition Coil BK Top of Valve
Cover5
Ignition Switch BK Rear of
Switch6
Inlet Air
Temperature
SensorBK Left Front of
Engine
Compartment2
Instrument
ClusterBK Left Side of
Instrument
Panel6
Knock Sensor BK Left Front of
Engine4
Leak
Detection
Pump (Except
Built-Up-
Export)BK Left Rear of
Vehicle13
Left Back-Up
LampBK At Lamp 11
Left City Lamp
(Built-Up-
Export)BK At Lamp N/S
Left Front
Door SpeakerBK At Drivers
Door14
Left Front Fog
LampBK At Lamp N/S
Left Front Side
Marker Lamp
(Except
Built-Up-
Export)NAT At Lamp N/S
Left Front Turn
Signal Lamp
(Built-Up-
Export)NAT At Lamp 2
Left Front
Wheel Speed
SensorBK At Left Front
Wheel
Opening2
Left Headlamp BK At Lamp 2
Left Headlamp
Leveling Motor
(Built-Up-
Export)GY Rear of Left
HeadlampN/S
Left
Instrument
Panel SpeakerBK At Speaker 6
PL8W - 90 CONNECTOR/GROUND LOCATIONS 8W - 90 - 3
DESCRIPTION AND OPERATION (Continued)