fuel cap DODGE NEON 2005 2.G Owners Manual
[x] Cancel search | Manufacturer: DODGE, Model Year: 2005, Model line: NEON, Model: DODGE NEON 2005 2.GPages: 246, PDF Size: 3.69 MB
Page 80 of 246

added. If the fuel level drops to about 1/2 gallon, the
fuel symbol will begin to flash and the chime will
sound several times.
16. Malfunction Indicator Light
This light is part of an onboard diagnostic
system called OBD that monitors emissions,
engine, and automatic transmission control
systems. The light will illuminate briefly when the key
is in the ON/RUN position before engine start. If the
bulb does not come on when turning the key from
OFF to ON/RUN, have the condition checked
promptly.
Certain conditions such as a loose or missing gas cap,
poor fuel quality, etc., may illuminate the light after
engine start. The vehicle should be serviced if the light
stays on through several of your typical driving cycles. In
most situations, the vehicle will drive normally and will
not require towing.
If the Malfunction Indicator Light flashes when the
engine is running, serious conditions may exist that
could lead to immediate loss of power or severe catalyticconverter damage. The vehicle should be serviced as
soon as possible if this occurs. (See page 166 for more
information.)
17. Odometer/Trip Odometer Reset Knob
Press this knob to switch between the odometer and trip
odometer. While the trip odometer is being displayed,
press and hold this knob for a few seconds to reset the
trip odometer to zero miles/kilometers.
18. Odometer/Trip Odometer
Shows the total distance the vehicle has been driven.
U.S. Federal regulations require that upon transfer of
vehicle ownership, the seller certify to the purchaser the
correct mileage that the vehicle has been driven. There-
fore, if the odometer reading changes during repair or
replacement, be sure to keep a record of the reading
before and after the service so the correct mileage can be
determined.
80 UNDERSTANDING YOUR INSTRUMENT PANEL
Page 112 of 246

mPower Steering........................124
mTire Safety Information..................124
NTire Markings........................124
NTire Identification Number (TIN)..........127
NTire Loading And Tire Pressure...........128
mTiresÐGeneral Information...............132
NTire Pressure.........................132
NTire Inflation Pressures.................133
NRadial-Ply Tires......................135
NCompact Spare Tire Ð If Equipped.........135
NLimited Use Spare Ð If Equipped.........136
NTire Spinning........................137
NTread Wear Indicators..................137
NReplacement Tires.....................138
NAlignment And Balance.................139
mTire Chains...........................139
mSnow Tires...........................140
mTire Rotation Recommendations...........141
mFuel Requirements.....................141
NSpark Knock.........................142
NReformulated Gasoline.................142
NGasoline/Oxygenate Blends..............142
NMMT In Gasoline.....................143
NMaterials Added To Fuel................143
NFuel System Cautions..................143
NCarbon Monoxide Warnings..............144
mAdding Fuel..........................144
NFuel Tank Filler Cap...................144
mVehicle Loading.......................146
mTrailer Towing........................146
112 STARTING AND OPERATING
Page 144 of 246
Fuel system damage or vehicle performance problems
resulting from the use of such fuels or additives is not
the responsibility of the manufacturer.
NOTE:Intentional tampering with emissions control
systems can result in civil penalties being assessed
against you.
Carbon Monoxide Warnings
WARNING!
Carbon monoxide (CO) in exhaust gases is deadly.
Follow the precautions below to prevent carbon
monoxide poisoning:
²Do not inhale exhaust gases. They contain carbon
monoxide, a colorless and odorless gas which can kill.
Never run the engine in a closed area, such as a
garage, and never sit in a parked vehicle with the
engine running for an extended period. If the vehicle is
stopped in an open area with the engine running for
more than a short period, adjust the ventilation system
to force fresh, outside air into the vehicle.
²Guard against carbon monoxide with proper mainte-
nance. Have the exhaust system inspected every time
the vehicle is raised. Have any abnormal conditions
repaired promptly. Until repaired, drive with all side
windows fully open.
²Keep the trunk closed when driving your vehicle to
prevent carbon monoxide and other poisonous ex-
haust gases from entering the vehicle.
ADDING FUEL
NOTE:
The fuel tank filler tube has a restricting door
about 2 inches (50 mm) down from the opening. If fuel is
poured from a portable container, the container should
have a flexible nozzle long enough to force open the
restricting door.
Fuel Tank Filler Cap
The gas cap is behind the fuel filler door, on the passen-
ger's side of the vehicle. If the gas cap is lost or damaged,
be sure the replacement cap has been designed for use
with this vehicle.
144 STARTING AND OPERATING
Page 145 of 246
CAUTION!
Damage to the fuel system or emission control
system could result from using an improper fuel
tank filler tube cap (gas cap). A poorly fitting cap
could let impurities into the fuel system.
CAUTION!
A poorly fitting gas cap may cause the Malfunction
Indicator Lamp to turn on.
NOTE:When the fuel nozzle ªclicksº or shuts off, the
fuel tank is full.
CAUTION!
To avoid fuel spillage and overfilling, do not ªtop
offº the fuel tank after filling.
NOTE:Tighten the gas cap about 1/4 turn until you
hear one click. This is an indication that the cap is
properly tightened.
If the gas cap is not tightened properly, the Malfunc-
tion Indicator light will come on. Be sure the gas cap is
tightened every time the vehicle is fueled.
WARNING!
²Never have any smoking materials lit in or near
the vehicle when the gas cap is removed or the
tank filled.
²Never add fuel when the engine is running.
²Turn off engine.
²Rotate the gas cap to the left to remove.
²To replace the cap, insert it into the filler neck and
tighten to the right until at least one click is heard.
STARTING AND OPERATING 145
5
Page 171 of 246
²Driving in dusty conditions
²Short trips of less than 10 miles (16.2 km)
²More than 50% of your driving is at sustained high
speeds during hot weather, above 90ÉF (32ÉC)
²Trailer towing
²Taxi, Police, or delivery service (commercial service)
²Off-road or desert operation
²If equipped for and operating with E-85 (ethanol) fuel
NOTE:IfANYof these apply to you then change your
engine oil every 3,000 miles (5 000 km) or 3 months,
whichever comes first and follow schedule ªBº of the
9Maintenance Schedules9section of this manual.
If none of these apply to you, then change your engine oil
at every interval shown on schedule9A9of the9Mainte-
nance Schedules9section of this manual.
NOTE:Under no circumstances should oil change
intervals exceed 6000 miles (10 000 km) or 6 months
whichever comes first.
Engine Oil Selection
For best performance and maximum protection under all
types of operating conditions, the manufacturer only
recommends engine oils that are API certified and meet
the requirements of DaimlerChrysler Material Standard
MS-6395.
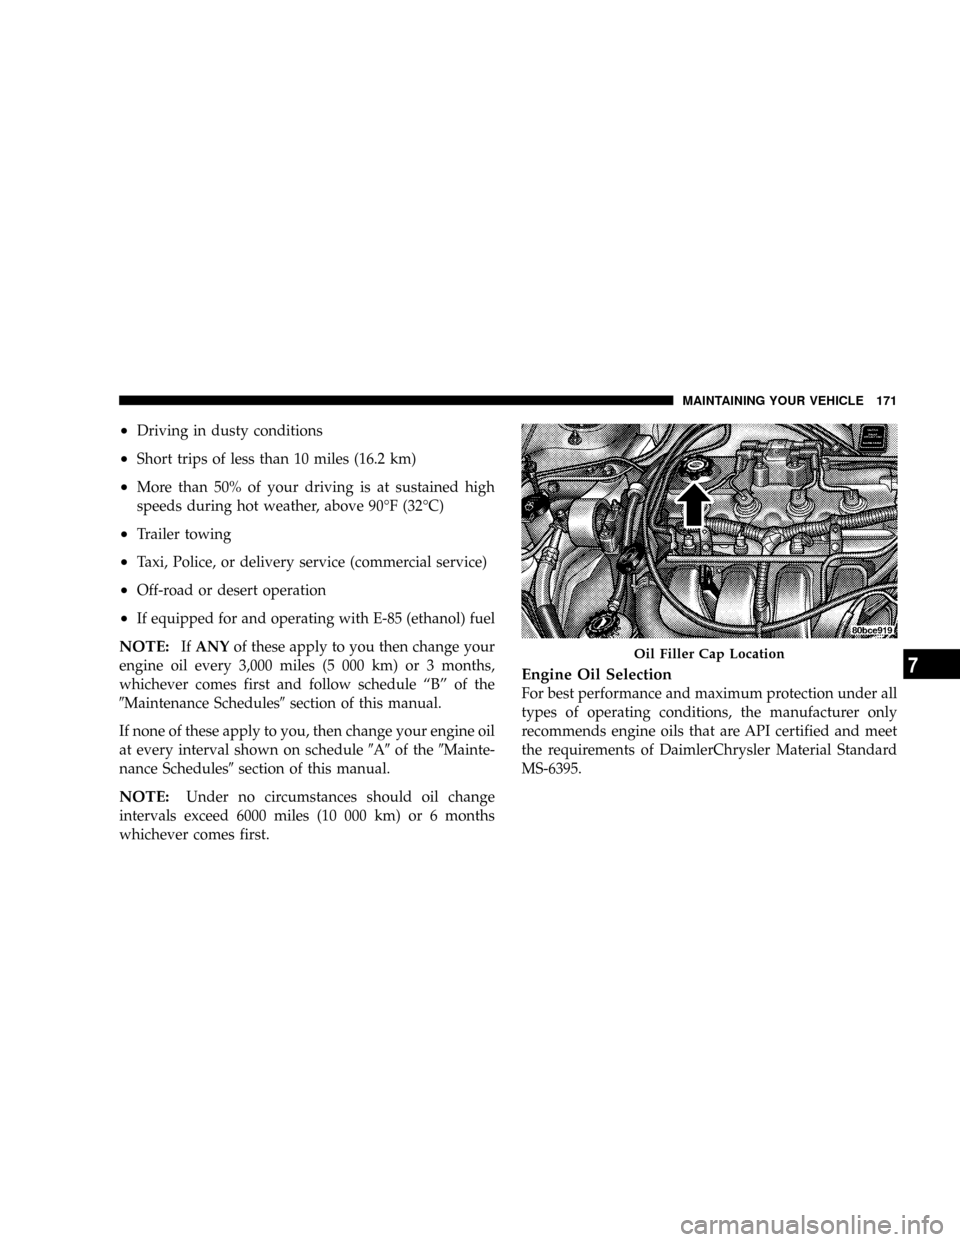
Oil Filler Cap Location
MAINTAINING YOUR VEHICLE 171
7
Page 172 of 246

American Petroleum Institute (API) Engine Oil
Identification Symbol
This symbol means that the oil has
been certified by the American
Petroleum Institute (API). The
manufacturer only recommends
API Certified engine oils.
Engine Oil Viscosity (SAE Grade)
SAE 5W-20 engine oil is recommended for all operating
temperatures. This engine oil improves low tempera-
ture starting and vehicle fuel economy. Refer to your
engine oil filler cap for the recommended engine oil
viscosity for your vehicle.
For information on engine oil filler cap location, see the
Engine Compartment illustration in this section.
Lubricants which do not have both, the engine oil certi-
fication mark and the correct SAE viscosity grade num-
ber should not be used.
Synthetic Engine Oils
There are a number of engine oils being promoted as
either synthetic or semi-synthetic. If you chose to use
such a product, useonlythose oils that are American
Petroleum Institute (API) Certified and have the recom-
mended SAE viscosity grade. Follow the maintenance
schedule that describes your driving type.
Materials Added To Engine Oils
The manufacturer strongly recommends against the ad-
dition of any additives (other than leak detection dyes) to
the engine oil. Engine oil is an engineered product and
it's performance may be impaired by supplemental ad-
ditives.
Disposing of Used Engine Oil
Care should be taken in disposing of used engine oil from
your vehicle. Used oil, indiscriminately discarded, can
present a problem to the environment. Contact your
dealer, service station, or governmental agency for advice
on how and where used oil can be safely discarded in
your area.
172 MAINTAINING YOUR VEHICLE
Page 202 of 246
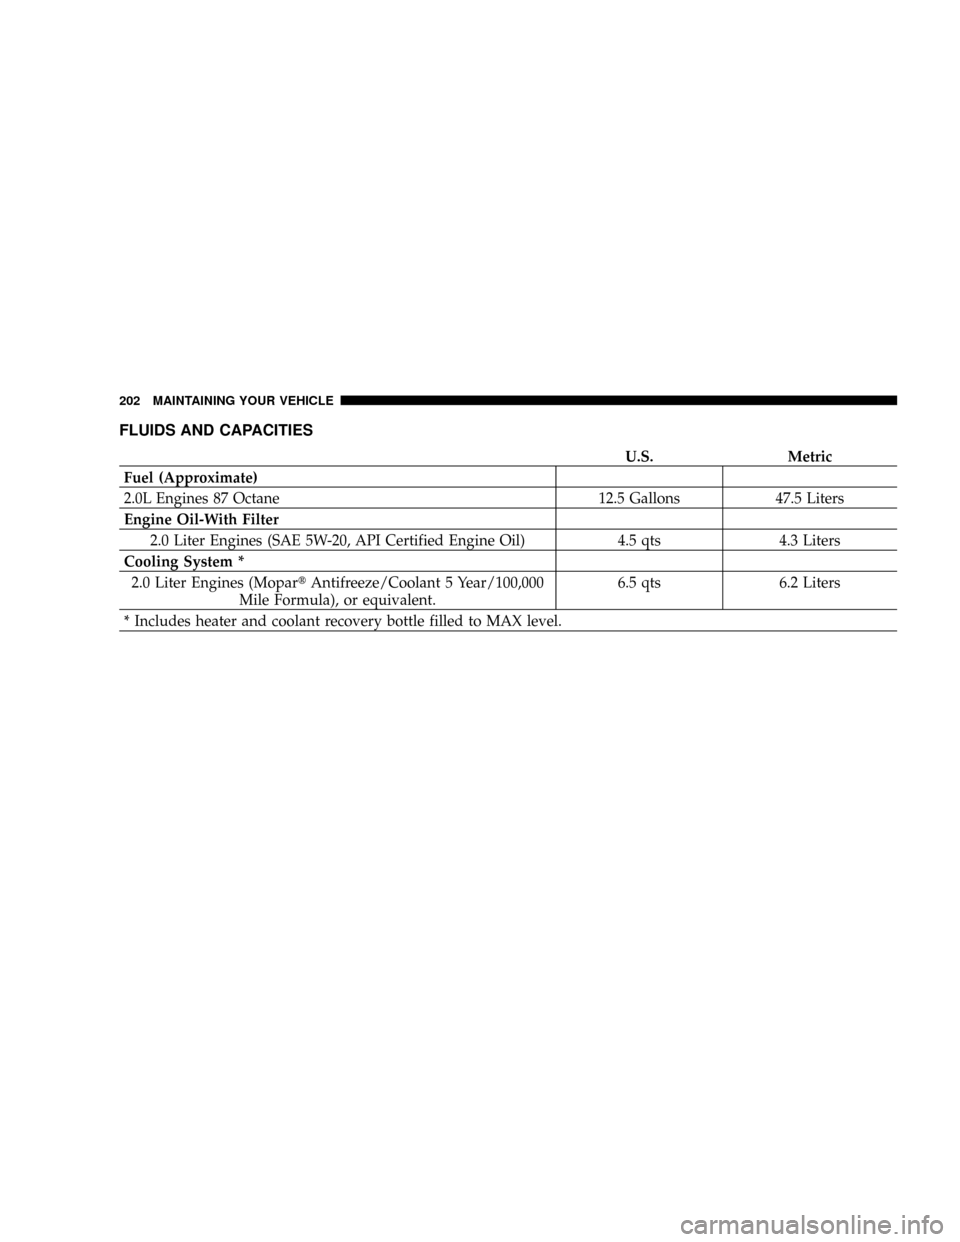
FLUIDS AND CAPACITIES
U.S. Metric
Fuel (Approximate)
2.0L Engines 87 Octane 12.5 Gallons 47.5 Liters
Engine Oil-With Filter
2.0 Liter Engines (SAE 5W-20, API Certified Engine Oil) 4.5 qts 4.3 Liters
Cooling System *
2.0 Liter Engines (MopartAntifreeze/Coolant 5 Year/100,000
Mile Formula), or equivalent.6.5 qts 6.2 Liters
* Includes heater and coolant recovery bottle filled to MAX level.
202 MAINTAINING YOUR VEHICLE
Page 203 of 246
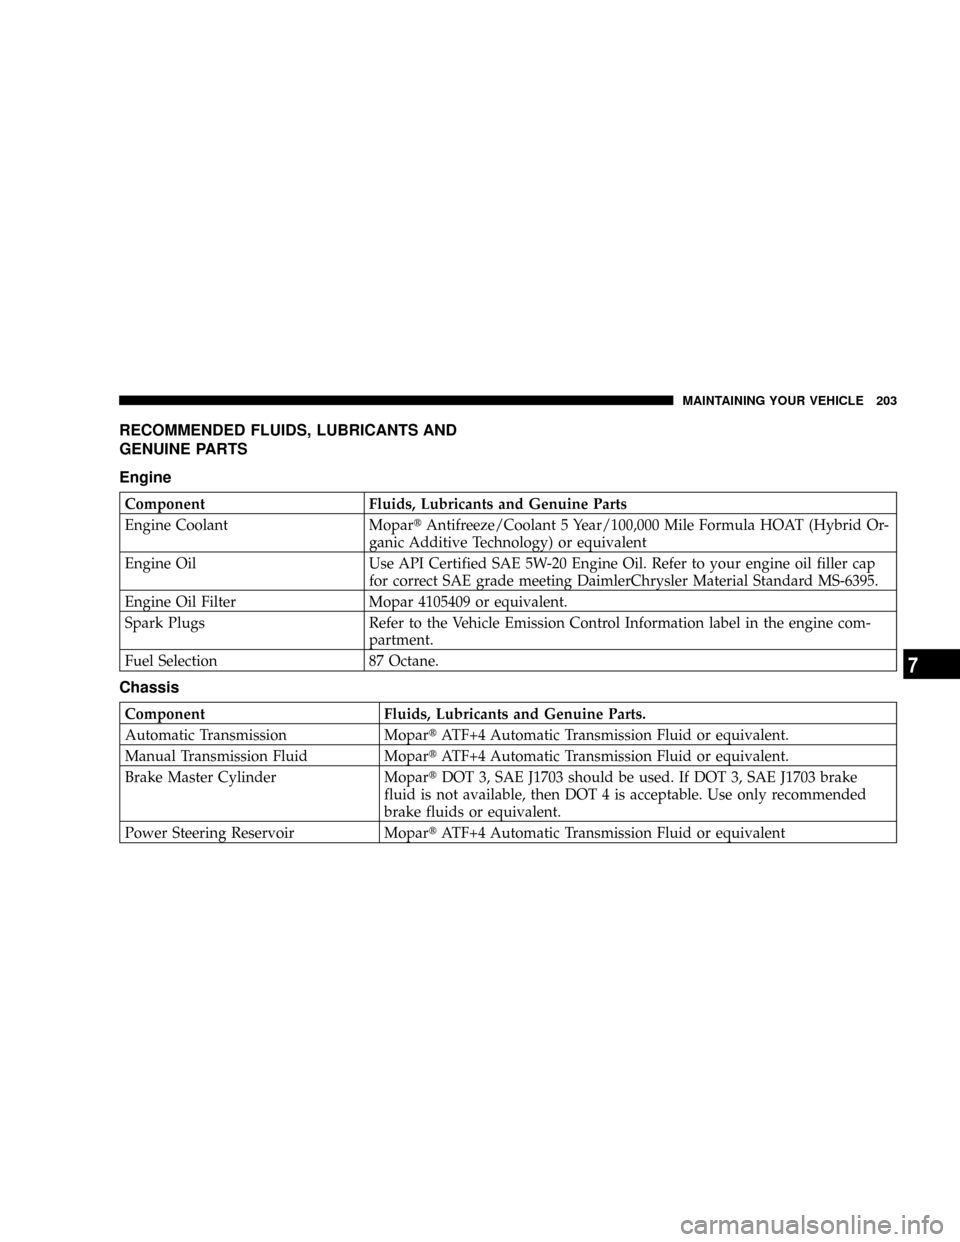
RECOMMENDED FLUIDS, LUBRICANTS AND
GENUINE PARTS
Engine
Component Fluids, Lubricants and Genuine Parts
Engine Coolant MopartAntifreeze/Coolant 5 Year/100,000 Mile Formula HOAT (Hybrid Or-
ganic Additive Technology) or equivalent
Engine Oil Use API Certified SAE 5W-20 Engine Oil. Refer to your engine oil filler cap
for correct SAE grade meeting DaimlerChrysler Material Standard MS-6395.
Engine Oil Filter Mopar 4105409 or equivalent.
Spark Plugs Refer to the Vehicle Emission Control Information label in the engine com-
partment.
Fuel Selection 87 Octane.
Chassis
Component Fluids, Lubricants and Genuine Parts.
Automatic Transmission MopartATF+4 Automatic Transmission Fluid or equivalent.
Manual Transmission Fluid MopartATF+4 Automatic Transmission Fluid or equivalent.
Brake Master Cylinder MopartDOT 3, SAE J1703 should be used. If DOT 3, SAE J1703 brake
fluid is not available, then DOT 4 is acceptable. Use only recommended
brake fluids or equivalent.
Power Steering Reservoir MopartATF+4 Automatic Transmission Fluid or equivalent
MAINTAINING YOUR VEHICLE 203
7
Page 234 of 246

ABS (Anti-Lock Brake) System............. 123
Adding Engine Coolant (Antifreeze)......... 183
Adding Fuel.......................... 144
Air Cleaner, Engine (Engine Air Cleaner Filter) . 175
Air Conditioning....................103,177
Air Conditioning Controls................ 103
Air Conditioning Refrigerant.............. 177
Air Conditioning System................. 177
Air Pressure, Tires...................... 133
Airbag................................ 31
Airbag Deployment...................... 36
Airbag Light.......................39,47,79
Airbag Maintenance...................... 38
Airbag, Side........................... 37
Alarm, Panic........................... 20
Alarm System........................22,79
Alignment and Balance.................. 139
Alterations/Modifications, Vehicle............ 6
Antenna, Satellite Radio................... 96
Antifreeze (Engine Coolant).........182,202,203
Capacities........................... 202
Disposal............................ 184
Anti-Lock Brake System (ABS)............. 123Anti-Lock Warning Light.................. 77
Anti-Theft Security Alarm................. 22
Appearance Care....................... 191
Arming Theft System..................... 22
Ashtrays and Lighter..................... 70
Automatic Door Locks.................... 16
Automatic Transaxle........... 9,114,116,117,188
Fluid and Filter Changes................ 190
Fluid Level Check..................... 188
Interlock System....................14,116
Reset Mode.......................... 117
Selection Of Lubricant................. 188
Shifting............................. 117
Special Additives..................... 190
Ball Joints............................ 178
Battery............................... 176
Keyless Transmitter Replacement.......... 21
Belts, Drive........................... 173
Belts, Engine.......................... 174
Body Mechanism Lubrication.............. 178
B-Pillar Location....................... 128
Brake Fluid........................... 203
234 INDEX
Page 235 of 246
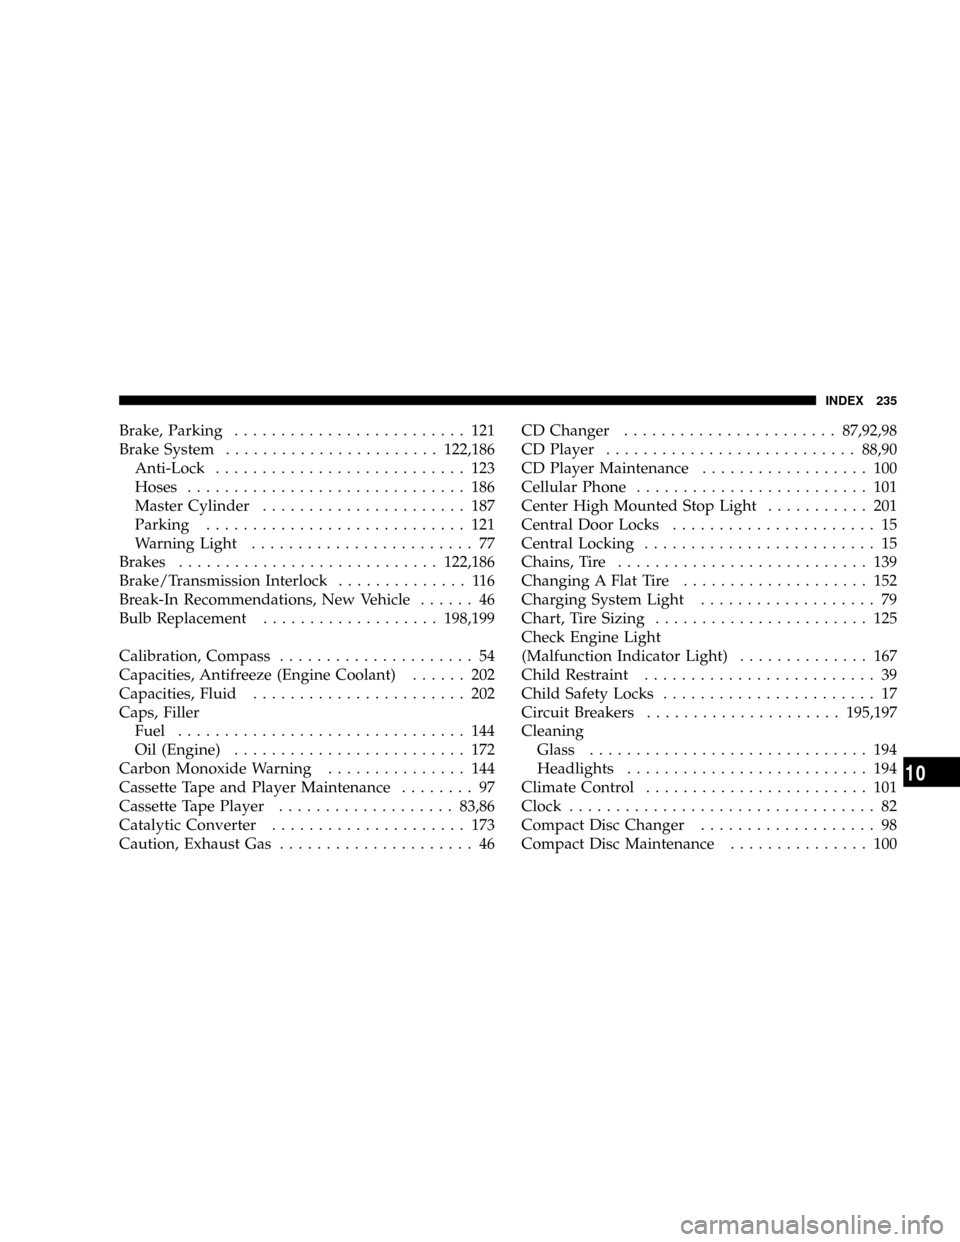
Brake, Parking......................... 121
Brake System.......................122,186
Anti-Lock........................... 123
Hoses.............................. 186
Master Cylinder...................... 187
Parking............................ 121
Warning Light........................ 77
Brakes............................122,186
Brake/Transmission Interlock.............. 116
Break-In Recommendations, New Vehicle...... 46
Bulb Replacement...................198,199
Calibration, Compass..................... 54
Capacities, Antifreeze (Engine Coolant)...... 202
Capacities, Fluid....................... 202
Caps, Filler
Fuel............................... 144
Oil (Engine)......................... 172
Carbon Monoxide Warning............... 144
Cassette Tape and Player Maintenance........ 97
Cassette Tape Player...................83,86
Catalytic Converter..................... 173
Caution, Exhaust Gas..................... 46CD Changer.......................87,92,98
CD Player...........................88,90
CD Player Maintenance.................. 100
Cellular Phone......................... 101
Center High Mounted Stop Light........... 201
Central Door Locks...................... 15
Central Locking......................... 15
Chains, Tire........................... 139
Changing A Flat Tire.................... 152
Charging System Light................... 79
Chart, Tire Sizing....................... 125
Check Engine Light
(Malfunction Indicator Light).............. 167
Child Restraint......................... 39
Child Safety Locks....................... 17
Circuit Breakers.....................195,197
Cleaning
Glass.............................. 194
Headlights.......................... 194
Climate Control........................ 101
Clock................................. 82
Compact Disc Changer................... 98
Compact Disc Maintenance............... 100
INDEX 235
10