headlamp DODGE NEON 2005 2.G Owners Manual
[x] Cancel search | Manufacturer: DODGE, Model Year: 2005, Model line: NEON, Model: DODGE NEON 2005 2.GPages: 246, PDF Size: 3.69 MB
Page 196 of 246

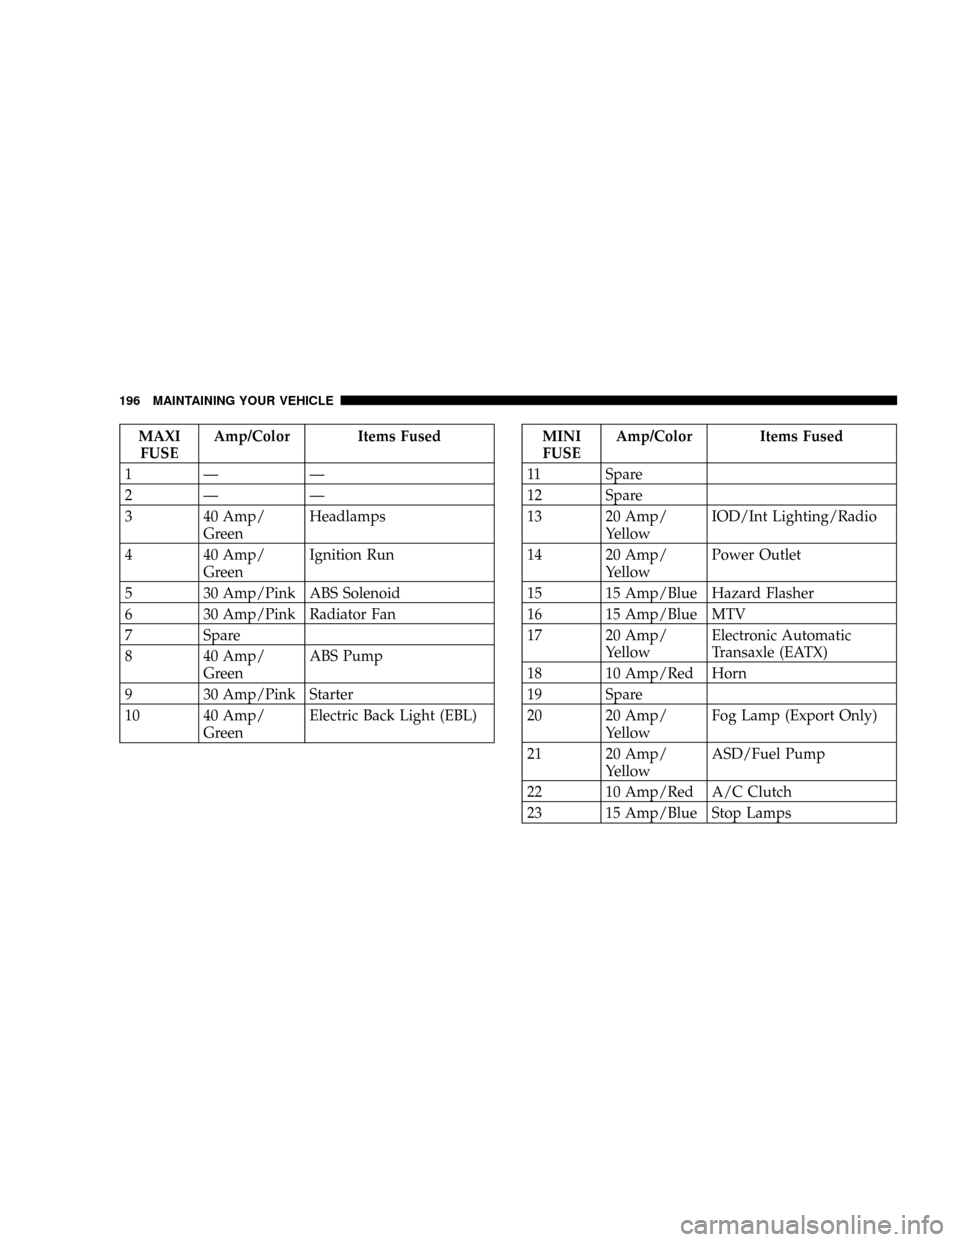
MAXI
FUSEAmp/Color Items Fused
1Ð Ð
2Ð Ð
3 40 Amp/
GreenHeadlamps
4 40 Amp/
GreenIgnition Run
5 30 Amp/Pink ABS Solenoid
6 30 Amp/Pink Radiator Fan
7 Spare
8 40 Amp/
GreenABS Pump
9 30 Amp/Pink Starter
10 40 Amp/
GreenElectric Back Light (EBL)MINI
FUSEAmp/Color Items Fused
11 Spare
12 Spare
13 20 Amp/
YellowIOD/Int Lighting/Radio
14 20 Amp/
YellowPower Outlet
15 15 Amp/Blue Hazard Flasher
16 15 Amp/Blue MTV
17 20 Amp/
YellowElectronic Automatic
Transaxle (EATX)
18 10 Amp/Red Horn
19 Spare
20 20 Amp/
YellowFog Lamp (Export Only)
21 20 Amp/
YellowASD/Fuel Pump
22 10 Amp/Red A/C Clutch
23 15 Amp/Blue Stop Lamps
196 MAINTAINING YOUR VEHICLE
Page 197 of 246

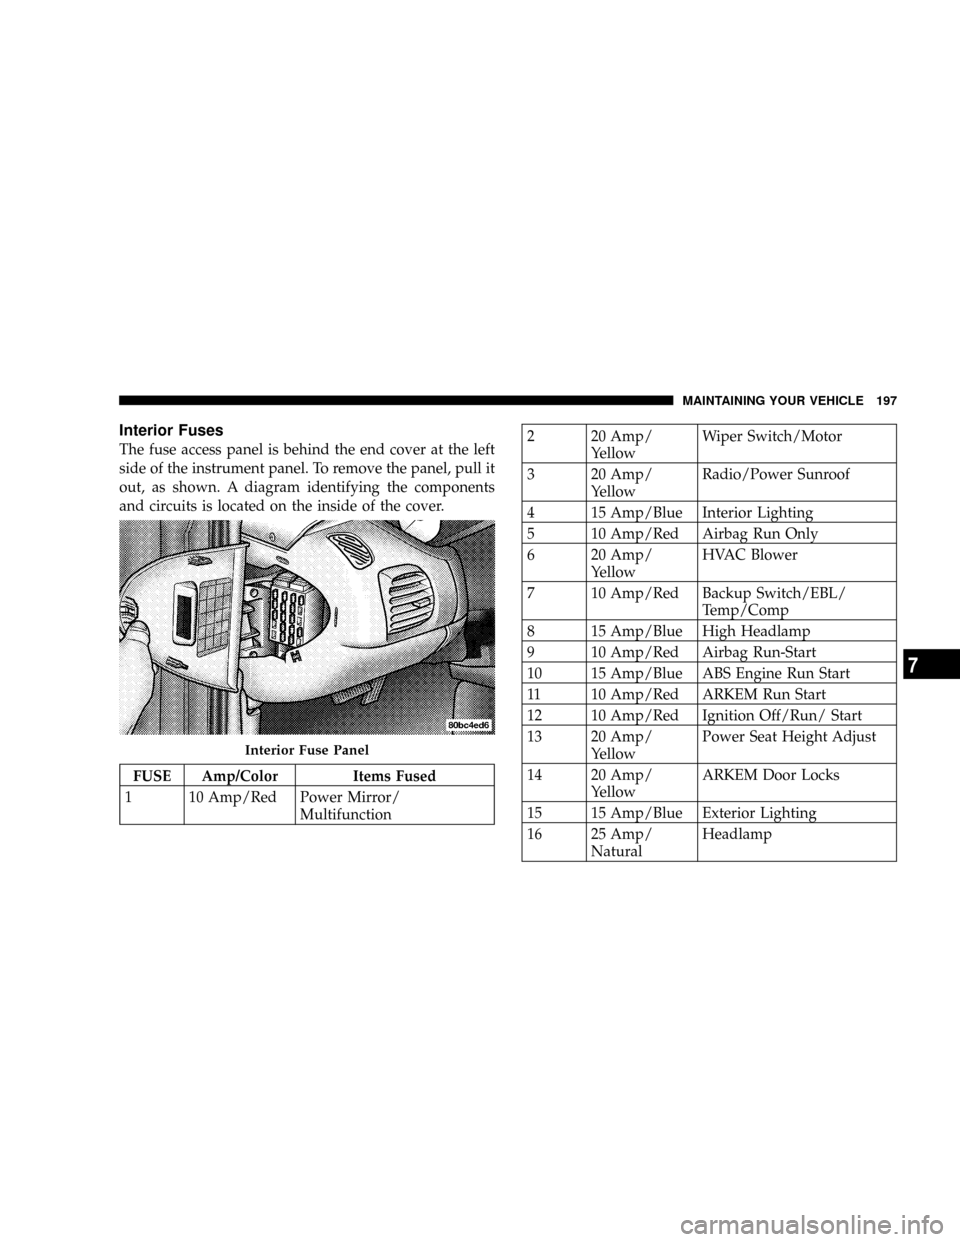
Interior Fuses
The fuse access panel is behind the end cover at the left
side of the instrument panel. To remove the panel, pull it
out, as shown. A diagram identifying the components
and circuits is located on the inside of the cover.
FUSE Amp/Color Items Fused
1 10 Amp/Red Power Mirror/
Multifunction
2 20 Amp/
YellowWiper Switch/Motor
3 20 Amp/
YellowRadio/Power Sunroof
4 15 Amp/Blue Interior Lighting
5 10 Amp/Red Airbag Run Only
6 20 Amp/
YellowHVAC Blower
7 10 Amp/Red Backup Switch/EBL/
Temp/Comp
8 15 Amp/Blue High Headlamp
9 10 Amp/Red Airbag Run-Start
10 15 Amp/Blue ABS Engine Run Start
11 10 Amp/Red ARKEM Run Start
12 10 Amp/Red Ignition Off/Run/ Start
13 20 Amp/
YellowPower Seat Height Adjust
14 20 Amp/
YellowARKEM Door Locks
15 15 Amp/Blue Exterior Lighting
16 25 Amp/
NaturalHeadlamp
Interior Fuse Panel
MAINTAINING YOUR VEHICLE 197
7
Page 198 of 246

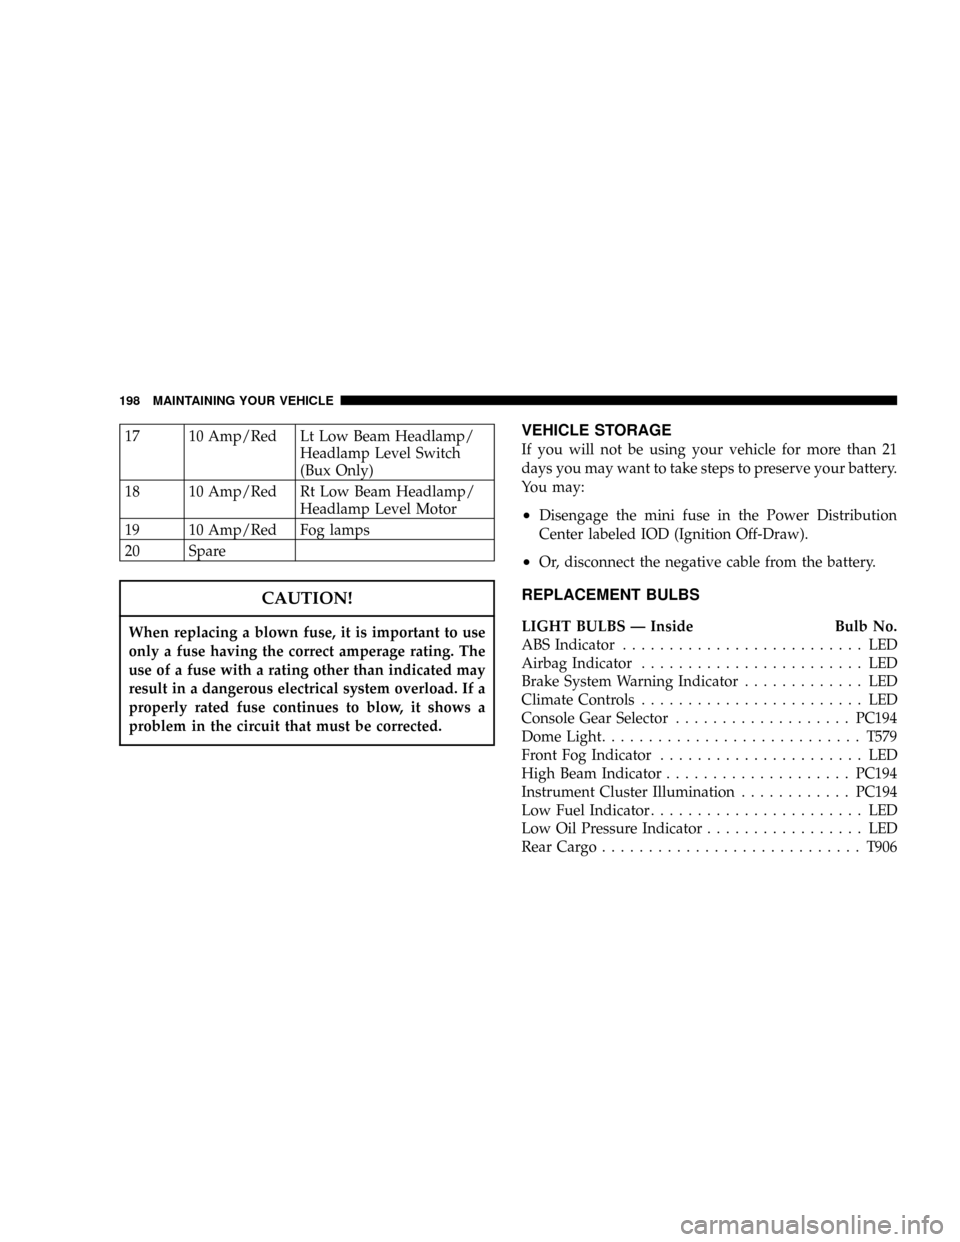
17 10 Amp/Red Lt Low Beam Headlamp/
Headlamp Level Switch
(Bux Only)
18 10 Amp/Red Rt Low Beam Headlamp/
Headlamp Level Motor
19 10 Amp/Red Fog lamps
20 Spare
CAUTION!
When replacing a blown fuse, it is important to use
only a fuse having the correct amperage rating. The
use of a fuse with a rating other than indicated may
result in a dangerous electrical system overload. If a
properly rated fuse continues to blow, it shows a
problem in the circuit that must be corrected.
VEHICLE STORAGE
If you will not be using your vehicle for more than 21
days you may want to take steps to preserve your battery.
You may:
²Disengage the mini fuse in the Power Distribution
Center labeled IOD (Ignition Off-Draw).
²Or, disconnect the negative cable from the battery.
REPLACEMENT BULBS
LIGHT BULBS Ð Inside Bulb No.
ABS Indicator.......................... LED
Airbag Indicator........................ LED
Brake System Warning Indicator............. LED
Climate Controls........................ LED
Console Gear Selector...................PC194
Dome Light............................T579
Front Fog Indicator...................... LED
High Beam Indicator....................PC194
Instrument Cluster Illumination............PC194
Low Fuel Indicator....................... LED
Low Oil Pressure Indicator................. LED
Rear Cargo............................T906
198 MAINTAINING YOUR VEHICLE
Page 200 of 246

2. Remove two screws from the headlight assembly and
remove the assembly from the vehicle.
NOTE:The headlight assembly is located to the fender
by a molded pin. Pull the outboard side of the headlight
straight out until the molded pin clears the fender, then
slide the headlight out from behind the bumper fascia
and grille.3. Disconnect the electrical connector.
4. Remove the retaining ring and replace the bulb.
CAUTION!
During installation, be sure when tightening the
inboard screw, to only tighten until the rubber
grommet on the screw starts to compress against the
headlamp module housing.
200 MAINTAINING YOUR VEHICLE