ignition DODGE NEON SRT 2004 2.G Owner's Guide
[x] Cancel search | Manufacturer: DODGE, Model Year: 2004, Model line: NEON SRT, Model: DODGE NEON SRT 2004 2.GPages: 200, PDF Size: 3.23 MB
Page 119 of 200

WHAT TO DO IN EMERGENCIES
CONTENTS
mHazard Warning Flasher.................120
mIf Your Engine Overheats................120
mJacking And Tire Changing...............122
NPreparations For Jacking................122
NInstructions.........................122
mJump-Starting Procedures Due To A Low
Battery
..............................125
mDriving On Slippery Surfaces.............128
NAcceleration.........................128NTraction............................128
mFreeing A Stuck Vehicle.................129
mTowing A Disabled Vehicle...............130
NWith Ignition Key.....................130
NWithout The Ignition Key...............130
NTowing This Vehicle Behind Another Vehicle
(Flat Towing With All Four Wheels On The
Ground)............................130
6
Page 120 of 200

HAZARD WARNING FLASHER
The flasher switch is on top of the steering column,
just behind the steering wheel. Depress the switch
and both cluster indicators and all front and rear direc-
tional signals will flash. Depress the switch again to turn
Hazard Warning Flashers off.
Do not use this emergency warning system when the
vehicle is in motion. Use it when your vehicle is disabled
and is creating a safety hazard for other motorists.If it is necessary to leave the vehicle to go for service, the
flasher system will continue to operate with the ignition
key removed and the vehicle locked.
NOTE:With extended use, the flasher may wear down
your battery.
IF YOUR ENGINE OVERHEATS
In any of the following situations, you can reduce the
potential for overheating by taking the appropriate ac-
tion.
²On the highways Ð Slow down.
²In city traffic Ð While stopped, put transaxle in
neutral, but do not increase engine idle speed.
NOTE:There are steps that you can take to slow down
an impending overheat condition. If your air conditioner
is on, turn it off. The air conditioning system adds heat to
the engine cooling system and turning off the A/C
removes this heat. You can also turn the Temperature
control to maximum heat, the Mode control to floor, and
120 WHAT TO DO IN EMERGENCIES
Page 125 of 200
7. Finish tightening the nuts. Push down on the wrench
while tightening the wheel nuts. Alternate nuts until each
nut has been tightened twice. Correct wheel nut torque is
100 ft. lbs. (135 N´m.). If you are not sure about the
tightness, have them checked with a torgue wrench by
your dealer or at a service station.
8. Remove the wheel blocks and lower the jack until it is
free. Stow the lug wrench, replaced tire, and jack. Secure
all parts using the means provided.
WARNING!
A loose tire or jack thrown forward in a collision or
hard stop could endanger the occupants of the ve-
hicle. Always stow the jack parts and the spare tire in
the places provided.
9. Adjust the tire pressure as soon as possible.
NOTE:The spare tire well is designed to hold the
compact spare tire or a deflated (flat) tire. A fully inflated
tire will not fit in the spare tire well.
JUMP-STARTING PROCEDURES DUE TO A LOW
BATTERY
WARNING!
Take care to avoid the radiator cooling fan whenever
the hood is raised. It can start anytime the ignition
switch is on. You can be hurt by the fan.
WARNING!
Do not attempt to push or tow your vehicle to get it
started. Unburned fuel could enter the catalytic
converter and once the engine has started, ignite and
damage the converter and vehicle. If the vehicle has
a discharged battery, booster cables may be used to
obtain a start from another vehicle. This type of start
can be dangerous if done improperly, so follow this
procedure carefully.
WHAT TO DO IN EMERGENCIES 125
6
Page 126 of 200
1. Wear eye protection and remove any metal jewelry
such as watch bands or bracelets that might make an
inadvertent electrical contact.
2. When boosting from a battery in another vehicle, park
that vehicle within booster cable reach but without
letting the vehicles touch. Set parking brake, place trans-
axle in NEUTRAL and turn ignition to OFF for both
vehicles.
3. Turn off the heater, radio and all unnecessary electrical
loads.
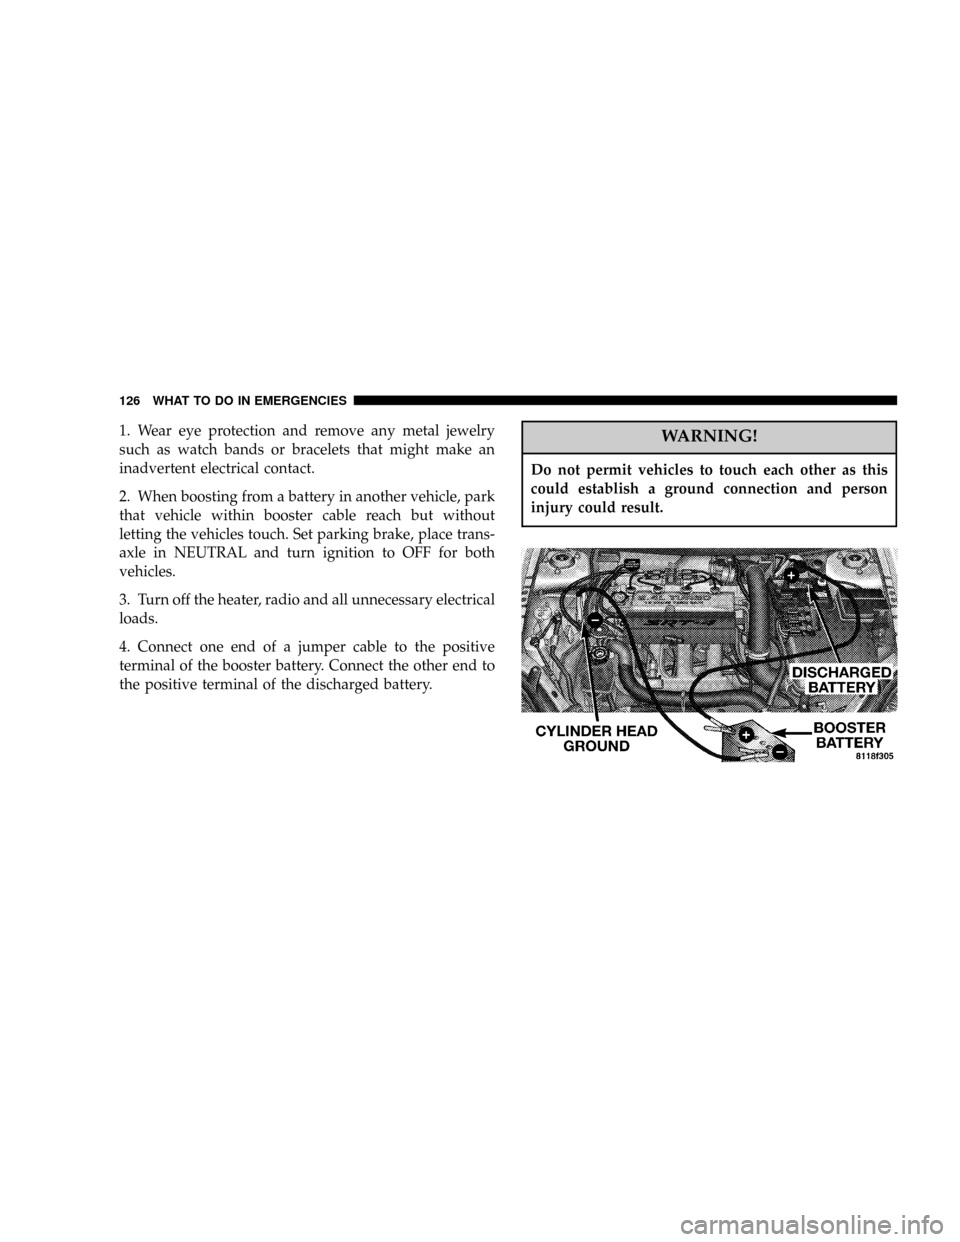
4. Connect one end of a jumper cable to the positive
terminal of the booster battery. Connect the other end to
the positive terminal of the discharged battery.WARNING!
Do not permit vehicles to touch each other as this
could establish a ground connection and person
injury could result.
126 WHAT TO DO IN EMERGENCIES
Page 127 of 200
WARNING!
Battery fluid is a corrosive acid solution; do not
allow battery fluid to contact eyes, skin or clothing.
Don't lean over battery when attaching clamps or
allow the clamps to touch each other. If acid splashes
in eyes or on skin, flush the contaminated area
immediately with large quantities of water.
A battery generates hydrogen gas which is flam-
mable and explosive. Keep flame or spark away
from the vent holes. Do not use a booster battery or
any other booster source with an output that exceeds
12 volts.
5. Connect the other cable, first to the negative terminal
of the booster battery and then to the engine of the
vehicle with the discharged battery. Make sure you have
a good contact on the engine.
WARNING!
Do not connect the cable to the negative post of the
discharge battery. The resulting electrical spark
could cause the battery to explode.
During cold weather when temperatures are below
freezing point, electrolyte in a discharged battery
may freeze. Do not attempt jump starting because
the battery could rupture or explode. The battery
temperature must be brought up above freezing
point before attempting to jump start.
6. Since your vehicle is equipped with senrty key immo-
bilizer, turn the ignition switch to the ON/RUN position
for 3 seconds prior to moving the ignition switch to the
crank position and starting the vehicle.
7. Start the engine in the vehicle that has the booster
battery, let the engine idle a few minutes, then start the
engine in the vehicle with the discharged battery.
8. When removing the jumper cables, reverse the above
sequence exactly. Be careful of the moving belts and fan.
WHAT TO DO IN EMERGENCIES 127
6
Page 130 of 200

TOWING A DISABLED VEHICLE
With Ignition Key
Your vehicle may be towed if the gearshift lever is in
NEUTRAL. If the transaxle is not operative, the vehicle
must be towed with the front wheels off the ground.
CAUTION!
If the vehicle being towed requires steering, the
ignition switch must be in the OFF position, not in
the LOCK or ACCESSORY positions.
If it is necessary to use the accessories while being towed
(wipers, defrosters, etc.), the key must be in the ON
position, not the ACCESSORY position. Make certain the
transaxle remains in NEUTRAL.
Without The Ignition Key
Special care must be taken when the vehicle is towed
with the ignition in the LOCK position. A dolly should be
used under the front wheels if the rear wheels are raised.
Proper towing equipment is necessary to prevent dam-
age to the vehicle.
Towing This Vehicle Behind Another Vehicle (Flat
Towing With All Four Wheels On The Ground)
Your vehicle may be towed at any legal highway speed,
for any distance, if the transaxle is in neutral.
130 WHAT TO DO IN EMERGENCIES
Page 131 of 200

MAINTAINING YOUR VEHICLE
CONTENTS
m2.4L Turbo Charged Engine Compartment....133
mOnboard Diagnostic System Ð OBD II......134
mEmissions Inspection And Maintenance
Programs
............................134
mReplacement Parts.....................136
mDealer Service........................136
mMaintenance Procedures.................136
NEngine Oil..........................137
NIgnition Wiring System.................142
NCrankcase Emission Control System........142
NFuel Filter..........................142
NAir Cleaner Element (Filter)..............142NMaintenance-Free Battery................142
NAir Conditioner......................144
NPower Steering Fluid Check..............145
NFront Suspension Ball Joints..............145
NBody Lubrication.....................145
NWindshield Wiper Blades................146
NWindshield Wiper Blade Replacement.......146
NWindshield Washer Aiming..............146
NWindshield Washer Reservoir.............147
NExhaust System......................147
NCooling System.......................148
7
Page 135 of 200

Normally, the OBD system will be ready. The OBD
system maynotbe ready if your vehicle was recently
serviced, if you recently had a dead battery, or a battery
replacement. If the OBD system should be determined
not ready for the I/M test, your vehicle may fail the test.
Your vehicle has a simple ignition key actuated test
which you can use prior to going to the test station. To
check if your vehicle's OBD system is ready, you must do
the following:
1. Insert your ignition key into the ignition switch.
2. Turn the ignition to the ON position, but do not crank
or start the engine.
3. If you crank or start the engine, you will have to start
this test over.
4. As soon as you turn your key to the ON position, you
will see your MIL symbol come on as part of a normal
bulb check.
5. Approximately 15 seconds later, one of two things will
happen:a. The MIL will flash for about 10 seconds and then
return to being fully illuminated until you turn off
the ignition key or start the engine. This means that
your vehicle's OBD system isnot readyand you
shouldnotproceed to the I/M station.
b. The MIL will not flash at all and will remain fully
illuminated until you turn off the ignition key or
start the engine. This means that your vehicle's OBD
system isreadyand you can proceed to the I/M
station.
If your OBD system isnot ready,you should see your
authorized dealer or repair facility. If your vehicle was
recently serviced or had a battery failure or replacement,
you may need to do nothing more than drive your
vehicle as you normally would in order for your OBD
system to update. A recheck with the above test routine
may then indicate that the system is now ready.
Regardless of whether your vehicle's OBD system is
ready or not ready, if the MIL symbol is illuminated
during normal vehicle operation, you should have your
MAINTAINING YOUR VEHICLE 135
7
Page 141 of 200
Catalytic Converter
The catalytic converter requires the use of unleaded fuel
only. Leaded gasoline will destroy the effectiveness of the
catalyst as an emission control device.
Under normal operating conditions, the catalytic con-
verter will not require maintenance. However, it is im-
portant to keep the engine properly tuned to assure
proper catalyst operation and prevent possible catalyst
damage.
CAUTION!
Damage to the catalytic converter can result if your
vehicle is not kept in proper operating condition. In
the event of engine malfunction, particularly involv-
ing engine misfire or other apparent loss of perfor-
mance, have your vehicle serviced promptly. Contin-
ued operation of your vehicle with a severe
malfunction could cause the converter to overheat,
resulting in possible damage to the converter and the
vehicle.
WARNING!
A hot exhaust system can start a fire if you park over
materials that can burn. Such materials might be
grass or leaves coming into contact with your ex-
haust system. Do not park or operate your vehicle in
areas where your exhaust system can contact any-
thing that can burn.
In unusual situations involving grossly malfunctioning
engine operation, a scorching odor may suggest severe
and abnormal catalyst overheating. If this occurs, stop
the vehicle, turn off the engine and allow it to cool.
Service, including a tune up to manufacturers specifica-
tions, should be obtained immediately.
To minimize the possibility of catalyst damage:
²Do not shut off the engine or interrupt the ignition
when the transaxle is in gear and the vehicle is in
motion.
²Do not try to start the engine by pushing or towing the
vehicle.
²Do not idle the engine with any spark plug wires
disconnected for prolonged period.
MAINTAINING YOUR VEHICLE 141
7
Page 142 of 200
Engine Timing Belt
Replace the engine timing belt at the intervals described
in the appropriate maintenance schedule.
Ignition Wiring System
The ignition cables should be kept clean and properly
connected. Terminals should be fully seated. Cracked,
damaged, or faulty cables should be replaced.
Crankcase Emission Control System
Proper operation of this system depends on freedom
from sticking or plugging due to deposits. As vehicle
mileage builds up, the PCV valve and passages may
accumulate deposits. If a valve is not working properly,
replace it with a new valve. DO NOT ATTEMPT TO
CLEAN THE OLD PCV VALVE!
Check ventilation hose for indication of damage or
plugging deposits. Replace if necessary.
Fuel Filter
A plugged fuel filter can cause hard starting or limit the
speed at which a vehicle can be driven. Should an
excessive amount of dirt accumulate in the fuel tank,
frequent filter replacement may be necessary.
Air Cleaner Element (Filter)
Under normal driving conditions, replace the filter at the
intervals shown on Schedule ªAº. If, however, you drive
the vehicle frequently under dusty or severe conditions,
the filter element should be inspected periodically and
replaced if necessary at the intervals shown on Schedule
ªBº.
WARNING!
The air cleaner can provide a measure of protection
in the case of engine backfire. Do not remove the air
cleaner unless such removal is necessary for repair or
maintenance. Make sure that no one is near the
engine compartment before starting the vehicle with
the air cleaner removed. Failure to do so can result in
serious personal injury.
Maintenance-Free Battery
The top of the MAINTENANCE-FREE battery is perma-
nently sealed. You will never have to add water, nor is
periodic maintenance required.
142 MAINTAINING YOUR VEHICLE