DODGE NITRO 2008 1.G Owners Manual
Manufacturer: DODGE, Model Year: 2008, Model line: NITRO, Model: DODGE NITRO 2008 1.GPages: 434, PDF Size: 6.2 MB
Page 381 of 434

Cleaning Plastic Instrument Cluster Lenses
The lenses in front of the instruments in this vehicle are
molded in clear plastic. When cleaning the lenses, care
must be taken to avoid scratching the plastic.
1.
Clean with a wet soft rag. A mild soap solution may be
used, but do not use high alcohol content or abrasive
cleaners. If soap is used, wipe clean with a clean damp rag.
2. Dry with a soft tissue.
Seat Belt Maintenance
Do not bleach, dye or clean the belts with chemical
solvents or abrasive cleaners. This will weaken the fabric.
Sun damage will also weaken the fabric.
If the belts need cleaning, use MopartTotal Clean, a mild
soap solution, or lukewarm water. Do not remove the
belts from the vehicle to wash them.
Replace the belts if they appear frayed or worn or if the
buckles do not work properly.
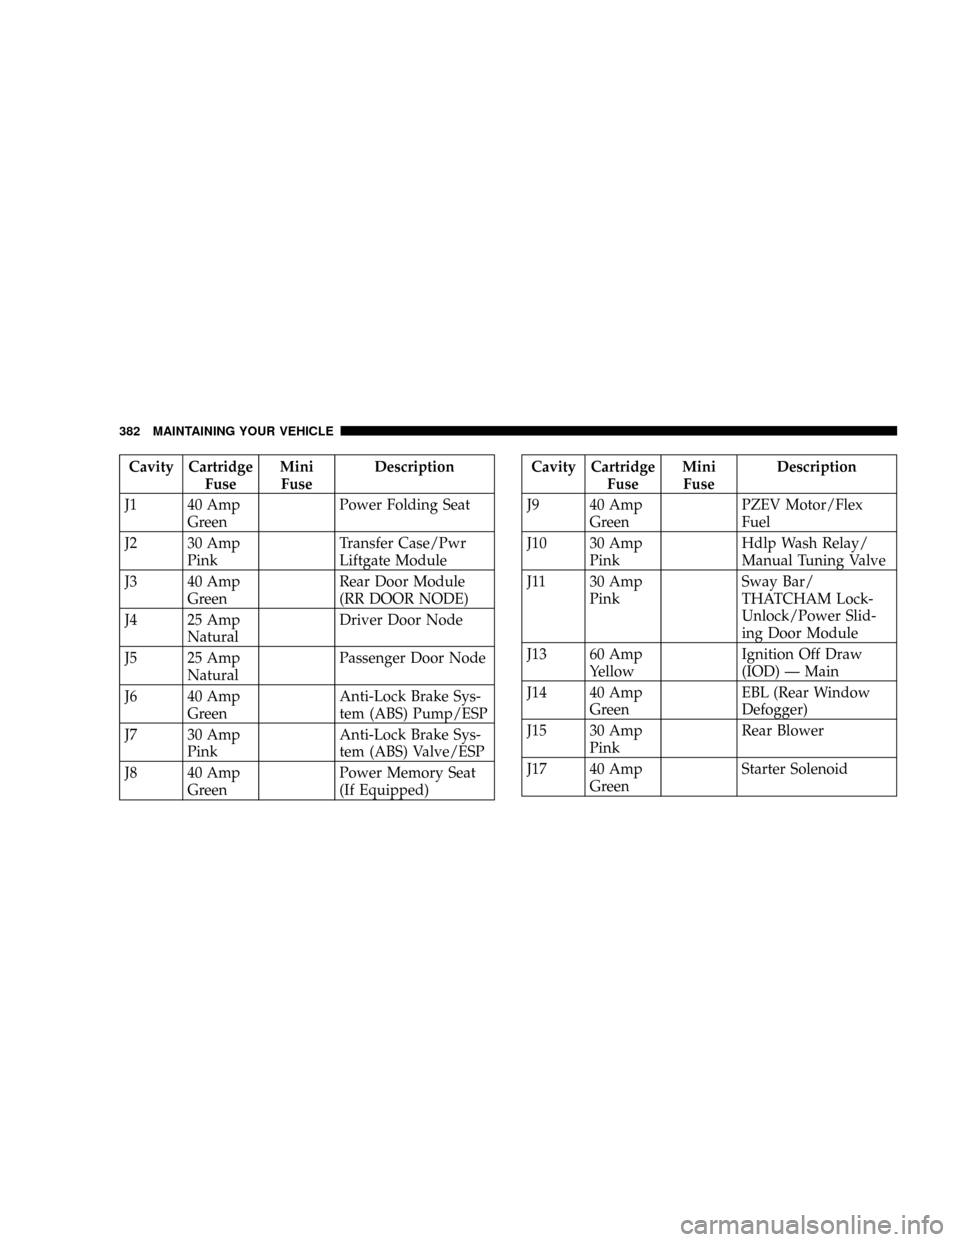
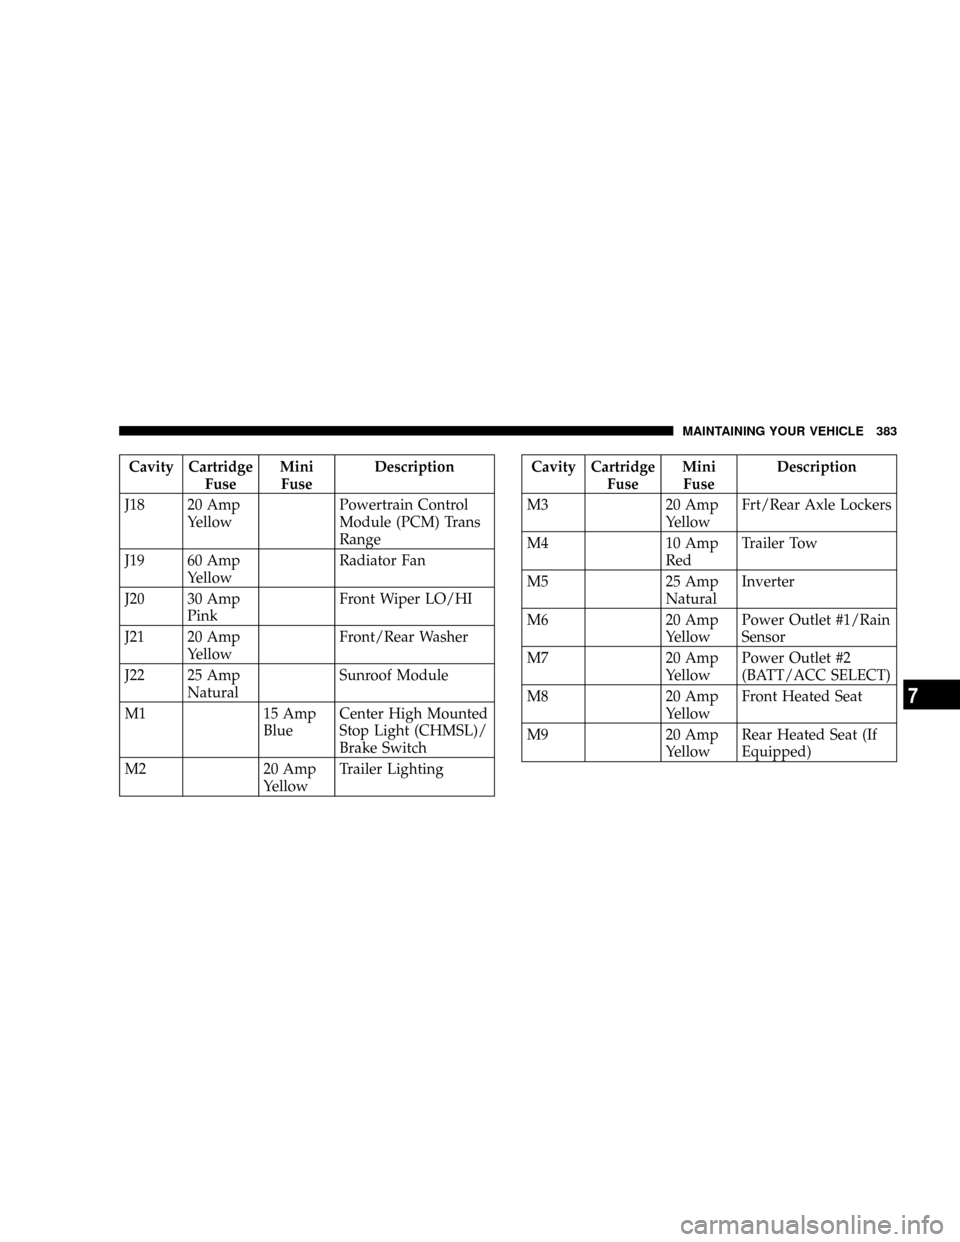
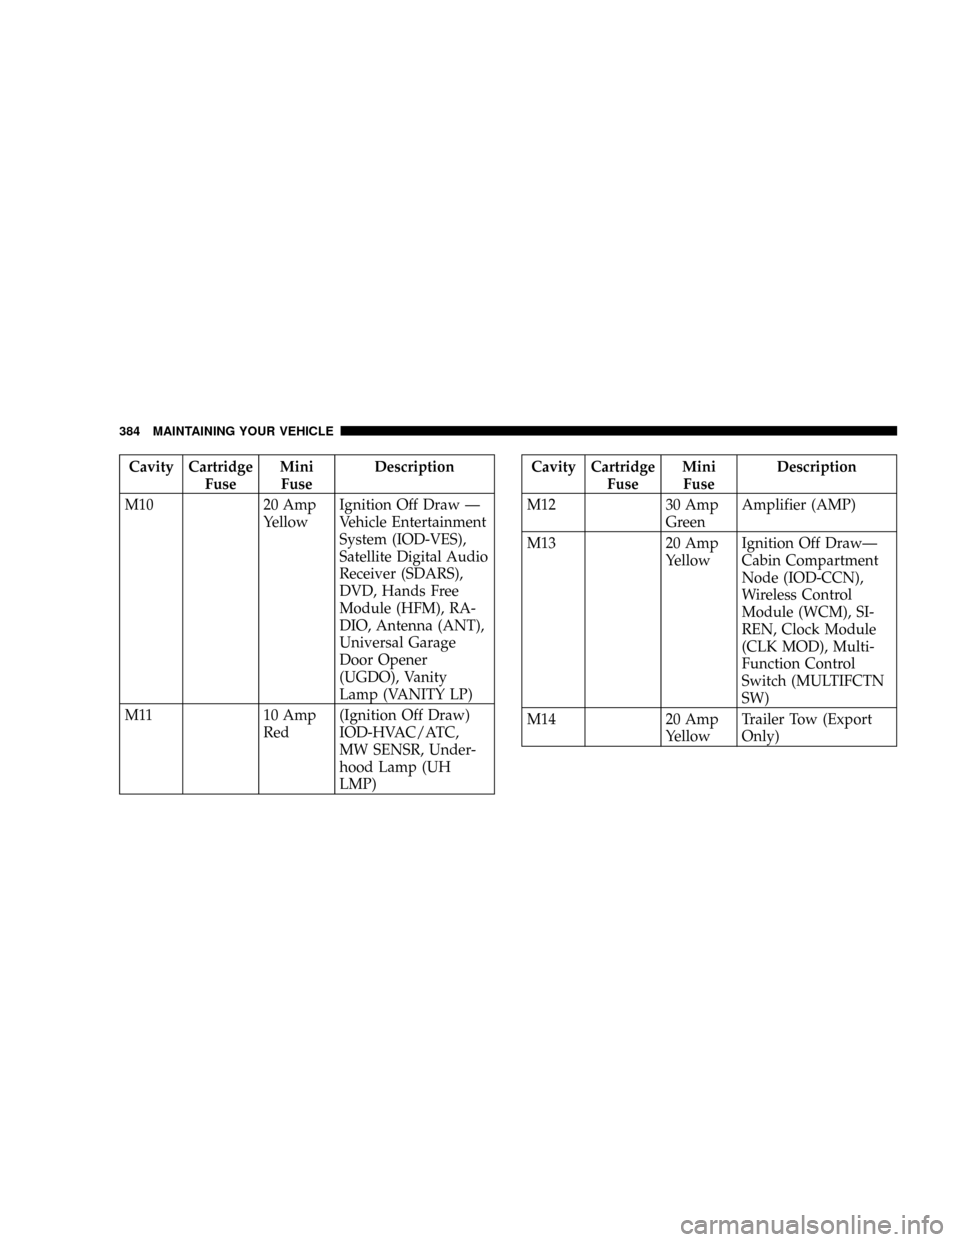
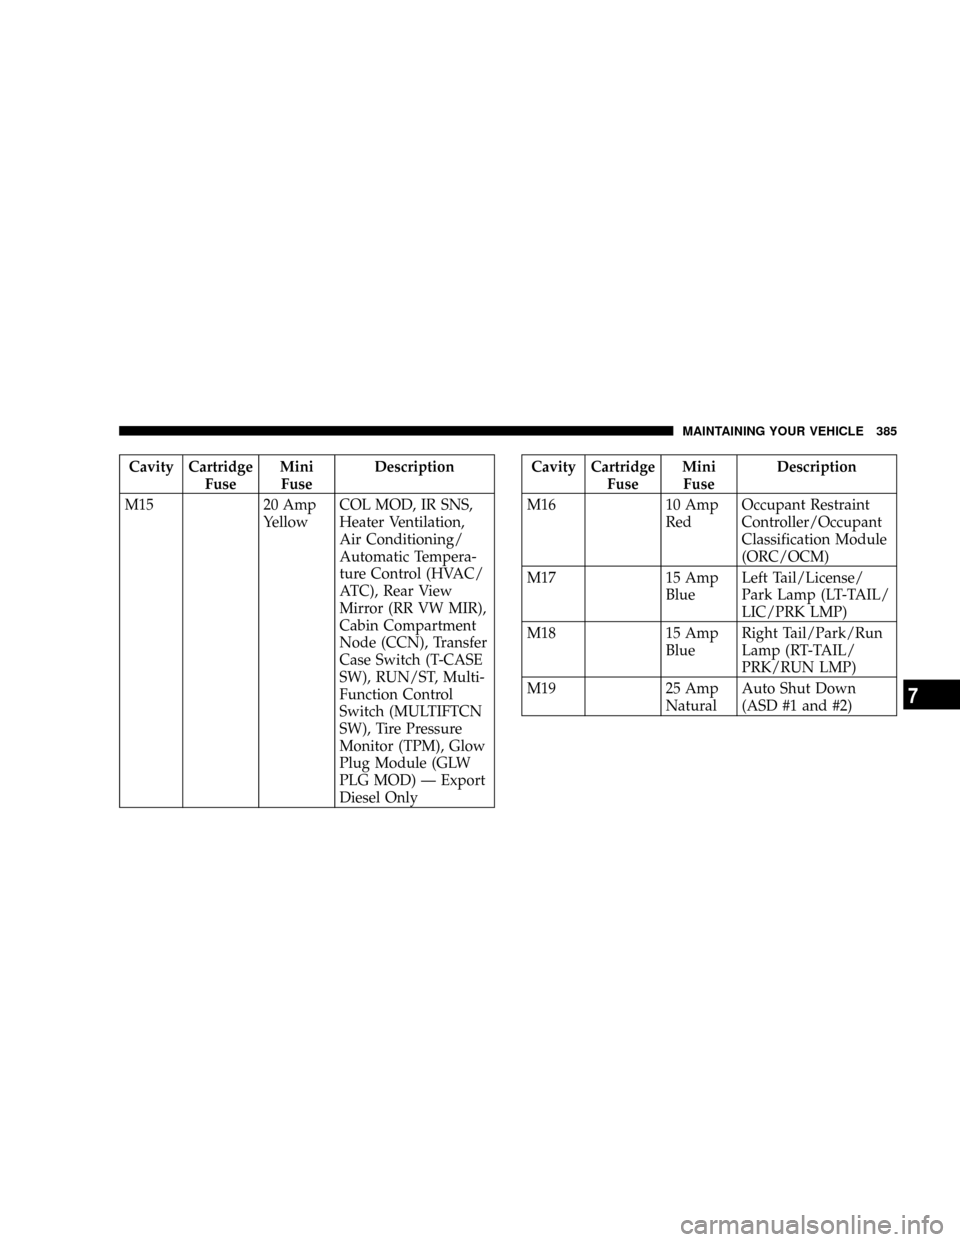
FUSES (INTEGRATED POWER MODULE)
The Totally Integrated Power Module (TIPM) is located
in the engine compartment near the battery. This center
contains cartridge fuses, mini fuses and relays. A label
that identifies each component is printed on the inside of
the cover.
Integrated Power Module (TIPM)
MAINTAINING YOUR VEHICLE 381
7
Page 382 of 434
Cavity Cartridge
FuseMini
FuseDescription
J1 40 Amp
GreenPower Folding Seat
J2 30 Amp
PinkTransfer Case/Pwr
Liftgate Module
J3 40 Amp
GreenRear Door Module
(RR DOOR NODE)
J4 25 Amp
NaturalDriver Door Node
J5 25 Amp
NaturalPassenger Door Node
J6 40 Amp
GreenAnti-Lock Brake Sys-
tem (ABS) Pump/ESP
J7 30 Amp
PinkAnti-Lock Brake Sys-
tem (ABS) Valve/ESP
J8 40 Amp
GreenPower Memory Seat
(If Equipped)Cavity Cartridge
FuseMini
FuseDescription
J9 40 Amp
GreenPZEV Motor/Flex
Fuel
J10 30 Amp
PinkHdlp Wash Relay/
Manual Tuning Valve
J11 30 Amp
PinkSway Bar/
THATCHAM Lock-
Unlock/Power Slid-
ing Door Module
J13 60 Amp
YellowIgnition Off Draw
(IOD) Ð Main
J14 40 Amp
GreenEBL (Rear Window
Defogger)
J15 30 Amp
PinkRear Blower
J17 40 Amp
GreenStarter Solenoid
382 MAINTAINING YOUR VEHICLE
Page 383 of 434
Cavity Cartridge
FuseMini
FuseDescription
J18 20 Amp
YellowPowertrain Control
Module (PCM) Trans
Range
J19 60 Amp
YellowRadiator Fan
J20 30 Amp
PinkFront Wiper LO/HI
J21 20 Amp
YellowFront/Rear Washer
J22 25 Amp
NaturalSunroof Module
M1 15 Amp
BlueCenter High Mounted
Stop Light (CHMSL)/
Brake Switch
M2 20 Amp
YellowTrailer LightingCavity Cartridge
FuseMini
FuseDescription
M3 20 Amp
YellowFrt/Rear Axle Lockers
M4 10 Amp
RedTrailer Tow
M5 25 Amp
NaturalInverter
M6 20 Amp
YellowPower Outlet #1/Rain
Sensor
M7 20 Amp
YellowPower Outlet #2
(BATT/ACC SELECT)
M8 20 Amp
YellowFront Heated Seat
M9 20 Amp
YellowRear Heated Seat (If
Equipped)
MAINTAINING YOUR VEHICLE 383
7
Page 384 of 434
Cavity Cartridge
FuseMini
FuseDescription
M10 20 Amp
YellowIgnition Off Draw Ð
Vehicle Entertainment
System (IOD-VES),
Satellite Digital Audio
Receiver (SDARS),
DVD, Hands Free
Module (HFM), RA-
DIO, Antenna (ANT),
Universal Garage
Door Opener
(UGDO), Vanity
Lamp (VANITY LP)
M11 10 Amp
Red(Ignition Off Draw)
IOD-HVAC/ATC,
MW SENSR, Under-
hood Lamp (UH
LMP)Cavity Cartridge
FuseMini
FuseDescription
M12 30 Amp
GreenAmplifier (AMP)
M13 20 Amp
YellowIgnition Off DrawÐ
Cabin Compartment
Node (IOD-CCN),
Wireless Control
Module (WCM), SI-
REN, Clock Module
(CLK MOD), Multi-
Function Control
Switch (MULTIFCTN
SW)
M14 20 Amp
YellowTrailer Tow (Export
Only)
384 MAINTAINING YOUR VEHICLE
Page 385 of 434
Cavity Cartridge
FuseMini
FuseDescription
M15 20 Amp
YellowCOL MOD, IR SNS,
Heater Ventilation,
Air Conditioning/
Automatic Tempera-
ture Control (HVAC/
ATC), Rear View
Mirror (RR VW MIR),
Cabin Compartment
Node (CCN), Transfer
Case Switch (T-CASE
SW), RUN/ST, Multi-
Function Control
Switch (MULTIFTCN
SW), Tire Pressure
Monitor (TPM), Glow
Plug Module (GLW
PLG MOD) Ð Export
Diesel OnlyCavity Cartridge
FuseMini
FuseDescription
M16 10 Amp
RedOccupant Restraint
Controller/Occupant
Classification Module
(ORC/OCM)
M17 15 Amp
BlueLeft Tail/License/
Park Lamp (LT-TAIL/
LIC/PRK LMP)
M18 15 Amp
BlueRight Tail/Park/Run
Lamp (RT-TAIL/
PRK/RUN LMP)
M19 25 Amp
NaturalAuto Shut Down
(ASD #1 and #2)
MAINTAINING YOUR VEHICLE 385
7
Page 386 of 434
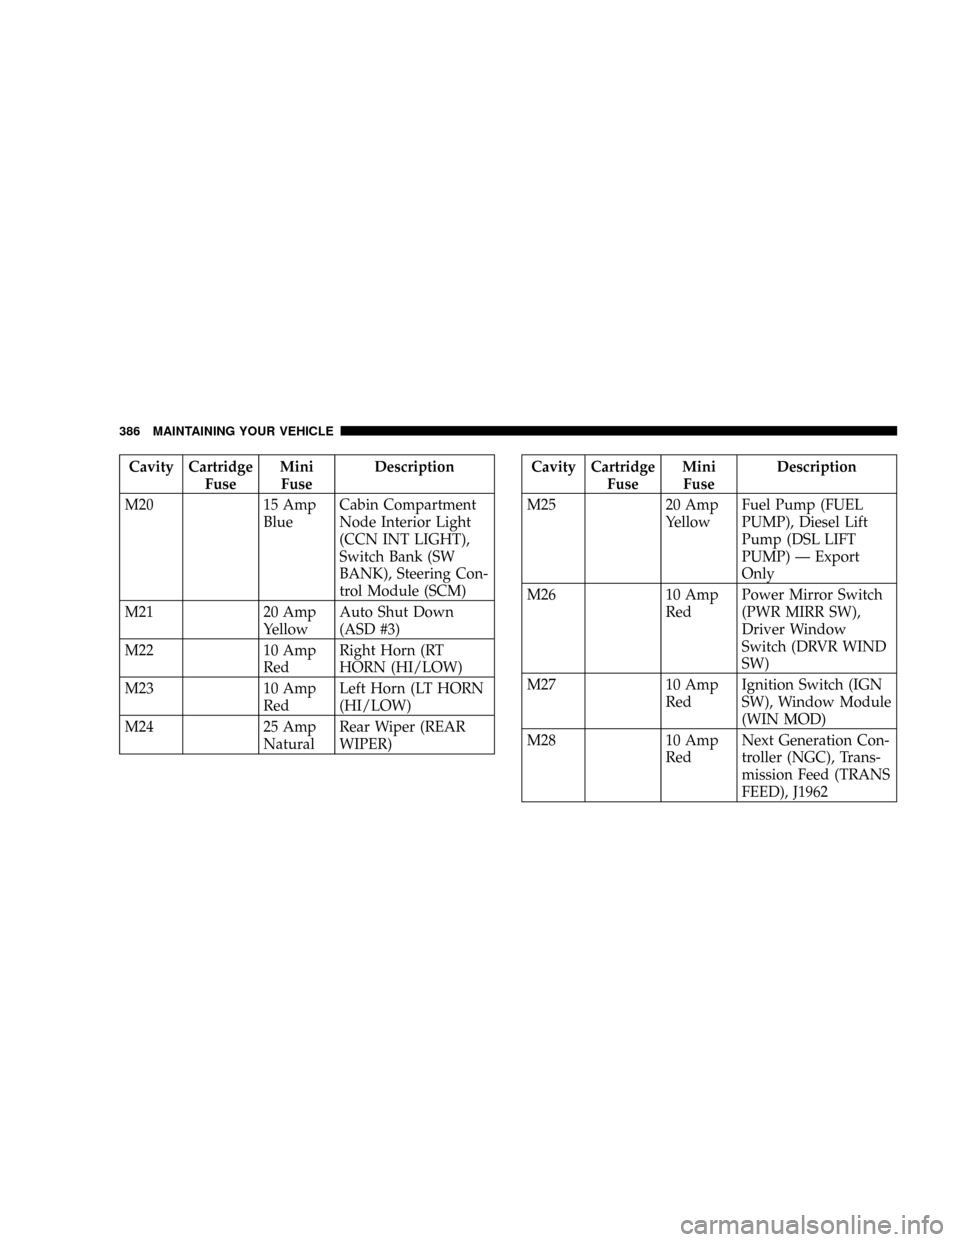
Cavity Cartridge
FuseMini
FuseDescription
M20 15 Amp
BlueCabin Compartment
Node Interior Light
(CCN INT LIGHT),
Switch Bank (SW
BANK), Steering Con-
trol Module (SCM)
M21 20 Amp
YellowAuto Shut Down
(ASD #3)
M22 10 Amp
RedRight Horn (RT
HORN (HI/LOW)
M23 10 Amp
RedLeft Horn (LT HORN
(HI/LOW)
M24 25 Amp
NaturalRear Wiper (REAR
WIPER)Cavity Cartridge
FuseMini
FuseDescription
M25 20 Amp
YellowFuel Pump (FUEL
PUMP), Diesel Lift
Pump (DSL LIFT
PUMP) Ð Export
Only
M26 10 Amp
RedPower Mirror Switch
(PWR MIRR SW),
Driver Window
Switch (DRVR WIND
SW)
M27 10 Amp
RedIgnition Switch (IGN
SW), Window Module
(WIN MOD)
M28 10 Amp
RedNext Generation Con-
troller (NGC), Trans-
mission Feed (TRANS
FEED), J1962
386 MAINTAINING YOUR VEHICLE
Page 387 of 434
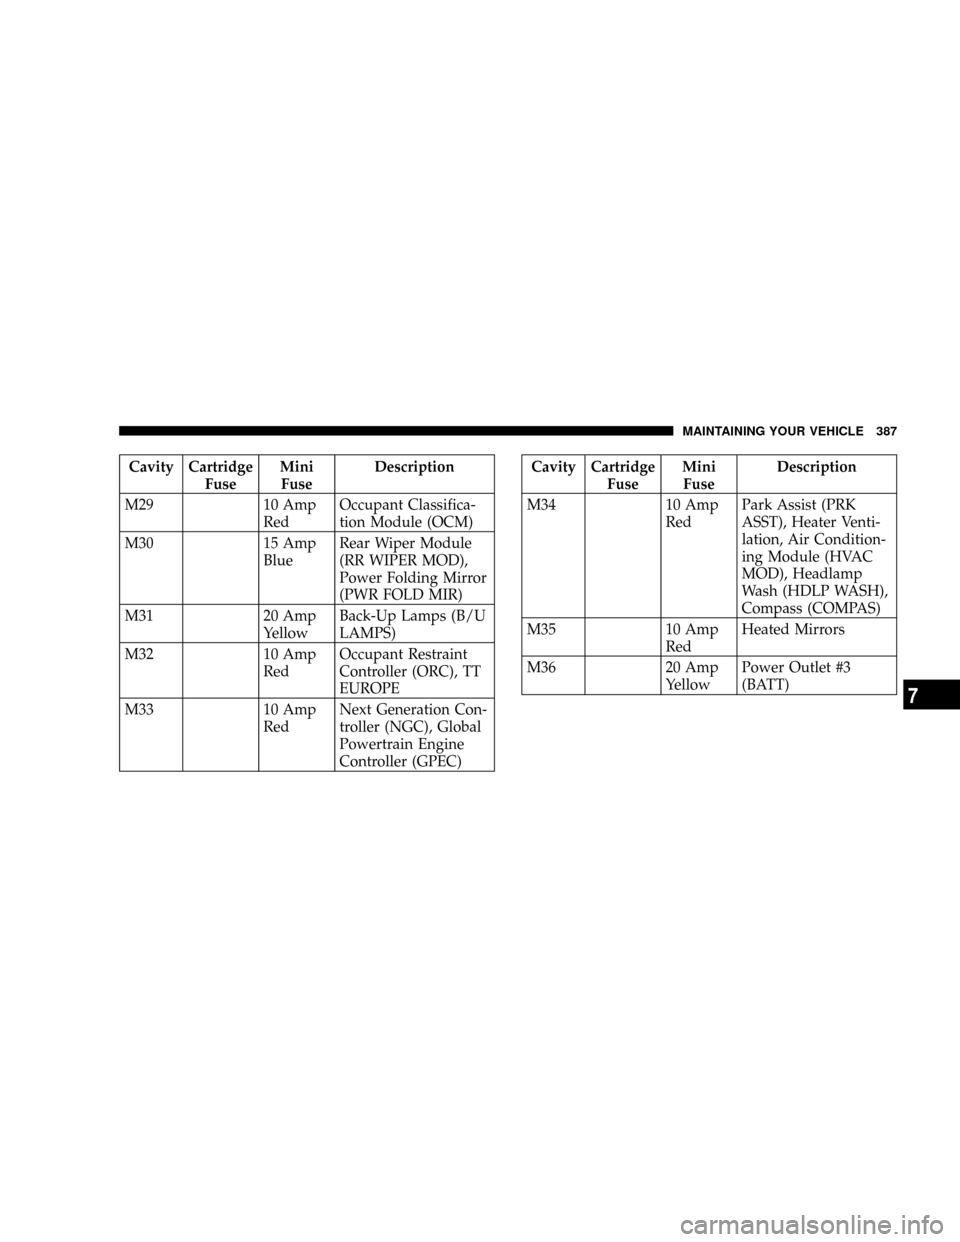
Cavity Cartridge
FuseMini
FuseDescription
M29 10 Amp
RedOccupant Classifica-
tion Module (OCM)
M30 15 Amp
BlueRear Wiper Module
(RR WIPER MOD),
Power Folding Mirror
(PWR FOLD MIR)
M31 20 Amp
YellowBack-Up Lamps (B/U
LAMPS)
M32 10 Amp
RedOccupant Restraint
Controller (ORC), TT
EUROPE
M33 10 Amp
RedNext Generation Con-
troller (NGC), Global
Powertrain Engine
Controller (GPEC)Cavity Cartridge
FuseMini
FuseDescription
M34 10 Amp
RedPark Assist (PRK
ASST), Heater Venti-
lation, Air Condition-
ing Module (HVAC
MOD), Headlamp
Wash (HDLP WASH),
Compass (COMPAS)
M35 10 Amp
RedHeated Mirrors
M36 20 Amp
YellowPower Outlet #3
(BATT)
MAINTAINING YOUR VEHICLE 387
7
Page 388 of 434
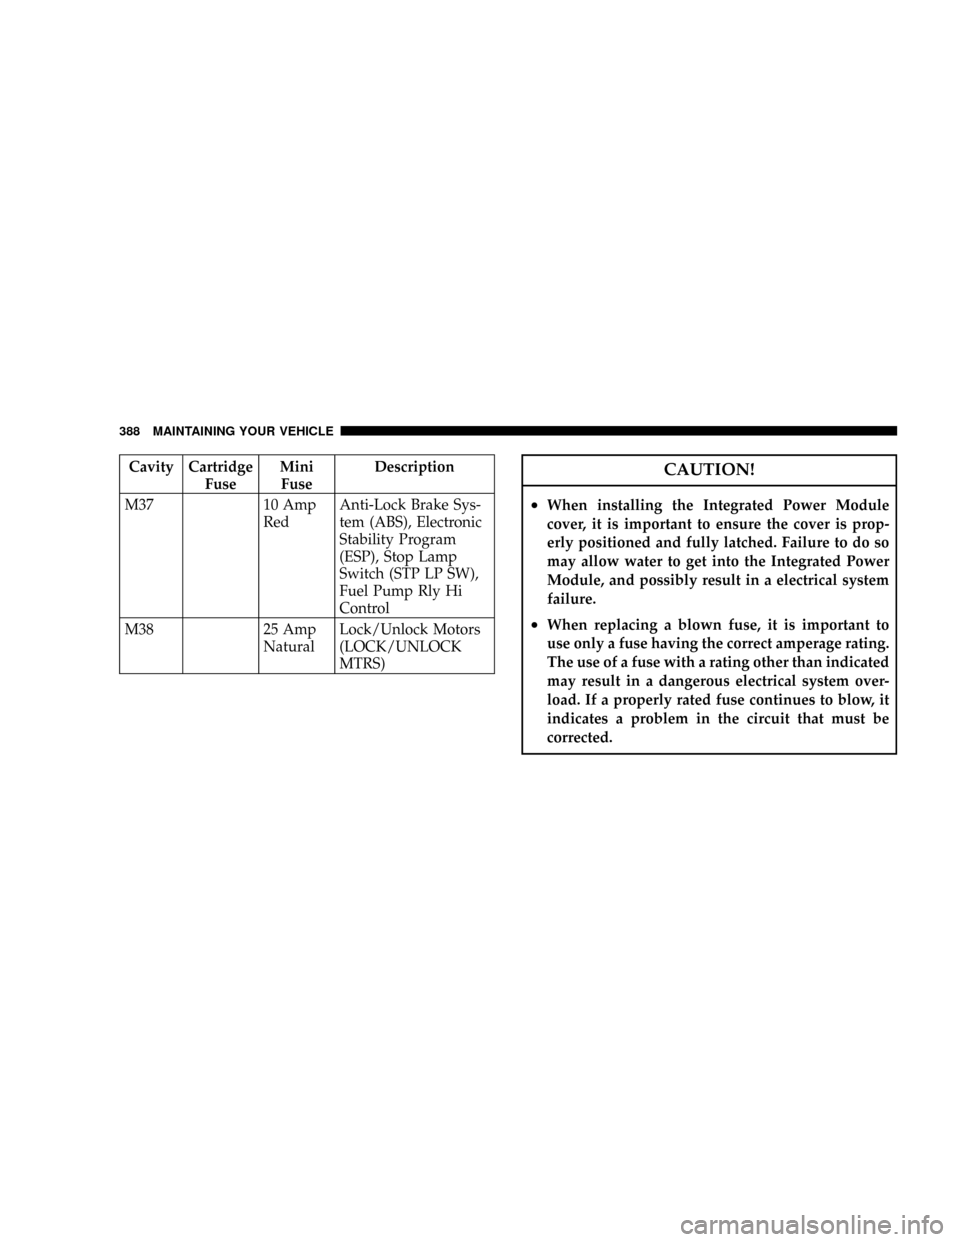
Cavity Cartridge
FuseMini
FuseDescription
M37 10 Amp
RedAnti-Lock Brake Sys-
tem (ABS), Electronic
Stability Program
(ESP), Stop Lamp
Switch (STP LP SW),
Fuel Pump Rly Hi
Control
M38 25 Amp
NaturalLock/Unlock Motors
(LOCK/UNLOCK
MTRS)CAUTION!
²When installing the Integrated Power Module
cover, it is important to ensure the cover is prop-
erly positioned and fully latched. Failure to do so
may allow water to get into the Integrated Power
Module, and possibly result in a electrical system
failure.
²When replacing a blown fuse, it is important to
use only a fuse having the correct amperage rating.
The use of a fuse with a rating other than indicated
may result in a dangerous electrical system over-
load. If a properly rated fuse continues to blow, it
indicates a problem in the circuit that must be
corrected.
388 MAINTAINING YOUR VEHICLE
Page 389 of 434
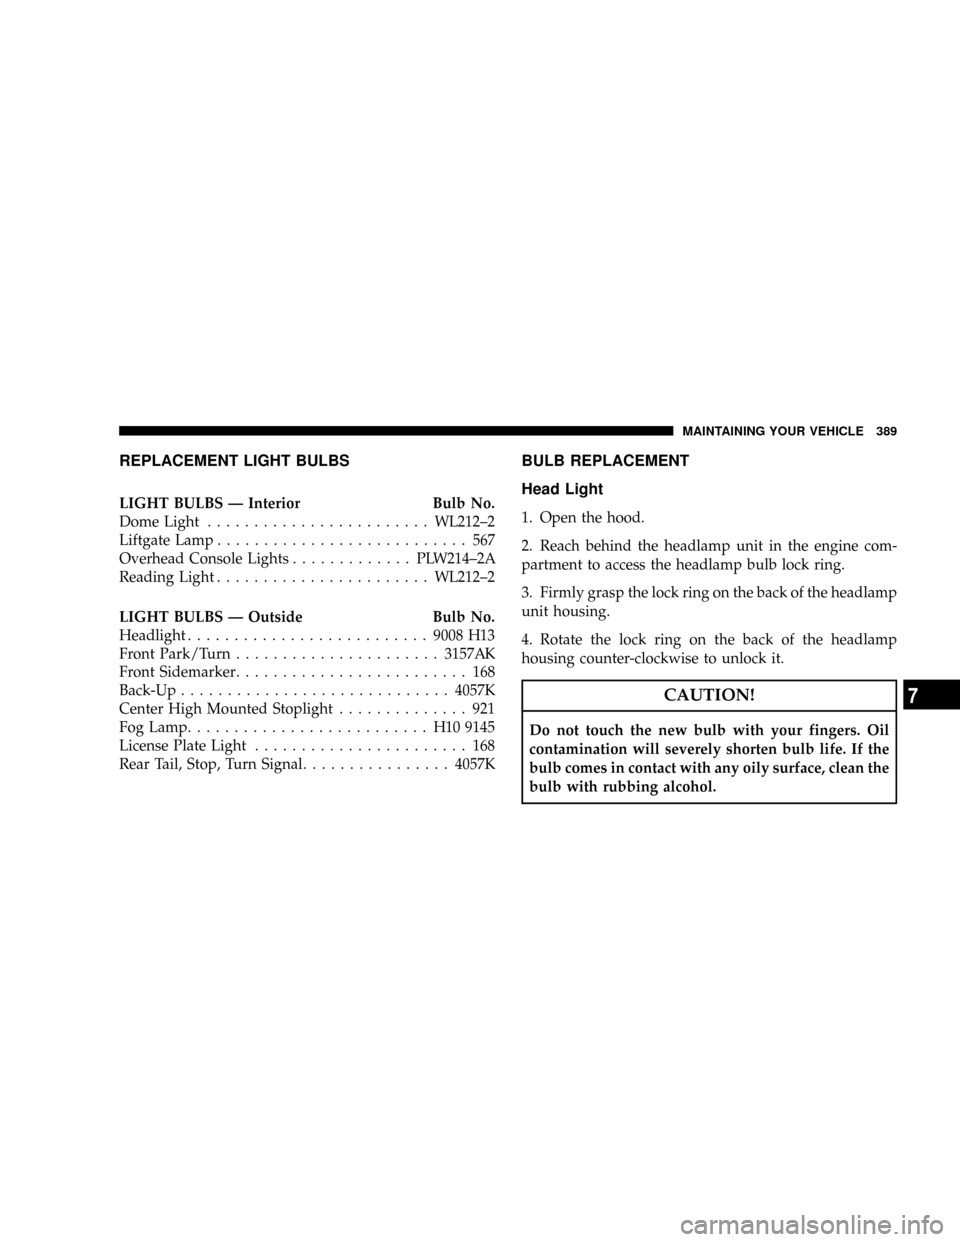
REPLACEMENT LIGHT BULBS
LIGHT BULBS Ð Interior Bulb No.
Dome Light........................WL212±2
Liftgate Lamp........................... 567
Overhead Console Lights............. PLW214±2A
Reading Light.......................WL212±2
LIGHT BULBS Ð Outside Bulb No.
Headlight..........................9008 H13
Front Park/Turn......................3157AK
Front Sidemarker......................... 168
Back-Up.............................4057K
Center High Mounted Stoplight.............. 921
Fog Lamp.......................... H109145
License Plate Light....................... 168
Rear Tail, Stop, Turn Signal................4057K
BULB REPLACEMENT
Head Light
1. Open the hood.
2. Reach behind the headlamp unit in the engine com-
partment to access the headlamp bulb lock ring.
3. Firmly grasp the lock ring on the back of the headlamp
unit housing.
4. Rotate the lock ring on the back of the headlamp
housing counter-clockwise to unlock it.
CAUTION!
Do not touch the new bulb with your fingers. Oil
contamination will severely shorten bulb life. If the
bulb comes in contact with any oily surface, clean the
bulb with rubbing alcohol.
MAINTAINING YOUR VEHICLE 389
7
Page 390 of 434

5. Disconnect the electrical connector and replace the
bulb.
Left Front Turn Signal
1. Turn the steering wheel all the way to the right (full
right lock).
2. Remove the door in the left wheel liner by twisting
counter clockwise. Access to the bulb can be gained
through the wheel liner hole.
3. Disconnect the electrical connector.
4. Twist the bulb counter clockwise to remove.
390 MAINTAINING YOUR VEHICLE