warning DODGE POWER WAGON 2007 2.G Owners Manual
[x] Cancel search | Manufacturer: DODGE, Model Year: 2007, Model line: POWER WAGON, Model: DODGE POWER WAGON 2007 2.GPages: 492, PDF Size: 8.25 MB
Page 356 of 492
WARNING!
Do not connect trailer brakes to your vehicle's hy-
draulic brake lines. It can overload your brake sys-
tem and cause it to fail. You might not have brakes
when you need them and could have an accident.
Towing any trailer will increase your stopping dis-
tance. When towing you should allow for additional
space between your vehicle and the vehicle in front
of you. Failure to do so could result in an accident.
Towing Requirements Ð Trailer Lights & Wiring
Whenever you pull a trailer, regardless of the trailer size,
stop lights and turn signals on the trailer are required for
motoring safety.
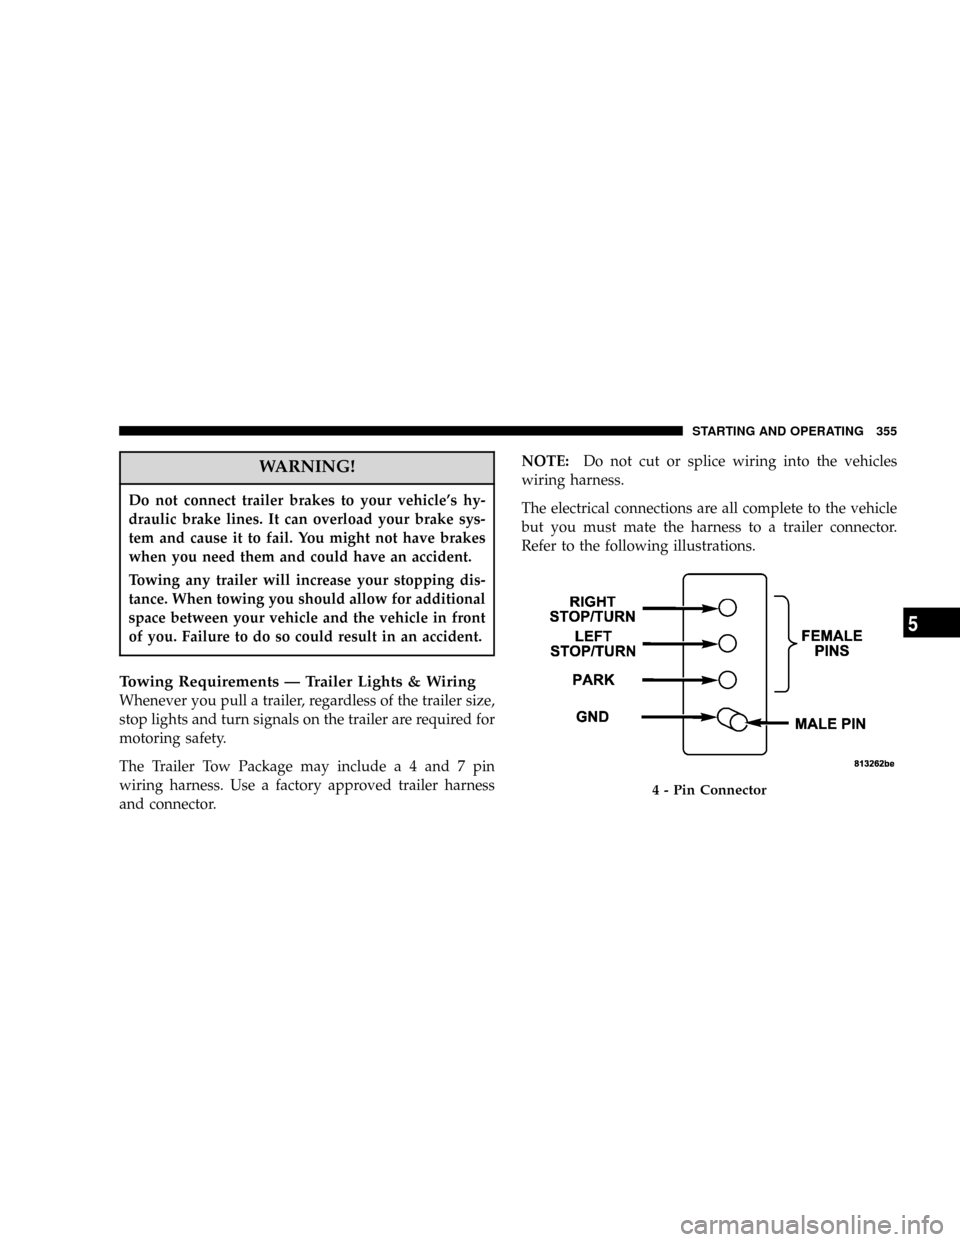
The Trailer Tow Package may includea4and7pin
wiring harness. Use a factory approved trailer harness
and connector.NOTE:Do not cut or splice wiring into the vehicles
wiring harness.
The electrical connections are all complete to the vehicle
but you must mate the harness to a trailer connector.
Refer to the following illustrations.
4 - Pin Connector
STARTING AND OPERATING 355
5
Page 360 of 492
SNOWPLOW
Dodge Power Wagon Models
NOTE:Do not use Dodge Power Wagon Models for
snowplow applications.
WARNING!
Snowplows and other aftermarket equipment
should not be added to the front end or your vehicle.
The airbag crash sensors may be affected by the
change in the front end structure. The airbags could
deploy unexpectedly or could fail to deploy during a
collision resulting in serious injury or death.
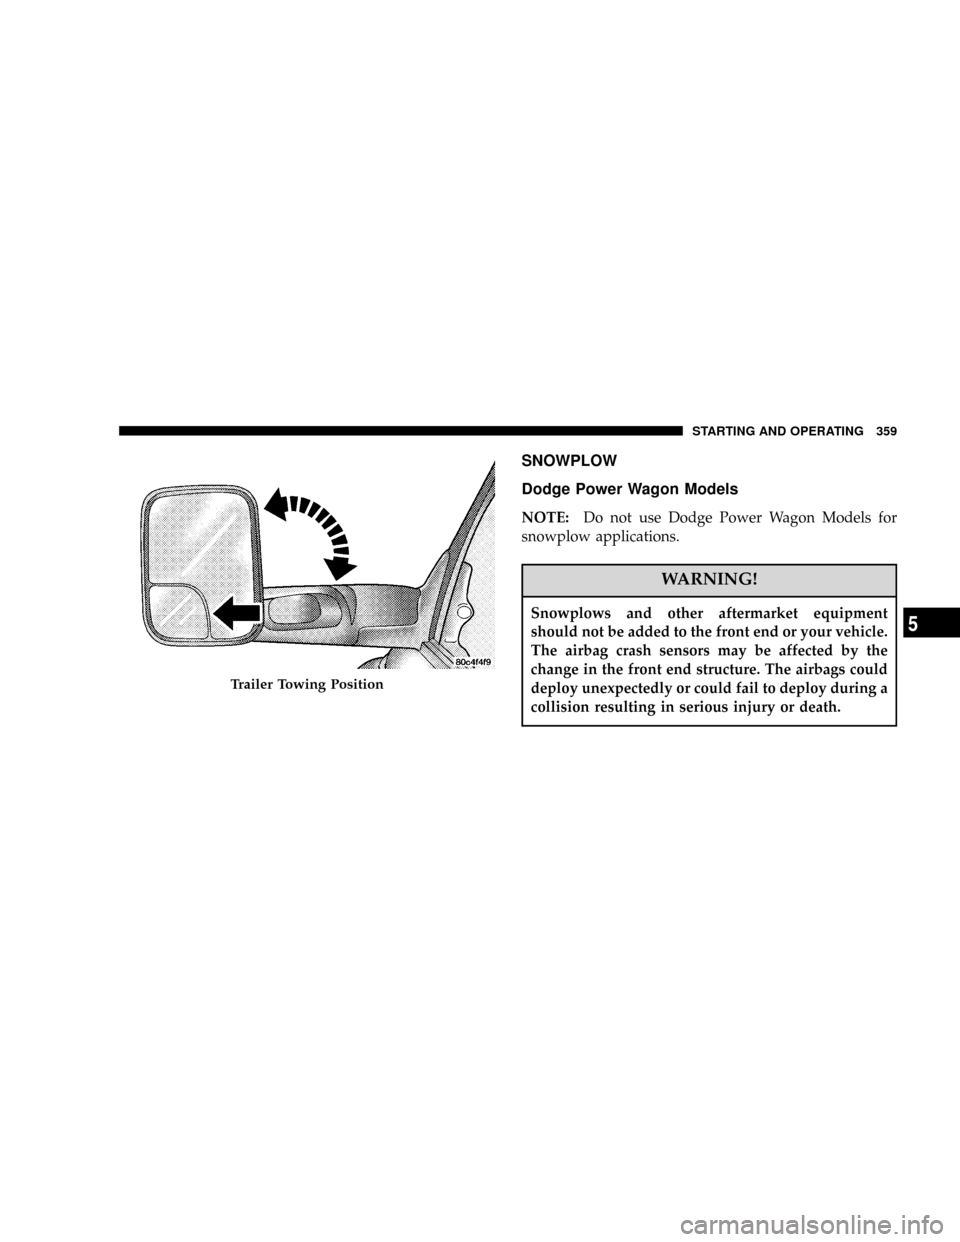
Trailer Towing Position
STARTING AND OPERATING 359
5
Page 361 of 492
CAUTION!
Using this vehicle for snowplow applications can
cause damage to the vehicle.
WARNING!
Attaching a snowplow to this vehicle could ad-
versely affect performance of the airbag system in an
accident. Do not expect that the airbag will perform
as described earlier in this manual
RECREATIONAL TOWING Ð 4±WHEEL DRIVE
VEHICLES (BEHIND MOTORHOME, ETC.)
CAUTION!
Internal damage to the transfer case will occur if a
front or rear wheel lift is used when recreational
towing.
NOTE:The transfer case must be shifted into Neutral
(N) for recreational towing. Automatic transmissions
must be placed in P (Park) position for recreational
towing. Manual transmissions must be left in gear (not in
neutral) for recreational towing. Refer below for the
proper transfer case Neutral shifting procedure for your
vehicle.
360 STARTING AND OPERATING
Page 363 of 492
CAUTION!
Damage to the automatic transmission may occur if
the transmission is shifted into P (PARK) with the
transfer case in N (NEUTRAL) and the engine RUN-
NING. With the transfer case in N (NEUTRAL)
ensure that the engine is OFF prior to shifting the
transmission into P (PARK)
Returning to Normal Operation Ð Manual Shift
Transfer Case
Use the following procedure to prepare your vehicle for
normal usage:
1. Bring the vehicle to a complete stop.
2. Shut OFF the engine.
3. Depress the brake pedal.4. Shift automatic transmission to N (NEUTRAL), or
depress the clutch on manual transmissions.
5. Shift transfer case lever to desired position.
6. Shift automatic transmission into P (Park).
WARNING!
You or others could be injured if you leave the
vehicle unattended with the transfer case in the N
(NEUTRAL) position without first fully engaging
the parking brake. The transfer case N (NEUTRAL)
position disengages both the front and rear drive-
shafts from the powertrain and will allow the ve-
hicle to move regardless of the transmission posi-
tion. The parking brake should always be applied
when the driver is not in the vehicle.
362 STARTING AND OPERATING
Page 366 of 492
WHAT TO DO IN EMERGENCIES
CONTENTS
mHazard Warning Flasher..................366
mJacking And Tire Changing................367
NAll Models..........................367
mJacking Instructions.....................368
NRemoving The Spare Tire................368
NTire Changing Procedure................369
mHoisting.............................375mJump-Starting.........................375
mFreeing A Stuck Vehicle..................378
mEmergency Tow Hooks Ð If Equipped........379
mTowing A Disabled Vehicle................380
N4-Wheel-Drive Vehicles.................380
mWinch Usage..........................380
6
Page 367 of 492
HAZARD WARNING FLASHER
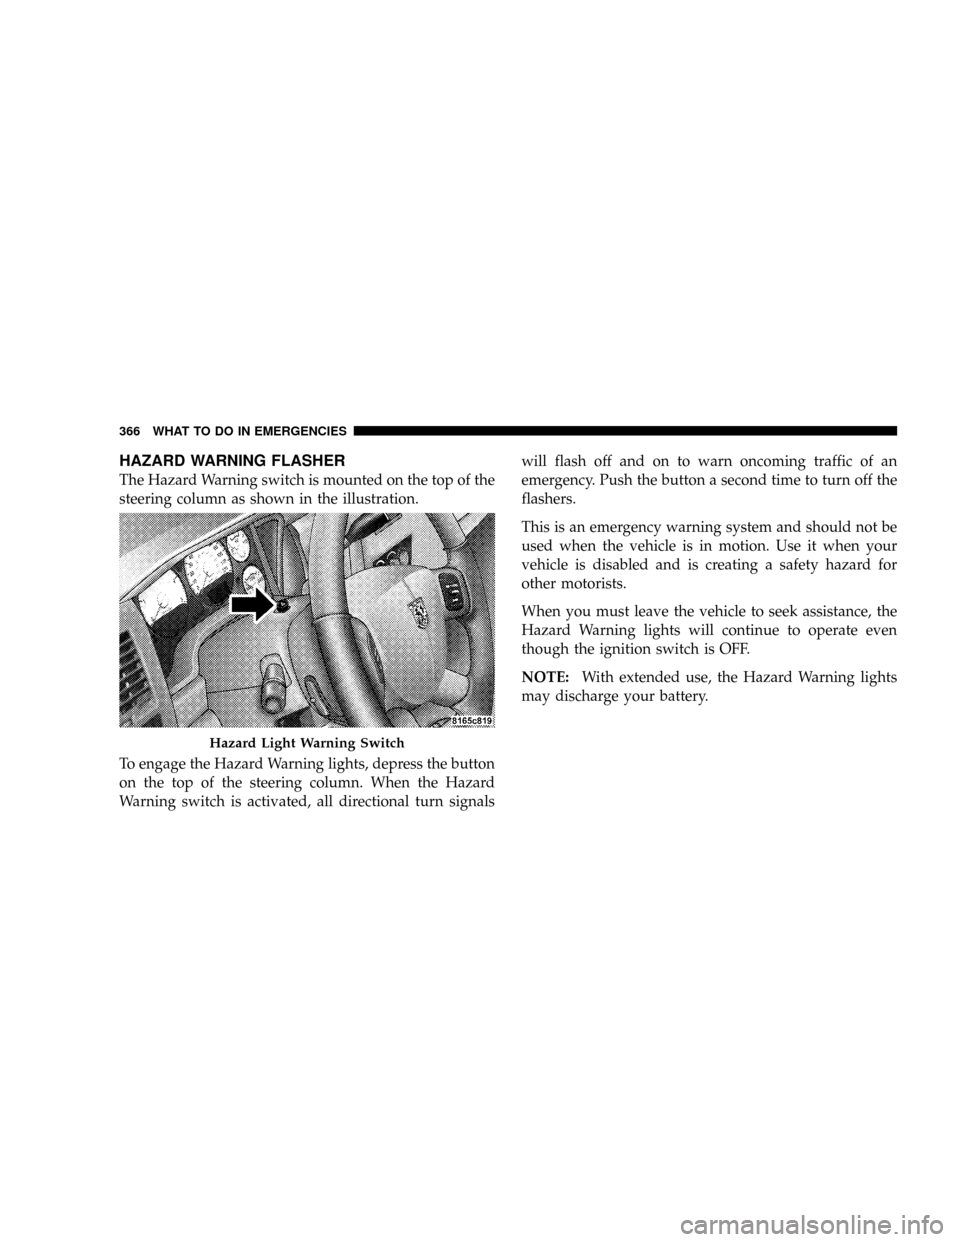
The Hazard Warning switch is mounted on the top of the
steering column as shown in the illustration.
To engage the Hazard Warning lights, depress the button
on the top of the steering column. When the Hazard
Warning switch is activated, all directional turn signalswill flash off and on to warn oncoming traffic of an
emergency. Push the button a second time to turn off the
flashers.
This is an emergency warning system and should not be
used when the vehicle is in motion. Use it when your
vehicle is disabled and is creating a safety hazard for
other motorists.
When you must leave the vehicle to seek assistance, the
Hazard Warning lights will continue to operate even
though the ignition switch is OFF.
NOTE:With extended use, the Hazard Warning lights
may discharge your battery.
Hazard Light Warning Switch
366 WHAT TO DO IN EMERGENCIES
Page 368 of 492

JACKING AND TIRE CHANGING
WARNING!
²Being under a jacked-up vehicle is dangerous.
The vehicle could slip off the jack and fall on you.
You could be crushed. Never put any part of your
body under a vehicle that is on a jack. Never start
or run the engine while the vehicle is on a jack. If
you need to get under a raised vehicle, take it to a
service center where it can be raised on a lift.
²The jack is designed to use as a tool for changing
tires only. The jack should not be used to lift the
vehicle for service purposes. The vehicle should
be jacked on a firm level surface only. Avoid ice or
slippery areas.
All Models
The jack and jack tools are stored under the front
passenger seat. Lift the flap on the side of the seat for
access.
Remove the jack and tools by removing the wing bolt and
sliding the assembly from under the seat.
WHAT TO DO IN EMERGENCIES 367
6
Page 369 of 492
WARNING!
After using the jack and tools, always reinstall them
in the original carrier and location. While driving
you may experience, abrupt stopping, rapid accelera-
tion, or sharp turns. A loose jack, tools, bracket or
other objects in the vehicle may move around with
force, resulting in serious injury.
JACKING INSTRUCTIONS
Removing The Spare Tire
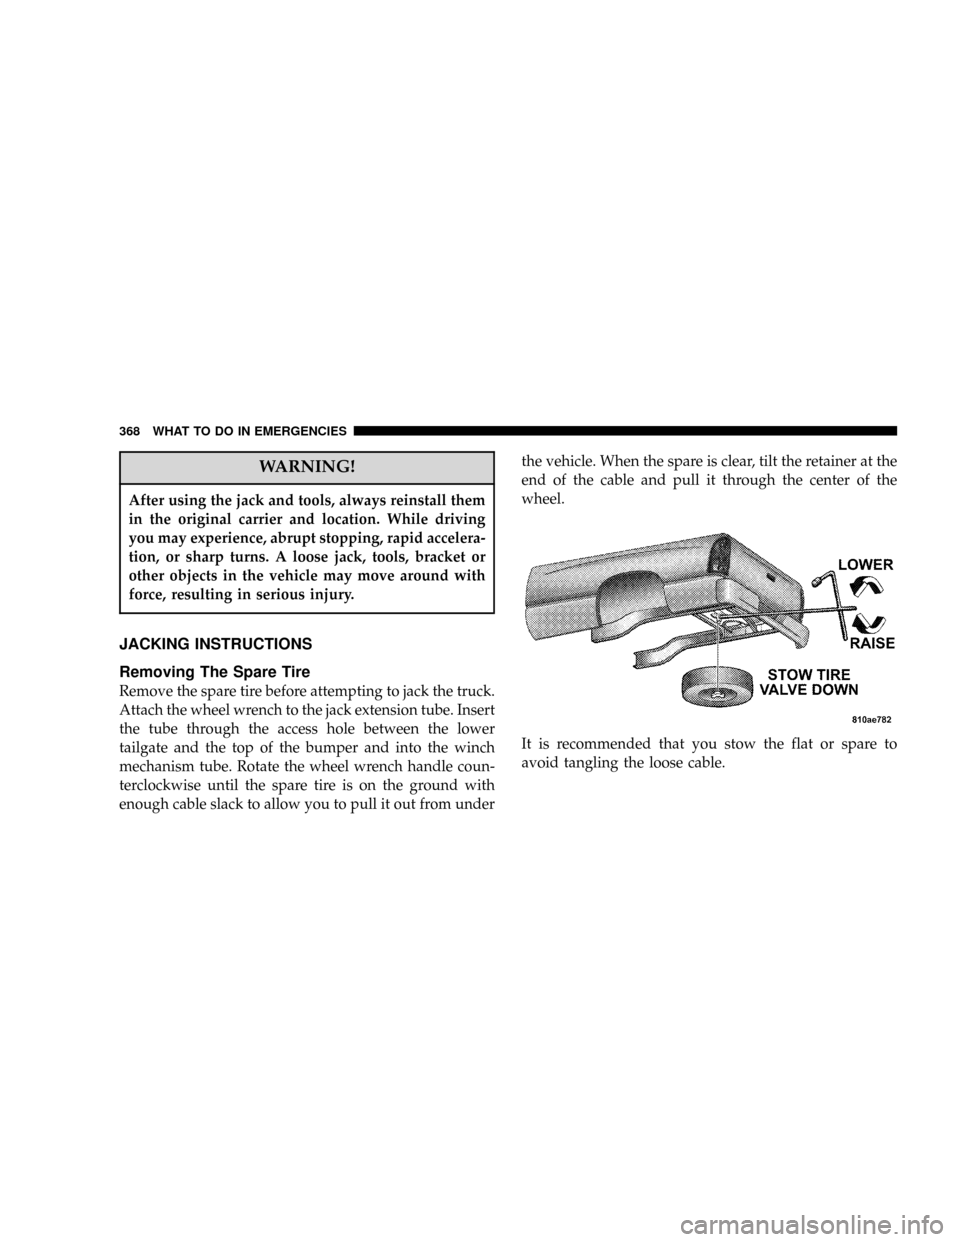
Remove the spare tire before attempting to jack the truck.
Attach the wheel wrench to the jack extension tube. Insert
the tube through the access hole between the lower
tailgate and the top of the bumper and into the winch
mechanism tube. Rotate the wheel wrench handle coun-
terclockwise until the spare tire is on the ground with
enough cable slack to allow you to pull it out from underthe vehicle. When the spare is clear, tilt the retainer at the
end of the cable and pull it through the center of the
wheel.
It is recommended that you stow the flat or spare to
avoid tangling the loose cable.
368 WHAT TO DO IN EMERGENCIES
Page 370 of 492
NOTE:The winch mechanism is designed for use with
the jack extension tube only. Use of an air wrench or other
power tools is not recommended and can damage the
winch.
Tire Changing Procedure
WARNING!
Getting under a jacked-up vehicle is dangerous. The
vehicle could slip off the jack and fall on you. You
could be crushed. Never get any part of your body
under a vehicle that is on a jack. Never start or run
the engine while the vehicle is on a jack. If you need
to get under a raised vehicle, take it to a service
center where it can be raised on a lift.
Do not raise this vehicle using a bumper jack. The jack is
designed as a tool for changing tires on this vehicle only.It is not recommended that the jack be used for service
purposes or to lift more than one wheel at a time.
Preparations
Park the vehicle on a firm level surface, avoiding ice or
slippery areas. Set the parking brake and place the gear
selector in PARK (automatic transmission) or REVERSE
(manual transmission). On four-wheel drive vehicles,
shift the transfer case to the ª4Lº position.
WARNING!
Do not attempt to change a tire on the side of the
vehicle close to moving traffic. Pull far enough off
the road to avoid the danger of being hit when
operating the jack or changing the wheel.
²Turn on the Hazard Warning Flasher.
WHAT TO DO IN EMERGENCIES 369
6
Page 371 of 492

²Block both the front and rear
of the wheel diagonally oppo-
site the jacking position. For
example, if the right front
wheel is being changed, block
the left rear wheel.
²Passengers should not remain in the vehicle when the
vehicle is being jacked.
Instructions
WARNING!
Carefully follow these tire changing warnings to help
prevent personal injury or damage to your vehicle:
²Always park on a firm, level surface as far from
the edge of the roadway as possible before raising
the vehicle.
²Block the wheel diagonally opposite the wheel to
be raised.
²Apply the parking brake firmly before jacking.
²Never start the engine with the vehicle on a jack.
²Do not let anyone sit in the vehicle when it is on
a jack.
²Do not get under the vehicle when it is on a jack.
²Only use the jack in the positions indicated.
²If working on or near a roadway, be extremely
careful of motor traffic.
370 WHAT TO DO IN EMERGENCIES