lights DODGE POWER WAGON 2007 2.G Owners Manual
[x] Cancel search | Manufacturer: DODGE, Model Year: 2007, Model line: POWER WAGON, Model: DODGE POWER WAGON 2007 2.GPages: 492, PDF Size: 8.25 MB
Page 19 of 492
4. Insert a blank Sentry Key into the ignition switch and
turn the ignition switch ON within 60 seconds. After 10
seconds a single chime will sound and the Vehicle Theft
Alarm Indicator Light will stop flashing, turn on again
for 3 seconds, and then turn off.
The new Sentry Key has been programmed.The Keyless
Entry Transmitter will also be programmed during this
procedure.Repeat this procedure to program up to a
total of 8 keys. If you do not have a programmed sentry
key, contact your dealer for details.
NOTE:If a programmed key is lost, see your dealer to
have all remaining keys erased from the systems
memory. This will prevent the lost key from starting your
vehicle. The remaining keys must then be repro-
grammed. All vehicle keys must be taken to the dealer at
the time of service to be reprogrammed.General Information
The Sentry Key system complies with FCC rules part 15
and with RSS-210 of Industry Canada. Operation is
subject to the following conditions:
²This device may not cause harmful interference.
²This device must accept any interference that may be
received, including interference that may cause undes-
ired operation.
SECURITY ALARM SYSTEM Ð IF EQUIPPED
This system monitors the vehicle doors and ignition for
unauthorized operation. When the alarm is activated, the
system provides both audible and visual signals. For the
first 3 minutes the horn will sound and the headlights
and security telltale will flash repeatedly. For an addi-
tional 15 minutes only the headlights and security telltale
will flash. The engine will run only if a valid Sentry Key
is used to start the vehicle. Use of the Sentry Key will
disable the alarm.
18 THINGS TO KNOW BEFORE STARTING YOUR VEHICLE
Page 20 of 492
Rearming of the System:
The security system will rearm itself after the 15 addi-
tional minutes of headlights and security telltale flashing,
if the system has not been disabled. If the condition
which initiated the alarm is still present, the system will
ignore that condition and monitor the remaining doors
and ignition.
To Set the Alarm:
The alarm will set when you use the power door locks, or
use the Keyless Entry transmitter to lock the doors. After
all the doors are locked and closed the SECURITY light in
the instrument cluster will flash rapidly to signal that the
system is arming. The security light in the instrument
panel cluster will flash rapidly for about 16 seconds to
indicate that the alarm is being set. After the alarm is set,
the security light will flash at a slower rate to indicate
that the system is armed.NOTE:If the SECURITY light stays on continuously
during vehicle operation, have the system checked by
your dealer.
To Disarm the System:
Use the Keyless Entry transmitter to unlock the door. If
something has triggered the system in your absence, the
horn will sound three times when you unlock the doors
and the security lamp will flash for 30 seconds. Check the
vehicle for tampering.
The Security system will also disarm, if the vehicle is
started with a programmed Sentry Key. If an unpro-
grammed Sentry Key is used to start a vehicle, the engine
will run for 2 seconds and then the security alarm will be
initiated. To exit alarming mode, press the transmitter
Unlock button, or start the vehicle with a programmed
Sentry Key.
THINGS TO KNOW BEFORE STARTING YOUR VEHICLE 19
2
Page 21 of 492
The Security Alarm System is designed to protect your
vehicle; however, you can create conditions where the
system will arm unexpectedly. If you remain in the
vehicle and lock the doors with the transmitter, the alarm
will sound when you pull the door handle to exit. The
door will be locked but the Security Alarm will not arm.
ILLUMINATED ENTRY SYSTEM Ð IF EQUIPPED
The courtesy lights will turn on when you use the keyless
entry transmitter or open the doors. This feature is only
available if you have Remote Keyless Entry.
The lights will fade to off after about 30 seconds or they
will immediately fade to off once the ignition switch is
turned on.
NOTE:
²The front courtesy overhead console, door courtesy
lights do not turn on if the dimmer control is in the
interior lights ON position (extreme top position).
²The illuminated entry system will not operate if the
dimmer control is in the ªdefeatº position (extreme
downward position).
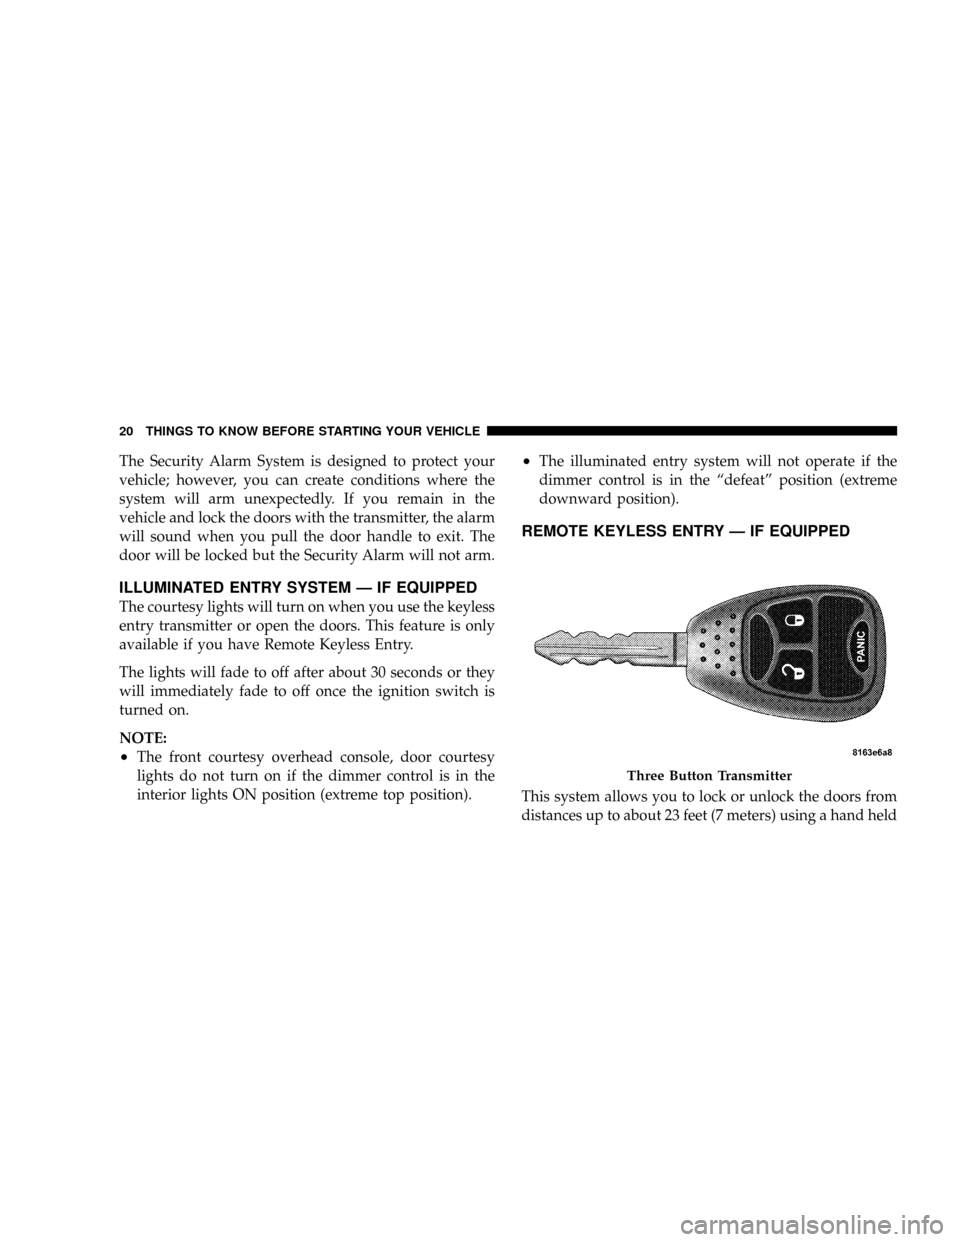
REMOTE KEYLESS ENTRY Ð IF EQUIPPED
This system allows you to lock or unlock the doors from
distances up to about 23 feet (7 meters) using a hand held
Three Button Transmitter
20 THINGS TO KNOW BEFORE STARTING YOUR VEHICLE
Page 22 of 492
radio transmitter. The transmitter need not be pointed at
the vehicle to activate the system.
To unlock the doors:
Press and release the UNLOCK button on the key fob
once to unlock only the driver's door or twice to unlock
all the doors. When the UNLOCK button is pressed, the
illuminated entry will initiate, the parking lights will
flash on twice and if installed, the cargo lamp will turn on
for 30 seconds.
The system can be programmed to unlock all the doors or
drivers door only upon the first UNLOCK button press
by using the following procedure:
1. Perform this operation while standing outside the
vehicle.
2. Press and hold the LOCK button on your key fob.3. Continue to hold the LOCK button at least 4 seconds,
but no longer than 10 seconds, then press and hold the
UNLOCK button while still holding the LOCK button.
4. Release both buttons at the same time.
5. This will allow you to unlock all doors on the first
press of the UNLOCK button.
To lock the doors:
Press and release the LOCK button on the transmitter to
lock all doors. If the ignition is OFF, when the doors are
locked, the parking lights will flash on once and the horn
will chirp once.
The horn chirp feature will be shipped from the assembly
plants activated. If desired this feature can be disabled by
using the following procedure:
1. Perform this operation while standing outside the
vehicle.
THINGS TO KNOW BEFORE STARTING YOUR VEHICLE 21
2
Page 23 of 492
2. Press and hold the LOCK button on a programmed
(i.e. functional) key fob.
3. Continue to hold the LOCK button, wait at least 4
seconds, but no longer than 10 seconds, then press and
hold the PANIC button. Release both buttons at the same
time.
4. To reactivate this feature, repeat the above steps.
Vehicles will be shipped from the assembly plants with
the park lamp flash feature activated. If desired, this
feature can be disabled by using the following procedure:
1. Perform this operation while standing outside the
vehicle.
2. Press and hold the UNLOCK button on a programmed
(i.e. functional) key fob.3. Continue to hold the UNLOCK button, wait at least 4
seconds, but no longer than 10 seconds, then press and
hold the LOCK button. Release both buttons at the same
time.
4. To reactivate this feature, repeat the above steps.
Using the Panic Alarm
To activate the Panic mode while the ignition is OFF press
and release the PANIC button on the transmitter once.
When the Panic mode is activated, the interior lights will
illuminate, the headlamps and parking lights will flash,
and the horn will sound.
To cancel the Panic mode press and release the PANIC
button on the transmitter a second time. Panic mode will
automatically cancel after 3 minutes or if the vehicle is
started and exceeds 15 mph. During the Panic Mode, the
door locks and remote keyless entry systems will func-
tion normally. Panic mode will not disarm the security
system on vehicles so equipped.
22 THINGS TO KNOW BEFORE STARTING YOUR VEHICLE
Page 25 of 492
NOTE:Do not touch the battery terminals that are on
the back housing or the printed circuit board.
1. With transmitter buttons facing down, use a flat blade
or dime to pry the two halves of the transmitter apart.
Make sure not to damage the rubber gasket during
removal.
2. Remove and replace the batteries. Be careful not to
disturb the metal terminal near the batteries. Install the
batteries with the positive terminal up, reference the note
9+ SIDE UP9on the inside of the bottom half of the
transmitter case. Avoid touching the new batteries with
your fingers. Skin oils may cause battery deterioration. If
you touch a battery, clean it with rubbing alcohol.
3. To reassemble the transmitter case snap the two halves
together. Make sure there is an even gap between the two
halves. Test transmitter operation.REMOTE STARTING SYSTEM Ð GAS ENGINE
ONLY
Your vehicle may be equipped with a remote starting
system, which will allow the vehicle to be started from
distances up to approximately 300 feet away from the
vehicle using the remote keyless entry key fob which is
part of your ignition key.
In order to remote start your vehicle, the hood, and all the
doors must be closed.
To remote start your vehicle, press the REMOTE START
button on the key fob twice within three seconds. To
indicate that the vehicle is about to start, the parking
lights will flash and the horn will sound briefly.
24 THINGS TO KNOW BEFORE STARTING YOUR VEHICLE
Page 56 of 492
bags to inflate, it signals the inflators on the crash side of
the vehicle. A quantity of nontoxic gas is generated to
inflate the window bag. The inflating window bag
pushes the side pillar molding out of the way and covers
the window. The airbag inflates in about 30 milliseconds
(about one-quarter of the time it takes to blink your eyes)
with enough force to injure you if you are not belted and
seated properly, or if items are positioned in the area
where the window bag inflates. This especially applies to
children. The window bag is only about 3
1¤2inches (8.9
cm) thick when it is inflated.
Enhanced Accident Response System
If the airbags deploy after an impact and the electrical
system remains functional, vehicles equipped with
power door locks will unlock automatically. In addition,
approximately 10 seconds after the vehicle has stopped
moving, the interior lights will light until the ignition
switch is turned off.
Maintaining Your Airbag Systems
WARNING!
²Modifications to any part of the airbag system
could cause it to fail when you need it. You could
be injured because the airbags are not there to
protect you. Do not modify the components or
wiring, including adding any kind of badges or
stickers to the steering wheel hub trim cover or
the upper right side of the instrument panel. Do
not modify the front bumper, vehicle body struc-
ture, or frame.
²You need proper knee impact protection in a
collision. Do not mount or locate any aftermarket
equipment on or behind the knee bolster.
²It is dangerous to try to repair any part of the
airbag system yourself. Be sure to tell anyone who
works on your vehicle that it has airbags.
THINGS TO KNOW BEFORE STARTING YOUR VEHICLE 55
2
Page 75 of 492
NExterior Mirrors Folding Feature...........85
NElectronic Power Mirrors ±If Equipped.......85
NElectric Rear Window Defroster And Heated
Sideview Mirrors ± If Equipped............86
NTrailer Towing Mirrors ± If Equipped........86
mHands±Free Communication (UConnectŸ) Ð
If Equipped............................87
NOperations...........................89
NPhone Call Features....................96
NUConnectŸ System Features..............98
NAdvanced Phone Connectivity............103
NThings You Should Know About Your
UConnectŸ System....................104
mSeats................................110N40-20-40 Front Seat....................111
NReclining Seats.......................112
NAdjustable Head Restraints..............112
NManual Rotary Lumbar Support Adjustment Ð
If Equipped.........................113
NPower Seats Ð If Equipped..............114
NHeated Seats Ð If Equipped.............115
mTo Open And Close The Hood.............117
mLights...............................118
NInterior Lights.......................119
NBattery Saver........................120
NHeadlamp Delay......................120
NHeadlights, Parking Lights, Panel Lights.....120
74 UNDERSTANDING THE FEATURES OF YOUR VEHICLE
Page 76 of 492
NDaytime Running Lights (Canada Only And
Fleet Vehicles)........................121
NLights-On Reminder...................122
NFog Lights Ð If Equipped...............122
NCargo Light Ð If Equipped..............122
NMultifunction Control Lever..............123
mWindshield Wipers And Washers............125
NWindshield Wipers....................125
NWindshield Washers...................126
mTilt Steering Column....................127
mElectronic Speed Control Ð If Equipped......128
NTo Activate..........................128
NTo Set At A Desired Speed...............128NTo Deactivate........................128
NTo Resume Speed.....................129
NTo Vary The Speed Setting...............129
NTo Accelerate For Passing...............130
mOverhead ConsoleÐ If Equipped...........131
NCourtesy/Reading Lights................132
mOverhead Console With Compass/Temperature
Mini-Trip Computer Ð If Equipped..........132
NUS/M Button........................133
NReset Button.........................133
NGlobal Reset.........................134
NStep Button.........................134
NAverage Fuel Economy (AVG ECO)........134
UNDERSTANDING THE FEATURES OF YOUR VEHICLE 75
3
Page 117 of 492
the switch a third time will turn the heated seats OFF. If
you do not purposefully turn the switch OFF, the seat
heating level will automatically change to the next lower
level, or OFF. The High heat level operates for 30 minutes
(approximate), the Low heat level operates for 30 min-
utes (approximate). The seat heat will also turn OFF
when the ignition is turned OFF. Both of the indicators
ON identifies High heat level. The lower indicator On
only, identifies Low heat level. Flashing indicator lights
on the switch indicate that the Heated Seat System needs
servicing.WARNING!
Persons who are unable to feel pain to the skin
because of advanced age, chronic illness, diabetes,
spinal cord injury, medication, alcohol use, exhaus-
tion or other physical condition must exercise care
when using the seat heater. It may cause burns even
at low temperatures, especially if used for long
periods of time.
Do not place anything on the seat that insulates
against heat, such as a blanket or cushion. This may
cause the seat heater to overheat.
116 UNDERSTANDING THE FEATURES OF YOUR VEHICLE