oil level DODGE POWER WAGON 2007 2.G Owners Manual
[x] Cancel search | Manufacturer: DODGE, Model Year: 2007, Model line: POWER WAGON, Model: DODGE POWER WAGON 2007 2.GPages: 492, PDF Size: 8.25 MB
Page 181 of 492
24. Low Washer Fluid Light
This light comes on when the washer fluid level falls
below approximately 1/4 full. The light will remain on
until fluid is added and ignition switch is cycled.
25. Transmission Oil Temperature Warning Light
(Automatic Transmissions Only)
This light indicates that there is excessive trans-
mission fluid temperature that might occur
with severe usage such as trailer towing. It may
also occur when operating the vehicle in a high
torque converter slip condition, such as 4-wheel-drive
operation (e.g. snow plowing, off- road operation). If this
light comes on, stop the vehicle and run the engine at idle
or faster, with the transmission in NEUTRAL until the
light goes off.26. Odometer/Trip Odometer Button
Press this button to toggle between the odometer and the
trip odometer display. Holding the button in resets the
trip odometer reading when in trip mode.
27. Fuel Gauge
Shows level of fuel in tank when ignition switch is in the
ON position.
28. Low Fuel Warning Light
When the fuel level drops to 1/16 tank, the fuel
symbol will light and a single chime will sound.
NOTE:If your vehicle is equipped with an overhead
console module (CMTC), it is possible for DTE to display
ªLO FUELº before the low fuel warning light turns on in
the instrument cluster. This could occur because the low
fuel warning is set to a specified fuel tank volume and
DTE is an estimated distance calculation based on vehicle
fuel economy and remaining fuel tank volume.
180 UNDERSTANDING YOUR INSTRUMENT PANEL
Page 390 of 492
could adversely affect the engine or vehicle performance.
These items should be inspected if a malfunction is
observed or suspected.
Engine Oil
Checking Oil Level
To assure proper lubrication of your vehicle's engine, the
engine oil must be maintained at the correct level. The
best time to check the engine oil level is about 5 minutes
after a fully warmed up engine is shut off or before
starting the engine after it has sat overnight.
Checking the oil while the vehicle is on level ground will
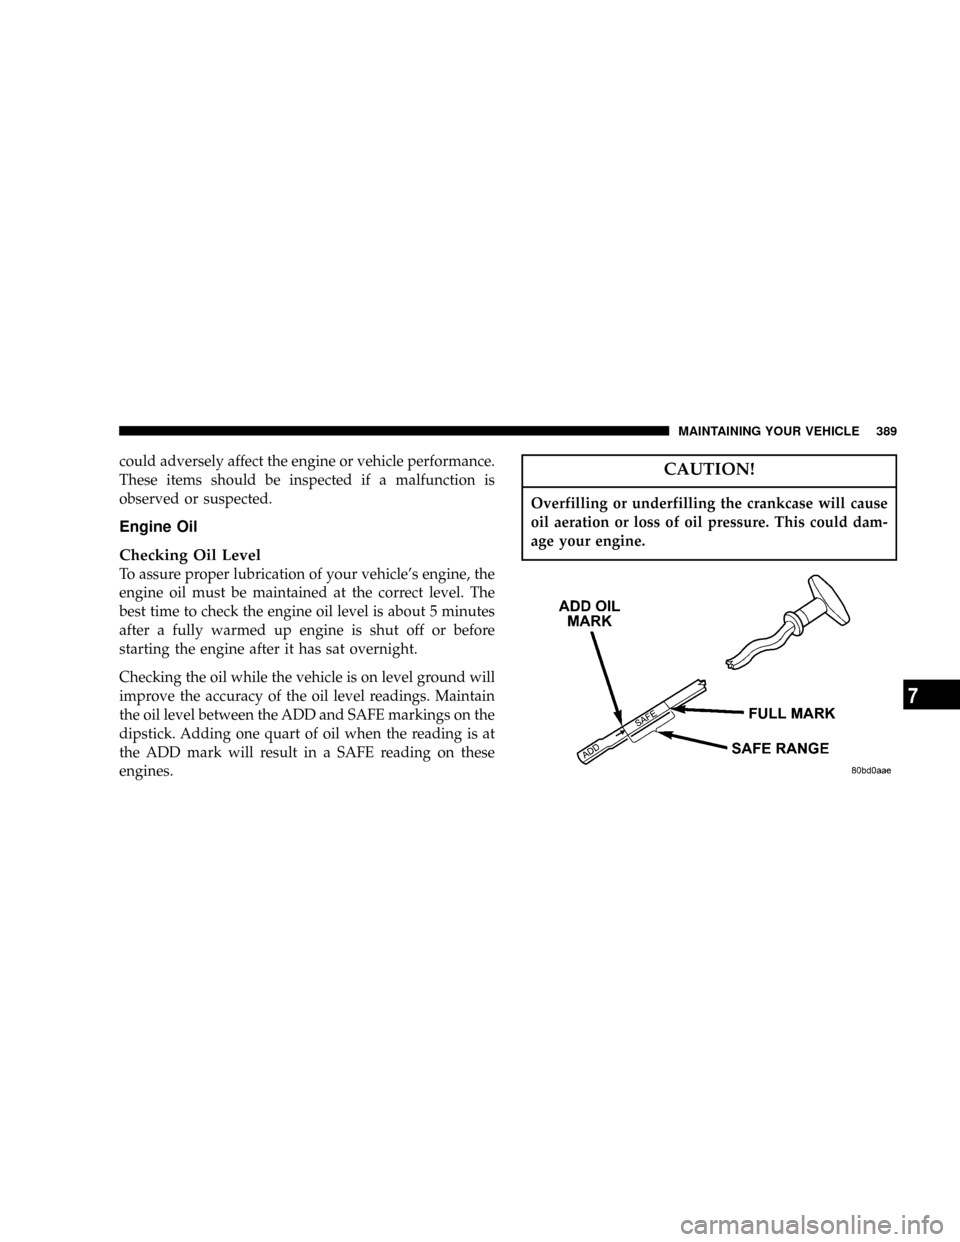
improve the accuracy of the oil level readings. Maintain
the oil level between the ADD and SAFE markings on the
dipstick. Adding one quart of oil when the reading is at
the ADD mark will result in a SAFE reading on these
engines.
CAUTION!
Overfilling or underfilling the crankcase will cause
oil aeration or loss of oil pressure. This could dam-
age your engine.
MAINTAINING YOUR VEHICLE 389
7
Page 399 of 492
WARNING!
²Use only refrigerants and compressor lubricants
approved by the manufacturer for your air condi-
tioning system. Some unapproved refrigerants are
flammable and can explode, injuring you. Other
unapproved refrigerants or lubricants can cause
the system to fail, requiring costly repairs.
²The air conditioning system contains refrigerant
under high pressure. To avoid risk of personal
injury or damage to the system, adding refrigerant
or any repair requiring lines to be disconnected
should be done by an experienced repairman.
Refrigerant Recovery and Recycling
R-134a Air Conditioning Refrigerant is a hydrofluorocar-
bon (HFC) that is endorsed by the Environmental Pro-
tection Agency and is an ozone-saving product. How-
ever, the manufacturer recommends that air conditioning
service be performed by dealers or other service facilities
using recovery and recycling equipment.
NOTE:Use only manufacturer approved A/C System
Sealers, Stop Leak Products, Seal Conditioners, Compres-
sor Oil, or Refrigerants.
Power Steering Ð Fluid Check
Checking the power steering fluid level at a defined
service interval is not required. The fluid should only be
checked if a leak is suspected, abnormal noises are
apparent, and/or the system is not functioning as antici-
pated. Coordinate inspection efforts through a certified
DaimlerChrysler Dealership.9
398 MAINTAINING YOUR VEHICLE
Page 402 of 492
Body Lubrication
Locks and all body pivot points, including such items as
seat tracks, doors, tailgate and hood hinges, should be
lubricated periodically to assure quiet, easy operation
and to protect against rust and wear. Prior to the appli-
cation of any lubricant, the parts concerned should be
wiped clean to remove dust and grit; after lubricating
excess oil and grease should be removed. Particular
attention should also be given to hood latching compo-
nents to insure proper function. When performing other
underhood services, the hood latch, release mechanism
and safety catch should be cleaned and lubricated.
The external lock cylinders should be lubricated twice a
year, preferably in the fall and spring. Apply a small
amount of a high quality lubricant such as MopartLock
Cylinder Lubricant directly into the lock cylinder.
Windshield Wiper Blades
The rubber edges of the wiper blades and the windshield
should be cleaned periodically with a sponge or soft cloth
and a mild nonabrasive cleaner. This will remove accu-
mulations of salt or road film.
Operation of the wipers on dry glass for long periods
may cause deterioration of the wiper blades. Always use
washer fluid when using the wipers to remove salt or dirt
from a dry windshield.
Avoid using the wiper blades to remove frost or ice from
the windshield. Keep the blade rubber out of contact with
petroleum products such as engine oil, gasoline, etc.
Windshield Washers
The fluid reservoir is located under the hood and should
be checked for fluid level at regular intervals. Fill the
reservoir with windshield washer solvent only (not ra-
diator antifreeze).
MAINTAINING YOUR VEHICLE 401
7
Page 410 of 492
Inspect all hose connections such as clamps and cou-
plings to make sure they are secure and no leaks are
present.
Components should be replaced immediately if there is
any evidence of wear or damage that could cause failure.
Brake System
Power Disc Brakes (front and rear)
Disc brakes do not require adjustment; however, several
hard stops during the break-in period are recommended
to seat the linings and wear off any foreign material.
Brake Master Cylinder
The fluid level of the master cylinder should be checked
when performing under the hood service, or immedi-
ately if the brake system warning lamp indicates system
failure.
The brake master cylinder has a translucent plastic
reservoir. On the outboard side of the reservoir, there is aªMAXº dot and an ªMINº dot. The fluid level must be
kept within these two dots. Do not add fluid above the
MAX mark, because leakage may occur at the cap.
With disc brakes the fluid level can be expected to fall as
the brake linings wear. However, an unexpected drop in
fluid level may be caused by a leak and a system check
should be conducted.
Refer to Fluids, Lubricants and Genuine Parts for the
correct Fluid type.
WARNING!
Use of a brake fluid that may have a lower initial
boiling point, or is unidentified as to specification,
may result in sudden brake failure during hard
prolonged braking. You could have an accident.
MAINTAINING YOUR VEHICLE 409
7
Page 412 of 492
Rear Axle And 4x4 Front Driving Axle Fluid Level
Refer to Fluids, Lubricants and Genuine Parts for the
correct Fluid type. For normal service, periodic fluid level
checks are not required. When the vehicle is serviced for
other reasons the exterior surfaces of the axle assembly
should be inspected. If gear oil leakage is suspected
inspect the fluid level.
This inspection should be made with the vehicle in a level
position. The fluid level should be even with the bottom
of the fill hole for the Manufacturer's C205F HD Front
Axles. The fluid level should be 5/8º (16 mm) below on
9 1/4º Manufacturer's Rear Axles.
For all 2500 Model axles, the fluid level should be 1/4º
1/4º (6.4 mm 6.4 mm) below the fill hole on the 9.25º
Front and 3/4º 1/4º (19 mm 6.4 mm) on 10.5º Rear
axles.
Drain and Refill
Vehicles operated in normal service do not have regularly
scheduled oil changes. If fluid has become contaminated
with water or to provide the correct viscosity grade, drain
and refill.
Lubricant Selection
Refer to Fluids, Lubricants and Genuine Parts for correct
fluid type.
NOTE:The presence of water in the gear lubricant will
result in corrosion and possible failure of differential
components. Operation of the vehicle in water, as may be
encountered in some off-highway types of service, will
require draining and refilling the axle to avoid damage.
Limited-Slip Differentials
Power Wagon AxlesDO NOT REQUIREany limited slip
oil additive (friction modifiers).
MAINTAINING YOUR VEHICLE 411
7
Page 413 of 492
Transfer Case
Fluid Level Check
This fluid level can be checked by removing the filler
plug. The fluid level should be to the bottom edge of the
filler plug hole with the vehicle in a level position.
Lubricant Selection
Refer to Fluids, Lubricants and Genuine Parts for correct
fluid type.
Front Drive Shaft
The front drive shaft contains a grease fitting which
should be serviced at every oil change (see maintenance
schedule A/B).
Manual Transmission
Fluid Level Check
This fluid level can be checked by removing the filler
plug. If the level of the lubricant is more than 1/4º (6.4
mm) below the bottom of the filler hole while the vehicleis on level ground, enough lubricant should be added to
bring the level to the bottom of the filler hole.
Lubricant Selection G56 (6 ± Speed Manual
Transmission Ð If Equipped)
This transmission does not require periodic changing. If
it becomes necessary to add or change the fluid in this
transmission, refer to Fluids, Lubricants and Genuine
Parts for correct fluid type.
Automatic Transmission
Fluid Level Check
The fluid level should be checked when the engine is
fully warmed up and the fluid in the transmission is at
normal operating temperature. Operation of the trans-
mission with an improper fluid level will greatly reduce
the life of the transmission and of the fluid. Check the
fluid level whenever the vehicle is serviced.
412 MAINTAINING YOUR VEHICLE
Page 414 of 492
Fluid Level Check ± 545RFE
Check the fluid level while the transmission is at normal
operating temperature 82ÉC (180ÉF). This occurs after at
least 15 miles (25 km) of driving. At normal operating
temperature the fluid cannot be held comfortably be-
tween the fingertips.
To check the automatic transmission fluid level properly,
the following procedure must be used:
1. Operate the engine at idle speed and normal operating
temperature.
2. The vehicle must be on level ground.
3. Fully apply the parking brake and press the brake
pedal.
4. Place the gear selector momentarily in each gear
position ending with the lever in P (Park).5. Remove the dipstick, wipe it clean and reinsert it until
seated.
6. Remove the dipstick again and note the fluid level on
both sides. The fluid level should be between the ªHOTº
(upper) reference holes on the dipstick at normal operat-
ing temperature. Verify that solid coating of oil is seen on
both sides of the dipstick. If the fluid is low, add as
required into the dipstick tube.Do not overfill.After
adding any quantity of oil through the oil fill tube, wait
a minimum of two (2) minutes for the oil to fully drain
into the transmission before rechecking the fluid level.
NOTE:If it is necessary to check the transmissionbelow
the operating temperature, the fluid level should be
between the two ªCOLDº (lower) holes on the dipstick
with the fluid at approximately 70ÉF (21ÉC) (room tem-
perature). If the fluid level is correctly established at
room temperature, it should be between the ªHOTº
MAINTAINING YOUR VEHICLE 413
7
Page 449 of 492
At Each Stop for Fuel
²Check the engine oil level about 5 minutes after a fully
warmed engine is shut off. Checking the oil level while
the vehicle is on level ground will improve the accu-
racy of the oil level reading. Add oil only when the
level is at or below the ADD or MIN mark.
²Check the windshield washer solvent and add if
required.
Once a Month
²Check tire pressure and look for unusual wear or
damage.
²Inspect the battery and clean and tighten the terminals
as required.
²Check the fluid levels of coolant bottle, brake master
cylinder, and transmission and add as needed.
²Check all lights and all other electrical items for correct
operation.
At Each Oil Change
²Change the engine oil filter.
²Lubricate the front driveshaft grease fitting and tie rod
end links.
²Inspect the exhaust system.
²Inspect the brake hoses.
²Inspect the UÐjoints and front suspension compo-
nents.
²Check the automatic transmission fluid level.
²Check the manual transmission fluid level.
²Check the coolant level, hoses, and clamps.
²Lubricate Front Drive Shaft Fitting.
448 MAINTENANCE SCHEDULES
8
M
A
I
N
T
E
N
A
N
C
E
S
C
H
E
D
U
L
E
S
Page 452 of 492
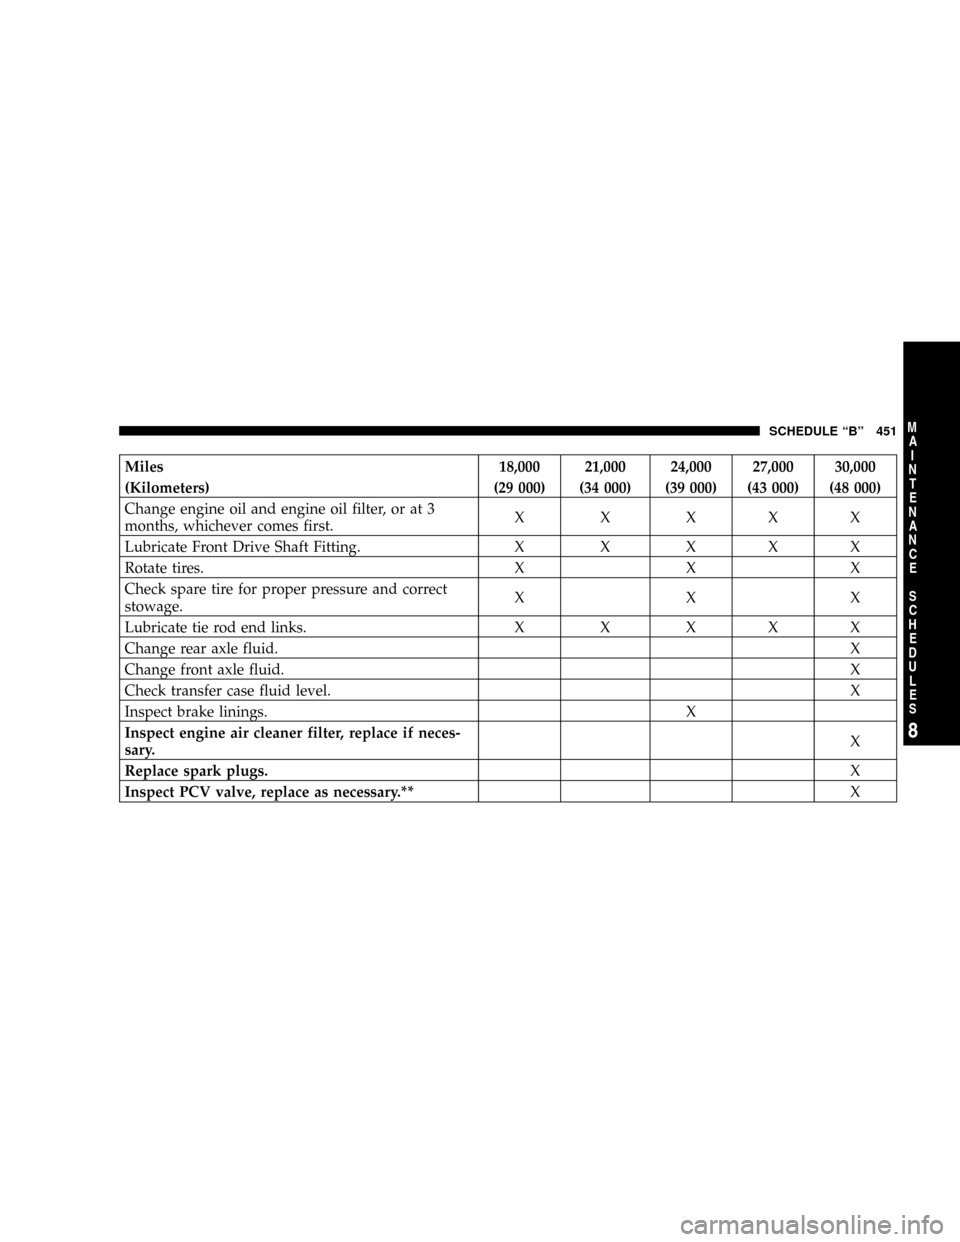
Miles 18,000 21,000 24,000 27,000 30,000
(Kilometers) (29 000) (34 000) (39 000) (43 000) (48 000)
Change engine oil and engine oil filter, or at 3
months, whichever comes first.X X XXX
Lubricate Front Drive Shaft Fitting. X X X X X
Rotate tires. X X X
Check spare tire for proper pressure and correct
stowage.XXX
Lubricate tie rod end links. X X X X X
Change rear axle fluid.X
Change front axle fluid.X
Check transfer case fluid level.X
Inspect brake linings. X
Inspect engine air cleaner filter, replace if neces-
sary.X
Replace spark plugs.X
Inspect PCV valve, replace as necessary.**X
SCHEDULE ªBº 451
8
M
A
I
N
T
E
N
A
N
C
E
S
C
H
E
D
U
L
E
S