DODGE RAM 1500 1998 2.G Workshop Manual
Manufacturer: DODGE, Model Year: 1998, Model line: RAM 1500, Model: DODGE RAM 1500 1998 2.GPages: 2627
Page 1551 of 2627
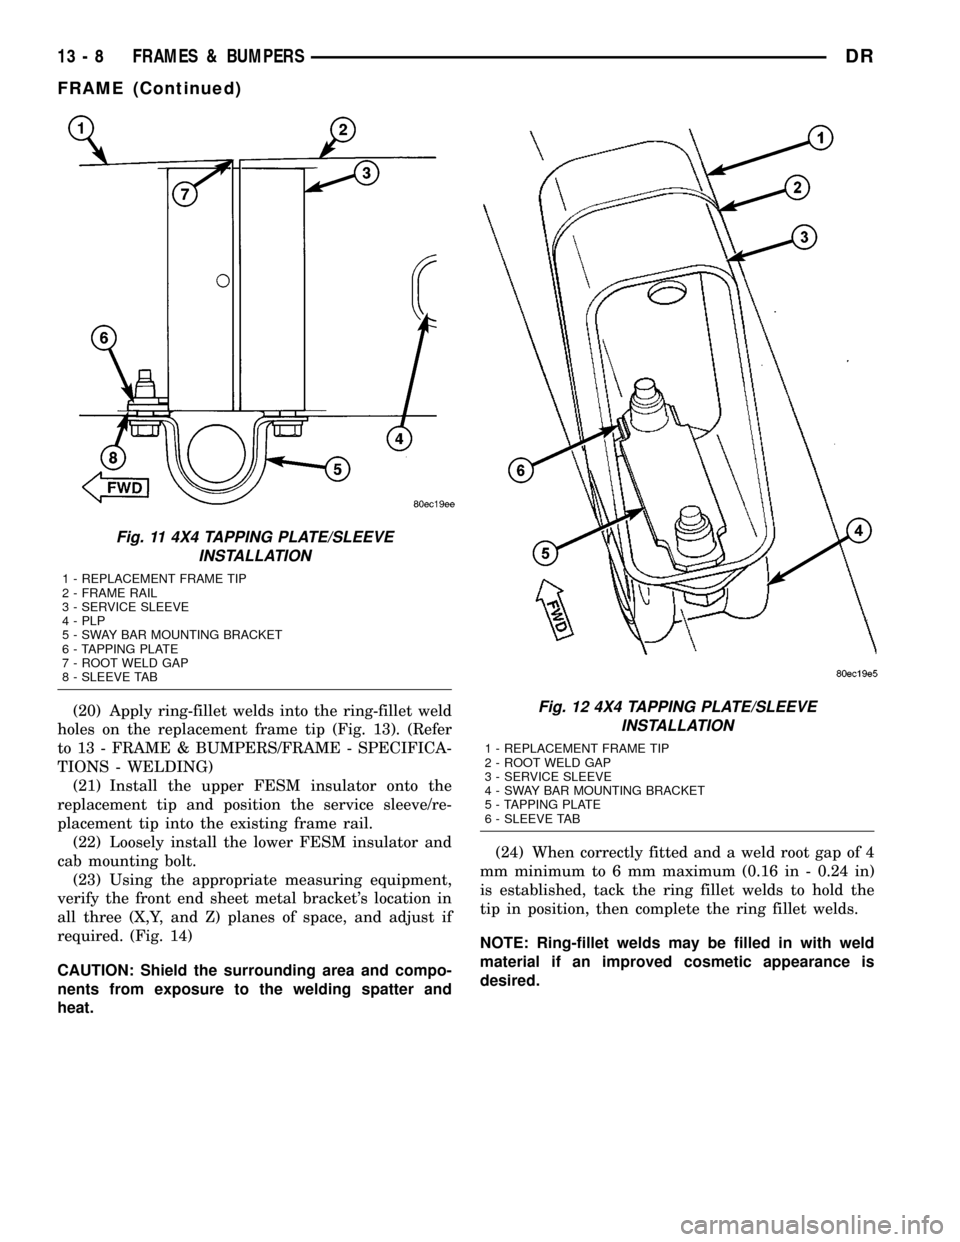
(20) Apply ring-fillet welds into the ring-fillet weld
holes on the replacement frame tip (Fig. 13). (Refer
to 13 - FRAME & BUMPERS/FRAME - SPECIFICA-
TIONS - WELDING)
(21) Install the upper FESM insulator onto the
replacement tip and position the service sleeve/re-
placement tip into the existing frame rail.
(22) Loosely install the lower FESM insulator and
cab mounting bolt.
(23) Using the appropriate measuring equipment,
verify the front end sheet metal bracket's location in
all three (X,Y, and Z) planes of space, and adjust if
required. (Fig. 14)
CAUTION: Shield the surrounding area and compo-
nents from exposure to the welding spatter and
heat.(24) When correctly fitted and a weld root gap of 4
mm minimum to 6 mm maximum (0.16 in - 0.24 in)
is established, tack the ring fillet welds to hold the
tip in position, then complete the ring fillet welds.
NOTE: Ring-fillet welds may be filled in with weld
material if an improved cosmetic appearance is
desired.
Fig. 11 4X4 TAPPING PLATE/SLEEVE
INSTALLATION
1 - REPLACEMENT FRAME TIP
2 - FRAME RAIL
3 - SERVICE SLEEVE
4 - PLP
5 - SWAY BAR MOUNTING BRACKET
6 - TAPPING PLATE
7 - ROOT WELD GAP
8 - SLEEVE TAB
Fig. 12 4X4 TAPPING PLATE/SLEEVE
INSTALLATION
1 - REPLACEMENT FRAME TIP
2 - ROOT WELD GAP
3 - SERVICE SLEEVE
4 - SWAY BAR MOUNTING BRACKET
5 - TAPPING PLATE
6 - SLEEVE TAB
13 - 8 FRAMES & BUMPERSDR
FRAME (Continued)
Page 1552 of 2627
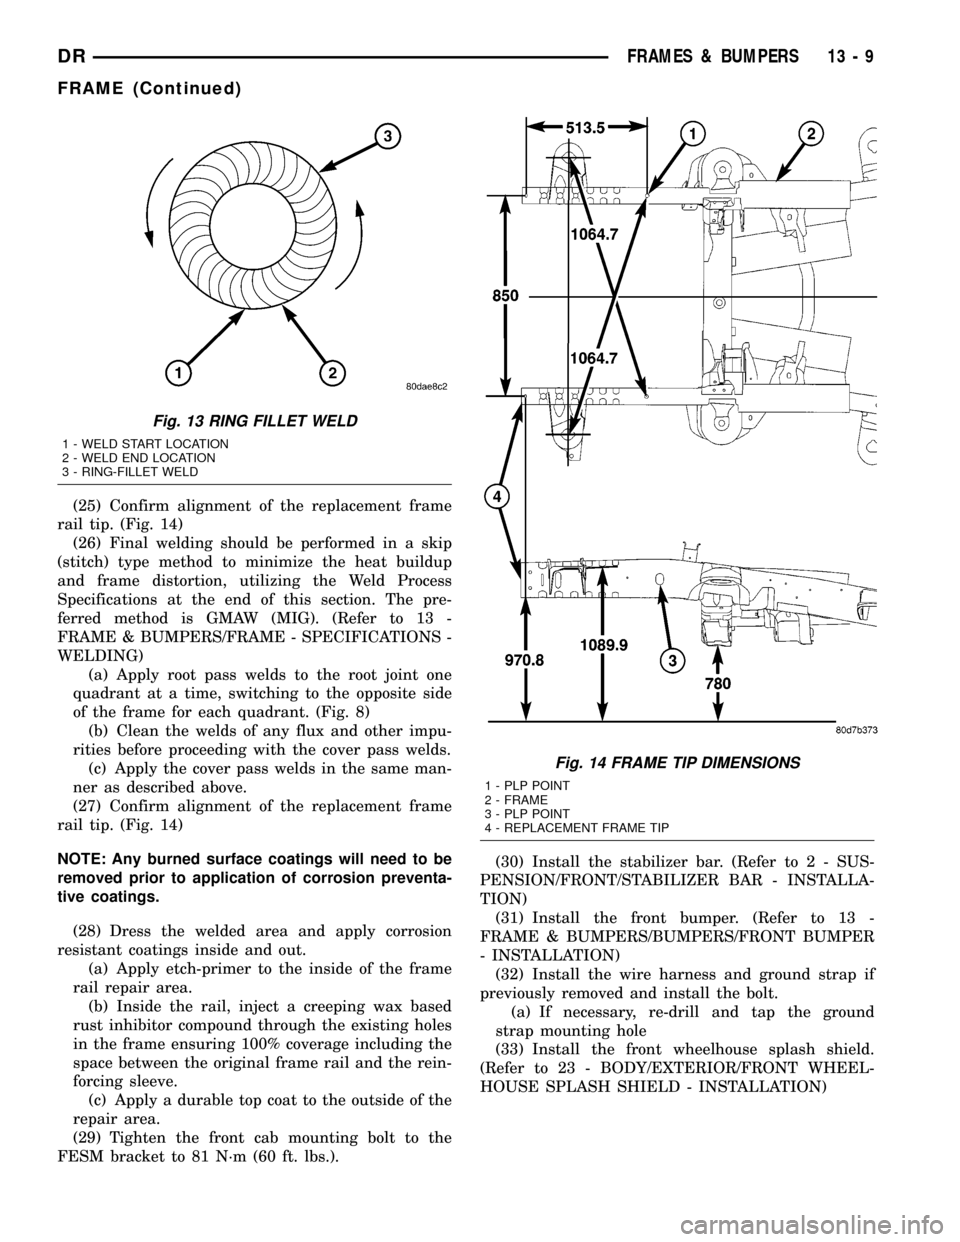
(25) Confirm alignment of the replacement frame
rail tip. (Fig. 14)
(26) Final welding should be performed in a skip
(stitch) type method to minimize the heat buildup
and frame distortion, utilizing the Weld Process
Specifications at the end of this section. The pre-
ferred method is GMAW (MIG). (Refer to 13 -
FRAME & BUMPERS/FRAME - SPECIFICATIONS -
WELDING)
(a) Apply root pass welds to the root joint one
quadrant at a time, switching to the opposite side
of the frame for each quadrant. (Fig. 8)
(b) Clean the welds of any flux and other impu-
rities before proceeding with the cover pass welds.
(c) Apply the cover pass welds in the same man-
ner as described above.
(27) Confirm alignment of the replacement frame
rail tip. (Fig. 14)
NOTE: Any burned surface coatings will need to be
removed prior to application of corrosion preventa-
tive coatings.
(28) Dress the welded area and apply corrosion
resistant coatings inside and out.
(a) Apply etch-primer to the inside of the frame
rail repair area.
(b) Inside the rail, inject a creeping wax based
rust inhibitor compound through the existing holes
in the frame ensuring 100% coverage including the
space between the original frame rail and the rein-
forcing sleeve.
(c) Apply a durable top coat to the outside of the
repair area.
(29) Tighten the front cab mounting bolt to the
FESM bracket to 81 N´m (60 ft. lbs.).(30) Install the stabilizer bar. (Refer to 2 - SUS-
PENSION/FRONT/STABILIZER BAR - INSTALLA-
TION)
(31) Install the front bumper. (Refer to 13 -
FRAME & BUMPERS/BUMPERS/FRONT BUMPER
- INSTALLATION)
(32) Install the wire harness and ground strap if
previously removed and install the bolt.
(a) If necessary, re-drill and tap the ground
strap mounting hole
(33) Install the front wheelhouse splash shield.
(Refer to 23 - BODY/EXTERIOR/FRONT WHEEL-
HOUSE SPLASH SHIELD - INSTALLATION)
Fig. 13 RING FILLET WELD
1 - WELD START LOCATION
2 - WELD END LOCATION
3 - RING-FILLET WELD
Fig. 14 FRAME TIP DIMENSIONS
1 - PLP POINT
2 - FRAME
3 - PLP POINT
4 - REPLACEMENT FRAME TIP
DRFRAMES & BUMPERS 13 - 9
FRAME (Continued)
Page 1553 of 2627
SERVICE SLEEVE ASSEMBLY
NOTE: Two sleeve halves are included with each
kit. Modifications as follow, are necessary to create
the correct sleeve assembly for each application.
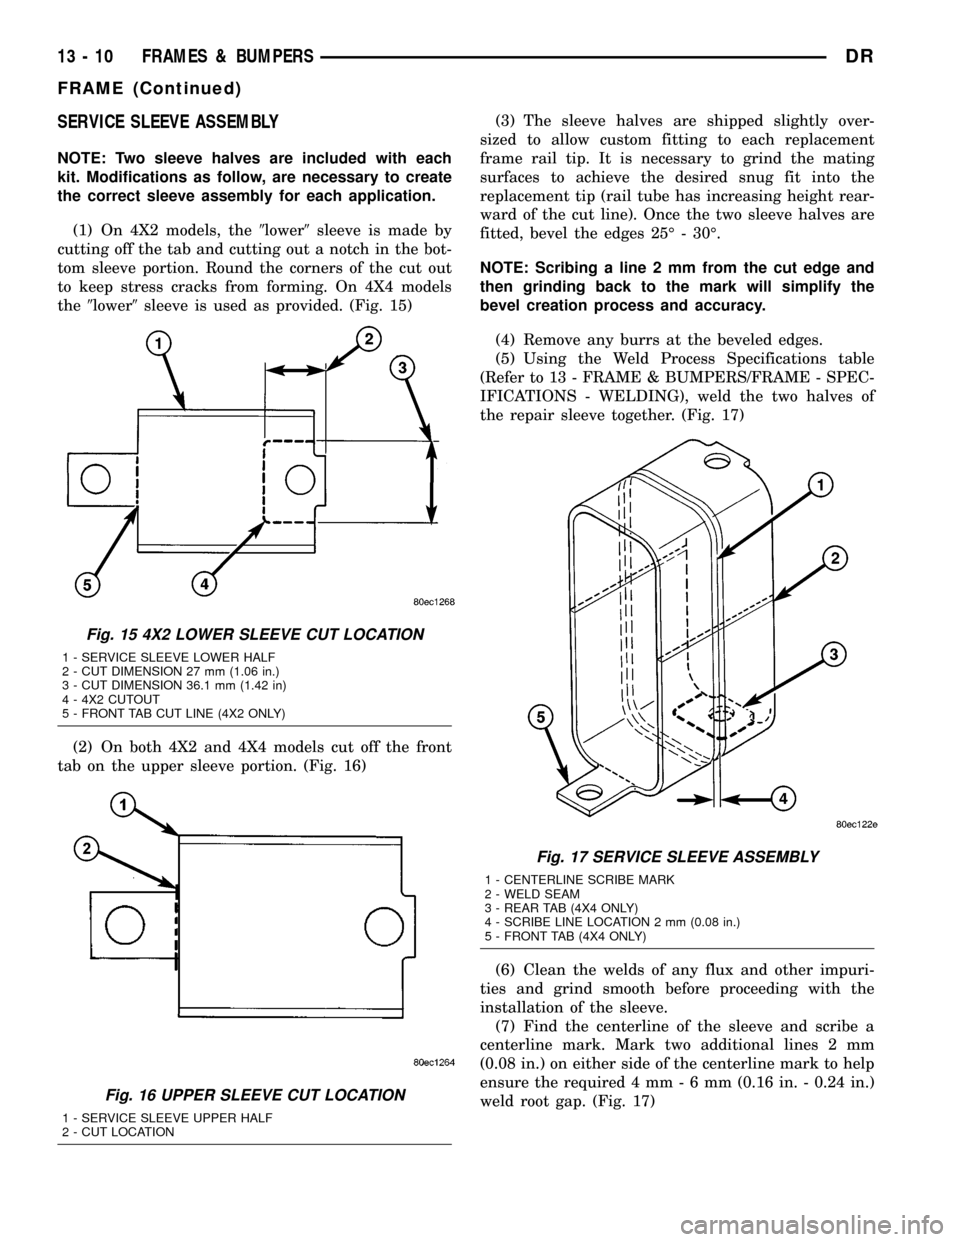
(1) On 4X2 models, the9lower9sleeve is made by
cutting off the tab and cutting out a notch in the bot-
tom sleeve portion. Round the corners of the cut out
to keep stress cracks from forming. On 4X4 models
the9lower9sleeve is used as provided. (Fig. 15)
(2) On both 4X2 and 4X4 models cut off the front
tab on the upper sleeve portion. (Fig. 16)(3) The sleeve halves are shipped slightly over-
sized to allow custom fitting to each replacement
frame rail tip. It is necessary to grind the mating
surfaces to achieve the desired snug fit into the
replacement tip (rail tube has increasing height rear-
ward of the cut line). Once the two sleeve halves are
fitted, bevel the edges 25É - 30É.
NOTE: Scribing a line 2 mm from the cut edge and
then grinding back to the mark will simplify the
bevel creation process and accuracy.
(4) Remove any burrs at the beveled edges.
(5) Using the Weld Process Specifications table
(Refer to 13 - FRAME & BUMPERS/FRAME - SPEC-
IFICATIONS - WELDING), weld the two halves of
the repair sleeve together. (Fig. 17)
(6) Clean the welds of any flux and other impuri-
ties and grind smooth before proceeding with the
installation of the sleeve.
(7) Find the centerline of the sleeve and scribe a
centerline mark. Mark two additional lines 2 mm
(0.08 in.) on either side of the centerline mark to help
ensure the required 4 mm-6mm(0.16 in. - 0.24 in.)
weld root gap. (Fig. 17)
Fig. 15 4X2 LOWER SLEEVE CUT LOCATION
1 - SERVICE SLEEVE LOWER HALF
2 - CUT DIMENSION 27 mm (1.06 in.)
3 - CUT DIMENSION 36.1 mm (1.42 in)
4 - 4X2 CUTOUT
5 - FRONT TAB CUT LINE (4X2 ONLY)
Fig. 16 UPPER SLEEVE CUT LOCATION
1 - SERVICE SLEEVE UPPER HALF
2 - CUT LOCATION
Fig. 17 SERVICE SLEEVE ASSEMBLY
1 - CENTERLINE SCRIBE MARK
2 - WELD SEAM
3 - REAR TAB (4X4 ONLY)
4 - SCRIBE LINE LOCATION 2 mm (0.08 in.)
5 - FRONT TAB (4X4 ONLY)
13 - 10 FRAMES & BUMPERSDR
FRAME (Continued)
Page 1554 of 2627

STANDARD PROCEDURE - HYDROFORM
FENDER RAIL REPAIR
CAUTION: This repair procedure assumes damage
to the right or left hydroform fender rail (Fig. 18).
Prior to any repairs, the vehicle must be mounted
on the appropriate frame repair equipment (ªframe
rackº), checked with three dimensional measuring
equipment, and necessary pull corrections made. If
damage exists in the hydroform fender rail, or cab
beyond the area covered by this service procedure
after dimensional corrections are made, the hydro-
form must be replaced in its entirety. Refer to 23 -
BODY/BODY STRUCTURE/WELD LOCATIONS -
SPECIFICATIONS, when replacing the entire hydro-
form.
(1) Before proceding with this repair procedure
review the required service warnings and precau-
tions. (Refer to 13 - FRAME & BUMPERS/FRAME -
WARNING)
(2) Disconnect and isolate the battery negative
cable.
(3) Remove the front wheelhouse splash shield.
(Refer to 23 - BODY/EXTERIOR/FRONT WHEEL-
HOUSE SPLASH SHIELD - REMOVAL)(4) Remove the fender. (Refer to 23 - BODY/EXTE-
RIOR/FRONT FENDER - REMOVAL)
(5) Remove the A/C condenser, if required. (Refer
to 24 - HEATING & AIR CONDITIONING/PLUMB-
ING/A/C CONDENSER - REMOVAL)
(6) Remove the A/C lines, if required. Refer to the
Heating and Air Conditioning section of the manual
for recommended procedures.
(7) Remove the radiator assembly. (Refer to 7 -
COOLING/ENGINE/RADIATOR - REMOVAL)
(8) Remove the air cleaner and support bracket, if
required. (Refer to 9 - ENGINE/AIR INTAKE SYS-
TEM/AIR CLEANER ELEMENT - REMOVAL)
(9) Remove the integrated power module. (Refer to
8 - ELECTRICAL/POWER DISTRIBUTION/INTE-
GRATED POWER MODULE - REMOVAL)
(10) Remove the bolts and position aside the wire
harness and grounds, if required.
(11) Remove the upper radiator crossmember.
(Refer to 23 - BODY/EXTERIOR/UPPER RADIATOR
CROSSMEMBER - REMOVAL)
(12) Remove the headlamp unit. (Refer to 8 -
ELECTRICAL/LAMPS/LIGHTING - EXTERIOR/
HEADLAMP UNIT - REMOVAL)
(13) Remove the front cab mount to the Front End
Sheet Metal bracket (FESM) bolt.
Fig. 18 HYDROFORM FENDER RAILS
1 - HYDROFORM FENDER RAIL
2 - FRONT END SHEET METAL BRACKET
3 - UPPER RADIATOR CROSSMEMBER BOLTS (4)4 - UPPER RADIATOR CROSSMEMBER
5 - LOWER RADIATOR CROSSMEMBER BOLTS (8)
6 - LOWER RADIATOR CROSSMEMBER
DRFRAMES & BUMPERS 13 - 11
FRAME (Continued)
Page 1555 of 2627

(14) Remove the bolts attaching the lower radiator
crossmember to the hydroform fender rail. (Fig. 18)
CAUTION: Do not use any flame or plasma cutting
equipment to cut the frame in this procedure. The
inaccurate and high temperatures achieved during
flame or plasma cutting will change the metal char-
acteristics and may weaken the frame and/or repair
location.
(15) Using a reciprocating saw or equivalent, cut
the fender rail and shotgun at a straight and square
section of the hydroform and remove.
(16) Smooth and square the cut edges.
(17) Using the damaged structure as a reference
cut the service part at the same location as the first
cut. Smooth and square the cut edges.
NOTE: The repair structure should butt up to the
remaining structure and provide the same overall
vehicle geometry.
(18) Fabricate 51 mm (2.0 in.) long repair inserts
using scrap from the old structure or the replacement
part. It will be necessary to split the inserts on each
of their four sides to fit into the hydroform.
(19) Remove any paint or e-coat from the inserts
and also to the interior and exterior of the hydro-
forms.
(20) Cut plug weld holes as described below.
²On the upper rail, cut one 13 mm (0.5 in.) hole
on each side of the rail, 25 mm (1.0 in.) from the butt
joint of the tubes.
²On the lower rail, cut one 13 mm (0.5 in.) hole
on the top and bottom sides of the rail 25 mm (1.0
in.) from the butt joint of the tube.
²On the lower rail, cut two 13 mm (0.5 in.) holes
on the inner and outer sides of the rail 25 mm (1.0
in.) from the butt joint of the tube.
CAUTION: Shield the surrounding area and compo-
nents from exposure to the welding spatter and
heat.
(21) Install the insert 1º into the replacement part
and tack into place with a weld. (Refer to 13 -
FRAME & BUMPERS/FRAME - SPECIFICATIONS -
WELDING)
(22) Insert the service part into place and using
the appropriate measuring equipment, verify the
front end sheet metal bracket's location in all three
(X,Y, and Z) planes of space. (Fig. 19)
(23) Complete all 360É plug welds.
NOTE: Before the final welding, use three dimen-
sional measuring equipment to ensure the part is in
the correct location. Verify that tap plate extrusion
at the bottom of the vertical post lines up with theisolator and hole in the frame perch mount. Also
ensure the lower radiator closure tube is bolted into
the forward shotgun ends.
(24) Complete welding by making a 360É butt weld
around the fender rails.
(25) Metal finish the exposed welds on the hydro-
forms.
(26) Dress the welded area and apply corrosion
resistant coatings inside and out.
(a) Inside the rail, inject a creeping wax based
rust inhibitor compound to the inside of the hydro-
forms ensuring 100% coverage including the mat-
ing face between the fender rail sections and insert
such that corrosion protection is restored in the
internal cavity.
(b) Apply a durable top coat to the outside of the
repair area.
(27) Install the front cab mount bolt if previously
removed and tighten to 81 N´m (60 ft. lbs.).
(28) Install the lower radiator crossmember bolts
and tighten to 28 N´m (21 ft. lbs.).
(29) Install the headlamp unit. (Refer to 8 - ELEC-
TRICAL/LAMPS/LIGHTING - EXTERIOR/HEAD-
LAMP UNIT - INSTALLATION)
(30) Install the upper radiator crossmember. (Refer
to 23 - BODY/EXTERIOR/UPPER RADIATOR
CROSSMEMBER - INSTALLATION)
(31) Install the wire harness and ground if previ-
ously removed and install the bolts.
(32) Install the integrated power module, if previ-
ously removed. (Refer to 8 - ELECTRICAL/POWER
DISTRIBUTION/INTEGRATED POWER MODULE -
INSTALLATION)
(33) Install the air cleaner bracket and air cleaner,
if previously removed. (Refer to 9 - ENGINE/AIR
INTAKE SYSTEM/AIR CLEANER ELEMENT -
INSTALLATION)
(34) Install the radiator assembly. (Refer to 7 -
COOLING/ENGINE/RADIATOR - INSTALLATION)
(35) Install the A/C lines, if previously removed.
Refer to the Heating and Air Conditioning section of
the manual for the recommended procedures.
(36) Install the A/C condenser, if previously
removed. (Refer to 24 - HEATING & AIR CONDI-
TIONING/PLUMBING/A/C CONDENSER - INSTAL-
LATION)
(37) Install the fender. (Refer to 23 - BODY/EXTE-
RIOR/FRONT FENDER - INSTALLATION)
(38) Install the front wheelhouse splash shield.
(Refer to 23 - BODY/EXTERIOR/FRONT WHEEL-
HOUSE SPLASH SHIELD - INSTALLATION)
(39) Reconnect the battery ground.
13 - 12 FRAMES & BUMPERSDR
FRAME (Continued)
Page 1556 of 2627

STANDARD PROCEDURE - REAR FRAME
H-SECTION REPLACEMENT
CAUTION: This procedure is designed to replace
the H-section/spare tire support located at the rear
of the frame assembly. Prior to any cutting, the
vehicle must be mounted on the appropriate frame
repair equipment (ªframe rackº), checked with three
dimensional measuring equipment, and the neces-
sary pull corrections made. If damage remains in
the frame beyond the area covered by this service
part after the pull, the frame must be replaced in its
entirety.
(1) Before proceding with this repair procedure
review the required service warnings and precau-
tions. (Refer to 13 - FRAME & BUMPERS/FRAME -
WARNING)
(2) Disconnect and isolate the battery negative
cable.
(3) Remove the cargo box. (Refer to 23 - BODY/EX-
TERIOR/CARGO BOX - REMOVAL)
(4) Remove the trailer hitch. (Refer to 13 - FRAME
& BUMPERS/FRAME/TRAILER HITCH -
REMOVAL)
(5) Raise and support the frame so the tires are off
floor.(6) Remove the shock absorbers. (Refer to 2 - SUS-
PENSION/REAR/SHOCK - REMOVAL)
(7) Remove the rear leaf spring shackle bolts and
let the axle rest on the ground. (Fig. 20)
(8) Remove the spare wheel.
Fig. 19 ENGINE COMPARTMENT/FRONT STRUCTURE
Fig. 20 REAR SPRING
1 - SPRING SHACKLE
2 - LEAF SPRING EYE BOLT/NUT
3 - REAR LEAF SPRING
DRFRAMES & BUMPERS 13 - 13
FRAME (Continued)
Page 1557 of 2627
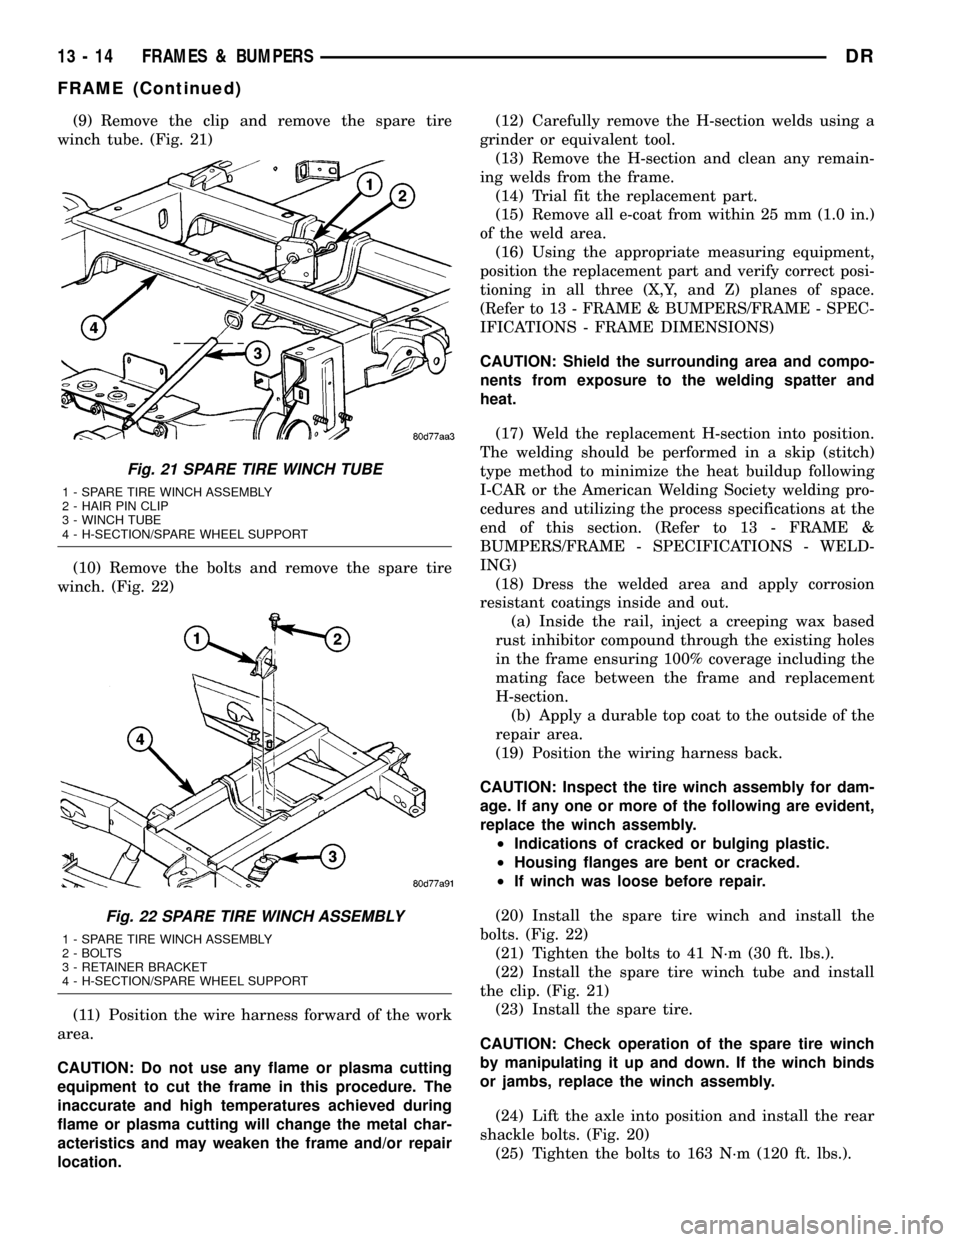
(9) Remove the clip and remove the spare tire
winch tube. (Fig. 21)
(10) Remove the bolts and remove the spare tire
winch. (Fig. 22)
(11) Position the wire harness forward of the work
area.
CAUTION: Do not use any flame or plasma cutting
equipment to cut the frame in this procedure. The
inaccurate and high temperatures achieved during
flame or plasma cutting will change the metal char-
acteristics and may weaken the frame and/or repair
location.(12) Carefully remove the H-section welds using a
grinder or equivalent tool.
(13) Remove the H-section and clean any remain-
ing welds from the frame.
(14) Trial fit the replacement part.
(15) Remove all e-coat from within 25 mm (1.0 in.)
of the weld area.
(16) Using the appropriate measuring equipment,
position the replacement part and verify correct posi-
tioning in all three (X,Y, and Z) planes of space.
(Refer to 13 - FRAME & BUMPERS/FRAME - SPEC-
IFICATIONS - FRAME DIMENSIONS)
CAUTION: Shield the surrounding area and compo-
nents from exposure to the welding spatter and
heat.
(17) Weld the replacement H-section into position.
The welding should be performed in a skip (stitch)
type method to minimize the heat buildup following
I-CAR or the American Welding Society welding pro-
cedures and utilizing the process specifications at the
end of this section. (Refer to 13 - FRAME &
BUMPERS/FRAME - SPECIFICATIONS - WELD-
ING)
(18) Dress the welded area and apply corrosion
resistant coatings inside and out.
(a) Inside the rail, inject a creeping wax based
rust inhibitor compound through the existing holes
in the frame ensuring 100% coverage including the
mating face between the frame and replacement
H-section.
(b) Apply a durable top coat to the outside of the
repair area.
(19) Position the wiring harness back.
CAUTION: Inspect the tire winch assembly for dam-
age. If any one or more of the following are evident,
replace the winch assembly.
²Indications of cracked or bulging plastic.
²Housing flanges are bent or cracked.
²If winch was loose before repair.
(20) Install the spare tire winch and install the
bolts. (Fig. 22)
(21) Tighten the bolts to 41 N´m (30 ft. lbs.).
(22) Install the spare tire winch tube and install
the clip. (Fig. 21)
(23) Install the spare tire.
CAUTION: Check operation of the spare tire winch
by manipulating it up and down. If the winch binds
or jambs, replace the winch assembly.
(24) Lift the axle into position and install the rear
shackle bolts. (Fig. 20)
(25) Tighten the bolts to 163 N´m (120 ft. lbs.).
Fig. 21 SPARE TIRE WINCH TUBE
1 - SPARE TIRE WINCH ASSEMBLY
2 - HAIR PIN CLIP
3 - WINCH TUBE
4 - H-SECTION/SPARE WHEEL SUPPORT
Fig. 22 SPARE TIRE WINCH ASSEMBLY
1 - SPARE TIRE WINCH ASSEMBLY
2 - BOLTS
3 - RETAINER BRACKET
4 - H-SECTION/SPARE WHEEL SUPPORT
13 - 14 FRAMES & BUMPERSDR
FRAME (Continued)
Page 1558 of 2627
(26) Install the lower shock absorber bolts. (Refer
to 2 - SUSPENSION/REAR/SHOCK - INSTALLA-
TION)
(27) Install the trailer hitch. (Refer to 13 - FRAME
& BUMPERS/FRAME/TRAILER HITCH - INSTAL-
LATION)(28) Install the cargo box. (Refer to 23 - BODY/EX-
TERIOR/CARGO BOX - INSTALLATION)
(29) Reconnect the battery ground.
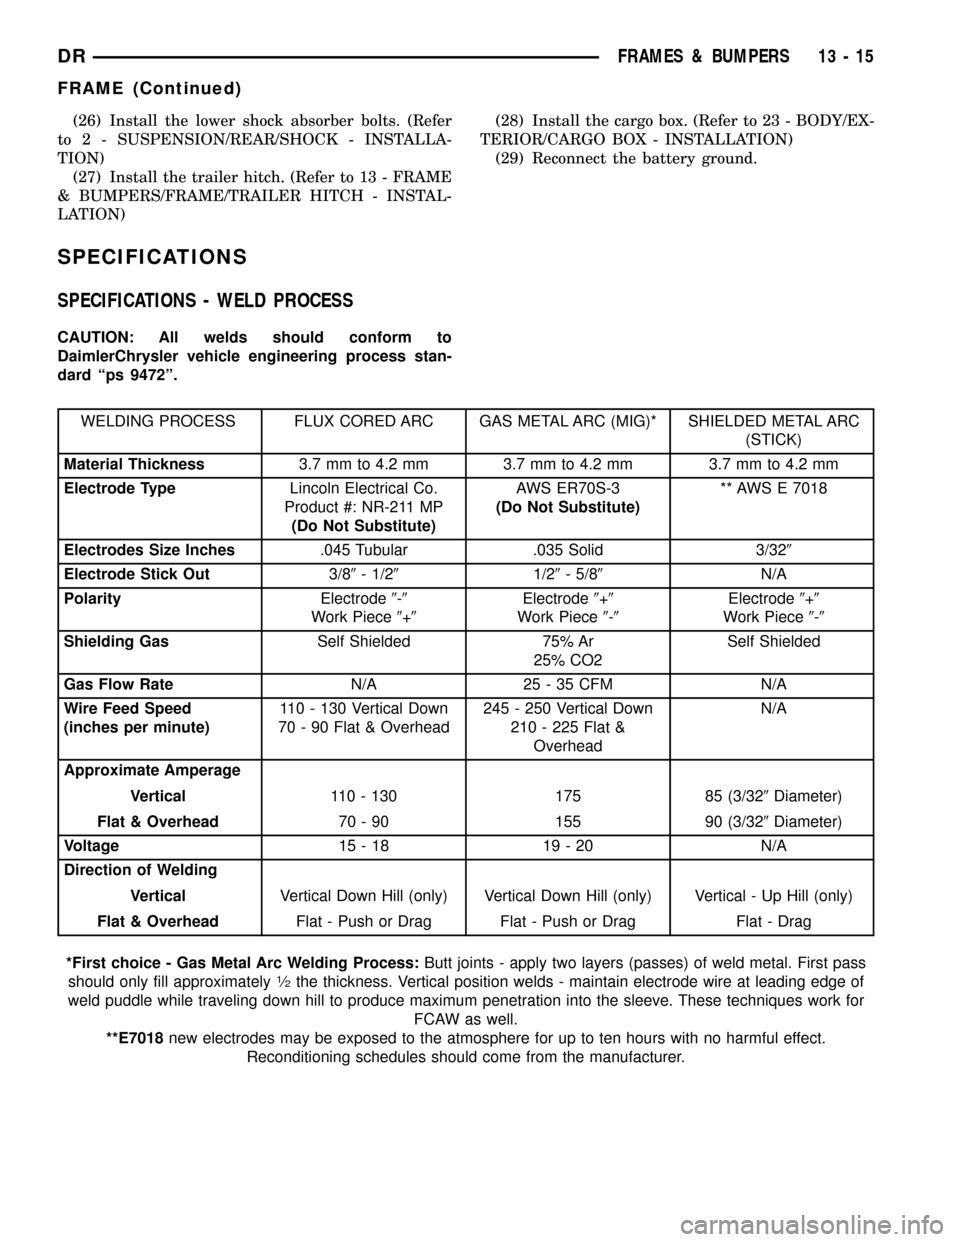
SPECIFICATIONS
SPECIFICATIONS - WELD PROCESS
CAUTION: All welds should conform to
DaimlerChrysler vehicle engineering process stan-
dard ªps 9472º.
WELDING PROCESS FLUX CORED ARC GAS METAL ARC (MIG)* SHIELDED METAL ARC
(STICK)
Material Thickness3.7 mm to 4.2 mm 3.7 mm to 4.2 mm 3.7 mm to 4.2 mm
Electrode TypeLincoln Electrical Co.
Product #: NR-211 MP
(Do Not Substitute)AWS ER70S-3
(Do Not Substitute)** AWS E 7018
Electrodes Size Inches.045 Tubular .035 Solid 3/329
Electrode Stick Out3/89- 1/291/29- 5/89N/A
PolarityElectrode9-9
Work Piece9+9Electrode9+9
Work Piece9-9Electrode9+9
Work Piece9-9
Shielding GasSelf Shielded 75% Ar
25% CO2Self Shielded
Gas Flow RateN/A 25 - 35 CFM N/A
Wire Feed Speed
(inches per minute)110 - 130 Vertical Down
70 - 90 Flat & Overhead245 - 250 Vertical Down
210 - 225 Flat &
OverheadN/A
Approximate Amperage
Vertical110 - 130 175 85 (3/329Diameter)
Flat & Overhead70 - 90 155 90 (3/329Diameter)
Voltage15-18 19-20 N/A
Direction of Welding
VerticalVertical Down Hill (only) Vertical Down Hill (only) Vertical - Up Hill (only)
Flat & OverheadFlat - Push or Drag Flat - Push or Drag Flat - Drag
*First choice - Gas Metal Arc Welding Process:Butt joints - apply two layers (passes) of weld metal. First pass
should only fill approximately
1¤2the thickness. Vertical position welds - maintain electrode wire at leading edge of
weld puddle while traveling down hill to produce maximum penetration into the sleeve. These techniques work for
FCAW as well.
**E7018new electrodes may be exposed to the atmosphere for up to ten hours with no harmful effect.
Reconditioning schedules should come from the manufacturer.
DRFRAMES & BUMPERS 13 - 15
FRAME (Continued)
Page 1559 of 2627
SPECIFICATIONS - FRAME DIMENSIONS
NOTE: Frame dimensions are listed in metric scale.
All dimensions are from center to center of Princi-
pal Locating Point (PLP), or from center to center of
PLP and fastener location.
VEHICLE PREPARATION
Position the vehicle on a level work surface. Using
screw or bottle jacks, adjust the vehicle PLP heights
to the specified dimension above a level work surface.
Vertical dimensions can be taken from the work sur-
face to the locations indicated were applicable.
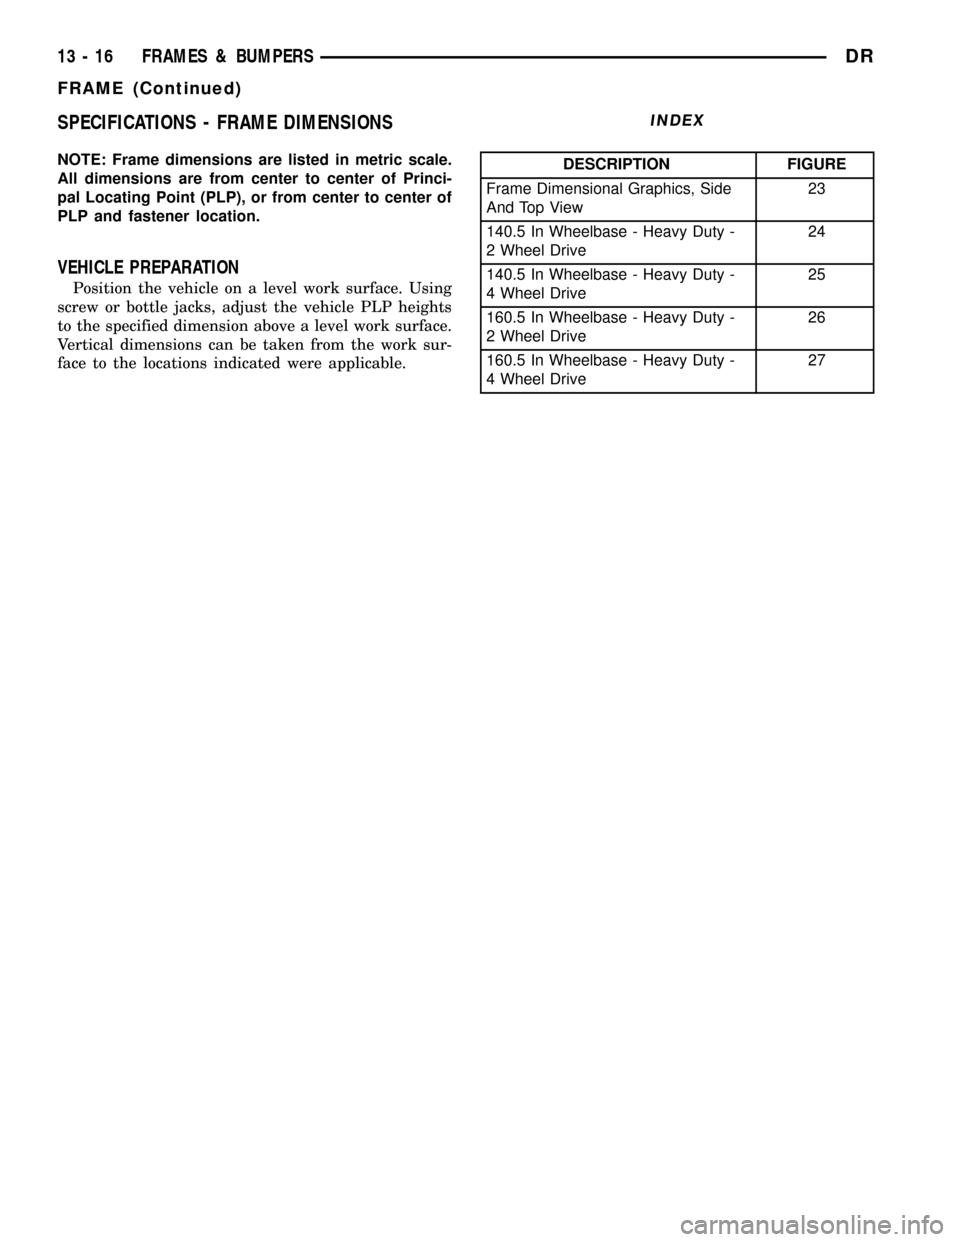
INDEX
DESCRIPTION FIGURE
Frame Dimensional Graphics, Side
And Top View23
140.5 In Wheelbase - Heavy Duty -
2 Wheel Drive24
140.5 In Wheelbase - Heavy Duty -
4 Wheel Drive25
160.5 In Wheelbase - Heavy Duty -
2 Wheel Drive26
160.5 In Wheelbase - Heavy Duty -
4 Wheel Drive27
13 - 16 FRAMES & BUMPERSDR
FRAME (Continued)
Page 1560 of 2627

Fig. 23 FRAME DIMENSIONS
DRFRAMES & BUMPERS 13 - 17
FRAME (Continued)