shaft DODGE RAM 2001 Service User Guide
[x] Cancel search | Manufacturer: DODGE, Model Year: 2001, Model line: RAM, Model: DODGE RAM 2001Pages: 2889, PDF Size: 68.07 MB
Page 74 of 2889
DIFFERENTIAL & DRIVELINE
TABLE OF CONTENTS
page page
PROPELLER SHAFT.......................1
FRONT AXLE - 216FBI....................12
FRONT AXLE - 248FBI....................45
REAR AXLE-91/4.......................77REAR AXLE - 248RBI....................109
REAR AXLE - 267RBI....................140
REAR AXLE - 286RBI....................169
PROPELLER SHAFT
TABLE OF CONTENTS
page page
PROPELLER SHAFT
DESCRIPTION............................1
OPERATION.............................1
DIAGNOSIS AND TESTING..................3
PROPELLER SHAFT.....................3
STANDARD PROCEDURE...................5
SPECIFICATIONS.........................8
SPECIAL TOOLS..........................8
PROPELLER SHAFT - FRONT
REMOVAL...............................8
INSTALLATION............................8PROPELLER SHAFT - REAR
REMOVAL...............................9
INSTALLATION............................9
CENTER BEARING
DESCRIPTION...........................10
OPERATION.............................10
REMOVAL..............................10
INSTALLATION...........................10
ADJUSTMENTS..........................10
SINGLE CARDAN UNIVERSAL JOINTS
DISASSEMBLY...........................11
PROPELLER SHAFT
DESCRIPTION
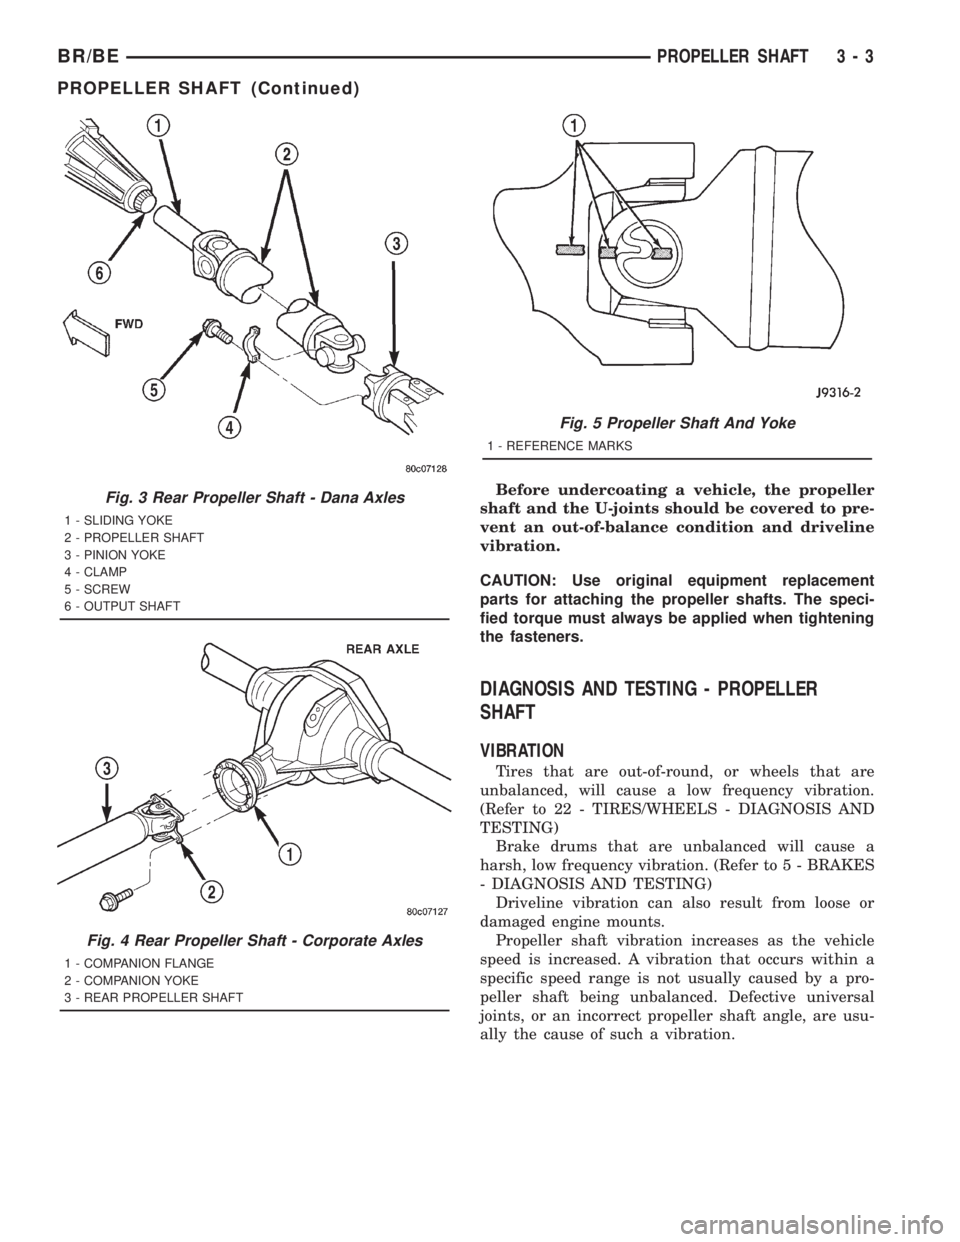
A propeller shaft (Fig. 1), (Fig. 2), (Fig. 3), and
(Fig. 4) is a shaft which connects the transmission/
transfer case to the axle differential. This is the link
through which the engine power is transmitted to the
axle.
The propeller shaft is designed and built with the
yoke lugs in line with each other which is called zero
phasing. This design produces the smoothest running
condition, an out-of-phase shaft can cause a vibra-
tion.
Tubular propeller shafts are balanced by the man-
ufacturer with weights spot welded to the tube.
Use the exact replacement parts when installing
the propeller shafts. The use of the correct replace-
ment parts helps to ensure safe operation. All fasten-
ers must be torqued to the specified values for safe
operation.Also make alignment reference marks (Fig. 5)on
the propeller shaft yoke and axle, or transmission,
yoke prior to servicing. This helps to eliminate possi-
ble vibration.
CAUTION: Do not allow the propeller shaft to drop
or hang from any propeller shaft joint during
removal. Attach the propeller shaft to the vehicle
underside with wire to prevent damage to the joints.
OPERATION
The propeller shaft must operate through con-
stantly changing relative angles between the trans-
mission and axle. It must also be capable of changing
length while transmitting torque. The axle rides sus-
pended by springs in a floating motion. The propeller
shaft must be able to change operating angles when
going over various road surfaces. This is accom-
plished through universal joints, which permit the
propeller shaft to operate at different angles. The slip
joints (or yokes) permit contraction or expansion.
BR/BEDIFFERENTIAL & DRIVELINE 3 - 1
Page 75 of 2889
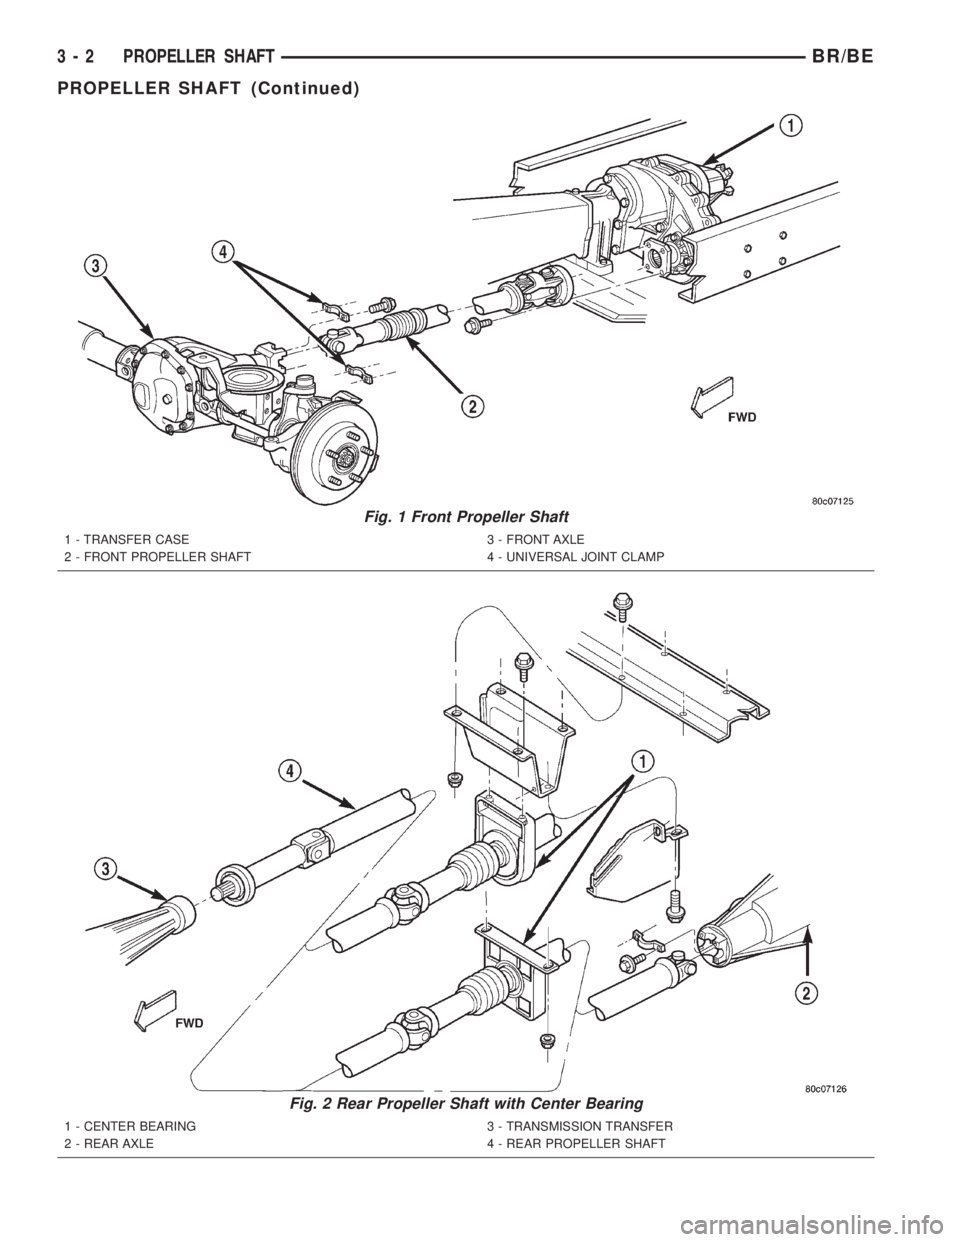
Fig. 1 Front Propeller Shaft
1 - TRANSFER CASE
2 - FRONT PROPELLER SHAFT3 - FRONT AXLE
4 - UNIVERSAL JOINT CLAMP
Fig. 2 Rear Propeller Shaft with Center Bearing
1 - CENTER BEARING
2 - REAR AXLE3 - TRANSMISSION TRANSFER
4 - REAR PROPELLER SHAFT
3 - 2 PROPELLER SHAFTBR/BE
PROPELLER SHAFT (Continued)
Page 76 of 2889
Before undercoating a vehicle, the propeller
shaft and the U-joints should be covered to pre-
vent an out-of-balance condition and driveline
vibration.
CAUTION: Use original equipment replacement
parts for attaching the propeller shafts. The speci-
fied torque must always be applied when tightening
the fasteners.
DIAGNOSIS AND TESTING - PROPELLER
SHAFT
VIBRATION
Tires that are out-of-round, or wheels that are
unbalanced, will cause a low frequency vibration.
(Refer to 22 - TIRES/WHEELS - DIAGNOSIS AND
TESTING)
Brake drums that are unbalanced will cause a
harsh, low frequency vibration. (Refer to 5 - BRAKES
- DIAGNOSIS AND TESTING)
Driveline vibration can also result from loose or
damaged engine mounts.
Propeller shaft vibration increases as the vehicle
speed is increased. A vibration that occurs within a
specific speed range is not usually caused by a pro-
peller shaft being unbalanced. Defective universal
joints, or an incorrect propeller shaft angle, are usu-
ally the cause of such a vibration.
Fig. 3 Rear Propeller Shaft - Dana Axles
1 - SLIDING YOKE
2 - PROPELLER SHAFT
3 - PINION YOKE
4 - CLAMP
5 - SCREW
6 - OUTPUT SHAFT
Fig. 4 Rear Propeller Shaft - Corporate Axles
1 - COMPANION FLANGE
2 - COMPANION YOKE
3 - REAR PROPELLER SHAFT
Fig. 5 Propeller Shaft And Yoke
1 - REFERENCE MARKS
BR/BEPROPELLER SHAFT 3 - 3
PROPELLER SHAFT (Continued)
Page 77 of 2889
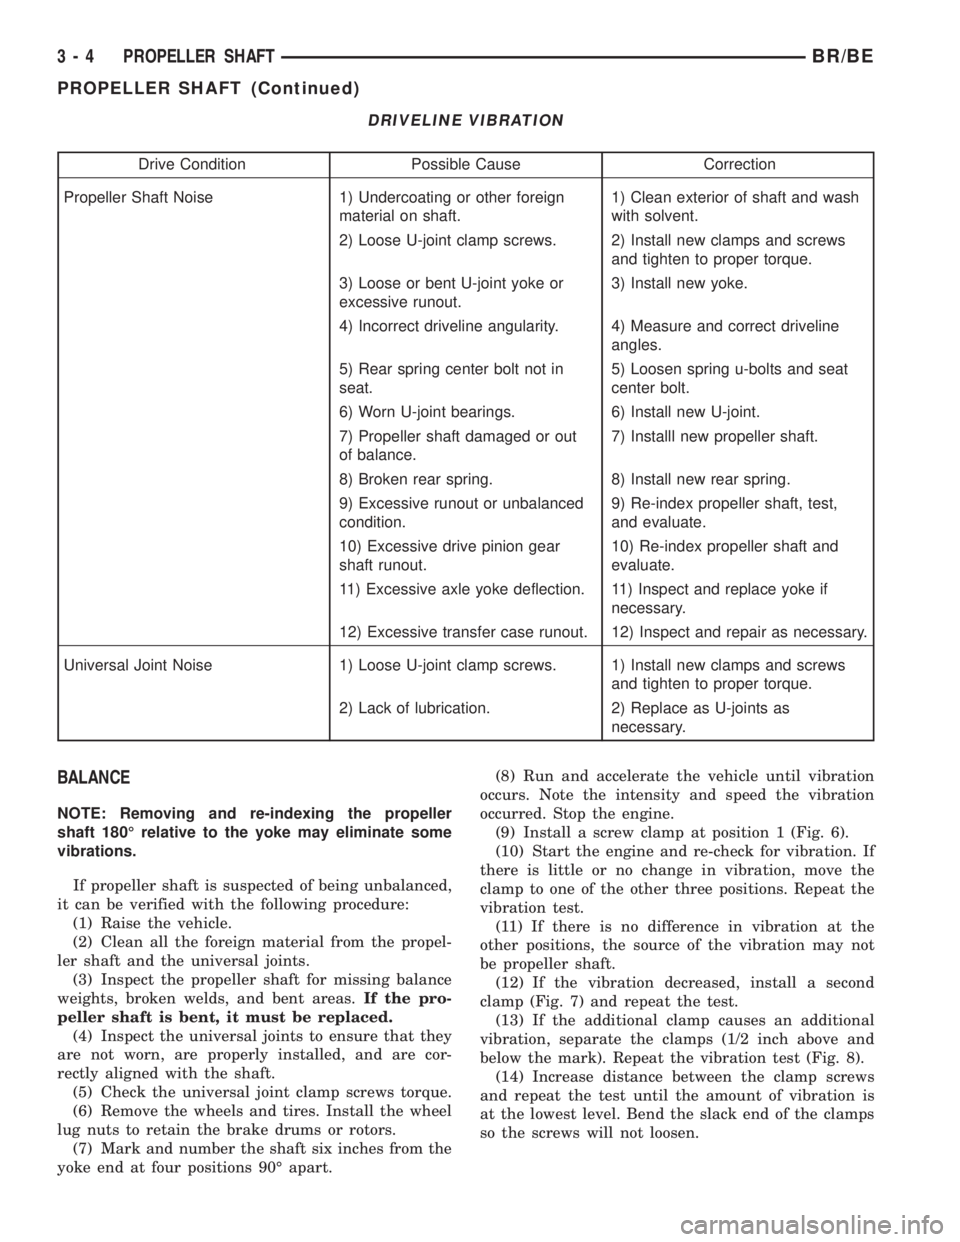
DRIVELINE VIBRATION
Drive Condition Possible Cause Correction
Propeller Shaft Noise 1) Undercoating or other foreign
material on shaft.1) Clean exterior of shaft and wash
with solvent.
2) Loose U-joint clamp screws. 2) Install new clamps and screws
and tighten to proper torque.
3) Loose or bent U-joint yoke or
excessive runout.3) Install new yoke.
4) Incorrect driveline angularity. 4) Measure and correct driveline
angles.
5) Rear spring center bolt not in
seat.5) Loosen spring u-bolts and seat
center bolt.
6) Worn U-joint bearings. 6) Install new U-joint.
7) Propeller shaft damaged or out
of balance.7) Installl new propeller shaft.
8) Broken rear spring. 8) Install new rear spring.
9) Excessive runout or unbalanced
condition.9) Re-index propeller shaft, test,
and evaluate.
10) Excessive drive pinion gear
shaft runout.10) Re-index propeller shaft and
evaluate.
11) Excessive axle yoke deflection. 11) Inspect and replace yoke if
necessary.
12) Excessive transfer case runout. 12) Inspect and repair as necessary.
Universal Joint Noise 1) Loose U-joint clamp screws. 1) Install new clamps and screws
and tighten to proper torque.
2) Lack of lubrication. 2) Replace as U-joints as
necessary.
BALANCE
NOTE: Removing and re-indexing the propeller
shaft 180É relative to the yoke may eliminate some
vibrations.
If propeller shaft is suspected of being unbalanced,
it can be verified with the following procedure:
(1) Raise the vehicle.
(2) Clean all the foreign material from the propel-
ler shaft and the universal joints.
(3) Inspect the propeller shaft for missing balance
weights, broken welds, and bent areas.If the pro-
peller shaft is bent, it must be replaced.
(4) Inspect the universal joints to ensure that they
are not worn, are properly installed, and are cor-
rectly aligned with the shaft.
(5) Check the universal joint clamp screws torque.
(6) Remove the wheels and tires. Install the wheel
lug nuts to retain the brake drums or rotors.
(7) Mark and number the shaft six inches from the
yoke end at four positions 90É apart.(8) Run and accelerate the vehicle until vibration
occurs. Note the intensity and speed the vibration
occurred. Stop the engine.
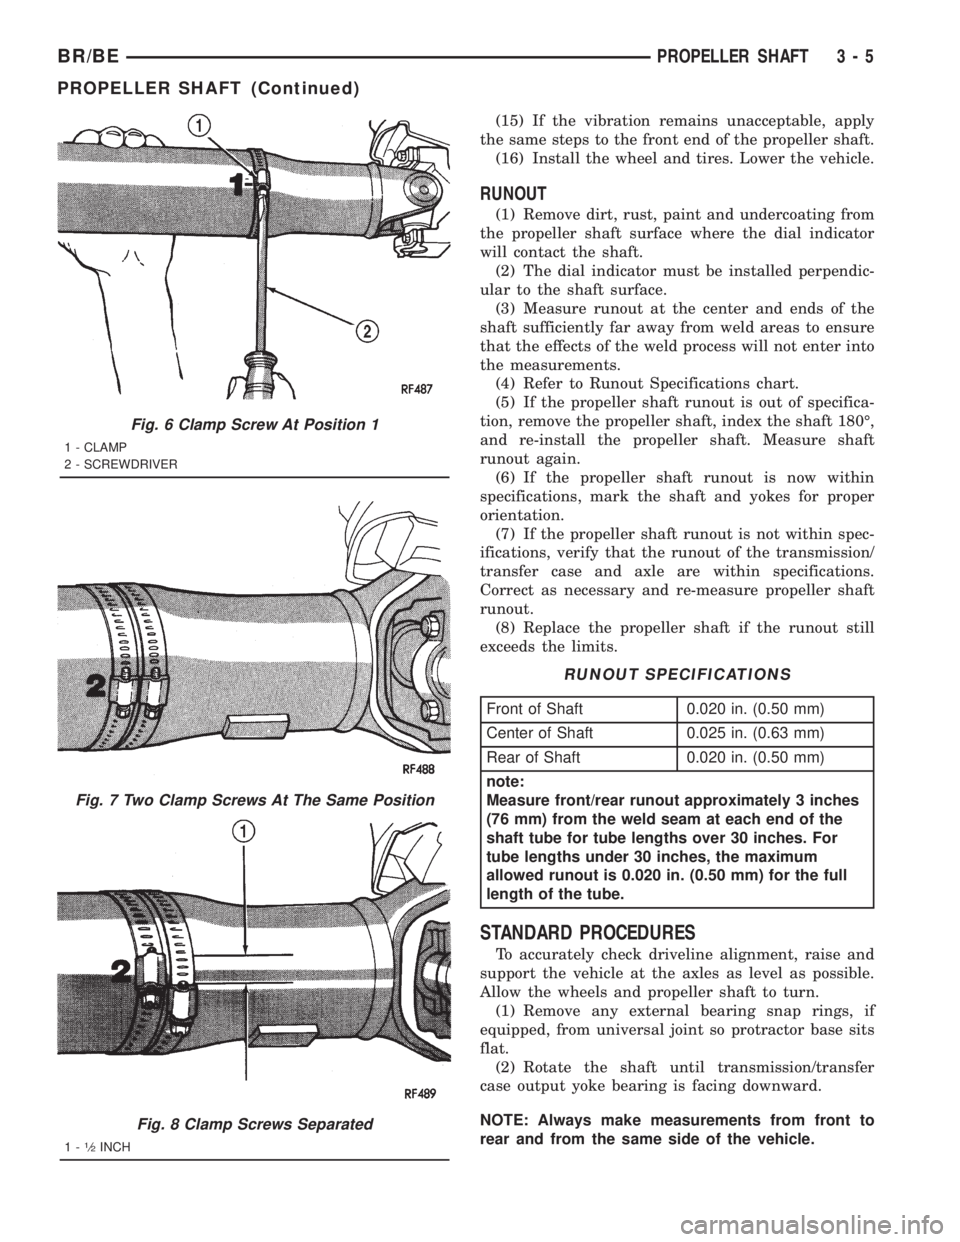
(9) Install a screw clamp at position 1 (Fig. 6).
(10) Start the engine and re-check for vibration. If
there is little or no change in vibration, move the
clamp to one of the other three positions. Repeat the
vibration test.
(11) If there is no difference in vibration at the
other positions, the source of the vibration may not
be propeller shaft.
(12) If the vibration decreased, install a second
clamp (Fig. 7) and repeat the test.
(13) If the additional clamp causes an additional
vibration, separate the clamps (1/2 inch above and
below the mark). Repeat the vibration test (Fig. 8).
(14) Increase distance between the clamp screws
and repeat the test until the amount of vibration is
at the lowest level. Bend the slack end of the clamps
so the screws will not loosen.
3 - 4 PROPELLER SHAFTBR/BE
PROPELLER SHAFT (Continued)
Page 78 of 2889
(15) If the vibration remains unacceptable, apply
the same steps to the front end of the propeller shaft.
(16) Install the wheel and tires. Lower the vehicle.
RUNOUT
(1) Remove dirt, rust, paint and undercoating from
the propeller shaft surface where the dial indicator
will contact the shaft.
(2) The dial indicator must be installed perpendic-
ular to the shaft surface.
(3) Measure runout at the center and ends of the
shaft sufficiently far away from weld areas to ensure
that the effects of the weld process will not enter into
the measurements.
(4) Refer to Runout Specifications chart.
(5) If the propeller shaft runout is out of specifica-
tion, remove the propeller shaft, index the shaft 180É,
and re-install the propeller shaft. Measure shaft
runout again.
(6) If the propeller shaft runout is now within
specifications, mark the shaft and yokes for proper
orientation.
(7) If the propeller shaft runout is not within spec-
ifications, verify that the runout of the transmission/
transfer case and axle are within specifications.
Correct as necessary and re-measure propeller shaft
runout.
(8) Replace the propeller shaft if the runout still
exceeds the limits.
RUNOUT SPECIFICATIONS
Front of Shaft 0.020 in. (0.50 mm)
Center of Shaft 0.025 in. (0.63 mm)
Rear of Shaft 0.020 in. (0.50 mm)
note:
Measure front/rear runout approximately 3 inches
(76 mm) from the weld seam at each end of the
shaft tube for tube lengths over 30 inches. For
tube lengths under 30 inches, the maximum
allowed runout is 0.020 in. (0.50 mm) for the full
length of the tube.
STANDARD PROCEDURES
To accurately check driveline alignment, raise and
support the vehicle at the axles as level as possible.
Allow the wheels and propeller shaft to turn.
(1) Remove any external bearing snap rings, if
equipped, from universal joint so protractor base sits
flat.
(2) Rotate the shaft until transmission/transfer
case output yoke bearing is facing downward.
NOTE: Always make measurements from front to
rear and from the same side of the vehicle.
Fig. 6 Clamp Screw At Position 1
1 - CLAMP
2 - SCREWDRIVER
Fig. 7 Two Clamp Screws At The Same Position
Fig. 8 Clamp Screws Separated
1-1¤2INCH
BR/BEPROPELLER SHAFT 3 - 5
PROPELLER SHAFT (Continued)
Page 79 of 2889
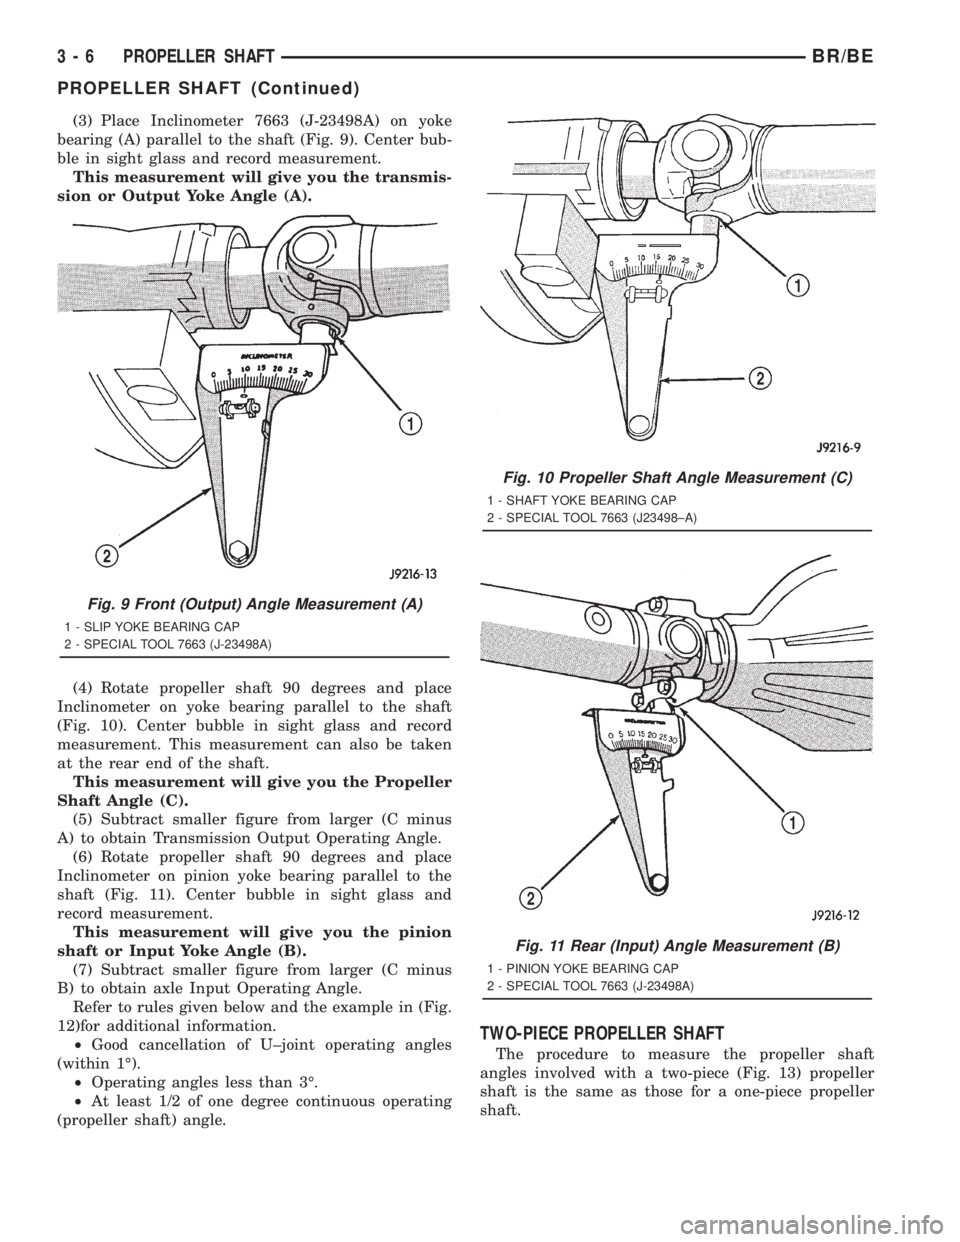
(3) Place Inclinometer 7663 (J-23498A) on yoke
bearing (A) parallel to the shaft (Fig. 9). Center bub-
ble in sight glass and record measurement.
This measurement will give you the transmis-
sion or Output Yoke Angle (A).
(4) Rotate propeller shaft 90 degrees and place
Inclinometer on yoke bearing parallel to the shaft
(Fig. 10). Center bubble in sight glass and record
measurement. This measurement can also be taken
at the rear end of the shaft.
This measurement will give you the Propeller
Shaft Angle (C).
(5) Subtract smaller figure from larger (C minus
A) to obtain Transmission Output Operating Angle.
(6) Rotate propeller shaft 90 degrees and place
Inclinometer on pinion yoke bearing parallel to the
shaft (Fig. 11). Center bubble in sight glass and
record measurement.
This measurement will give you the pinion
shaft or Input Yoke Angle (B).
(7) Subtract smaller figure from larger (C minus
B) to obtain axle Input Operating Angle.
Refer to rules given below and the example in (Fig.
12)for additional information.
²Good cancellation of U±joint operating angles
(within 1É).
²Operating angles less than 3É.
²At least 1/2 of one degree continuous operating
(propeller shaft) angle.
TWO-PIECE PROPELLER SHAFT
The procedure to measure the propeller shaft
angles involved with a two-piece (Fig. 13) propeller
shaft is the same as those for a one-piece propeller
shaft.
Fig. 9 Front (Output) Angle Measurement (A)
1 - SLIP YOKE BEARING CAP
2 - SPECIAL TOOL 7663 (J-23498A)
Fig. 10 Propeller Shaft Angle Measurement (C)
1 - SHAFT YOKE BEARING CAP
2 - SPECIAL TOOL 7663 (J23498±A)
Fig. 11 Rear (Input) Angle Measurement (B)
1 - PINION YOKE BEARING CAP
2 - SPECIAL TOOL 7663 (J-23498A)
3 - 6 PROPELLER SHAFTBR/BE
PROPELLER SHAFT (Continued)
Page 80 of 2889

Fig. 12 Universal Joint Angle Example
1 - 4.9É Angle (C)
2 - 3.2É Angle (B)
3 - Input Yoke4 - 3.0É Angle (A)
5 - Output Yoke
Fig. 13 Universal Joint Angle Two-Piece Shaft
1 - YOKES MUST BE IN SAME PLANE
BR/BEPROPELLER SHAFT 3 - 7
PROPELLER SHAFT (Continued)
Page 81 of 2889
SPECIFICATIONS
PROPELLER SHAFT
TORQUE SPECIFICATIONS
DESCRIPTION N´m Ft. Lbs. In. Lbs.
Center Bearing Bolts 68 50 -
Front Shaft Flange Yoke 88 65 -
Front Shaft Axle Yoke 19 14 -
Rear Shaft 9 1/4 Axle 108 80 -
Rear Shaft Dana Axle 29 22 -
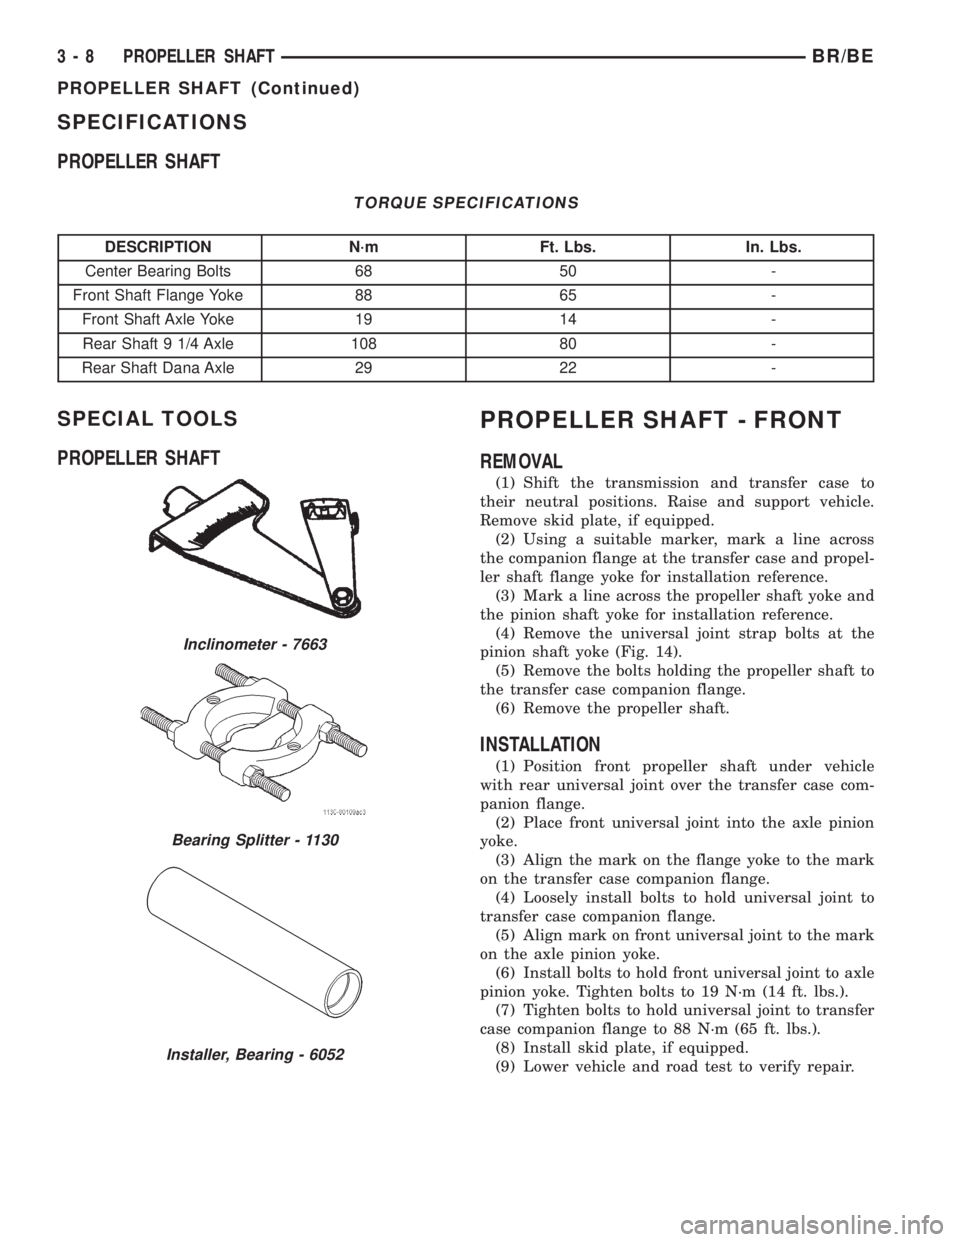
SPECIAL TOOLS
PROPELLER SHAFTPROPELLER SHAFT - FRONT
REMOVAL
(1) Shift the transmission and transfer case to
their neutral positions. Raise and support vehicle.
Remove skid plate, if equipped.
(2) Using a suitable marker, mark a line across
the companion flange at the transfer case and propel-
ler shaft flange yoke for installation reference.
(3) Mark a line across the propeller shaft yoke and
the pinion shaft yoke for installation reference.
(4) Remove the universal joint strap bolts at the
pinion shaft yoke (Fig. 14).
(5) Remove the bolts holding the propeller shaft to
the transfer case companion flange.
(6) Remove the propeller shaft.
INSTALLATION
(1) Position front propeller shaft under vehicle
with rear universal joint over the transfer case com-
panion flange.
(2) Place front universal joint into the axle pinion
yoke.
(3) Align the mark on the flange yoke to the mark
on the transfer case companion flange.
(4) Loosely install bolts to hold universal joint to
transfer case companion flange.
(5) Align mark on front universal joint to the mark
on the axle pinion yoke.
(6) Install bolts to hold front universal joint to axle
pinion yoke. Tighten bolts to 19 N´m (14 ft. lbs.).
(7) Tighten bolts to hold universal joint to transfer
case companion flange to 88 N´m (65 ft. lbs.).
(8) Install skid plate, if equipped.
(9) Lower vehicle and road test to verify repair.
Inclinometer - 7663
Bearing Splitter - 1130
Installer, Bearing - 6052
3 - 8 PROPELLER SHAFTBR/BE
PROPELLER SHAFT (Continued)
Page 82 of 2889
PROPELLER SHAFT - REAR
REMOVAL
(1) Raise and support vehicle on safety stands.
(2) Shift the transmission to the Neutral position.
(3) Using a suitable marker, mark a line across
the axle pinion yoke, or companion flange, and the
propeller shaft, or flange yoke for installation refer-
ence.
(4) Using a suitable marker, mark the outline of
the center bearing on the frame crossmember for
installation reference, if equipped.
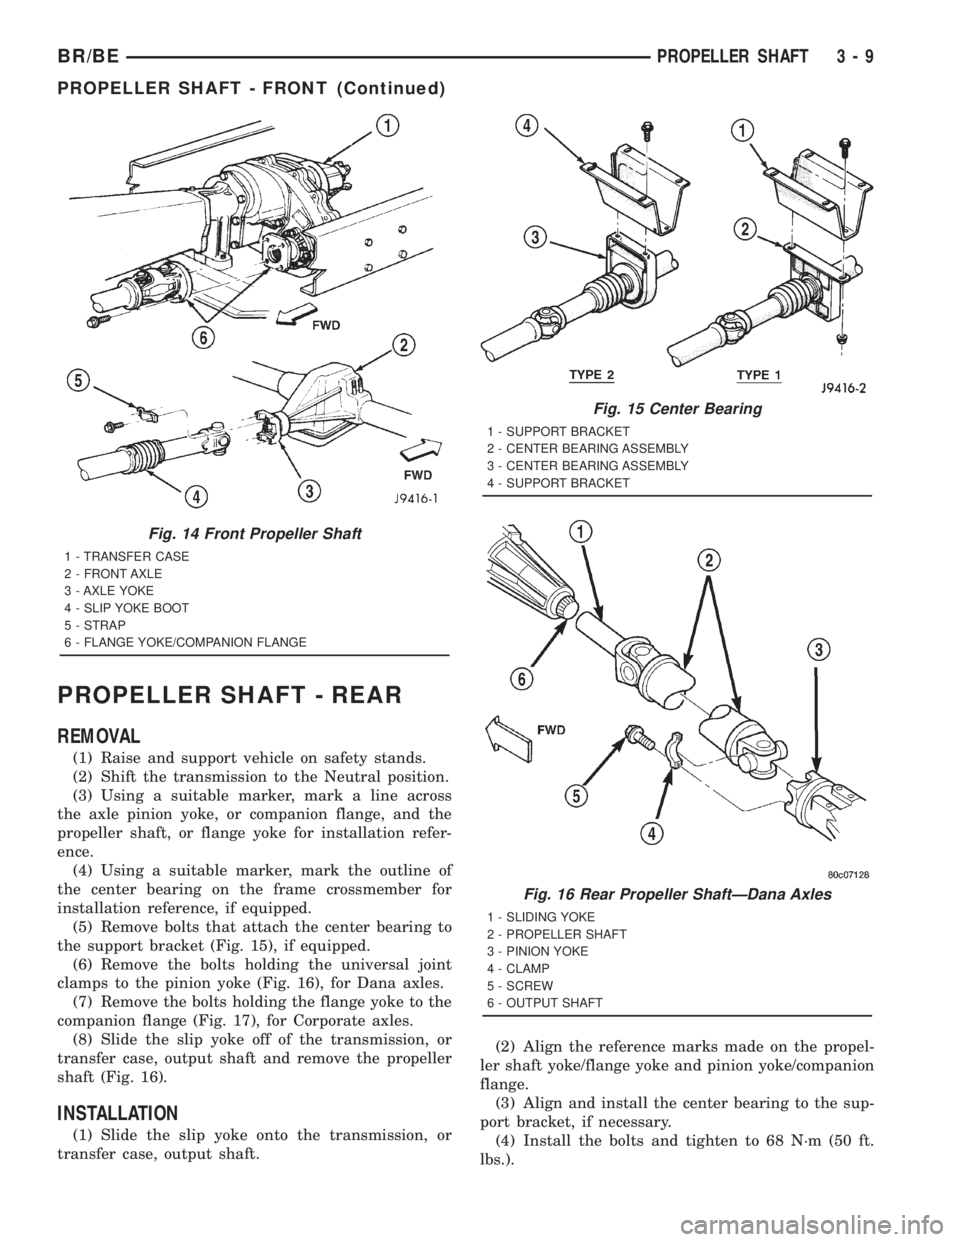
(5) Remove bolts that attach the center bearing to
the support bracket (Fig. 15), if equipped.
(6) Remove the bolts holding the universal joint
clamps to the pinion yoke (Fig. 16), for Dana axles.
(7) Remove the bolts holding the flange yoke to the
companion flange (Fig. 17), for Corporate axles.
(8) Slide the slip yoke off of the transmission, or
transfer case, output shaft and remove the propeller
shaft (Fig. 16).
INSTALLATION
(1) Slide the slip yoke onto the transmission, or
transfer case, output shaft.(2) Align the reference marks made on the propel-
ler shaft yoke/flange yoke and pinion yoke/companion
flange.
(3) Align and install the center bearing to the sup-
port bracket, if necessary.
(4) Install the bolts and tighten to 68 N´m (50 ft.
lbs.).
Fig. 14 Front Propeller Shaft
1 - TRANSFER CASE
2 - FRONT AXLE
3 - AXLE YOKE
4 - SLIP YOKE BOOT
5 - STRAP
6 - FLANGE YOKE/COMPANION FLANGE
Fig. 15 Center Bearing
1 - SUPPORT BRACKET
2 - CENTER BEARING ASSEMBLY
3 - CENTER BEARING ASSEMBLY
4 - SUPPORT BRACKET
Fig. 16 Rear Propeller ShaftÐDana Axles
1 - SLIDING YOKE
2 - PROPELLER SHAFT
3 - PINION YOKE
4 - CLAMP
5 - SCREW
6 - OUTPUT SHAFT
BR/BEPROPELLER SHAFT 3 - 9
PROPELLER SHAFT - FRONT (Continued)
Page 83 of 2889
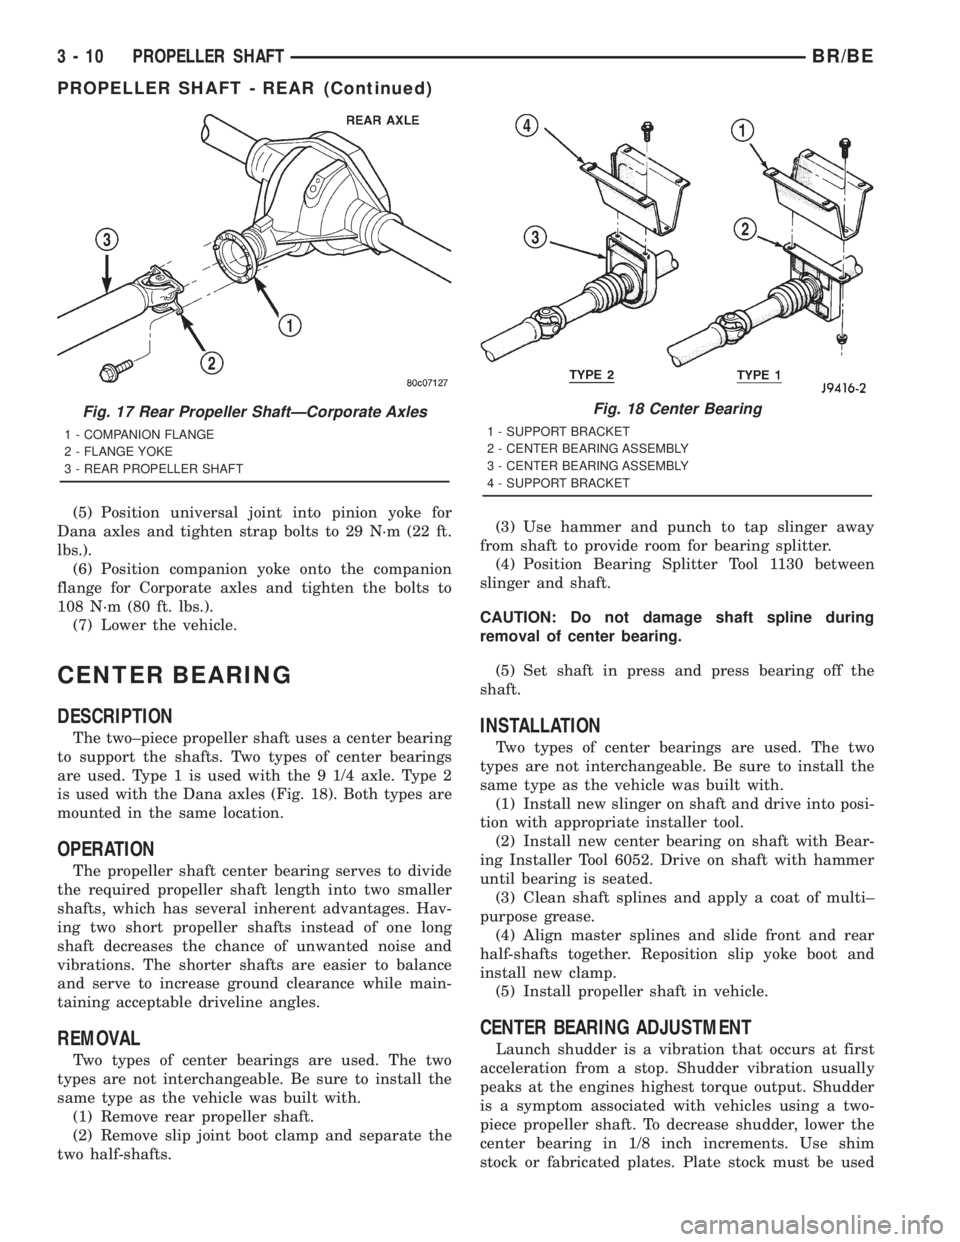
(5) Position universal joint into pinion yoke for
Dana axles and tighten strap bolts to 29 N´m (22 ft.
lbs.).
(6) Position companion yoke onto the companion
flange for Corporate axles and tighten the bolts to
108 N´m (80 ft. lbs.).
(7) Lower the vehicle.
CENTER BEARING
DESCRIPTION
The two±piece propeller shaft uses a center bearing
to support the shafts. Two types of center bearings
are used. Type 1 is used with the 9 1/4 axle. Type 2
is used with the Dana axles (Fig. 18). Both types are
mounted in the same location.
OPERATION
The propeller shaft center bearing serves to divide
the required propeller shaft length into two smaller
shafts, which has several inherent advantages. Hav-
ing two short propeller shafts instead of one long
shaft decreases the chance of unwanted noise and
vibrations. The shorter shafts are easier to balance
and serve to increase ground clearance while main-
taining acceptable driveline angles.
REMOVAL
Two types of center bearings are used. The two
types are not interchangeable. Be sure to install the
same type as the vehicle was built with.
(1) Remove rear propeller shaft.
(2) Remove slip joint boot clamp and separate the
two half-shafts.(3) Use hammer and punch to tap slinger away
from shaft to provide room for bearing splitter.
(4) Position Bearing Splitter Tool 1130 between
slinger and shaft.
CAUTION: Do not damage shaft spline during
removal of center bearing.
(5) Set shaft in press and press bearing off the
shaft.
INSTALLATION
Two types of center bearings are used. The two
types are not interchangeable. Be sure to install the
same type as the vehicle was built with.
(1) Install new slinger on shaft and drive into posi-
tion with appropriate installer tool.
(2) Install new center bearing on shaft with Bear-
ing Installer Tool 6052. Drive on shaft with hammer
until bearing is seated.
(3) Clean shaft splines and apply a coat of multi±
purpose grease.
(4) Align master splines and slide front and rear
half-shafts together. Reposition slip yoke boot and
install new clamp.
(5) Install propeller shaft in vehicle.
CENTER BEARING ADJUSTMENT
Launch shudder is a vibration that occurs at first
acceleration from a stop. Shudder vibration usually
peaks at the engines highest torque output. Shudder
is a symptom associated with vehicles using a two-
piece propeller shaft. To decrease shudder, lower the
center bearing in 1/8 inch increments. Use shim
stock or fabricated plates. Plate stock must be used
Fig. 17 Rear Propeller ShaftÐCorporate Axles
1 - COMPANION FLANGE
2 - FLANGE YOKE
3 - REAR PROPELLER SHAFT
Fig. 18 Center Bearing
1 - SUPPORT BRACKET
2 - CENTER BEARING ASSEMBLY
3 - CENTER BEARING ASSEMBLY
4 - SUPPORT BRACKET
3 - 10 PROPELLER SHAFTBR/BE
PROPELLER SHAFT - REAR (Continued)