brake rotor DODGE RAM 2002 Service User Guide
[x] Cancel search | Manufacturer: DODGE, Model Year: 2002, Model line: RAM, Model: DODGE RAM 2002Pages: 2255, PDF Size: 62.07 MB
Page 74 of 2255
(2) Secure axle to lifting device.
(3) Position the axle under the vehicle.
(4) Install springs, retainer clip and bolts.
(5) Raise axle and align it with the spring pads.
(6) Position upper and lower suspension arms in
the axle brackets. Install bolts, nuts and align the
suspension alignment cams to the reference marks.
Do not tighten at this time.
(7) Connect track bar to the axle bracket and
install the bolt. Do not tighten at this time.
(8) Install shock absorber and tighten bolts to 121
N´m (89 ft. lbs.).
(9) Install stabilizer bar link to the axle bracket.
Tighten the nut to 37 N´m (27 ft. lbs.).
(10) Install drag link and tie rod to the steering
knuckles and tighten the nuts to 88 N´m (65 ft. lbs.).
(11) Install ABS wheel speed sensors, if equipped.
Refer to 5 Brakes for procedures.
(12) Install rotors and brake calipers, refer to 5
Brakes for procedures.
(13) Connect the vent hose to the tube fitting.
(14) Connect vacuum hose and electrical connector
to disconnect housing.
(15) Install front propeller shaft.
(16) Check and add differential lubricant, if neces-
sary. Refer to Lubricant Specifications for lubricant
requirements.
(17) Install wheel and tire assemblies.
(18) Remove supports and lower the vehicle.
(19) Tighten upper suspension arm nuts at axle to
121 N´m (89 ft. lbs.). Tighten upper suspension arm
nuts at frame to 84 N´m (62 ft. lbs.).
(20) Tighten lower suspension arm nuts at axle to
84 N´m (62 ft. lbs.). Tighten the lower suspension
arm nuts at frame to 119 N´m (88 ft. lbs.).
(21) Tighten track bar bolt at the axle bracket to
176 N´m (130 ft. lbs.).
(22) Check front wheel alignment.
ADJUSTMENTS
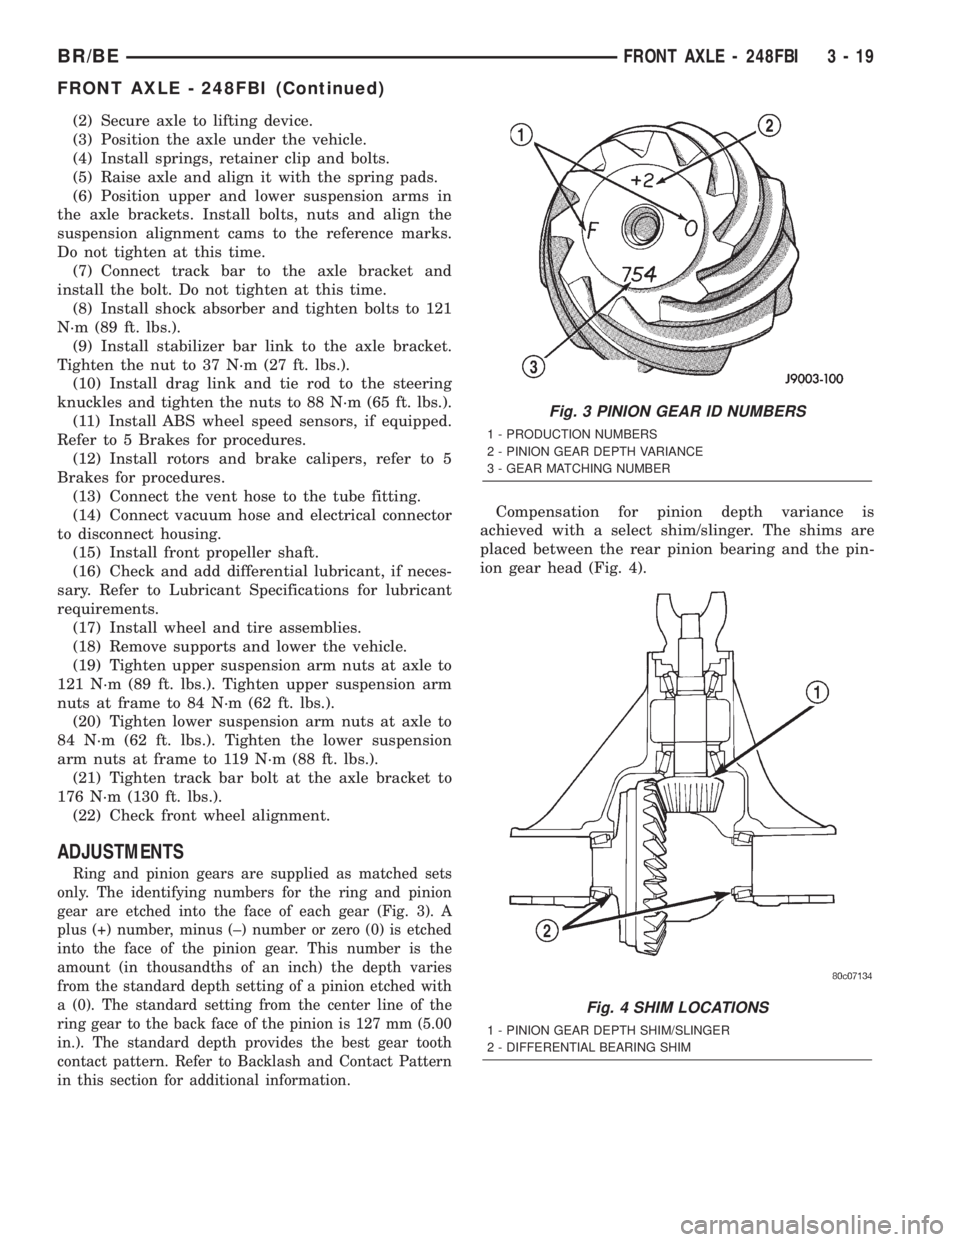
Ring and pinion gears are supplied as matched sets
only. The identifying numbers for the ring and pinion
gear are etched into the face of each gear (Fig. 3). A
plus (+) number, minus (±) number or zero (0) is etched
into the face of the pinion gear. This number is the
amount (in thousandths of an inch) the depth varies
from the standard depth setting of a pinion etched with
a (0). The standard setting from the center line of the
ring gear to the back face of the pinion is 127 mm (5.00
in.). The standard depth provides the best gear tooth
contact pattern. Refer to Backlash and Contact Pattern
in this section for additional information.
Compensation for pinion depth variance is
achieved with a select shim/slinger. The shims are
placed between the rear pinion bearing and the pin-
ion gear head (Fig. 4).
Fig. 3 PINION GEAR ID NUMBERS
1 - PRODUCTION NUMBERS
2 - PINION GEAR DEPTH VARIANCE
3 - GEAR MATCHING NUMBER
Fig. 4 SHIM LOCATIONS
1 - PINION GEAR DEPTH SHIM/SLINGER
2 - DIFFERENTIAL BEARING SHIM
BR/BEFRONT AXLE - 248FBI 3 - 19
FRONT AXLE - 248FBI (Continued)
Page 84 of 2255
AXLE SHAFTS
REMOVAL
(1) Raise and support the vehicle.
(2) Remove wheel and tire assembly.
(3) Remove brake caliper, rotor and ABS wheel
speed sensor if equipped. Refer to 5 Brakes for pro-
cedures.
(4) Remove the cotter pin and axle hub nut.
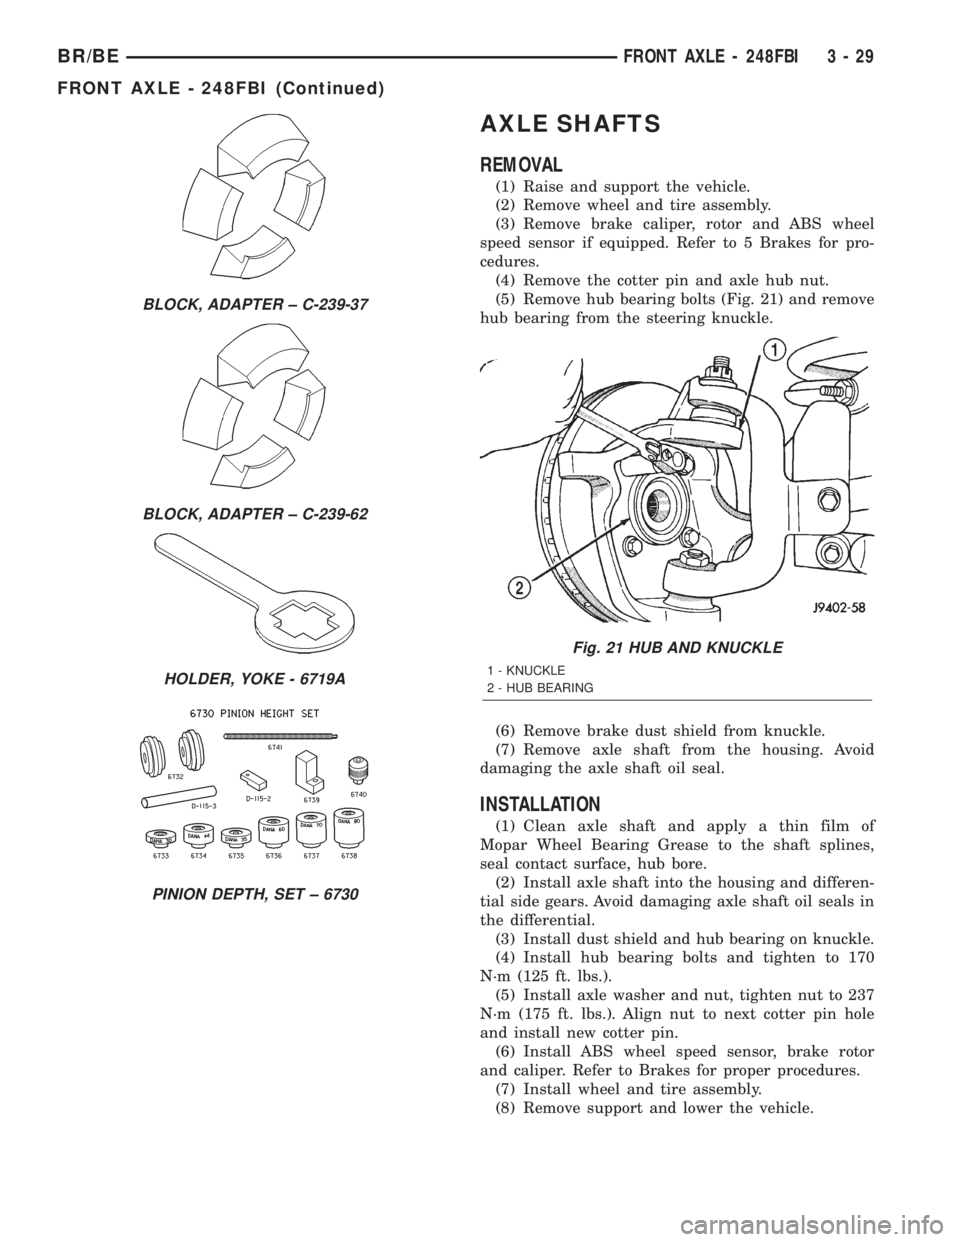
(5) Remove hub bearing bolts (Fig. 21) and remove
hub bearing from the steering knuckle.
(6) Remove brake dust shield from knuckle.
(7) Remove axle shaft from the housing. Avoid
damaging the axle shaft oil seal.
INSTALLATION
(1) Clean axle shaft and apply a thin film of
Mopar Wheel Bearing Grease to the shaft splines,
seal contact surface, hub bore.
(2) Install axle shaft into the housing and differen-
tial side gears. Avoid damaging axle shaft oil seals in
the differential.
(3) Install dust shield and hub bearing on knuckle.
(4) Install hub bearing bolts and tighten to 170
N´m (125 ft. lbs.).
(5) Install axle washer and nut, tighten nut to 237
N´m (175 ft. lbs.). Align nut to next cotter pin hole
and install new cotter pin.
(6) Install ABS wheel speed sensor, brake rotor
and caliper. Refer to Brakes for proper procedures.
(7) Install wheel and tire assembly.
(8) Remove support and lower the vehicle.
BLOCK, ADAPTER ± C-239-37
BLOCK, ADAPTER ± C-239-62
HOLDER, YOKE - 6719A
PINION DEPTH, SET ± 6730
Fig. 21 HUB AND KNUCKLE
1 - KNUCKLE
2 - HUB BEARING
BR/BEFRONT AXLE - 248FBI 3 - 29
FRONT AXLE - 248FBI (Continued)
Page 90 of 2255
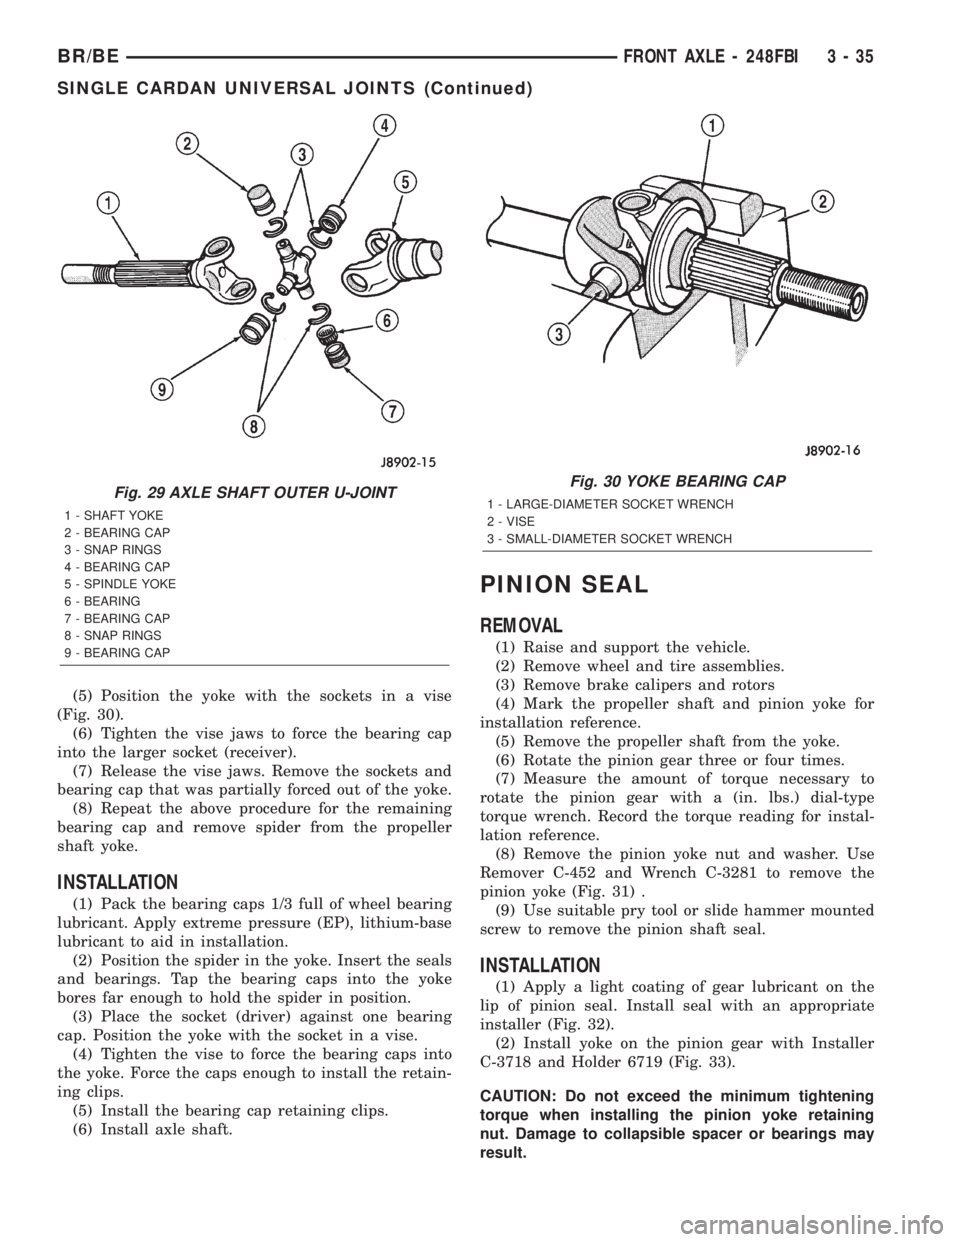
(5) Position the yoke with the sockets in a vise
(Fig. 30).
(6) Tighten the vise jaws to force the bearing cap
into the larger socket (receiver).
(7) Release the vise jaws. Remove the sockets and
bearing cap that was partially forced out of the yoke.
(8) Repeat the above procedure for the remaining
bearing cap and remove spider from the propeller
shaft yoke.
INSTALLATION
(1) Pack the bearing caps 1/3 full of wheel bearing
lubricant. Apply extreme pressure (EP), lithium-base
lubricant to aid in installation.
(2) Position the spider in the yoke. Insert the seals
and bearings. Tap the bearing caps into the yoke
bores far enough to hold the spider in position.
(3) Place the socket (driver) against one bearing
cap. Position the yoke with the socket in a vise.
(4) Tighten the vise to force the bearing caps into
the yoke. Force the caps enough to install the retain-
ing clips.
(5) Install the bearing cap retaining clips.
(6) Install axle shaft.
PINION SEAL
REMOVAL
(1) Raise and support the vehicle.
(2) Remove wheel and tire assemblies.
(3) Remove brake calipers and rotors
(4) Mark the propeller shaft and pinion yoke for
installation reference.
(5) Remove the propeller shaft from the yoke.
(6) Rotate the pinion gear three or four times.
(7) Measure the amount of torque necessary to
rotate the pinion gear with a (in. lbs.) dial-type
torque wrench. Record the torque reading for instal-
lation reference.
(8) Remove the pinion yoke nut and washer. Use
Remover C-452 and Wrench C-3281 to remove the
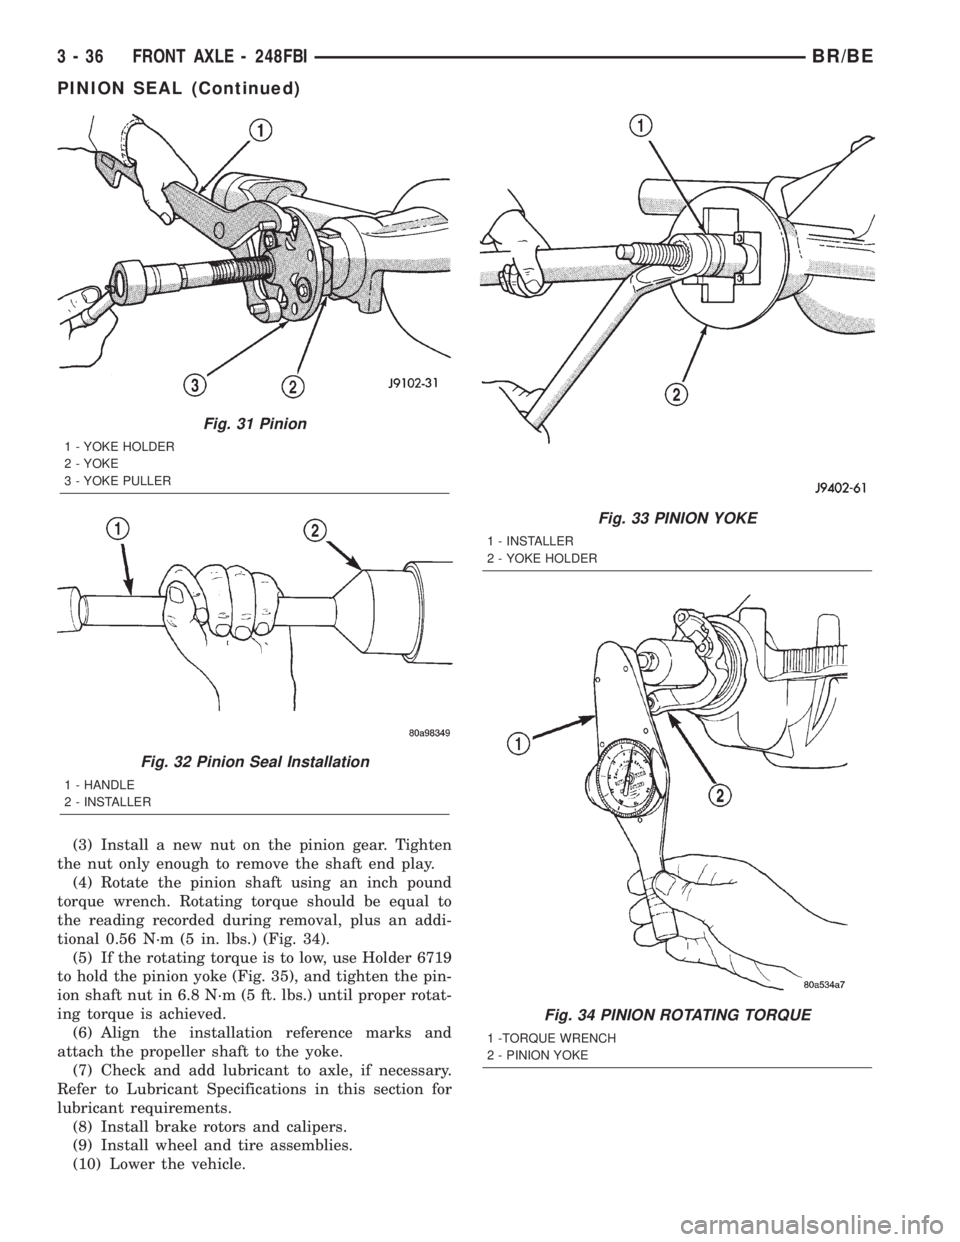
pinion yoke (Fig. 31) .
(9) Use suitable pry tool or slide hammer mounted
screw to remove the pinion shaft seal.
INSTALLATION
(1) Apply a light coating of gear lubricant on the
lip of pinion seal. Install seal with an appropriate
installer (Fig. 32).
(2) Install yoke on the pinion gear with Installer
C-3718 and Holder 6719 (Fig. 33).
CAUTION: Do not exceed the minimum tightening
torque when installing the pinion yoke retaining
nut. Damage to collapsible spacer or bearings may
result.
Fig. 29 AXLE SHAFT OUTER U-JOINT
1 - SHAFT YOKE
2 - BEARING CAP
3 - SNAP RINGS
4 - BEARING CAP
5 - SPINDLE YOKE
6 - BEARING
7 - BEARING CAP
8 - SNAP RINGS
9 - BEARING CAP
Fig. 30 YOKE BEARING CAP
1 - LARGE-DIAMETER SOCKET WRENCH
2 - VISE
3 - SMALL-DIAMETER SOCKET WRENCH
BR/BEFRONT AXLE - 248FBI 3 - 35
SINGLE CARDAN UNIVERSAL JOINTS (Continued)
Page 91 of 2255
(3) Install a new nut on the pinion gear. Tighten
the nut only enough to remove the shaft end play.
(4) Rotate the pinion shaft using an inch pound
torque wrench. Rotating torque should be equal to
the reading recorded during removal, plus an addi-
tional 0.56 N´m (5 in. lbs.) (Fig. 34).
(5) If the rotating torque is to low, use Holder 6719
to hold the pinion yoke (Fig. 35), and tighten the pin-
ion shaft nut in 6.8 N´m (5 ft. lbs.) until proper rotat-
ing torque is achieved.
(6) Align the installation reference marks and
attach the propeller shaft to the yoke.
(7) Check and add lubricant to axle, if necessary.
Refer to Lubricant Specifications in this section for
lubricant requirements.
(8) Install brake rotors and calipers.
(9) Install wheel and tire assemblies.
(10) Lower the vehicle.
Fig. 31 Pinion
1 - YOKE HOLDER
2 - YOKE
3 - YOKE PULLER
Fig. 32 Pinion Seal Installation
1 - HANDLE
2 - INSTALLER
Fig. 33 PINION YOKE
1 - INSTALLER
2 - YOKE HOLDER
Fig. 34 PINION ROTATING TORQUE
1 -TORQUE WRENCH
2 - PINION YOKE
3 - 36 FRONT AXLE - 248FBIBR/BE
PINION SEAL (Continued)
Page 190 of 2255
BRAKES
TABLE OF CONTENTS
page page
BRAKES - BASE........................... 1BRAKES - ABS........................... 35
BRAKES - BASE
TABLE OF CONTENTS
page page
BRAKES - BASE
SPECIFICATIONS
BASE BRAKE.........................2
TORQUE CHART......................3
SPECIAL TOOLS
BASE BRAKES........................4
HYDRAULIC/MECHANICAL
DESCRIPTION..........................4
WARNING.............................4
DIAGNOSIS AND TESTING - BASE BRAKE
SYSTEM.............................5
STANDARD PROCEDURE
STANDARD PROCEDURE - MANUAL
BLEEDING............................7
STANDARD PROCEDURE - PRESSURE
BLEEDING............................8
BRAKE LINES
STANDARD PROCEDURE
STANDARD PROCEDURE - DOUBLE
INVERTED FLARING....................8
STANDARD PROCEDURE - ISO FLARING . . . 8
COMBINATION VALVE
DESCRIPTION..........................8
OPERATION............................9
DIAGNOSIS AND TESTING - COMBINATION
VALVE ...............................9
REMOVAL.............................9
INSTALLATION..........................9
DISC BRAKE CALIPERS
DESCRIPTION.........................10
OPERATION...........................10
REMOVAL
REMOVAL - REAR.....................10
REMOVAL - FRONT....................11
DISASSEMBLY.........................11
CLEANING............................12
INSPECTION..........................12ASSEMBLY............................13
INSTALLATION
INSTALLATION - REAR.................14
INSTALLATION - FRONT................14
FLUID
DIAGNOSIS AND TESTING - BRAKE FLUID
CONTAMINATION.....................15
STANDARD PROCEDURE - BRAKE FLUID
LEVEL..............................15
SPECIFICATIONS
BRAKE FLUID........................15
FLUID RESERVOIR
REMOVAL.............................15
INSTALLATION.........................15
PEDAL
DESCRIPTION.........................17
OPERATION...........................17
REMOVAL.............................17
INSTALLATION.........................17
POWER BRAKE BOOSTER
DIAGNOSIS AND TESTING - HYDRAULIC
BOOSTER...........................18
STANDARD PROCEDURE - BLEEDING......19
REMOVAL.............................19
INSTALLATION.........................19
ROTORS
DIAGNOSIS AND TESTING
DISC BRAKE ROTOR..................20
REMOVAL
REMOVAL - REAR.....................21
REMOVAL - FRONT ± 2500..............22
REMOVAL - FRONT - 3500..............22
INSTALLATION
INSTALLATION - REAR.................22
INSTALLATION - FRONT ± 2500..........23
INSTALLATION - FRONT - 3500...........23
BR/BEBRAKES 5 - 1
Page 191 of 2255
BRAKE PADS/SHOES
REMOVAL
REMOVAL - REAR.....................23
REMOVAL - FRONT....................24
INSTALLATION
INSTALLATION - REAR.................25
INSTALLATION - FRONT................26
MASTER CYLINDER
DESCRIPTION.........................26
OPERATION...........................26
DIAGNOSIS AND TESTING - MASTER
CYLINDER/POWER BOOSTER...........26
STANDARD PROCEDURE - MASTER
CYLINDER BLEEDING..................27
REMOVAL.............................27
INSTALLATION.........................28
PARKING BRAKE
DESCRIPTION.........................28
OPERATION...........................28
PEDAL
REMOVAL.............................28
INSTALLATION.........................29CABLES
REMOVAL
REMOVAL - REAR PARK BRAKE CABLE . . . 29
REMOVAL - FRONT PARKING BRAKE
CABLE..............................29
INSTALLATION
INSTALLATION - REAR PARK BRAKE
CABLE..............................30
INSTALLATION - FRONT PARKING BRAKE
CABLE..............................30
CABLE TENSIONER
ADJUSTMENTS
ADJUSTMENT........................30
RELEASE HANDLE
REMOVAL.............................31
INSTALLATION.........................32
SHOES
REMOVAL.............................32
INSTALLATION.........................32
ADJUSTMENTS
ADJUSTMENT - PARKING BRAKE SHOES . . 33
BRAKES - BASE
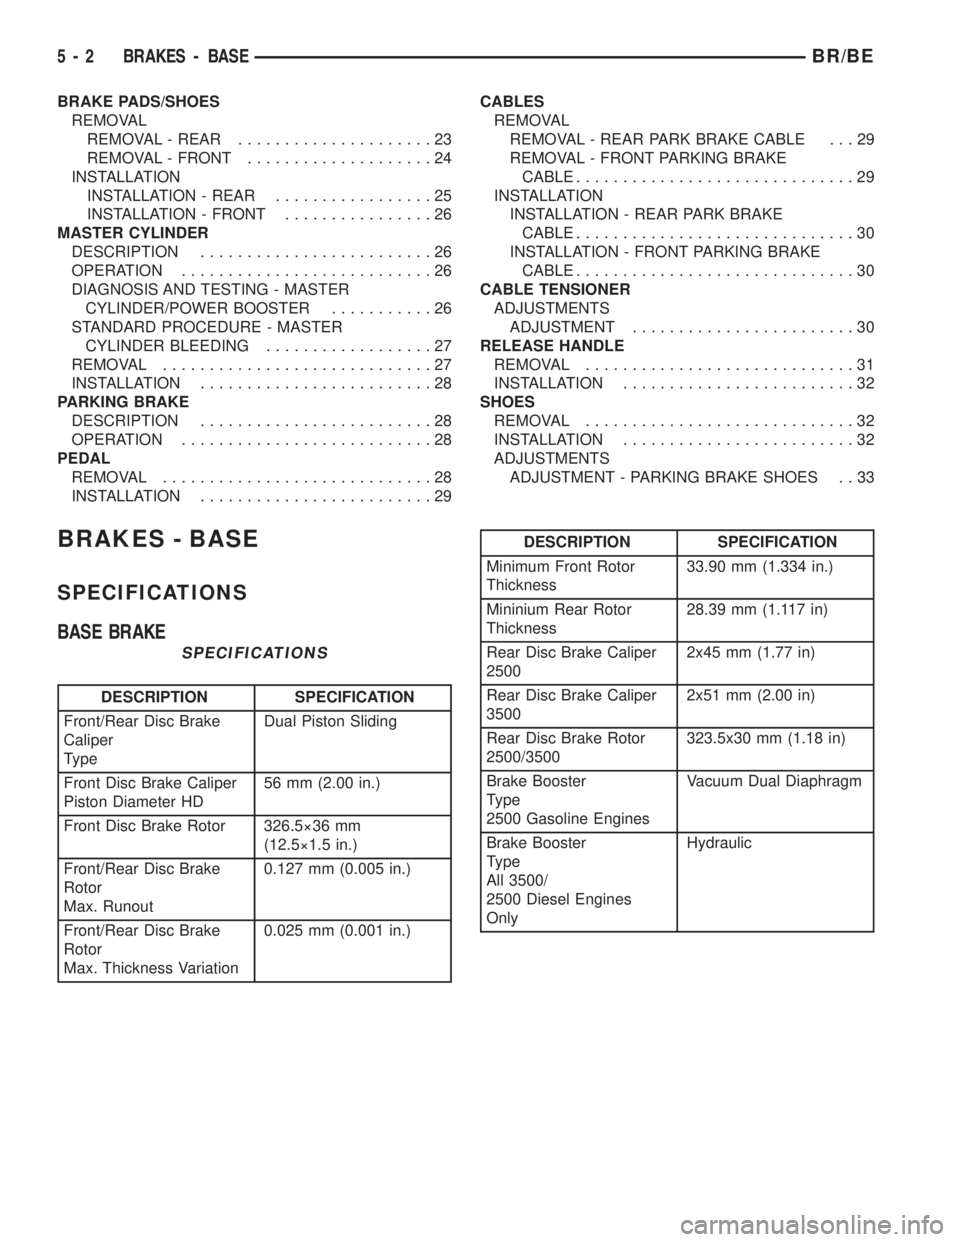
SPECIFICATIONS
BASE BRAKE
SPECIFICATIONS
DESCRIPTION SPECIFICATION
Front/Rear Disc Brake
Caliper
TypeDual Piston Sliding
Front Disc Brake Caliper
Piston Diameter HD56 mm (2.00 in.)
Front Disc Brake Rotor 326.5ý36 mm
(12.5ý1.5 in.)
Front/Rear Disc Brake
Rotor
Max. Runout0.127 mm (0.005 in.)
Front/Rear Disc Brake
Rotor
Max. Thickness Variation0.025 mm (0.001 in.)
DESCRIPTION SPECIFICATION
Minimum Front Rotor
Thickness33.90 mm (1.334 in.)
Mininium Rear Rotor
Thickness28.39 mm (1.117 in)
Rear Disc Brake Caliper
25002x45 mm (1.77 in)
Rear Disc Brake Caliper
35002x51 mm (2.00 in)
Rear Disc Brake Rotor
2500/3500323.5x30 mm (1.18 in)
Brake Booster
Type
2500 Gasoline EnginesVacuum Dual Diaphragm
Brake Booster
Type
All 3500/
2500 Diesel Engines
OnlyHydraulic
5 - 2 BRAKES - BASEBR/BE
Page 192 of 2255
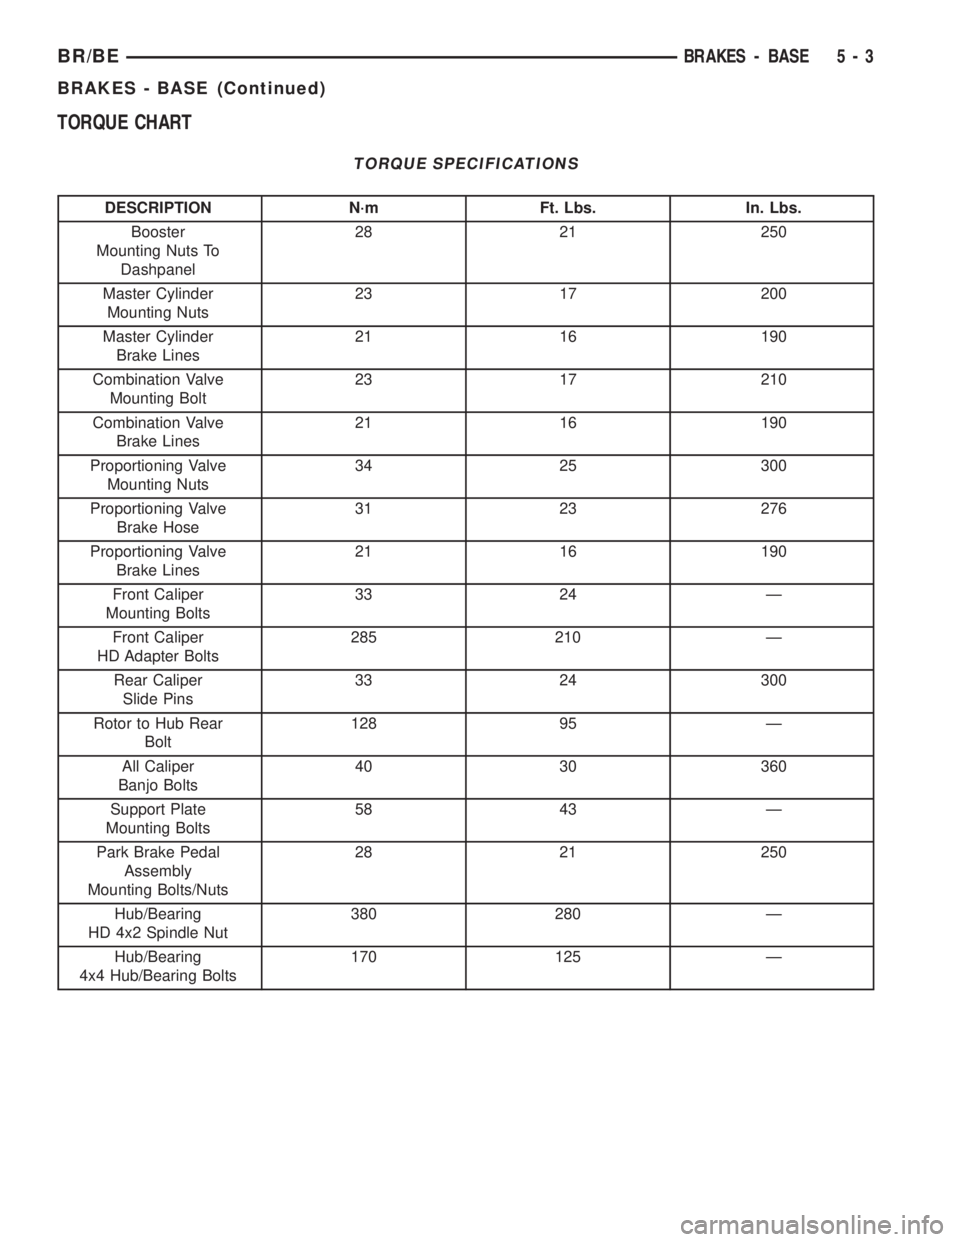
TORQUE CHART
TORQUE SPECIFICATIONS
DESCRIPTION N´m Ft. Lbs. In. Lbs.
Booster
Mounting Nuts To
Dashpanel28 21 250
Master Cylinder
Mounting Nuts23 17 200
Master Cylinder
Brake Lines21 16 190
Combination Valve
Mounting Bolt23 17 210
Combination Valve
Brake Lines21 16 190
Proportioning Valve
Mounting Nuts34 25 300
Proportioning Valve
Brake Hose31 23 276
Proportioning Valve
Brake Lines21 16 190
Front Caliper
Mounting Bolts33 24 Ð
Front Caliper
HD Adapter Bolts285 210 Ð
Rear Caliper
Slide Pins33 24 300
Rotor to Hub Rear
Bolt128 95 Ð
All Caliper
Banjo Bolts40 30 360
Support Plate
Mounting Bolts58 43 Ð
Park Brake Pedal
Assembly
Mounting Bolts/Nuts28 21 250
Hub/Bearing
HD 4x2 Spindle Nut380 280 Ð
Hub/Bearing
4x4 Hub/Bearing Bolts170 125 Ð
BR/BEBRAKES - BASE 5 - 3
BRAKES - BASE (Continued)
Page 193 of 2255
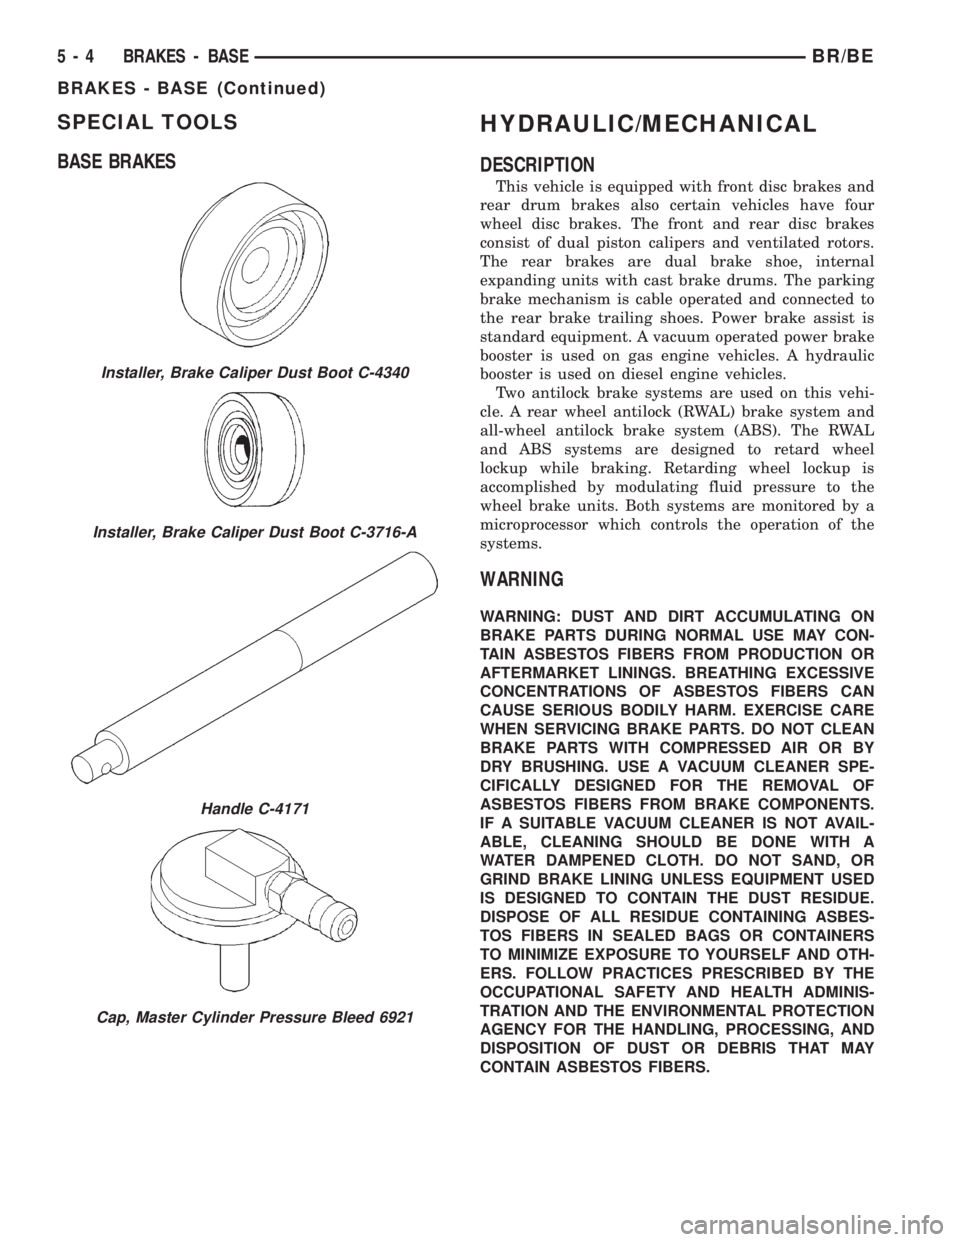
SPECIAL TOOLS
BASE BRAKESHYDRAULIC/MECHANICAL
DESCRIPTION
This vehicle is equipped with front disc brakes and
rear drum brakes also certain vehicles have four
wheel disc brakes. The front and rear disc brakes
consist of dual piston calipers and ventilated rotors.
The rear brakes are dual brake shoe, internal
expanding units with cast brake drums. The parking
brake mechanism is cable operated and connected to
the rear brake trailing shoes. Power brake assist is
standard equipment. A vacuum operated power brake
booster is used on gas engine vehicles. A hydraulic
booster is used on diesel engine vehicles.
Two antilock brake systems are used on this vehi-
cle. A rear wheel antilock (RWAL) brake system and
all-wheel antilock brake system (ABS). The RWAL
and ABS systems are designed to retard wheel
lockup while braking. Retarding wheel lockup is
accomplished by modulating fluid pressure to the
wheel brake units. Both systems are monitored by a
microprocessor which controls the operation of the
systems.
WARNING
WARNING: DUST AND DIRT ACCUMULATING ON
BRAKE PARTS DURING NORMAL USE MAY CON-
TAIN ASBESTOS FIBERS FROM PRODUCTION OR
AFTERMARKET LININGS. BREATHING EXCESSIVE
CONCENTRATIONS OF ASBESTOS FIBERS CAN
CAUSE SERIOUS BODILY HARM. EXERCISE CARE
WHEN SERVICING BRAKE PARTS. DO NOT CLEAN
BRAKE PARTS WITH COMPRESSED AIR OR BY
DRY BRUSHING. USE A VACUUM CLEANER SPE-
CIFICALLY DESIGNED FOR THE REMOVAL OF
ASBESTOS FIBERS FROM BRAKE COMPONENTS.
IF A SUITABLE VACUUM CLEANER IS NOT AVAIL-
ABLE, CLEANING SHOULD BE DONE WITH A
WATER DAMPENED CLOTH. DO NOT SAND, OR
GRIND BRAKE LINING UNLESS EQUIPMENT USED
IS DESIGNED TO CONTAIN THE DUST RESIDUE.
DISPOSE OF ALL RESIDUE CONTAINING ASBES-
TOS FIBERS IN SEALED BAGS OR CONTAINERS
TO MINIMIZE EXPOSURE TO YOURSELF AND OTH-
ERS. FOLLOW PRACTICES PRESCRIBED BY THE
OCCUPATIONAL SAFETY AND HEALTH ADMINIS-
TRATION AND THE ENVIRONMENTAL PROTECTION
AGENCY FOR THE HANDLING, PROCESSING, AND
DISPOSITION OF DUST OR DEBRIS THAT MAY
CONTAIN ASBESTOS FIBERS.
Installer, Brake Caliper Dust Boot C-4340
Installer, Brake Caliper Dust Boot C-3716-A
Handle C-4171
Cap, Master Cylinder Pressure Bleed 6921
5 - 4 BRAKES - BASEBR/BE
BRAKES - BASE (Continued)
Page 194 of 2255
CAUTION: Never use gasoline, kerosene, alcohol,
motor oil, transmission fluid, or any fluid containing
mineral oil to clean the system components. These
fluids damage rubber cups and seals. Use only
fresh brake fluid or Mopar brake cleaner to clean or
flush brake system components. These are the only
cleaning materials recommended. If system contam-
ination is suspected, check the fluid for dirt, discol-
oration, or separation into distinct layers. Also
check the reservoir cap seal for distortion. Drain
and flush the system with new brake fluid if con-
tamination is suspected.
CAUTION: Use Mopar brake fluid, or an equivalent
quality fluid meeting SAE/DOT standards J1703 and
DOT 3. Brake fluid must be clean and free of con-
taminants. Use fresh fluid from sealed containers
only to ensure proper antilock component opera-
tion.
CAUTION: Use Mopar multi-mileage or high temper-
ature grease to lubricate caliper slide surfaces,
drum brake pivot pins, and shoe contact points on
the backing plates. Use multi-mileage grease or GE
661 or Dow 111 silicone grease on caliper slide pins
to ensure proper operation.
DIAGNOSIS AND TESTING - BASE BRAKE
SYSTEM
Base brake components consist of the brake shoes,
calipers, wheel cylinders, brake drums, rotors, brake
lines, master cylinder, booster, and parking brake
components.
Brake diagnosis involves determining if the prob-
lem is related to a mechanical, hydraulic, or vacuum
operated component.
The first diagnosis step is the preliminary check.
PRELIMINARY BRAKE CHECK
(1) Check condition of tires and wheels. Damaged
wheels and worn, damaged, or underinflated tires
can cause pull, shudder, vibration, and a condition
similar to grab.
(2) If complaint was based on noise when braking,
check suspension components. Jounce front and rear
of vehicle and listen for noise that might be caused
by loose, worn or damaged suspension or steering
components.
(3) Inspect brake fluid level and condition. Note
that the brake reservoir fluid level will decrease in
proportion to normal lining wear.Also note that
brake fluid tends to darken over time. This is
normal and should not be mistaken for contam-
ination.(a) If fluid level is abnormally low, look for evi-
dence of leaks at calipers, wheel cylinders, brake
lines, and master cylinder.
(b) If fluid appears contaminated, drain out a
sample to examine. System will have to be flushed
if fluid is separated into layers, or contains a sub-
stance other than brake fluid. The system seals
and cups will also have to be replaced after flush-
ing. Use clean brake fluid to flush the system.
(4) Check parking brake operation. Verify free
movement and full release of cables and pedal. Also
note if vehicle was being operated with parking
brake partially applied.
(5) Check brake pedal operation. Verify that pedal
does not bind and has adequate free play. If pedal
lacks free play, check pedal and power booster for
being loose or for bind condition. Do not road test
until condition is corrected.
(6) Check booster vacuum check valve and hose.
(7) If components checked appear OK, road test
the vehicle.
ROAD TESTING
(1) If complaint involved low brake pedal, pump
pedal and note if it comes back up to normal height.
(2) Check brake pedal response with transmission
in Neutral and engine running. Pedal should remain
firm under constant foot pressure.
(3) During road test, make normal and firm brake
stops in 25-40 mph range. Note faulty brake opera-
tion such as low pedal, hard pedal, fade, pedal pulsa-
tion, pull, grab, drag, noise, etc.
(4) Attempt to stop the vehicle with the parking
brake only and note grab, drag, noise, etc.
PEDAL FALLS AWAY
A brake pedal that falls away under steady foot
pressure is generally the result of a system leak. The
leak point could be at a brake line, fitting, hose, or
caliper/wheel cylinder. If leakage is severe, fluid will
be evident at or around the leaking component.
Internal leakage (seal by-pass) in the master cylin-
der caused by worn or damaged piston cups, may
also be the problem cause.
An internal leak in the ABS or RWAL system may
also be the problem with no physical evidence.
LOW PEDAL
If a low pedal is experienced, pump the pedal sev-
eral times. If the pedal comes back up, worn linings,
rotors, drums, or rear brakes out of adjustment are
the most likely causes. The proper course of action is
to inspect and replace all worn component and make
the proper adjustments.
BR/BEBRAKES - BASE 5 - 5
HYDRAULIC/MECHANICAL (Continued)
Page 195 of 2255
SPONGY PEDAL
A spongy pedal is most often caused by air in the
system. However, thin brake drums or substandard
brake lines and hoses can also cause a spongy pedal.
The proper course of action is to bleed the system,
and replace thin drums and substandard quality
brake hoses if suspected.
HARD PEDAL OR HIGH PEDAL EFFORT
A hard pedal or high pedal effort may be due to
lining that is water soaked, contaminated, glazed, or
badly worn. The power booster or check valve could
also be faulty.
PEDAL PULSATION
Pedal pulsation is caused by components that are
loose, or beyond tolerance limits.
The primary cause of pulsation are disc brake
rotors with excessive lateral runout or thickness vari-
ation, or out of round brake drums. Other causes are
loose wheel bearings or calipers and worn or dam-
aged tires.
NOTE: Some pedal pulsation may be felt during
ABS/EBD activation.
BRAKE DRAG
Brake drag occurs when the lining is in constant
contact with the rotor or drum. Drag can occur at one
wheel, all wheels, fronts only, or rears only.
Drag is a product of incomplete brake shoe release.
Drag can be minor or severe enough to overheat the
linings, rotors and drums.
Minor drag will usually cause slight surface char-
ring of the lining. It can also generate hard spots in
rotors and drums from the overheat-cool down pro-
cess. In most cases, the rotors, drums, wheels and
tires are quite warm to the touch after the vehicle is
stopped.
Severe drag can char the brake lining all the way
through. It can also distort and score rotors and
drums to the point of replacement. The wheels, tires
and brake components will be extremely hot. In
severe cases, the lining may generate smoke as it
chars from overheating.
Common causes of brake drag are:
²Seized or improperly adjusted parking brake
cables
²Loose/worn wheel bearing
²Seized caliper or wheel cylinder piston
²Caliper binding on damaged or missing anti-rat-
tle clips or bushings
²Loose caliper mounting
²Drum brake shoes binding on worn/damaged
support plates
²Mis-assembled components²Long booster output rod
If brake drag occurs at all wheels, the problem
may be related to a blocked master cylinder return
port, or faulty power booster (binds-does not release).
BRAKE FADE
Brake fade is usually a product of overheating
caused by brake drag. However, brake overheating
and resulting fade can also be caused by riding the
brake pedal, making repeated high deceleration stops
in a short time span, or constant braking on steep
mountain roads. Refer to the Brake Drag information
in this section for causes.
BRAKE PULL
Front brake pull condition could result from:
²Contaminated lining in one caliper
²Seized caliper piston
²Binding caliper
²Loose caliper
²Damaged anti-rattle clips
²Improper brake shoes
²Damaged rotor
A worn, damaged wheel bearing or suspension
component are further causes of pull. A damaged
front tire (bruised, ply separation) can also cause
pull.
A common and frequently misdiagnosed pull condi-
tion is where direction of pull changes after a few
stops. The cause is a combination of brake drag fol-
lowed by fade at one of the brake units.
As the dragging brake overheats, efficiency is so
reduced that fade occurs. Since the opposite brake
unit is still functioning normally, its braking effect is
magnified. This causes pull to switch direction in
favor of the normally functioning brake unit.
An additional point when diagnosing a change in
pull condition concerns brake cool down. Remember
that pull will return to the original direction, if the
dragging brake unit is allowed to cool down (and is
not seriously damaged).
REAR BRAKE GRAB OR PULL
Rear grab or pull is usually caused by improperly
adjusted or seized parking brake cables, contami-
nated lining, bent or binding shoes and support
plates, or improperly assembled components. This is
particularly true when only one rear wheel is
involved. However, when both rear wheels are
affected, the master cylinder or proportioning valve
could be at fault.
BRAKES DO NOT HOLD AFTER DRIVING THROUGH DEEP
WATER PUDDLES
This condition is generally caused by water soaked
lining. If the lining is only wet, it can be dried by
driving with the brakes very lightly applied for a
5 - 6 BRAKES - BASEBR/BE
HYDRAULIC/MECHANICAL (Continued)