lug pattern DODGE RAM 2003 Service Repair Manual
[x] Cancel search | Manufacturer: DODGE, Model Year: 2003, Model line: RAM, Model: DODGE RAM 2003Pages: 2895, PDF Size: 83.15 MB
Page 112 of 2895
(3) Spread housing and measure the distance with
the dial indicator.
CAUTION: Never spread over 0.50 mm (0.020 in). If
the housing is over-spread, it could be distorted or
damaged.
(4) Remove dial indicator.
(5) Install differential case in the housing. Ensure
differential bearing cups remain in position on the
bearings and the differential preload shims are
seated in the housing. Tap differential case to ensure
bearings cups are seated in the housing.
(6) Install bearing caps to their original locations
and loosely install cap bolts.
(7) Remove housing spreader.
(8) Tighten the bearing cap bolts to 61 N´m (45 ft.
lbs.).
(9) Install axle shafts.
(10) Apply a bead of red Mopar Silicone Sealant or
equivalent to the housing cover.
CAUTION: If cover is not installed within 3 to 5 min-
utes, the cover must be cleaned and new RTV
applied or adhesion quality will be compromised.
(11) Install cover and tighten bolts in a criss-cross
pattern to 22 N´m (15 ft. lbs.).
(12) Fill differential with lubricant.
DIFFERENTIAL CASE
BEARINGS
REMOVAL
(1) Remove differential from housing.
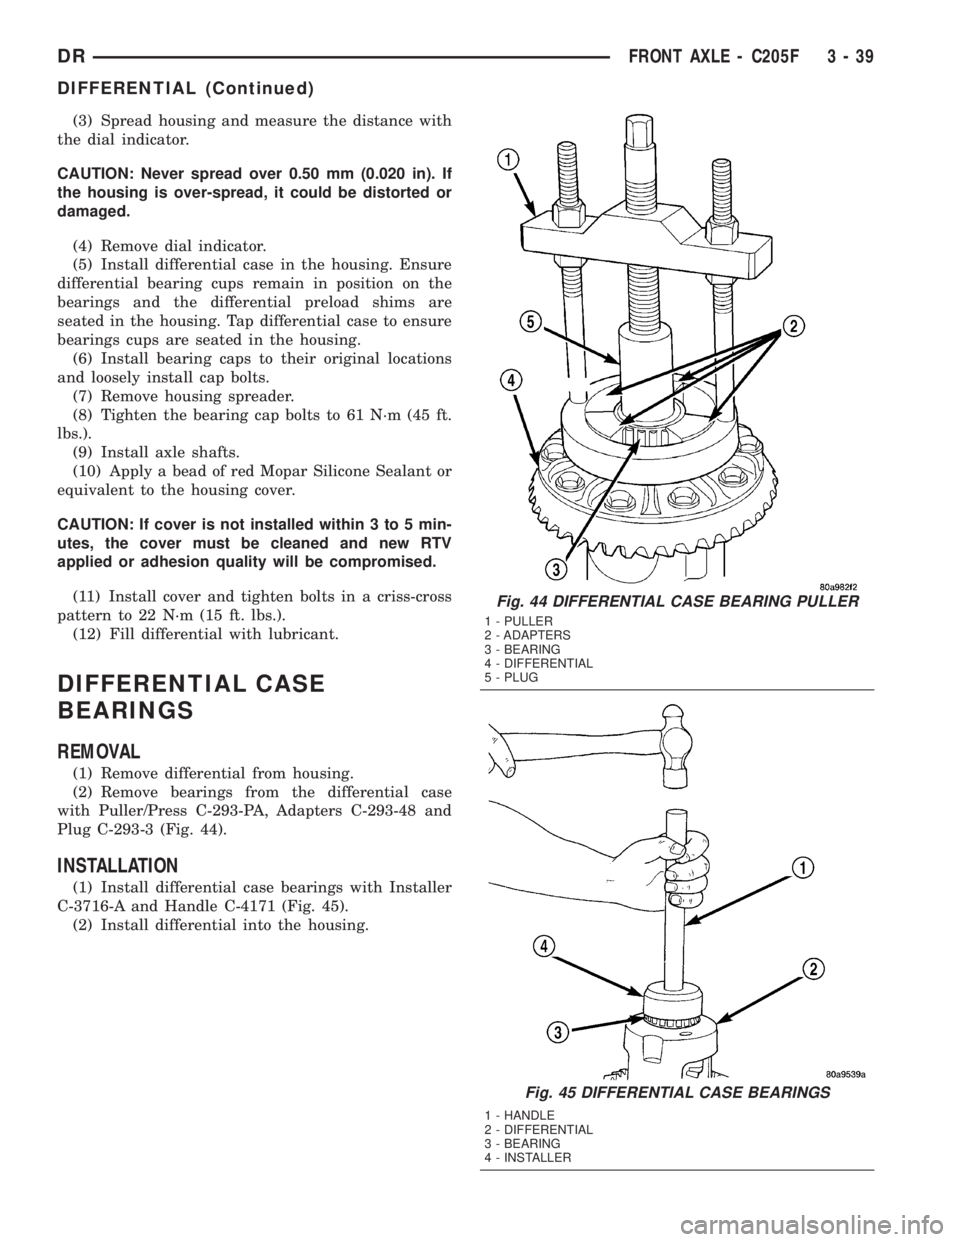
(2) Remove bearings from the differential case
with Puller/Press C-293-PA, Adapters C-293-48 and
Plug C-293-3 (Fig. 44).
INSTALLATION
(1) Install differential case bearings with Installer
C-3716-A and Handle C-4171 (Fig. 45).
(2) Install differential into the housing.
Fig. 44 DIFFERENTIAL CASE BEARING PULLER
1 - PULLER
2 - ADAPTERS
3 - BEARING
4 - DIFFERENTIAL
5 - PLUG
Fig. 45 DIFFERENTIAL CASE BEARINGS
1 - HANDLE
2 - DIFFERENTIAL
3 - BEARING
4 - INSTALLER
DRFRONT AXLE - C205F 3 - 39
DIFFERENTIAL (Continued)
Page 137 of 2895
(7) Back off the ring gear side adjuster 4 holes, to
obtain initial ring gear backlash.
(8) Install ring gear side adjuster lock and bolt. Do
not tighten adjuster lock bolt at this time.
(9) Tighten pinion gear side adjuster firmly
against the differential case bearing cup.
(10) Rotate the pinion several times to seat the dif-
ferential bearings.
(11) Loosen pinion gear side adjuster until it is no
longer in contact with the bearing cup.
(12) Tighten pinion gear side adjuster until it just
makes contact with the bearing cup.
(13) Tighten pinion gear side adjuster an addi-
tional:
²New Bearings:6 Adjuster Holes
²Original Bearings:4 Adjuster Holes
(14) Install pinion gear side adjuster lock and bolt.
Do not tighten adjuster lock bolt at this time.
(15) Tighten bearing cap bolts to 85 N´m (63 ft.
lbs.).
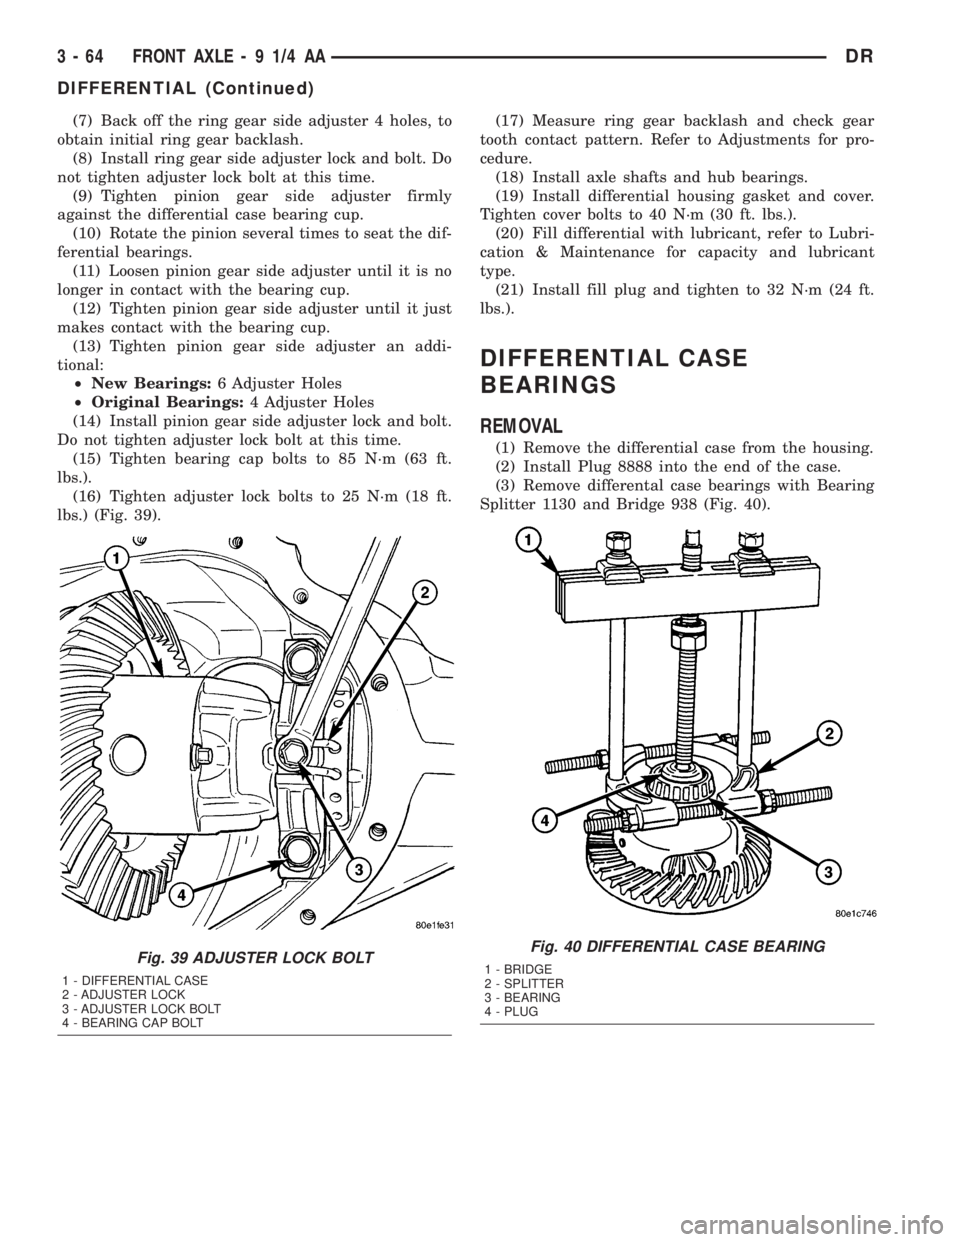
(16) Tighten adjuster lock bolts to 25 N´m (18 ft.
lbs.) (Fig. 39).(17) Measure ring gear backlash and check gear
tooth contact pattern. Refer to Adjustments for pro-
cedure.
(18) Install axle shafts and hub bearings.
(19) Install differential housing gasket and cover.
Tighten cover bolts to 40 N´m (30 ft. lbs.).
(20) Fill differential with lubricant, refer to Lubri-
cation & Maintenance for capacity and lubricant
type.
(21) Install fill plug and tighten to 32 N´m (24 ft.
lbs.).
DIFFERENTIAL CASE
BEARINGS
REMOVAL
(1) Remove the differential case from the housing.
(2) Install Plug 8888 into the end of the case.
(3) Remove differental case bearings with Bearing
Splitter 1130 and Bridge 938 (Fig. 40).
Fig. 39 ADJUSTER LOCK BOLT
1 - DIFFERENTIAL CASE
2 - ADJUSTER LOCK
3 - ADJUSTER LOCK BOLT
4 - BEARING CAP BOLT
Fig. 40 DIFFERENTIAL CASE BEARING
1 - BRIDGE
2 - SPLITTER
3 - BEARING
4 - PLUG
3 - 64 FRONT AXLE - 9 1/4 AADR
DIFFERENTIAL (Continued)
Page 141 of 2895
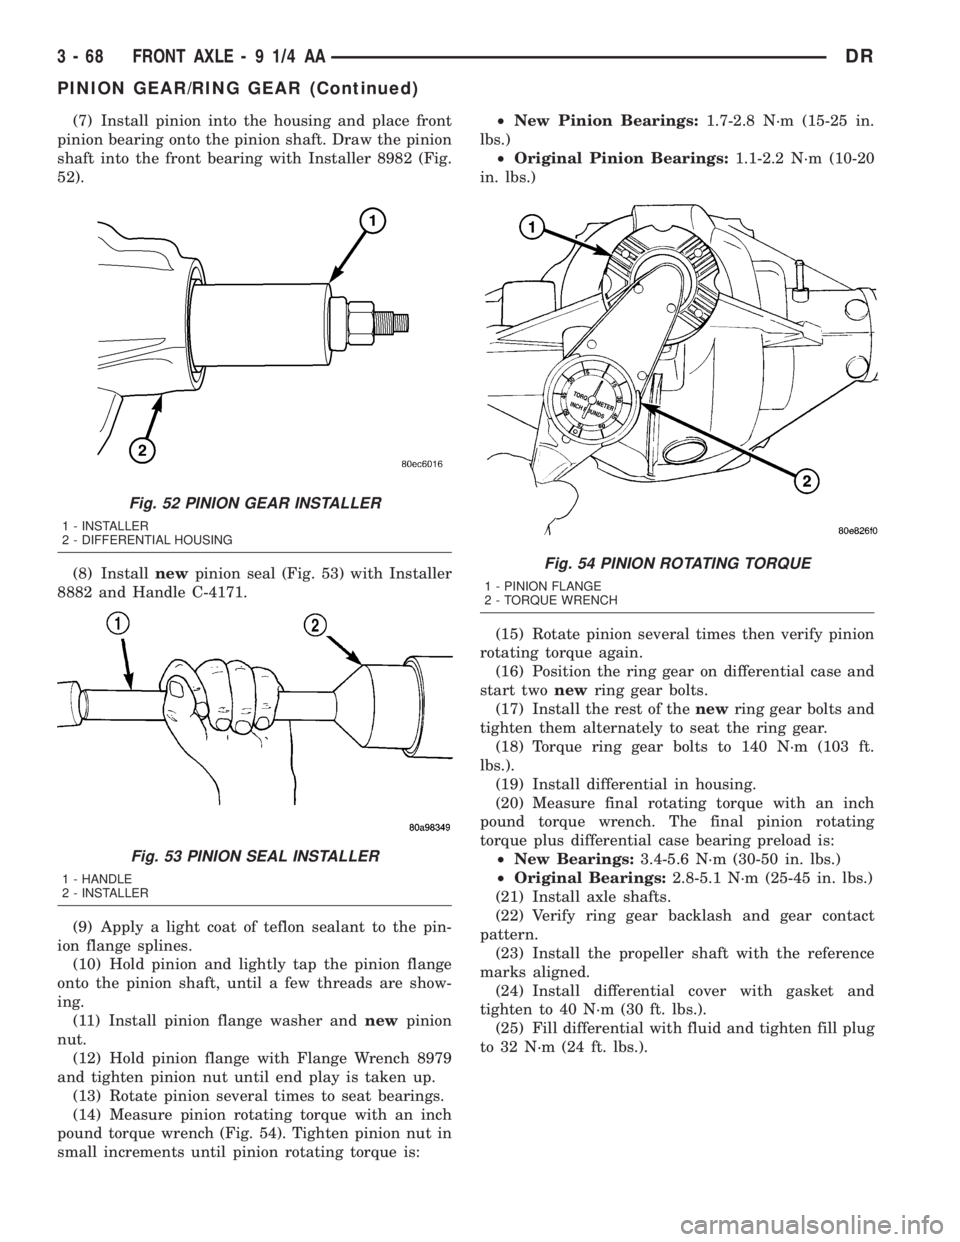
(7) Install pinion into the housing and place front
pinion bearing onto the pinion shaft. Draw the pinion
shaft into the front bearing with Installer 8982 (Fig.
52).
(8) Installnewpinion seal (Fig. 53) with Installer
8882 and Handle C-4171.
(9) Apply a light coat of teflon sealant to the pin-
ion flange splines.
(10) Hold pinion and lightly tap the pinion flange
onto the pinion shaft, until a few threads are show-
ing.
(11) Install pinion flange washer andnewpinion
nut.
(12) Hold pinion flange with Flange Wrench 8979
and tighten pinion nut until end play is taken up.
(13) Rotate pinion several times to seat bearings.
(14) Measure pinion rotating torque with an inch
pound torque wrench (Fig. 54). Tighten pinion nut in
small increments until pinion rotating torque is:²New Pinion Bearings:1.7-2.8 N´m (15-25 in.
lbs.)
²Original Pinion Bearings:1.1-2.2 N´m (10-20
in. lbs.)
(15) Rotate pinion several times then verify pinion
rotating torque again.
(16) Position the ring gear on differential case and
start twonewring gear bolts.
(17) Install the rest of thenewring gear bolts and
tighten them alternately to seat the ring gear.
(18) Torque ring gear bolts to 140 N´m (103 ft.
lbs.).
(19) Install differential in housing.
(20) Measure final rotating torque with an inch
pound torque wrench. The final pinion rotating
torque plus differential case bearing preload is:
²New Bearings:3.4-5.6 N´m (30-50 in. lbs.)
²Original Bearings:2.8-5.1 N´m (25-45 in. lbs.)
(21) Install axle shafts.
(22) Verify ring gear backlash and gear contact
pattern.
(23) Install the propeller shaft with the reference
marks aligned.
(24) Install differential cover with gasket and
tighten to 40 N´m (30 ft. lbs.).
(25) Fill differential with fluid and tighten fill plug
to 32 N´m (24 ft. lbs.).
Fig. 52 PINION GEAR INSTALLER
1 - INSTALLER
2 - DIFFERENTIAL HOUSING
Fig. 53 PINION SEAL INSTALLER
1 - HANDLE
2 - INSTALLER
Fig. 54 PINION ROTATING TORQUE
1 - PINION FLANGE
2 - TORQUE WRENCH
3 - 68 FRONT AXLE - 9 1/4 AADR
PINION GEAR/RING GEAR (Continued)
Page 191 of 2895
(8) Install ring gear side adjuster lock and bolt. Do
not tighten adjuster lock bolt at this time.
(9) Tighten pinion gear side adjuster firmly
against the differential case bearing cup.
(10) Rotate the pinion several times to seat the dif-
ferential bearings.
(11) Loosen pinion gear side adjuster until it is no
longer in contact with the bearing cup.
(12) Tighten pinion gear side adjuster until it just
makes contact with the bearing cup.
(13) Tighten pinion gear side adjuster an addi-
tional:
²New Bearings6 Adjuster Holes
²Original Bearings4 Adjuster Holes
(14) Install pinion gear side adjuster lock and bolt.
Do not tighten adjuster lock bolt at this time.
(15) Tighten bearing cap bolts to 165 N´m (122 ft.
lbs.).
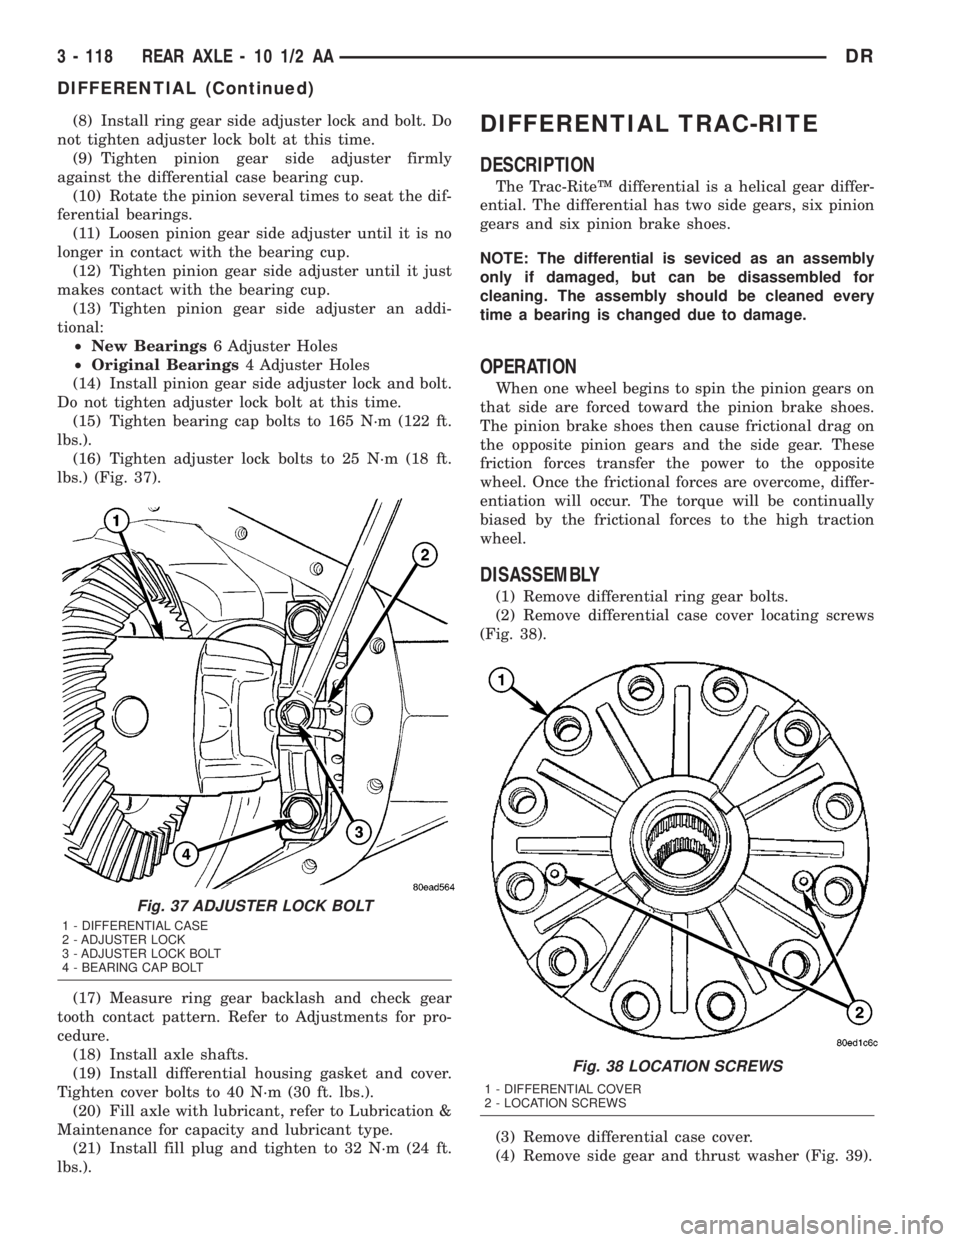
(16) Tighten adjuster lock bolts to 25 N´m (18 ft.
lbs.) (Fig. 37).
(17) Measure ring gear backlash and check gear
tooth contact pattern. Refer to Adjustments for pro-
cedure.
(18) Install axle shafts.
(19) Install differential housing gasket and cover.
Tighten cover bolts to 40 N´m (30 ft. lbs.).
(20) Fill axle with lubricant, refer to Lubrication &
Maintenance for capacity and lubricant type.
(21) Install fill plug and tighten to 32 N´m (24 ft.
lbs.).DIFFERENTIAL TRAC-RITE
DESCRIPTION
The Trac-RiteŸ differential is a helical gear differ-
ential. The differential has two side gears, six pinion
gears and six pinion brake shoes.
NOTE: The differential is seviced as an assembly
only if damaged, but can be disassembled for
cleaning. The assembly should be cleaned every
time a bearing is changed due to damage.
OPERATION
When one wheel begins to spin the pinion gears on
that side are forced toward the pinion brake shoes.
The pinion brake shoes then cause frictional drag on
the opposite pinion gears and the side gear. These
friction forces transfer the power to the opposite
wheel. Once the frictional forces are overcome, differ-
entiation will occur. The torque will be continually
biased by the frictional forces to the high traction
wheel.
DISASSEMBLY
(1) Remove differential ring gear bolts.
(2) Remove differential case cover locating screws
(Fig. 38).
(3) Remove differential case cover.
(4) Remove side gear and thrust washer (Fig. 39).
Fig. 37 ADJUSTER LOCK BOLT
1 - DIFFERENTIAL CASE
2 - ADJUSTER LOCK
3 - ADJUSTER LOCK BOLT
4 - BEARING CAP BOLT
Fig. 38 LOCATION SCREWS
1 - DIFFERENTIAL COVER
2 - LOCATION SCREWS
3 - 118 REAR AXLE - 10 1/2 AADR
DIFFERENTIAL (Continued)
Page 199 of 2895
(18) Torque ring gear bolts to 237 N´m (175 ft.
lbs.).
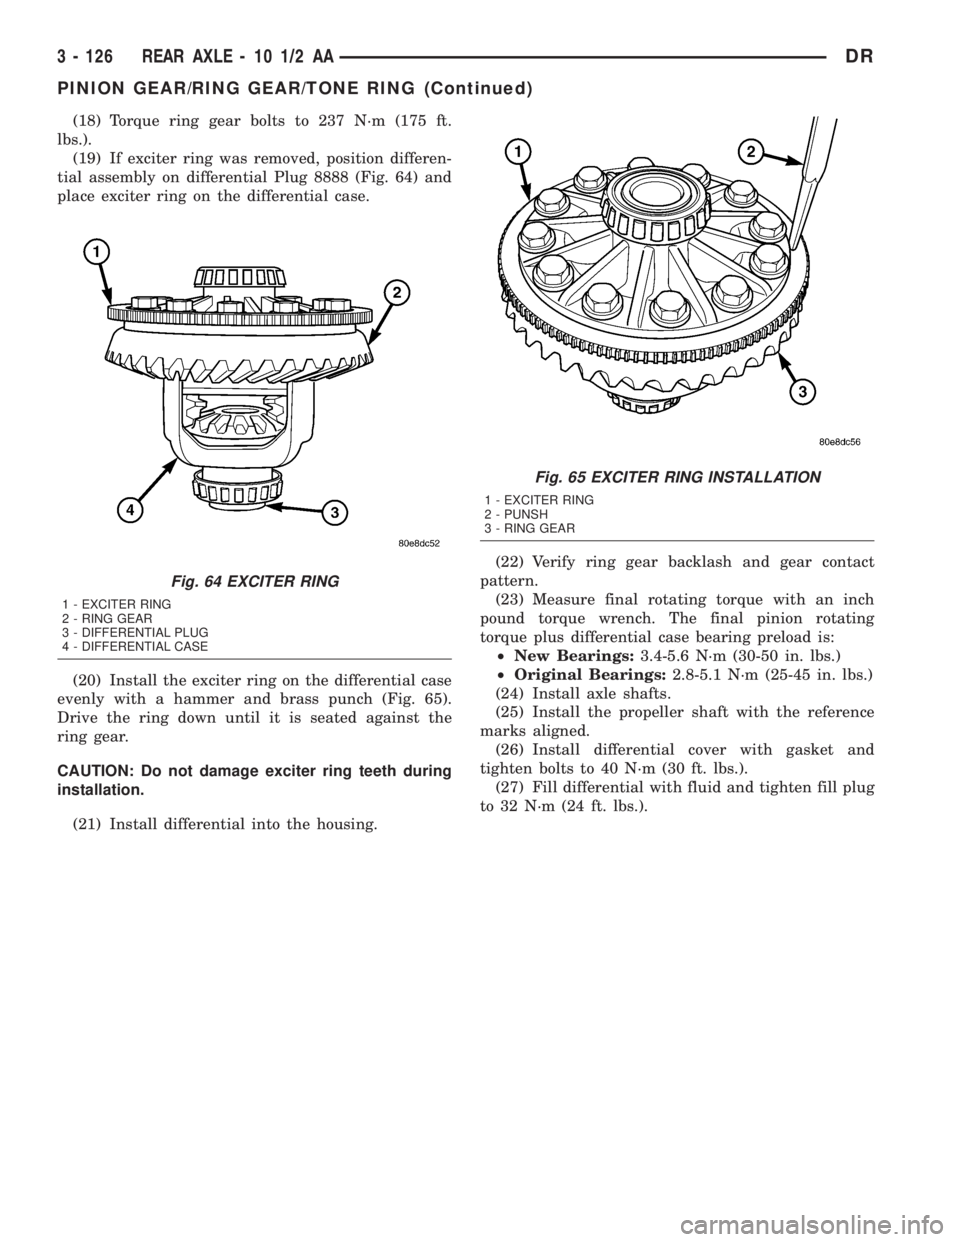
(19) If exciter ring was removed, position differen-
tial assembly on differential Plug 8888 (Fig. 64) and
place exciter ring on the differential case.
(20) Install the exciter ring on the differential case
evenly with a hammer and brass punch (Fig. 65).
Drive the ring down until it is seated against the
ring gear.
CAUTION: Do not damage exciter ring teeth during
installation.
(21) Install differential into the housing.(22) Verify ring gear backlash and gear contact
pattern.
(23) Measure final rotating torque with an inch
pound torque wrench. The final pinion rotating
torque plus differential case bearing preload is:
²New Bearings:3.4-5.6 N´m (30-50 in. lbs.)
²Original Bearings:2.8-5.1 N´m (25-45 in. lbs.)
(24) Install axle shafts.
(25) Install the propeller shaft with the reference
marks aligned.
(26) Install differential cover with gasket and
tighten bolts to 40 N´m (30 ft. lbs.).
(27) Fill differential with fluid and tighten fill plug
to 32 N´m (24 ft. lbs.).
Fig. 64 EXCITER RING
1 - EXCITER RING
2 - RING GEAR
3 - DIFFERENTIAL PLUG
4 - DIFFERENTIAL CASE
Fig. 65 EXCITER RING INSTALLATION
1 - EXCITER RING
2 - PUNSH
3 - RING GEAR
3 - 126 REAR AXLE - 10 1/2 AADR
PINION GEAR/RING GEAR/TONE RING (Continued)
Page 218 of 2895
(8) Install ring gear side adjuster lock and bolt. Do
not tighten adjuster lock bolt at this time.
(9) Tighten pinion gear side adjuster firmly
against the differential case bearing cup.
(10) Rotate the pinion several times to seat the dif-
ferential bearings.
(11) Loosen pinion gear side adjuster until it is no
longer in contact with the bearing cup.
(12) Tighten pinion gear side adjuster until it just
makes contact with the bearing cup.
(13)
Tighten pinion gear side adjuster an additional:
²New Bearings6 Adjuster Holes
²Original Bearings4 Adjuster Holes
(14) Install pinion gear side adjuster lock and bolt.
Do not tighten adjuster lock bolt at this time.
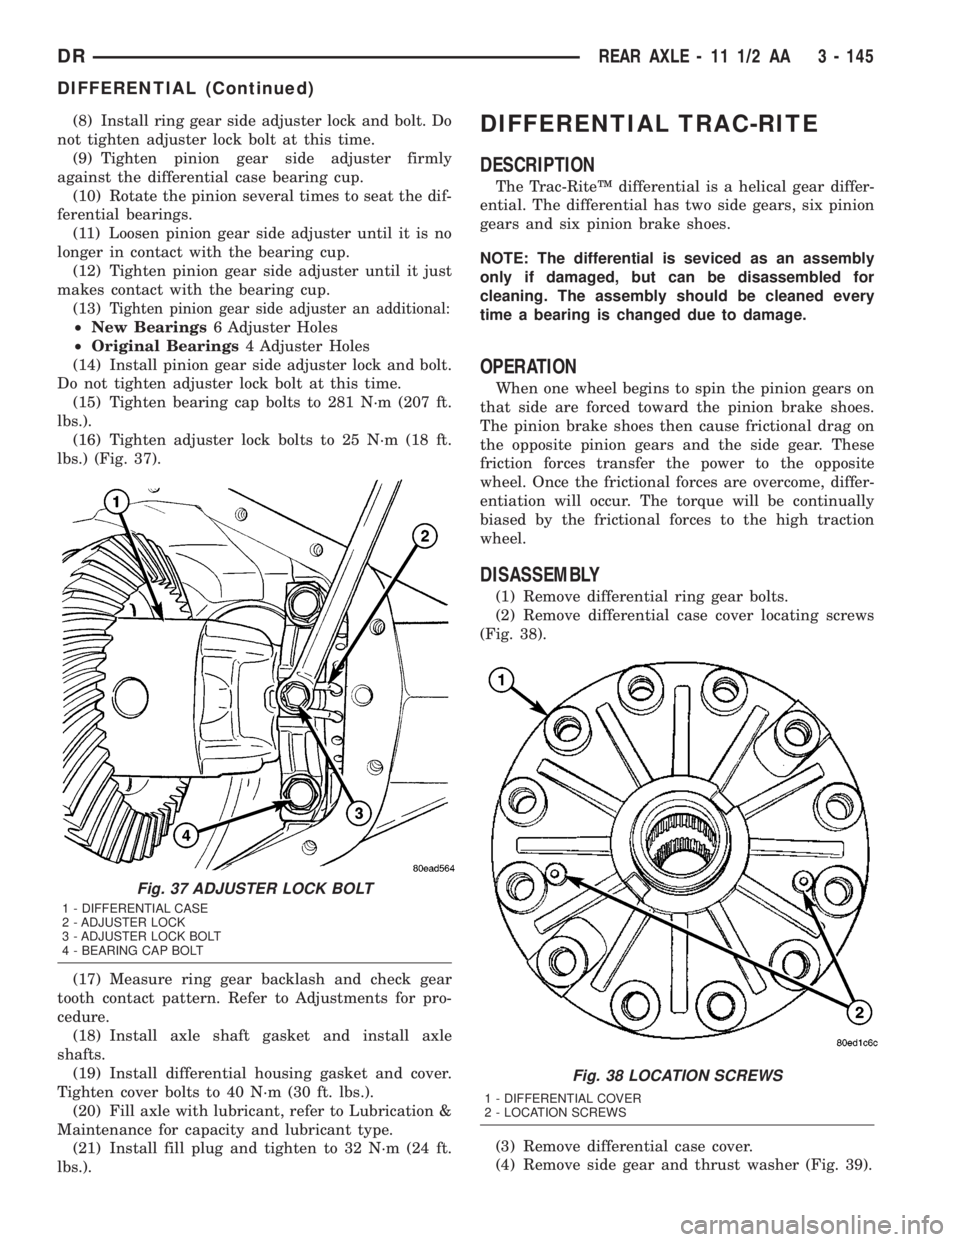
(15) Tighten bearing cap bolts to 281 N´m (207 ft.
lbs.).
(16) Tighten adjuster lock bolts to 25 N´m (18 ft.
lbs.) (Fig. 37).
(17) Measure ring gear backlash and check gear
tooth contact pattern. Refer to Adjustments for pro-
cedure.
(18) Install axle shaft gasket and install axle
shafts.
(19) Install differential housing gasket and cover.
Tighten cover bolts to 40 N´m (30 ft. lbs.).
(20) Fill axle with lubricant, refer to Lubrication &
Maintenance for capacity and lubricant type.
(21) Install fill plug and tighten to 32 N´m (24 ft.
lbs.).
DIFFERENTIAL TRAC-RITE
DESCRIPTION
The Trac-RiteŸ differential is a helical gear differ-
ential. The differential has two side gears, six pinion
gears and six pinion brake shoes.
NOTE: The differential is seviced as an assembly
only if damaged, but can be disassembled for
cleaning. The assembly should be cleaned every
time a bearing is changed due to damage.
OPERATION
When one wheel begins to spin the pinion gears on
that side are forced toward the pinion brake shoes.
The pinion brake shoes then cause frictional drag on
the opposite pinion gears and the side gear. These
friction forces transfer the power to the opposite
wheel. Once the frictional forces are overcome, differ-
entiation will occur. The torque will be continually
biased by the frictional forces to the high traction
wheel.
DISASSEMBLY
(1) Remove differential ring gear bolts.
(2) Remove differential case cover locating screws
(Fig. 38).
(3) Remove differential case cover.
(4) Remove side gear and thrust washer (Fig. 39).
Fig. 37 ADJUSTER LOCK BOLT
1 - DIFFERENTIAL CASE
2 - ADJUSTER LOCK
3 - ADJUSTER LOCK BOLT
4 - BEARING CAP BOLT
Fig. 38 LOCATION SCREWS
1 - DIFFERENTIAL COVER
2 - LOCATION SCREWS
DRREAR AXLE - 11 1/2 AA 3 - 145
DIFFERENTIAL (Continued)
Page 226 of 2895
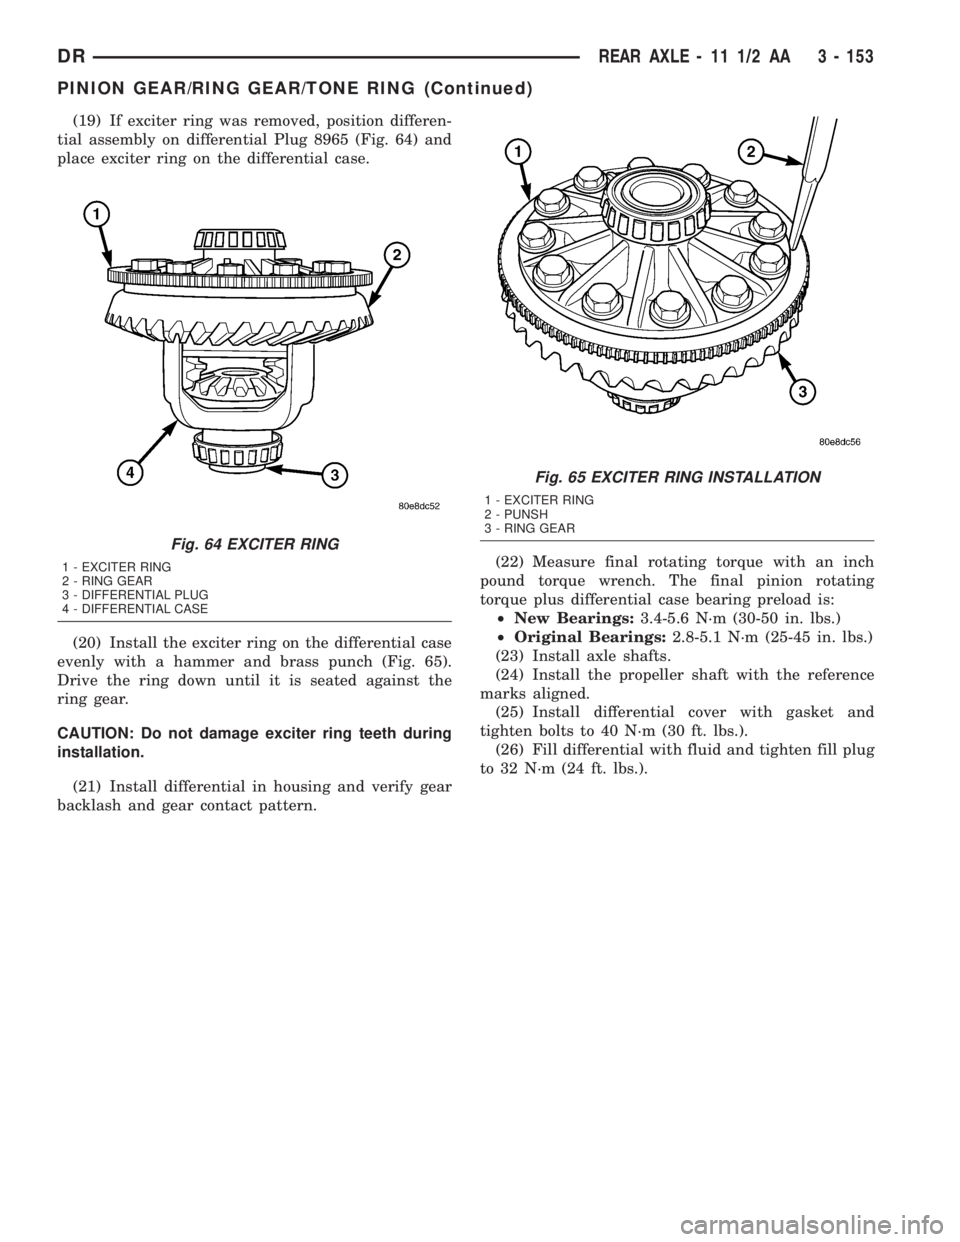
(19) If exciter ring was removed, position differen-
tial assembly on differential Plug 8965 (Fig. 64) and
place exciter ring on the differential case.
(20) Install the exciter ring on the differential case
evenly with a hammer and brass punch (Fig. 65).
Drive the ring down until it is seated against the
ring gear.
CAUTION: Do not damage exciter ring teeth during
installation.
(21) Install differential in housing and verify gear
backlash and gear contact pattern.(22) Measure final rotating torque with an inch
pound torque wrench. The final pinion rotating
torque plus differential case bearing preload is:
²New Bearings:3.4-5.6 N´m (30-50 in. lbs.)
²Original Bearings:2.8-5.1 N´m (25-45 in. lbs.)
(23) Install axle shafts.
(24) Install the propeller shaft with the reference
marks aligned.
(25) Install differential cover with gasket and
tighten bolts to 40 N´m (30 ft. lbs.).
(26) Fill differential with fluid and tighten fill plug
to 32 N´m (24 ft. lbs.).
Fig. 64 EXCITER RING
1 - EXCITER RING
2 - RING GEAR
3 - DIFFERENTIAL PLUG
4 - DIFFERENTIAL CASE
Fig. 65 EXCITER RING INSTALLATION
1 - EXCITER RING
2 - PUNSH
3 - RING GEAR
DRREAR AXLE - 11 1/2 AA 3 - 153
PINION GEAR/RING GEAR/TONE RING (Continued)
Page 552 of 2895
(4) Install the cluster bezel onto the instrument
panel (Fig. 9).
(5) Connect the battery negative cable.
HEADLAMP UNIT
REMOVAL
(1) Disconnect and isolate the battery negative
cable.
(2) Remove the push pins attaching the seal to the
fender.
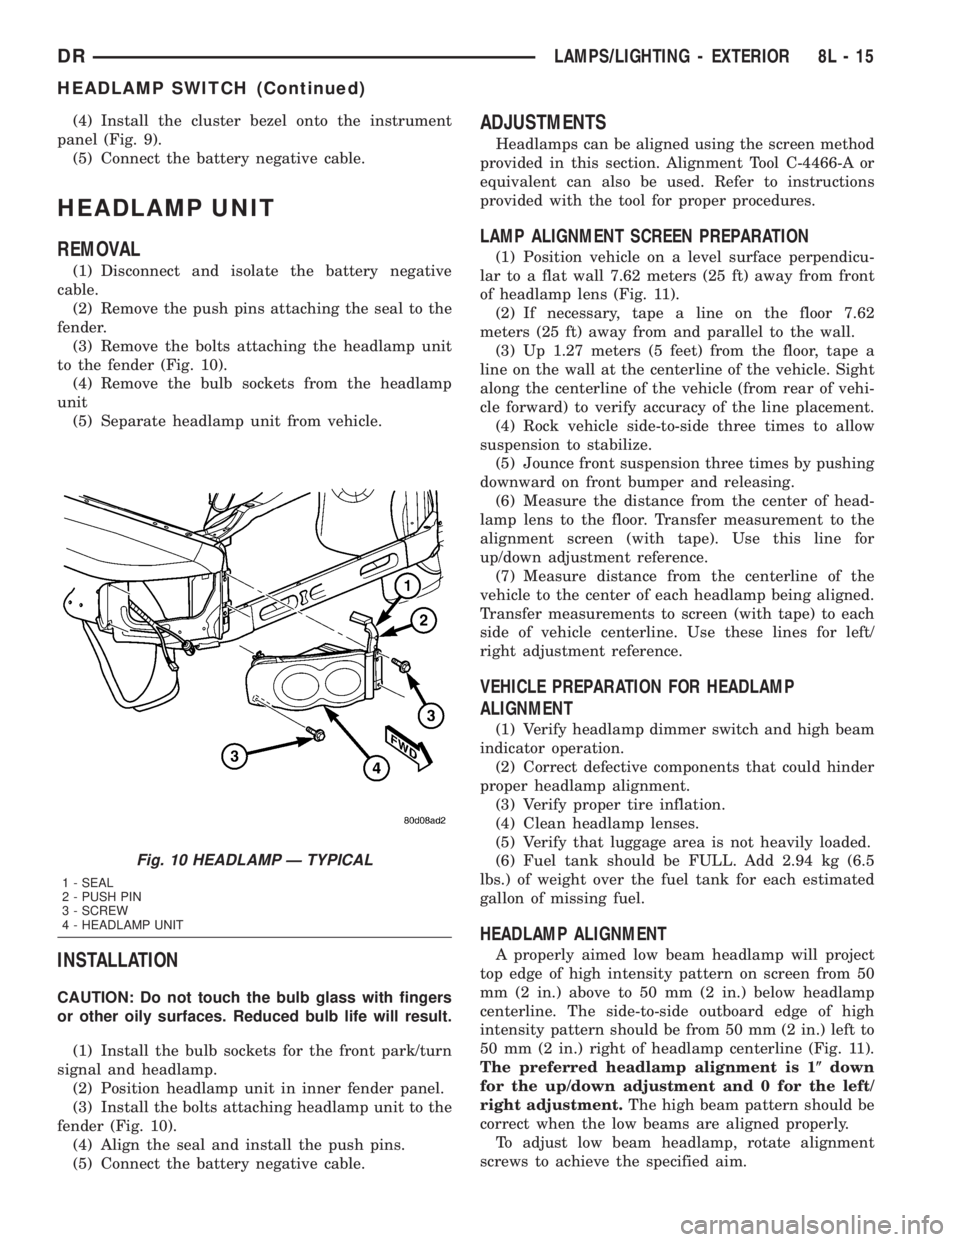
(3) Remove the bolts attaching the headlamp unit
to the fender (Fig. 10).
(4) Remove the bulb sockets from the headlamp
unit
(5) Separate headlamp unit from vehicle.
INSTALLATION
CAUTION: Do not touch the bulb glass with fingers
or other oily surfaces. Reduced bulb life will result.
(1) Install the bulb sockets for the front park/turn
signal and headlamp.
(2) Position headlamp unit in inner fender panel.
(3) Install the bolts attaching headlamp unit to the
fender (Fig. 10).
(4) Align the seal and install the push pins.
(5) Connect the battery negative cable.
ADJUSTMENTS
Headlamps can be aligned using the screen method
provided in this section. Alignment Tool C-4466-A or
equivalent can also be used. Refer to instructions
provided with the tool for proper procedures.
LAMP ALIGNMENT SCREEN PREPARATION
(1) Position vehicle on a level surface perpendicu-
lar to a flat wall 7.62 meters (25 ft) away from front
of headlamp lens (Fig. 11).
(2) If necessary, tape a line on the floor 7.62
meters (25 ft) away from and parallel to the wall.
(3) Up 1.27 meters (5 feet) from the floor, tape a
line on the wall at the centerline of the vehicle. Sight
along the centerline of the vehicle (from rear of vehi-
cle forward) to verify accuracy of the line placement.
(4) Rock vehicle side-to-side three times to allow
suspension to stabilize.
(5) Jounce front suspension three times by pushing
downward on front bumper and releasing.
(6) Measure the distance from the center of head-
lamp lens to the floor. Transfer measurement to the
alignment screen (with tape). Use this line for
up/down adjustment reference.
(7) Measure distance from the centerline of the
vehicle to the center of each headlamp being aligned.
Transfer measurements to screen (with tape) to each
side of vehicle centerline. Use these lines for left/
right adjustment reference.
VEHICLE PREPARATION FOR HEADLAMP
ALIGNMENT
(1) Verify headlamp dimmer switch and high beam
indicator operation.
(2) Correct defective components that could hinder
proper headlamp alignment.
(3) Verify proper tire inflation.
(4) Clean headlamp lenses.
(5) Verify that luggage area is not heavily loaded.
(6) Fuel tank should be FULL. Add 2.94 kg (6.5
lbs.) of weight over the fuel tank for each estimated
gallon of missing fuel.
HEADLAMP ALIGNMENT
A properly aimed low beam headlamp will project
top edge of high intensity pattern on screen from 50
mm (2 in.) above to 50 mm (2 in.) below headlamp
centerline. The side-to-side outboard edge of high
intensity pattern should be from 50 mm (2 in.) left to
50 mm (2 in.) right of headlamp centerline (Fig. 11).
The preferred headlamp alignment is 1(down
for the up/down adjustment and 0 for the left/
right adjustment.The high beam pattern should be
correct when the low beams are aligned properly.
To adjust low beam headlamp, rotate alignment
screws to achieve the specified aim.
Fig. 10 HEADLAMP Ð TYPICAL
1 - SEAL
2 - PUSH PIN
3 - SCREW
4 - HEADLAMP UNIT
DRLAMPS/LIGHTING - EXTERIOR 8L - 15
HEADLAMP SWITCH (Continued)
Page 682 of 2895
CAUTION: Never use compressed air to flush the
washer system plumbing. Compressed air pres-
sures are too great for the washer system plumbing
components and will result in further system dam-
age. Never use sharp instruments to clear a
plugged washer nozzle or damage to the nozzle ori-
fice and improper nozzle spray patterns will result.
INSPECTION - WIPER & WASHER SYSTEM
WIPER SYSTEM
The wiper blades and wiper arms should be
inspected periodically, not just when wiper perfor-
mance problems are experienced. This inspection
should include the following points:
(1) Inspect the wiper arms for any indications of
damage, or contamination. If the wiper arms are con-
taminated with any foreign material, clean them as
required. (Refer to 8 - ELECTRICAL/WIPERS/
WASHERS - CLEANING). If a wiper arm is damaged
or corrosion is evident, replace the wiper arm with a
new unit. Do not attempt to repair a wiper arm that
is damaged or corroded.
(2) Carefully lift the wiper blade off of the glass.
Note the action of the wiper arm hinge. The wiper
arm should pivot freely at the hinge, but with no lat-
eral looseness evident. If there is any binding evident
in the wiper arm hinge, or there is evident lateral
play in the wiper arm hinge, replace the wiper arm.
CAUTION: Do not allow the wiper arm to spring
back against the glass without the wiper blade in
place or the glass may be damaged.
(3) Once proper hinge action of the wiper arm is
confirmed, check the hinge for proper spring tension.
Remove the wiper blade from the wiper arm. Either
place a small postal scale between the blade end of
the wiper arm and the glass, or carefully lift the
blade end of the arm away from the glass using a
small fish scale. Compare the scale readings between
the right and left wiper arms. Replace a wiper arm if
it has comparatively lower spring tension, as evi-
denced by a lower scale reading.
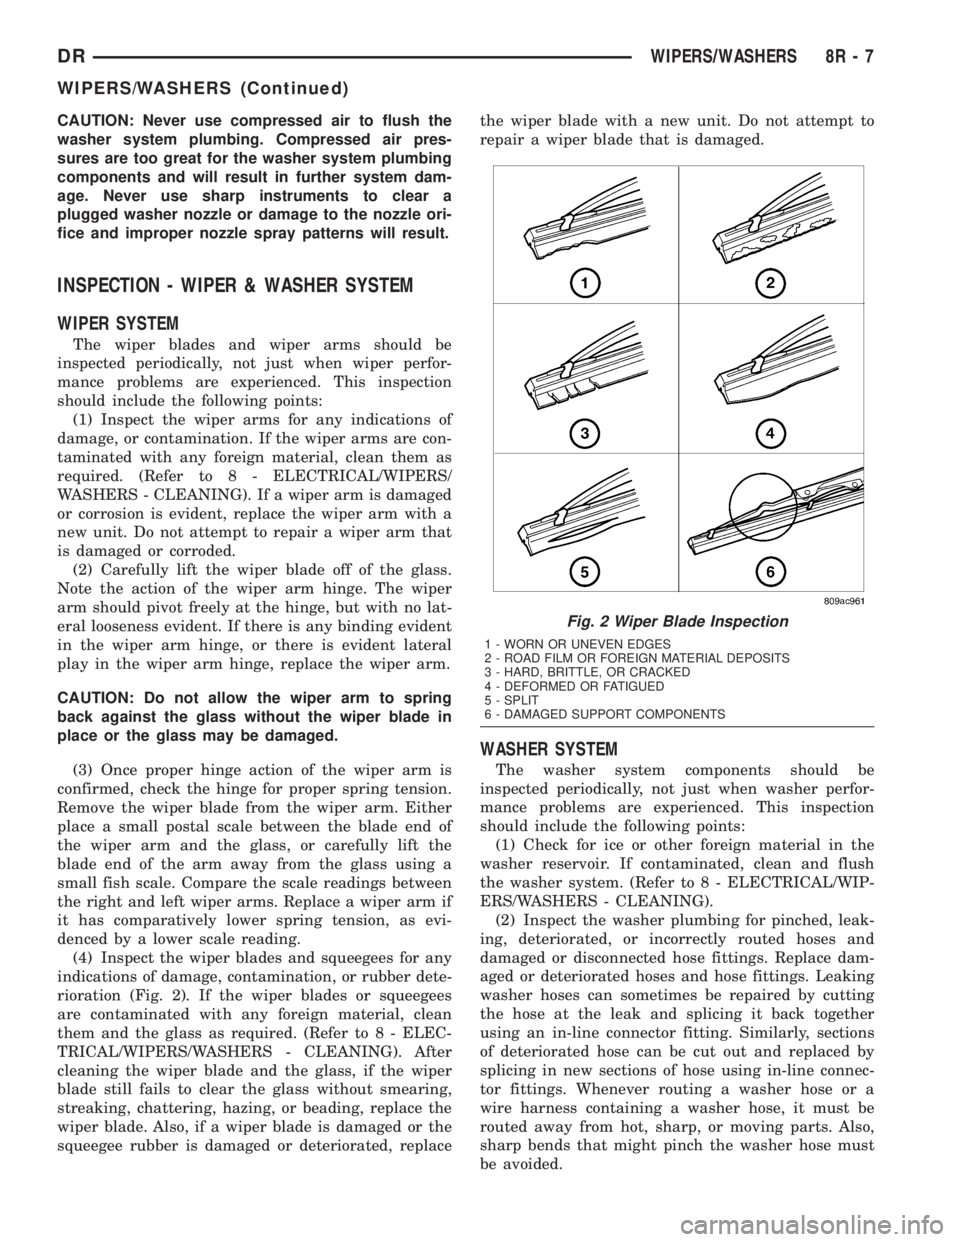
(4) Inspect the wiper blades and squeegees for any
indications of damage, contamination, or rubber dete-
rioration (Fig. 2). If the wiper blades or squeegees
are contaminated with any foreign material, clean
them and the glass as required. (Refer to 8 - ELEC-
TRICAL/WIPERS/WASHERS - CLEANING). After
cleaning the wiper blade and the glass, if the wiper
blade still fails to clear the glass without smearing,
streaking, chattering, hazing, or beading, replace the
wiper blade. Also, if a wiper blade is damaged or the
squeegee rubber is damaged or deteriorated, replacethe wiper blade with a new unit. Do not attempt to
repair a wiper blade that is damaged.
WASHER SYSTEM
The washer system components should be
inspected periodically, not just when washer perfor-
mance problems are experienced. This inspection
should include the following points:
(1) Check for ice or other foreign material in the
washer reservoir. If contaminated, clean and flush
the washer system. (Refer to 8 - ELECTRICAL/WIP-
ERS/WASHERS - CLEANING).
(2) Inspect the washer plumbing for pinched, leak-
ing, deteriorated, or incorrectly routed hoses and
damaged or disconnected hose fittings. Replace dam-
aged or deteriorated hoses and hose fittings. Leaking
washer hoses can sometimes be repaired by cutting
the hose at the leak and splicing it back together
using an in-line connector fitting. Similarly, sections
of deteriorated hose can be cut out and replaced by
splicing in new sections of hose using in-line connec-
tor fittings. Whenever routing a washer hose or a
wire harness containing a washer hose, it must be
routed away from hot, sharp, or moving parts. Also,
sharp bends that might pinch the washer hose must
be avoided.
Fig. 2 Wiper Blade Inspection
1 - WORN OR UNEVEN EDGES
2 - ROAD FILM OR FOREIGN MATERIAL DEPOSITS
3 - HARD, BRITTLE, OR CRACKED
4 - DEFORMED OR FATIGUED
5 - SPLIT
6 - DAMAGED SUPPORT COMPONENTS
DRWIPERS/WASHERS 8R - 7
WIPERS/WASHERS (Continued)
Page 683 of 2895
CHECK VALVE
DESCRIPTION
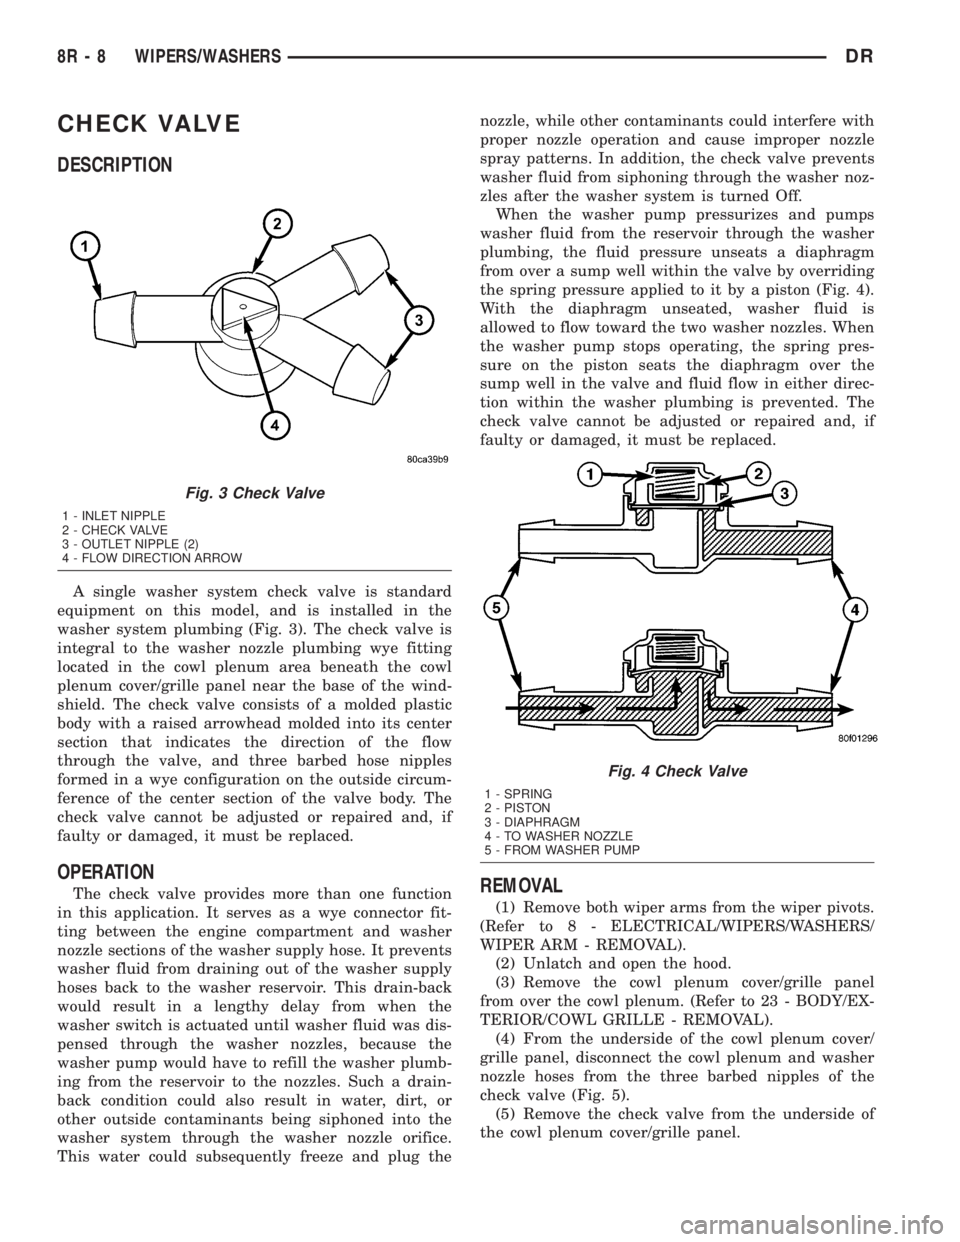
A single washer system check valve is standard
equipment on this model, and is installed in the
washer system plumbing (Fig. 3). The check valve is
integral to the washer nozzle plumbing wye fitting
located in the cowl plenum area beneath the cowl
plenum cover/grille panel near the base of the wind-
shield. The check valve consists of a molded plastic
body with a raised arrowhead molded into its center
section that indicates the direction of the flow
through the valve, and three barbed hose nipples
formed in a wye configuration on the outside circum-
ference of the center section of the valve body. The
check valve cannot be adjusted or repaired and, if
faulty or damaged, it must be replaced.
OPERATION
The check valve provides more than one function
in this application. It serves as a wye connector fit-
ting between the engine compartment and washer
nozzle sections of the washer supply hose. It prevents
washer fluid from draining out of the washer supply
hoses back to the washer reservoir. This drain-back
would result in a lengthy delay from when the
washer switch is actuated until washer fluid was dis-
pensed through the washer nozzles, because the
washer pump would have to refill the washer plumb-
ing from the reservoir to the nozzles. Such a drain-
back condition could also result in water, dirt, or
other outside contaminants being siphoned into the
washer system through the washer nozzle orifice.
This water could subsequently freeze and plug thenozzle, while other contaminants could interfere with
proper nozzle operation and cause improper nozzle
spray patterns. In addition, the check valve prevents
washer fluid from siphoning through the washer noz-
zles after the washer system is turned Off.
When the washer pump pressurizes and pumps
washer fluid from the reservoir through the washer
plumbing, the fluid pressure unseats a diaphragm
from over a sump well within the valve by overriding
the spring pressure applied to it by a piston (Fig. 4).
With the diaphragm unseated, washer fluid is
allowed to flow toward the two washer nozzles. When
the washer pump stops operating, the spring pres-
sure on the piston seats the diaphragm over the
sump well in the valve and fluid flow in either direc-
tion within the washer plumbing is prevented. The
check valve cannot be adjusted or repaired and, if
faulty or damaged, it must be replaced.REMOVAL
(1) Remove both wiper arms from the wiper pivots.
(Refer to 8 - ELECTRICAL/WIPERS/WASHERS/
WIPER ARM - REMOVAL).
(2) Unlatch and open the hood.
(3) Remove the cowl plenum cover/grille panel
from over the cowl plenum. (Refer to 23 - BODY/EX-
TERIOR/COWL GRILLE - REMOVAL).
(4) From the underside of the cowl plenum cover/
grille panel, disconnect the cowl plenum and washer
nozzle hoses from the three barbed nipples of the
check valve (Fig. 5).
(5) Remove the check valve from the underside of
the cowl plenum cover/grille panel.
Fig. 3 Check Valve
1 - INLET NIPPLE
2 - CHECK VALVE
3 - OUTLET NIPPLE (2)
4 - FLOW DIRECTION ARROW
Fig. 4 Check Valve
1 - SPRING
2 - PISTON
3 - DIAPHRAGM
4 - TO WASHER NOZZLE
5 - FROM WASHER PUMP
8R - 8 WIPERS/WASHERSDR