sensor DODGE RAM 2003 Service Repair Manual
[x] Cancel search | Manufacturer: DODGE, Model Year: 2003, Model line: RAM, Model: DODGE RAM 2003Pages: 2895, PDF Size: 83.15 MB
Page 544 of 2895
STANDARD PROCEDURE
SAFETY PRECAUTIONS
WARNING: EYE PROTECTION SHOULD BE USED
WHEN SERVICING GLASS COMPONENTS. PER-
SONAL INJURY CAN RESULT.
CAUTION: Do not touch the glass of halogen bulbs
with fingers or other possibly oily surface, reduced
bulb life will result.Do not use bulbs with higher
candle power than indicated in the Bulb Application
table . Damage to lamp and/or Daytime Running
Lamp Module can result.Do not use fuses, circuit
breakers or relays having greater amperage value
than indicated on the fuse panel or in the Owners
Manual.
When it is necessary to remove components to ser-
vice another, it should not be necessary to apply
excessive force or bend a component to remove it.
Before damaging a trim component, verify hidden
fasteners or captured edges are not holding the com-
ponent in place.
SPECIFICATIONS
EXTERIOR LAMPS
CAUTION: Do not use bulbs that have a higher can-
dle power than the bulb listed in the Bulb Applica-
tion Table. Damage to lamp can result. Do not touch
halogen bulbs with fingers or other oily surfaces.
Bulb life will be reduced.
The following Bulb Application Table lists the lamp
title on the left side of the column and trade number
or part number on the right.
BULB APPLICATION TABLE
LAMP BULB
Back-up 3157
Center High Mounted
Stop lamp912
Fog lamp 9006LL
Front Park/Turn Signal 4157NAK
Head lamp 9007
License Plate 7F69
Tail, Brake, Turn Signal 3157
Side Marker, Tail Gate,
Cab Clearance168
SPECIAL TOOLS - HEADLAMP ALIGNMENT
BACKUP LAMP
REMOVAL
(1) Remove and isolate the negitive battery cable.
(2) Remove the taillamp unit (Refer to 8 - ELEC-
TRICAL/LAMPS/LIGHTING - EXTERIOR/TAIL
LAMP UNIT - REMOVAL).
(3) Remove the bulb back plate from the tail lamp
unit.
(4) Separate the bulb from the socket.
INSTALLATION
(1) Install the bulb into the socket.
(2) Install the bulb back plate to the tail lamp
unit.
(3) Install the tail lamp unit (Refer to 8 - ELEC-
TRICAL/LAMPS/LIGHTING - EXTERIOR/TAIL
LAMP UNIT - INSTALLATION).
(4) Reconnect the negative battery cable.
BACKUP LAMP SWITCH
DESCRIPTION
Vehicles equipped with a manual transmission
have a normally open, spring-loaded plunger type
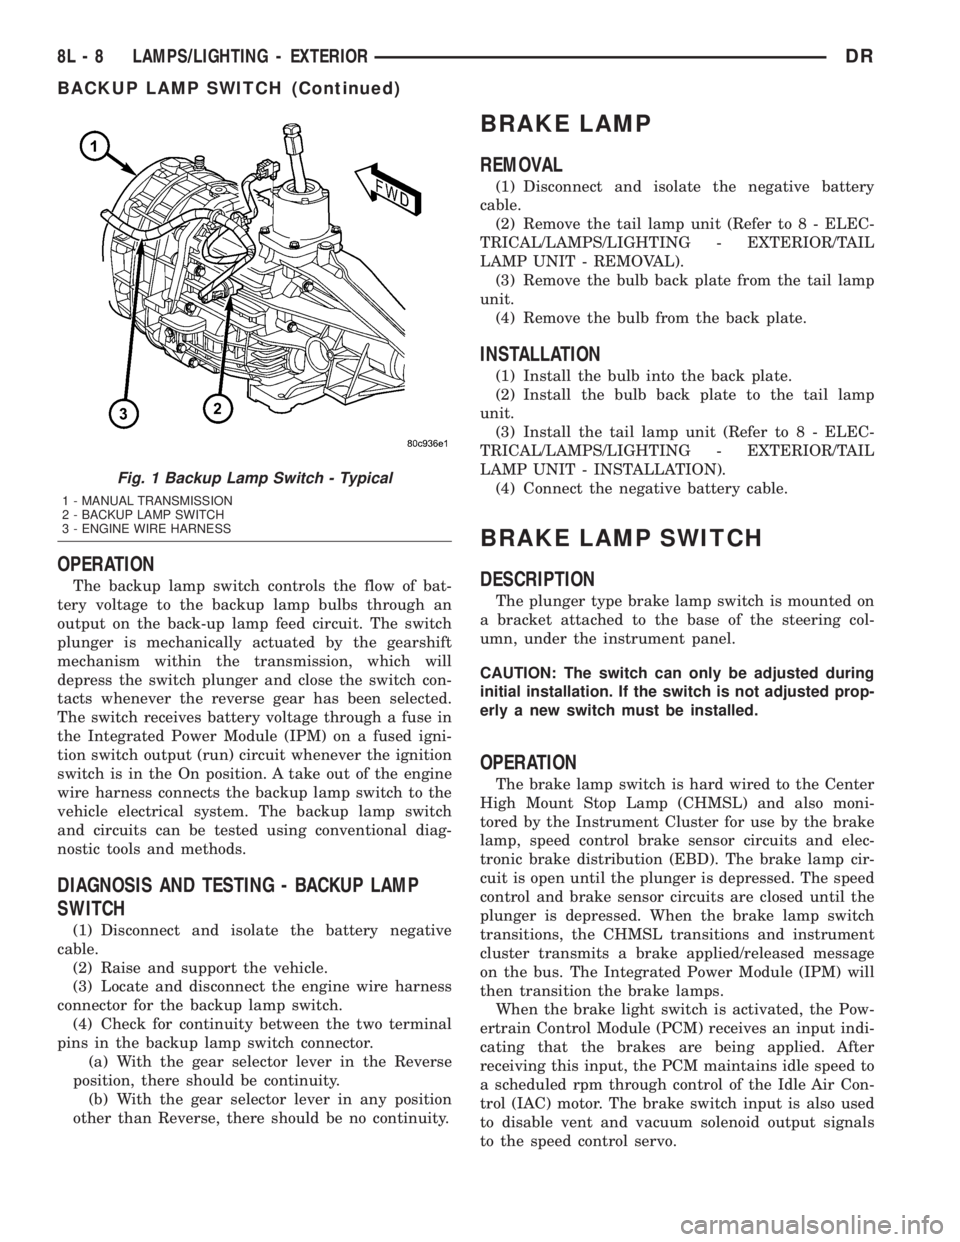
back-up lamp switch (Fig. 1). The backup lamp
switch is located in a threaded hole on the side of the
manual transmission housing. The backup lamp
switch has a threaded body and a hex formation near
the plunger end of the switch, and an integral con-
nector at the opposite end of the switch. When
installed, only the connector and the hex formation
are visible on the outside of the transmission hous-
ing. Vehicles with an optional electronic automatic
transmission have a Transmission Range Sensor
(TRS) that is used to perform several functions,
including that of the backup lamp switch. The TRS is
described in further detail elsewhere in this service
information. The backup lamp switch cannot be
adjusted or repaired and, if faulty or damaged, the
entire switch unit must be replaced.
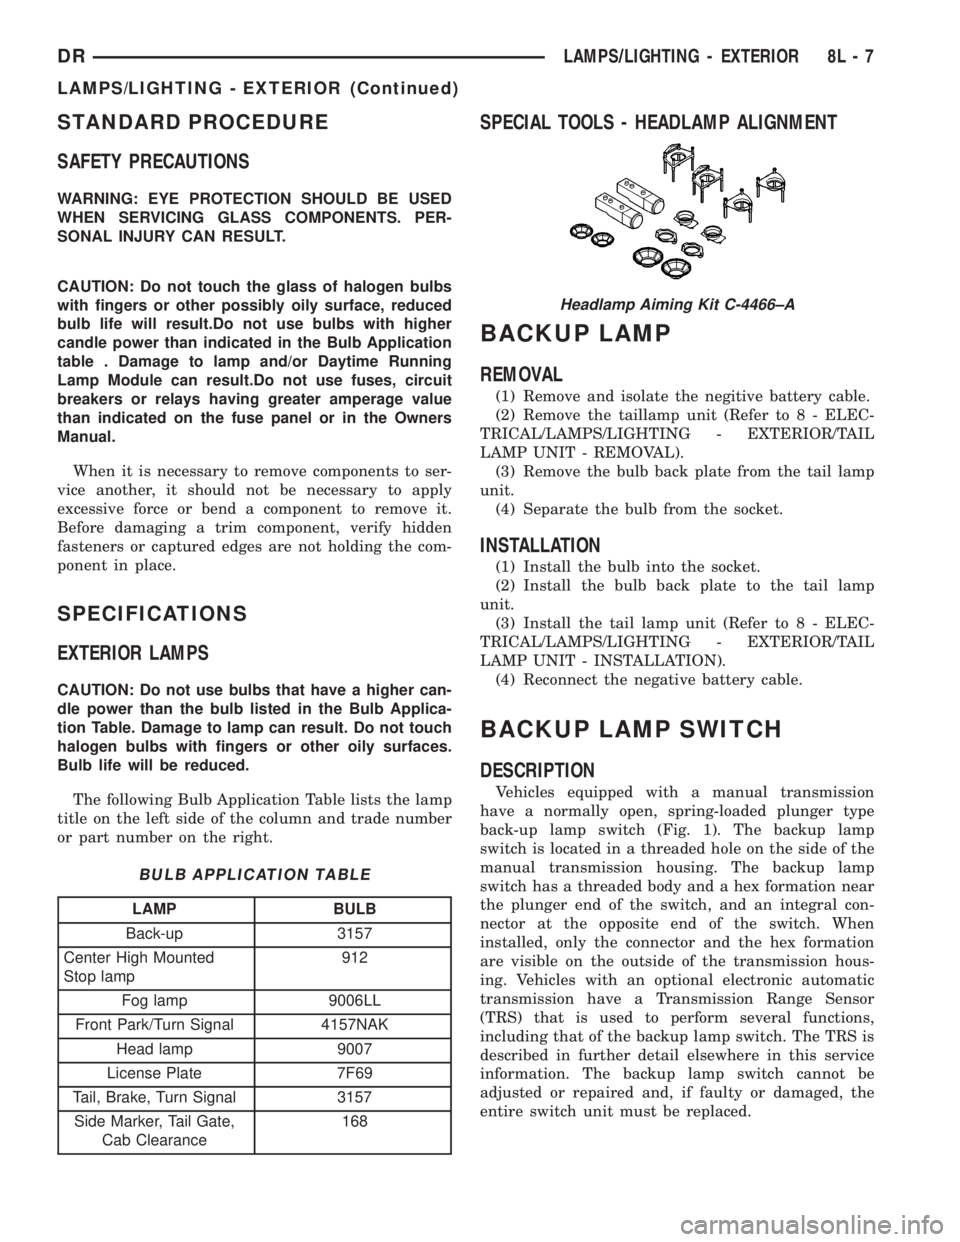
Headlamp Aiming Kit C-4466±A
DRLAMPS/LIGHTING - EXTERIOR 8L - 7
LAMPS/LIGHTING - EXTERIOR (Continued)
Page 545 of 2895
OPERATION
The backup lamp switch controls the flow of bat-
tery voltage to the backup lamp bulbs through an
output on the back-up lamp feed circuit. The switch
plunger is mechanically actuated by the gearshift
mechanism within the transmission, which will
depress the switch plunger and close the switch con-
tacts whenever the reverse gear has been selected.
The switch receives battery voltage through a fuse in
the Integrated Power Module (IPM) on a fused igni-
tion switch output (run) circuit whenever the ignition
switch is in the On position. A take out of the engine
wire harness connects the backup lamp switch to the
vehicle electrical system. The backup lamp switch
and circuits can be tested using conventional diag-
nostic tools and methods.
DIAGNOSIS AND TESTING - BACKUP LAMP
SWITCH
(1) Disconnect and isolate the battery negative
cable.
(2) Raise and support the vehicle.
(3) Locate and disconnect the engine wire harness
connector for the backup lamp switch.
(4) Check for continuity between the two terminal
pins in the backup lamp switch connector.
(a) With the gear selector lever in the Reverse
position, there should be continuity.
(b) With the gear selector lever in any position
other than Reverse, there should be no continuity.
BRAKE LAMP
REMOVAL
(1) Disconnect and isolate the negative battery
cable.
(2) Remove the tail lamp unit (Refer to 8 - ELEC-
TRICAL/LAMPS/LIGHTING - EXTERIOR/TAIL
LAMP UNIT - REMOVAL).
(3) Remove the bulb back plate from the tail lamp
unit.
(4) Remove the bulb from the back plate.
INSTALLATION
(1) Install the bulb into the back plate.
(2) Install the bulb back plate to the tail lamp
unit.
(3) Install the tail lamp unit (Refer to 8 - ELEC-
TRICAL/LAMPS/LIGHTING - EXTERIOR/TAIL
LAMP UNIT - INSTALLATION).
(4) Connect the negative battery cable.
BRAKE LAMP SWITCH
DESCRIPTION
The plunger type brake lamp switch is mounted on
a bracket attached to the base of the steering col-
umn, under the instrument panel.
CAUTION: The switch can only be adjusted during
initial installation. If the switch is not adjusted prop-
erly a new switch must be installed.
OPERATION
The brake lamp switch is hard wired to the Center
High Mount Stop Lamp (CHMSL) and also moni-
tored by the Instrument Cluster for use by the brake
lamp, speed control brake sensor circuits and elec-
tronic brake distribution (EBD). The brake lamp cir-
cuit is open until the plunger is depressed. The speed
control and brake sensor circuits are closed until the
plunger is depressed. When the brake lamp switch
transitions, the CHMSL transitions and instrument
cluster transmits a brake applied/released message
on the bus. The Integrated Power Module (IPM) will
then transition the brake lamps.
When the brake light switch is activated, the Pow-
ertrain Control Module (PCM) receives an input indi-
cating that the brakes are being applied. After
receiving this input, the PCM maintains idle speed to
a scheduled rpm through control of the Idle Air Con-
trol (IAC) motor. The brake switch input is also used
to disable vent and vacuum solenoid output signals
to the speed control servo.
Fig. 1 Backup Lamp Switch - Typical
1 - MANUAL TRANSMISSION
2 - BACKUP LAMP SWITCH
3 - ENGINE WIRE HARNESS
8L - 8 LAMPS/LIGHTING - EXTERIORDR
BACKUP LAMP SWITCH (Continued)
Page 549 of 2895
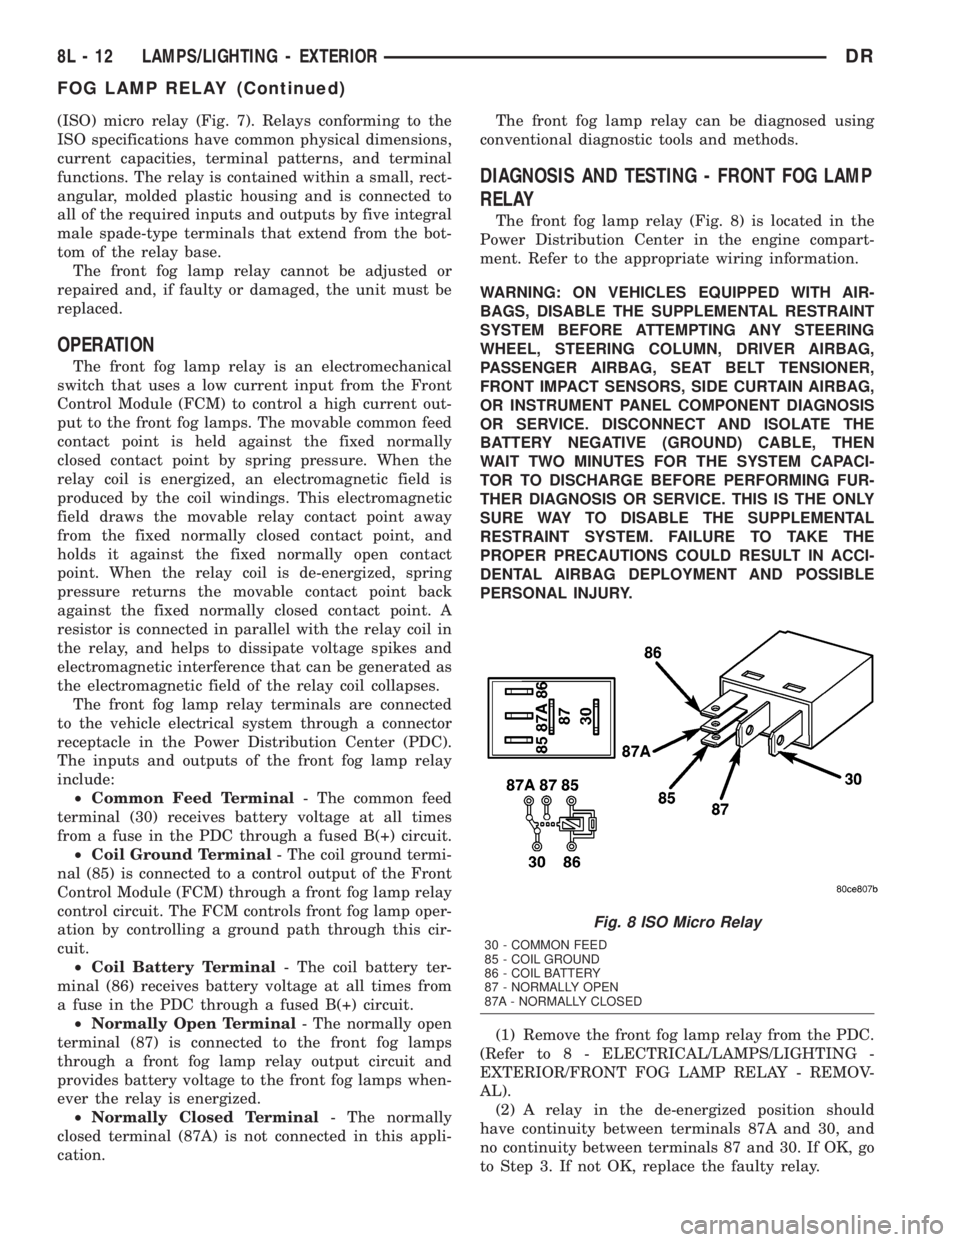
(ISO) micro relay (Fig. 7). Relays conforming to the
ISO specifications have common physical dimensions,
current capacities, terminal patterns, and terminal
functions. The relay is contained within a small, rect-
angular, molded plastic housing and is connected to
all of the required inputs and outputs by five integral
male spade-type terminals that extend from the bot-
tom of the relay base.
The front fog lamp relay cannot be adjusted or
repaired and, if faulty or damaged, the unit must be
replaced.
OPERATION
The front fog lamp relay is an electromechanical
switch that uses a low current input from the Front
Control Module (FCM) to control a high current out-
put to the front fog lamps. The movable common feed
contact point is held against the fixed normally
closed contact point by spring pressure. When the
relay coil is energized, an electromagnetic field is
produced by the coil windings. This electromagnetic
field draws the movable relay contact point away
from the fixed normally closed contact point, and
holds it against the fixed normally open contact
point. When the relay coil is de-energized, spring
pressure returns the movable contact point back
against the fixed normally closed contact point. A
resistor is connected in parallel with the relay coil in
the relay, and helps to dissipate voltage spikes and
electromagnetic interference that can be generated as
the electromagnetic field of the relay coil collapses.
The front fog lamp relay terminals are connected
to the vehicle electrical system through a connector
receptacle in the Power Distribution Center (PDC).
The inputs and outputs of the front fog lamp relay
include:
²Common Feed Terminal- The common feed
terminal (30) receives battery voltage at all times
from a fuse in the PDC through a fused B(+) circuit.
²Coil Ground Terminal- The coil ground termi-
nal (85) is connected to a control output of the Front
Control Module (FCM) through a front fog lamp relay
control circuit. The FCM controls front fog lamp oper-
ation by controlling a ground path through this cir-
cuit.
²Coil Battery Terminal- The coil battery ter-
minal (86) receives battery voltage at all times from
a fuse in the PDC through a fused B(+) circuit.
²Normally Open Terminal- The normally open
terminal (87) is connected to the front fog lamps
through a front fog lamp relay output circuit and
provides battery voltage to the front fog lamps when-
ever the relay is energized.
²Normally Closed Terminal- The normally
closed terminal (87A) is not connected in this appli-
cation.The front fog lamp relay can be diagnosed using
conventional diagnostic tools and methods.
DIAGNOSIS AND TESTING - FRONT FOG LAMP
RELAY
The front fog lamp relay (Fig. 8) is located in the
Power Distribution Center in the engine compart-
ment. Refer to the appropriate wiring information.
WARNING: ON VEHICLES EQUIPPED WITH AIR-
BAGS, DISABLE THE SUPPLEMENTAL RESTRAINT
SYSTEM BEFORE ATTEMPTING ANY STEERING
WHEEL, STEERING COLUMN, DRIVER AIRBAG,
PASSENGER AIRBAG, SEAT BELT TENSIONER,
FRONT IMPACT SENSORS, SIDE CURTAIN AIRBAG,
OR INSTRUMENT PANEL COMPONENT DIAGNOSIS
OR SERVICE. DISCONNECT AND ISOLATE THE
BATTERY NEGATIVE (GROUND) CABLE, THEN
WAIT TWO MINUTES FOR THE SYSTEM CAPACI-
TOR TO DISCHARGE BEFORE PERFORMING FUR-
THER DIAGNOSIS OR SERVICE. THIS IS THE ONLY
SURE WAY TO DISABLE THE SUPPLEMENTAL
RESTRAINT SYSTEM. FAILURE TO TAKE THE
PROPER PRECAUTIONS COULD RESULT IN ACCI-
DENTAL AIRBAG DEPLOYMENT AND POSSIBLE
PERSONAL INJURY.
(1) Remove the front fog lamp relay from the PDC.
(Refer to 8 - ELECTRICAL/LAMPS/LIGHTING -
EXTERIOR/FRONT FOG LAMP RELAY - REMOV-
AL).
(2) A relay in the de-energized position should
have continuity between terminals 87A and 30, and
no continuity between terminals 87 and 30. If OK, go
to Step 3. If not OK, replace the faulty relay.
Fig. 8 ISO Micro Relay
30 - COMMON FEED
85 - COIL GROUND
86 - COIL BATTERY
87 - NORMALLY OPEN
87A - NORMALLY CLOSED
8L - 12 LAMPS/LIGHTING - EXTERIORDR
FOG LAMP RELAY (Continued)
Page 550 of 2895

(3) Resistance between terminals 85 and 86 (elec-
tromagnet) should be 75 8 ohms. If OK, go to Step
4. If not OK, replace the faulty relay.
(4) Connect a battery to terminals 85 and 86.
There should now be continuity between terminals
30 and 87, and no continuity between terminals 87A
and 30. If OK, reinstall the relay and use a DRBIIIt
scan tool to perform further testing. Refer to the
appropriate diagnostic information.
REMOVAL
WARNING: ON VEHICLES EQUIPPED WITH AIR-
BAGS, DISABLE THE SUPPLEMENTAL RESTRAINT
SYSTEM BEFORE ATTEMPTING ANY STEERING
WHEEL, STEERING COLUMN, DRIVER AIRBAG,
PASSENGER AIRBAG, SEAT BELT TENSIONER,
FRONT IMPACT SENSORS, SIDE CURTAIN AIRBAG,
OR INSTRUMENT PANEL COMPONENT DIAGNOSIS
OR SERVICE. DISCONNECT AND ISOLATE THE
BATTERY NEGATIVE (GROUND) CABLE, THEN
WAIT TWO MINUTES FOR THE SYSTEM CAPACI-
TOR TO DISCHARGE BEFORE PERFORMING FUR-
THER DIAGNOSIS OR SERVICE. THIS IS THE ONLY
SURE WAY TO DISABLE THE SUPPLEMENTAL
RESTRAINT SYSTEM. FAILURE TO TAKE THE
PROPER PRECAUTIONS COULD RESULT IN ACCI-
DENTAL AIRBAG DEPLOYMENT AND POSSIBLE
PERSONAL INJURY.
(1) Disconnect and isolate the battery negative
cable.
(2) Remove the cover for the Power Distribution
Center (PDC).
(3) Remove the front fog lamp relay by grasping it
firmly and pulling it straight out from the receptacle
in the PDC.
INSTALLATION
WARNING: ON VEHICLES EQUIPPED WITH AIR-
BAGS, DISABLE THE SUPPLEMENTAL RESTRAINT
SYSTEM BEFORE ATTEMPTING ANY STEERING
WHEEL, STEERING COLUMN, DRIVER AIRBAG,
PASSENGER AIRBAG, SEAT BELT TENSIONER,
FRONT IMPACT SENSORS, SIDE CURTAIN AIRBAG,
OR INSTRUMENT PANEL COMPONENT DIAGNOSIS
OR SERVICE. DISCONNECT AND ISOLATE THE
BATTERY NEGATIVE (GROUND) CABLE, THEN
WAIT TWO MINUTES FOR THE SYSTEM CAPACI-
TOR TO DISCHARGE BEFORE PERFORMING FUR-
THER DIAGNOSIS OR SERVICE. THIS IS THE ONLY
SURE WAY TO DISABLE THE SUPPLEMENTAL
RESTRAINT SYSTEM. FAILURE TO TAKE THE
PROPER PRECAUTIONS COULD RESULT IN ACCI-
DENTAL AIRBAG DEPLOYMENT AND POSSIBLE
PERSONAL INJURY.(1) Position the front fog lamp relay to the proper
receptacle in the Power Distribution Center (PDC).
(2) Align the front fog lamp relay terminals with
the terminal cavities in the PDC.
(3) Press firmly and evenly on the top of the front
fog lamp relay until the terminals are fully seated in
the PDC.
(4) Reconnect the battery negative cable.
HAZARD SWITCH
DESCRIPTION
The hazard switch is activated by a push button
located in the multifunction switch on the top of the
steering column between the steering wheel and
instrument cluster.
The hazard warning system allows the vehicle
operator to provide other vehicle operators in the
near proximity an optical indication that the vehicle
is disabled or an obstacle to traffic flow. The hazard
warning system has battery voltage at all times,
regardless of ignition position.
OPERATION
The instrument cluster monitors the multiplexed
multifunction switch operation. When the hazard
warning switch is activated, the instrument cluster
will send a J1850 bus message to the Front Control
Module (FCM), then activate the two turn signal indi-
cators and audible click in the instrument cluster.
The FCM will then activate the necessary relays in
the Power Distribution Center (PDC) to begin flash-
ing both the front and rear turn signal indicator
lamps.
HEADLAMP
REMOVAL
(1) Disconnect and isolate the negitive battery
cable.
(2) Remove the headlamp unit (Refer to 8 - ELEC-
TRICAL/LAMPS/LIGHTING - EXTERIOR/HEAD-
LAMP UNIT - REMOVAL).
(3) Seperate the socket from the headlamp unit.
INSTALLATION
CAUTION: Do Not Touch the bulb glass with fingers
or other oily surfaces. Reduced bulb life will result.
(1) Install the socket into the headlamp unit.
(2) Install the headlamp unit (Refer to 8 - ELEC-
TRICAL/LAMPS/LIGHTING - EXTERIOR/HEAD-
LAMP UNIT - INSTALLATION).
(3) Connect the negitive battery cable.
DRLAMPS/LIGHTING - EXTERIOR 8L - 13
FOG LAMP RELAY (Continued)
Page 557 of 2895
the park lamp relay output circuit and provides
ground to the park lamps when the relay is de-ener-
gized, and battery current to the park lamps when-
ever the relay is energized.
²Coil Ground Terminal- The coil ground termi-
nal (85) is connected to a control output of the Front
Control Module (FCM) through a park lamp relay
control circuit. The FCM controls park lamp opera-
tion by controlling a ground path through this cir-
cuit.
²Coil Battery Terminal- The coil battery ter-
minal (86) receives battery current at all times from
a fuse in the PDC through a fused B(+) circuit.
²Normally Open Terminal- The normally open
terminal (87) receives battery current at all times
from a fuse in the Power Distribution Center (PDC)
through a fused B(+) circuit.
²Normally Closed Terminal- The normally
closed terminal (87A) is connected to ground at all
times.
The park lamp relay can be diagnosed using con-
ventional diagnostic tools and methods.
DIAGNOSIS AND TESTING - PARK LAMP
RELAY
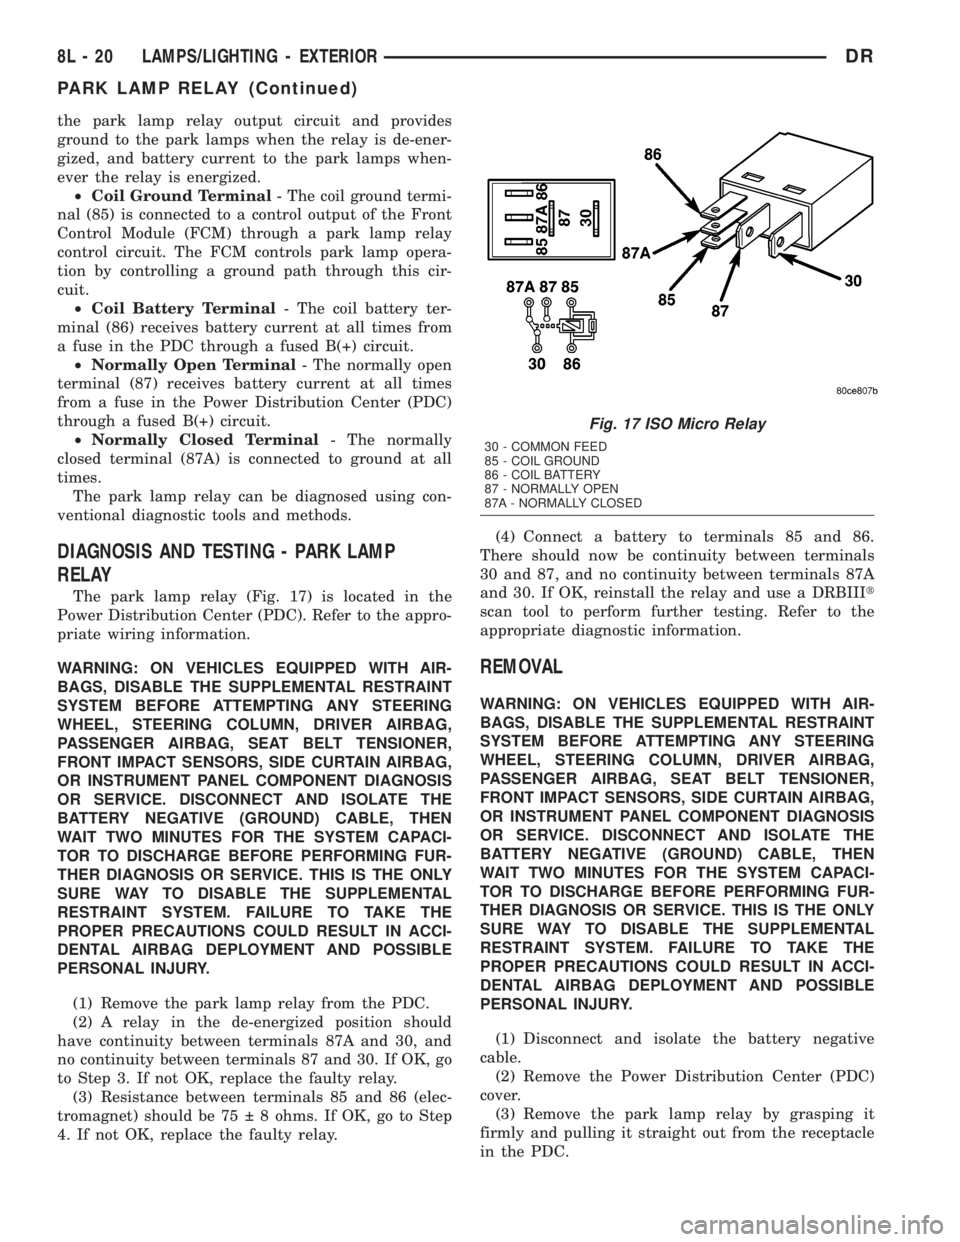
The park lamp relay (Fig. 17) is located in the
Power Distribution Center (PDC). Refer to the appro-
priate wiring information.
WARNING: ON VEHICLES EQUIPPED WITH AIR-
BAGS, DISABLE THE SUPPLEMENTAL RESTRAINT
SYSTEM BEFORE ATTEMPTING ANY STEERING
WHEEL, STEERING COLUMN, DRIVER AIRBAG,
PASSENGER AIRBAG, SEAT BELT TENSIONER,
FRONT IMPACT SENSORS, SIDE CURTAIN AIRBAG,
OR INSTRUMENT PANEL COMPONENT DIAGNOSIS
OR SERVICE. DISCONNECT AND ISOLATE THE
BATTERY NEGATIVE (GROUND) CABLE, THEN
WAIT TWO MINUTES FOR THE SYSTEM CAPACI-
TOR TO DISCHARGE BEFORE PERFORMING FUR-
THER DIAGNOSIS OR SERVICE. THIS IS THE ONLY
SURE WAY TO DISABLE THE SUPPLEMENTAL
RESTRAINT SYSTEM. FAILURE TO TAKE THE
PROPER PRECAUTIONS COULD RESULT IN ACCI-
DENTAL AIRBAG DEPLOYMENT AND POSSIBLE
PERSONAL INJURY.
(1) Remove the park lamp relay from the PDC.
(2) A relay in the de-energized position should
have continuity between terminals 87A and 30, and
no continuity between terminals 87 and 30. If OK, go
to Step 3. If not OK, replace the faulty relay.
(3) Resistance between terminals 85 and 86 (elec-
tromagnet) should be 75 8 ohms. If OK, go to Step
4. If not OK, replace the faulty relay.(4) Connect a battery to terminals 85 and 86.
There should now be continuity between terminals
30 and 87, and no continuity between terminals 87A
and 30. If OK, reinstall the relay and use a DRBIIIt
scan tool to perform further testing. Refer to the
appropriate diagnostic information.
REMOVAL
WARNING: ON VEHICLES EQUIPPED WITH AIR-
BAGS, DISABLE THE SUPPLEMENTAL RESTRAINT
SYSTEM BEFORE ATTEMPTING ANY STEERING
WHEEL, STEERING COLUMN, DRIVER AIRBAG,
PASSENGER AIRBAG, SEAT BELT TENSIONER,
FRONT IMPACT SENSORS, SIDE CURTAIN AIRBAG,
OR INSTRUMENT PANEL COMPONENT DIAGNOSIS
OR SERVICE. DISCONNECT AND ISOLATE THE
BATTERY NEGATIVE (GROUND) CABLE, THEN
WAIT TWO MINUTES FOR THE SYSTEM CAPACI-
TOR TO DISCHARGE BEFORE PERFORMING FUR-
THER DIAGNOSIS OR SERVICE. THIS IS THE ONLY
SURE WAY TO DISABLE THE SUPPLEMENTAL
RESTRAINT SYSTEM. FAILURE TO TAKE THE
PROPER PRECAUTIONS COULD RESULT IN ACCI-
DENTAL AIRBAG DEPLOYMENT AND POSSIBLE
PERSONAL INJURY.
(1) Disconnect and isolate the battery negative
cable.
(2) Remove the Power Distribution Center (PDC)
cover.
(3) Remove the park lamp relay by grasping it
firmly and pulling it straight out from the receptacle
in the PDC.
Fig. 17 ISO Micro Relay
30 - COMMON FEED
85 - COIL GROUND
86 - COIL BATTERY
87 - NORMALLY OPEN
87A - NORMALLY CLOSED
8L - 20 LAMPS/LIGHTING - EXTERIORDR
PARK LAMP RELAY (Continued)
Page 558 of 2895
INSTALLATION
WARNING: ON VEHICLES EQUIPPED WITH AIR-
BAGS, DISABLE THE SUPPLEMENTAL RESTRAINT
SYSTEM BEFORE ATTEMPTING ANY STEERING
WHEEL, STEERING COLUMN, DRIVER AIRBAG,
PASSENGER AIRBAG, SEAT BELT TENSIONER,
FRONT IMPACT SENSORS, SIDE CURTAIN AIRBAG,
OR INSTRUMENT PANEL COMPONENT DIAGNOSIS
OR SERVICE. DISCONNECT AND ISOLATE THE
BATTERY NEGATIVE (GROUND) CABLE, THEN
WAIT TWO MINUTES FOR THE SYSTEM CAPACI-
TOR TO DISCHARGE BEFORE PERFORMING FUR-
THER DIAGNOSIS OR SERVICE. THIS IS THE ONLY
SURE WAY TO DISABLE THE SUPPLEMENTAL
RESTRAINT SYSTEM. FAILURE TO TAKE THE
PROPER PRECAUTIONS COULD RESULT IN ACCI-
DENTAL AIRBAG DEPLOYMENT AND POSSIBLE
PERSONAL INJURY.
(1) Position the park lamp relay to the proper
receptacle in the Power Distribution Center (PDC).
(2) Align the park lamp relay terminals with the
terminal cavities in the PDC.
(3) Press firmly and evenly on the top of the park
lamp relay until the terminals are fully seated in the
PDC.
(4) Install the PDC cover.
(5) Reconnect the battery negative cable.
PARK/TURN SIGNAL LAMP
REMOVAL
(1) Disconnect and isolate the negative battery
cable.
(2) Remove the headlamp unit.(Refer to 8 - ELEC-
TRICAL/LAMPS/LIGHTING - EXTERIOR/HEAD-
LAMP UNIT - REMOVAL).
(3) Seperate the socket from the headlamp unit.
(4) Release the bulb socket locking tabs and seper-
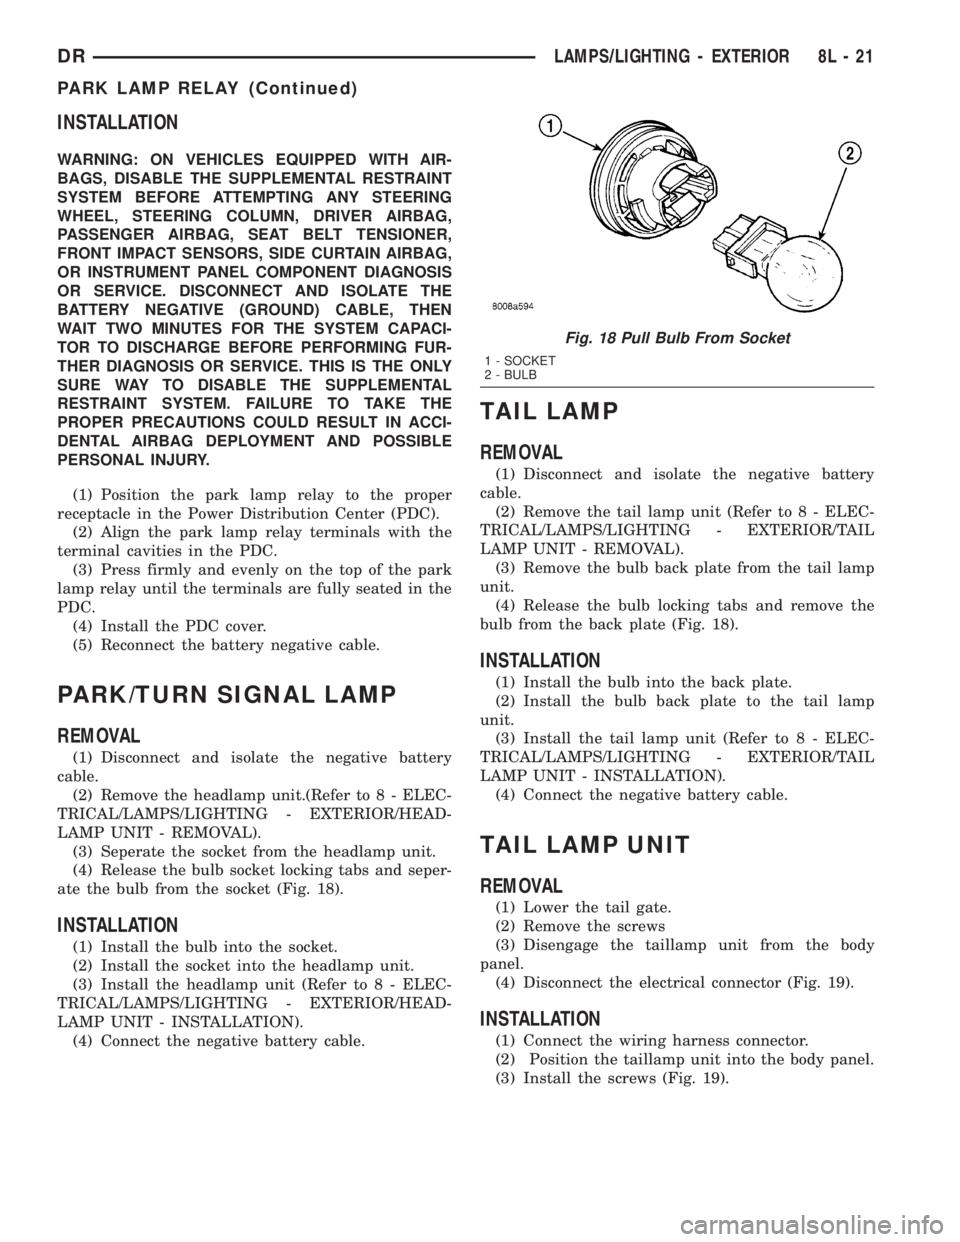
ate the bulb from the socket (Fig. 18).
INSTALLATION
(1) Install the bulb into the socket.
(2) Install the socket into the headlamp unit.
(3) Install the headlamp unit (Refer to 8 - ELEC-
TRICAL/LAMPS/LIGHTING - EXTERIOR/HEAD-
LAMP UNIT - INSTALLATION).
(4) Connect the negative battery cable.
TAIL LAMP
REMOVAL
(1) Disconnect and isolate the negative battery
cable.
(2) Remove the tail lamp unit (Refer to 8 - ELEC-
TRICAL/LAMPS/LIGHTING - EXTERIOR/TAIL
LAMP UNIT - REMOVAL).
(3) Remove the bulb back plate from the tail lamp
unit.
(4) Release the bulb locking tabs and remove the
bulb from the back plate (Fig. 18).
INSTALLATION
(1) Install the bulb into the back plate.
(2) Install the bulb back plate to the tail lamp
unit.
(3) Install the tail lamp unit (Refer to 8 - ELEC-
TRICAL/LAMPS/LIGHTING - EXTERIOR/TAIL
LAMP UNIT - INSTALLATION).
(4) Connect the negative battery cable.
TAIL LAMP UNIT
REMOVAL
(1) Lower the tail gate.
(2) Remove the screws
(3) Disengage the taillamp unit from the body
panel.
(4) Disconnect the electrical connector (Fig. 19).
INSTALLATION
(1) Connect the wiring harness connector.
(2) Position the taillamp unit into the body panel.
(3) Install the screws (Fig. 19).
Fig. 18 Pull Bulb From Socket
1 - SOCKET
2 - BULB
DRLAMPS/LIGHTING - EXTERIOR 8L - 21
PARK LAMP RELAY (Continued)
Page 564 of 2895
MESSAGE SYSTEMS
TABLE OF CONTENTS
page page
OVERHEAD CONSOLE
DESCRIPTION..........................1
OPERATION............................2
DIAGNOSIS AND TESTING - OVERHEAD
CONSOLE............................2
STANDARD PROCEDURE
STANDARD PROCEDURE - READING/
COURTESY LAMP REPLACEMENT.........3
STANDARD PROCEDURE - MODULE LENS
REPLACEMENT.......................3
STANDARD PROCEDURE - MODULE LAMP
REPLACEMENT.......................3
STANDARD PROCEDURE - COMPASS
CALIBRATION.........................3
STANDARD PROCEDURE - COMPASS
DEMAGNETIZING......................4
STANDARD PROCEDURE - COMPASS
VARIATION ADJUSTMENT................4
REMOVAL
OVERHEAD CONSOLE REMOVAL.........5
INSTALLATION..........................5
SPECIAL TOOLS
OVERHEAD CONSOLE..................6
COMPASS/MINI-TRIP COMPUTER
DESCRIPTION..........................6
OPERATION............................7
DIAGNOSIS AND TESTING - COMPASS
MINI-TRIP COMPUTER..................7
REMOVAL.............................7
INSTALLATION..........................7
ELECTRONIC VEHICLE INFO CENTER
DESCRIPTION..........................7OPERATION............................8
DIAGNOSIS AND TESTING - ELECTRONIC
VEHICLE INFORMATION CENTER.........8
STANDARD PROCEDURE - ELECTRONIC
VEHICLE INFORMATION CENTER
PROGRAMMING.......................8
REMOVAL.............................10
INSTALLATION.........................10
AMBIENT TEMP SENSOR
DESCRIPTION.........................10
OPERATION...........................10
DIAGNOSIS AND TESTING
DIAGNOSIS AND TESTING - AMBIENT
TEMPERATURE SENSOR...............11
DIAGNOSIS AND TESTING - AMBIENT
TEMPERATURE SENSOR CIRCUIT........11
REMOVAL.............................11
INSTALLATION.........................11
UNIVERSAL TRANSMITTER
DESCRIPTION.........................11
OPERATION...........................12
DIAGNOSIS AND TESTING - UNIVERSAL
TRANSMITTER.......................12
STANDARD PROCEDURE
STANDARD PROCEDURE - ERASING
TRANSMITTER CODES.................12
STANDARD PROCEDURE - SETTING
TRANSMITTER CODES.................12
REMOVAL.............................13
OVERHEAD CONSOLE
DESCRIPTION
Two different overhead consoles are available on
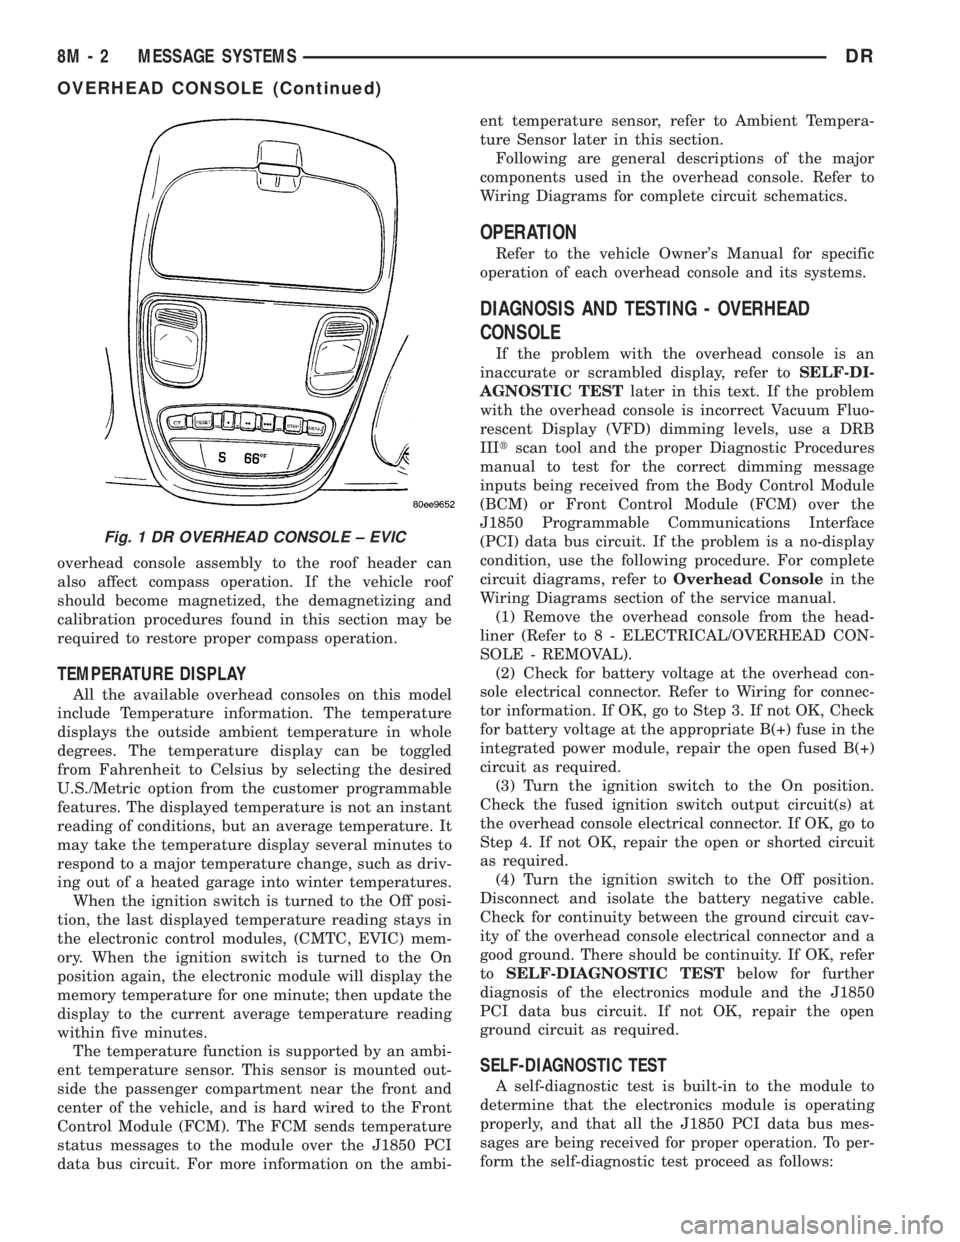
DR models. The Electronic Vehicle Information Cen-
ter (EVIC) (Fig. 1) or Compass Mini-Trip Computer
(CMTC). All consoles are equipped with two reading/
courtesy lamps. The overhead console is mounted
with screws and two snap clips to a molded plastic
retainer bracket located above the headliner.
COMPASS DISPLAY
All the available overhead consoles on this model
include Compass information. While in the compass/
temperature mode, the compass will display thedirection in which the vehicle is pointed using the
eight major compass headings (Examples: north is N,
northeast is NE). The self-calibrating compass unit
requires no adjusting in normal use. The only cali-
bration that may prove necessary is to drive the vehi-
cle at 5 to 8 kilometers-per-hour (3 to 5 miles-per-
hour), on level ground in a square shaped pattern.
This will reorient the compass unit to its vehicle.
The compass unit also will compensate for magne-
tism the body of the vehicle may acquire during nor-
mal use. However, avoid placing anything magnetic
directly on the roof of the vehicle. Magnetic mounts
for an antenna, a repair order hat, or a funeral pro-
cession flag can exceed the compensating ability of
the compass unit if placed on the roof panel. Mag-
netic bit drivers used on the fasteners that hold the
DRMESSAGE SYSTEMS 8M - 1
Page 565 of 2895
overhead console assembly to the roof header can
also affect compass operation. If the vehicle roof
should become magnetized, the demagnetizing and
calibration procedures found in this section may be
required to restore proper compass operation.
TEMPERATURE DISPLAY
All the available overhead consoles on this model
include Temperature information. The temperature
displays the outside ambient temperature in whole
degrees. The temperature display can be toggled
from Fahrenheit to Celsius by selecting the desired
U.S./Metric option from the customer programmable
features. The displayed temperature is not an instant
reading of conditions, but an average temperature. It
may take the temperature display several minutes to
respond to a major temperature change, such as driv-
ing out of a heated garage into winter temperatures.
When the ignition switch is turned to the Off posi-
tion, the last displayed temperature reading stays in
the electronic control modules, (CMTC, EVIC) mem-
ory. When the ignition switch is turned to the On
position again, the electronic module will display the
memory temperature for one minute; then update the
display to the current average temperature reading
within five minutes.
The temperature function is supported by an ambi-
ent temperature sensor. This sensor is mounted out-
side the passenger compartment near the front and
center of the vehicle, and is hard wired to the Front
Control Module (FCM). The FCM sends temperature
status messages to the module over the J1850 PCI
data bus circuit. For more information on the ambi-ent temperature sensor, refer to Ambient Tempera-
ture Sensor later in this section.
Following are general descriptions of the major
components used in the overhead console. Refer to
Wiring Diagrams for complete circuit schematics.
OPERATION
Refer to the vehicle Owner's Manual for specific
operation of each overhead console and its systems.
DIAGNOSIS AND TESTING - OVERHEAD
CONSOLE
If the problem with the overhead console is an
inaccurate or scrambled display, refer toSELF-DI-
AGNOSTIC TESTlater in this text. If the problem
with the overhead console is incorrect Vacuum Fluo-
rescent Display (VFD) dimming levels, use a DRB
IIItscan tool and the proper Diagnostic Procedures
manual to test for the correct dimming message
inputs being received from the Body Control Module
(BCM) or Front Control Module (FCM) over the
J1850 Programmable Communications Interface
(PCI) data bus circuit. If the problem is a no-display
condition, use the following procedure. For complete
circuit diagrams, refer toOverhead Consolein the
Wiring Diagrams section of the service manual.
(1) Remove the overhead console from the head-
liner (Refer to 8 - ELECTRICAL/OVERHEAD CON-
SOLE - REMOVAL).
(2) Check for battery voltage at the overhead con-
sole electrical connector. Refer to Wiring for connec-
tor information. If OK, go to Step 3. If not OK, Check
for battery voltage at the appropriate B(+) fuse in the
integrated power module, repair the open fused B(+)
circuit as required.
(3) Turn the ignition switch to the On position.
Check the fused ignition switch output circuit(s) at
the overhead console electrical connector. If OK, go to
Step 4. If not OK, repair the open or shorted circuit
as required.
(4) Turn the ignition switch to the Off position.
Disconnect and isolate the battery negative cable.
Check for continuity between the ground circuit cav-
ity of the overhead console electrical connector and a
good ground. There should be continuity. If OK, refer
toSELF-DIAGNOSTIC TESTbelow for further
diagnosis of the electronics module and the J1850
PCI data bus circuit. If not OK, repair the open
ground circuit as required.
SELF-DIAGNOSTIC TEST
A self-diagnostic test is built-in to the module to
determine that the electronics module is operating
properly, and that all the J1850 PCI data bus mes-
sages are being received for proper operation. To per-
form the self-diagnostic test proceed as follows:
Fig. 1 DR OVERHEAD CONSOLE ± EVIC
8M - 2 MESSAGE SYSTEMSDR
OVERHEAD CONSOLE (Continued)
Page 570 of 2895
OPERATION
The Compass Mini-Trip Computer module in the
overhead console has buttons used to select various
functions. The CMTC selector buttons will not oper-
ate until the ignition is in the RUN position.
When the ignition switch is first turned to the
RUN position the CMTC display;
²Returns to the last mode setting selected before
the ignition was last switched OFF.
DIAGNOSIS AND TESTING - COMPASS
MINI-TRIP COMPUTER
Compass Mini-Trip Computer (CMTC) data is
obtained from other electronic modules (CCN, FCM
and JTEC) on the J1850 Data Bus circuit. The
CMTC will display dashes (- -) for any of the screens
it did not receive the bus messages. The label corre-
sponding to the missing information will be lit. If no
compass mini-trip computer data is displayed, check
the J1850 Data Bus circuit communications and the
other modules.
Refer to Overhead Console Diagnosis and Testing
for instructions on performing a CMTC module Self-
Diagnostic Test. The DRB IIItis recommended for
checking the J1850 Data Bus circuit and the other
modules. Perform the CMTC self diagnosis before
replacing the CMTC module.
REMOVAL
(1) Disconnect and isolate the negative battery
cable.
(2) Remove the overhead console from the headlin-
er.(Refer to 8 - ELECTRICAL/OVERHEAD CON-
SOLE - REMOVAL).
(3) Remove the screws holding Compass Mini-Trip
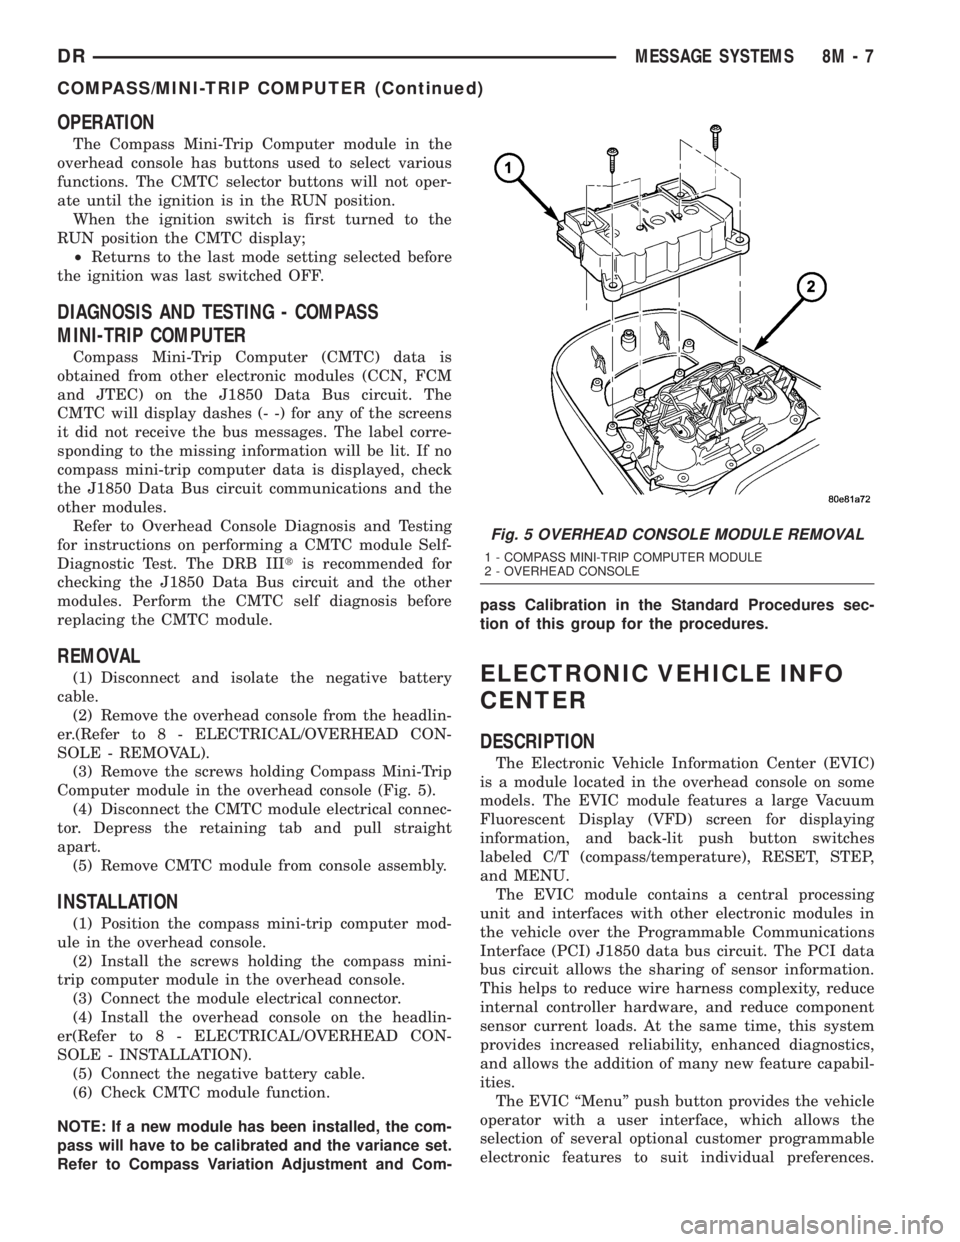
Computer module in the overhead console (Fig. 5).
(4) Disconnect the CMTC module electrical connec-
tor. Depress the retaining tab and pull straight
apart.
(5) Remove CMTC module from console assembly.
INSTALLATION
(1) Position the compass mini-trip computer mod-
ule in the overhead console.
(2) Install the screws holding the compass mini-
trip computer module in the overhead console.
(3) Connect the module electrical connector.
(4) Install the overhead console on the headlin-
er(Refer to 8 - ELECTRICAL/OVERHEAD CON-
SOLE - INSTALLATION).
(5) Connect the negative battery cable.
(6) Check CMTC module function.
NOTE: If a new module has been installed, the com-
pass will have to be calibrated and the variance set.
Refer to Compass Variation Adjustment and Com-pass Calibration in the Standard Procedures sec-
tion of this group for the procedures.
ELECTRONIC VEHICLE INFO
CENTER
DESCRIPTION
The Electronic Vehicle Information Center (EVIC)
is a module located in the overhead console on some
models. The EVIC module features a large Vacuum
Fluorescent Display (VFD) screen for displaying
information, and back-lit push button switches
labeled C/T (compass/temperature), RESET, STEP,
and MENU.
The EVIC module contains a central processing
unit and interfaces with other electronic modules in
the vehicle over the Programmable Communications
Interface (PCI) J1850 data bus circuit. The PCI data
bus circuit allows the sharing of sensor information.
This helps to reduce wire harness complexity, reduce
internal controller hardware, and reduce component
sensor current loads. At the same time, this system
provides increased reliability, enhanced diagnostics,
and allows the addition of many new feature capabil-
ities.
The EVIC ªMenuº push button provides the vehicle
operator with a user interface, which allows the
selection of several optional customer programmable
electronic features to suit individual preferences.
Fig. 5 OVERHEAD CONSOLE MODULE REMOVAL
1 - COMPASS MINI-TRIP COMPUTER MODULE
2 - OVERHEAD CONSOLE
DRMESSAGE SYSTEMS 8M - 7
COMPASS/MINI-TRIP COMPUTER (Continued)
Page 573 of 2895
memory setting 1 and the second transmitter trained
will be associated with memory setting 2. Additional
transmitters will not be associated with a memory
setting. When you have finished training the trans-
mitters, press the menu button again and the EVIC
will display ªTRAIN DONE ªXº TRAINED. If no
transmitters are trained within approximately 30
seconds the EVIC will display ªTRAIN TIMEOUTº.
REMOVAL
(1) Disconnect and isolate the battery negative
cable.
(2) Remove the overhead console from the headlin-
er.(Refer to 8 - ELECTRICAL/OVERHEAD CON-
SOLE - REMOVAL).
(3) Disconnect the EVIC module electrical connec-
tor. Depress the retaining tab and pull straight
apart.
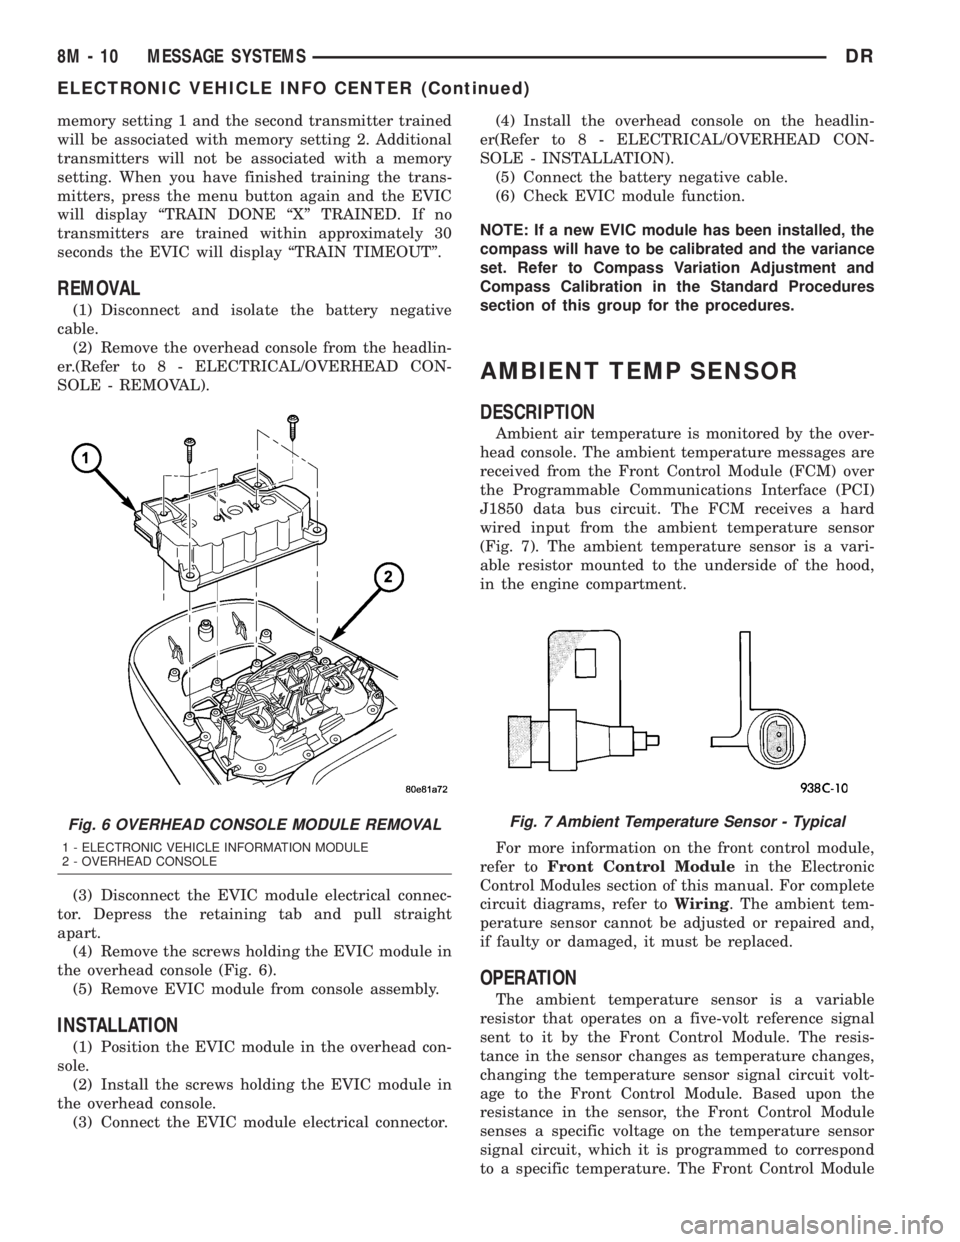
(4) Remove the screws holding the EVIC module in
the overhead console (Fig. 6).
(5) Remove EVIC module from console assembly.
INSTALLATION
(1) Position the EVIC module in the overhead con-
sole.
(2) Install the screws holding the EVIC module in
the overhead console.
(3) Connect the EVIC module electrical connector.(4) Install the overhead console on the headlin-
er(Refer to 8 - ELECTRICAL/OVERHEAD CON-
SOLE - INSTALLATION).
(5) Connect the battery negative cable.
(6) Check EVIC module function.
NOTE: If a new EVIC module has been installed, the
compass will have to be calibrated and the variance
set. Refer to Compass Variation Adjustment and
Compass Calibration in the Standard Procedures
section of this group for the procedures.
AMBIENT TEMP SENSOR
DESCRIPTION
Ambient air temperature is monitored by the over-
head console. The ambient temperature messages are
received from the Front Control Module (FCM) over
the Programmable Communications Interface (PCI)
J1850 data bus circuit. The FCM receives a hard
wired input from the ambient temperature sensor
(Fig. 7). The ambient temperature sensor is a vari-
able resistor mounted to the underside of the hood,
in the engine compartment.
For more information on the front control module,
refer toFront Control Modulein the Electronic
Control Modules section of this manual. For complete
circuit diagrams, refer toWiring. The ambient tem-
perature sensor cannot be adjusted or repaired and,
if faulty or damaged, it must be replaced.
OPERATION
The ambient temperature sensor is a variable
resistor that operates on a five-volt reference signal
sent to it by the Front Control Module. The resis-
tance in the sensor changes as temperature changes,
changing the temperature sensor signal circuit volt-
age to the Front Control Module. Based upon the
resistance in the sensor, the Front Control Module
senses a specific voltage on the temperature sensor
signal circuit, which it is programmed to correspond
to a specific temperature. The Front Control Module
Fig. 6 OVERHEAD CONSOLE MODULE REMOVAL
1 - ELECTRONIC VEHICLE INFORMATION MODULE
2 - OVERHEAD CONSOLE
Fig. 7 Ambient Temperature Sensor - Typical
8M - 10 MESSAGE SYSTEMSDR
ELECTRONIC VEHICLE INFO CENTER (Continued)