Engine wire harness DODGE RAM 2003 Service Owner's Manual
[x] Cancel search | Manufacturer: DODGE, Model Year: 2003, Model line: RAM, Model: DODGE RAM 2003Pages: 2895, PDF Size: 83.15 MB
Page 668 of 2895
REMOVAL
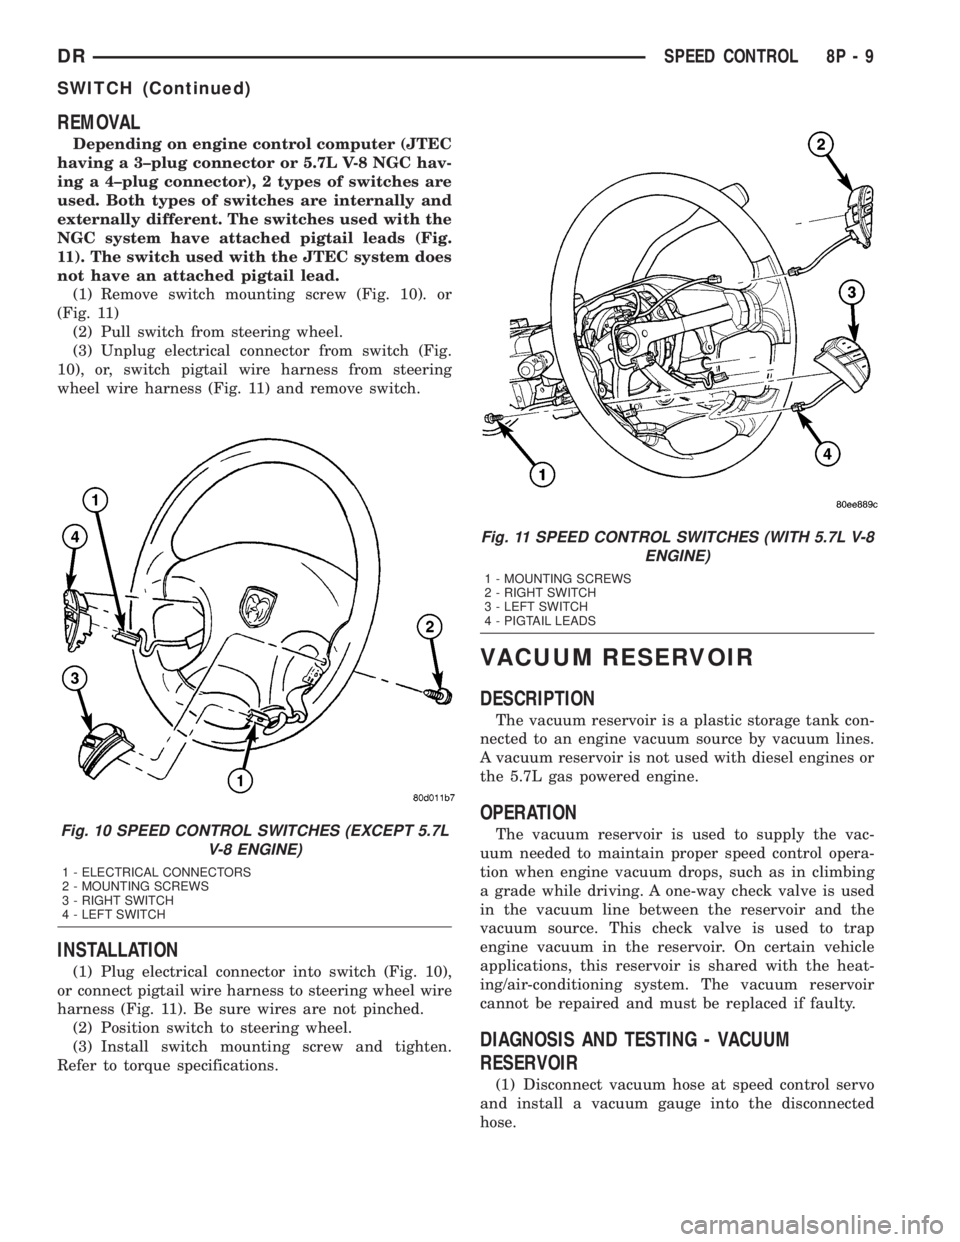
Depending on engine control computer (JTEC
having a 3±plug connector or 5.7L V-8 NGC hav-
ing a 4±plug connector), 2 types of switches are
used. Both types of switches are internally and
externally different. The switches used with the
NGC system have attached pigtail leads (Fig.
11). The switch used with the JTEC system does
not have an attached pigtail lead.
(1) Remove switch mounting screw (Fig. 10). or
(Fig. 11)
(2) Pull switch from steering wheel.
(3) Unplug electrical connector from switch (Fig.
10), or, switch pigtail wire harness from steering
wheel wire harness (Fig. 11) and remove switch.
INSTALLATION
(1) Plug electrical connector into switch (Fig. 10),
or connect pigtail wire harness to steering wheel wire
harness (Fig. 11). Be sure wires are not pinched.
(2) Position switch to steering wheel.
(3) Install switch mounting screw and tighten.
Refer to torque specifications.
VACUUM RESERVOIR
DESCRIPTION
The vacuum reservoir is a plastic storage tank con-
nected to an engine vacuum source by vacuum lines.
A vacuum reservoir is not used with diesel engines or
the 5.7L gas powered engine.
OPERATION
The vacuum reservoir is used to supply the vac-
uum needed to maintain proper speed control opera-
tion when engine vacuum drops, such as in climbing
a grade while driving. A one-way check valve is used
in the vacuum line between the reservoir and the
vacuum source. This check valve is used to trap
engine vacuum in the reservoir. On certain vehicle
applications, this reservoir is shared with the heat-
ing/air-conditioning system. The vacuum reservoir
cannot be repaired and must be replaced if faulty.
DIAGNOSIS AND TESTING - VACUUM
RESERVOIR
(1) Disconnect vacuum hose at speed control servo
and install a vacuum gauge into the disconnected
hose.
Fig. 10 SPEED CONTROL SWITCHES (EXCEPT 5.7L
V-8 ENGINE)
1 - ELECTRICAL CONNECTORS
2 - MOUNTING SCREWS
3 - RIGHT SWITCH
4 - LEFT SWITCH
Fig. 11 SPEED CONTROL SWITCHES (WITH 5.7L V-8
ENGINE)
1 - MOUNTING SCREWS
2 - RIGHT SWITCH
3 - LEFT SWITCH
4 - PIGTAIL LEADS
DRSPEED CONTROL 8P - 9
SWITCH (Continued)
Page 678 of 2895
²Washer Pump/Motor- The electric washer
pump/motor unit is located in a dedicated hole on the
rearward facing surface of the washer reservoir in
the engine compartment.
²Washer Reservoir- On all models except those
with an optional V-10 or diesel engine, the washer
reservoir is secured by integral mounting tabs and a
snap feature to slots in the right side of the cooling
module shroud in the engine compartment. On mod-
els with an optional V-10 or diesel engine, the washer
reservoir is secured by screws to the back of the
upright left vertical member of the radiator support
in the engine compartment. The washer reservoir
filler neck is accessed from the engine compartment.
²Wiper Arm- The two wiper arms are secured
with integral latches to the serrated ends of the two
wiper pivot shafts, which extend through the cowl
plenum cover/grille panel located near the base of the
windshield.
²Wiper Blade- The two wiper blades are
secured to the two wiper arms with an integral latch,
and are parked on the glass near the bottom of the
windshield when the wiper system is not in opera-
tion.
²Wiper High/Low Relay- The wiper high/low
relay is an International Standards Organization
(ISO) micro relay located in the Integrated Power
Module (IPM) in the engine compartment near the
battery.
²Wiper Module- The wiper pivot shafts are the
only visible components of the wiper module. The
remainder of the module is concealed within the cowl
plenum area beneath the cowl plenum cover/grille
panel. The wiper module includes the wiper module
bracket, four rubber-isolated wiper module mounts,
the wiper motor, the wiper motor crank arm, the two
wiper drive links, and the two wiper pivots.
²Wiper On/Off Relay- The wiper on/off relay is
an International Standards Organization (ISO) micro
relay located in the Integrated Power Module (IPM)
in the engine compartment near the battery.
Hard wired circuitry connects the wiper and
washer system components to the electrical system of
the vehicle. These hard wired circuits are integral to
several wire harnesses, which are routed throughout
the vehicle and retained by many different methods.
These circuits may be connected to each other, to the
vehicle electrical system and to the wiper and washer
system components through the use of a combination
of soldered splices, splice block connectors, and many
different types of wire harness terminal connectors
and insulators. Refer to the appropriate wiring infor-
mation. The wiring information includes wiring dia-
grams, proper wire and connector repair procedures,
further details on wire harness routing and reten-tion, as well as pin-out and location views for the
various wire harness connectors, splices and grounds.
OPERATING MODES
The components of the wiper and washer system
are designed to work in concert to provide the follow-
ing operating modes:
²Continuous Wipe Mode- The control knob on
the control stalk of the multi-function switch has two
continuous wipe positions, Low and High. When
selected, these switch positions will cause the two-
speed wiper motor to operate in a continuous low or
high speed cycle.
²Intermittent Wipe Mode- The control knob on
the control stalk of the multi-function switch has five
minor detent intermittent wipe positions. When
selected, these switch positions will cause the wiper
system to operate with one of five delay intervals
between complete wipe cycles. The intermittent wipe
delay intervals are speed sensitive and will be dou-
bled when the vehicle speed is about sixteen kilome-
ters-per-hour (ten miles-per-hour) or less.
²Pulse Wipe Mode- When the control knob on
the control stalk of the multi-function switch is
depressed to the momentary Wash position for less
than about one-half second, the wiper system will
operate the wipers for one complete low speed cycle,
then will park the wiper blades near the base of the
windshield.
²Washer Mode- When the control knob on the
control stalk of the multi-function switch is
depressed to the momentary Wash position for more
than about one-half second with the wiper system
turned Off, the washer pump/motor and the wipers
will operate for as long as the washer switch is held
closed up to about thirty seconds, then the wipe-af-
ter-wash mode is invoked when the control knob is
released. When the Wash position is selected with
the wiper system operating in a continuous wipe
mode, washer fluid will be dispensed onto the wind-
shield glass through the washer nozzles for as long
as the washer switch is held closed up to about thirty
seconds. When the Wash position is selected with the
wiper system operating in an intermittent wipe
mode, washer fluid is still dispensed until the control
knob is released; however, the wipers will operate in
a low speed continuous cycle from the time the
washer switch is closed until several wipe cycles
after the switch is released, before returning to the
selected intermittent wipe interval. If the control
knob is held in the depressed Wash position for more
than about thirty seconds, washer system operation
will be suspended until the control knob is released
for about two seconds then cycled back to the Wash
position.
DRWIPERS/WASHERS 8R - 3
WIPERS/WASHERS (Continued)
Page 685 of 2895
The washer fluid level switch is connected to the
vehicle electrical system through a dedicated take
out and connector of the right (except V-10 and diesel
engines) or left (V-10 and diesel engines only) head-
lamp and dash wire harness. The switch is connected
in series between a clean ground output of the Front
Control Module (FCM) on a sensor return circuit and
the washer fluid switch sense input to the FCM.
When the switch closes, the FMC senses the ground
on the washer fluid switch sense circuit. The FMC is
programmed to respond to this input by sending an
electronic washer fluid indicator lamp-on message to
the instrument cluster over the Programmable Com-
munications Interface (PCI) data bus. The instru-
ment cluster responds to this message by
illuminating the washer fluid indicator and by sound-
ing an audible chime tone warning.
The washer fluid level switch may be diagnosed
and tested using conventional diagnostic tools and
procedures. However, conventional diagnostic meth-
ods may not prove conclusive in the diagnosis of the
instrument cluster, the Front Control Module (FCM),
or the electronic message inputs to or outputs from
the instrument cluster and the FCM that control the
operation of the washer fluid visual and/or audible
indicators. The most reliable, efficient, and accurate
means to diagnose the washer fluid level indicator,
the instrument cluster, the FCM, or the electronic
message inputs and outputs related to the washer
fluid indicator requires the use of a DRBIIItscan
tool. Refer to the appropriate diagnostic information.
REMOVAL
The washer fluid level switch can be removed from
the washer reservoir without removing the reservoir
from the vehicle.
(1) Unlatch and open the hood.
(2) Disconnect and isolate the battery negative
cable.
(3) Disconnect the washer hose from the barbed
outlet nipple of the washer pump/motor unit and
allow the washer fluid to drain into a clean container
for reuse.
(4) Disconnect the right (except V-10 and diesel
engine) or left (V-10 and diesel engine only) head-
lamp and dash wire harness connector for the washer
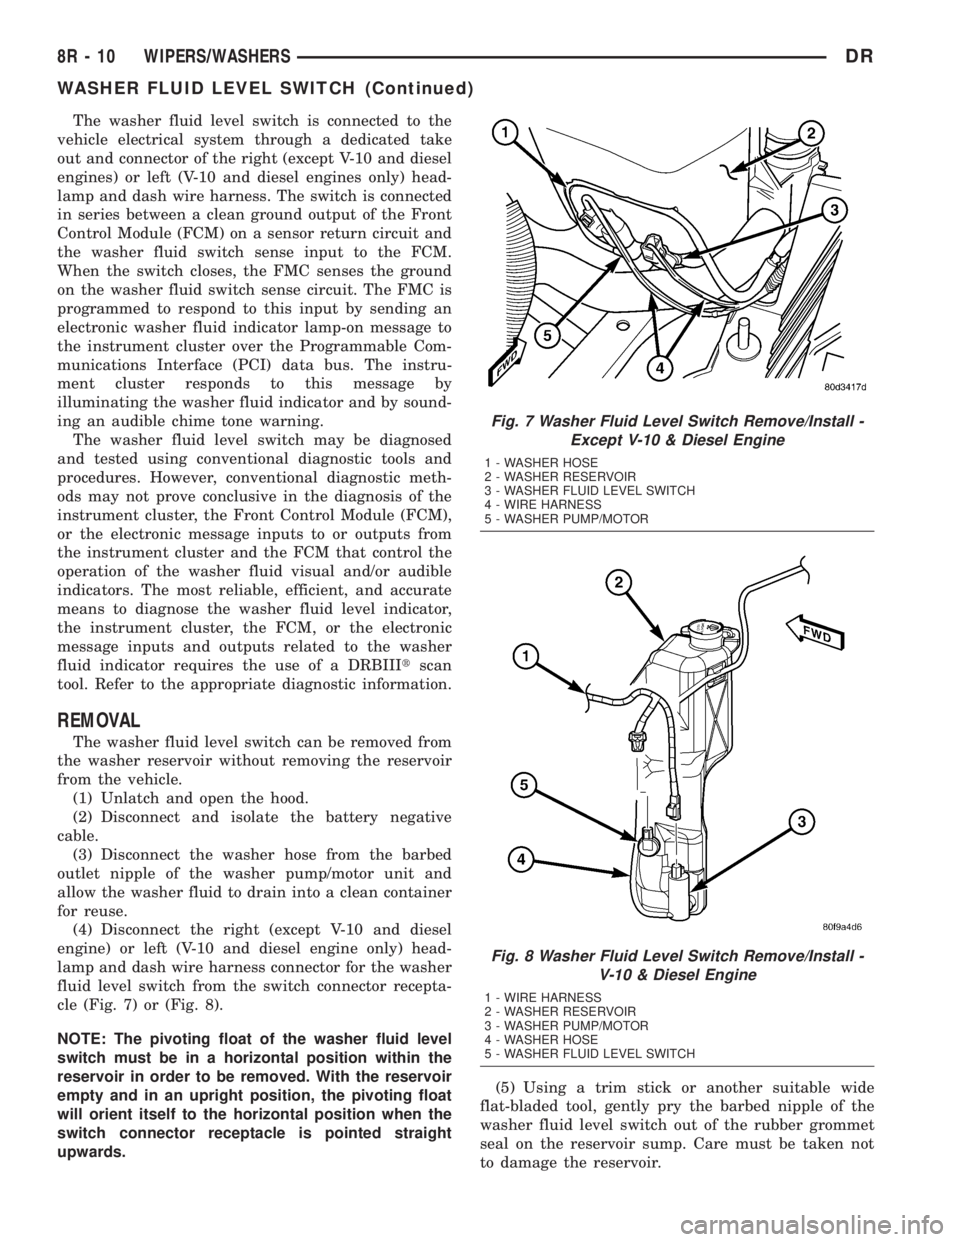
fluid level switch from the switch connector recepta-
cle (Fig. 7) or (Fig. 8).
NOTE: The pivoting float of the washer fluid level
switch must be in a horizontal position within the
reservoir in order to be removed. With the reservoir
empty and in an upright position, the pivoting float
will orient itself to the horizontal position when the
switch connector receptacle is pointed straight
upwards.(5) Using a trim stick or another suitable wide
flat-bladed tool, gently pry the barbed nipple of the
washer fluid level switch out of the rubber grommet
seal on the reservoir sump. Care must be taken not
to damage the reservoir.
Fig. 7 Washer Fluid Level Switch Remove/Install -
Except V-10 & Diesel Engine
1 - WASHER HOSE
2 - WASHER RESERVOIR
3 - WASHER FLUID LEVEL SWITCH
4 - WIRE HARNESS
5 - WASHER PUMP/MOTOR
Fig. 8 Washer Fluid Level Switch Remove/Install -
V-10 & Diesel Engine
1 - WIRE HARNESS
2 - WASHER RESERVOIR
3 - WASHER PUMP/MOTOR
4 - WASHER HOSE
5 - WASHER FLUID LEVEL SWITCH
8R - 10 WIPERS/WASHERSDR
WASHER FLUID LEVEL SWITCH (Continued)
Page 686 of 2895
(6) Remove the washer fluid level switch from the
washer reservoir.
(7) Remove the rubber grommet seal from the
washer fluid level switch mounting hole in the
washer reservoir and discard.
INSTALLATION
(1) Install a new rubber grommet seal into the
washer fluid level switch mounting hole in the
washer reservoir. Always use a new rubber grommet
seal on the reservoir.
(2) Insert the float of the washer fluid level switch
through the rubber grommet seal and into the
washer reservoir. The connector receptacle of the
washer fluid level switch should be pointed upward.
(3) Using hand pressure, press firmly and evenly
on the washer fluid level switch mounting flange
until the barbed nipple is fully seated in the rubber
grommet seal in the washer reservoir mounting hole.
(4) Reconnect the right (except V-10 and diesel
engine) or left (V-10 and diesel engine only) head-
lamp and dash wire harness connector for the washer
fluid level switch to the switch connector receptacle
(Fig. 7) or (Fig. 8).
(5) Reconnect the removed washer hose to the
barbed outlet nipple of the washer pump/motor unit.
(6) Refill the washer reservoir with the washer
fluid drained from the reservoir during the removal
procedure.
(7) Reconnect the battery negative cable.
(8) Close and latch the hood.
WASHER HOSES/TUBES
DESCRIPTION
The washer plumbing consists of a small diameter
rubber reservoir washer hose that is routed from the
barbed outlet nipple of the electric washer pump/mo-
tor unit on the washer reservoir through a trough
molded into the back of the reservoir above the
washer pump and to the engine compartment washer
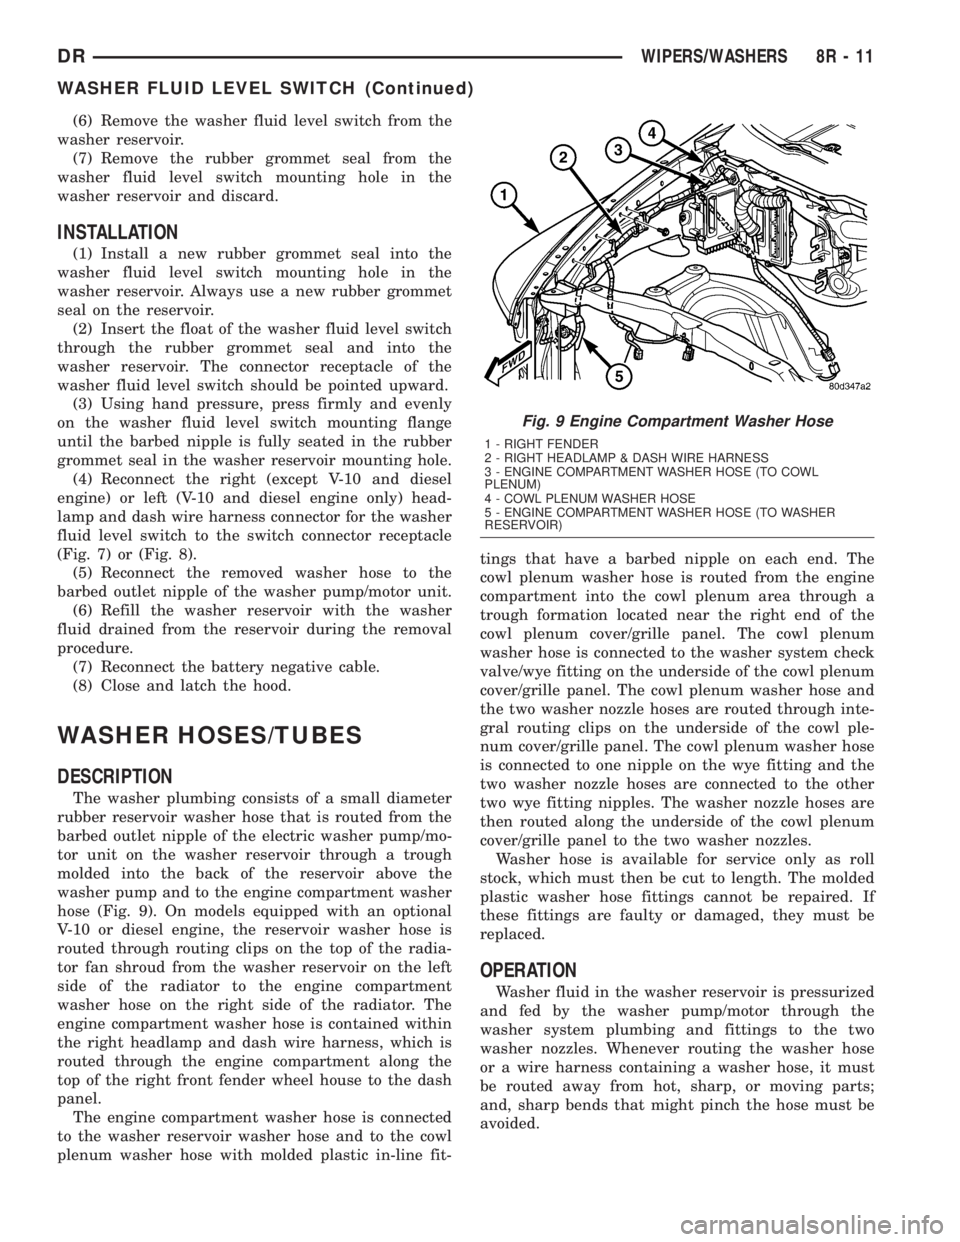
hose (Fig. 9). On models equipped with an optional
V-10 or diesel engine, the reservoir washer hose is
routed through routing clips on the top of the radia-
tor fan shroud from the washer reservoir on the left
side of the radiator to the engine compartment
washer hose on the right side of the radiator. The
engine compartment washer hose is contained within
the right headlamp and dash wire harness, which is
routed through the engine compartment along the
top of the right front fender wheel house to the dash
panel.
The engine compartment washer hose is connected
to the washer reservoir washer hose and to the cowl
plenum washer hose with molded plastic in-line fit-tings that have a barbed nipple on each end. The
cowl plenum washer hose is routed from the engine
compartment into the cowl plenum area through a
trough formation located near the right end of the
cowl plenum cover/grille panel. The cowl plenum
washer hose is connected to the washer system check
valve/wye fitting on the underside of the cowl plenum
cover/grille panel. The cowl plenum washer hose and
the two washer nozzle hoses are routed through inte-
gral routing clips on the underside of the cowl ple-
num cover/grille panel. The cowl plenum washer hose
is connected to one nipple on the wye fitting and the
two washer nozzle hoses are connected to the other
two wye fitting nipples. The washer nozzle hoses are
then routed along the underside of the cowl plenum
cover/grille panel to the two washer nozzles.
Washer hose is available for service only as roll
stock, which must then be cut to length. The molded
plastic washer hose fittings cannot be repaired. If
these fittings are faulty or damaged, they must be
replaced.
OPERATION
Washer fluid in the washer reservoir is pressurized
and fed by the washer pump/motor through the
washer system plumbing and fittings to the two
washer nozzles. Whenever routing the washer hose
or a wire harness containing a washer hose, it must
be routed away from hot, sharp, or moving parts;
and, sharp bends that might pinch the hose must be
avoided.
Fig. 9 Engine Compartment Washer Hose
1 - RIGHT FENDER
2 - RIGHT HEADLAMP & DASH WIRE HARNESS
3 - ENGINE COMPARTMENT WASHER HOSE (TO COWL
PLENUM)
4 - COWL PLENUM WASHER HOSE
5 - ENGINE COMPARTMENT WASHER HOSE (TO WASHER
RESERVOIR)
DRWIPERS/WASHERS 8R - 11
WASHER FLUID LEVEL SWITCH (Continued)
Page 688 of 2895
(4) Reinstall the washer hose for the washer noz-
zle into its routing clips on the underside of the cowl
plenum cover/grille panel.
(5) Reinstall the cowl plenum cover/grille panel
over the cowl plenum. (Refer to 23 - BODY/EXTERI-
OR/COWL GRILLE - INSTALLATION).
(6) Close and latch the hood.
(7) Reinstall both wiper arms onto the wiper piv-
ots. (Refer to 8 - ELECTRICAL/WIPERS/WASHERS/
WIPER ARM - INSTALLATION).
WASHER PUMP/MOTOR
DESCRIPTION
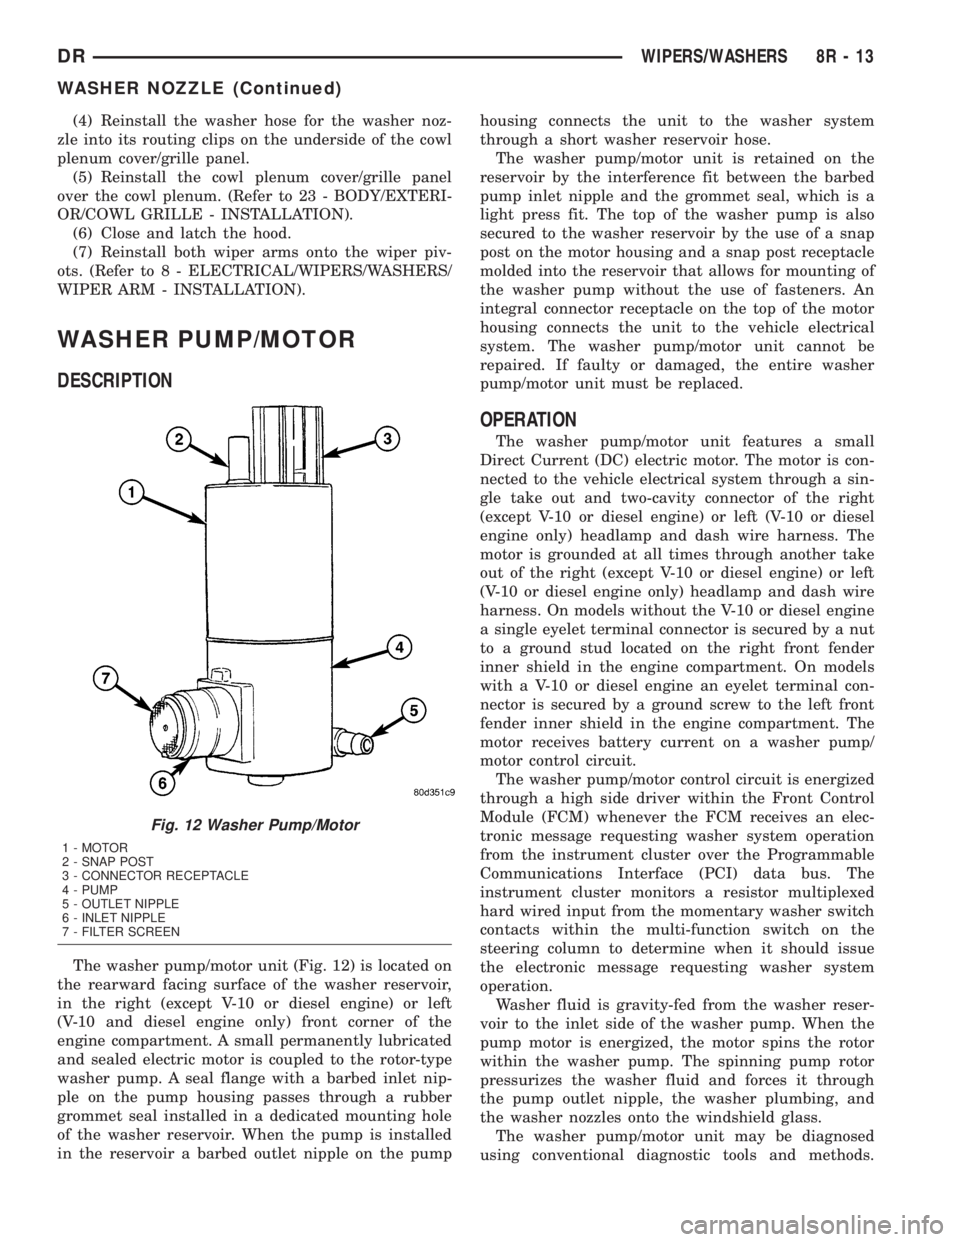
The washer pump/motor unit (Fig. 12) is located on
the rearward facing surface of the washer reservoir,
in the right (except V-10 or diesel engine) or left
(V-10 and diesel engine only) front corner of the
engine compartment. A small permanently lubricated
and sealed electric motor is coupled to the rotor-type
washer pump. A seal flange with a barbed inlet nip-
ple on the pump housing passes through a rubber
grommet seal installed in a dedicated mounting hole
of the washer reservoir. When the pump is installed
in the reservoir a barbed outlet nipple on the pumphousing connects the unit to the washer system
through a short washer reservoir hose.
The washer pump/motor unit is retained on the
reservoir by the interference fit between the barbed
pump inlet nipple and the grommet seal, which is a
light press fit. The top of the washer pump is also
secured to the washer reservoir by the use of a snap
post on the motor housing and a snap post receptacle
molded into the reservoir that allows for mounting of
the washer pump without the use of fasteners. An
integral connector receptacle on the top of the motor
housing connects the unit to the vehicle electrical
system. The washer pump/motor unit cannot be
repaired. If faulty or damaged, the entire washer
pump/motor unit must be replaced.
OPERATION
The washer pump/motor unit features a small
Direct Current (DC) electric motor. The motor is con-
nected to the vehicle electrical system through a sin-
gle take out and two-cavity connector of the right
(except V-10 or diesel engine) or left (V-10 or diesel
engine only) headlamp and dash wire harness. The
motor is grounded at all times through another take
out of the right (except V-10 or diesel engine) or left
(V-10 or diesel engine only) headlamp and dash wire
harness. On models without the V-10 or diesel engine
a single eyelet terminal connector is secured by a nut
to a ground stud located on the right front fender
inner shield in the engine compartment. On models
with a V-10 or diesel engine an eyelet terminal con-
nector is secured by a ground screw to the left front
fender inner shield in the engine compartment. The
motor receives battery current on a washer pump/
motor control circuit.
The washer pump/motor control circuit is energized
through a high side driver within the Front Control
Module (FCM) whenever the FCM receives an elec-
tronic message requesting washer system operation
from the instrument cluster over the Programmable
Communications Interface (PCI) data bus. The
instrument cluster monitors a resistor multiplexed
hard wired input from the momentary washer switch
contacts within the multi-function switch on the
steering column to determine when it should issue
the electronic message requesting washer system
operation.
Washer fluid is gravity-fed from the washer reser-
voir to the inlet side of the washer pump. When the
pump motor is energized, the motor spins the rotor
within the washer pump. The spinning pump rotor
pressurizes the washer fluid and forces it through
the pump outlet nipple, the washer plumbing, and
the washer nozzles onto the windshield glass.
The washer pump/motor unit may be diagnosed
using conventional diagnostic tools and methods.
Fig. 12 Washer Pump/Motor
1 - MOTOR
2 - SNAP POST
3 - CONNECTOR RECEPTACLE
4 - PUMP
5 - OUTLET NIPPLE
6 - INLET NIPPLE
7 - FILTER SCREEN
DRWIPERS/WASHERS 8R - 13
WASHER NOZZLE (Continued)
Page 689 of 2895
However, conventional diagnostic methods may not
prove conclusive in the diagnosis of the instrument
cluster, the Front Control Module (FCM), or the elec-
tronic message inputs to or outputs from the instru-
ment cluster and the FCM that control the operation
of the washer pump/motor unit. The most reliable,
efficient, and accurate means to diagnose the washer
pump/motor unit, the instrument cluster, the FCM,
or the electronic message inputs and outputs related
to the washer pump/motor unit operation requires
the use of a DRBIIItscan tool. Refer to the appro-
priate diagnostic information.
REMOVAL
The washer pump/motor unit can be removed from
the washer reservoir without removing the reservoir
from the vehicle.
(1) Unlatch and open the hood.
(2) Disconnect and isolate the battery negative
cable.
(3) Disconnect the washer hose from the barbed
outlet nipple of the washer pump/motor unit and
allow the washer fluid to drain into a clean container
for reuse.
(4) Disconnect the right (except V-10 or diesel
engine) or left (V-10 or diesel engine only) headlamp
and dash wire harness connector for the washer
pump/motor unit from the motor connector receptacle
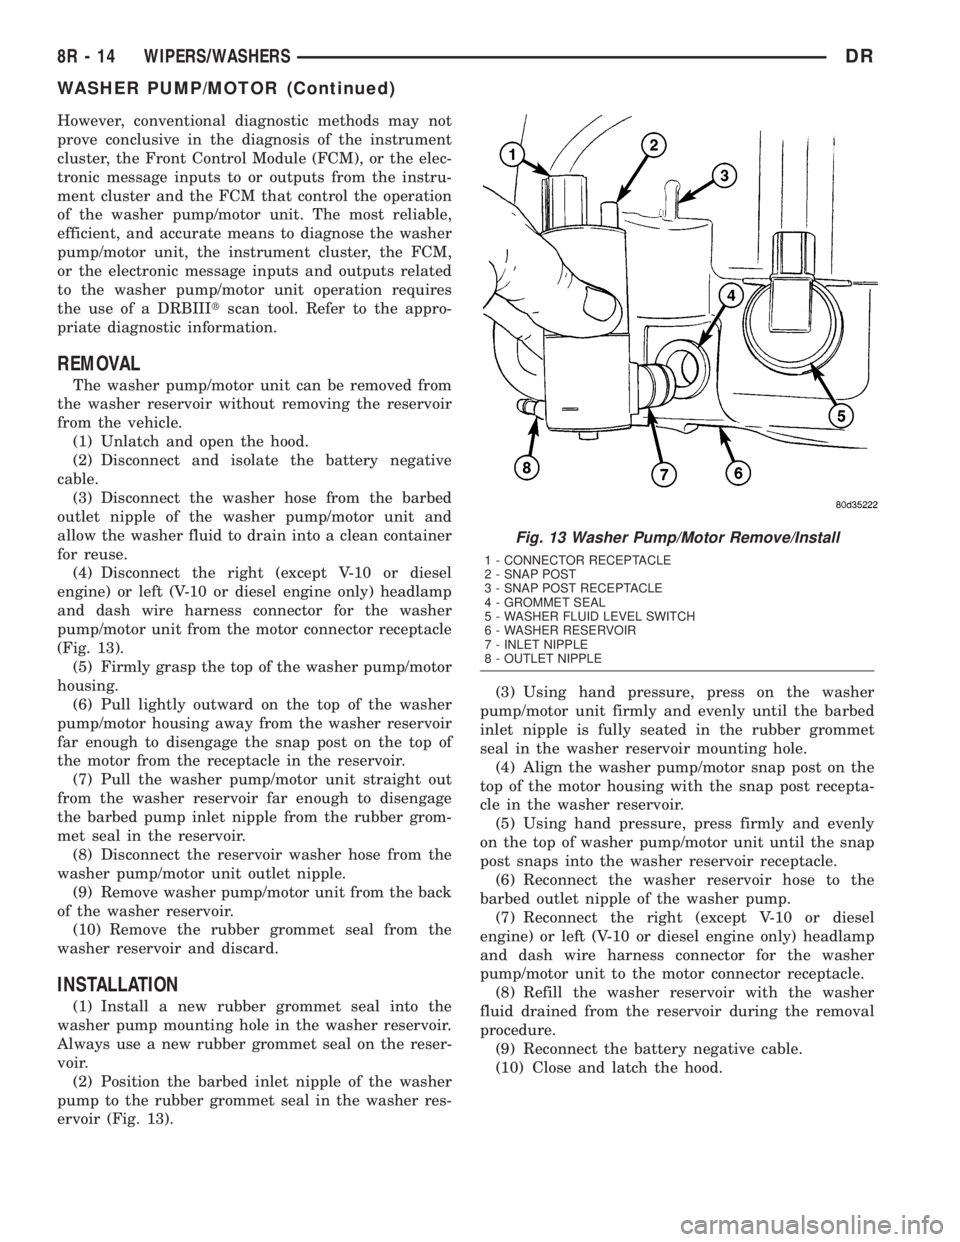
(Fig. 13).
(5) Firmly grasp the top of the washer pump/motor
housing.
(6) Pull lightly outward on the top of the washer
pump/motor housing away from the washer reservoir
far enough to disengage the snap post on the top of
the motor from the receptacle in the reservoir.
(7) Pull the washer pump/motor unit straight out
from the washer reservoir far enough to disengage
the barbed pump inlet nipple from the rubber grom-
met seal in the reservoir.
(8) Disconnect the reservoir washer hose from the
washer pump/motor unit outlet nipple.
(9) Remove washer pump/motor unit from the back
of the washer reservoir.
(10) Remove the rubber grommet seal from the
washer reservoir and discard.
INSTALLATION
(1) Install a new rubber grommet seal into the
washer pump mounting hole in the washer reservoir.
Always use a new rubber grommet seal on the reser-
voir.
(2) Position the barbed inlet nipple of the washer
pump to the rubber grommet seal in the washer res-
ervoir (Fig. 13).(3) Using hand pressure, press on the washer
pump/motor unit firmly and evenly until the barbed
inlet nipple is fully seated in the rubber grommet
seal in the washer reservoir mounting hole.
(4) Align the washer pump/motor snap post on the
top of the motor housing with the snap post recepta-
cle in the washer reservoir.
(5) Using hand pressure, press firmly and evenly
on the top of washer pump/motor unit until the snap
post snaps into the washer reservoir receptacle.
(6) Reconnect the washer reservoir hose to the
barbed outlet nipple of the washer pump.
(7) Reconnect the right (except V-10 or diesel
engine) or left (V-10 or diesel engine only) headlamp
and dash wire harness connector for the washer
pump/motor unit to the motor connector receptacle.
(8) Refill the washer reservoir with the washer
fluid drained from the reservoir during the removal
procedure.
(9) Reconnect the battery negative cable.
(10) Close and latch the hood.
Fig. 13 Washer Pump/Motor Remove/Install
1 - CONNECTOR RECEPTACLE
2 - SNAP POST
3 - SNAP POST RECEPTACLE
4 - GROMMET SEAL
5 - WASHER FLUID LEVEL SWITCH
6 - WASHER RESERVOIR
7 - INLET NIPPLE
8 - OUTLET NIPPLE
8R - 14 WIPERS/WASHERSDR
WASHER PUMP/MOTOR (Continued)
Page 691 of 2895
REMOVAL
REMOVAL - EXCEPT V-10 OR DIESEL ENGINE
(1) Unlatch and open the hood.
(2) Disconnect and isolate the battery negative
cable.
(3) Remove the fasteners securing the coolant
recovery container or the coolant pressure container
to the top of the cooling module and move the con-
tainer aside. It is not necessary to open or drain the
engine cooling system. (Refer to 7 - COOLING/EN-
GINE/COOLANT RECOVERY CONTAINER -
REMOVAL) or (Refer to 7 - COOLING/ENGINE/
COOLANT RECOVERY PRESSURE CONTAINER -
REMOVAL).
(4) Disconnect the reservoir washer hose from the
barbed nipple of the inline fitting at the engine com-
partment washer hose in the right headlamp and
dash wire harness and allow the washer fluid to
drain from the reservoir into a clean container for
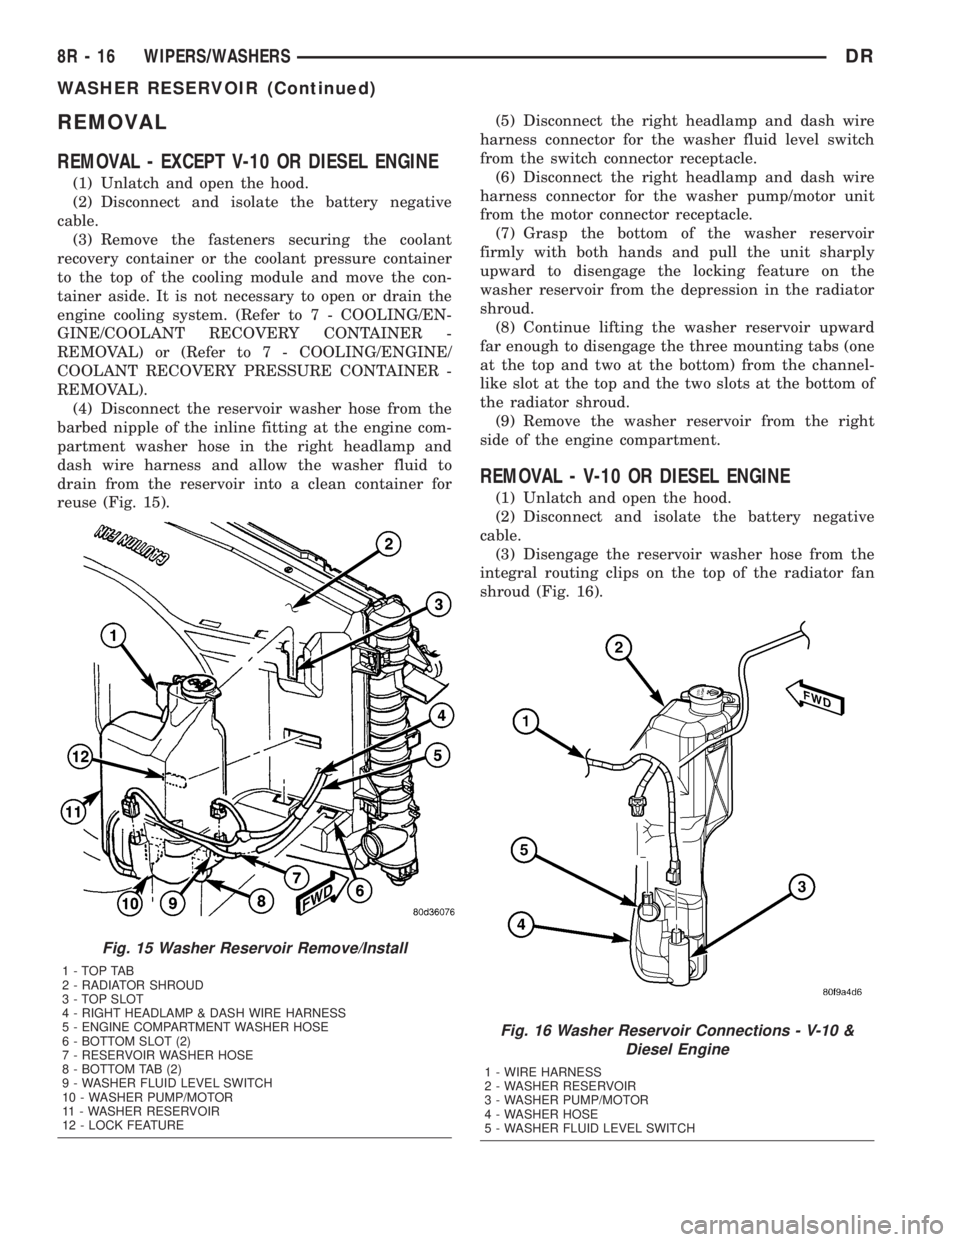
reuse (Fig. 15).(5) Disconnect the right headlamp and dash wire
harness connector for the washer fluid level switch
from the switch connector receptacle.
(6) Disconnect the right headlamp and dash wire
harness connector for the washer pump/motor unit
from the motor connector receptacle.
(7) Grasp the bottom of the washer reservoir
firmly with both hands and pull the unit sharply
upward to disengage the locking feature on the
washer reservoir from the depression in the radiator
shroud.
(8) Continue lifting the washer reservoir upward
far enough to disengage the three mounting tabs (one
at the top and two at the bottom) from the channel-
like slot at the top and the two slots at the bottom of
the radiator shroud.
(9) Remove the washer reservoir from the right
side of the engine compartment.
REMOVAL - V-10 OR DIESEL ENGINE
(1) Unlatch and open the hood.
(2) Disconnect and isolate the battery negative
cable.
(3) Disengage the reservoir washer hose from the
integral routing clips on the top of the radiator fan
shroud (Fig. 16).
Fig. 15 Washer Reservoir Remove/Install
1-TOPTAB
2 - RADIATOR SHROUD
3 - TOP SLOT
4 - RIGHT HEADLAMP & DASH WIRE HARNESS
5 - ENGINE COMPARTMENT WASHER HOSE
6 - BOTTOM SLOT (2)
7 - RESERVOIR WASHER HOSE
8 - BOTTOM TAB (2)
9 - WASHER FLUID LEVEL SWITCH
10 - WASHER PUMP/MOTOR
11 - WASHER RESERVOIR
12 - LOCK FEATURE
Fig. 16 Washer Reservoir Connections - V-10 &
Diesel Engine
1 - WIRE HARNESS
2 - WASHER RESERVOIR
3 - WASHER PUMP/MOTOR
4 - WASHER HOSE
5 - WASHER FLUID LEVEL SWITCH
8R - 16 WIPERS/WASHERSDR
WASHER RESERVOIR (Continued)
Page 692 of 2895
(4) Disconnect the reservoir washer hose from the
barbed nipple of the inline fitting at the engine com-
partment washer hose in the right headlamp and
dash wire harness and allow the washer fluid to
drain from the reservoir into a clean container for
reuse.
(5) Disconnect the left headlamp and dash wire
harness connector for the washer fluid level switch
from the switch connector receptacle.
(6) Disconnect the left headlamp and dash wire
harness connector for the washer pump/motor unit
from the motor connector receptacle.
(7) Remove the two screws that secure the washer
reservoir to the left vertical member of the radiator
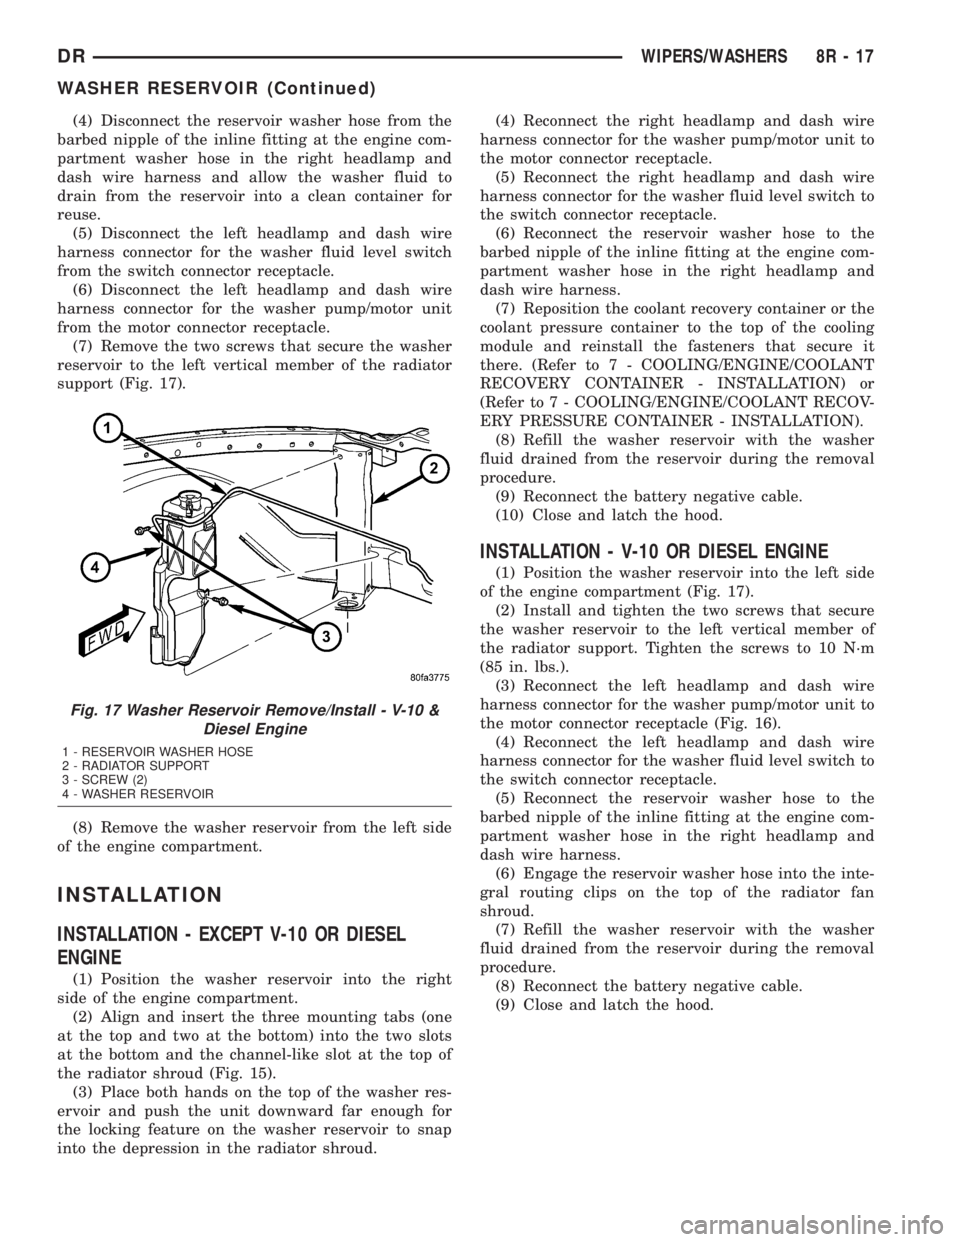
support (Fig. 17).
(8) Remove the washer reservoir from the left side
of the engine compartment.
INSTALLATION
INSTALLATION - EXCEPT V-10 OR DIESEL
ENGINE
(1) Position the washer reservoir into the right
side of the engine compartment.
(2) Align and insert the three mounting tabs (one
at the top and two at the bottom) into the two slots
at the bottom and the channel-like slot at the top of
the radiator shroud (Fig. 15).
(3) Place both hands on the top of the washer res-
ervoir and push the unit downward far enough for
the locking feature on the washer reservoir to snap
into the depression in the radiator shroud.(4) Reconnect the right headlamp and dash wire
harness connector for the washer pump/motor unit to
the motor connector receptacle.
(5) Reconnect the right headlamp and dash wire
harness connector for the washer fluid level switch to
the switch connector receptacle.
(6) Reconnect the reservoir washer hose to the
barbed nipple of the inline fitting at the engine com-
partment washer hose in the right headlamp and
dash wire harness.
(7) Reposition the coolant recovery container or the
coolant pressure container to the top of the cooling
module and reinstall the fasteners that secure it
there. (Refer to 7 - COOLING/ENGINE/COOLANT
RECOVERY CONTAINER - INSTALLATION) or
(Refer to 7 - COOLING/ENGINE/COOLANT RECOV-
ERY PRESSURE CONTAINER - INSTALLATION).
(8) Refill the washer reservoir with the washer
fluid drained from the reservoir during the removal
procedure.
(9) Reconnect the battery negative cable.
(10) Close and latch the hood.
INSTALLATION - V-10 OR DIESEL ENGINE
(1) Position the washer reservoir into the left side
of the engine compartment (Fig. 17).
(2) Install and tighten the two screws that secure
the washer reservoir to the left vertical member of
the radiator support. Tighten the screws to 10 N´m
(85 in. lbs.).
(3) Reconnect the left headlamp and dash wire
harness connector for the washer pump/motor unit to
the motor connector receptacle (Fig. 16).
(4) Reconnect the left headlamp and dash wire
harness connector for the washer fluid level switch to
the switch connector receptacle.
(5) Reconnect the reservoir washer hose to the
barbed nipple of the inline fitting at the engine com-
partment washer hose in the right headlamp and
dash wire harness.
(6) Engage the reservoir washer hose into the inte-
gral routing clips on the top of the radiator fan
shroud.
(7) Refill the washer reservoir with the washer
fluid drained from the reservoir during the removal
procedure.
(8) Reconnect the battery negative cable.
(9) Close and latch the hood.
Fig. 17 Washer Reservoir Remove/Install - V-10 &
Diesel Engine
1 - RESERVOIR WASHER HOSE
2 - RADIATOR SUPPORT
3 - SCREW (2)
4 - WASHER RESERVOIR
DRWIPERS/WASHERS 8R - 17
WASHER RESERVOIR (Continued)
Page 696 of 2895
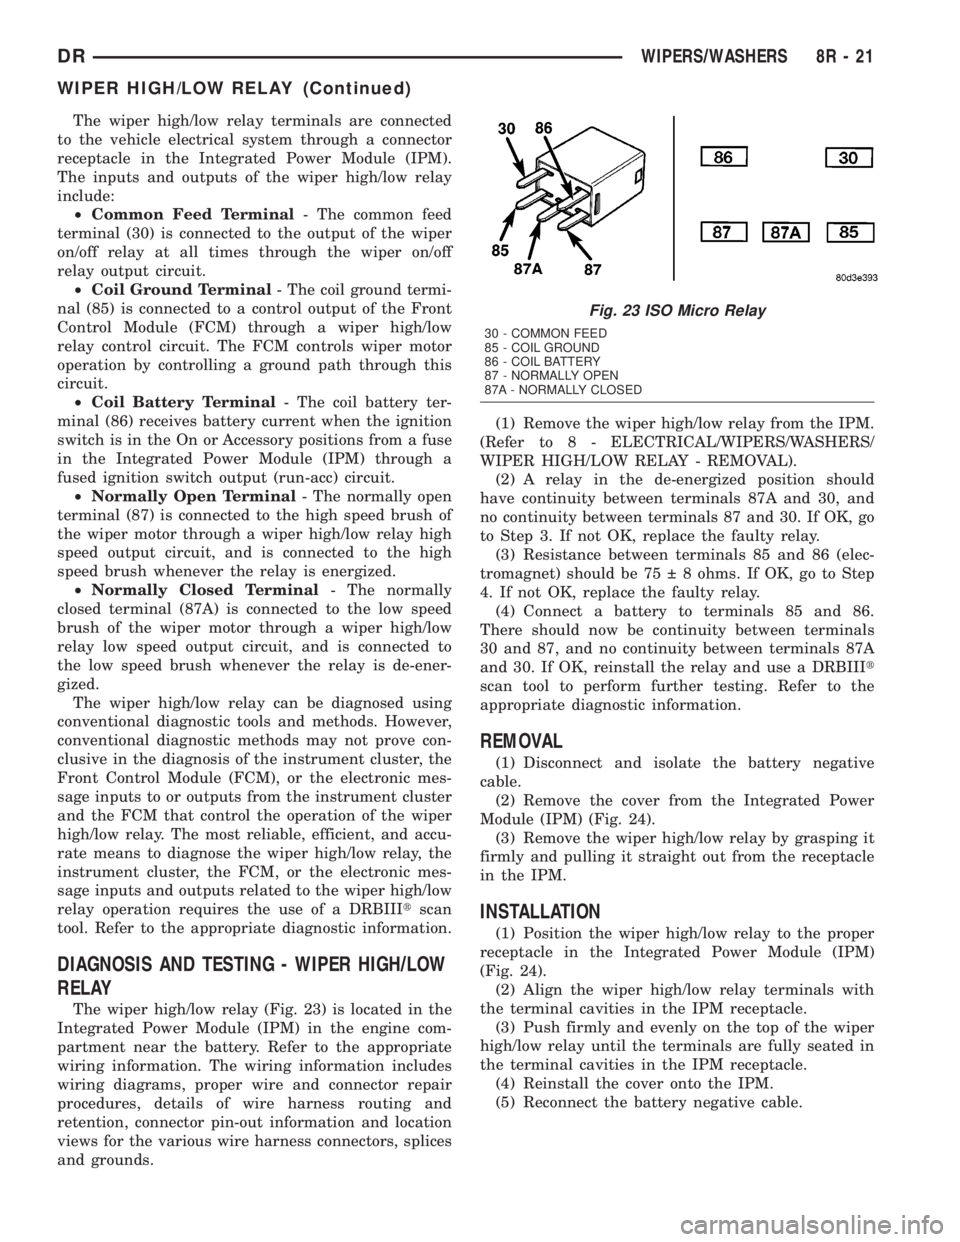
The wiper high/low relay terminals are connected
to the vehicle electrical system through a connector
receptacle in the Integrated Power Module (IPM).
The inputs and outputs of the wiper high/low relay
include:
²Common Feed Terminal- The common feed
terminal (30) is connected to the output of the wiper
on/off relay at all times through the wiper on/off
relay output circuit.
²Coil Ground Terminal- The coil ground termi-
nal (85) is connected to a control output of the Front
Control Module (FCM) through a wiper high/low
relay control circuit. The FCM controls wiper motor
operation by controlling a ground path through this
circuit.
²Coil Battery Terminal- The coil battery ter-
minal (86) receives battery current when the ignition
switch is in the On or Accessory positions from a fuse
in the Integrated Power Module (IPM) through a
fused ignition switch output (run-acc) circuit.
²Normally Open Terminal- The normally open
terminal (87) is connected to the high speed brush of
the wiper motor through a wiper high/low relay high
speed output circuit, and is connected to the high
speed brush whenever the relay is energized.
²Normally Closed Terminal- The normally
closed terminal (87A) is connected to the low speed
brush of the wiper motor through a wiper high/low
relay low speed output circuit, and is connected to
the low speed brush whenever the relay is de-ener-
gized.
The wiper high/low relay can be diagnosed using
conventional diagnostic tools and methods. However,
conventional diagnostic methods may not prove con-
clusive in the diagnosis of the instrument cluster, the
Front Control Module (FCM), or the electronic mes-
sage inputs to or outputs from the instrument cluster
and the FCM that control the operation of the wiper
high/low relay. The most reliable, efficient, and accu-
rate means to diagnose the wiper high/low relay, the
instrument cluster, the FCM, or the electronic mes-
sage inputs and outputs related to the wiper high/low
relay operation requires the use of a DRBIIItscan
tool. Refer to the appropriate diagnostic information.
DIAGNOSIS AND TESTING - WIPER HIGH/LOW
RELAY
The wiper high/low relay (Fig. 23) is located in the
Integrated Power Module (IPM) in the engine com-
partment near the battery. Refer to the appropriate
wiring information. The wiring information includes
wiring diagrams, proper wire and connector repair
procedures, details of wire harness routing and
retention, connector pin-out information and location
views for the various wire harness connectors, splices
and grounds.(1) Remove the wiper high/low relay from the IPM.
(Refer to 8 - ELECTRICAL/WIPERS/WASHERS/
WIPER HIGH/LOW RELAY - REMOVAL).
(2) A relay in the de-energized position should
have continuity between terminals 87A and 30, and
no continuity between terminals 87 and 30. If OK, go
to Step 3. If not OK, replace the faulty relay.
(3) Resistance between terminals 85 and 86 (elec-
tromagnet) should be 75 8 ohms. If OK, go to Step
4. If not OK, replace the faulty relay.
(4) Connect a battery to terminals 85 and 86.
There should now be continuity between terminals
30 and 87, and no continuity between terminals 87A
and 30. If OK, reinstall the relay and use a DRBIIIt
scan tool to perform further testing. Refer to the
appropriate diagnostic information.
REMOVAL
(1) Disconnect and isolate the battery negative
cable.
(2) Remove the cover from the Integrated Power
Module (IPM) (Fig. 24).
(3) Remove the wiper high/low relay by grasping it
firmly and pulling it straight out from the receptacle
in the IPM.
INSTALLATION
(1) Position the wiper high/low relay to the proper
receptacle in the Integrated Power Module (IPM)
(Fig. 24).
(2) Align the wiper high/low relay terminals with
the terminal cavities in the IPM receptacle.
(3) Push firmly and evenly on the top of the wiper
high/low relay until the terminals are fully seated in
the terminal cavities in the IPM receptacle.
(4) Reinstall the cover onto the IPM.
(5) Reconnect the battery negative cable.
Fig. 23 ISO Micro Relay
30 - COMMON FEED
85 - COIL GROUND
86 - COIL BATTERY
87 - NORMALLY OPEN
87A - NORMALLY CLOSED
DRWIPERS/WASHERS 8R - 21
WIPER HIGH/LOW RELAY (Continued)
Page 699 of 2895

Fig. 26 Wiper Module Remove/Install
1 - COWL PLENUM WASHER HOSE
2 - PLASTIC FASTENER (6)
3 - SCREW (2)
4 - WIPER ARM & BLADE (2)
5 - COWL PLENUM COVER/GRILLE PANEL6 - WIPER MODULE
7 - WIRE HARNESS CONNECTOR
8 - PLENUM PANEL
9 - SCREW (4)
10 - ENGINE COMPARTMENT WASHER HOSE
8R - 24 WIPERS/WASHERSDR
WIPER MODULE (Continued)