spare wheel DODGE RAM 2500 DIESEL 2004 3.G Owners Manual
[x] Cancel search | Manufacturer: DODGE, Model Year: 2004, Model line: RAM 2500 DIESEL, Model: DODGE RAM 2500 DIESEL 2004 3.GPages: 426, PDF Size: 7.22 MB
Page 201 of 426
NTire Loading And Tire Pressure...........247
mTiresÐGeneral Information................251
NTire Pressure.........................251
NTire Inflation Pressures.................252
NRadial-Ply Tires......................255
NCompact Spare Tire Ð If Equipped.........255
NTire Spinning........................256
NTread Wear Indicators..................257
NReplacement Tires.....................257
NAlignment And Balance.................258
mSupplemental Tire Pressure Information.......259
mTire Chains...........................259
mSnow Tires...........................261mTire Rotation Recommendations............261
NDual Rear Wheels.....................263
mEngine Runaway.......................264
mFuel Requirements......................264
NAdding Fuel.........................265
NBulk Fuel Storage.....................267
NFuel Specifications....................267
mVehicle Loading........................269
NCertification Label.....................269
mTrailer Towing.........................272
NTo Maintain Warranty Coverage...........272
NAxle Lubricant And Trailer Towing.........274
NTrailer Towing Recommendations..........274
STARTING AND OPERATING 201
5
Page 255 of 426
Radial-Ply Tires
WARNING!
Combining radial ply tires with other types of tires
on your vehicle will cause your vehicle to handle
poorly. The instability could cause an accident. Al-
ways use radial ply tires in sets of four (or 6, in case
of trucks with dual rear wheels). Never combine
them with other types of tires.
Cuts and punctures in radial tires are repairable only in
the tread area because of sidewall flexing. Consult your
authorized tire dealer for radial tire repairs.
Compact Spare Tire Ð If Equipped
The compact spare is for temporary emergency use with
radial tires. It is engineered to be used on your style
vehicle only. Since this tire has limited tread life, the
original tire should be repaired (or replaced) and rein-
stalled at the first opportunity.
WARNING!
Temporary use spare tires are for emergency use
only. With these tires, do not drive more than 50 mph
(80 km/h). Temporary-use spare tires have limited
tread life. When two or more tread wear indicators
appear in adjacent grooves, the temporary use spare
tire needs to be replaced. Be sure to follow the
warnings which apply to your spare. Failure to do so
could result in spare tire failure and loss of vehicle
control.
STARTING AND OPERATING 255
5
Page 256 of 426
Do not install a wheel cover or attempt to mount a
conventional tire on the compact spare wheel, since the
wheel is designed specifically for the compact spare.
Do not install more than one compact spare tire/wheel
on the vehicle at any given time.
CAUTION!
Because of the reduced ground clearance, do not take
your vehicle through an automatic car wash with the
compact spare installed. Damage to the vehicle may
result.
Tire Spinning
When stuck in mud, sand, snow, or ice conditions, do not
spin your vehicle's wheels above 35 mph (55 km/h).
See the paragraph on Freeing A Stuck Vehicle in Section
6 of this manual.
WARNING!
Fast spinning tires can be dangerous. Forces gener-
ated by excessive wheel speeds may cause tire dam-
age or failure. A tire could explode and injure
someone. Do not spin your vehicle's wheels faster
than 35 mph (55 km/h) when you are stuck. And
don't let anyone near a spinning wheel, no matter
what the speed.
256 STARTING AND OPERATING
Page 263 of 426
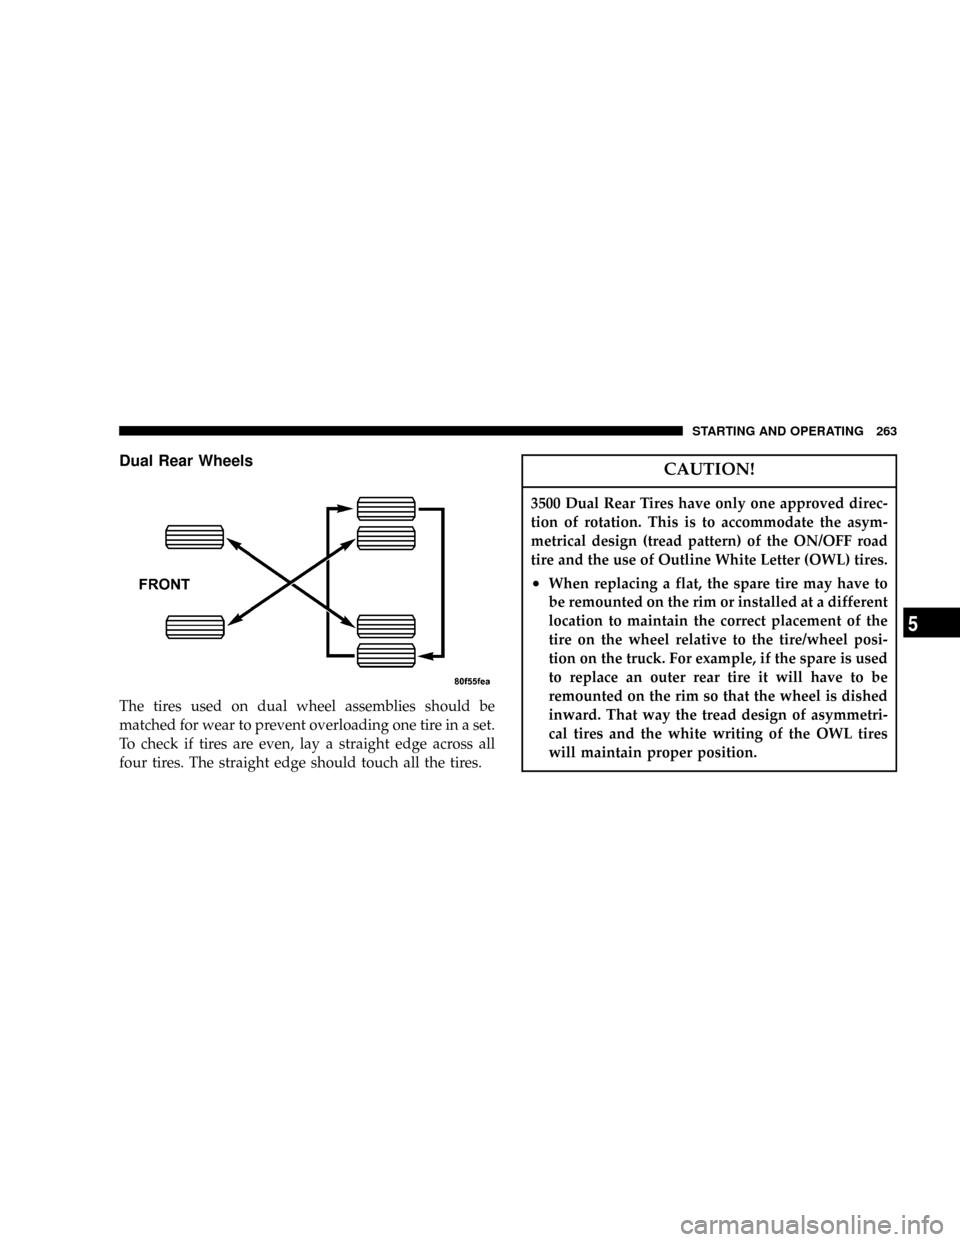
Dual Rear Wheels
The tires used on dual wheel assemblies should be
matched for wear to prevent overloading one tire in a set.
To check if tires are even, lay a straight edge across all
four tires. The straight edge should touch all the tires.
CAUTION!
3500 Dual Rear Tires have only one approved direc-
tion of rotation. This is to accommodate the asym-
metrical design (tread pattern) of the ON/OFF road
tire and the use of Outline White Letter (OWL) tires.
²When replacing a flat, the spare tire may have to
be remounted on the rim or installed at a different
location to maintain the correct placement of the
tire on the wheel relative to the tire/wheel posi-
tion on the truck. For example, if the spare is used
to replace an outer rear tire it will have to be
remounted on the rim so that the wheel is dished
inward. That way the tread design of asymmetri-
cal tires and the white writing of the OWL tires
will maintain proper position.
STARTING AND OPERATING 263
5
Page 295 of 426
WHAT TO DO IN EMERGENCIES
CONTENTS
mHazard Warning Lights..................296
mAdding Fuel Ð 24±Valve Cummins Turbo
Diesel...............................297
mJack Location..........................298
NAll Models..........................298
mChanging A Flat Tire....................299
NRemoving The Spare Tire................299
NTire Changing Procedure................300
mHoisting.............................309mJump-Starting.........................310
NWith Portable Starting Unit..............313
mFreeing A Stuck Vehicle..................313
mEmergency Tow Hooks Ð If Equipped........314
mTowing A Disabled Vehicle................315
N4-Wheel- Drive Vehicles.................315
N2±Wheel- Drive Vehicles................315
6
Page 299 of 426
WARNING!
The jack is designed to use as a tool for changing
tires only. The jack should not be used to lift the
vehicle for service purposes, unless suitable sup-
ports are placed under the vehicle as a safety mea-
sure. The vehicle should be jacked on a firm level
surface only. Avoid ice or slippery areas.
WARNING!
After using the jack and tools, always reinstall them
in the original carrier and location. While driving
you may experience, abrupt stopping, rapid accelera-
tion, or sharp turns. A loose jack, tools, bracket or
other objects in the vehicle may move around with
force, resulting in serious injury.
CHANGING A FLAT TIRE
Removing The Spare Tire
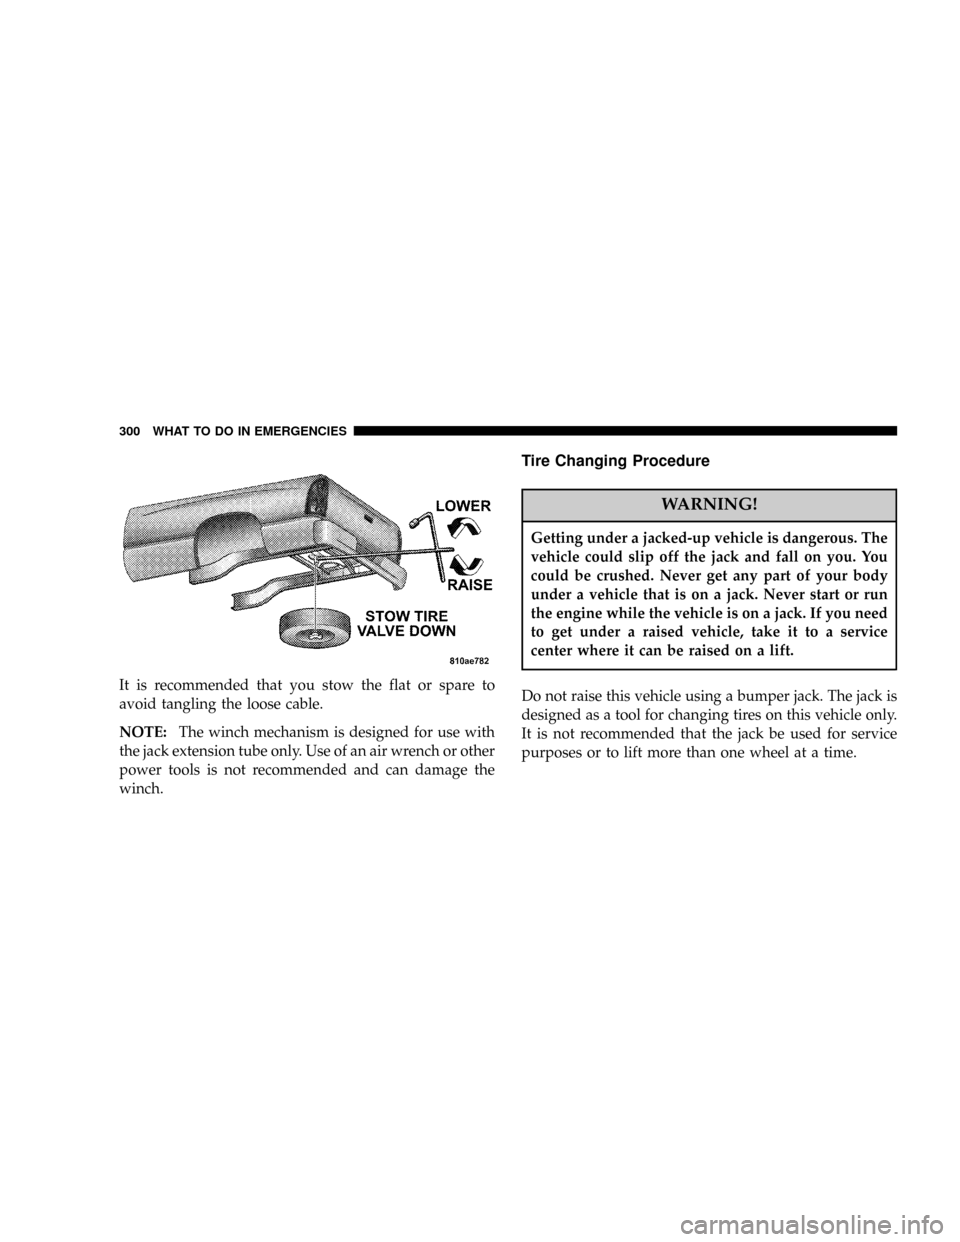
Remove the spare tire before attempting to jack the truck.
Attach the wheel wrench to the jack extension tube. Insert
the tube through the access hole between the lower
tailgate and the top of the bumper and into the winch
mechanism tube. Rotate the wheel wrench handle coun-
terclockwise until the spare tire is on the ground with
enough cable slack to allow you to pull it out from under
the vehicle. When the spare is clear, tilt the retainer at the
end of the cable and pull it through the center of the
wheel.
WHAT TO DO IN EMERGENCIES 299
6
Page 300 of 426
It is recommended that you stow the flat or spare to
avoid tangling the loose cable.
NOTE:The winch mechanism is designed for use with
the jack extension tube only. Use of an air wrench or other
power tools is not recommended and can damage the
winch.
Tire Changing Procedure
WARNING!
Getting under a jacked-up vehicle is dangerous. The
vehicle could slip off the jack and fall on you. You
could be crushed. Never get any part of your body
under a vehicle that is on a jack. Never start or run
the engine while the vehicle is on a jack. If you need
to get under a raised vehicle, take it to a service
center where it can be raised on a lift.
Do not raise this vehicle using a bumper jack. The jack is
designed as a tool for changing tires on this vehicle only.
It is not recommended that the jack be used for service
purposes or to lift more than one wheel at a time.
300 WHAT TO DO IN EMERGENCIES
Page 302 of 426
Instructions
WARNING!
Carefully follow these tire changing warnings to
help prevent personal injury or damage to your
vehicle:
²Always park on a firm, level surface as far from
the edge of the roadway as possible before raising
the vehicle.
²Block the wheel diagonally opposite the wheel to
be raised.
²Apply the parking brake firmly before jacking.
²Never start the engine with the vehicle on a jack.
²Do not let anyone sit in the vehicle when it is on
a jack.
²Do not get under the vehicle when it is on a jack.
²Only use the jack in the positions indicated.
²If working on or near a roadway, be extremely
careful of motor traffic.
1. Remove the spare wheel, jack, and tools from storage.
2. Using the wheel wrench, loosen, but do not remove,
the wheel nuts by turning them counterclockwise one
turn while the wheel is still on the ground.
3. For 2500/3500 4x2 series trucks, when changing a
front wheel, place the bottle jack under the frame rail
behind the wheel. Locate the jack as far forward as
possible on the straight part of the frame.
For 2500/3500 4x4 series trucks, when changing the front
wheel, assemble the jack drive tube to the jack and
connect the drive tube to the extension tube. Place the
jack under the axle as close to the tire as possible with the
drive tubes extending to the front. Connect the jack tube
extension and wheel wrench.
302 WHAT TO DO IN EMERGENCIES
Page 305 of 426
WARNING!
Raising the vehicle higher than necessary can make
the vehicle unstable and cause an accident. It could
slip off the jack and hurt someone near it. Raise the
vehicle only enough to remove the tire.
5. Remove the wheel nuts and pull the wheel off. Install
the spare wheel and wheel nuts with the cone shaped end
of the nuts toward the wheel on 2500/3500 single rear
wheel (SRW) models. On 3500 dual rear wheel models
(DRW) the lug nuts are a two piece assembly with a flat
face. Lightly tighten the nuts. To avoid risk of forcing the
vehicle off the jack, do not fully tighten the nuts until the
vehicle has been lowered.
6. Using the wheel wrench, finish tightening the nuts
using a crisscross pattern. Correct nut tightness is 135 ft.
lbs. (183 N´m) torque for 2500/3500 single rear wheel(SRW) models and 145 ft. lbs. (197 N´m) for 3500 dual rear
wheel models. If in doubt about the correct tightness,
have them checked with a torque wrench by your dealer
or at a service station.
WARNING!
A loose tire or jack thrown forward in a collision or
hard stop could injure someone in the vehicle.
Always stow the jack parts and the extra tire and
wheel in the places provided.
7. Install wheel center cap and remove wheel blocks. Do
not install chrome or aluminum wheel center caps on the
spare wheel. This may result in cap damage.
8. Lower the jack to its fully closed position. If the jack
will not lower by turning the dial (thumb wheel) by
WHAT TO DO IN EMERGENCIES 305
6
Page 307 of 426

Slots in the wheels will assist in properly orienting the
inner and outer wheels. Align these slots when assem-
bling the wheels for best access to the tire valve on the
inner wheel. The tires of both dual wheels must be
completely off the ground when tightening to insure
wheel centering and maximum wheel clamping.Dual wheel models require a special heavy-duty lug nut
tightening adapter (included with the vehicle) to cor-
rectly tighten the lug nuts. Also, when it is necessary to
remove and install dual rear wheels, use a proper vehicle
lifting device.
NOTE:When installing a spare tire as part of a dual rear
wheel end combination, the tire diameter of the two
individual tires must be compared. If there is a significant
difference, the larger tire should be installed in a front
location. Correct direction of rotation for dual tire instal-
lations must also be observed.
These dual rear wheels should be tightened as follows:
WHAT TO DO IN EMERGENCIES 307
6