wheel DODGE RAM 5500 CHASSIS CAB 2008 3.G Workshop Manual
[x] Cancel search | Manufacturer: DODGE, Model Year: 2008, Model line: RAM 5500 CHASSIS CAB, Model: DODGE RAM 5500 CHASSIS CAB 2008 3.GPages: 528, PDF Size: 7.84 MB
Page 334 of 528

These cautions apply to all chain traction devices, includ-
ing link and cable (radial) chains.
Tire chain use is permitted only on the rear tires of Ram
4X2 trucks.
NOTE:The use of class ªUº chains is permitted on the
front and rear of 4X4, Ram Trucks with Dual Rear Wheels
and LT235/80R17E tires.
NOTE:On 4X2 Ram Trucks, class ªUº snow chains are
permitted on the rear wheels only of vehicles equipped
with LT245/70R17, LT265/70R17, and LT235/80R17 size
tires.
NOTE:On 4X4 Single Rear Wheel (SRW) Ram Trucks,
class ªUº snow chains are permitted on the rear wheels
only of vehicles equipped with LT265/70R17.CAUTION!
Do not use tire chains on the 4X2 front wheels of
SRW (Single Rear Wheels) equipped with LT245/
70R17, LT265/70R17 tires or 4X4 front tires of Ram
Trucks equipped with LT265/70R17tires. There may
not be adequate clearance for the chains and you are
risking structural or body damage to your vehicle.
SNOW TIRES
Snow tires should be of the same size and type construc-
tion as the front tires. Consult the manufacturer of the
snow tire to determine any maximum vehicle speed
requirement associated with the tire. These tires should
always be operated at the vehicle maximum capacity
inflation pressures under any load condition.
While studded tires improve performance on ice, skid
and traction capability on wet or dry surfaces may be
334 STARTING AND OPERATING
Page 336 of 528

Dual Rear Wheels
The tires used on dual wheel assemblies should be
matched for wear to prevent overloading one tire in a set.
To check if tires are even, lay a straight edge across all
four tires. The straight edge should touch all the tires.
CAUTION!
3500/4500/5500 Dual Rear Tires have only one ap-
proved direction of rotation. This is to accommodate
the asymmetrical design (tread pattern) of the ON/
OFF road tire and the use of Outline White Letter
(OWL) tires.
²When replacing a flat, the spare tire may have to
be remounted on the rim or installed at a different
location to maintain the correct placement of the
tire on the wheel relative to the tire/wheel position
on the truck. For example, if the spare is used to
replace an outer rear tire it will have to be re-
mounted on the rim so that the wheel is dished
inward. That way the tread design of asymmetrical
tires and the white writing of the OWL tires will
maintain proper position.
336 STARTING AND OPERATING
Page 348 of 528

Rating (GAWR) front and rear, and Vehicle Identification
Number (VIN). A Month-Day-Hour (MDH) number is
included on this label and indicates the Month, Day and
Hour of manufacture. The bar code that appears on the
bottom of the label is your Vehicle Identification Number
(VIN).
Gross Vehicle Weight Rating (GVWR)
The GVWR is the total permissible weight of your vehicle
including driver, passengers, vehicle, options and cargo.
The label also specifies maximum capacities of front and
rear axle systems (GAWR). Total load must be limited so
GVWR and front and rear GAWR are not exceeded.
Payload
The payload of a vehicle is defined as the allowable load
weight a truck can carry, including the weight of the
driver, all passengers, options and cargo.
Gross Axle Weight Rating (GAWR)
The GAWR is the maximum permissible load on the front
and rear axles. The load must be distributed in the cargo
area so that the GAWR of each axle is not exceeded.
Each axle GAWR is determined by the components in the
system with the lowest load carrying capacity (axle,
springs, tires or wheels). Heavier axles or suspension
components sometimes specified by purchasers for in-
creased durability does not necessarily increase the vehi-
cle's GVWR.
Tire Size
The tire size on the Label represents the actual tire size on
your vehicle. Replacement tires must be equal to the load
capacity of this tire size.
Rim Size
This is the rim size that is appropriate for the tire size
listed.
348 STARTING AND OPERATING
Page 355 of 528

Fifth-Wheel Hitch
A special high platform with a coupling that mounts over
the rear axle of the tow vehicle in the truck bed. Connects
a vehicle and fifth-wheel trailer with a coupling king pin.
Gooseneck Hitch
The gooseneck hitch employs a pivoted coupling arm
which attaches to a ball mounted in the bed of a pickup
truck. The coupling arm connects to the hitch mounted
over the rear axle in the truck bed.
Trailer Hitch Classification
The rear bumper is intended to tow trailers up to 2,000
lbs (907 kg) without added equipment or alterations to
the standard equipment. Your vehicle may be factory
equipped for safe towing of trailers weighing over 2,000
lbs (907 kg) with the optional Trailer Tow Prep Package.
See your dealer for package content.
The following chart provides the industry standard for
the maximum trailer weight a given trailer hitch class cantow and should be used to assist you in selecting the
correct trailer hitch for your intended towing condition.
Refer to ªTrailer Towing Weights (Maximum Trailer
Weight Ratings)º for the website address that contains
the necessary information for your specific drivetrain.
Trailer Hitch Classification
Class Max. GTW
(Gross Trailer Wt.)
Class I - Light Duty 2,000 lbs (907 kg)
Class II - Medium
Duty3,500 lbs (1587 kg)
Class III - Heavy Duty 5,000 lbs (2268 kg)
Class IV - Extra
Heavy Duty10,000 lbs (4540 kg)
Fifth Wheel/
GooseneckGreater than 10,000 lbs
(4540 kg)
All trailer hitches should be professionally installed on
your vehicle.
STARTING AND OPERATING 355
5
Page 356 of 528

Trailer Towing Weights (Maximum Trailer Weight
Ratings)
NOTE:For additional trailer towing information (maxi-
mum trailer weight ratings) refer to the following website
addresses:
²http:// www.dodge.com/towing.
²http:// www.dodge.ca(Canada).
Trailer and Tongue Weight
Always load a trailer with 60% to 65% of the weight in
the front of the trailer. This places 10% to 15% of the
Gross Trailer Weight (GTW) on the tow hitch of your
vehicle. Loads balanced over the wheels or heavier in the
rear can cause the trailer to swayseverelyside to side
which will cause loss of control of vehicle and trailer.
Failure to load trailers heavier in front is the cause of
many trailer accidents.Never exceed the maximum tongue weight stamped on
your bumper or trailer hitch.
Consider the following items when computing the
weight on the rear axle of the vehicle:
²The tongue weight of the trailer.
356 STARTING AND OPERATING
Page 358 of 528
WARNING!
Improper towing can lead to an injury accident.
Follow these guidelines to make your trailer towing
as safe as possible:
Make certain that the load is secured in the trailer
and will not shift during travel. When trailering
cargo that is not fully secured, dynamic load shifts
can occur that may be difficult for the driver to
control. You could lose control of your vehicle and
have an accident.
²When hauling cargo or towing a trailer, do not over-
load your vehicle or trailer. Overloading can cause a
loss of control, poor performance or damage to brakes,
axle, engine, transmission, steering, suspension, chas-
sis structure or tires.
²Safety chains must always be used between your
vehicle and trailer. Always connect the chains to the
frame or hook retainers of the vehicle hitch. Cross the
chains under the trailer tongue and allow enough
slack for turning corners.
²Vehicles with trailers should not be parked on a grade.
When parking, apply the parking brake on the tow
vehicle. Put the tow vehicle automatic transmission in
P for Park. With a manual transmission, shift the
transmission into reverse. And with four-wheel-drive
vehicles, make sure the transfer case is not in neutral.
Always, block or9chock9the trailer wheels.
²GCWR must not be exceeded.
²Total weight must be distributed between the tow
vehicle and the trailer such that the following four
ratings are not exceeded:
1. GVWR
358 STARTING AND OPERATING
Page 367 of 528
Vehicle front end wheel alignment was set to specifica-
tions at the factory without consideration for the weight
of the plow. Front end tow-in should be checked and
reset if necessary at the beginning and end of the
snowplow season. This will help prevent uneven tire
wear.
The blade should be lowered whenever the vehicle is
parked.
Maintain and operate your vehicle and snowplow equip-
ment following the recommendations provided by the
specific snowplow manufacturer.
Over the Road Operation With Snowplow
Attached
The blade restricts air flow to the radiator and causes the
engine to operate at higher than normal temperatures.
Therefore, when transporting the plow, angle the blade
completely and position it as low as road or surfaceconditions permit. Do not exceed 40 mph (64 km/h). The
operator should always maintain a safe stopping distance
and allow adequate passing clearance.
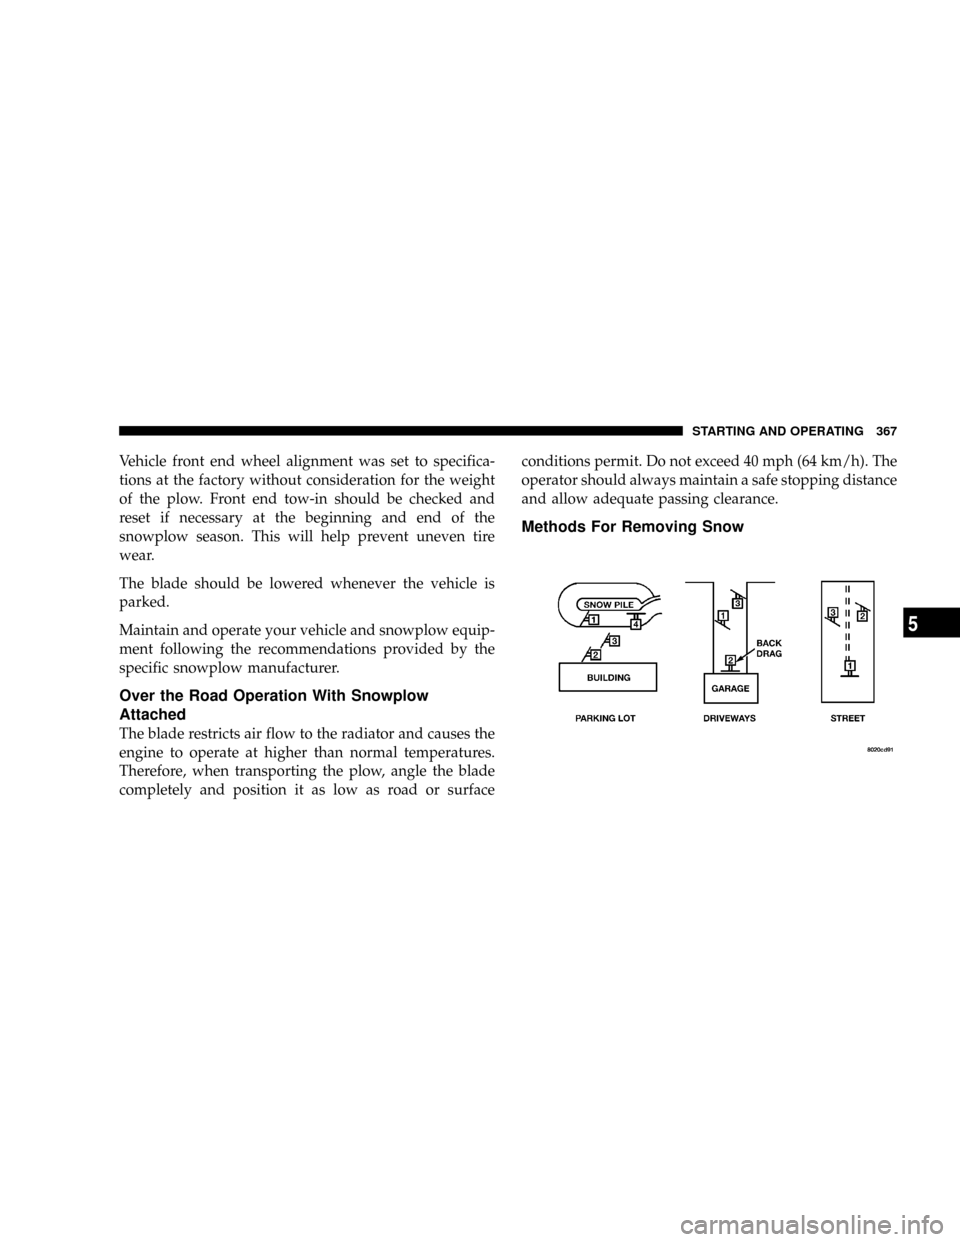
Methods For Removing Snow
STARTING AND OPERATING 367
5
Page 369 of 528
²Do not shift the transmission unless the engine has
returned to idle and wheels have stopped. Make a
practice of stepping on the brake pedal before shifting
the transmission.
RECREATIONAL TOWING (BEHIND
MOTORHOME, ETC.)
Recreational Towing ± 2 Wheel Drive Models
Recreational towing of 2 Wheel Drive models is not
allowed.Towing with the rear wheels on the ground can
result in severe transmission damage.
Recreational Towing ± 4 Wheel Drive Models
CAUTION!
Failure to follow these requirements can cause severe
damage to the transmission and/or transfer case.
CAUTION!
Internal damage to the transfer case will occur if a
front or rear wheel lift is used when recreational
towing.
NOTE:Both the Manual Shift and Electronic Shift
transfer cases must be shifted into Neutral (N) for
recreational towing. Automatic transmissions must be
placed in P (Park) position for recreational towing.
Manual transmissions must be left in gear (not in neutral)
for recreational towing. Refer below for the proper trans-
fer case Neutral shifting procedure for your vehicle.
STARTING AND OPERATING 369
5
Page 377 of 528
WHAT TO DO IN EMERGENCIES
CONTENTS
mHazard Warning Flasher..................378
mJacking And Tire Changing................379
N3500 Models ± If Equipped..............379
mJacking Instructions.....................380
NTire Changing Procedure................380
mHoisting.............................389mJump-Starting.........................390
NWith Portable Starting Unit..............393
mFreeing A Stuck Vehicle..................393
mEmergency Tow Hooks Ð If Equipped........394
mTowing A Disabled Vehicle................395
N4-Wheel- Drive Vehicles.................396
N2±Wheel- Drive Vehicles................396
6
Page 380 of 528
WARNING!
After using the jack and tools, always reinstall them
in the original carrier and location. While driving
you may experience, abrupt stopping, rapid accelera-
tion, or sharp turns. A loose jack, tools, bracket or
other objects in the vehicle may move around with
force, resulting in serious injury.
4500/5500 Models
These vehicles do not come with a jack.
NOTE:Jacking and tire changing on 4500/5500 models
should be performed by an authorized dealer, or knowl-
edgeable service personnel with the appropriate heavy
duty equipment like a tire service company.
JACKING INSTRUCTIONS
Tire Changing Procedure
WARNING!
Getting under a jacked-up vehicle is dangerous. The
vehicle could slip off the jack and fall on you. You
could be crushed. Never get any part of your body
under a vehicle that is on a jack. Never start or run
the engine while the vehicle is on a jack. If you need
to get under a raised vehicle, take it to a service center
where it can be raised on a lift.
Do not raise this vehicle using a bumper jack. The jack is
designed as a tool for changing tires on this vehicle only.
It is not recommended that the jack be used for service
purposes or to lift more than one wheel at a time.
380 WHAT TO DO IN EMERGENCIES